popeye the sailor
-
Posts
16,007 -
Joined
-
Last visited
Content Type
Profiles
Forums
Gallery
Events
Everything posted by popeye the sailor
-
 as this dries, it will lose most of the sheen. it had better.......it was flat paint I went back in my pictures and found the perfect 'before' picture........ here is the 'after' photo.....big difference! yea........very glad I chose to redo this
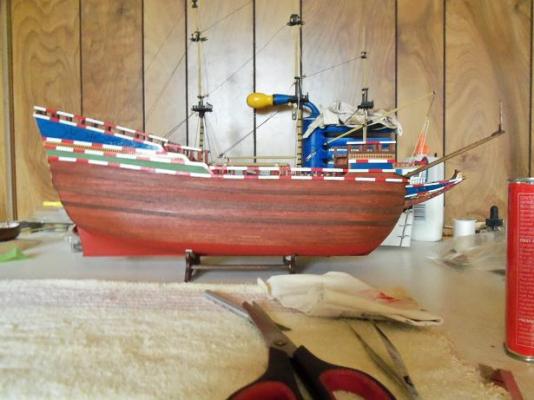

-
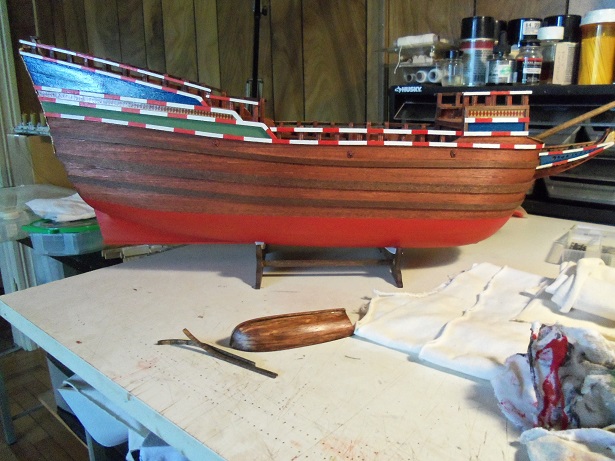
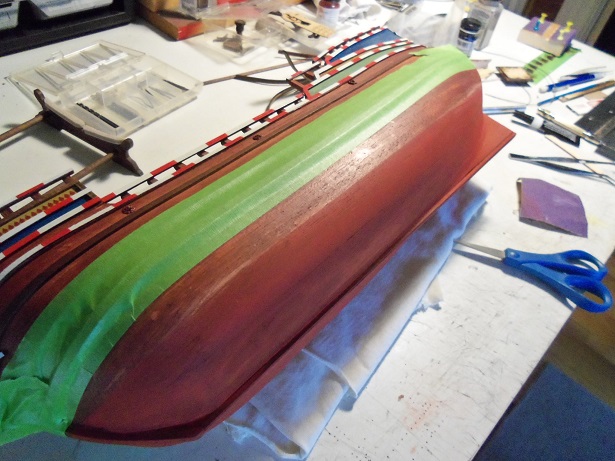
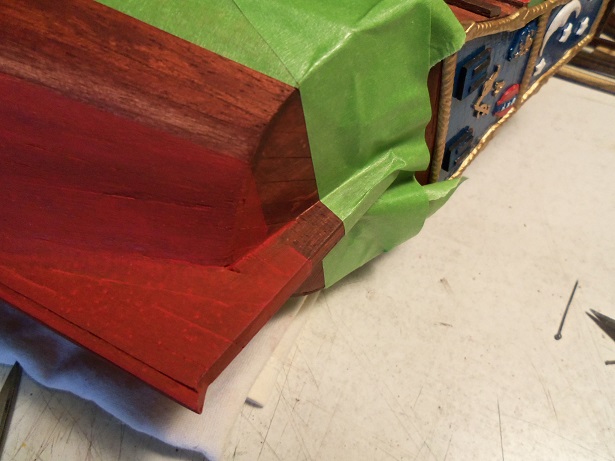
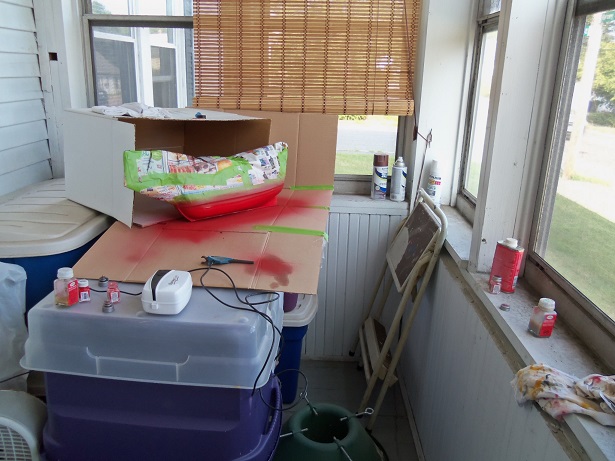
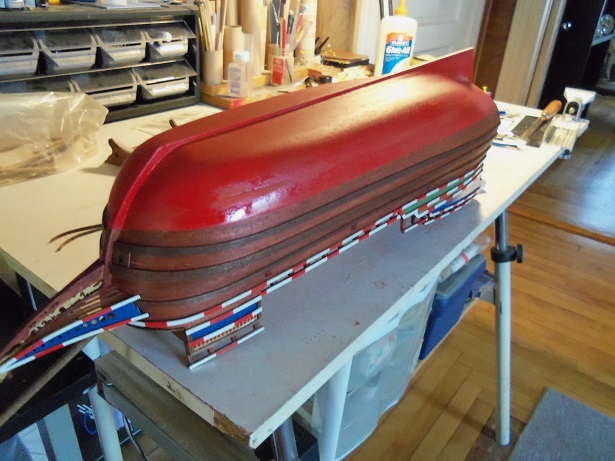
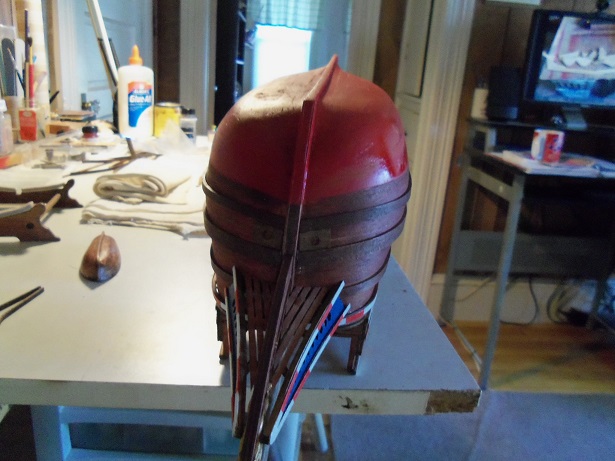
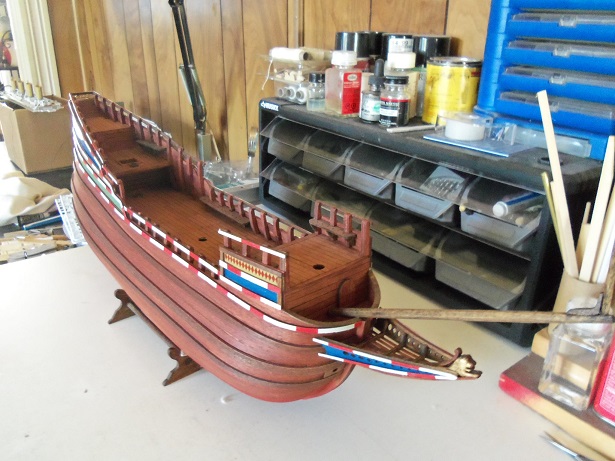
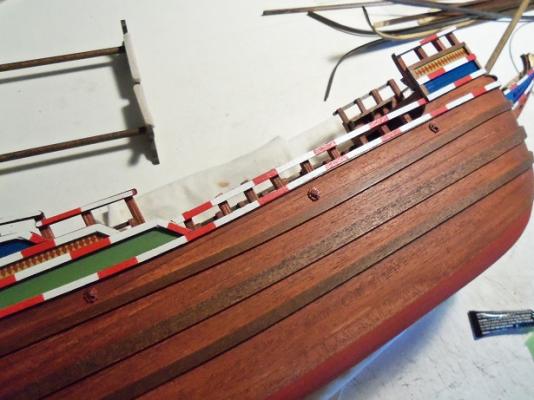
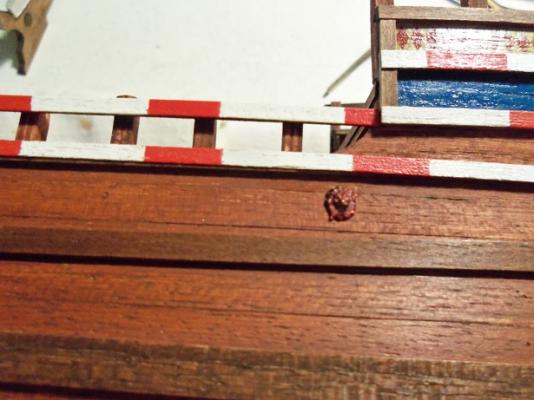
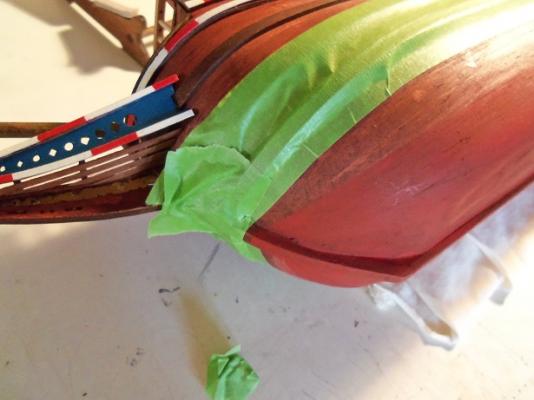
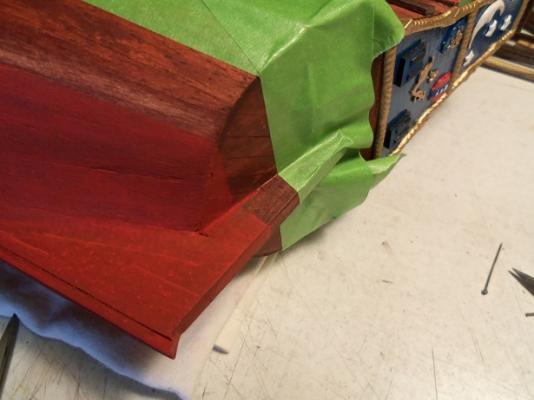
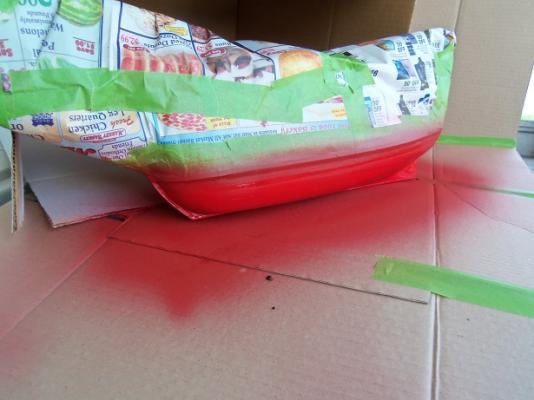
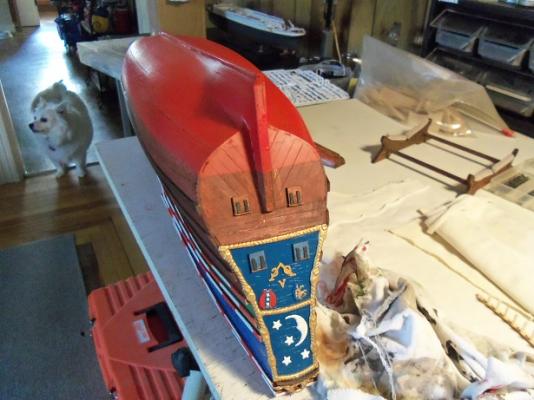
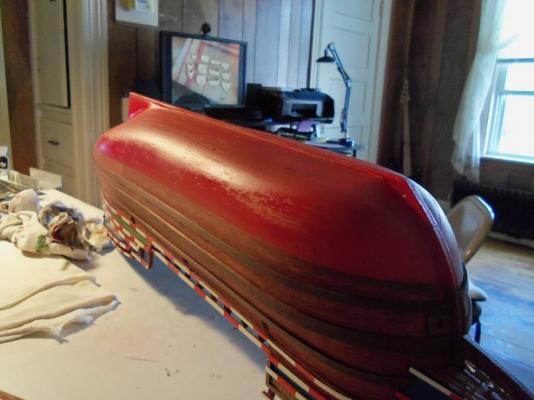
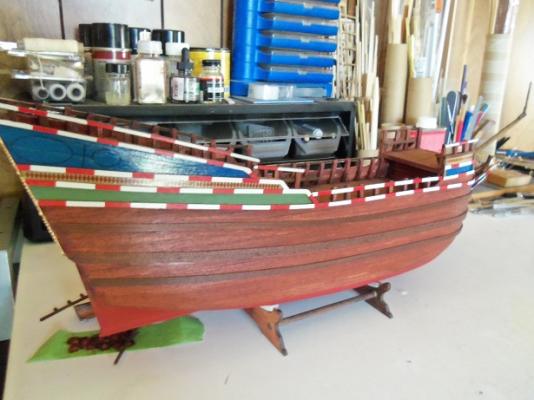
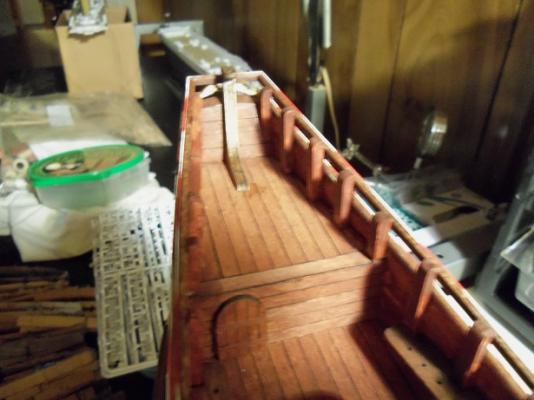
here you go J.........the tack line decorations are finally in place. Corel sent me ten of them.........I drilled and painted up the whole lot. I picked out the best ones and put 'em on. long time in the making my friend........I recall how impatient I was to get them. again......I thank you for showing them to me.......and I thank Corel {if your browsing} for being so generous now with the bottom paint.......between the paint bleeds and the fact that it was too low....well, it was something I really had to fix. it was raised almost 3/4 of an inch.......it covers the bleeds at the stern and the incorrect arc at the bow. ....sanded lightly a few areas that had a raised paint line. a lot of the problem here, is that I had thinned the paint down too much.........or had done it for another build and forgot about it. too bad......I did like the way it looked.......kind of an antiquing hue to it. I'm still painting on the porch......lots of ventilation and light. I spread out a box to widen the area. keeping the hull perpendicular and letting it skin over a little..........the tape came off! my lovely assistant helped me by holding the removed paper at first, she was afraid that I had painted over the wood color........but I assured her that there's still plenty to see. another funny I had.........I had showed you the fore deck railing to go along the bow. I had fitted it and it was awaiting the walnut stain. well........I forgot it was on there when I masked it up. I held that hull every which way but loose.........it never came out of place! while I was removing the masking, I hit it with a finger, and it fell on the cardboard table! it didn't break........WOW! the stern cam out looking much better. the coverage was even better.........close to 1/4 oz of paint was used. the bleeds are almost non existent. the bow came out better as well........the line is a lot straighter. it too is a lot crisper than it was before.....the bottom isn't so blotchy either. this was a win / win.........with a little paint left over for the rudder..........which I should get off my duff and install


-
howdy ....hi there......and hello! thanks for the kind word and the likes! I've got another update on her.......it remedies the huge problem I had with the bottom paint work. the tack line decorations are in place J..........they look great! thanks George.........enjoy the catch up! hello John.......heard you were off on a trip....glad your back! multi build....hmmmm........well, if your referring to what I have on the table at the moment, I'd say it;s about time I started to use the other table for what it was meant to be, instead of a catch all as for my recent banter.......I should remember an old saying: loose lips, sinks ships! thanks J.......between the Holiday build and the Andrea Gail.....I don't know where the time went. I should keep in mind that spinach and Seagram don't mix I appreciate the offer.........I've got it down to a simple idea......as long as I stay within the fore deck bulkhead and the aft deck bulkhead, I should be good. we'll leave it as........if you get a chance I thought you added a whip staff??.........must have been Jerry's build I was thinking of. I'm kinda hoping it doesn't get lost in the detail sense.........awwww, no matter, I added it thanks Nigel..........that's the power of Billing's mahogany stain and min wax dark walnut. my thought is that there are a few degrees of mahogany tones, from the wood that I've gotten from Billing Boats. to achieve a darker mahogany tone, I've used the dark walnut first, and then went over it with the mahogany stain. some of the accents {parts}, I've left as a dark walnut, to blend the two colors together. once there is more on the deck, the contrast should show up more. glad to have you following along
-
it still kills me that my admiral's favorite ship is 'ole Nordie! you gotta love it! she looks every bit as sweet in brown...I agree about the stand as well........looks very much like a true boat slip
- 127 replies
-
- 4
-

-
- dragon class
- yacht
- (and 1 more)
-
no Greg........that would be too easy besides, three are kits for all there, out there somewhere that would be a cool project, if someone would take up the gauntlet. thanks Nenad........very kind of you to say. the TRMA site is a good site......glad I found it. they cover the Revell kit, and the Minicraft kit, as well as the Academy kit. I have the movie too.........I've been so wrapped up with Walking Dead and Game of Thrones......perhaps I should give it another go Springsteen has a song about 57 channels.........makes me wonder why I pay for cable sometimes
-
thanks to you all........yes, it's good to be playing with wood again! .......felt good in the fingers I did say that this was going to happen......just a question of which one. just got to get myself positioned in the saddle correctly, so I don't get saddle sores thanks Nenad! thanks Jerry........I'll be looking closely at yours and JCT's build. there are some aspects that the Billing kit does not have........that and the direction I was going in comparison to the actual ship......the remake of it, of course rigging will be another hurdle.......the diagrams I have looks like someone went nutz with a straight edge........I can see where some initiate, but hard to see where they terminate. that blunt bow will get you every time......but she's doing well. I think back to when I did my first ship........oh baby......was I green! what seems tough in the beginning, will be a joy in the end........I envy the two of you, working together so closely. my admiral won't have anything to do with it, after seeing some of the stuff I do.......she says I'm crazy it stuns me to hear that her favorite is 'ole Nordie'. none the less, it will be a special treasure to look at the Bounty later on, and know that you did it together nothing can top that........well, perhaps the birth of your first child. I hope you have something new to report......I'm still in the process of catching up. thanks Patrick. it's always been here........just that it's been dormant for so long if you like to read, I have the expanded version on the Word Press site: https://wenzelswharf.wordpress.com/2014/08/13/billingshalf-moon-a-140-scale-kit-part-54/ this is the wharf itself..........I wish I could link all the other to it. .......still not as smart as I should be concerning blog sites. this will take you to the middle of the ship's boat fiasco. believe it or not.......I started this build in May of 2013. my modus operandi has always been the same.......get an idea {or kit}, keep it in my head for a while,.....and then, when I can't stand it any longer.....off I go I'll still be working on Titanic......painting the handrails on every one I've put in place already. then I can continue with the ones I still need to do. so slow........touching them up is really a drag, but this build will fill in the gaps. more to come.........thanks again for looking in!
-
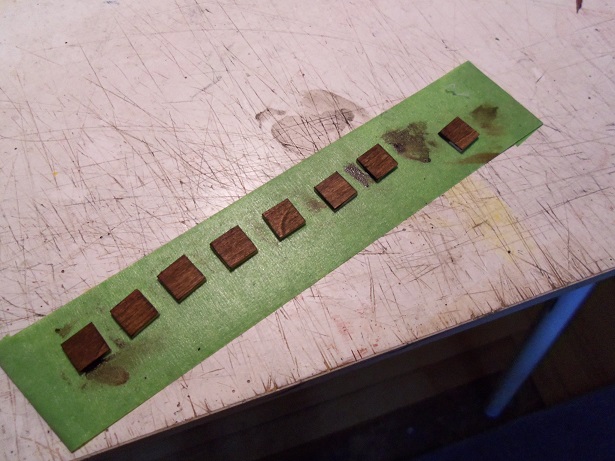
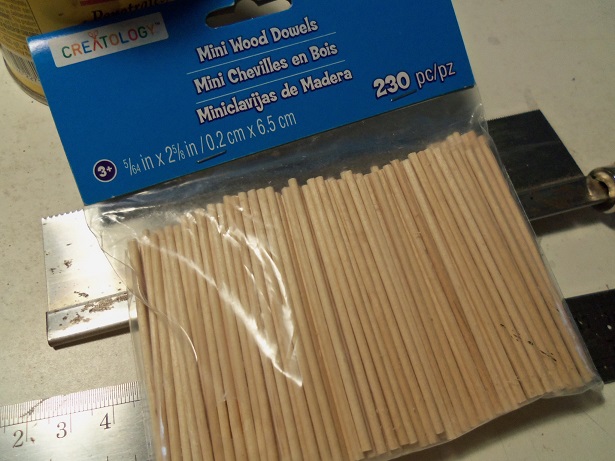
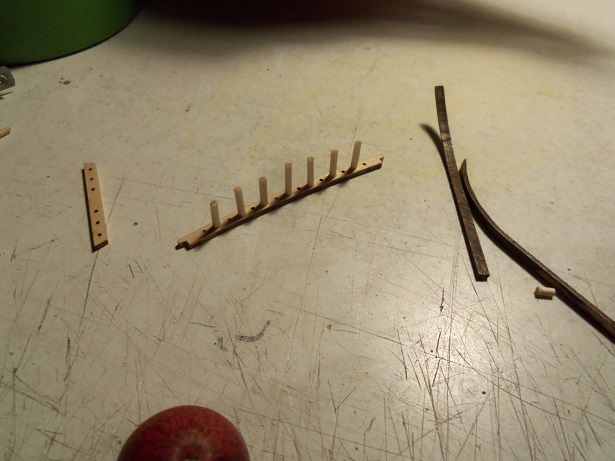
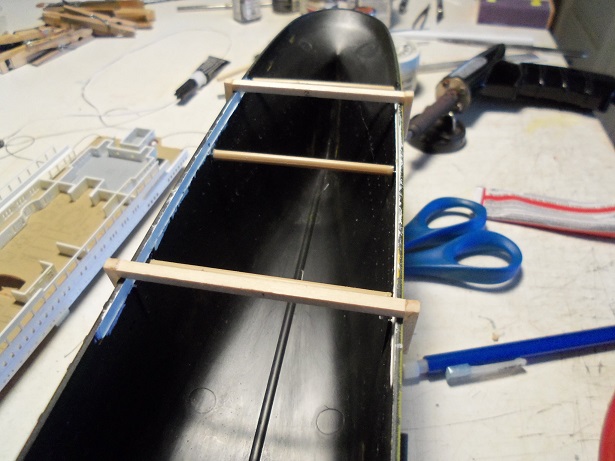
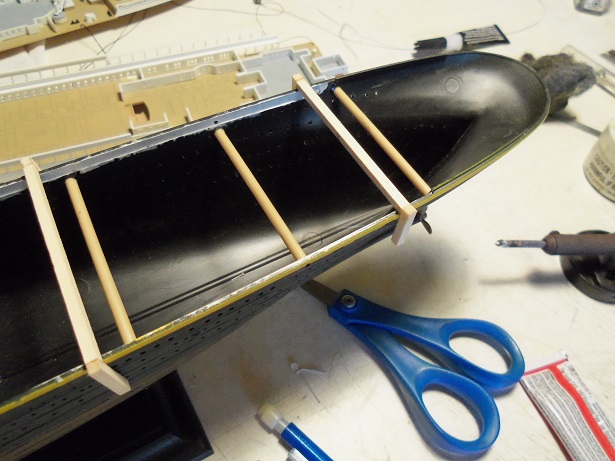
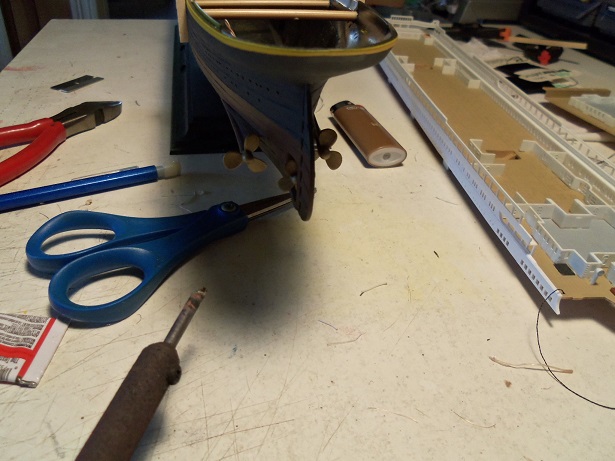
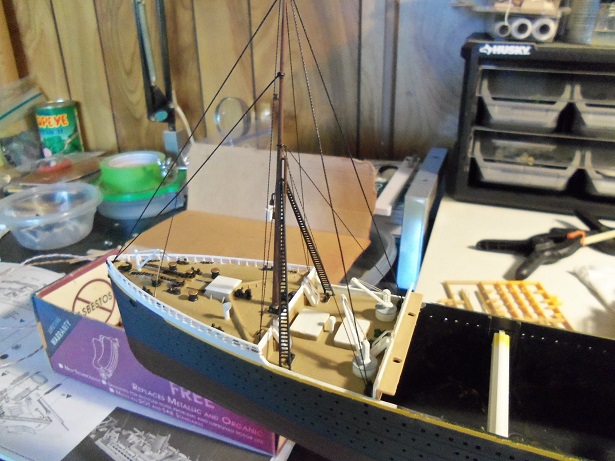
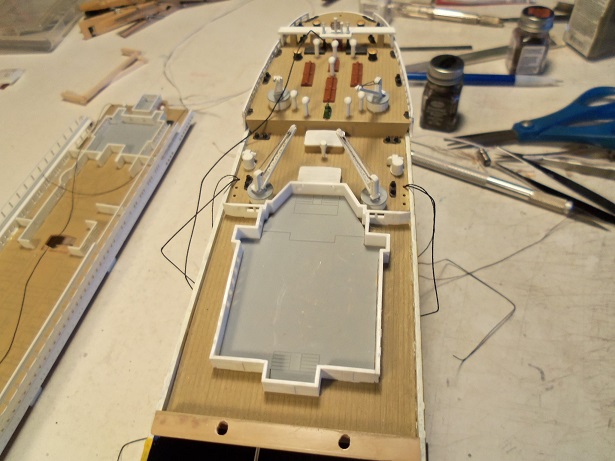
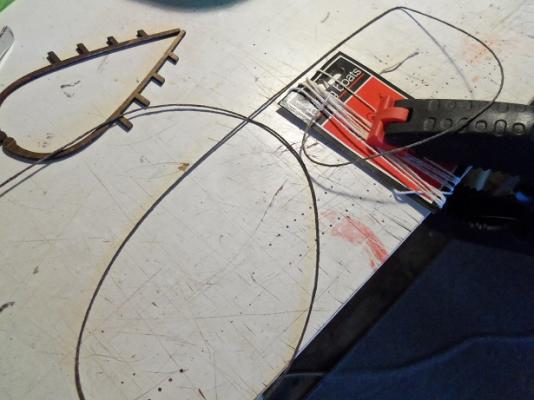
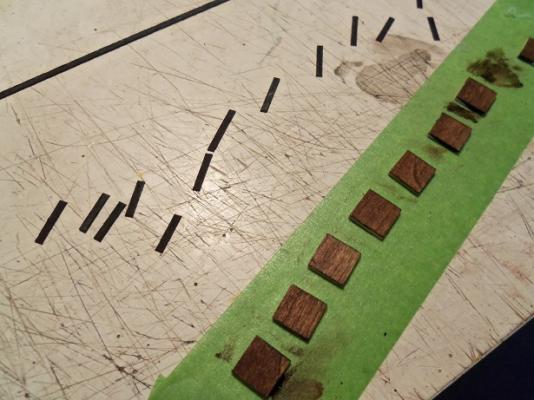
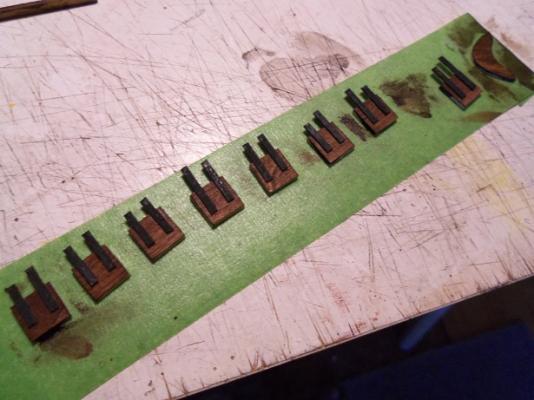
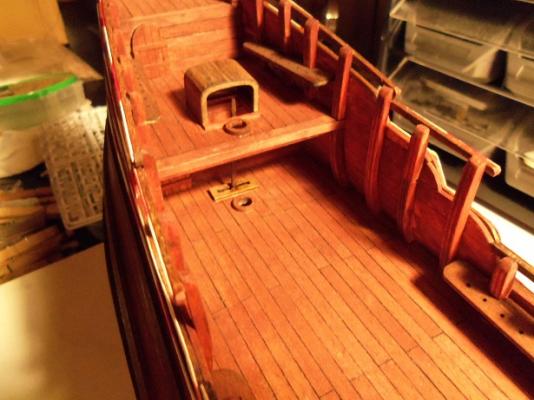
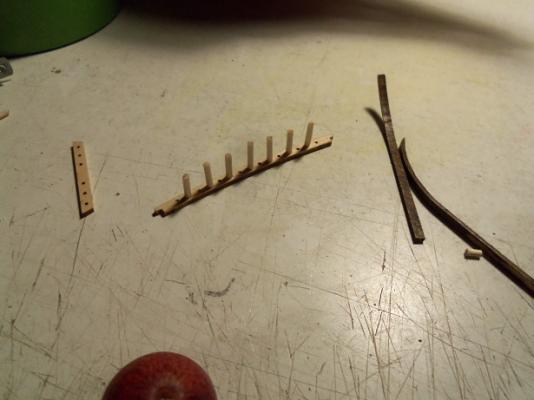
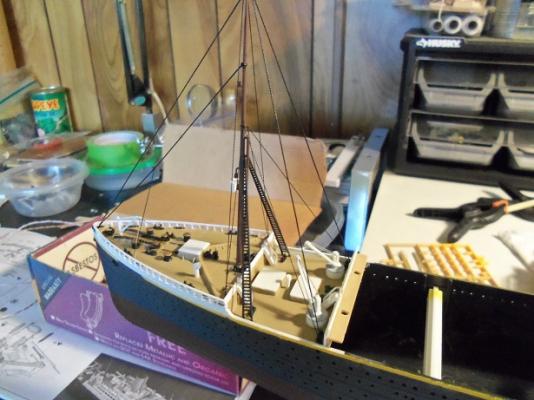
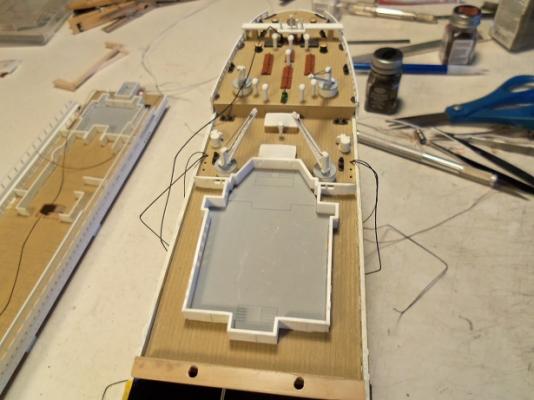
you'll never guess what build ended back on the table......... it was about time that the Titanic was moved to the other table, the parts have dwindled down enough. now I can have the best of both worlds looking at the rigging diagrams.......the old familiar headaches surfaced again. though I need to look at the 'real' ship pictures again, I recalled the Corel kit that was done by Jerry and JCT, and I still want incorporate some of the detail from that kit, to this one. I already have the decorations for the tack line sheave holes...thanks to JCT and the kind folks from Corel for sending them to me. the other hurdle will be the cannon port lid spacing. Billing's only show two lids at the fore section {half} of the ship.........the Corel kit show four, which looks much more logical and appealing. the main mast shroud has an even spaced arrangement.......while I am writing this........I took a quick glance at JCT's build, and saw that Corel made allowance for it. so, I will do the same for this build as soon as I can get back the jist in direction of which I was going........I'll be OK the first thing was to assemble all the lids I cut prior, and arrange them on a piece of sticky tape. I was not happy with a couple of them, so I cut a couple new ones. on the transom face of the ship, I had included the four lids there........for the seal along the tops, I trimmed the anchor rope I had made up for the Gothenborg. there was quite a bit extra and that build would not need it {another poor soul that I need to get back to}.......I used it for this purpose. seeing that there was no more.......and no more extra, I had to make more.......just some medium thickness Billing's thread, stained, and then coated with diluted white glue. now for the hinges......the transom's were done with simple mahogany strip painted flat black. more was made to continue the process. it would not do to replace them with brass. when we were out looking for the doll house lighting for the Titanic.......we checked out the local Michael's craft store. they had moved to a new location.......wanted to see if they had expanded any of their product lines. bit bust on that front......I guess the only place I can get them will be from Hobby Lobby. I did come away with something though.......they do stock Balsa and Basswood.......nice to know........but I also found this package of thin dowels......they'd be like 2 mm.......can't give you the diameter value. these will come in handy for railings, cannon wheel axles, flag poles, among some of the uses for them. they couldn't have been spotted any sooner........railings will be what I'll used them for the hinge hardware was then cemented to the lids........the extra part on the end will be for the life boat........the very step I was working on before I fell victim to the tangent that took me away from this build. one aspect I was going to delete.........{perish the though.....it ain't so........} was the whip staff. located behind the mizzen mast root, as it passes through the decks, I thought that it might not be very visible. seeing it added to the otyher builds made me think differently. it was quickly assembled and added to the build. the light was directly over it........now THAT'S mahogany! {that's the stain color}. the build is being enhanced with dark walnut with a mahogany tone added. it's kinda neat........makes some of the aspects stand out the flag pole bracket was also added to the build......located on the poop deck. so.......at this point, I'll be working on the railings and ladders........* ohhhh! not ladders again! I just went through all kinds of grief with the last build..* I should be glad about this........they are in the Billing's diagrams. I began by assembling the bow railing, using the round stock. next will be the ladders......so to gauge the rest of the railings. I should get the chain boards set up and ready to install..........this will help to position the cannon port lids wwe'll see what happens?!?!


-
you don't waste any time......no rest for the wicked, as they say this is quite an undertaking........but you'll do a wonderful job of her. having build so many Billing's kits.......I wish I could help. surprisingly, most of the kits I've built have come with the wood dead eyes........it's the blocks that made me nutz {most were fishing vessels - not many to worry about}. I can certainly sympathize with you of the rigging diagrams though.......like someone went nutz with a straight edge happy to pull up a seat and watch......a friend of mine has been wanting me to do a build of this magnitude. I'll get to see what I've been missing out on
- 59 replies
-
- 4
-
-
- norske lowe
- billing boats
- (and 1 more)
-
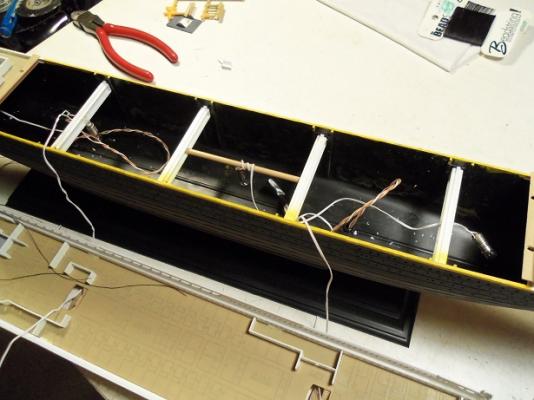
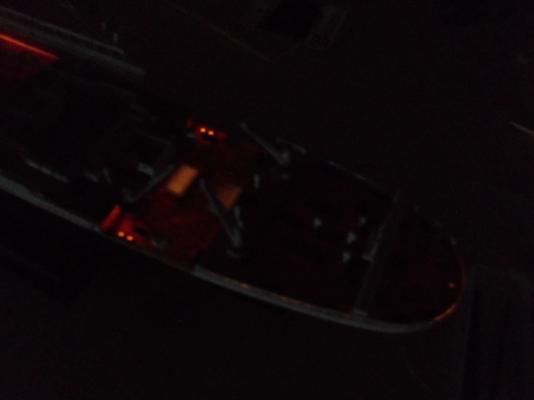
thanks to all for the kind comments and the likes. I knew there would be some light filtration......had I had the fore thought, I might have seen it coming. for what it is, I'll take it who knows how many times it will ever be lit. I know I'll have better luck with the Holiday boats......I don't think there will be problems like this. in another small way, it looks kinda cool.......the well decks are lit to some degree. I feel I broke even. the other day, we checked out another local craft store that had moved to a new location. I figured they might have expanded their product lines as well, but nawwww.......same 'ole store. they do carry wood though.......basswood, balsa, and beech plywood......it's nice to know there's another supply out there. I was interested to see if they carried doll house lighting........sadly.......no. we did meet this wonderful lady........her hobby......rooms. she takes square or rectangular boxes........cuts out windows and doors........walls out the inside and decorates the space.....whether it be a bedroom.....living room......den......let the imagination flow. she showed us a picture on her phone.......simply amazing! SO........I need a couple more lights to complete the circuits.....I ran two separate lines into the hull, so not to tax the system. the Titanic is finally on the other table........moved my wood rack to the main table, so I would have more room. I've got the half Moon on the main table for the moment.
-
she's looking very nice Larry..... the masting looks especially good. cleanly done
-
a fine looking ship!........very nice detail
-
I kinda like it dave........dress it up with the deck beams, knees and scribe work, and it will look even better. it's very different.......definitely a one of a kind idea......I've never seen it before.
- 601 replies
-
- 2
-
-
- constitution
- revell
- (and 1 more)
-
nicely done Patrick! looking forward in seeing the outside of symphony as finely detailed as the inside
-
glad to see the hull fared well.........probably needed a bath anyway, with all the dust you've been kick'in up love the deck planking......looks really sweet!
- 2,625 replies
-
- 5
-
-
- kaiser wilhelm der grosse
- passenger steamer
- (and 1 more)
-
great job Danny........ship and log are both superb so much for the benefit for all. thanks for sharing your build with us
-
Cutty Sark by NenadM
popeye the sailor replied to NenadM's topic in - Build logs for subjects built 1851 - 1900
are the holes in the dead eyes all the way through? looks as though you may need to drill them out- 4,152 replies
-
- 6
-
-
- cutty sark
- tehnodidakta
- (and 1 more)
-
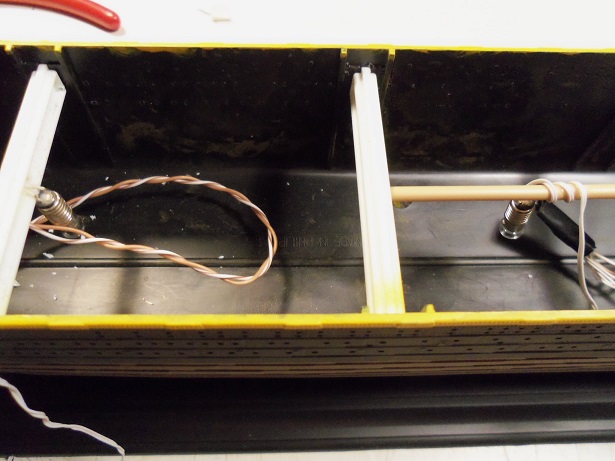
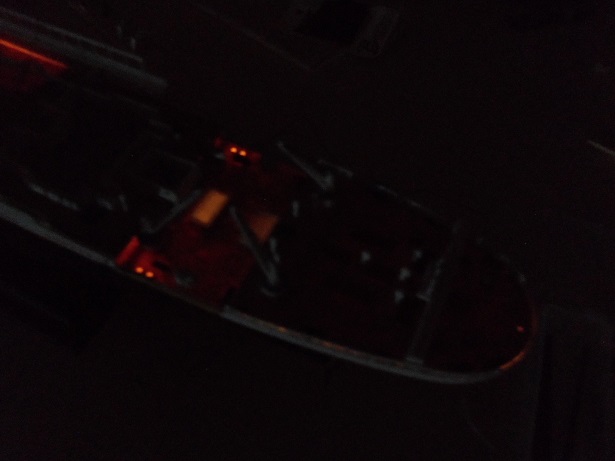
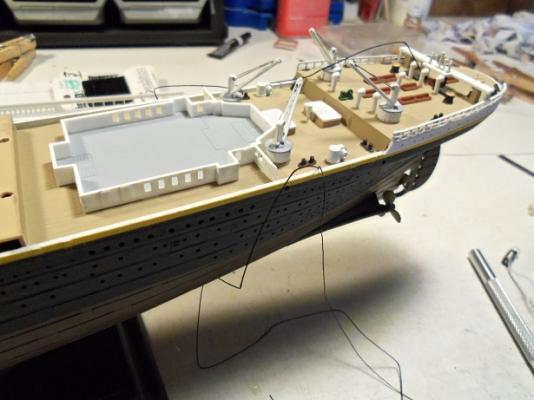
ok..........my flip has flopped........there will be lighting. now that the bow and stern is on the hull for good, the wiring was run into the hull. I'm going with four bulbs instead of the two I tried my first test with. the connections were soldered and taped up. I hope you can see these next photos........they are dark. even through the deck, there is some light filtration. it does look kinda cool though......some illumination for the well decks it's too late to take any measures to keep it from happening. but.....awwww, what the heck. at first, the admiral wasn't too keen on the idea. now that she's seen it, she likes it I will be adding a couple more lights to the bridge deck and the A deck. it's the best I can do......any inaccessible areas will be void. from the looks of it though, I think there will be enough light emitted to make up for it.


- 573 replies
-
- 19
-
-
thanks for the good word folks! hopefully I can keep up with the progress for the duration of my vacation I'm afraid it will be some time before I can even touch that project. in the meantime, I can cut all the hull parts that I'll need and order up some planking. I have all the parts for the 'mother ship......the other two will be scratch built {of course}. these three share the same {if not.....very close} hull construction.....it's how they are fitted out, that is unique. man..........I gotta get a wood build on the table to feed my Frankenstein I wish I could say more.........I keep my fingers crossed that my circumstances don't change before I get to them here is a hint Patrick: all three have kits out on the market for them, but they are all of different scale. the 'mother ship' is 1:65......thereby, all three will be of this scale. I know it's not much......but I don't want to jinx it.
-
Cutty Sark by NenadM
popeye the sailor replied to NenadM's topic in - Build logs for subjects built 1851 - 1900
have been busy..........I see, so have you nice progress on the Cutty......got some super detail there~! glad that the trip was good!- 4,152 replies
-
- 6
-
-
- cutty sark
- tehnodidakta
- (and 1 more)
-
hey there! I've had to play 'catch up' again.......I must say, you've been very busy very nice progress all the way around.....even your idea with the bar code........that is so awesome! very nice
-
nice job on the Cannons Piet..........good to see you back in the workshop.
-
sorry to hear about the ship Nils.........I too hope nothing goes out of whack. your making such great progress with her........looking very nice.
- 2,625 replies
-
- 1
-
-
- kaiser wilhelm der grosse
- passenger steamer
- (and 1 more)
-
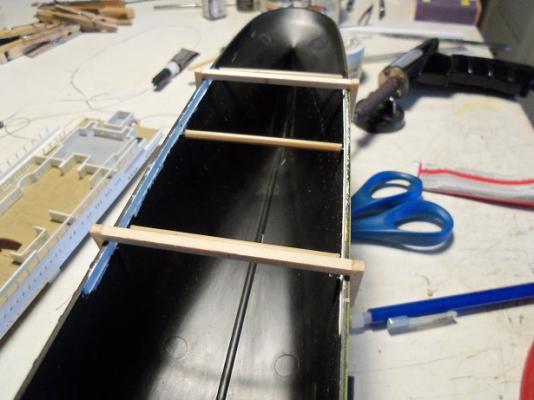
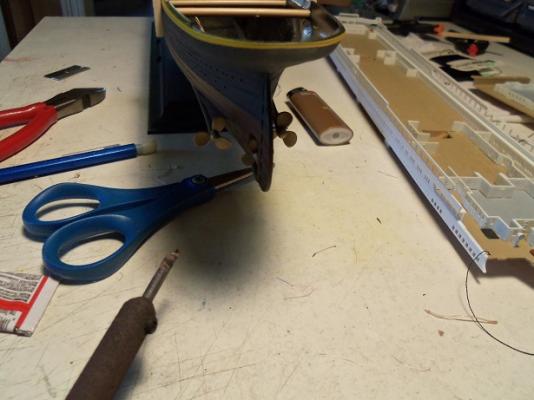
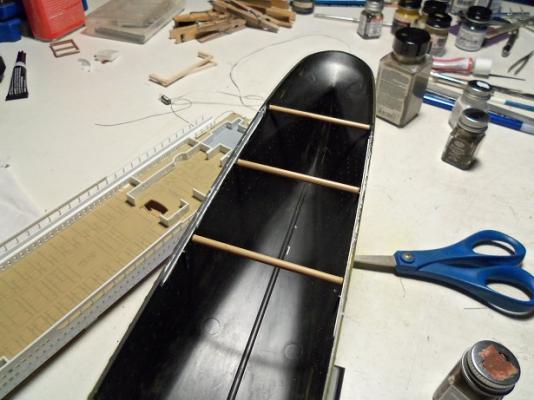
well.......I'm trying to have fun........teteur me.......I bit off a bit more than I could chew with a couple projects. just as well, because one of the steps I took needed time to set and dry. the stern section needed to be fixed........so two jigs had to be made to align the sides. setting the stern section in place, I got my measurements and made the two jigs out of basswood. once they were given my blessing.......finger's crossed, they were set in place and braces made from sprue, were cut and cemented in place. since I'm working on the hull, the props were cemented in place at this time. the bow section has already been cemented in place. touch ups were done. a day or so passed........I did my time consuming projects around the house. the jigs were removed and this is what I have now. the hull is much more streamlined now........adding the braces pulled the sides in. fitting the stern section back in was a snug fit........sanding the edges of the section helped eliminate this. the tops of the bulwarks along the well was painted a flat white, and the tops along the mid ship was painted with the insignia yellow. when the mid ship is in place, no black separation will be seen. another aspect I've been working on, is the wood tops for the railings. I wasn't going to add this detail in due to the scale........and the face that I had already done the bow section without doing it. now that I started with it.......I'm beginning to wish I hadn't. the paint I'm using has been thinned down a bit. I added some paint to it to thicken it back up........not enough I'm afraid. the paint spread and bled down onto the lower part, making quite a mess. so, I have to do some damage control on that front. yesterday, after whatever off the wall thing I was doing, the wood bug took over. I did some more work on that special project, I have on the back burner. making parts on the scroll saw. I'm not using the parts panels, as I've done with other projects......I'm using the actual parts from the 'mother ship'. I would have been happy to have bought another kit of this vessel and recreated the extra hull for the threesome {using those parts panels as templates}, but waiting for the cash flow....I'm getting impatient! what sucks too, is I'm using that 1/4 inch oak panel I bought some time ago.......that stuff is a bear to sand! yea.......you read right.......another trio. we all know what happened to the last trio build......one left to become something better......at least, I think so one thing I can assure you with this one....I can't back out of it.....they all have names........and will have those names from the very beginning. when I'm ready to fly.......

- 573 replies
-
- 14
-