


popeye the sailor
-
Posts
16,007 -
Joined
-
Last visited
Content Type
Profiles
Forums
Gallery
Events
Everything posted by popeye the sailor
-
 thanks OC.....and those who hit the like button I went a little bit further......and of course, more today. for a change of pace, I started to do a little on the torpedo tubes.......first to separate and sand all the chocks. they are made of resin and were all connected together. never messed with resin before........kinda messy. after cleaning the floor before Gibbs comes sniffing around, the nose and tail parts were added to the tubes.......more detail to be added. on deck are the pivot plates...these are the front ones for the forward and aft tubes......the rear ones are stationary, but are pinned to allow the tubes to be positioned inward and outward. as mentioned, these tubes were a bit unreliable........information I've read told of them having to be hit with a hammer, in order to get them to fire! sounded scary to me............ the last section to be assembled is the engine cover, which is connected to the day cabin. according to the instructions.....which is very scant......they don't even give measurements, just a few for positioning. the center deck parts are warped pretty good......it is making it harder to get proper measurements. I see a change I want to make too, where the cover mates to the day cabin. I'll get into it more on the next update.
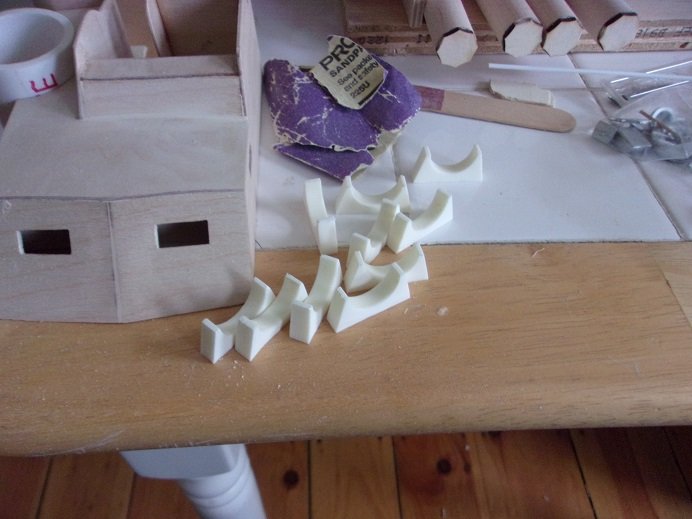
- 221 replies
-
- 11
-

-
agreed with the chain detail.......I chose to use the PE chain on the Vendetta, and should they get bent {for some unseen reason}, they are difficult to lay down. also they look 'flat'. the deck is really nice.......interesting that they make them for this scale. do you have bits for the upper levels of the structures, or are they to remain 'metal' decking?
- 168 replies
-
- 4
-
-
- Scharnhorst
- Flyhawk
- (and 1 more)
-
look'in good James
-
looks like your interested in everything they have there you just keep rolling along Andy........it's always nice to see train models being built. don't mind us if you see us gawking over your shoulder. I'll try and keep the garlic to a minimum very nice work!.......glad to see you back!
-
we had waste oil heaters where I once worked. the original one they used looked like a small stove.......had to be stoked every morning. the new one they bought had a big register / blower that hung over the bench, pointed out over the bays. it would heat that part and the adjoining bays, even being separated by a partition wall. darn thing would drive you out, if you were in the center bay. are you gonna have air for pneumatic tools? very nice diorama......really good detail
-
you can also look at the avatars.......if it says 'gone but not forgotten', you'll know that the gent has left the table. no harm, no foul......if I saw something this good, chances are I'd compliment the modeler too look'in forward to your log one fine day friend!
-
looks really good.......yep, too good to lay waste I've never seen that kit......what is the production year? have you got a log on her yet?
-
that size of gun has a elongated breech and barrel.......if your gonna fire something that big, you'll need the room look at the size of the breech on Leopold, the German rail gun....freak'in huge! I'm sure your using magnification for this one.......very nice!
- 168 replies
-
- 5
-
-
- Scharnhorst
- Flyhawk
- (and 1 more)
-
we seem to think alike? you save the parts panels! I do as well, using them to clone other hulls and fit them out as I like fine looking project......love your below deck details.......it's the little things. I don't usually double plank......it seems hard with this model, given the deep rabbits and the way the assembly runs. I've used the thin strip and thread method for simulated calking......I settled on using a Pritt pen to do it very nice model....really looks the nine! I'm envious of your planking skills.
- 79 replies
-
- 1
-
-
- Fifie
- Victory Models
- (and 1 more)
-
super looking model. really like what you've done on her so far!
-
nice........your half way there sanding and filler is still your friend.......paint covers a lot of sin. you'll get better......the other side might come out better, it may surprise you I haven't got it down pat either....... I wouldn't double plank.......filler.....sand it smooth and to contour, and paint. to me, the only reason that one would double plank a hull, is to avoid stain. cover with Walnut, mahogany, or Oak thin strip and a clear sealer [especially if that particular color of stain is unavailable}. looks fine........your on the right track. when you can get the two hull halves together, you'll see
-
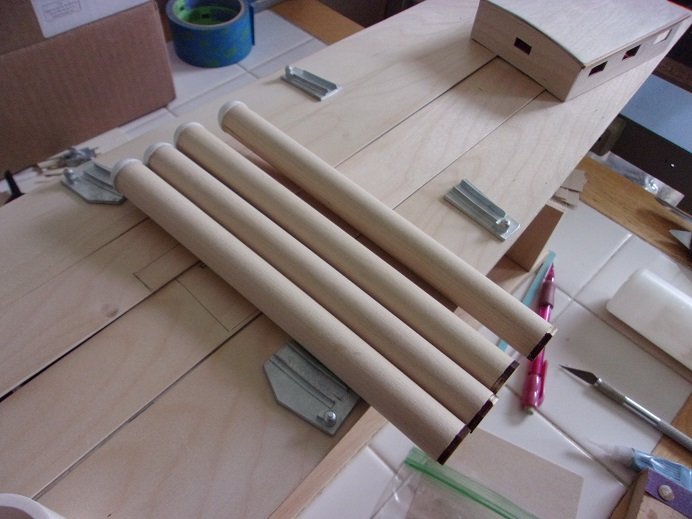
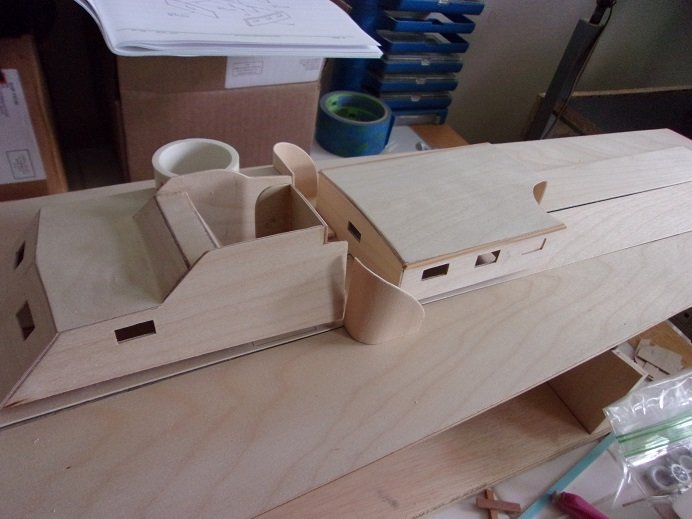
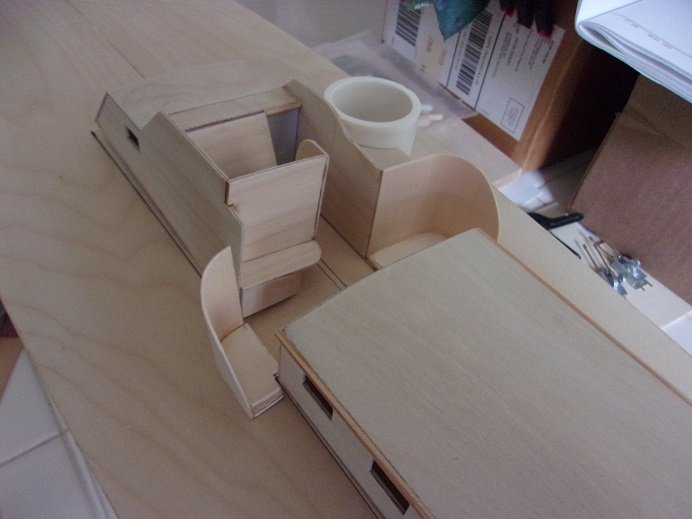
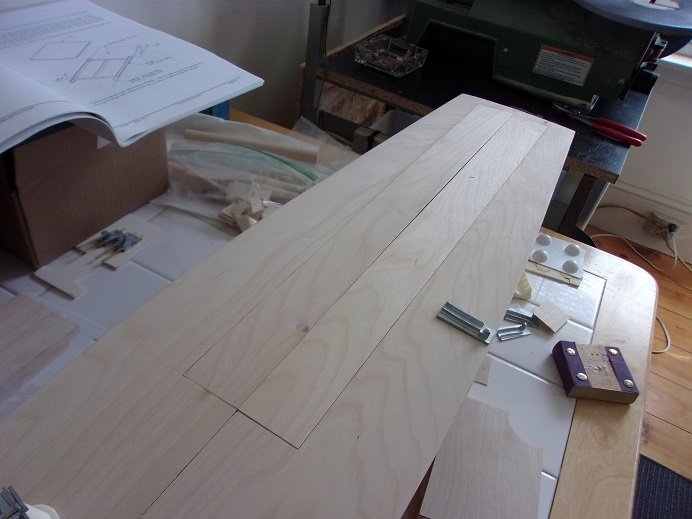
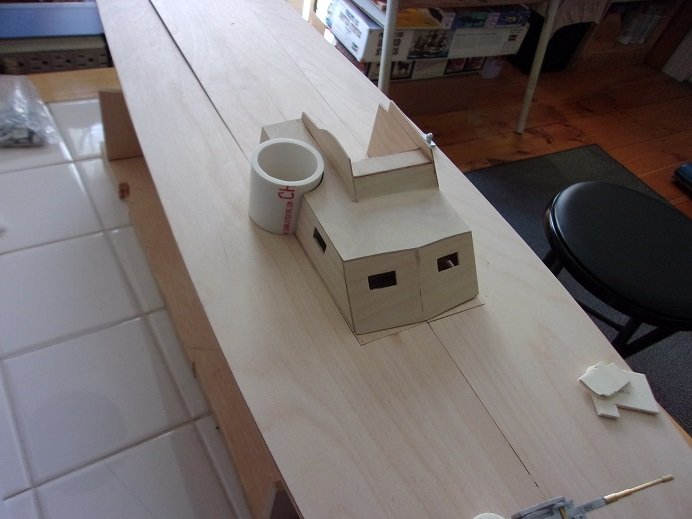
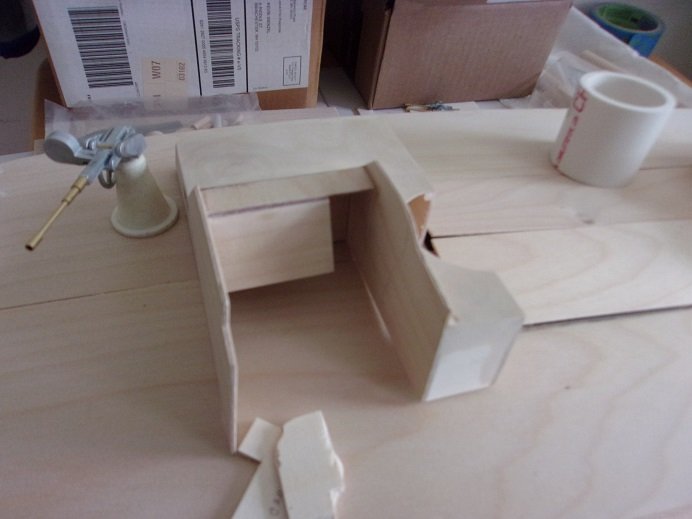
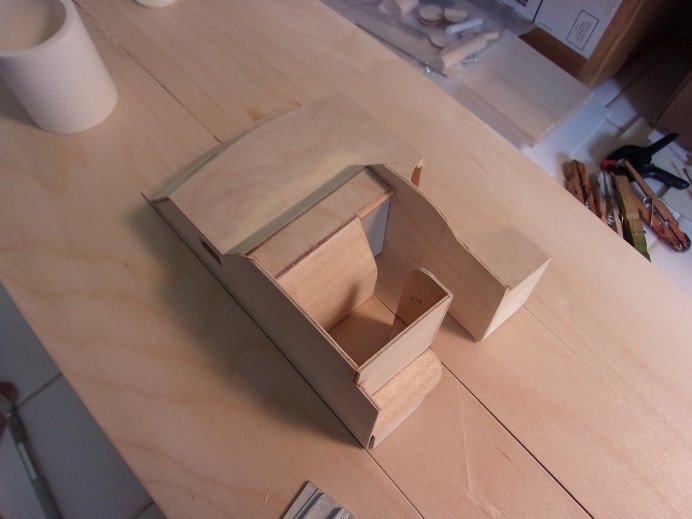
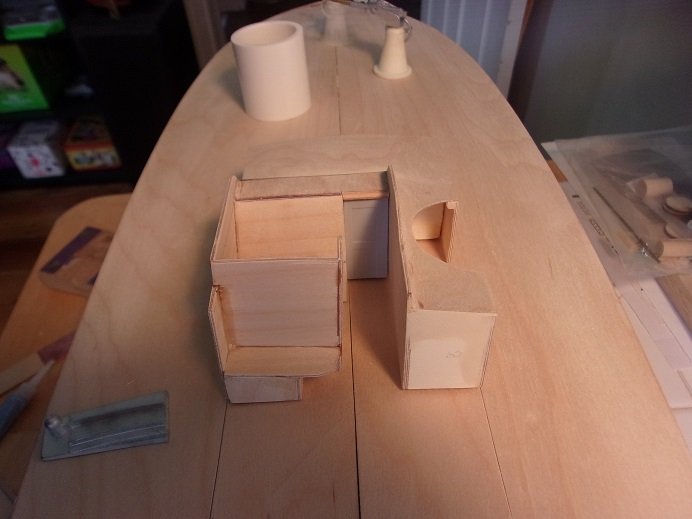
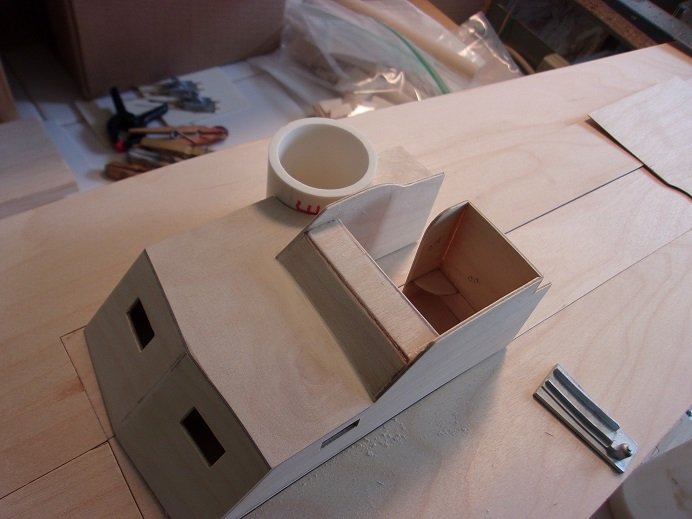
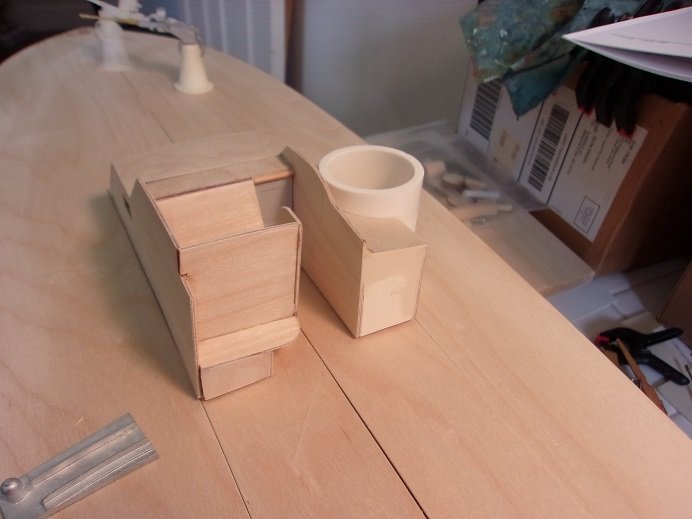
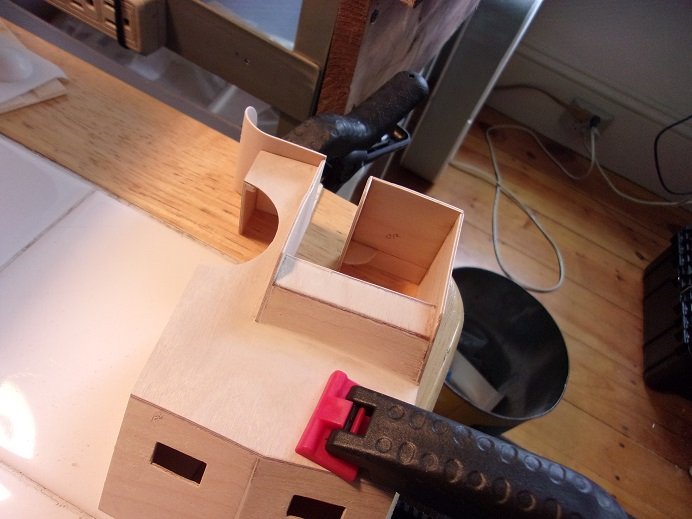
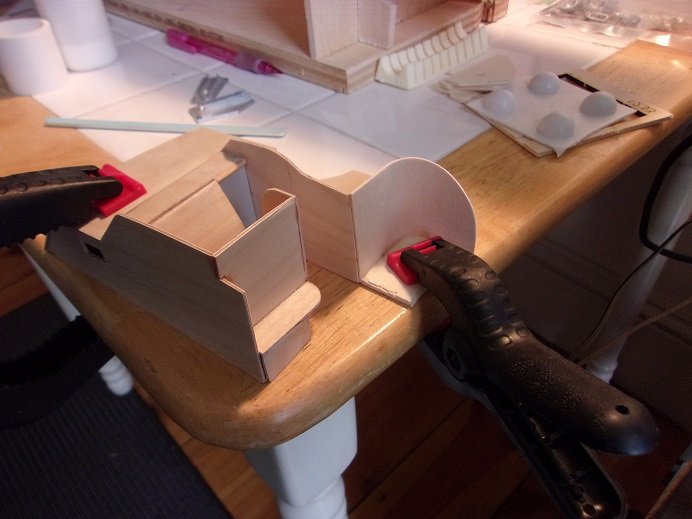
I have been all over that 103 site........indeed there is a lot of good info there. since the model is of the PT 109, I though I'd take a browse into John F. Kennedy while I was at it. originally, he was assigned to PT 101, squadron 14 {RON 14}, to patrol along the Panama Canal. while he languished here, PT 109 was in the process of being shipped to the Pacific theatre, aboard the U.S.S. Joseph Stanton, along with three other boats. these transport ships could only carry four at a time. Kennedy put in for a transfer against his parents wishes, and with the Help of a Mass. congressman, found himself heading for Tulagi Island, where Squadron 2 was based. he took command of PT 109 on April 23, 1943. two other things I found out in my browsings, was that the torpedoes weren't that great, and neither was the radar systems in these boats......half the time they were unreliable or didn't work at all. now that the hull can sit on her new stand, I can start to flesh out the deck layout. the deck platform has a punch out on each half, to enable access to the R/C works.......the entire structure can be removed. matching the punch outs to the correct side that they came from.......makes for a better fit. that's the new table.......a bit lower than what I had before. I'll see if the creases in the top gives me any trouble. if they do, I'll have to get something to cover it over.....Formica or the like. I wasn't sure if I wanted to trim the helm structure or the turret rook to fit.......easiest was to just trim the helm structure. basically, this is how it will sit......to be removed along with the rest of the center structures. the structure isn't finished yet........and there's something I'm not too crazy about. the companionway entry to me seems too small.......that, and I'm still puzzled how the back wall {that little piece I made earlier} fits. so I cut it all out except for the control panel. thinking it should be wider, I cut about 1/8 off of the control panel. the opening was walled off again with cast off basswood, and added a door, which was an extra from the Progress's fittings kit. those two choppy looking pieces in front are additional shields.....gotta figure how they come into play with this part of the structures. the wood is Spruce plywood.......terrible stuff to work with. as mentioned, being die cut, the parts need to be scored before they are punched out of the parts panels. as for that small section of back wall, it too was shortened by about an 1/8, and trimmed to fit the relief toward the end of the port side wall. now it has the proper configuration. ...and with the turret rook in place..... I started with the starboard side shield. here where the wood grain can help you.......cutting a piece of 1/32 basswood the height needed, I got it wet, and let it set for a few moments. patting it down damp, it was cemented {with CA} around the edge of the shield 'floor'. with a pair of scissors, it was trimmed with a curve, ending straight down where it opens to the deck. the grain when wet will be a lot more forgiving, for bending it to this degree. it was then glued to the flat surface of the starboard side 'end' box. the wood still damp, it still remembers that it was once straight, so it need to be taught that it now has the bend. the structure was clamped to the table, keeping everything flat until it dries. using the grain as a tool can add interest and natural curvature and contour. it beats having to round off corners. there are a few chiggers in the shield floor......there will be in the other one too. I could have simply scratch cut another pair, but I have something else in mind. I could have gone further, but I started to clean off table white....then ended up painting the pin rail parts for the Agillis while the work I did on the PT boat dries. I should have more tomorrow

- 221 replies
-
- 12
-
-
thanks everyone the nod thing doesn't just apply to the computer, it happens when I spend too much time doing the same thing. I've done it at work too.......runn'in around all day working.......they call a meeting, and they expect you to sit through it. I've been moving all day....now they want me to sit....I call it stagnant this is why I don't sit at the 'drawing board' when I model.......I have to be in motion. I hardly ever draw anything out....the only thing I've ever drawn out, was the dance floor for the M&M boat. I dunno.........maybe I should look into my ancestry, to see if I'm related to Rip Van Winkle or something second cousin to the Sandman...........Prince Valium {Spaceballs antidote} but no......really, glad I got up the gusto to finally finish her toys that would try to kill you......the Puppetmaster comes to mind
- 1,090 replies
-
- 6
-
-
- showcase models
- vendetta
- (and 2 more)
-
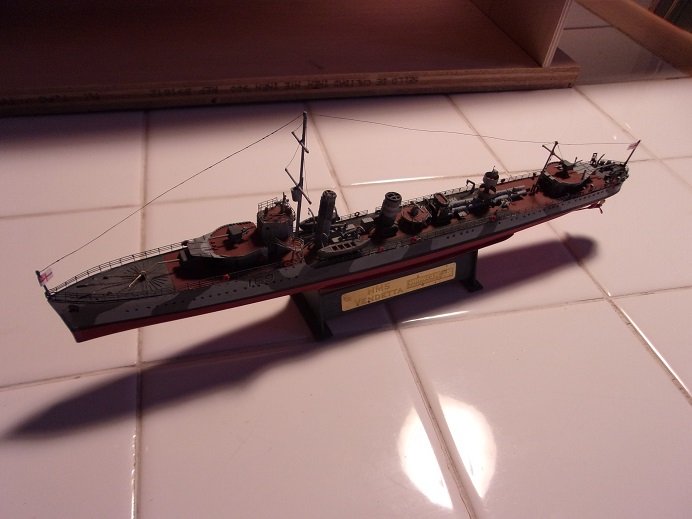
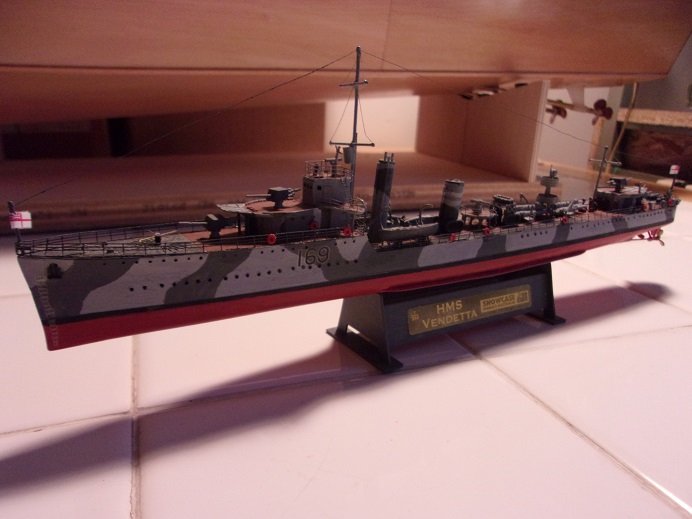
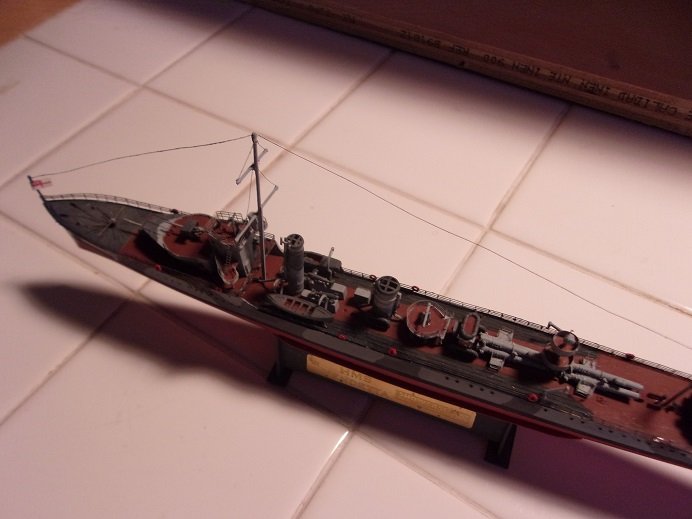
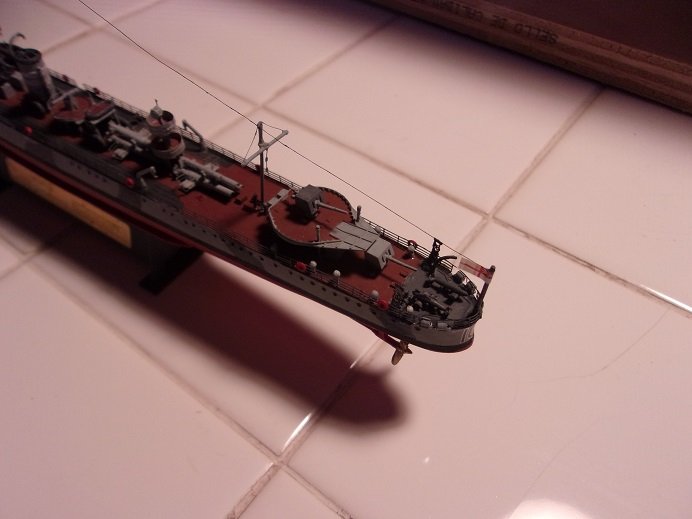
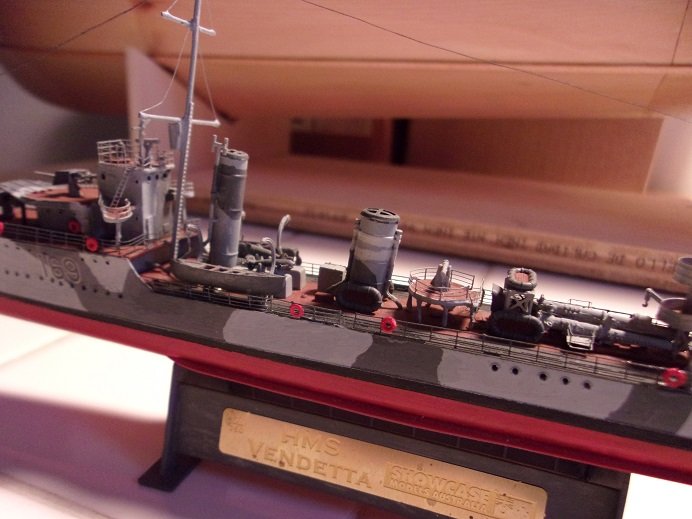
I'm gonna call her finished.......if I mess with 'er any more, I might ruin her. life preservers, flags, and general touching up enjoy! I photogged her on the new table for the PT boat.......it's a bit low.......might serve well for sailing ships.

- 1,090 replies
-
- 7
-
-

-
- showcase models
- vendetta
- (and 2 more)
-
hey-ho gents!.......getting caught up with the goings on here.....thanks for all the kind comments yepper......strange events going on.......we saw snow, but you would hardly know it. the flakes were as big as dimes.........really wet stuff. it's over now I think.......haven't seen any more precip since lunch. I knew I wasn't going to get another coat on the hull.......I haven't touched it either. I did put her on the stand though, and now I'm thinking of what goes on the deck. I'm thinking of how many dead lights are on the deck......so I pulled out the Revell kit of the PT 109 and took a look. I also looked on that 103 website, but the diagram there must include the placements of different variants.......cripes, there's a bout 50 of 'em. oh......I did sand around the edge of the deck sheer....a little resin did collect. I'm thinking though that a light sanding might be all it will need......the one coat of resin is good. especially since it's going to be a static model. for anyone who might do an R/C, this is the way to go. after two coats........even without the cloth, it will more than suffice to seal the hull. Vaseline or a light grease should seal up the rudder and screw tubes. I just glad that the day came.......and to me, it was a complete success! I did some more reno to the spare room........I have a different table now. the table I was using, was actually a shelf I built for some of my modeling stuff. I added a couple more shelves, and opened the room up some more........although I think that dream of a 'wrap around' work table has gone poof in the process I should have a bit more to report very soon. thanks for look'in in
-
hey there OC.........superb job on the tank! love the weathering job and what you did with the tracks. you've really gone all out
-
sadly, the master of card has passed away, but I'm sure he's smiling, knowing that his logs live on
-
very nice job..........the paint work is awesome!
-
McLaren M8B by CDW - Accurate Miniatures - 1:24 Scale
popeye the sailor replied to CDW's topic in Non-ship/categorised builds
looks like an international orange........I have some -
still a nice looking model though! well done!
-
I do apologize that I haven't gotten back.......life can be so involving. good you fixed the garboard......it looked as though you were in the process of removing it. as with all planking, it goes all the way back to the stern stem. as you notice, the bulwark strips are not the same thickness as the planking. the planking is 1.5 mm..the thickness of the bulwark panels is about 1 mm. when I built mine, I looked at this and that is why I decided to do away with them and plank the bulwarks. sanding the planking to match the bulwarks would substantially thin the planking, and raise the concern that I would sand through...... there's no need to remove them......you can very easily use 0.5 thin strip and add to the thickness of the panels. planking is a slow process......I like to use the time to research and look through the instructions. I'll see things that can be improved on, even things that can be done while I'm waiting for the next run. don't be concerned in using a more aggressive sandpaper either.......keep in mind as to where you are with thickness and sand consistently along the entire length of the hull. never concentrate on any particular spot....that will cause you to sand through....you don't want that. if you are planning the use sheet basswood or the like to cover over the stern transom, go with a thin sheet......and use the grain to your advantage. wet it, let it soak a short time, and work it while damp {you may want to pat some of the wetness away}. I trim as I go along fitting it.....I get a more exact fit this way. your line looks better...your adjustments show improvement it may look scary at the moment, but this is normal. once the hull halves are joined and sanding has been done, it will begin to look like something. it's when you can get some paint on her, that her beauty starts to show. your doing a great job


