
HOLIDAY DONATION DRIVE - SUPPORT MSW - DO YOUR PART TO KEEP THIS GREAT FORUM GOING! (89 donations so far out of 49,000 members - C'mon guys!)
×


popeye the sailor
-
Posts
16,007 -
Joined
-
Last visited
Content Type
Profiles
Forums
Gallery
Events
Everything posted by popeye the sailor
-
 I hope it works.........I've never tried it. Leo has a neat idea there.......I think it can be expanded on. you go first......I'll cover you {famous last words} they would be very close to scale too! that's the cool part
 -
hello Charlene....aka: J.A. a big welcome from the northeast! always glad to see new modelers enter the fold.......I think your going to enjoy it as much as we do! your right on track.........that's what we usually do........dry fit the frame.......and then sit there and think. are those plans 1:1 with the model? I like the way they show the parts. not to put an idea in your mind, but this particular hull is fairly common to a couple of other ships........a scratch build could very well come from those plans ..........that is, if you want to scare Jerry further ain't I a stinker! :D I look forward in seeing your progress
-
good to see you >somewhat< back to the table........I've had the doldrums before. all it takes though, is a thought or an idea.........and the right time, to get you back in full swing it will happen.........just keep pick'in up that x-actor. gotta keep those muscles in tune, for when your ready I thought you already found another job........guess I was mistaken continued luck in that endeavor.......I'm sure you'll find one soon! as far as you knee problem goes.......if your planning on a cut-away deck, you may have to include them. you could scope it down though to just the area that is exposed. you have some pretty clear plans though, as to how they are shaped.....just make a couple and see how they fit this may be the spark your looking for
-
man........I wish I could see 'into' a build, as well as you folks.........truly wonderful workmanship!
-
will this finish the build? hard to think you'd be done, with all that you've put into her the picture of her with all her sails will be a keeper!
-
she looks sweet Piet! looks great on her new mount fingers crossed from me too......hope there's good news all the way around!
-
gee.......you know that sparked an idea. Leo said the paper is thin.......make two sails exactly the same size. lay the first one on a board and with pins and thread {very small thread} , starting at a pinnacle at the top, span the thread out to simulate the pleats, over the sail. use a spray bottle with diluted white glue and spray {atomize}over the sail and thread {lightly......not saturated}. then lay the other sail directly over it and press with a roller of sorts {or a long enough piece of large dowel. it will sandwich the thread between the layers and create the pleats.....puffed out a tiny bit. if you use black thread, it will show through the material and give you the color you desire. you could even get away with using tracing paper, but if not, I guess your going to need to go on a shoe buying expedition nice........now I think we started him off on a shoe fetish
-
Cutty Sark by NenadM
popeye the sailor replied to NenadM's topic in - Build logs for subjects built 1851 - 1900
I'm a computer gamer too Nenad........at the moment it's Divinity 2 - ergo draconis......I have the whole series I also like the Gothic series.......and anything with a sword or bow sometimes it's nice to kick back....enjoy!- 4,152 replies
-
- 3
-

-
- cutty sark
- tehnodidakta
- (and 1 more)
-
I've been looking into the scratch vs buy thing as well. I don't have the capabilities to do stanchions like that either.......lucky I had a decent inventory.......which by now, is greatly depleted. you have a knack with working with metal Nils...your not fool'in me looking great Nils.......really like the method your doing with the sails
-
looking awesome David
-
that's all the matters George........I'm sure it cemented together well with ice cream..........YUM!!!!! not just a thought Marty......but a great idea. as I read your post, the image came to mind. I'll have to look at this........a Wal Green's is nearby you got me Carl.....I admit it.........I'm a confirmed junk food junkie! but I'm a pretty rare bird........there are no know photos of my species though, cuz I strike fast.......and disappear without a trace
- 956 replies
-
- 5
-
-
- andrea gail
- trawler
- (and 1 more)
-
this must be the planking question, I hear tell about well.........let's see........hmmmmmmm. I guess it would depend on the build. for me, I like to do the hull first, mostly for the reason you stated. I use pins mostly, and I clamp very little........if I'm able to bend the planking, so much the better. if a deck platform is to be used, sometimes planking before faring can be a good thing, but I wouldn't do a seal coat until the hull is planked. on a build like yours Mark......I'm sure you left provision for the deck beams........plank your hull
-
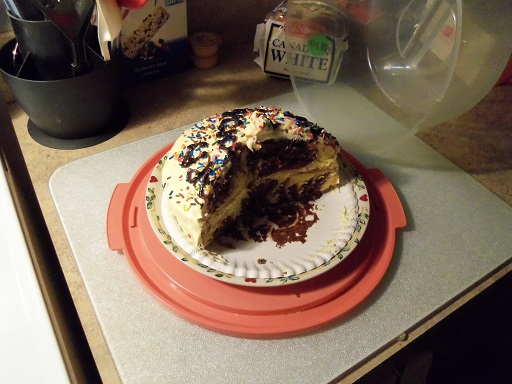
hello Wayne.........thanks for the good word! as much as I would like to try making my own netting, I bought some material a while back that will fit the bill quite nicely. the Billing's kit of this model, supplies a greenish netting.........I happen to have that color, as well as a brownish color. I also have an ample supply of tulle. Hobby Lobby carries this in the wedding dept {best way to describe it}...and the tulle is also found in many different colors. I may not use it though because the texture is of a smaller scale than what I need. tomorrow is my last day of the work cycle........play time is near there will be bubbly .......when I am done I almost forgot to ask you George........given the background in which you showed your cake, what happened...........did you drop an anchor on it? the cake I made is almost gone........only a two piece wedge is all that's left. I better get one more piece, before the vulture comes home!
- 956 replies
-
- 3
-
-
- andrea gail
- trawler
- (and 1 more)
-
those are super looking railings Kees........very well done indeed! I think I mentioned it before.......on one of my jaunts to the craft store, I saw some jewelery fittings that look just like them.......even have the holes predrilled. if I see them again, I will pick them up.....I'll show 'em to you the stanchions I work with are sold by Billing Boats....I had quite an inventory........I'm now starting to dwindle down on them. really neat idea to make them, something to keep in mind future build idea look really cool! are you going to make the hull the same way as this one?
- 205 replies
-
- 1
-
-
- kw49 antje
- trawler
- (and 1 more)
-
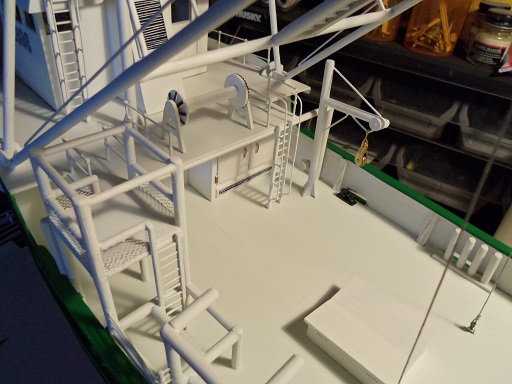
thank you all for the kind comments and the likes! I still got more to do......some how the four days I have off from work, just doesn't seem to be enough. I just leave it to the future......but one never know what it will bring John........you are way too kind! thank you! I have two boys Carl........my oldest has four of his own, and my youngest is 25 and still at home. I'm waiting for his inner nomad to kick in I'm not rushing him though. perhaps a future build will have all those things......the trick will be to think of them before I go too far. not really in the habit of back tracking I'm still looking into it Piet........I'll see what I can do welcome Greg.......I'm glad you like how this one has progressed. crazy idea gone wild...best way to describe it hope you continue to follow along. there will be nets........the stern reels have them. as for the fore deck reel........gotta wait for that one. the assembly is made......now to bash it thanks Patrick.......I let my hair down for these updates. I'm the nut that will do my Popeye laugh in the middle of a busy department store, especially at the check out! well.......I'm really late now.......gotta get ready for work! shouldn't come here in the AM..........I get carried away!
- 956 replies
-
- 6
-
-
- andrea gail
- trawler
- (and 1 more)
-
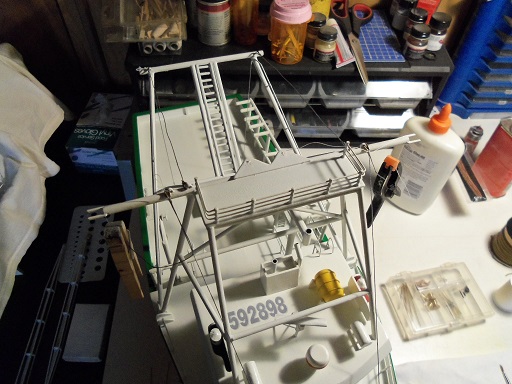
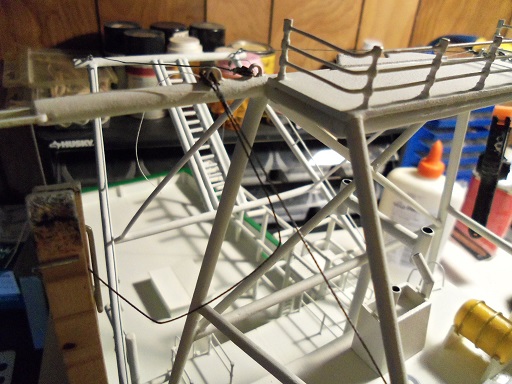
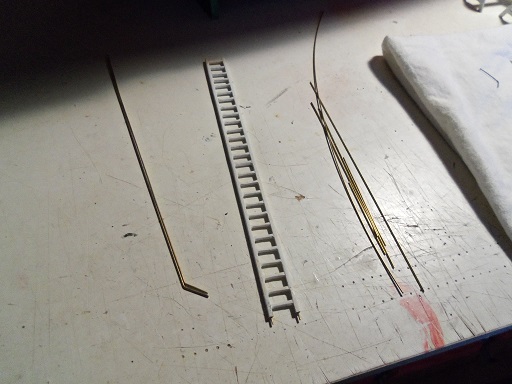
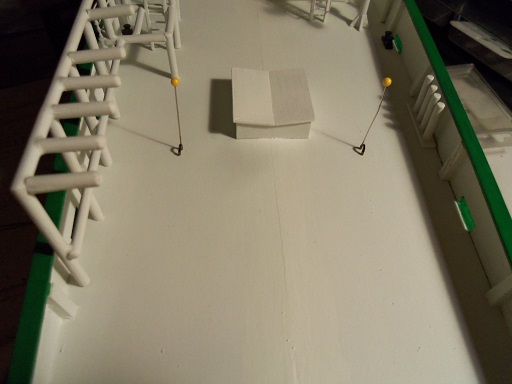
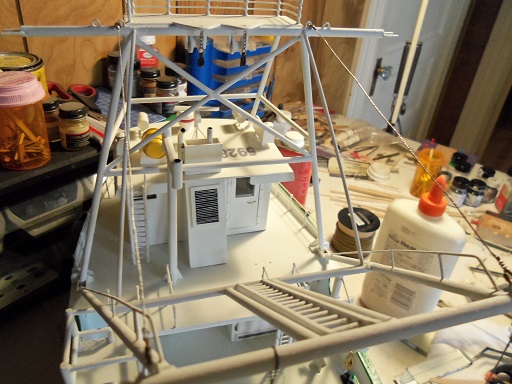
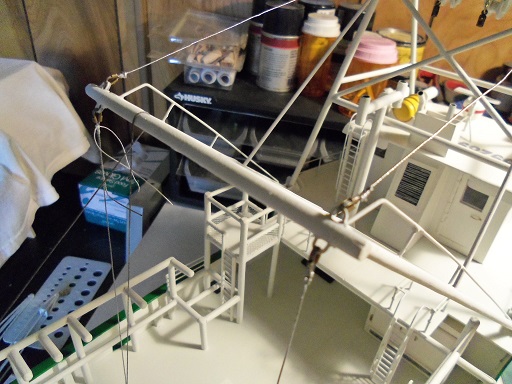
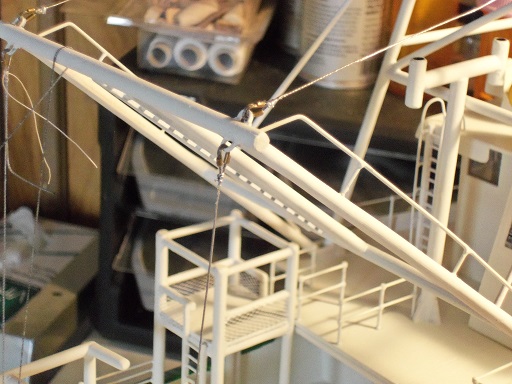
As I mentioned........some pictures had cabling at the bow, so I added them. they started at the deck and terminated at the top of the rig. I tried to get an over head shot......... I have the ladder ready to go..... ...and I brought out the reels. I will need to modify the fore deck reel I also checked out how hard it would be to work in ......and reach in the trawl rig. it's not too bad.....I'll just need to be a bit careful that's my play time for Friday.........work beckons now. I can't wait till the 18th....I'm using another of my vacations. I'm hoping I can finish by the end of it

- 956 replies
-
- 13
-
-
- andrea gail
- trawler
- (and 1 more)
-
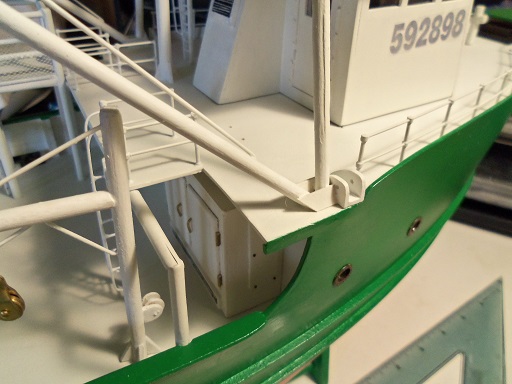
OK......now that I can sit back and chat........ it was early Carl.......I mis-read what you were getting at.........I was barely getting the first cup of coffee down still more to go Bob..........I think this one has to be the most prolific build I have done so far....there are about 70 photo files on the build. cementing the trawl rig in place is a pretty big milestone...but now I have to work around it. now that I have that sorted out........the Bob thing is just too funny to pass up Nils........reminds me of a couple monty Python skits......... "is your name not Bob?" {I changed the name} "No........it's Denis." "that's gonna cause a bit of confusion........mind if we call you Bob, to keep it clear?" thank you Mark, Nenad, Patrick, Lawrence, and Ed for the kind word...I really appreciate it . All I can say, is that this is one heck of a cool subject to model, even if I'm using the Billing's instructions to build it. John and Augie.......what can I say.......I'm usually not very vocal about the culinary stuff. I took a picture of it this morning, thinking that my son hadn't had a piece yet. I got home this evening......in our conversation, the admiral showed me the cake.....and mentioned that our son, had indeed.....made off with a piece. I was relieved to know that the admiral and I, didn't make a pig of ourselves that evening! thanks Frank.......yea, the mending plates was a good idea. they hide the gaps that the trawl rig had, in the mating to the deck. now that I've done the touch ups......they look much better, but I may drill them and install some simulated bolts for added detail. there's more to come
- 956 replies
-
- 8
-
-
- andrea gail
- trawler
- (and 1 more)
-
there......now I can talk! yes......I agree with you Carl...I wish I was at the point where I can retire one day soon...I hope! you must mean our beloved Capt'n Bob.........I really enjoy his talent....I wish I could understand CAD like he does. I had something this morn I wanted to post......wait moment you'll love it thanks Mobbsie.......I think I see what your pointing out....... consider it fixed! thank you for letting me know. I'm starting to get the Jeebies anyway.....I see spots and paint flecks......I touch them up.......and then I see more! then I clean my glasses and some of them go away! thank you Tom........the admiral had a very good day. every year it's the same.......I tell her she's catching up to me...and every year, she gets confused gotta keep 'em guessing
- 956 replies
-
- 6
-
-
- andrea gail
- trawler
- (and 1 more)
-
I'm such a cad!.......shoulda got a picture of the cake before we got into it I cheated.......I licked the knife thanks for all your kind comments and likes. Nils and Carl: you must mean 'Bob the builder' no....just me an Chester.....sort of remind me........oh crap! gotta get ready for work! be back tonight!
- 956 replies
-
- 4
-
-
- andrea gail
- trawler
- (and 1 more)
-
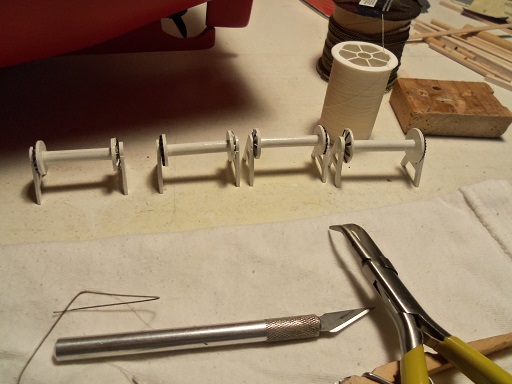
I get many great ideas from the jewelery dept at Hobby Lobby, and other craft stores.
- 396 replies
-
- 2
-
-
- Idea
- Bright Idea
- (and 1 more)
-
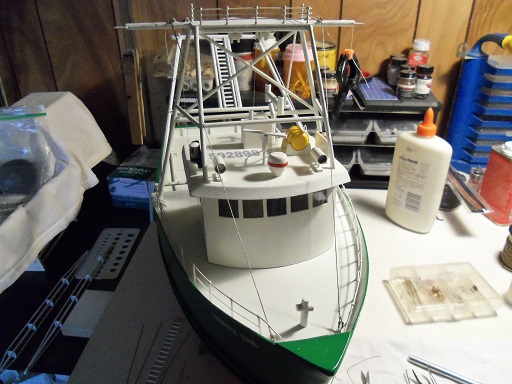
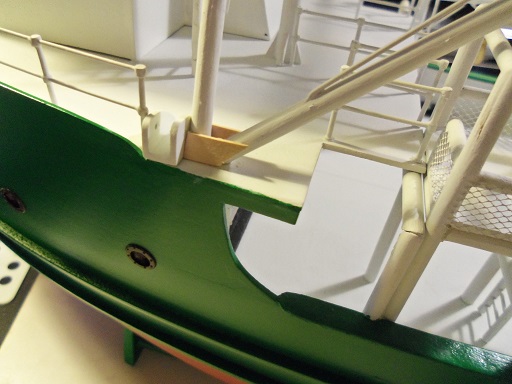
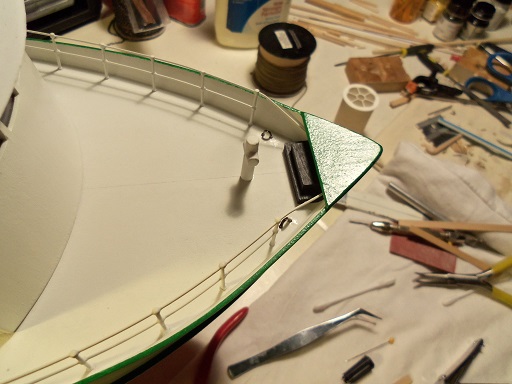
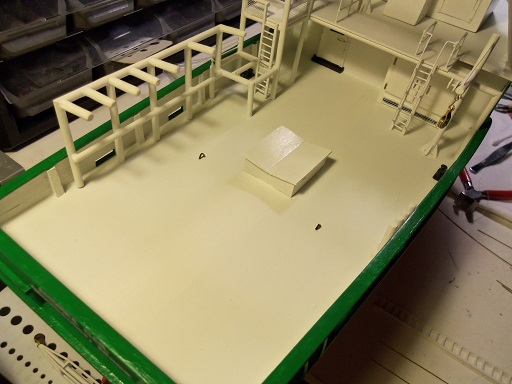
so....yea, some clean up was in order. mental note to self.......when I buy paint for any task, it's good to jot down the product number and stuff......the primer I bought is not the same as I started with. lucky for me, that the Billing's flat white is very close to the primer color. the color is very slight...hardly noticeable I did do a bit of repair work on that deck seam down the middle.......looks a bit better now. with the small bottles of paint......ever notice that by the time your well into the build, you can hardly read what the name of the color is......I find that with the Model Master, and Billing's paints. a good remedy for it, is to cover the name with scotch tape...something clear, to protect it from getting rubbed off. here are the mending plates I put at the base of the trawl rig. they make the assembly to the deck a bit stronger, and cleans up the looks of it. the placement for the aft section cables were plotted out. impressions from the pins marked where to drill. some pictures of the model show them on the transom......some show them at mid ship. I chose them in this position, because it looks more on the logical side. the same went for a pair at the bow........some even used chain. I have looked for clear instruction of the rigging........even actual pictures show me very little. the reel on the fore deck is a good example. netting would be illogical in that position......and I have seen rigging that moves along and through the trawl rig. there are separate winches that operate the stabilizer booms, so this still leaves the reel open for thought. I will delve into it further, but I have an idea of how to rig it after I had cemented the bow shackles in place, I did the same to the main deck shackles. the mending plates are painted now. when the shackles were painted, I set to work on another creation.........a birthday cake for the admiral. she wanted to be different this year, and go for a marble cake. no real biggie! by the time the two 9 inch rounds were in the oven, the shackles were dry, and I could begin the rigging for them. I touched up the other cables with silver, to make them more noticeable. those little shackle thingies I bought seem to work quite well with the rigging.......adds a bit more to the attachment points. control panels for the booms and reel, the curved vents, the gangway ladder, the buoys, are just a few of the things left to on this build.......aside from other bits of detail I want to add. still more to go.......no land sightings yet

- 956 replies
-
- 20
-
-
- andrea gail
- trawler
- (and 1 more)
-
Cutty Sark by NenadM
popeye the sailor replied to NenadM's topic in - Build logs for subjects built 1851 - 1900
I'm holding up my lighter over here- 4,152 replies
-
- 1
-
-
- cutty sark
- tehnodidakta
- (and 1 more)
-
now your thinking back to Frankie and Annette too cool! watch out Piet.........folks might mistake you for a parade float
-
the margins look really good John.......love the construction pictures that show the framing
- 745 replies
-
- 1
-
-
- francis pritt
- mission ship
- (and 1 more)
-
I'm starting to think in that direction as well........I usually buy my wire in packs at the hobby store.