


popeye the sailor
-
Posts
16,007 -
Joined
-
Last visited
Content Type
Profiles
Forums
Gallery
Events
Everything posted by popeye the sailor
-
 if you have any sag in the bow standing rigging.......doing the standing rigging for the main mast should tighten the bow up. making some nice progress, and moving at a decent pace very nice
 -
like the wood grain look......and the staggers can be seen very nice so far!
-
looking very nice Larry! I can imagine a whole row of 'em sweet!
-
thanks Greg..........I'll get some time in, I'm sure I made only a little progress yesterday......out running some errands and surveyed the yards. the plow guy really did a number on the back yard...got some landscaping to do, that's for sure. very little snow is left on the ground now........so happy to see it gone. should have an update very soon thanks for looking in!
- 956 replies
-
- 3
-

-
- andrea gail
- trawler
- (and 1 more)
-
Cutty Sark by NenadM
popeye the sailor replied to NenadM's topic in - Build logs for subjects built 1851 - 1900
I didn't take that long of a hiatus.......but I'll bet it was for the same reason.......lack of time. no actually, I think your build is to be commended. this build is based on an idea you had........you could have done as many have in the past {I'm sure}......just let it fester, but you chose to act on it. as you say.....it may not have begun as well as you would have liked, but looking at what you've accomplished so far, I'd say you've fine tuned you idea quite well. chalk it up to a rough idea......or a hairbrained scheme.........but your effort and commitment has shined from the beginning. your going to have some enjoyable memories, as you look up at her....finished.....up on your mantle your cage looks great........needles are a very hard metal.....must have been tough to trim them all. piggy looks good in there!- 4,152 replies
-
- 5
-
-
- cutty sark
- tehnodidakta
- (and 1 more)
-
thanks for the good word and likes! yes, I'm quite pleased with the way she's fitting out. there are several more aspects that need to be added, and then it's the finer bits of detail I want to add to finish her off. I wish I was into weathering Matti......but I'm not that good. my eyes are trained to see only the beauty........not the age. I need more training ion that area I see you've been doing some looking for pictures of Nanny Dee, Nenad.........look for the poem 'Tam 'O Shanter' by Robert Brown {I believe that's who penned it}...and you'll get the low-down on the lore...right down to the horses tail, she has clutched in her hand I know what you mean though.......I promise to get as much build time in as I can
- 956 replies
-
- 4
-
-
- andrea gail
- trawler
- (and 1 more)
-
Cutty Sark by NenadM
popeye the sailor replied to NenadM's topic in - Build logs for subjects built 1851 - 1900
now your going places Nenad.....first the trailboards ......and now this!?!?! I can't wait till you get to the structures...to see what you come up with!- 4,152 replies
-
- 2
-
-
- cutty sark
- tehnodidakta
- (and 1 more)
-
looking great Michael......the bends look really tight
-
man........is she REALLY taking shape! the mock ups look great! if you can get all that detail in the finished sails, they will add so much to the build......simply awesome! not to worry about the rigging........it always looks like that, until it is tied down and trimmed your really going above and beyond on this build!
-
thanks Carl......I'm looking forward to it.......even though the admiral has spring cleaning on her mind
- 956 replies
-
- 1
-
-
- andrea gail
- trawler
- (and 1 more)
-
yea....I have a couple of my 'plastic pals' using it.....they've been using another paint as well.......Jo Santos {hope I spelt it right}. believe it or not, they've also been using windshield washer in mixing it as well. I haven't tried it...I'm too much of an enamel fan
- 205 replies
-
- 3
-
-
- kw49 antje
- trawler
- (and 1 more)
-
thanks Wayne they are cemented in place.........no chance to change them now thanks Bob.......one more day........and then I can get back to the table! thanks for the good word and the likes!
- 956 replies
-
- 2
-
-
- andrea gail
- trawler
- (and 1 more)
-
I've heard of adding alcohol ti the paint.......enables it to dry faster as well. you'll get past this small wrinkle....I've no doubt
- 205 replies
-
- 2
-
-
- kw49 antje
- trawler
- (and 1 more)
-
as with any stain, if not sealed right way, it will attract dust and such. I also keep a cover cloth handy for when I'm not ready to add to the build, and I need to make sawdust. I'm not fond of it either
- 1,616 replies
-
- 3
-
-
- caldercraft
- agamemnon
- (and 1 more)
-
looking very good Charlene......it Ok about the Olive Oyl thing..........my admiral doesn't even like it when I calls 'er that Ak-k-k-k-k-k! everything you do now, with the frame, is gonna pay big time when ya gets to tha far'in an' plank'in nice to see your hav'in fun!
-
thanks for the good word...and the likes! I didn't try and see what the brown netting would have looked like.....Billing's is famous for green netting in their kits. there are a lot of those 3-D photos online.......even some using Legos. ...off on the second day, of my three day countdown.....waiting with baited breath.......... .........whoever thought up that phrase, was ill.....
- 956 replies
-
- 6
-
-
- andrea gail
- trawler
- (and 1 more)
-
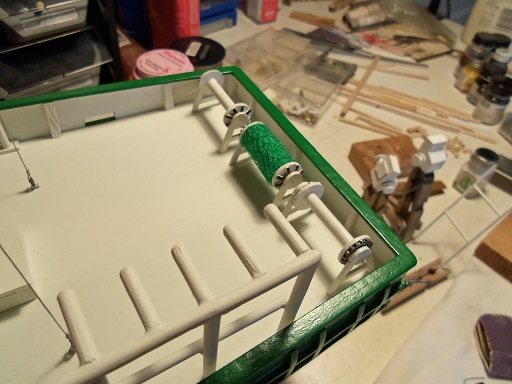
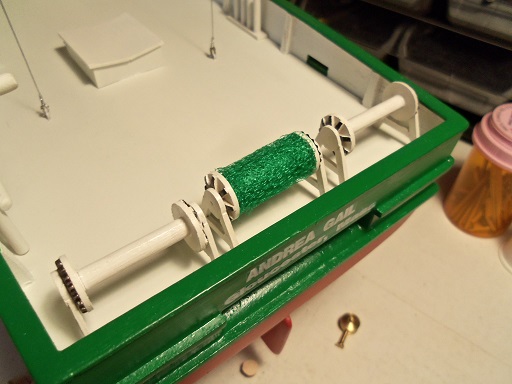
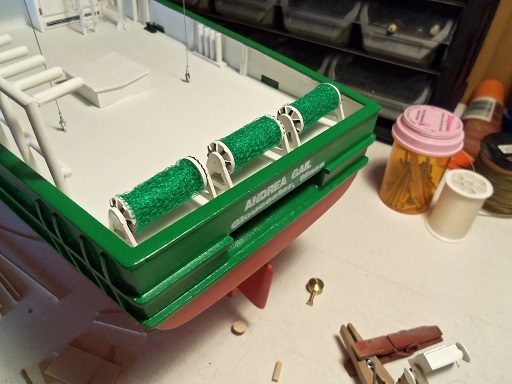
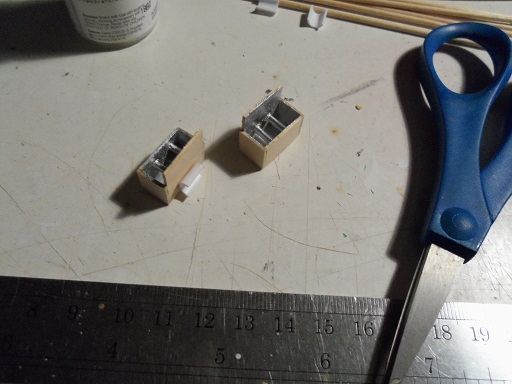
the reels that I had placed at her stern, were becoming a bother. dry fitting parts and things.....I'd hit them with my arm of sleeve.......and it would push them out of alignment. in the box was the netting I was going to use, along with some tulle, which I didn't need any longer. what was salvageable, I put it away........the rest I tossed {I have plenty, and I know where to get more}. I chose the green netting over the brown, since that's what the kit would supply. cutting it was a question for me also.......I though that a triangle would be best, since I was to fold it into itself, so it would fit the frame. I made up the first one and cemented it in place. I had thought of Kees, and what he did with the bath netting sponge. I had already bought a yard of this netting material, so I went with it. the piling kinda hides the scale of the mesh, so it looks good. I made up the other two. the fore deck reel was put in place on the deck........I'm thinking what what I would use to rig it. black thread......perhaps done with the silver and copper........or even the small size hemp thread. I still need to plot out the rest of the fittings to do it. the control; panel still need to be made for it. sad that errands had to be run, or I could have gone further. the aft lights were the last aspect I tinkered with....besides painting that frame piece. I added some tiny bars inside, to simulate the florescent tubes, and the insides were painted silver. they are not finished yet....still more to paint and add to them, before they are cemented in place. two more days.........and I will be on vacation. I can't wait!


- 956 replies
-
- 13
-
-
- andrea gail
- trawler
- (and 1 more)
-
thank you every one for the kind comments and the likes. I don't know what to say...I'm so humbles and appreciative I can report that the shoe box that housed all of the parts for her....is gone. everything left for her is on the table. it's not to say though, that the finish is near......just that there is still more to do. more parts to fabricate, as well as the added detail, I might find in the inventory. Friday's update emptied the box.......I hope you enjoy
- 956 replies
-
- 3
-
-
- andrea gail
- trawler
- (and 1 more)
-
I absolutely love it Daniel......they are our children.......they are: spawned from imagination born from ideas........and Hatched from plans......... not to mention the labor we put into them.......you must be a very proud Papa!
-
you've been holding out on us...... now that is some sweet looking moldings....very nice!
- 2,191 replies
-
- 2
-
-
- confederacy
- Model Shipways
- (and 1 more)
-
very nice Denis!