popeye the sailor
-
Posts
16,007 -
Joined
-
Last visited
Content Type
Profiles
Forums
Gallery
Events
Everything posted by popeye the sailor
-
 it's hard to get them to droop the way you want them to very nice progress Jerry
 -
you've got quite a build ahead of you.......looking at your first bit of bash.......I think your well on your way. safe to say, you won't go much larger than a 5 mm block.......4 mm would be more realistic........smaller for the individual riggings {bunts, leech, clew.......if you add in all those lines. I'll look forward in seeing your progress....nice size for a build
-
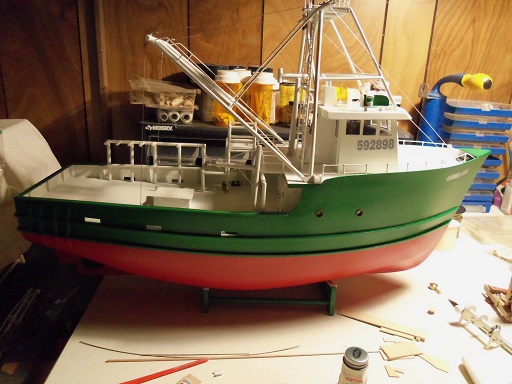
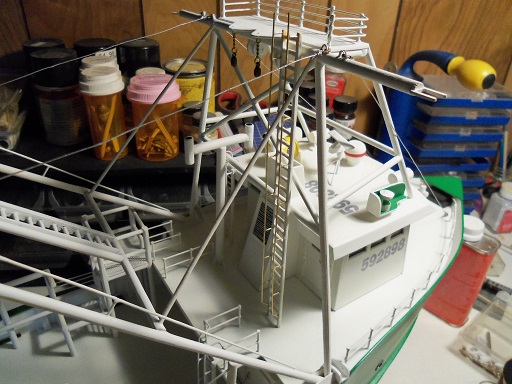
to continue with the progress of these sub assemblies, I picked up where I left off with the aft lights. the sanding was finished and the top was added. the control panels were also refined a bit more.........an access panel was added to the back. adding another sub assembly to the mix........the brace for the center of the first section of the trawl rig. this will be fitted under the center frame, by the vent. going to be a pain to get it in there....just getting the measurements alone was tough. it was time for the control panels to get a coat of primer. the ladder had been secluded for the time being.......I've been painting the smaller parts in the hallway, in a make-shift spray booth. the ladder is in place now. I may have to replace those cables, if I keep hitting them. I've already proven that they can be re rigged....or even adjusted at one end........I'll have to check it out and see. here's a better picture of the antennas.......I painted them as well this is where the brace part is supposed to go.... while I was doing this, I pricked where I am to drill the holes. I had fitted brass tabs in the bottom legs darn thing broke on me........mad scramble to repair it. going back to the aft lights.....two more parts were added to them. those little tube parts........I'm going to use both. they were cut in half lengthwise.....half was cemented to the backs of the lights. the other halfs will be cemented in place, once the lights are in place on the top bar of the rig. I found that the bottle of Billing's gloss white had died and turned to jelly. I was lucky to find I still had some testor's kicking around. it was kinda thick, so I thinned it, and gave the control panels a coat. this will get them ready for the next process. they are almost finished......better start making the fore deck reel panel.


- 956 replies
-
- 10
-

-
- andrea gail
- trawler
- (and 1 more)
-
thanks Piet.........I think though that I can do better with the air horn. I think the body of it is too large next update, I'll have the revised horn. I wish I had taken a picture of it in place......I think you'd agree I saw the spotlight lying down in the package I had it in.......and it caught my eye. thanks for the good word
- 956 replies
-
- 3
-
-
- andrea gail
- trawler
- (and 1 more)
-
thanks Tom.......I know I have to jump sooner or later......but which one? I'll be glad when I get caught up! Sjors and Nenad.......still more to add adding the trawl rig now though really puts me to the test....gotta be careful now! John......I don't know about that......rigging is a tougher act to follow Mark.......ya think so? to me, it looks like an automotive air cleaner looks a bit bulky too. I may change it to look more the part I appreciate all the kind comments and the likes.....thank you very much!
- 956 replies
-
- 5
-
-
- andrea gail
- trawler
- (and 1 more)
-
I agree......the way you made the hull alone, is a stroke of genius. precision is evident from bow to stern.......yes sir.......you be darn proud of what you've built.....hey! I'm proud just watching you!
- 205 replies
-
- 3
-
-
- kw49 antje
- trawler
- (and 1 more)
-
Cutty Sark by NenadM
popeye the sailor replied to NenadM's topic in - Build logs for subjects built 1851 - 1900
perhaps a bar stool might be a better choice........that table might hurt you- 4,152 replies
-
- 3
-
-
- cutty sark
- tehnodidakta
- (and 1 more)
-
watch out Carl........poetry is catchy......... I'll try........but this ball is rolling under her own steam now.............oh, I hate it when it rolls under the sofa.....Whoa! thanks Patrick and Augie.......getting harder to tell what will come out next
- 956 replies
-
- 2
-
-
- andrea gail
- trawler
- (and 1 more)
-
I don't say much Danny........your one of the awesome craftsmen here. the ability to craft your own blocks and perform such life-like rigging, is a prime example of technique and experience. so many comment who have much more experience than I do, so I simply watch and learn, and enjoy watching you do that voodoo, you do
-
awesome progress Kees...fore deck and outer hull work is phenomenal! I'm truly enjoying your scratch techniques so......does this mean that there could be two builds in your dry docks?
- 205 replies
-
- 1
-
-
- kw49 antje
- trawler
- (and 1 more)
-
super update John........yards have a very nice shape to them! really captured the look
- 2,250 replies
-
- 2
-
-
- model shipways
- Charles W Morgan
- (and 1 more)
-
no matter about the type of camera Sjors.....she looks great! very nice shot of the aft deck.....
- 1,616 replies
-
- 3
-
-
- caldercraft
- agamemnon
- (and 1 more)
-
I saw this on the right hand side of the forum page.......and I just HAD to see! freak'in awesome mate! this isn't the kit that has the hull painted already.....they did the same thing with the Cutty.......called the museum series kit. very nicely done.....but you may want to wait with the sails, till you have all the standing rigging done......it will just make it harder for you. this kit is getting to be quite rare....when did you get it and where? I agree with the artistic license thing....do it your way. this particular series of Revell kits......have their own inaccuracies built -in. the modeler can change them or build the kit the way it is.......still yields a very nice model. keep going......I'd love to follow along
-
thanks for the good word George think of it as I do..........that all you see here, as an advance, will only set the stage for the next one "keep on thinking free"......Moody Blues
- 956 replies
-
- 3
-
-
- andrea gail
- trawler
- (and 1 more)
-
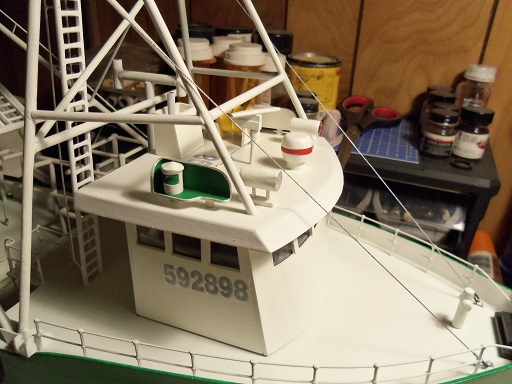
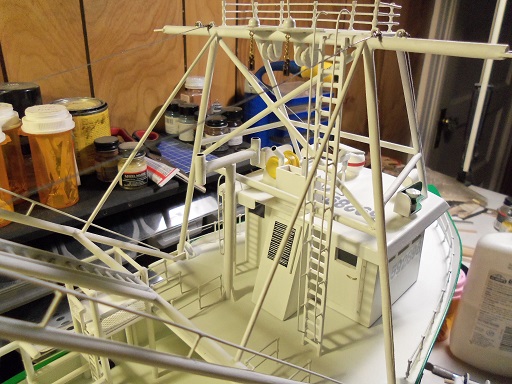
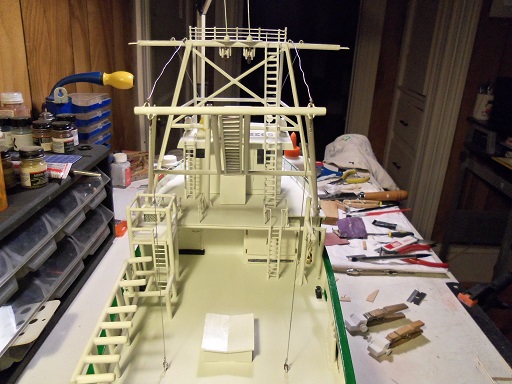
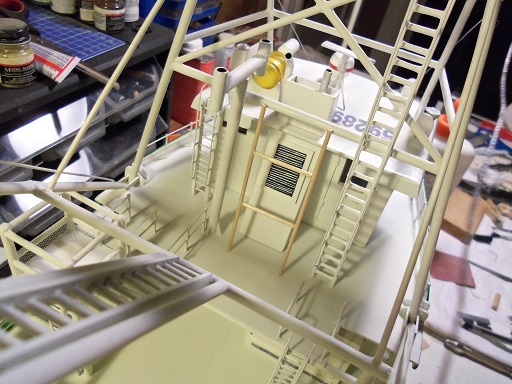
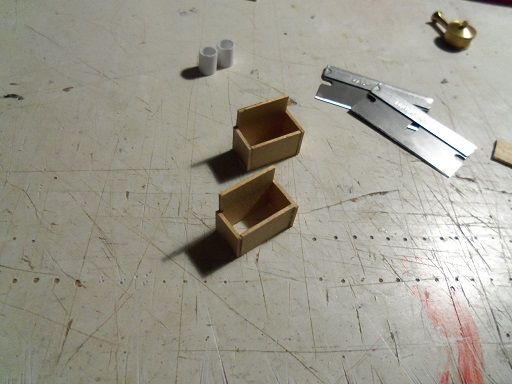
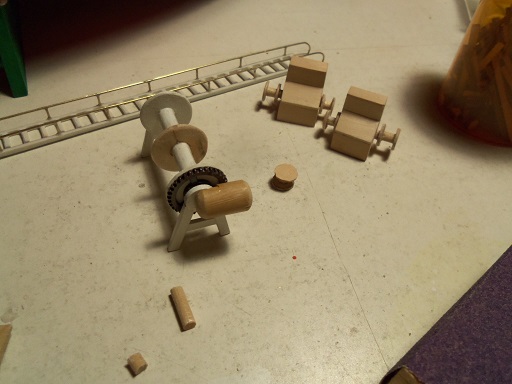
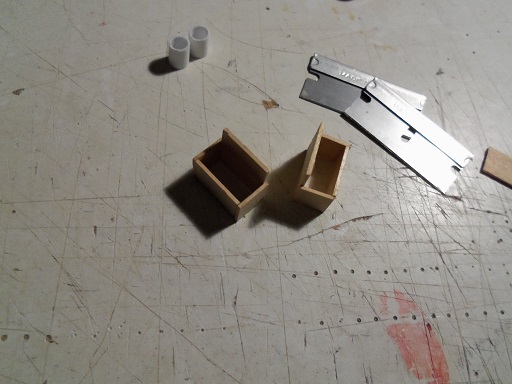
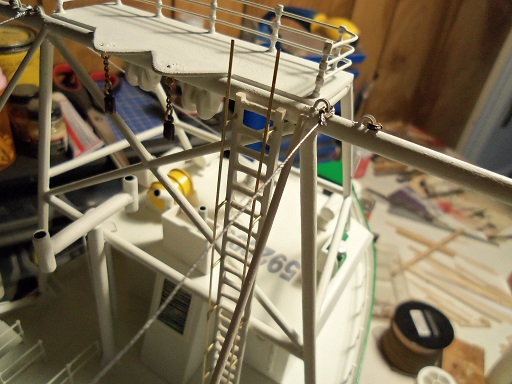
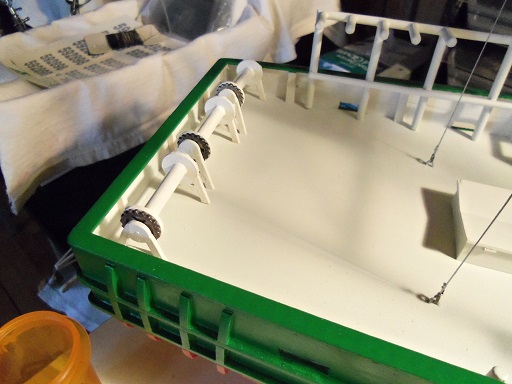
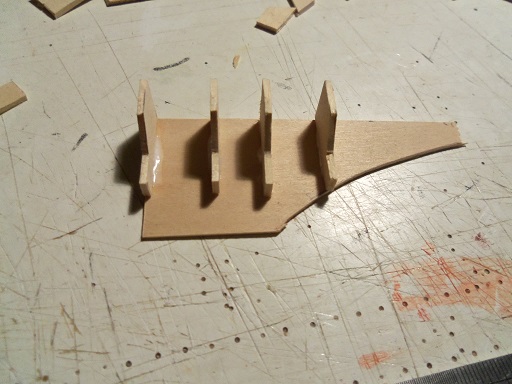
the other one was assembled and set in place for a fit. gauging where they will be, will dictate the rest of the eye bolt and block additions, for their rigging. here is how they will sit on the deck. here is is Piet.....the creation of the air horn Hee......Hee! Rorschach #88 .....what's the first thing that comes to mind?? this is the Billing's offering of a spotlight. I took the lense out and laid it on the table, their idea of an eye bolt was glued to the top of it.....it has an hole drilled through it, and was added to simulate the air intake / vent. not sure if I'll ad it.....the plans don't show one.......and I'm rather amused at the shape of it. another addition to the trawl rig I need to make, are the two lights that are perched on the top cross bar of the aft section. the boxes were made from 1/32 scrap. before I make the control panel for the fore deck reel, I was juggling the idea of connecting it to the reel itself. I went with plan B though, since the kit parts for this aspect does include the idea for making something like this attached to the reel. I added a small motor to the gear side of the reel......the panel will be separate. you can probably see what I did for the ladder........cutting the excess off did play in my favor. I simply curved what there was.....they won't touch the platform, but they are curved enough to be believable. as for that lone part I showed on the table.....I found no mate but, I did find something while looking through the 'Syborn's' part box....which was the same place I found the spotlight. I saw these in the plans.....so I had to add them. a pair of antennas on the top of the gangway. they also hide the stubbles from the eye bolts. they need paint now. the last thing done, was a little sanding on the aft section lights. more to come on these a bit more browsing.......and then back to the table mother nature was angry yesterday and gave us a dusting of snow, with a freezing rain chaser........I'd have just settled for a flat beer, but OK?!?!?!


- 956 replies
-
- 12
-
-
- andrea gail
- trawler
- (and 1 more)
-
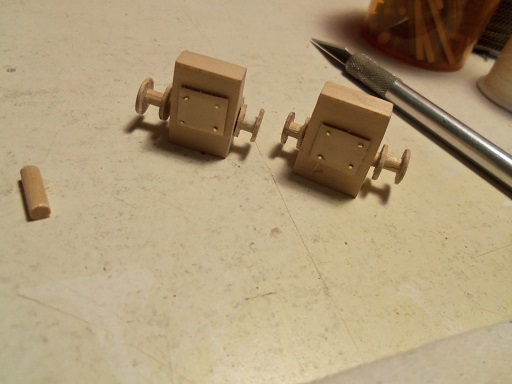
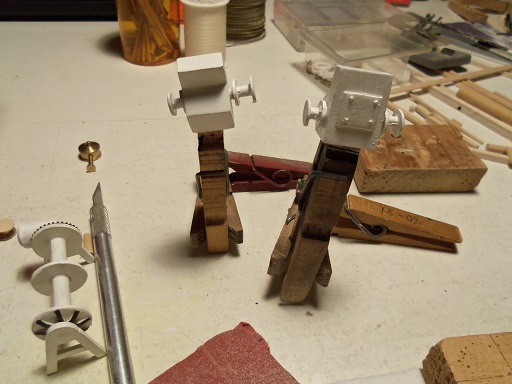
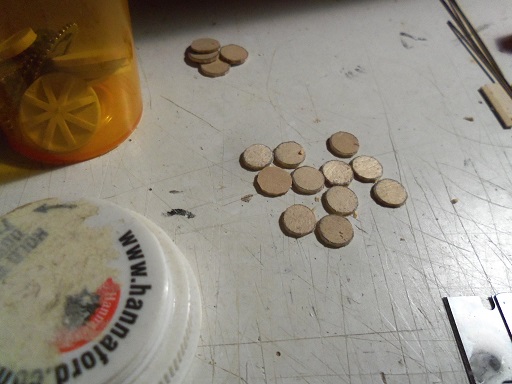
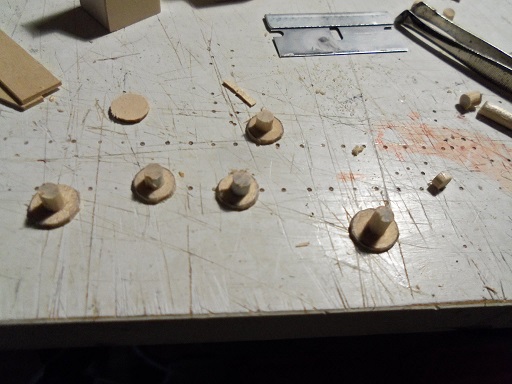
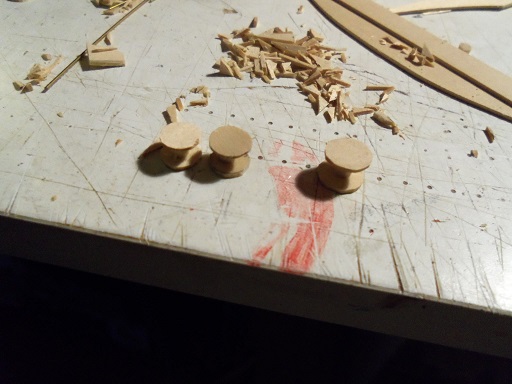
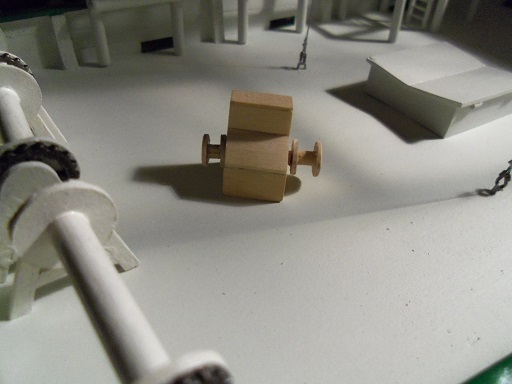
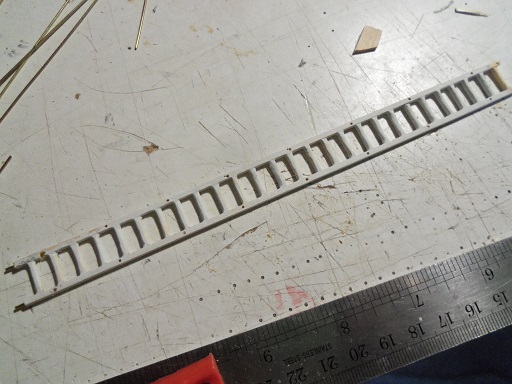
sorry about that.........I haven't penned a poem in a while. I guess you can chalk it up to 'poet withdrawal' I mean it though........since I've been here, I met quite a few really cool folks, made even more as friends, and had things happen that I never experienced, in the days I worked on plastic. MSW has been, and will continue to be, the greatest place on earth! anyway......today's update! oh yes! I have something for you Piet....an aspect you've inquired about. you'll see it in a bit speaking of bits......it was time to entertain myself, by making more circles. these are 1/32nds thick......more usage from the scrap wood, which I'm glad to say, is dwindling even lower. there are some that are 11/32........the ones in the upper corner are 25/64. in thinking of the fore deck reel...if I'm to do what I'm thinking of doing, it will need a divider in the middle. I still have some of those larger circles.....in drilling the hole in the middle, of course they would split. the first break was off, and rendered unusable. the second one however, split in a good way....I would have had to split it anyway, to fit it without any dis-assembly of the reel. the hole was sculpted and filed out, and assembled on the reel. the ladder was trimmed to the *real* length...and set in place to be sure the other reels, just to get them out of the way for the moment, were set in place in the stern I'll get to them soon.......it was time to cut some tiny pieces of small dowel, and assemble the pulleys I will need these will be sanded round and cleaned up......and then added to the control panels. there needs to be a left and right, since the smaller pulley will be for the stabilizer boom rigging, and the larger ones will be for the weighted anchors, rigged onto the booms. the control panels, faced the way they need to be, will be opposites of one another. I did make the goof though.....and had to scramble to correct it before the glue dried. this is how they will look. the bulk of the panel suggests a built-in motor. a bit more to them, and they'll be ready for paint.

- 956 replies
-
- 11
-
-
- andrea gail
- trawler
- (and 1 more)
-
thanks again everyone for the kind comments and likes I'm only using that ladder, because I made it for the boat....the first attempt....and not like the others. they sport the round rungs. I'm still rather new to scratch building, and the first thing I came away with, is if you make an aspect in a certain way, all 'like' aspects should be done the same way. it gives uniformity throughout the entire build. no fret on the finish of this one........I have two other fishing vessels in the wings. I've had urges to do something on them...but I can't seem to pull myself away from the A.G. I need to see this build done I also learned a few things from this build....some really cool stuff to throw at the others. I want to dwindle down my back log.......I have that Titanic......AND I have another special project in mind........sorry, can't go into it any deeper I can guarantee though...that you'll love it. I guess you can say that I'm way past the lament of the finished build........most likely another reason why I've accumulated the back log I have....I find {and have found} myself not waiting for the finish....and just mindlessly ramble on to the next one. I'm glad your all enjoying this build........I'm enjoying sharing it with you here in this theater, that is MSW, we portray a play for all to see.......and our models are the stars. they don't do much, no lines to read.....and us, as the modelers, pull the strings, to make them perform. at MSW, there spotlights a stage where logs accumulate, page by page narrated through the modeler's eye it grows, it grows, as time goes by no dance to do, no song to sing but ships made from wood and string we tell how it's built, cut and glue we describe all the steps we do but time goes by, and soon it is done congrats and kind words from everyone thanks MSW for all that you do for allowing us to share them with you ....oh dear..........I think I've caught a bad case of poetry .......well, how long have you had it? ...ohhhhhh, once upon a time! >Monty Python<
- 956 replies
-
- 12
-
-
- andrea gail
- trawler
- (and 1 more)
-
very nice work ........truly amazing
-
thanks to all your kind comments and likes! I hope I can add more to the boat by the end of the week....if not sooner Michael: that's probably the reasoning behind it........could be weathering.......could be smatter Crackers: quite an honor.......can't seem to wrap my head around it though...I'm just average still checking out the Clooney angle for Frank....I think I'd get a bigger kick out of getting a picture of George in MY living room! I'll keep it in mind though.....I really appreciate your very kind comment
- 956 replies
-
- 2
-
-
- andrea gail
- trawler
- (and 1 more)
-
you'll simply have to expand on the Flemish coil tool you made.......how do you do it??????? they look awesome! nice looking teeth you got there! no complaints from the dentist, I bet!
-
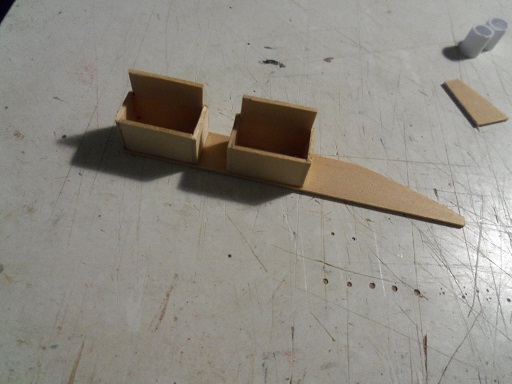
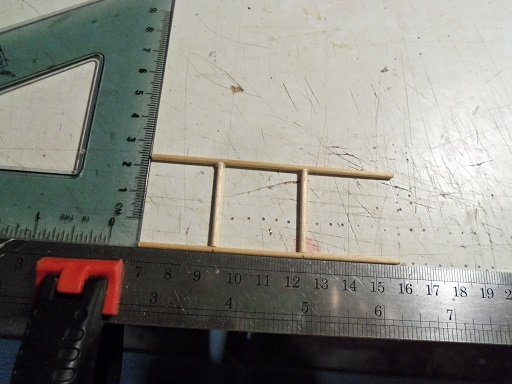
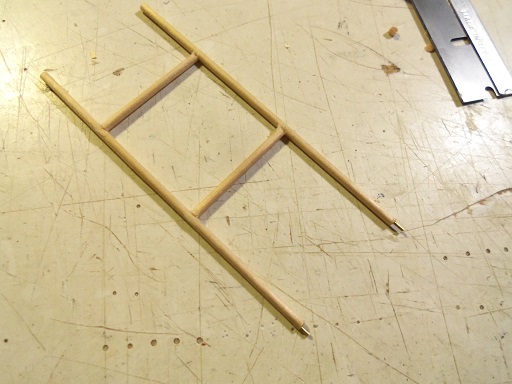
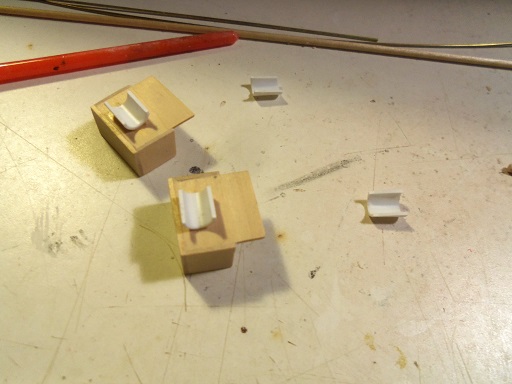
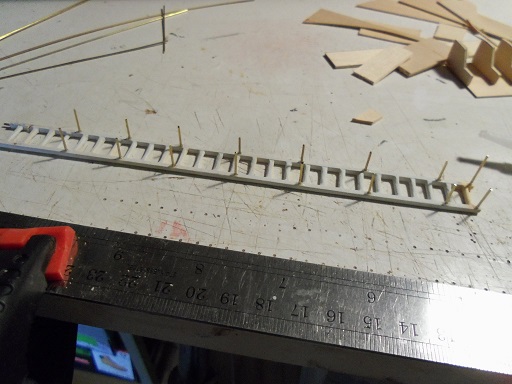
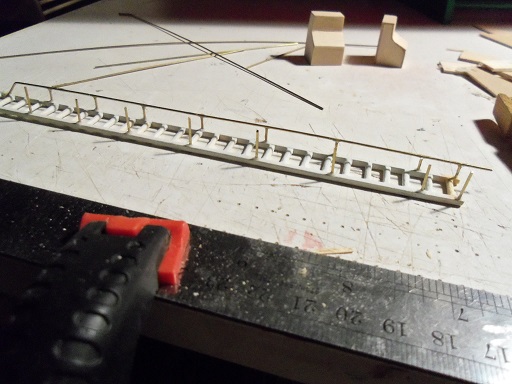
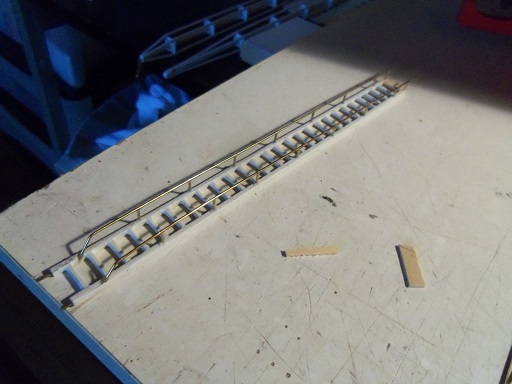
other than the 'birds', I really don't have anything else to add to the model. soooooo, I guess I'll have to make more sub assemblies. I'm going to need three control panels.......one for each stabilizer boom, and one for the fore deck reel. to begin on the two for the booms, the side panels were cut and cemented to a piece of scrap flat stock. I'm doing quite well in using up all the scrap I've created......slowly getting down to just bits and smaller pieces. while these were drying........the gangway ladder was drilled for the grab rails. I had already measured and cut the excess off the ladder. it came out needing eight support bars for the rails......cut and cemented in place the control panel twins were separated and fronts were added to them the first grab rail was added to the ladder the other side was added......but there's a problem. I was sure that I had measured them correctly......there was supposed to be more at the top, for the bend. it's Ok.......I have a remedy for it already the control panels have been sanded. I though of something else I need to make........I cut two pieces from the round styrene tubing I bought earlier. I will only need one, the other is for the goof factor. I'll use 1/32 flat stock for this pair of sub assemblies. I found this part in my odd brass bin....now if I can only find another one I can do a dry fit........here is how the improved ladder looks in position. I thought I trimmed the excess off the ladder?!?! I must have cut it wrong? it should be flush to the top of the gangway.....I'll make the adjustment......perhaps it may fall in my favor there are more assemblies I need to make......kind of a goal to get the 'birds' on by Friday. but if I don't, I'll be on vacation the following week.....and then maybe, I can finish the build who knows?!?!


- 956 replies
-
- 18
-
-
- andrea gail
- trawler
- (and 1 more)
-
sounds like the kit was revised......and the plans weren't....typical I've had seen some strange stuff with Billing's plans as well. the kit is the focus.....the plans can just be used as reference. you did it......you drilled those holes! rigging looks super Jerry!