


glbarlow
-
Posts
3,809 -
Joined
-
Last visited
Content Type
Profiles
Forums
Gallery
Events
Posts posted by glbarlow
-
-
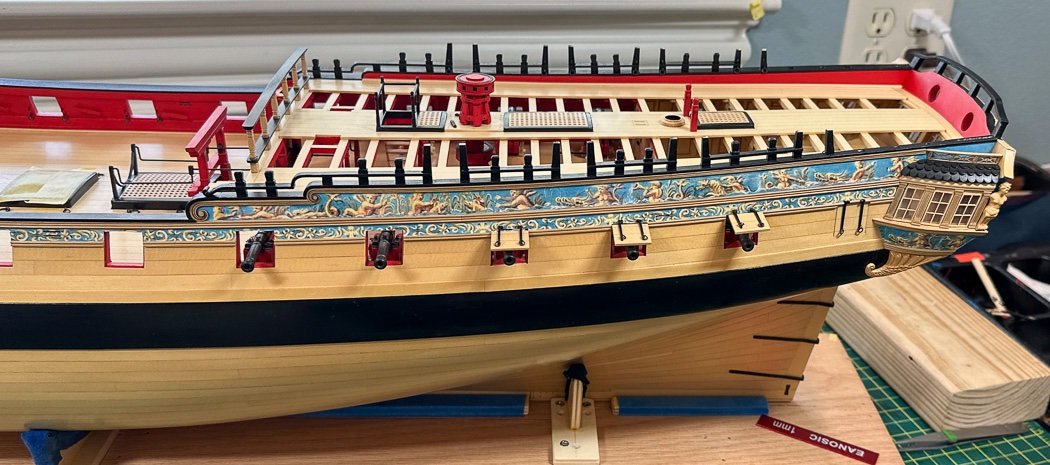
Quarterdeck Cannon
No lengthy explanations, the quarterdeck cannon were made just as the main deck guns detailed in an earlier post.
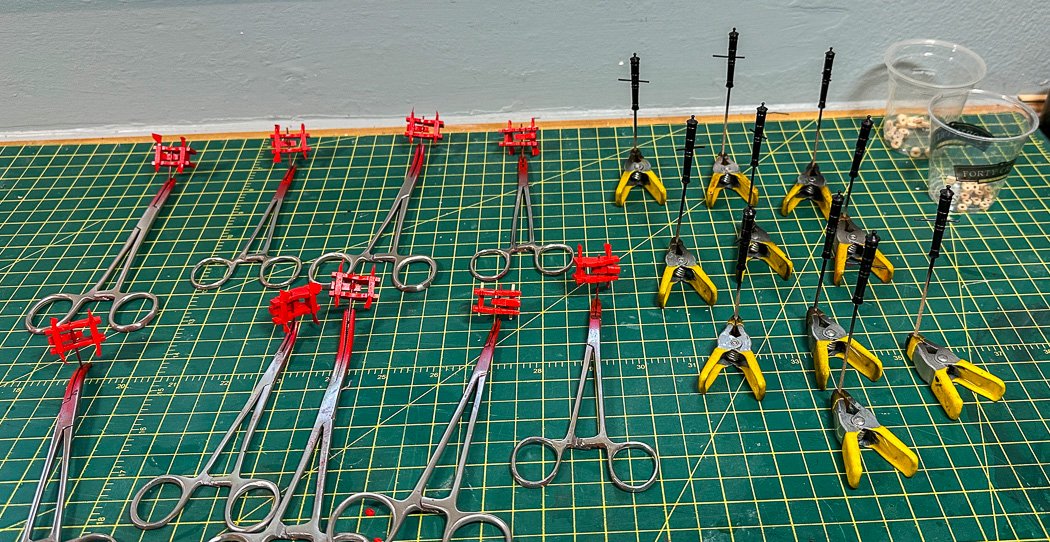
The carriages were freed of char and air brushed.
One difference from the main guns are the cannon; before being air brushed with Ironwood Black I elected to replace the thin resin trunnions with 19 gauge wire by drilling through the guns using my mill. Or perhaps I should say the decision was made for me with at least three of the guns already having the plastic ones broken off while still in the bag. No doubt carelessness on my part.
The production line is ready.

The completed guns sitting (not glued, that comes later) on the q-deck. I always build one extra … just in case.
On to Chapter 11.
- sfotinos, Thukydides, FrankWouts and 13 others
-
 14
14
-
 2
2
-
-
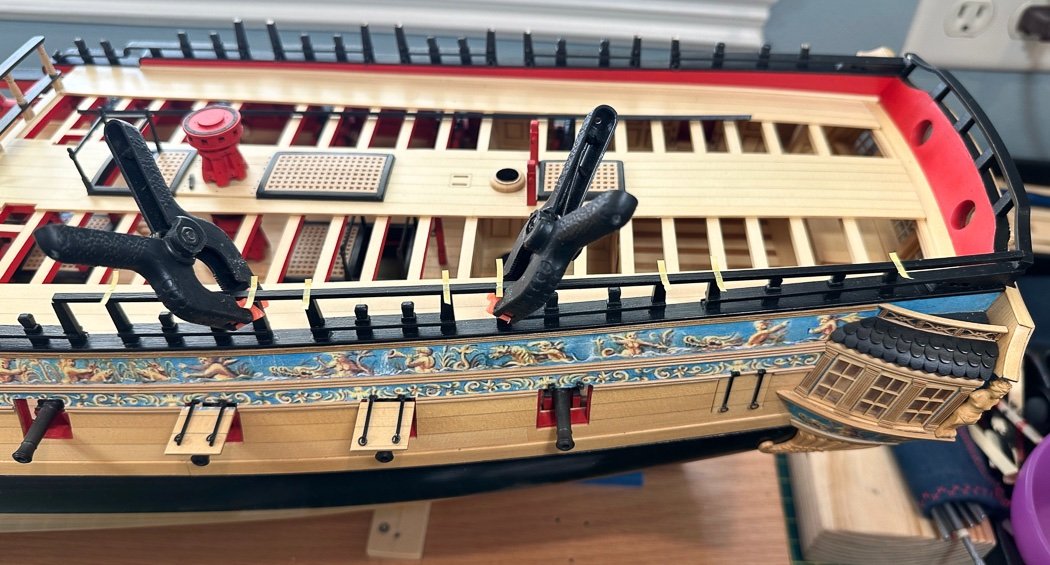
First Quarter deck cannon complete and posed next to its main deck companion.

Seven more to go
- Chuck, FrankWouts, CaptMorgan and 15 others
-
18
-
-
Chris…the man, the legend.
is this the NRG magazine all us members should receive?
-
3 hours ago, brunnels said:
requesting a refund and they approved it
For the whole model or just the wood?
- Canute, mtaylor and thibaultron
-
3
-
11 hours ago, MichaelZ said:
exchanged the originals for basswood
Not sure basswood for boxwood is a fair exchange, glad it works for you.
- thibaultron, mtaylor, Canute and 1 other
-
4
-
13 hours ago, allanyed said:
Chuck's is the gold medal winner.
This I know from building. Cheerful and Winchelsea. This is next level.
- thibaultron, mtaylor, Rustyj and 5 others
-
8
-
-
1 hour ago, Rustyj said:
Resisting
I’ll watch you for a while 😁
- mtaylor, thibaultron, Rustyj and 1 other
-
4
-
Mostly due to the size and available (or I should allowable based on my wife’s review) display space I’m really trying to convince myself Speedwell is not my next project. With each new innovation that gets harder and harder to do…..I mean, to scale door handles and books on a table in the cabin, wow.
- thibaultron, Canute, Rustyj and 4 others
-
7
-
9 hours ago, brunnels said:
Model Shipways kits,
Not all of us have high praise, I think they’re a junk company that proudly lists kits based on stolen IP from China.
As Chuck notes The Modeler’s Saw Mill is an excellent US source for wood. I recommend you replace what you have with Alaskan Yellow Cedar (much less than boxwood and easier to work with, though boxwood is amazing). See my Cheerful or Winchelsea build log for more photos on how it looks planked on a hull. Then toss that junk away after sending MS a demand for refund (which you likely won’t get, but you’ll feel better) and post a nice Google Review.
-
Very vivid and nicely done!
-
-
On 3/24/2024 at 9:01 AM, barkeater said:
The problem with using CA for planking is that it stains any exposed surface and is just about impossible to sand out because it penetrates
Not entirely true, like any glue you need to be neat and apply it carefully and sparingly. The hulls of my Winchelsea and Cheerful (see build logs) have no such stains.
-
On 3/24/2024 at 6:56 AM, S.Coleman said:
CA glue will just get crystallised after awhile and break apart.
This is simply not true with a quality brand - perhaps some cheap brand might. CA is not universal, there are quality differences by manufacturer.
- Canute, robert952, Scottish Guy and 2 others
-
5
-
Day and night opinions (which is what they are) on this topic, and likely a hundred or so different posts on the topic as a search would show.
I ALWAYS use CA for hull planking. Over a dozen models now, some 20+ years old and never had and still don't have any issue with the quality of my planking or its durability. Higher quality CA like Bob Smith Industries, (they aren't all the same) does not have excessive fumes or strong smell. In fact Bob Smith Industries has a version of CA that is odorless entirely.
Bottom line is use what works for you, as it seems everyone replying to this post has. It annoys me when instead of telling you their preference and reasons for it they denigrate someone else's. Why not just share why your method works for you.
CA works great, it's the right choice for me. I guess other glues must too, but I've never seen reason to try them.
-
Excellent work Frank, very meticulous. Great plan to fit the channels now to void having to cut away that moulding later. After the qdeck cannon that’s next up for me, I’m hoping I can manage it without damaging the surrounding area, a problem you won’t have now.
-
I think you’ll find lots of us didn’t drill the interior ones. Easy to mess up and gouge the deck, they are largely hidden by the cannon anyway.
The eyebolts get easier, tiresome but easier as you lock onto a process that works for you. 12 cannon, 7 eyebolts and two rings each plus 4 more and two rings for the bulwark per cannon, you lave a lot more in your future. If you’re using Alaska Yellow Cedar you’ll find you can push the bolts into the wood. Mike’s is all boxwood.
-
Thank you Rusty. I think I made this one too long, I’ll be more concise from here on.
-
Just now, hollowneck said:
What's next, Glenn?
Still at least 6 months to go, but that’s a good question. I don’t know yet.
- hollowneck and FrankWouts
-
2
-
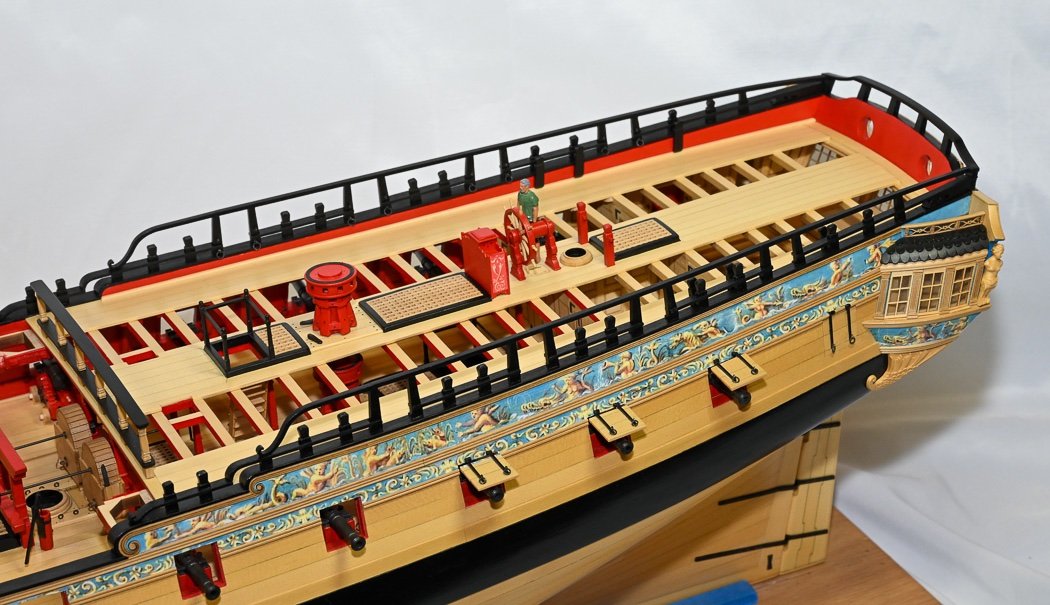
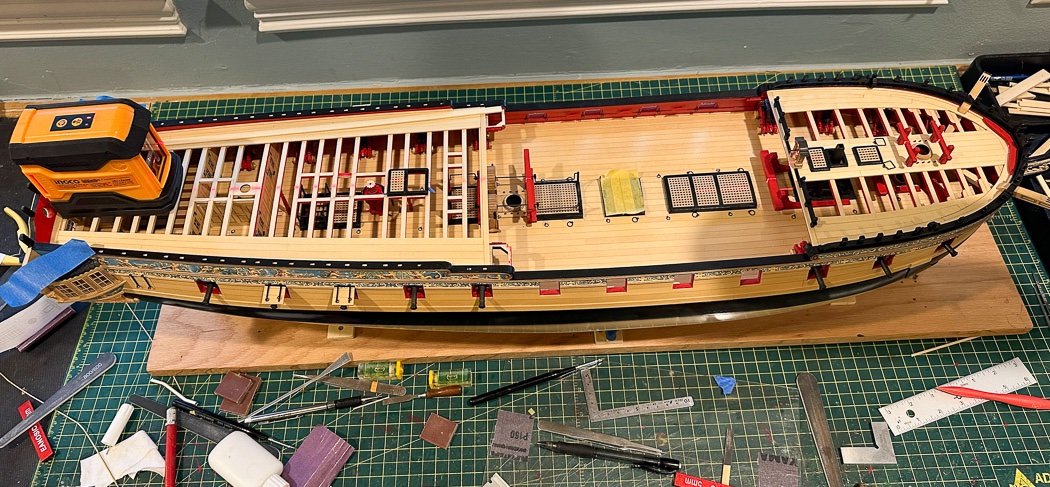
My Chapter 10 posts were too long, I won’t take the time to do that much again.
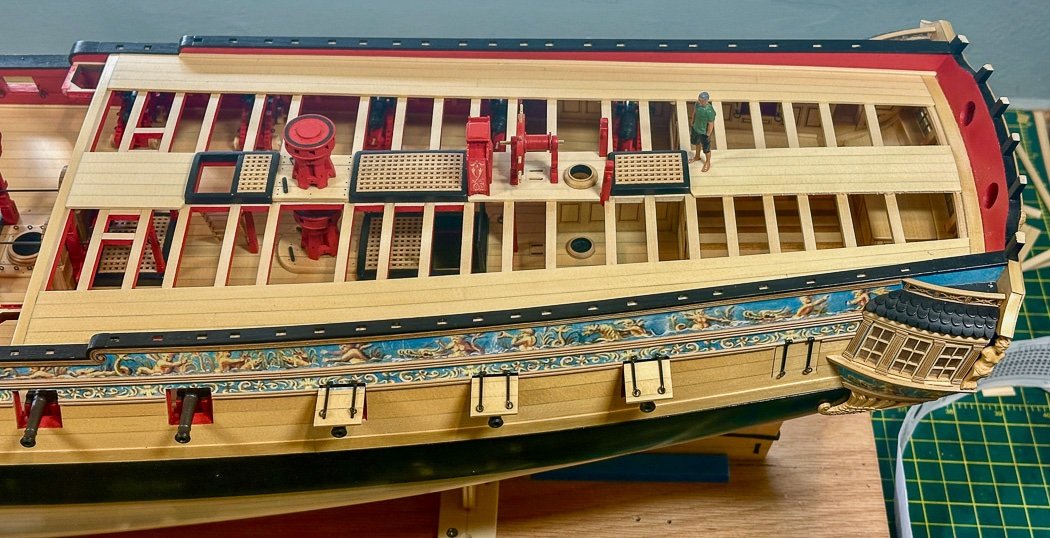
The quarterdeck is pretty much the last “big” thing to do, starting with planking and ending with rails. It’s been such a journey from the first framing, through months of planking and the many detailed components assemblies since. Not sure I want it to end.
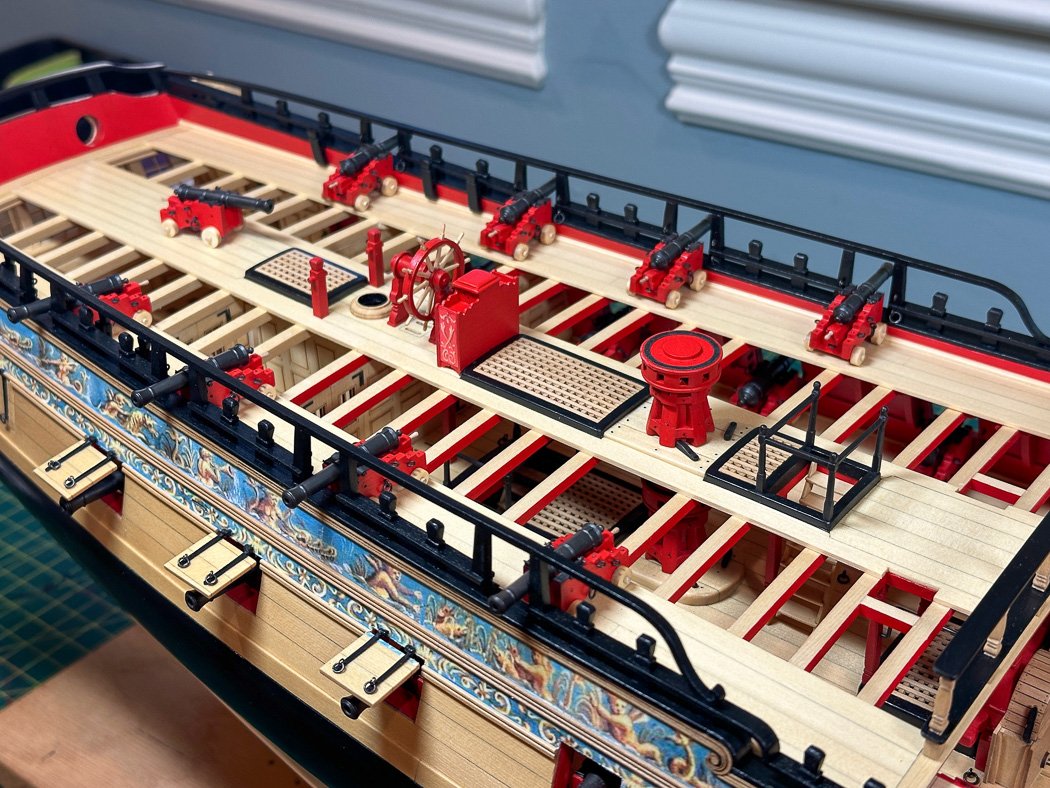
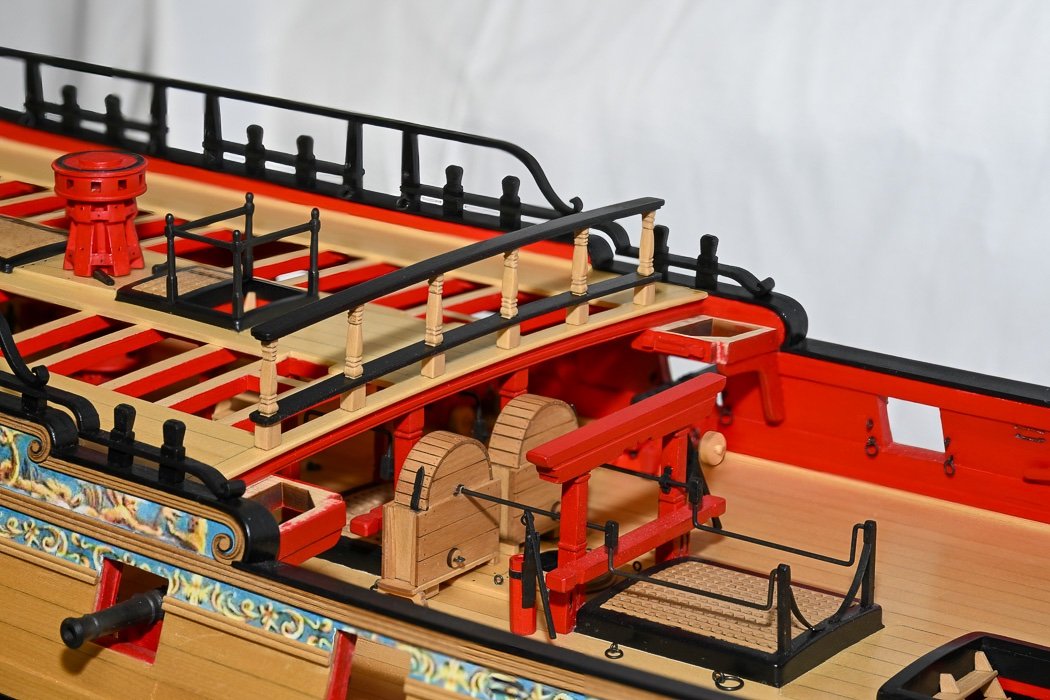
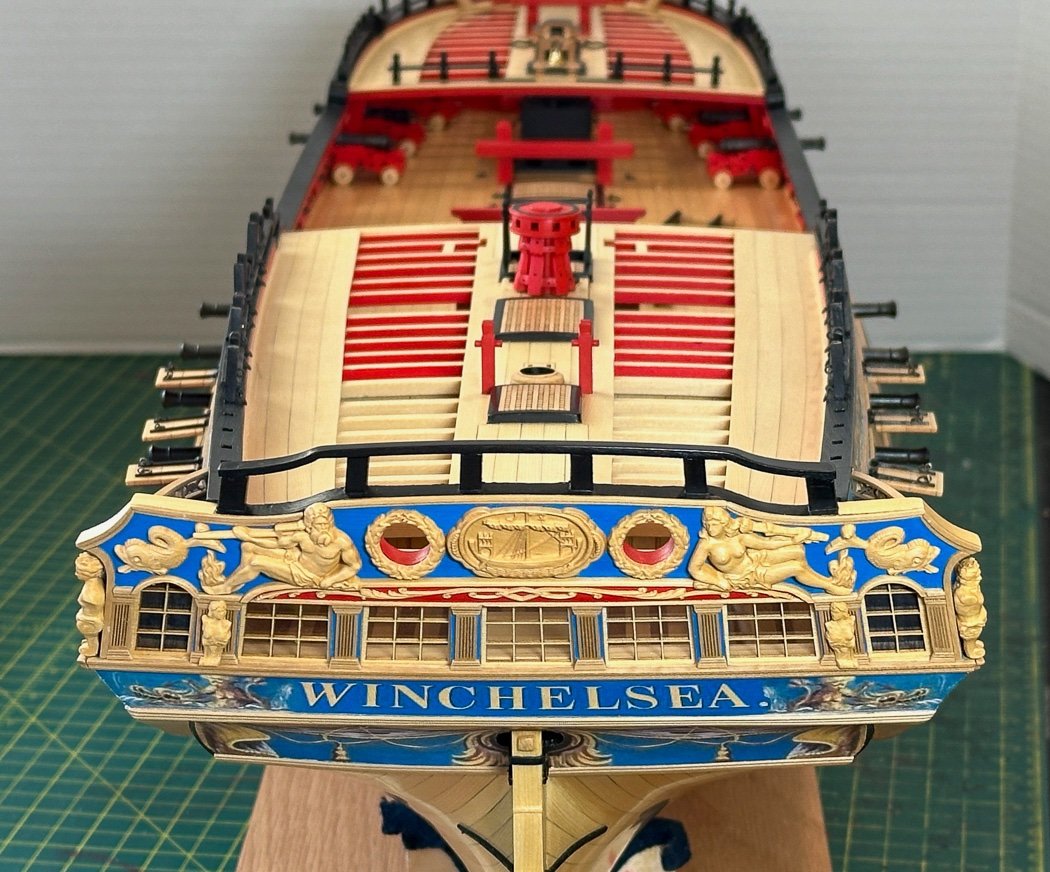
To keep it short, here are just four final photos of the quarterdeck.
- hollowneck, FrankWouts, chris watton and 14 others
-
13
-
4
-
The Quarterdeck - Part 2 of an extra long post
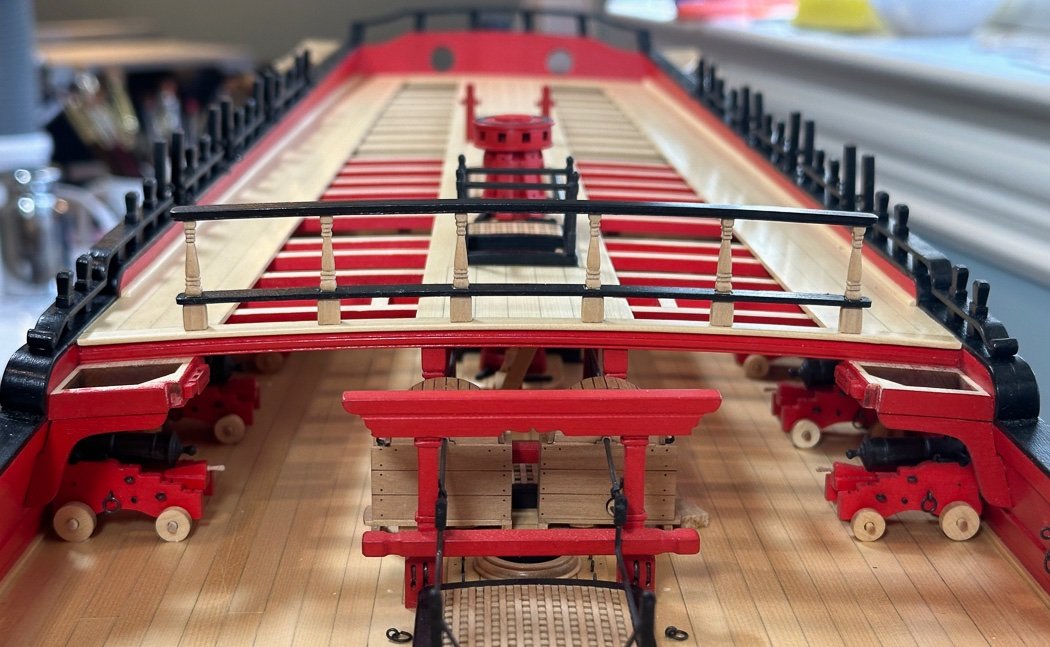
The capstan and companionway post and rails are installed. The rails are 3/64 square boxwood fitted between the posts. The
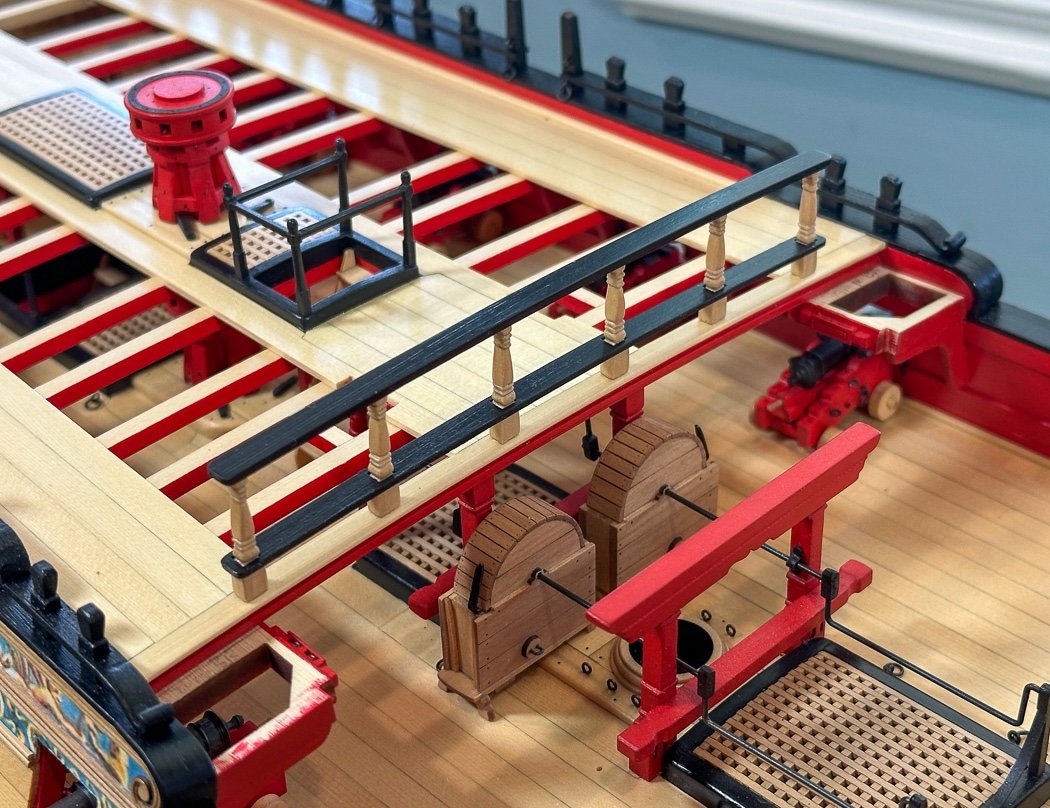
‘locks’ for the capstan are from 1/16th square boxwood, shaped, painted, with a blacked nail as their pivot. The scratch from a dropped tool on the beam behind was later fixed. I really need to stop dropping stuff.
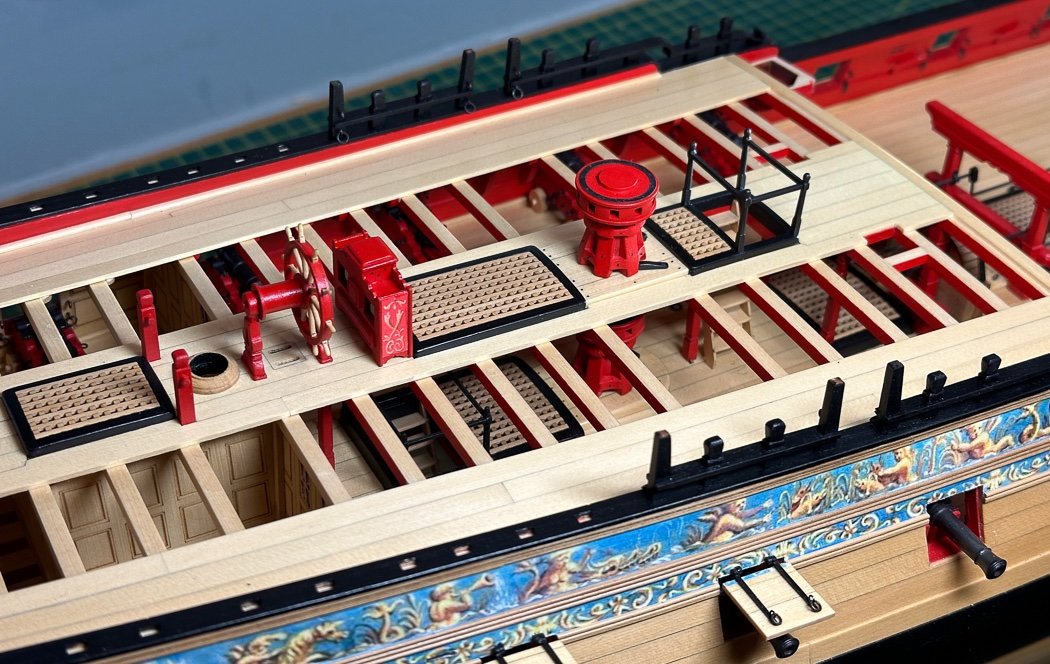
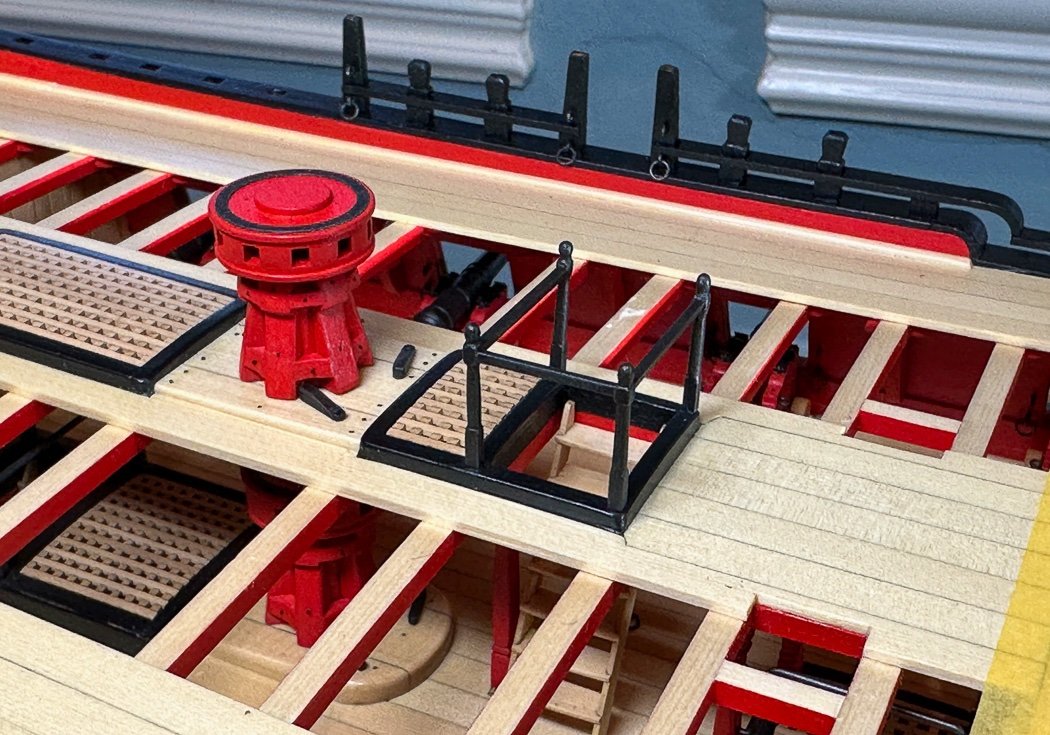
It starts to come together (Wheel and binnacle just sitting there).
I used the template to cut down the transom framing posts to their final height. This razor saw comes in handy for tight, fine cuts.
The provided center curved laser cut piece also has to be bent. I took a left over beam and sanded its curve to match the template then repeatedly heat bent the center piece to the proper shape. I also used a thicker gel CA which gives a bit longer set up time and a near welded attachment to the posts. There is no way to clamp it so for a few wild seconds on it goes, fit, check, slightly panic, hold in place, abort, no stay with it, step back, did I get it right, yay I did.
The outer wings are laser cut extra large to allow for the angles and width necessary to match up each unique hull shape. They take a good amount of time to sand, file, and fit, but what a nice look it turns out to be. I couldn’t really paint off the ship and as you can see in the photo got a little paranoid about painting it installed.
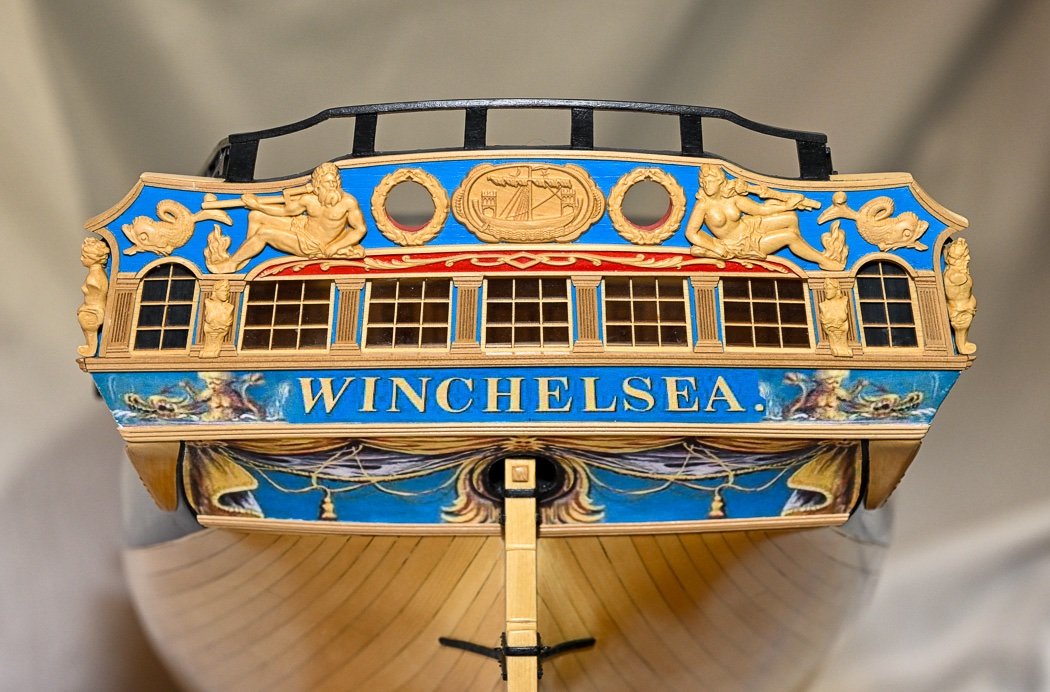
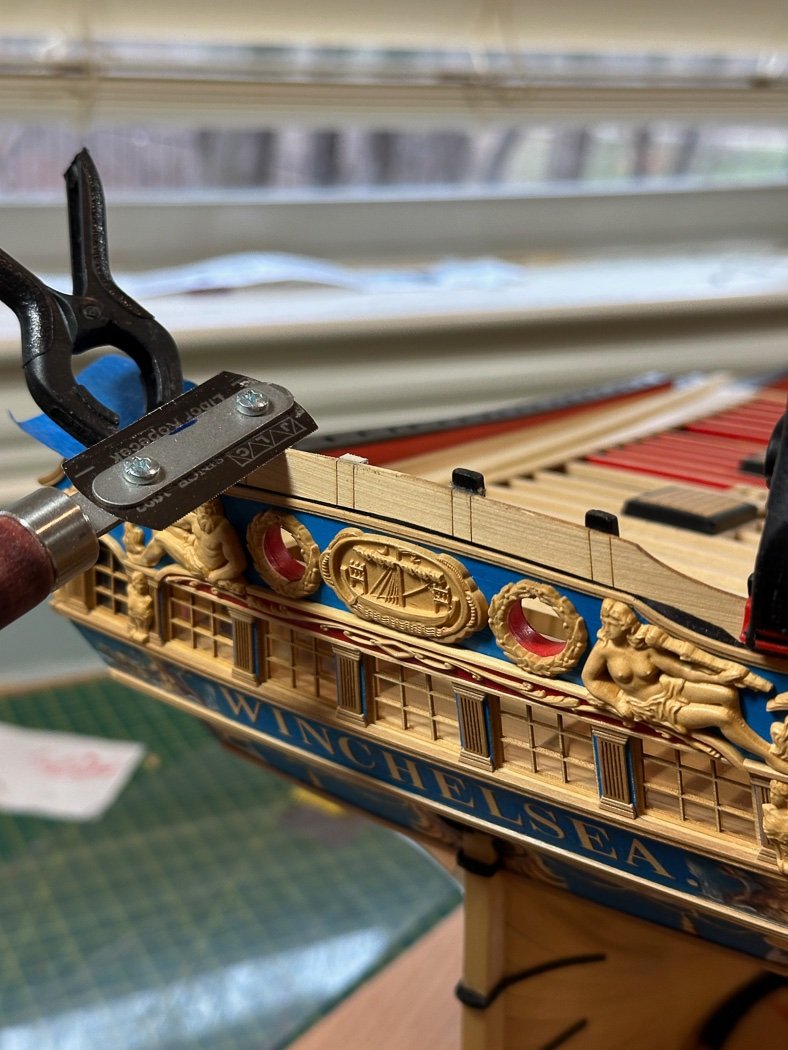
It all turned out fine in the end. As I noted in the previous post, the progression from framing to a completed stern has been a really fun trip. I’m really pleased with just how different, detailed, and so much better this element of the model has turned out in comparison to anything else I’ve built. It think it’s pretty cool.
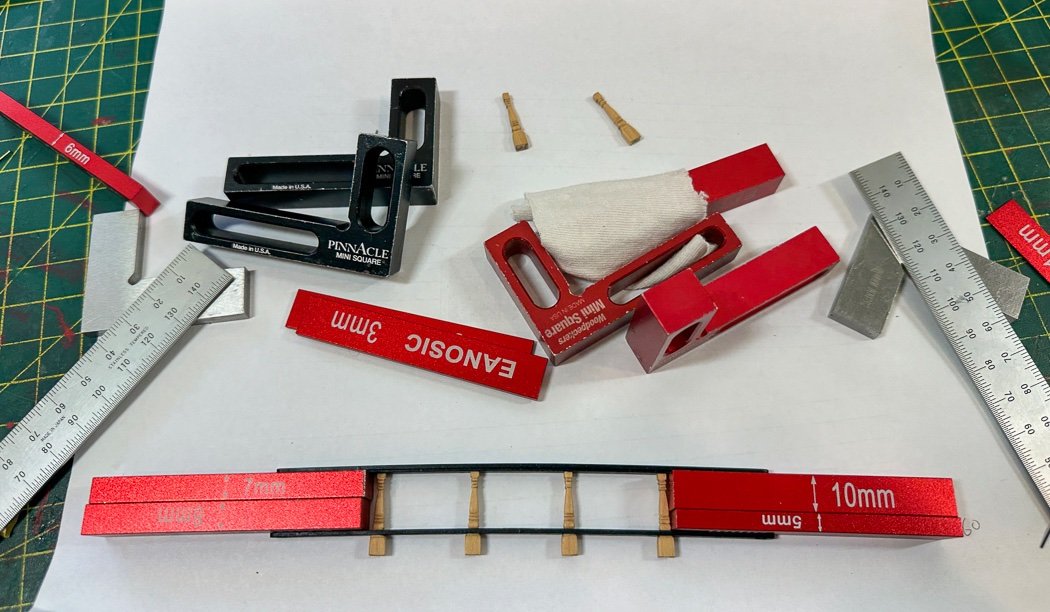
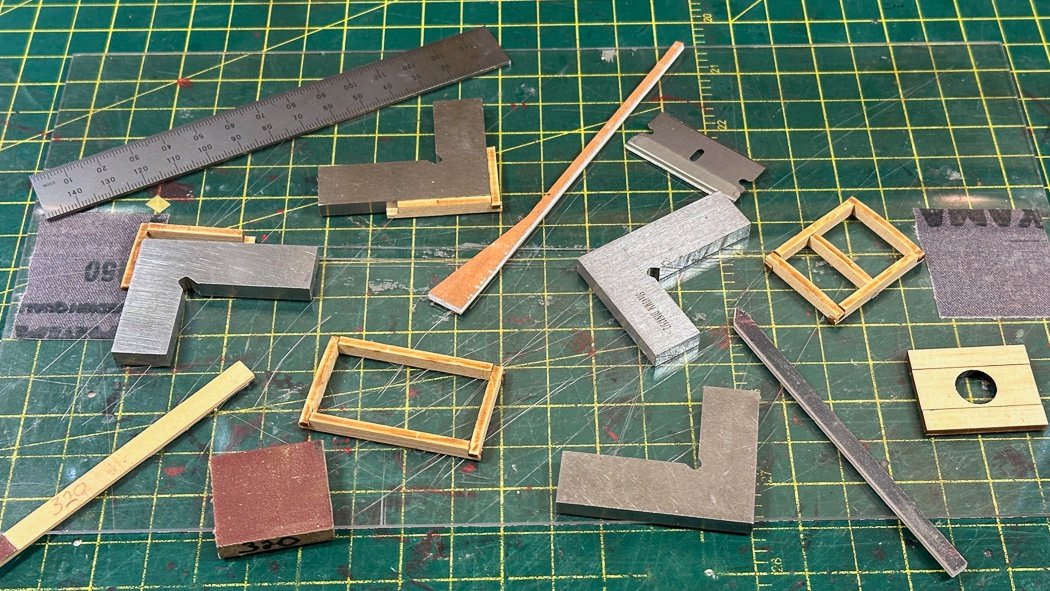
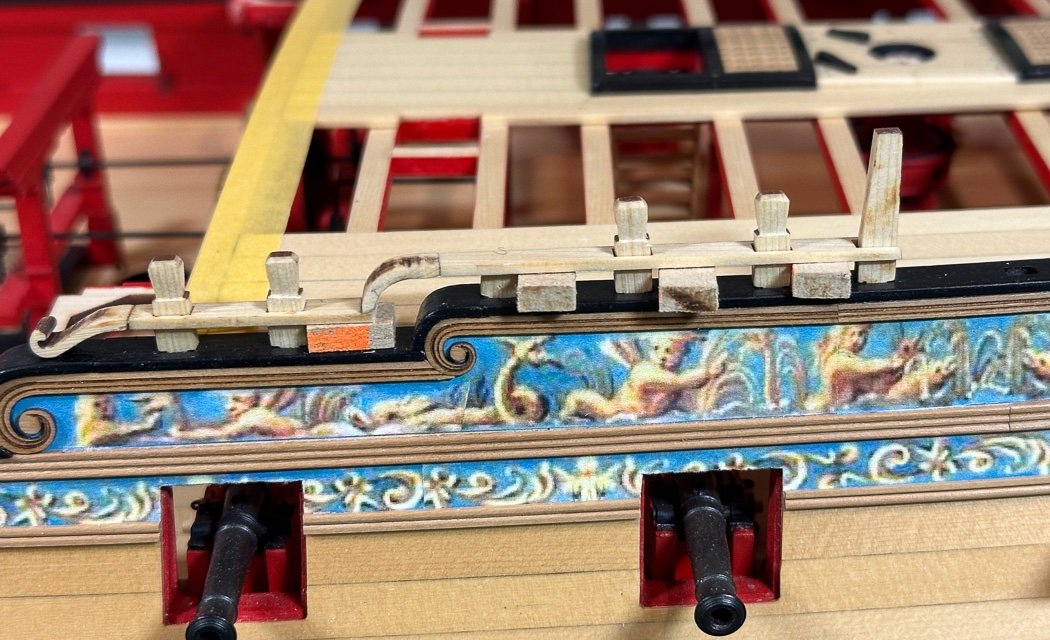
I spent a really long time on the breast rail. First it was frustration with char removal. I created a separate post on this topic in another forum and got some great ideas. I ended up using all of them, and adding some really nice special purpose Glardon Vallorbe needle files to my collection. As I’ve mentioned before, jewelry maker websites like Rio Grande are the best source for these and other tools I use. I also added this set of metric set up blocks. I bought them on a whim with no specific purpose in mind, but I find myself using them a lot. They are on Amazon and just keep coming in handy.
Anyway, after adopting new methods and Chucks assurance to just dig in and shape them given they are made bigger than needed I finally got there, more or less. I made this rail three times, the first time the bottom rail broke (Chuck was kind to send a replacement), the second time, despite using a spare beam to match up the angles, I didn’t get it right and I still didn’t I like the look of the posts. So I took it apart again and spent even more time with char removal and shaping before reassembling again.
This is a major element of the model, I’m ok with how it turned out in the end. Though even now I feel like starting over knowing I could still do it better.

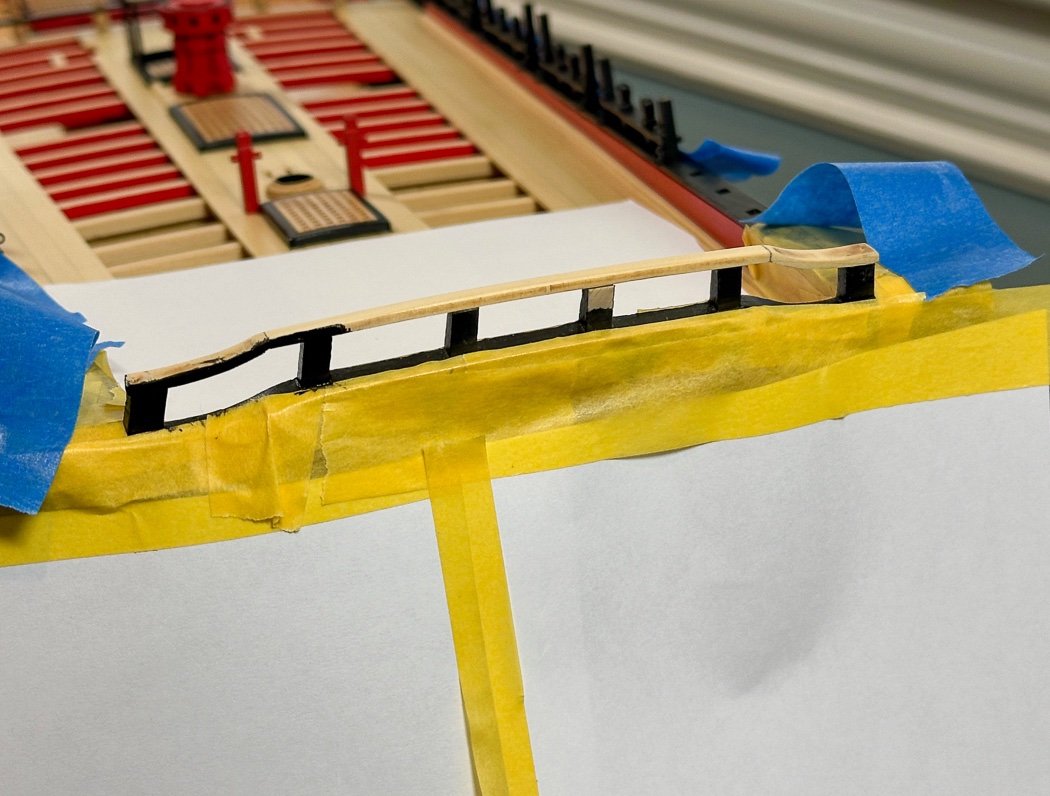
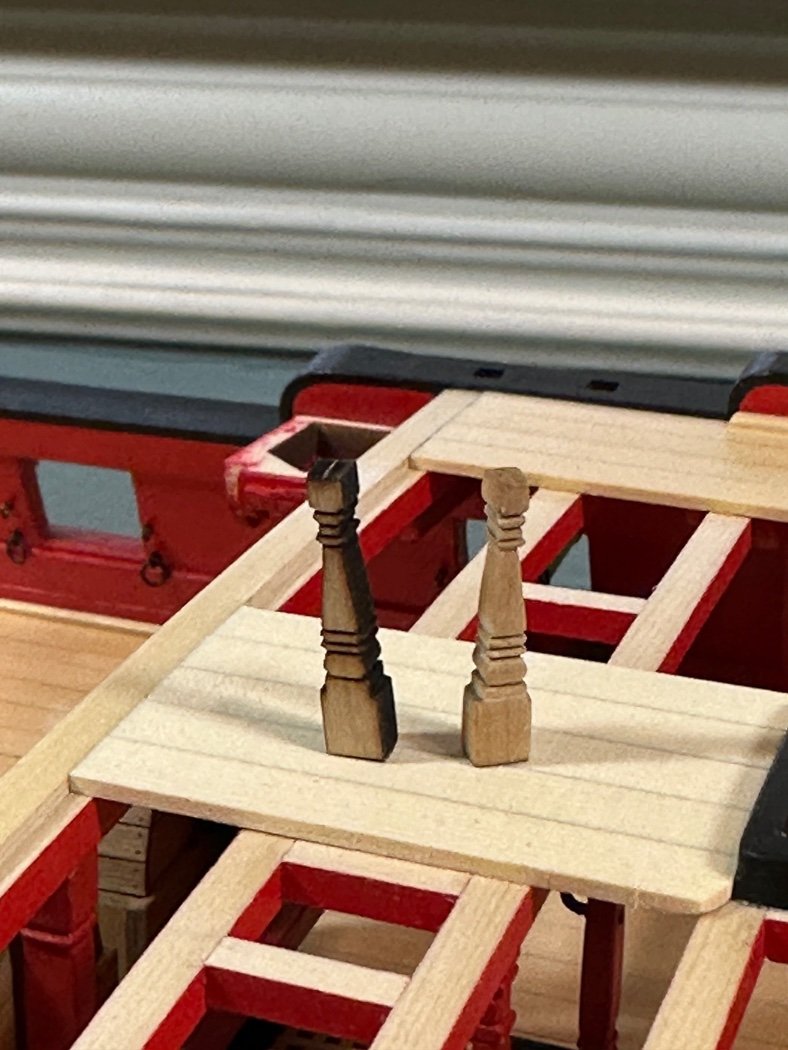
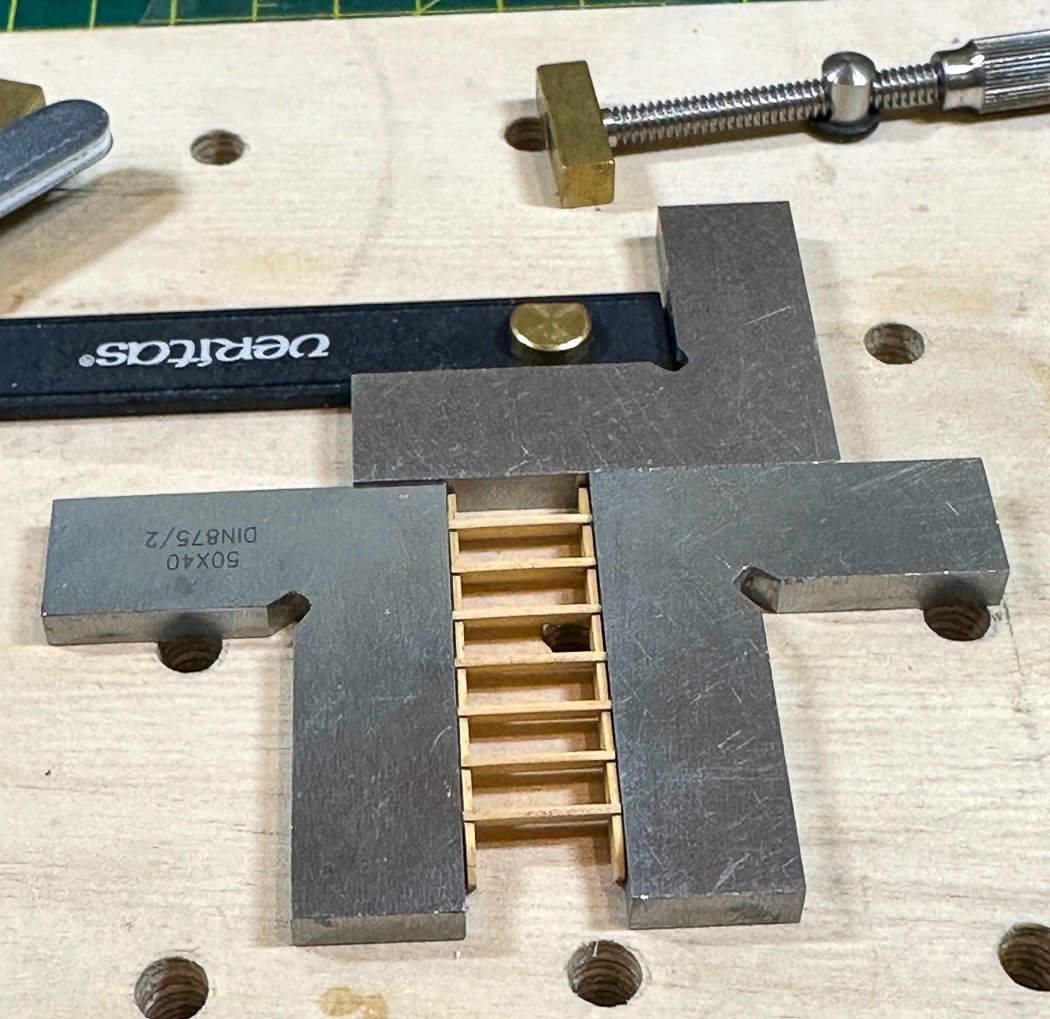
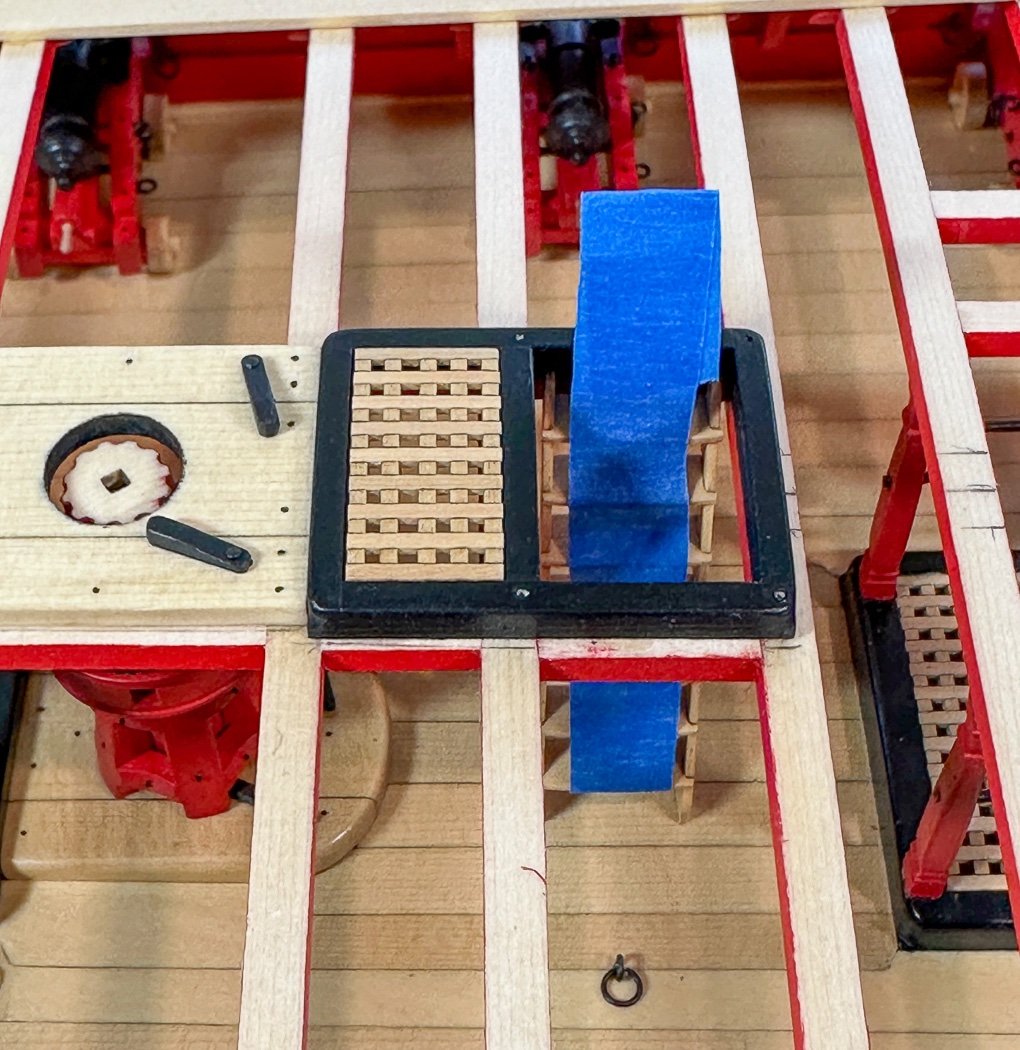
My tool set for the q-deck rail sections. The little posts with squares on them in the center are my jigs to place, drill, and add the two eye and ring bolts on each upright before they were installed. It was so much easier to do now than trying to drill and mount once on the ship.
There’s those set up blocks again, the 12.5mm one was the right size to square up the opening (eventual gun port) between each upright. The thinner longer ones I used to keep the uprights aligned for the eventual top rail.
I just love bending 24 gauge wire for eye and ring bolts, doesn’t everyone. I’m pretty good at it by now.
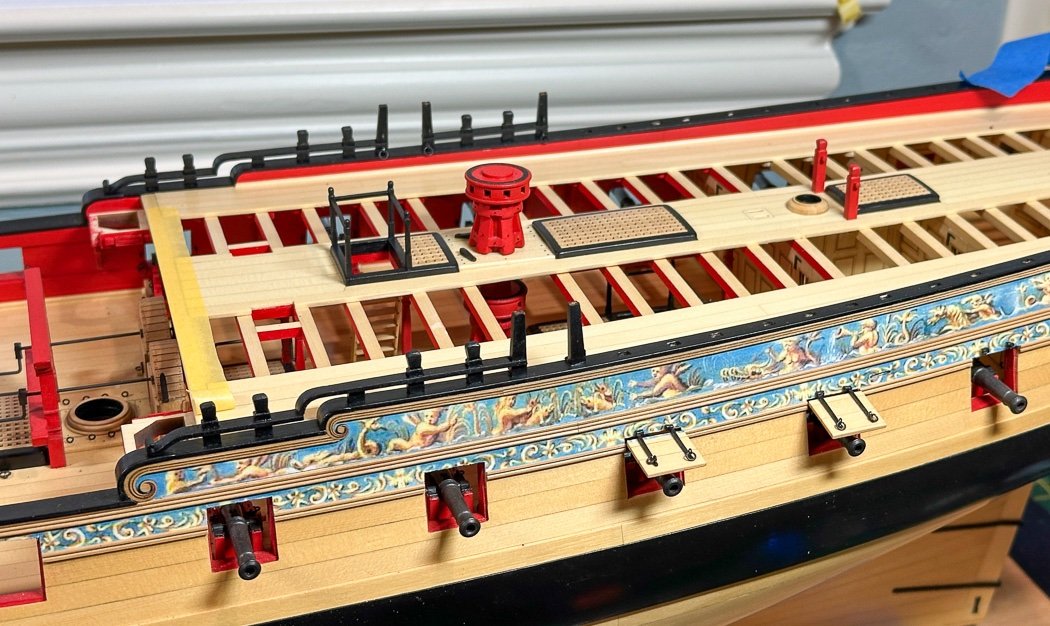
And on they go, section by section.
Finished off with the fragile top rail. I painted it off the model. The thin tape strips mark where the rail aligns with a post. I stripped off the paint on the bottom side of those tape marks so the glue was bare wood to bare wood. I don’t trust any glue to adhere paint to paint - so this and also roughing up the wood with a #11 blade or chisel is my practice. I could have painted it on the ship I suppose…with my luck I’d drop the brush on the frieze, so no.
You can also see I, again, knocked off a port lid. I’ve done this too many times to count. I really, really, really should have waited until the very last thing to install these. The vinyl hinges look great and are great, but they are fragile. Obviously all I need to do is not knock them off, but I’m really good at it. So far I’ve been able to glue them back on.

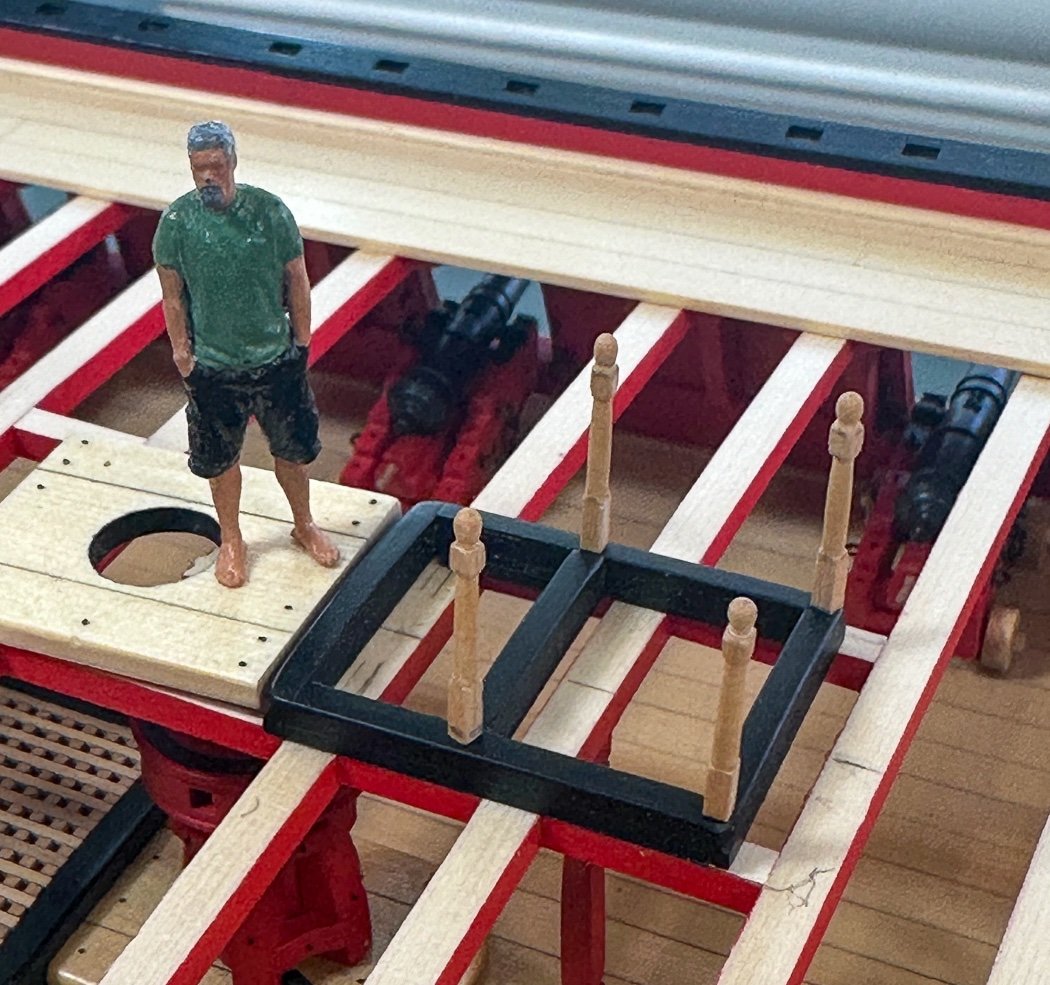
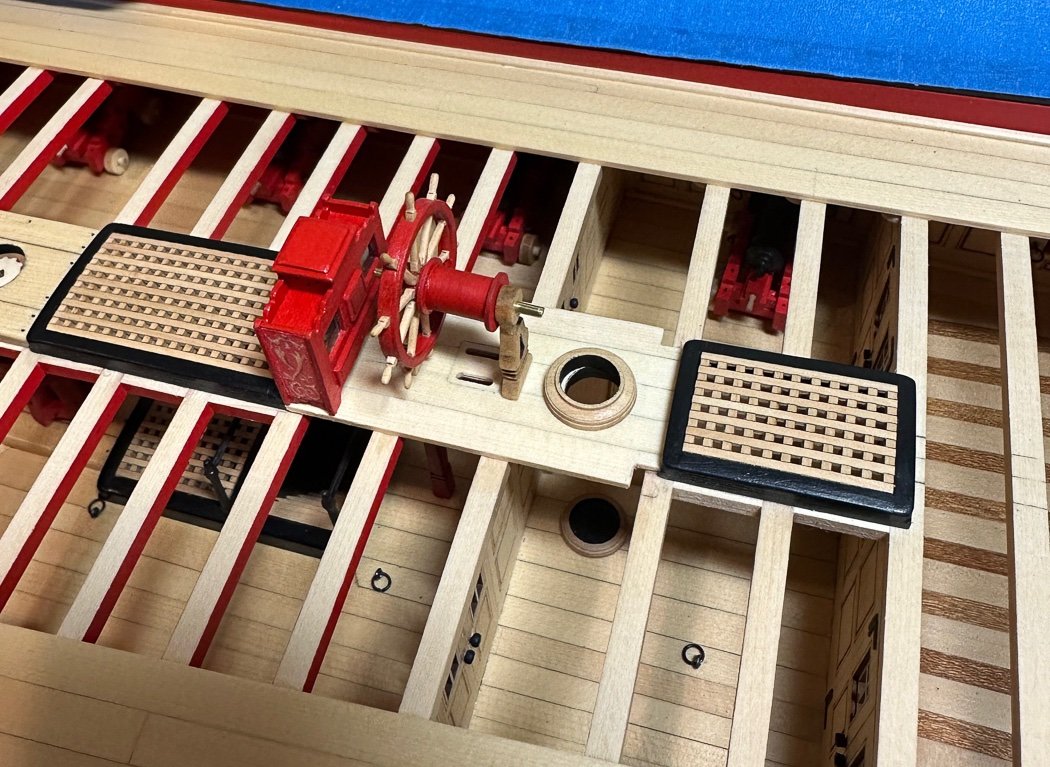
The laser level again came in handy along with a measured spacer for centering, squaring, and locating the ships wheel. Once located I roughed up the wood on the deck, again not trusting any glue to adhere to the multiple coats of WOP.
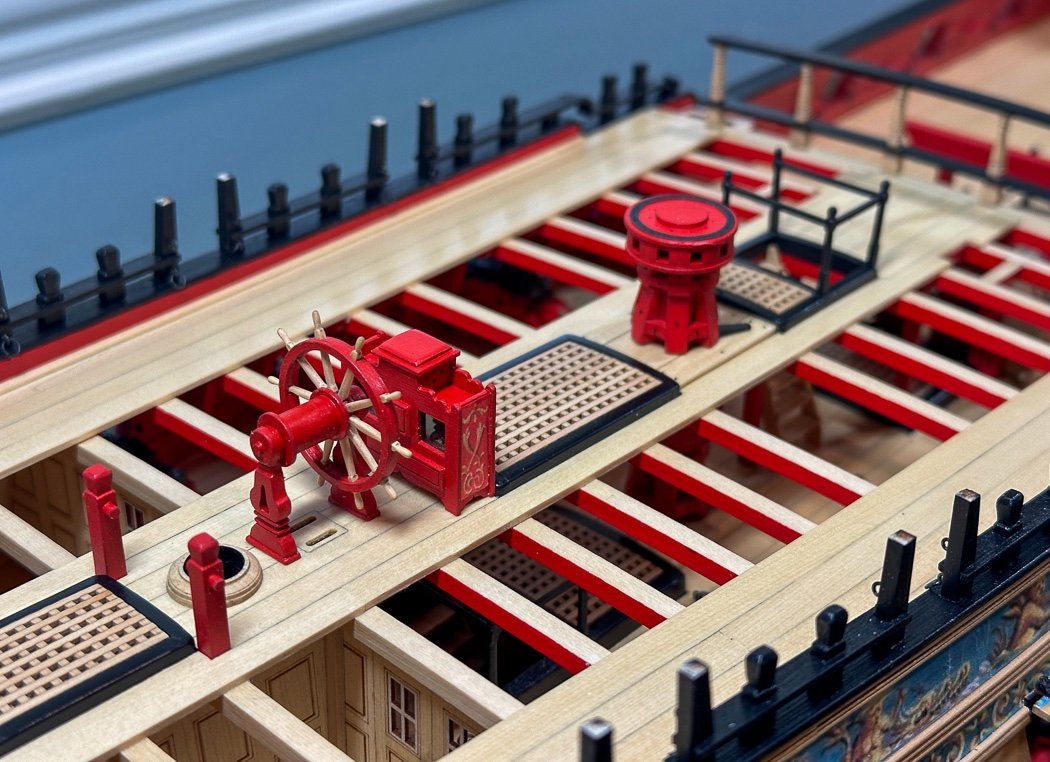
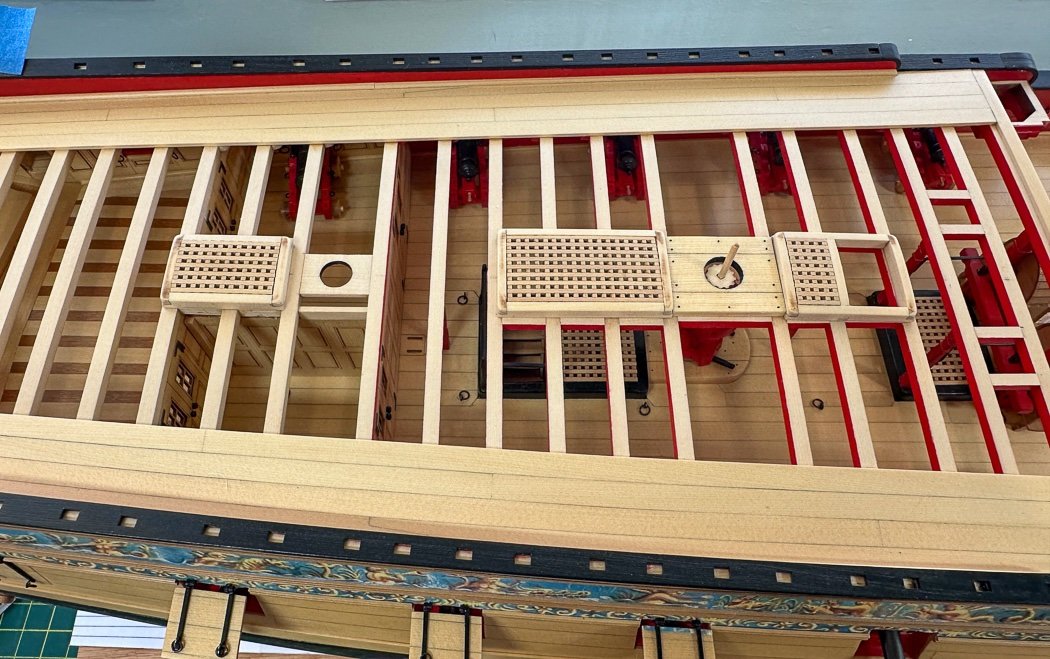
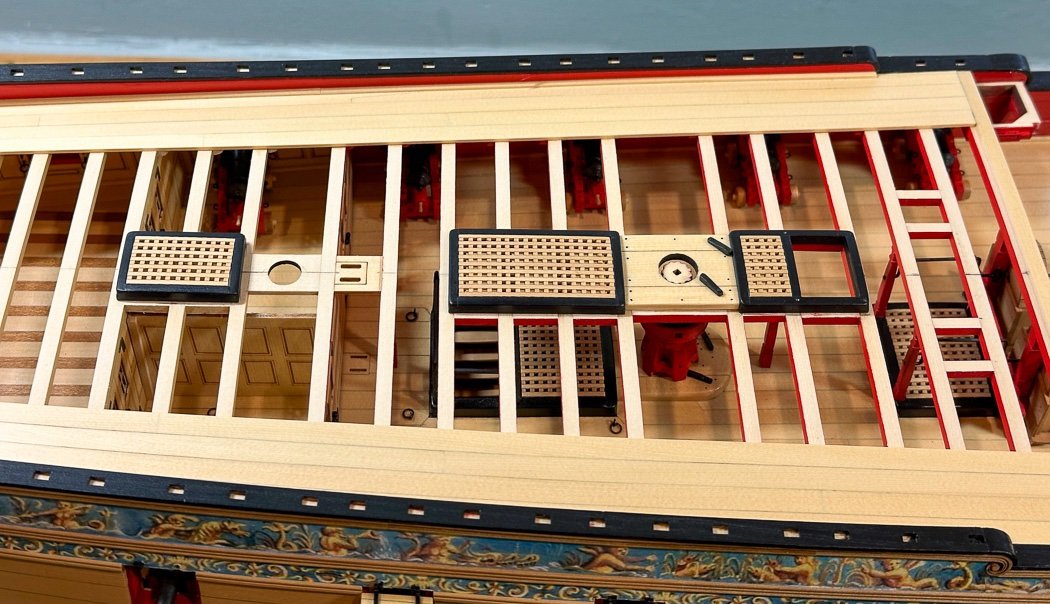
The Qdeck furniture is now all installed.
And there we have it. One more post with finished chapter ten photos. Thank you for stopping by and for your likes and comments, hope you made it to the end of this long post.
I'm going to do a third post with Chapter 10 Complete photos. There is a limit on how many can be uploaded in a single post, it seems I like to test that limit.
-
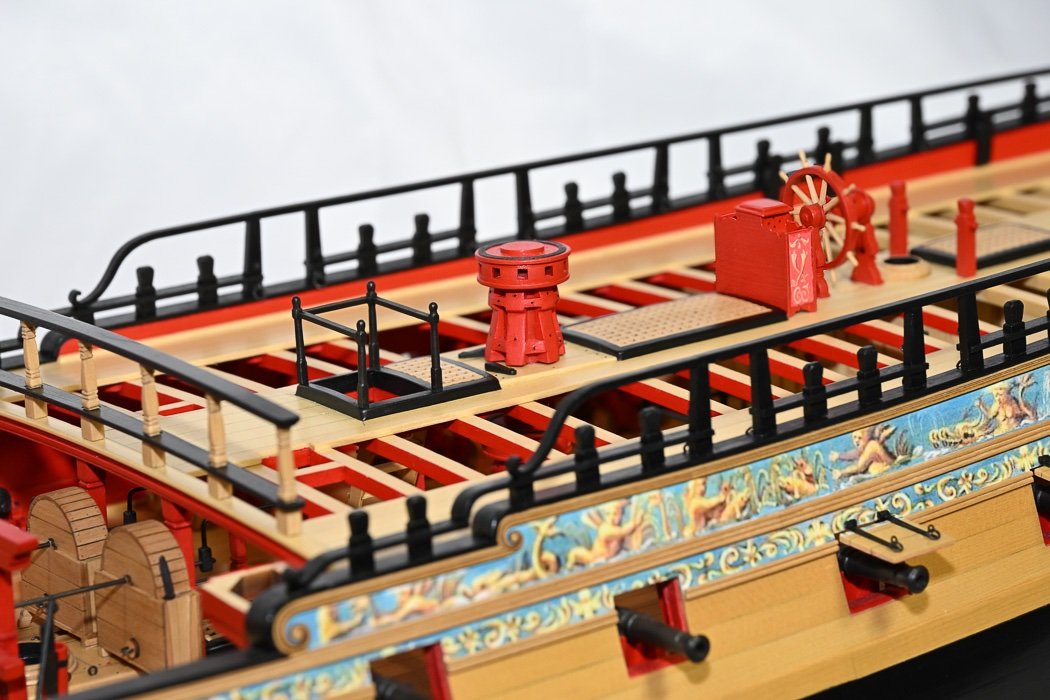
The Quarterdeck (from the beginning, repeating a couple of update photos)
The post is so long it is posted in two parts - couldn’t upload all the photos in one. That’s probably telling me something, anyway….
Part 1
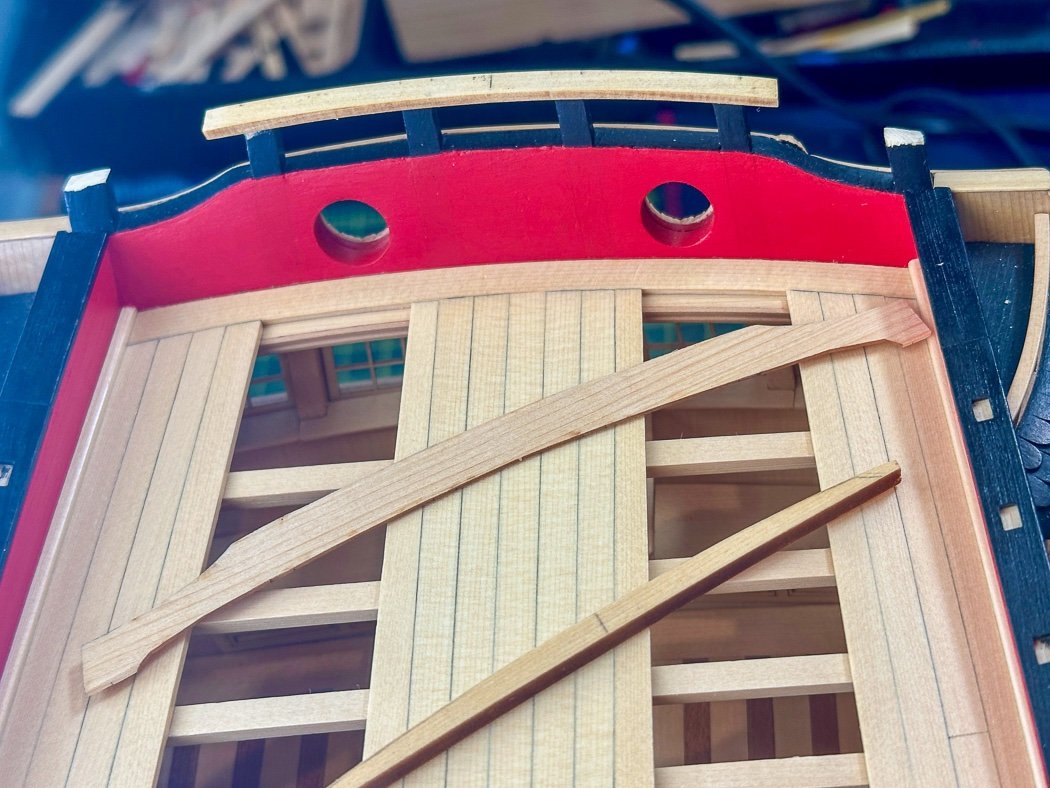
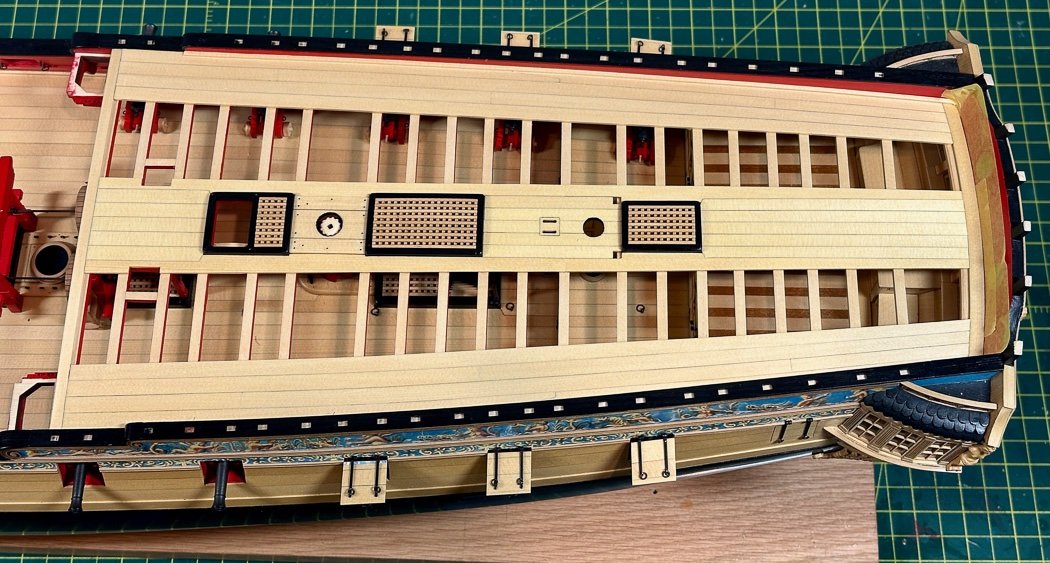
Chapter 10 is all about the quarterdeck. So with some reluctance in covering up all the knees I began with the outer layer of planking. It’s pretty straightforward, beginning full width and ending with a taper consistent with the included template.
It is obviously critical to have the centerline deck furniture, well centered. Finding that point can be a bit challenging. My way of finding it is once again using my handy laser level. It’s oddly satisfying to watch the laser lighted line go through the center of hatches ending with a little red dot on the stem. Once aligned I just pencil a line across the wood beams, using the light beam.
It’s back to coaming and hatches. With Chuck’s lasered parts these are so much easier than Cheerful and my past models. Aside from more char removal it’s just about carefully squaring them up. Make up some hatches from a Syren mini-kit and jig, then sand to fit. The important is sanding the hatch pieces to near wafer thin until all the char is gone, keeping the curve, for the best look and a nice tight fit in the coamings.
Then some placement testing based on the capstan partners and centerline and I’m ready to paint and install the hatches.
Good time for the companion way ladder. These are nicely made laser cut pieces, again more char removal. Actually a lot of char removal as I want to leave them natural. While assembling is straightforward, they can be a bit of a challenge (and annoying) to get aligned and square (yes the char still shown was remove, damn micro images).
While I was there I also made the four posts. Making one using my Proxxon lathe and needle files is not that hard, making four near the same a little more so. I painted, added pins, located and drilled the coaming, then sat them aside for later (they don't really look this rough, did I say damn micro images already..
I don’t recall who to attribute this tape method of installing the ladder, it works. Lightly tape to the bottom step then run it up the front with a fold over at the top, After multiple test fits, add glue on the bottom and top back, in it goes using the tape with an assist from some blunt tweezers.
First stage of center line complete. There are two schools of thought, not gluing these in before planking and doing so. I opted to glue them in and work around with the planking. At least for me that’s trading a tight fit of surrounding planking vs. a more thorough sanding of that planking, but there are sound reasons to go either way.
Made up the binnacle and ships wheel for later installation. I elected to use the side graphic on the binnacle but not the back. The large graphic was just a bit much for me, just a personal choice. For fun I added compass faces to the little discs inside the binnacle.
Like with the forecastle rather than the stacked three rings, I added a mast ring I made from a solid block of boxwood my Proxxon mill. I endeavored to keep the mizzen one simpler.
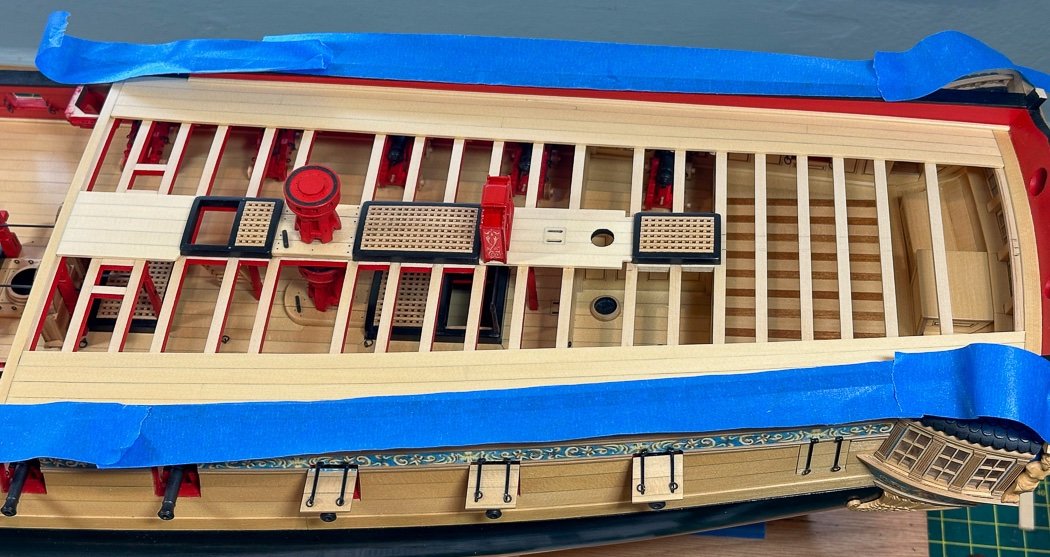
The center planking requires planning and use of the supplied template. The planking naturally tapers from front to back but since the center five are interrupted with the partners and hatches, each section between has to be fit and tapered separately. Measure and measure again, cut a couple of times, eventually I got it right.
The center outer planks, like the main deck and forecastle, are cut around the partners and hatches. The taper here though is more severe so it’s not just the cut outs (the difference between the partners and the two hatches either side is one millimeter, that was fun), its also matching up also the taper to keep the open area to the outer planks and even flow and equal on either side front to back. Just more careful measuring to match up not only the template but the nuances of my particular hull.
Like the forecastle I marveled at the detail of the cap rails and scrolls before I started the model. Chuck’s design makes constructing these easy, just fit and glue the pieces together. Mine matched up with little adjustment other than the curved pieces, these are provided larger on purpose to match distance and angle it to my model’s hull.
I cut the little spacers to ensure I didn’t push down too hard and to keep the rails at an equal height throughout, especially given from here to the transom they are done in sections.
Continued in the next post…
- ccoyle, Erik W, Thukydides and 6 others
-
9


HMS Winchelsea 1764 by glbarlow - 1:48
in Member Build logs for the HMS Winchelsea
Posted
Thank you for the kind words. Glad my log will be of some help. Both Cheerful and now Winchelsea are great build, lots of challenges and lots of fun - with a little frustration here and there.