glbarlow
-
Posts
4,127 -
Joined
-
Last visited
Content Type
Profiles
Forums
Gallery
Events
Everything posted by glbarlow
-
 Has anyone used adhesive paper for the friezes, like that used for mailing labels? In theory it seems like a good idea…
- 1,784 replies
-
- 1
-

-
- winchelsea
- Syren Ship Model Company
- (and 1 more)
-
Seems like you’re in a race. You’re doing in days what it took me weeks to do. Planking to the correct port size using the sills already installed takes time and patience. 1/16th is a lot at this scale, not something I’d do. But it’s your model and ultimately your result for you to enjoy. I think a few others may have taken this shortcut, you could research the other build logs to see if you find one and see how it came out.
- 389 replies
-
- 2
-
-
- winchelsea
- Syren Ship Model Company
- (and 1 more)
-
I’m pretty good at making extra time necessary 😂
- 840 replies
-
- 3
-
-
- winchelsea
- Syren Ship Model Company
- (and 1 more)
-
No telling where it would be if I tried holding it🤣
- 840 replies
-
- 3
-
-
- winchelsea
- Syren Ship Model Company
- (and 1 more)
-
Thanks Bob, not sure about easy, but it is fun. Thank you. You did a nice job with your log in this section, an excellent reference.
- 840 replies
-
- 2
-
-
- winchelsea
- Syren Ship Model Company
- (and 1 more)
-
Thank you for the comment, I’m far from a master builder, I doubt I’m in the top 10 of Winchelsea builders, but thanks for the thought😊Just doing the best I can.
- 840 replies
-
- 2
-
-
- winchelsea
- Syren Ship Model Company
- (and 1 more)
-
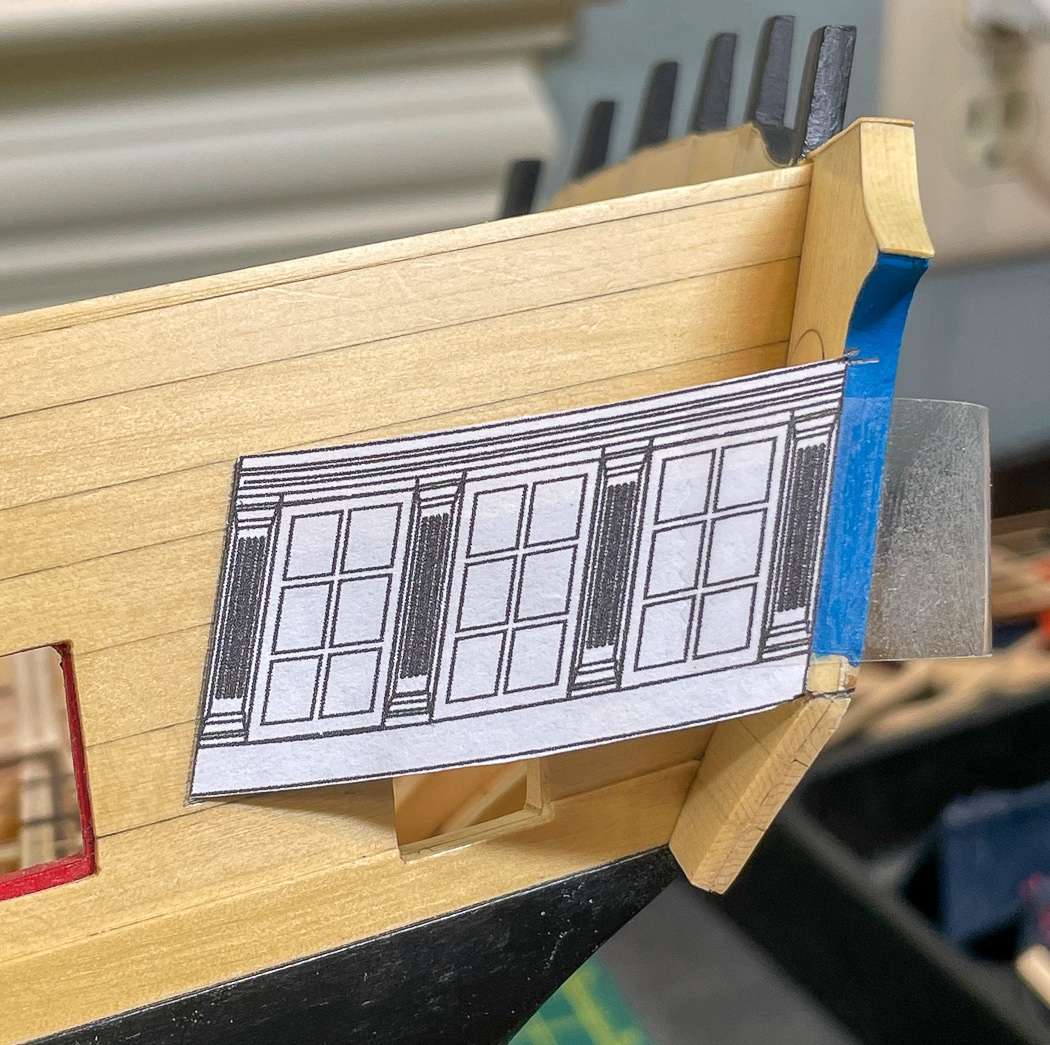
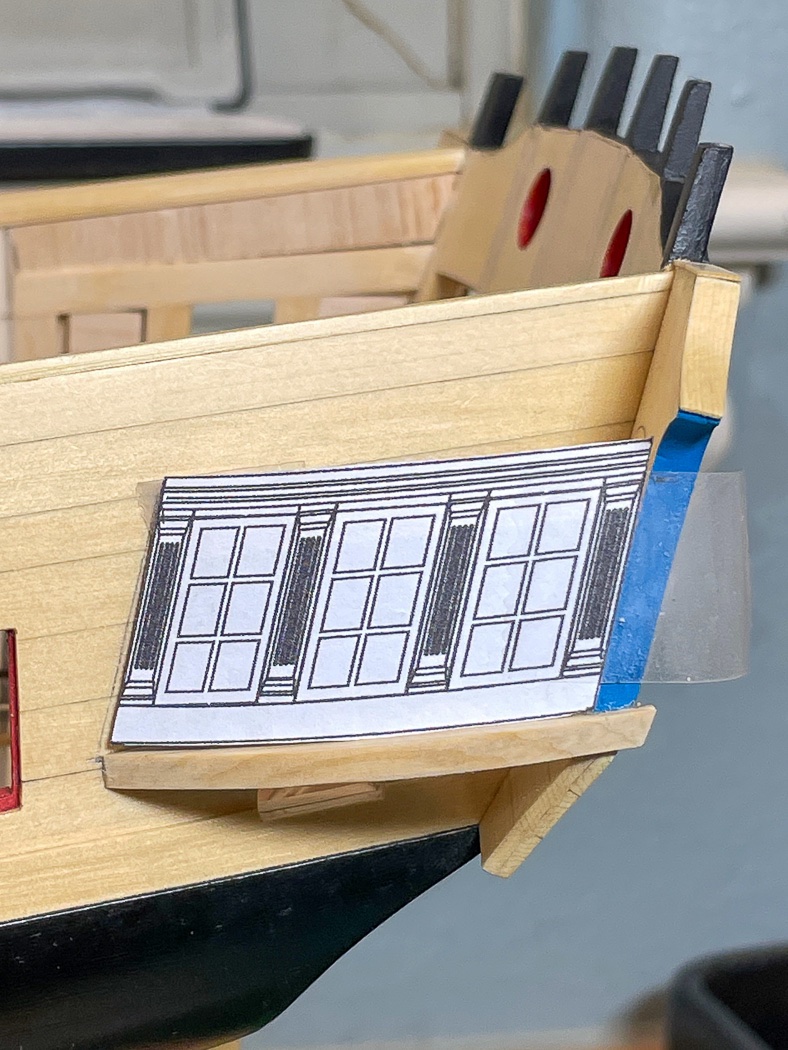
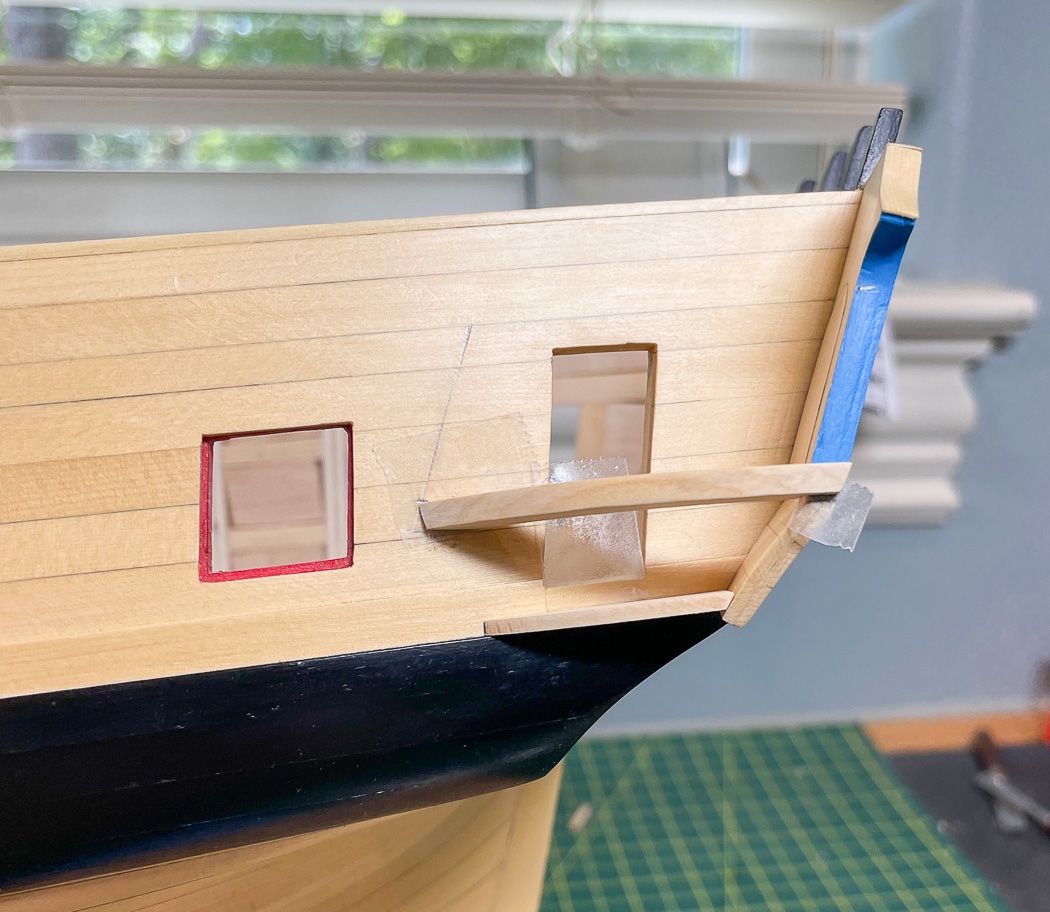
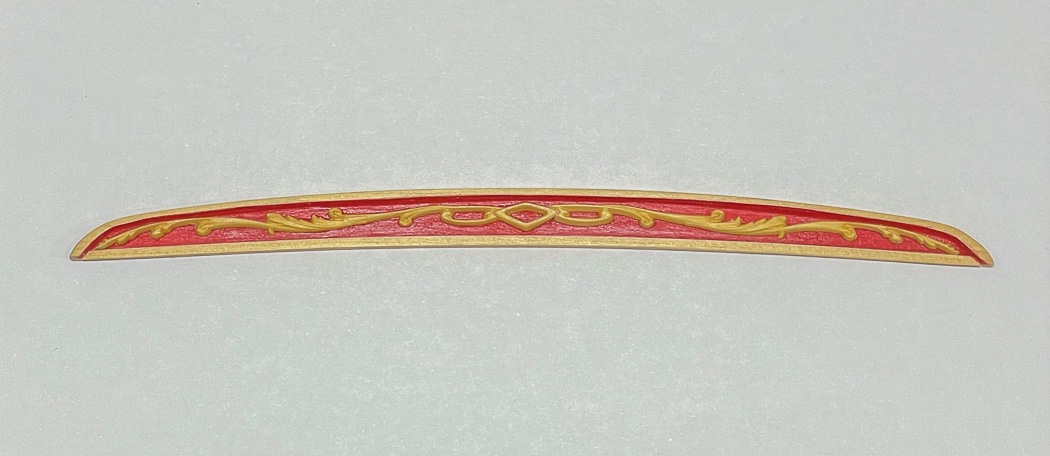
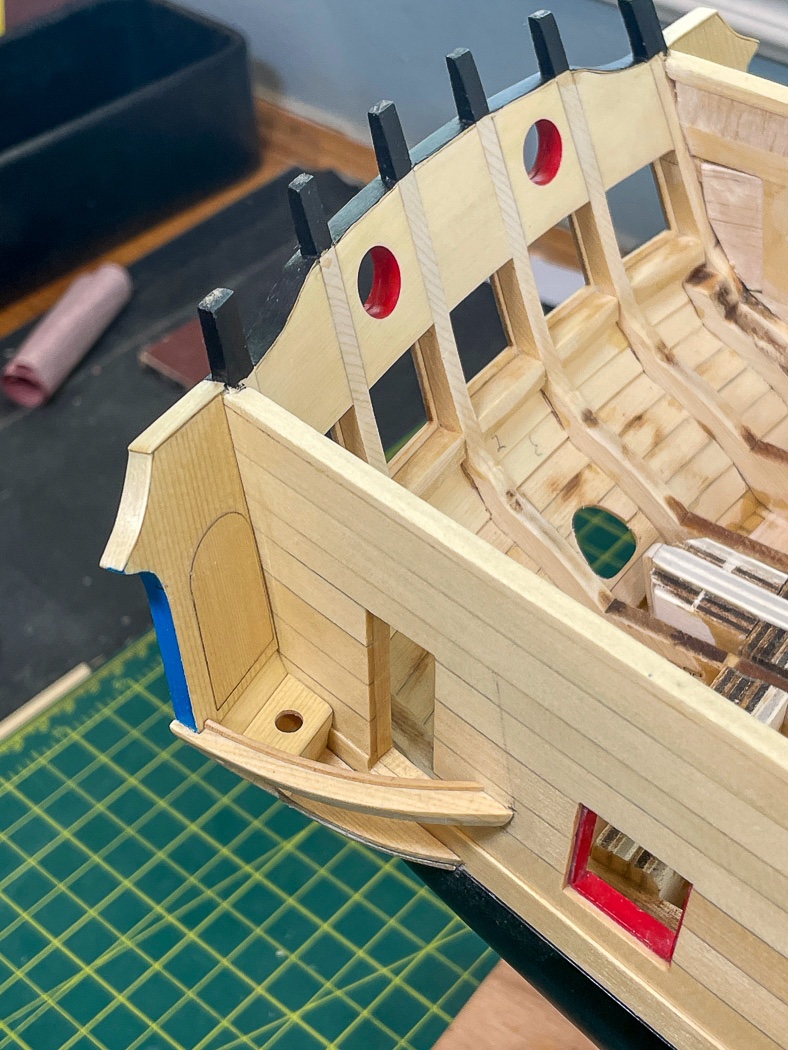
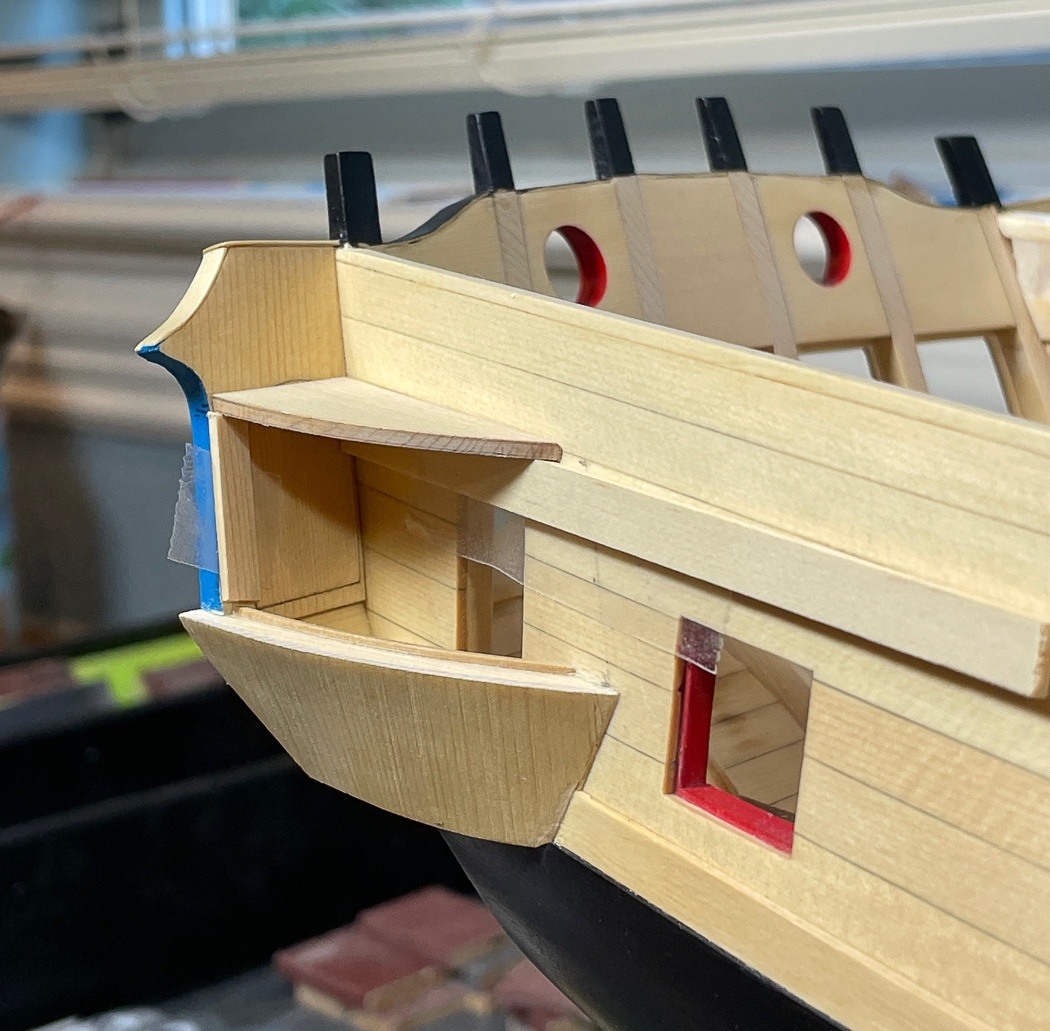
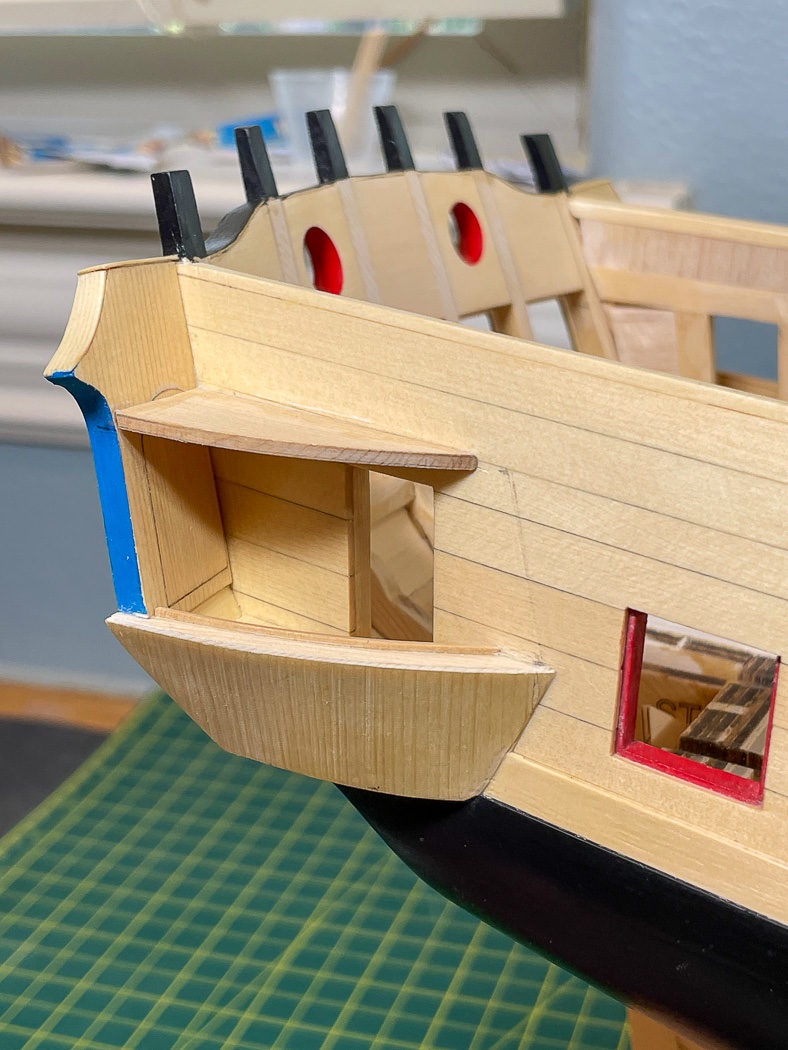
Starting the QGalleries This post will look a lot like many other fine logs that have gone before me. I’ll once again say how wonderful MSW, build logs, and this group project are as a ready resource, in addition to Chuck’s fine monograph of course, in helping guide my build. Maybe I’ll offer something new to those that follow, or at least serve as confirmation doing as others have done. The q-galleries are an exercise in patience. Not difficult in and of themselves to make, given the nice laser cut parts Chuck provides for chapter 3, they require a great deal of precision in getting the measurements, location, and references lining up one part to another, and those to yet another. Like many elements of the build, getting the “infrastructure” right is critical to how the final product will look. First up is cutting out the gallery template and marking the location of the top frame and roof. I thought for a moment why not just get some crayons, color this in and call it done, but decided to continue forward when my grandkids wouldn’t let me use their crayons. I glued on the upper frame after checking and rechecking measurements. There is the reality that every hull is different and there likely won’t be an exact match. It’s amazing though how well Chuck’s design works, things just seem to fit and/or have the built in latitude for adjustment. I will give myself a little credit for my obsession all the way back to fitting the stern frames and gallery framing against the plan. (the template is just loosely sitting there for the photo). Next up is adding the lower frame or floor along the line of the wales. Here it's held up for checking using my new best friend, double sided tape. It holds well and is easily removed. I prefer to work both sides of the ship rather than completely finishing one, so while waiting for the PVA glue to dry at various points I worked on the transom cove. I’m happy to report I did not break those lovely but very fragile scroll parts (they come as two, then mated on the cove). Don’t need it yet, but it was a nice distraction. Not sure which log I saw this on, so thanks to my fellow builder for the idea of installing the head before adding the q-frame planking. I’ll have to say fitting it this way from the side verses working from the top was a straight forward approach, just had to gently fair the outboard edge to match up with the upper and lower frame. After fairing the frames I added the “planking,” a 1/32 layered sheet that easily bends on multiple axis to nicely cover the frame. It was a bit of a challenge for me to line it up to cover top and bottom, fore to aft. Just a little fumble fingered work, it’s purposely oversized to allow for that adjustment - I just had to do it. I resorted to CA here, it’s not going anywhere now. I spent several hours sorting out how to attach the gallery roof. Pie-shaped it has to hold itself up (for now) glued to two sides. Ok, that’s not so hard…maybe… The challenge is attaching the slippery little pie so that it is parallel to the upper frame, like the lower frame reasonably closely following the run of the planks, and be in line with the deck. After a few false starts I elected to install some temporary “scaffolding” after measuring remeasuring, then measuring again. The final challenge for me was to have both port and starboard roofs the same height above the upper frame and the same height below the top rail of the hull on the side and the transom at the back. I had to carefully remove my scaffolding after the glue had a little time to hold and before it became glued to the hull too. With that both galleries are ready to be closed up with posts, windows and moulding followed by the roof and touch up painting. If you never hear from me again you’ll know it didn’t go well or I’m still trying to scrape wood into molding. Thanks for stopping by, your likes and comments are always appreciated.

- 840 replies
-
- 20
-
-
- winchelsea
- Syren Ship Model Company
- (and 1 more)
-
You are correct, those bow caps are cut from 1/16th board. Good new is the actual cap rails to be installed in chapter 10 are laser cut. Chuck encourages everyone to download, print, and cut out those chapter 10 paper templates as a guide to ensure you’re shaping your bow to match them now. Do you have a build log? If not I’d encourage you to start one, it’s a lot easier to get answers like these using photos and text of your model. I try to put all I can in my logs to be of help just as I consult multiple other logs to get help.
- 840 replies
-
- 3
-
-
- winchelsea
- Syren Ship Model Company
- (and 1 more)
-
In fact there are laser cut pieces in yellow cedar, four of them, the lower a slightly different size than the upper. I fabricated two more I placed between the two. The laser cut pieces do require some shaping. For the inboard fairing I filled between the bulkheads and ports, including the bow, with balsa, more as a guide. I think I showed all this early in the log, you may want to check there or other logs for options. Hope that helps.
- 840 replies
-
- 3
-
-
- winchelsea
- Syren Ship Model Company
- (and 1 more)
-
Have you held up the side view of the gallery framing to your work? It doesn’t seem the door frame is squared up. I covered this in post #47 of my log as one example if you’re interested.
- 389 replies
-
- 5
-
-
- winchelsea
- Syren Ship Model Company
- (and 1 more)
-
Not sure what you’re referring to, do you mean in the framing before planking?
- 840 replies
-
- 1
-
-
- winchelsea
- Syren Ship Model Company
- (and 1 more)
-
I hope it proves helpful - I feel the same about Winchelsea, lots of logs to consult.
-
I throughly enjoyed building Cheerful, it gave me the confidence and some new skills to build Winchelsea. I completely understand your taking a pause on Winchelsea to build Cheerful It’s a great model, yours is off to a excellent start. I’ll enjoy following along as you continue.
- 113 replies
-
- 1
-
-
- Cheerful
- Syren Ship Model Company
- (and 1 more)
-
A really fine looking ship Bob, you should be justly proud to have arrived so close to being finished. I’m so impressed with your work as one of the pack leaders, not having very many other builds to consult as you’ve gone forward. Have you decided what and how her final display mount will look?
-
Those lamps are amazing. I’ve not been a fan of LED lighting on models but your authentic lamps are very appealing and give a whole new character to the model and something I’ve not seen before. It will look great sitting somewhere acting as a warm, soft light accent tone. Well done!
-
The templates Chuck shows in his photos were critical to me in lining up the stern windows and fillers, I could only do that working from behind the stern. The filler and sill alignment are critical for the rest of the build, the window templates make it easy, or at least easier, to line it all up to the template strips. Even at this early point I also had a cut-out of the galley framing to make sure those angles lined up to the template, and of course again as I did the galley framing. The "curve" of the transom is actually created just by placing the frames in the slots correctly, a rear guide as you built should just confirm the placement. As Chuck notes, I couldn't have done this working from the front or without the frame templates double-sided taped to the rear of the frames. The challenge is more in getting the right bevel on the transom fillers than the placement of the stern frames, at least for me it was. While balsa in the bow is a common step for many of us, there is a filler along the bottom of the stern frames that will come later. More critical now is fitting and shaping the cedar fillers along the stern post once the you have the the frames and sills set. The good news is many have gone before, in addition to Chuck's log there are many fine build logs to consult, almost every problem has been confronted and solved in a bounty of different ways to either emulate, learn from, or both. Or even if not helpful they at least show what it looks like complete.
- 389 replies
-
- 1
-
-
- winchelsea
- Syren Ship Model Company
- (and 1 more)
-
The reason I cut a piece of wood in the shape of the ship using the plans is to avoid a bad fit. If you clamp, rubber band or whatever your gun port patterns (the correct name, bulwarks is confusing) to wood in the same pattern as the ship you’re naturally doing to have a better fit. You should be able to re-soak them, just not for too long and not too many times because delaminating is a risk. But having a bad fit of the gun port patterns is going to result in a troublesome model at the start. Some waviness is still likely and is fine, you’re going to plank over it. It is critical though to have a tight solid glued fit of the pattern at every bulkhead extension. Your photo shows them to be short at the stern, I don’t know why that is, lack of a tight fit down the sides…? People on this forum respond better to photos, long paragraphs to explain problems can be a lot shorter and easier to understand with photos, just a suggestion. Hang in there, you’ll get it sorted out. It’s wood, everything can be fixed.
- 22 replies
-
- 1
-
-
- first build
- Lady Nelson
- (and 2 more)
-
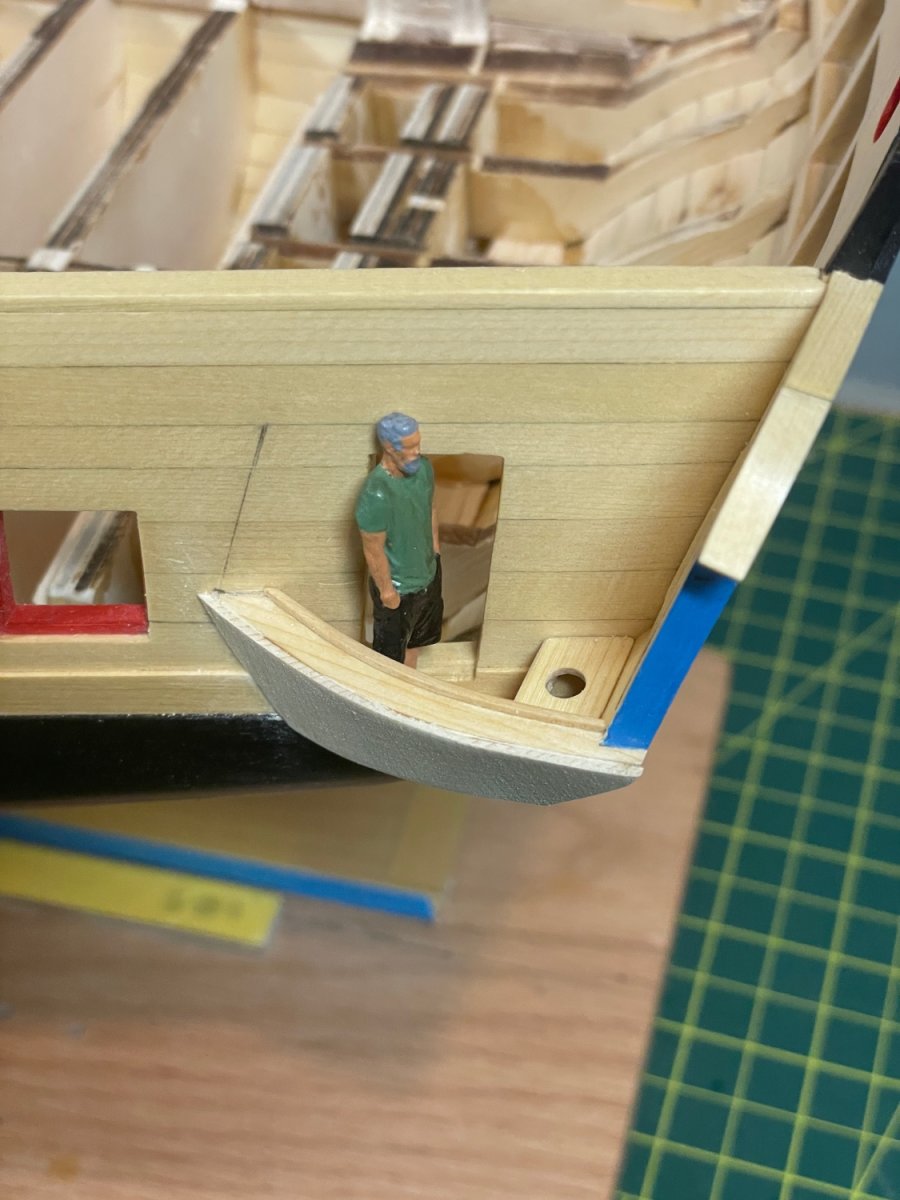
Mini-me makes his first appearance on Winchelsea after supervising Cheerful’s build. His first reaction: ”These facilities are pretty tight, but it’s better than the open air head on Cheerful.” I’m plugging away on the galleries (and beating up the wales while I’m at it), a better post when I finish them. Lots of family distractions at the moment.

- 840 replies
-
- 16
-
-

-
- winchelsea
- Syren Ship Model Company
- (and 1 more)
-
Excellent work, you’ve done a great job, very neat work.
- 399 replies
-
- 2
-
-
- winchelsea
- Syren Ship Model Company
- (and 1 more)
-
Thanks Rusty, your log is a frequent reference for me and always fun to see your take on steps of the build.
- 840 replies
-
- 2
-
-
- winchelsea
- Syren Ship Model Company
- (and 1 more)
-
I don’t agree with that all and will just leave it at that.
- 542 replies
-
- 2
-
-
- Sphinx
- Vanguard Models
- (and 3 more)
-
You’re over-thinking it. You need enough keel to attach planks to and enough keel to support the planking. You especially need enough to attach the stem to. Keep in mind you can sand the planking, both second and first, to get the widths required. From what I see you’ve taken more than enough. I highly recommend you use the search function to find other Lady Nelson build logs, including mine. You’ll find they answer a lot of your questions. It’s the best way to build your community. We’ve all done our first builds and happy to offer help.
- 22 replies
-
- 4
-
-
- first build
- Lady Nelson
- (and 2 more)