


glbarlow
-
Posts
4,126 -
Joined
-
Last visited
Content Type
Profiles
Forums
Gallery
Events
Everything posted by glbarlow
-
 Well done, the extra touches are nice. Sorry about the shipping, I’m sure that’s frustrating.
- 137 replies
-
- 1
-

-
- winchelsea
- Syren Ship Model Company
- (and 1 more)
-
As Chuck notes they require more than tweaking. They form the curve of the stern. Ultimately. In addition to the monograph I’m sure other logs will show the amount of shaping required.
-
With the masts and rigging the boats are a nice touch, without those the boats, cradles, and perhaps even the skid beams overweight the top and distract from the rest of the model….in my humble opinion.
- 857 replies
-
- 6
-
-
- Sphinx
- Vanguard Models
- (and 1 more)
-
Lots of ways to add these, I used balsa and shaped it as needed. They are essential though for terminating stern planking later. With the balsa I was able to make some minor adjustments as I was planking.
-
Happy to wait until immediate needs are filled. I’m more comfortable buying in advance of need and knowing I can complete the model in case of some unforeseen event. However, I certainly don’t want to keep someone ready for them now being able to buy first, I’m content to wait for the next batch.
- 1 reply
-
- 1
-
-
In any case I think it has to come out, maybe including deck beams. I’m sure you can get replacement parts. I’d change brands of glue, if no markers that’s the only explanation sort of a roof leak. Better to demo and replace rather than attempt salvage from the looks of it. Hard to tell from photos but seems like some of the Qdeck beams aren’t set right also. I tear off stuff and replace all the time. It’s so fun😊
- 505 replies
-
- 6
-
-
- vanguard models
- Sphinx
- (and 1 more)
-
Very well done, pristine and crisp work!
-
The bow fillers are useful and worth the time. I’m almost done planking and don’t regret adding them, though I took the simpler approach of using balsa. I also duplicated the curved fames above the deck and the bow and added a second set. I noted later Chuck adds filler for the anchor rope hole, adding them now gave me planking support above deck level. As was mentioned the transom frames provide the needed curve by their alignment in the bulkhead slots. I too spent a lot of time working to get them right. Like the fairing every thing done right at this phase pays dividends. Don’t forget the have fun part😊
-
Fairing is extremely important for this single planked model, you’ve made it much more challenging with the ply with the number of bulkheads and size. It took me over a week to fair mine using Chuck’s starter pack. I like your build more but you’ll also need a firm support for it upside down. Mine hasn’t been right side up since March. I doubt you’ll be the last and there are a number of us not that far ahead. Welcome to the project, always glad to see a new builder as part of the group. We all help each other, don’t be reluctant to ask.
-
Beautiful work! That’s some serious focus and dedication rigging all those guns, well done.
-
You’ve definitely made it your own, it looks great. I’d never seen snaking, a nice touch.
- 542 replies
-
- 1
-
-
- Sphinx
- Vanguard Models
- (and 3 more)
-
Congratulations on your first model. It looks great, you’ve done a nice job. I’m sure you’ve learned a lot along the way you’ll apply to future models. I’m not a fan of display cases myself. They take up too much space and gather more dust than the model. I just dust them all off every six months one so.
- 362 replies
-
- 2
-

-
-
- Amati
- Lady Nelson
- (and 2 more)
-
I am one of those advocates of using CA for aspects of building, like planking. However, I don’t use it for rigging for the reason Allan describes. Diluted white PVA, matte varnish, or clear acrylic paint are much better solutions. Learning to tie a figure 8 seizing will serve you well, it can be used extensively in the rigging stage. A Quad Hands (Amazon) is essential to be able to seize lines easily and effectively.
-
Your Duchess is featured on MSW’s Facebook post today, congratulations 🎊
- 345 replies
-
- 5
-
-
-
- Duchess Of Kingston
- Vanguard Models
- (and 1 more)
-
Mine shows them level along with a test fit of the windows 😊
- 389 replies
-
- 2
-
-
- winchelsea
- Syren Ship Model Company
- (and 1 more)
-
The sills are level with the deck (so build board) as window sills would be from inside the captain’s cabin. You’ll see it in most every build log I’d imagine.
- 389 replies
-
- 4
-
-
- winchelsea
- Syren Ship Model Company
- (and 1 more)
-
Thank you for the kind words. Yes the copper plating drove a long hiatus, but as you noticed I’ve been back at it for a while now. However, I will never ever copper plate anything ever again😎
- 101 replies
-
- 1
-
-
- victory models
- amati
- (and 2 more)
-
I’m looking forward to that day, I think they will too. If I get to that day😁
- 840 replies
-
- 3
-
-
- winchelsea
- Syren Ship Model Company
- (and 1 more)
-
Thanks Rusty, but I’m pretty sure I’m second to a lot of our planking crowd 😊
- 840 replies
-
- 1
-
-
- winchelsea
- Syren Ship Model Company
- (and 1 more)
-
Yes, AYC. I turn it every month but no sunlight is hitting it. It’s just mellowed since I finished it. 😊 sort of I have as I’ve aged.
- 840 replies
-
- 3
-
-
- winchelsea
- Syren Ship Model Company
- (and 1 more)
-
Thanks JJ, your planking is great, nothing needing change, mine has its flaws. I’m fortunate to have completed Cheerful over a year ago now it sits in indirect sunlight and has taken on a warm and even gold glow. I’m hoping my Winchelsea will do the same. I do like the color tone on yours and appreciate the suggestion.

- 840 replies
-
- 8
-
-

-
- winchelsea
- Syren Ship Model Company
- (and 1 more)
-
It looks better with the second coat of WOP and will better still with the third coat, gotta love AYC. Thank you all for the comments and the likes!
- 840 replies
-
- 3
-
-
- winchelsea
- Syren Ship Model Company
- (and 1 more)
-
Thank you all for the kind comments. The bad lighting is referring to the bright spots, the color of the wood is true. I’m building ind AYC. I love boxwood too, but not this time around.
- 840 replies
-
- 3
-
-
- winchelsea
- Syren Ship Model Company
- (and 1 more)
-
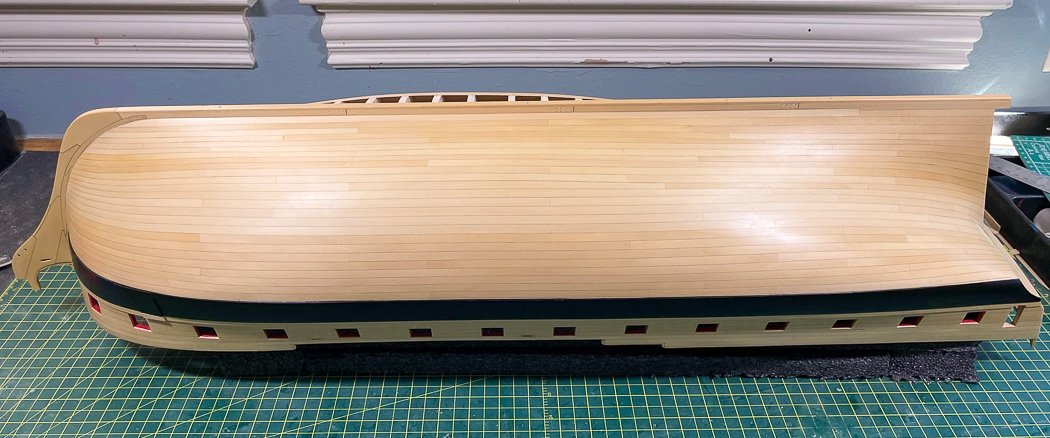
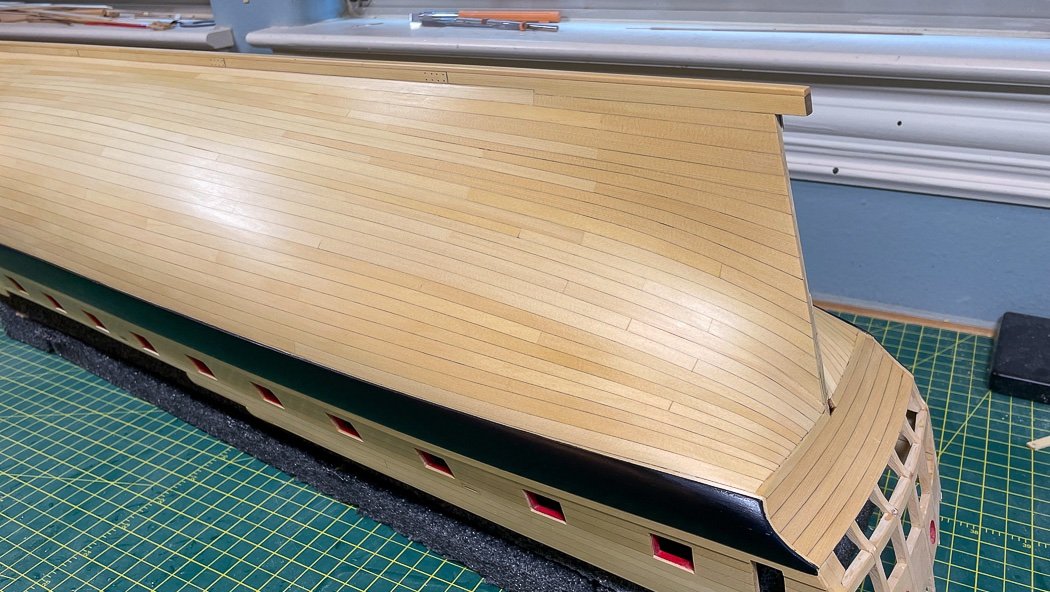
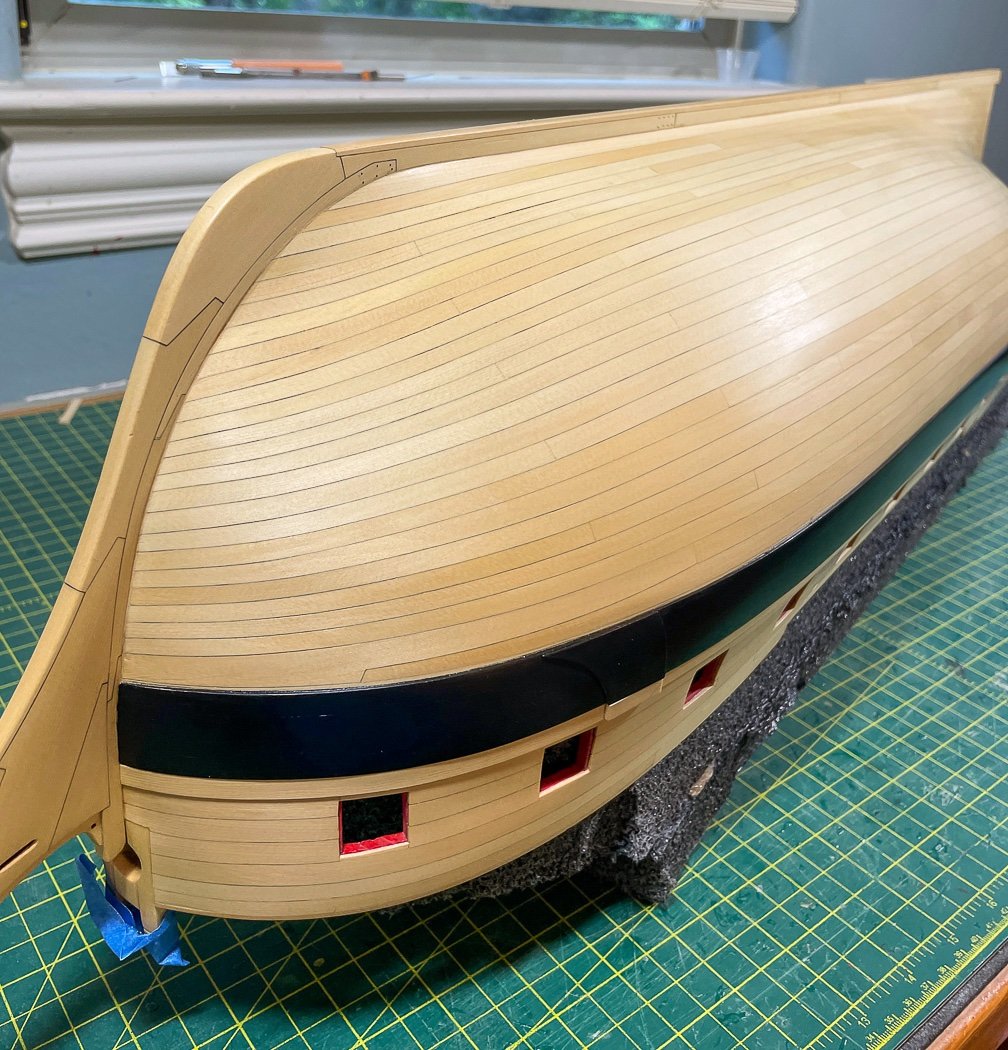
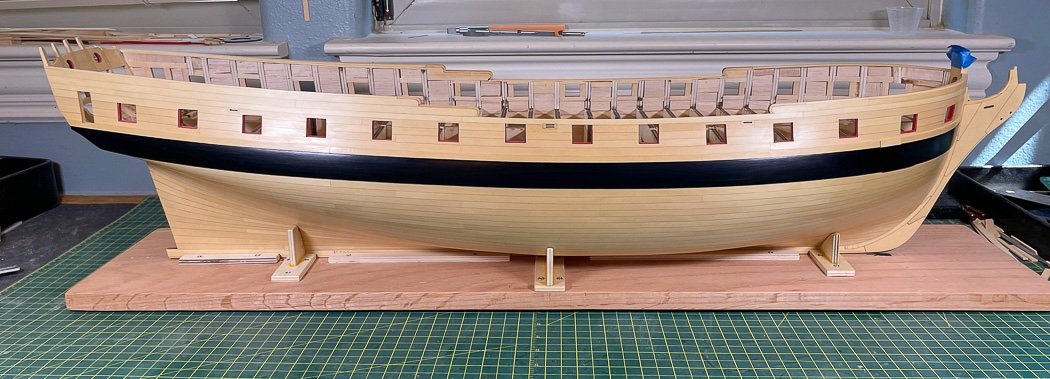
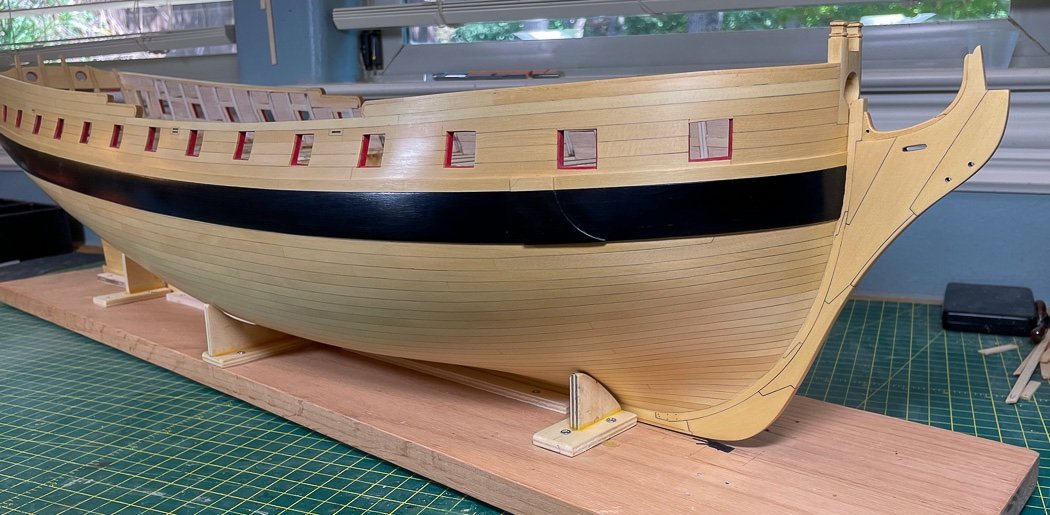
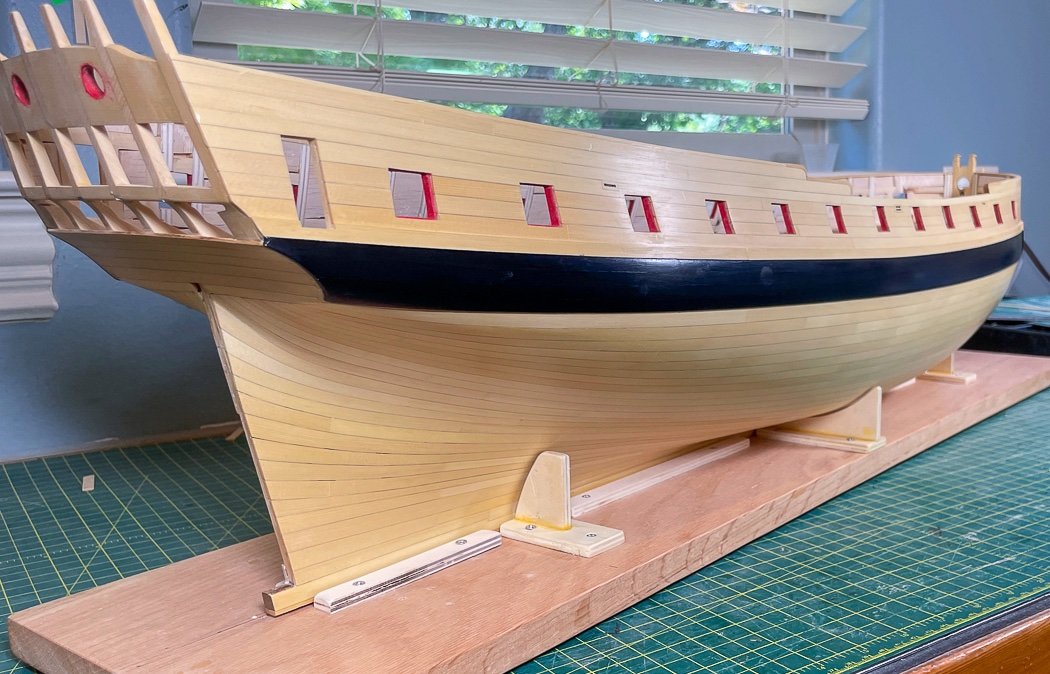
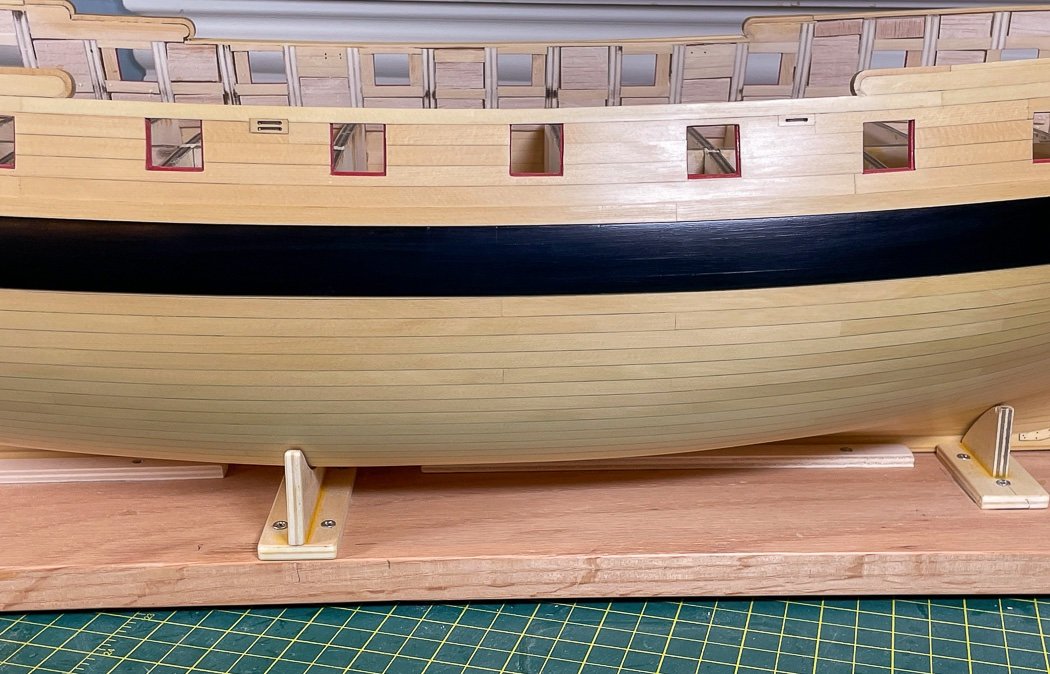
A Half A Milestone After a two week interlude of family vacations in Colorado and North Carolina I'm back to spending time with Winchelsea. I’ve now reached half of a major milestone by completing one side of the hull, only eight more strakes to go on the port side to finish my seemingly life long pursuit of planking. Other than apologizing for the poor lighting and rushed quality of photographs there isn’t too much to add to the text, I’ve about used up all my planking related commentary having been at for four months or so at this point. So here in her upside down glory subject to all that macro shots expose: I’m not at all concerned about the different shades. I completed Cheerful just over a year ago, I know the AYC mellows wonderfully with age and evens itself out. Plus there is only a single coat of WOP at the moment. I will sand with 800 grit and add at least two more coats before I call it done, that too will even out the color. Plus there is all that character and showcasing the butt shift pattern. Now flipping it over for the first time in a long time: Now back to my push to complete the hull and seeing her deck up going forward. As always thank you for the likes and your comments, they motivate me to continue.

- 840 replies
-
- 24
-
-
-
- winchelsea
- Syren Ship Model Company
- (and 1 more)
-
It’s looking really nice, well done! I’m looking forward to this phase of my build.
