glbarlow
-
Posts
4,126 -
Joined
-
Last visited
Content Type
Profiles
Forums
Gallery
Events
Everything posted by glbarlow
-
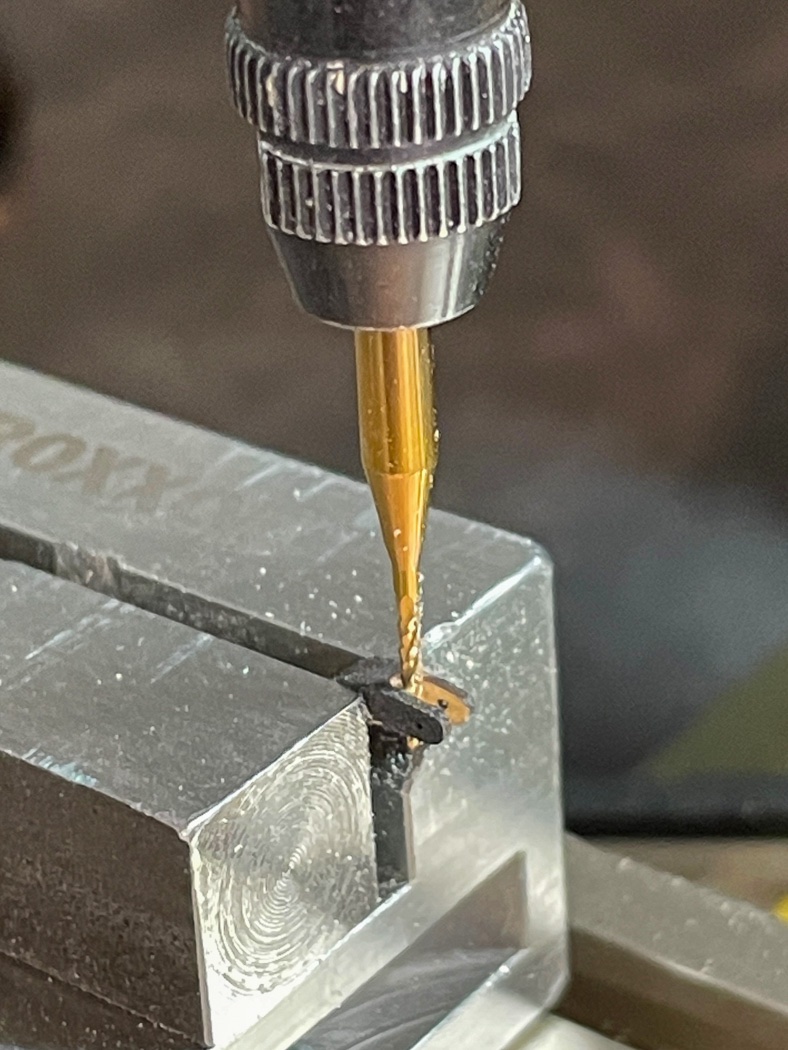
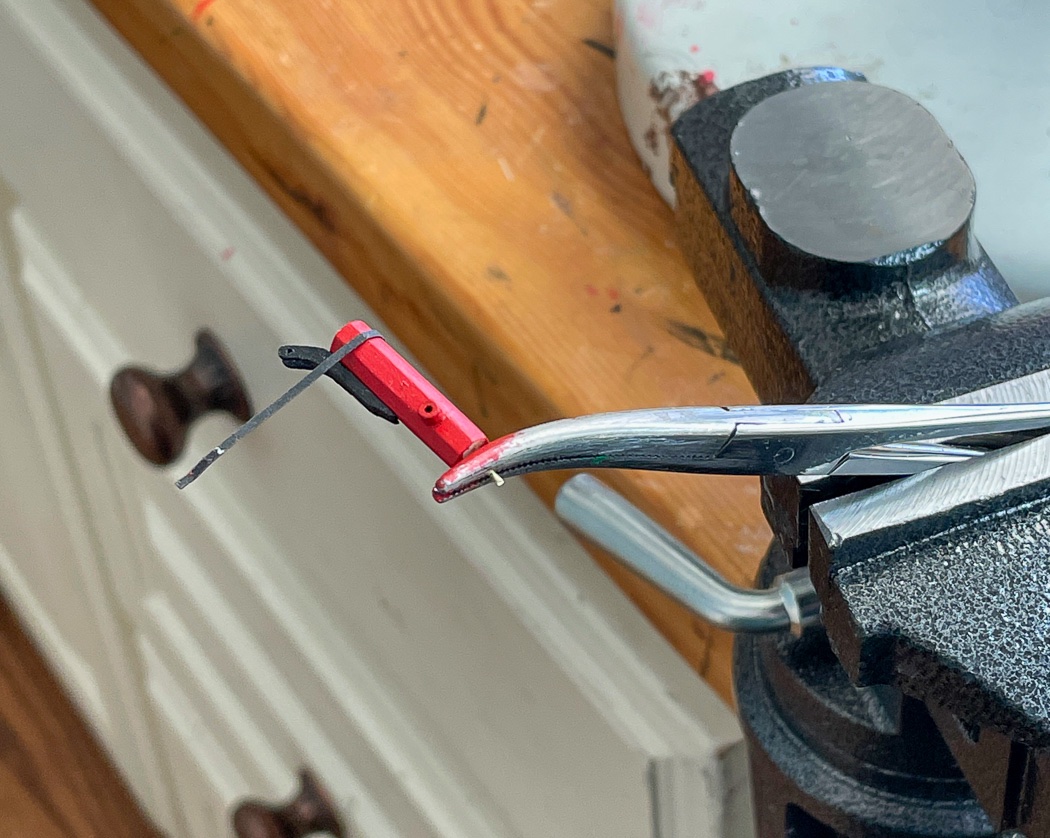
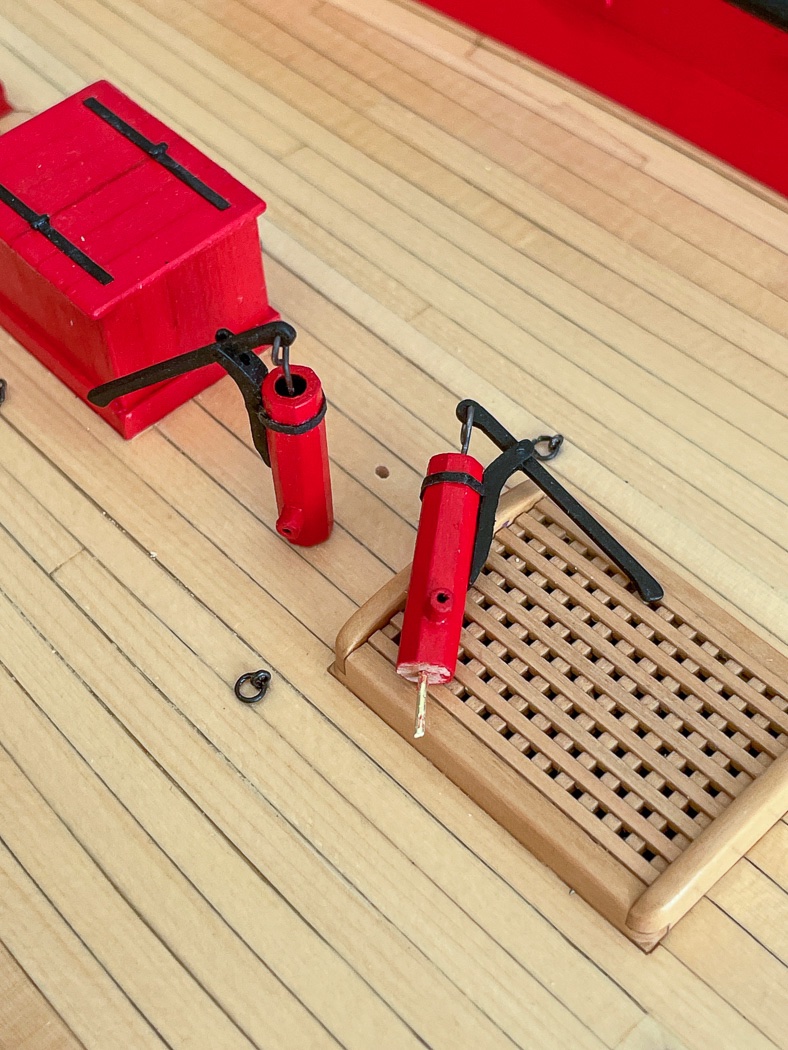
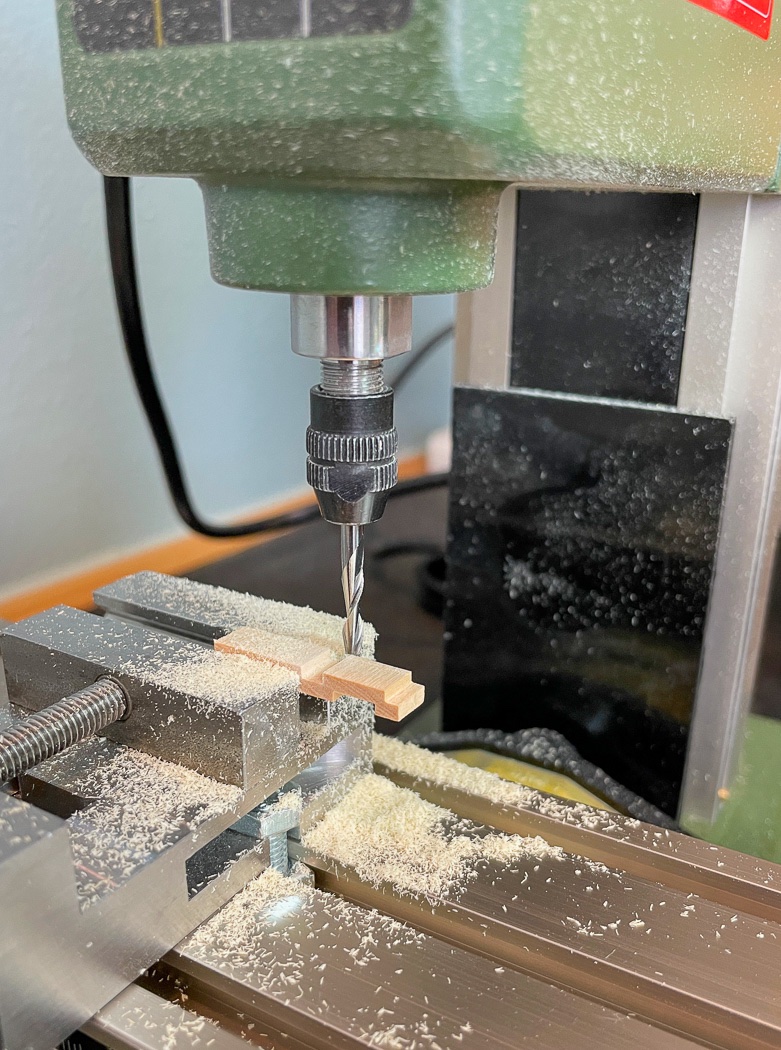
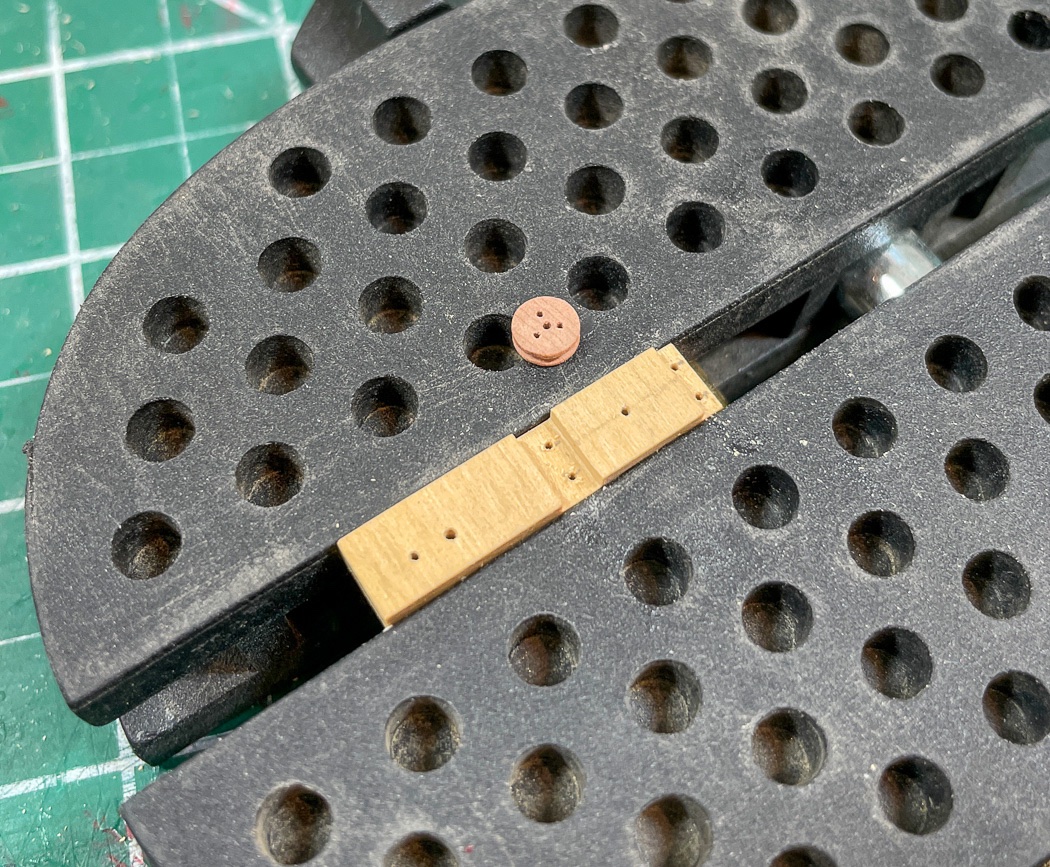
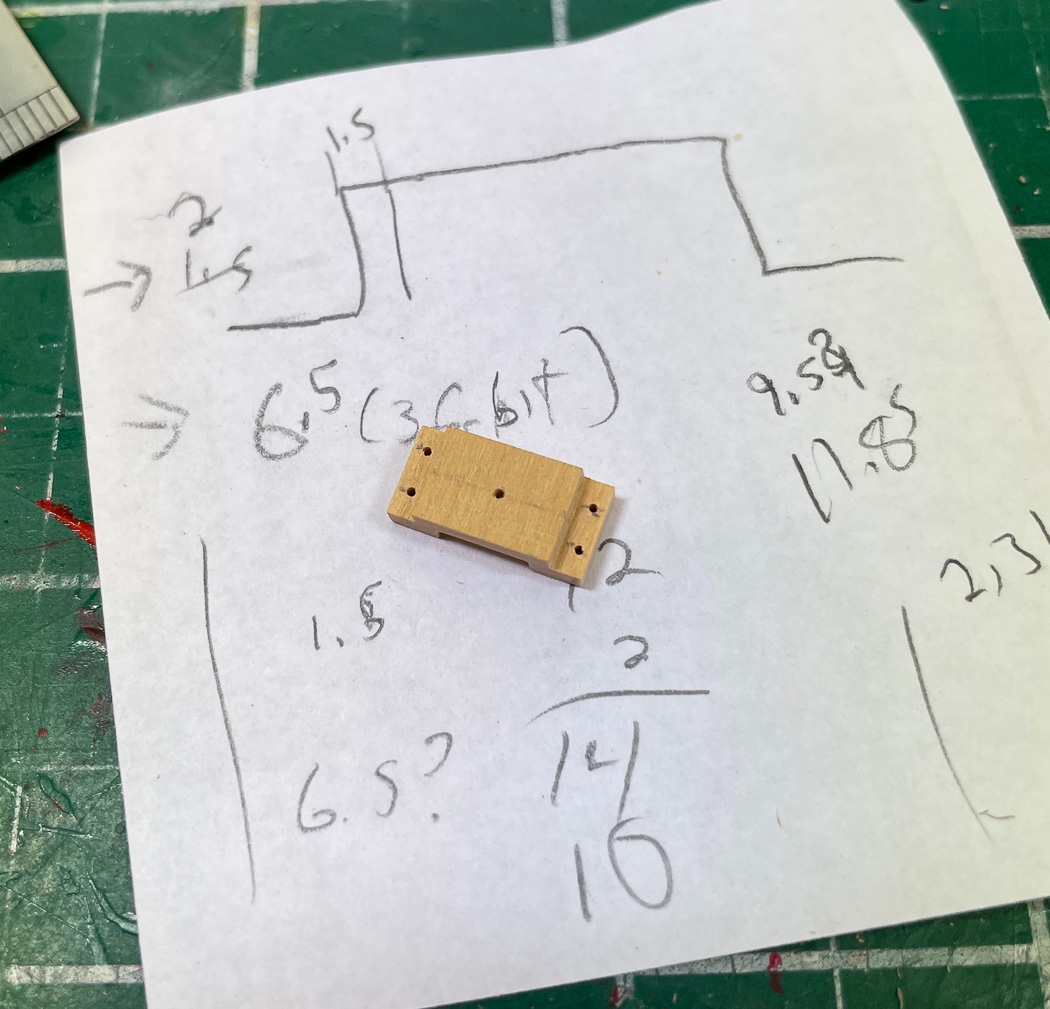
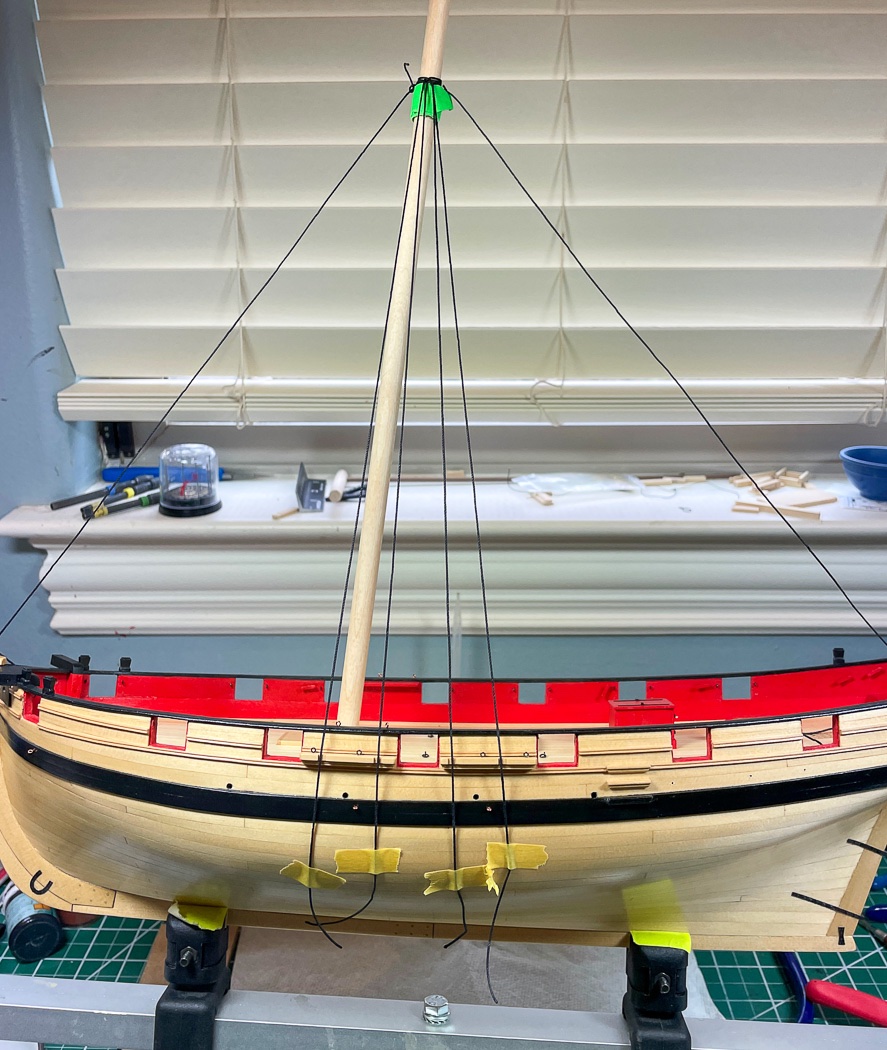
 The last two items for me to make in completing the hull are the elm tree pumps and the fixed block, the first from Chuck’s mini-kit the second a scratch build. Elm Tree Pumps The first step is applying the 7-10-7 rule to a square piece of boxwood then using that to create the octagon shape of the pumps. The jig I used won’t win any ‘pretty’ awards, I modified it to work from a different jig, but is was effective in holding the small wood piece steady while I shaped it using my favorite finger planer. Between the planer, a file, and a sanding block I was fairly quickly able to get both pumps converted to octagons. I painted the handle and bracket before removing these laser cut pieces from their frame knowing I’d have to paint them again, it made doing that easier. The bracket has to be slice cut at its top to accept the handle, so back to my favorite mill again. This could be done by hand with a file I’m sure, but again, there’s a mill just sitting there. Though a simple cut it is very delicate and requires careful measuring - as you can see there is not much room to be wrong. The resulting hinge opening is very delicate, I was fortunate not to break one but if I had Chuck does include 3 of both the handle and the bracket in the mini-kit. I drilled two holes at the proper deck location and inserted brass pins in the base of both pumps. It made it easier to add the spout and easier to paint holding them with my hemostats (more dental tools) as well as to install the metal (black paper) band around the top. Chuck provides enough strip if you want to add another band at the bottom. I like the way these look without that. Either way is historically accurate for those counting. I rounded and softened the edges of the handle for a used look. Lining up the wire pin through the bracket and handle was fun... A quick dry fit and then off they go to my construction shelf to be mounted later. The handles move so I can position them. I’ll have to watch closely to make sure they aren’t snagged during the rigging. Though they do move I did not test to see if they remove water from the bilge. Fixed Block Next up is the fixed block on the starboard side of the stem. For this I had only the plans to go by and consulting of other logs for ideas, once again the strength of MSW. This turned out to be a pleasant afternoon’s project start to finish. It was fun to figure out and make. I started with a piece of scrap boxwood - I just love boxwood, it’s so nice to work with, shape and polish into shape. I’m glad when I have a use for it not calling for paint, it is also very complimentary to the model’s yellow cedar. I cut a piece longer than I needed 6mm wide (per the plans) and 3mm thick (just looked right, no way to tell from the 2 dimensional plans). I suppose I could have made it from a piece 2mm thick but with its required U shape I was concerned it might break at the joints. Of course this is a task the mill is perfectly designed for, much crisper and faster than I could have done it by hand. Have I mentioned how much I enjoy having the mill… I failed to take a photo of the reverse side of the block - essentially it’s cut to a block form U (as can be seen in the previous photo). The plans call for the ‘indention’ to be 6mm long and deep enough to hold the sheave, and as it happens a perfect fit for a 5mm pear wood deadeye I took from my Speedy kit. I drilled a hole in the center of both the block and deadeye, I did have to sand the sides of the deadeye considerably for it to fit between the block and the stem, which is ok, it looks like a sheave now. I drilled a hole for a 22 gauge wire center for the sheave and four 24 gauge wire mounting holes. The extra length was handy for testing holes and for holding the piece both in the mill vise and on the work bench. Once everything was ready I carefully sliced it off with the cross cut sliding table on my Byrnes saw. You can also see the measurements (1mm turns of the axis wheels) and notations used for cutting it on the mill, I have to do this otherwise I lose track. I spent a considerable amount of time with fine and extra fine sanding sticks to round it off and shaping it to look a little worn and pounded by the waves, then attached it with CA and firmed it up with the wire mounts. I had mounted the center wire and deadeye first. The uncut center wire was handy in giving me something to hold on to while lining it up on the stem. I roughed up the contact points where the block and stem meet for adhesion, there’s a lot of poly on the stem. With the wires cut to stand proud and their tops painted Iron Work Black and a coat of WOP the block is done. So is all of the deck furniture, though most not yet mounted, making this something of a milestone. Next up is making the bowsprit. I need it to determine the location of other pieces. Once I have that done I’ll next rig the cannons while there’s room then mount the remaining deck furniture, bow sprit, and mast. I’ll pause to enjoy the work, then it’s time to rig. One decision I haven’t made is whether to include anchor hawse running across the deck. I like the look but not sure I want to cut holes in the forward hatch, I’ll have to decide soon though. Thanks for all the likes and comments, I appreciate and enjoy your taking the time.
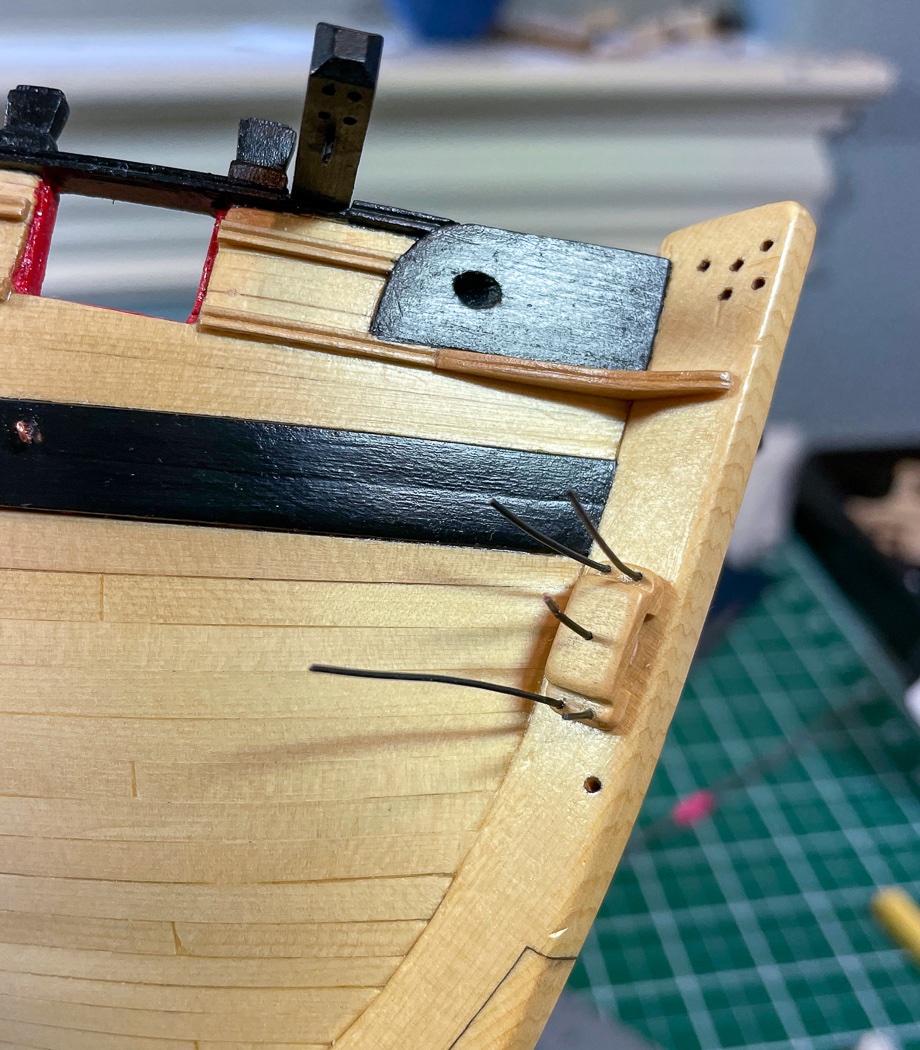
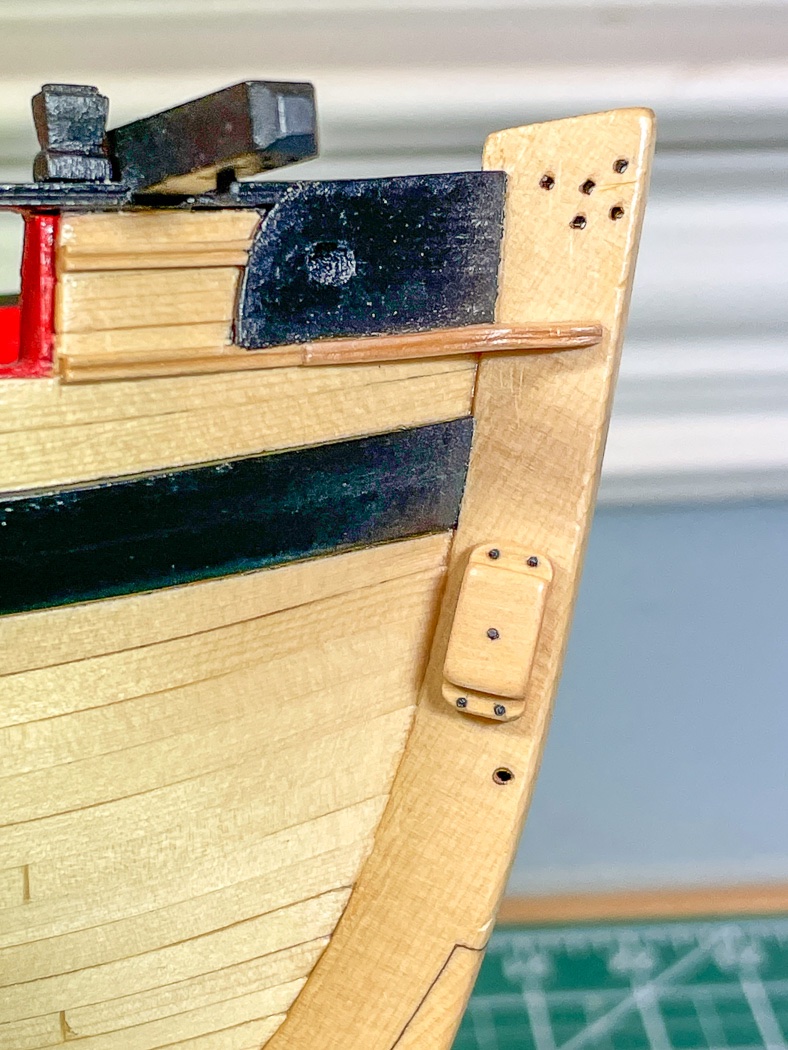
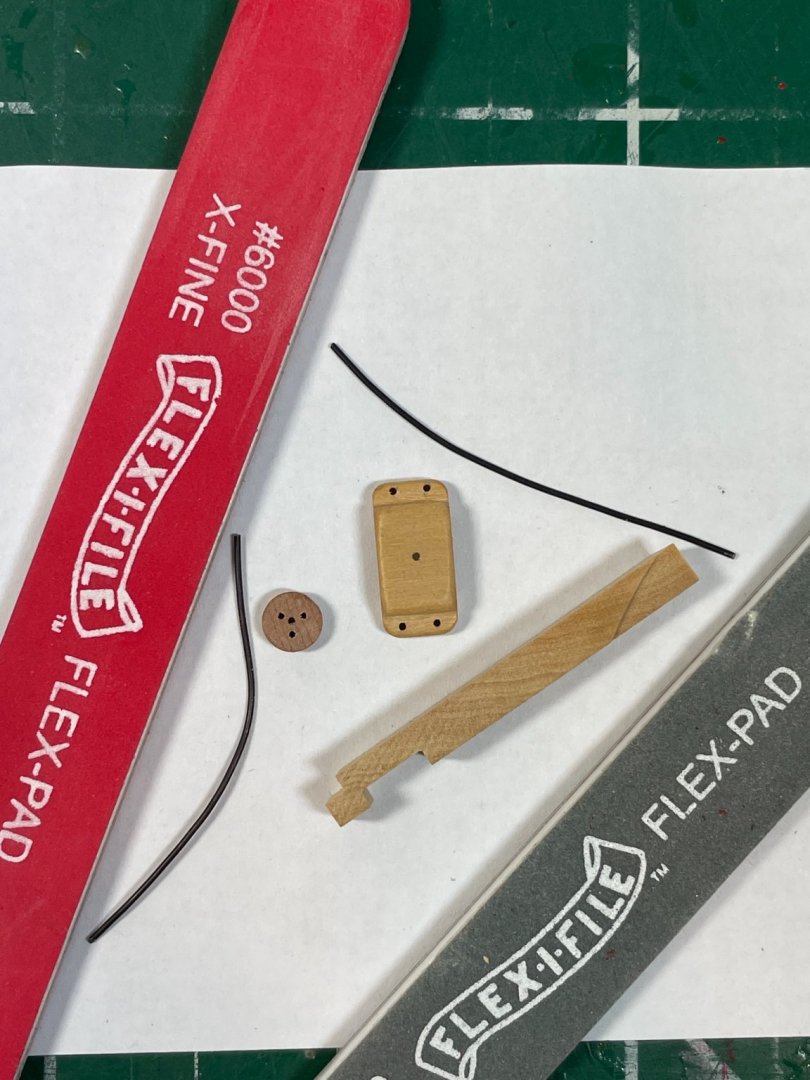
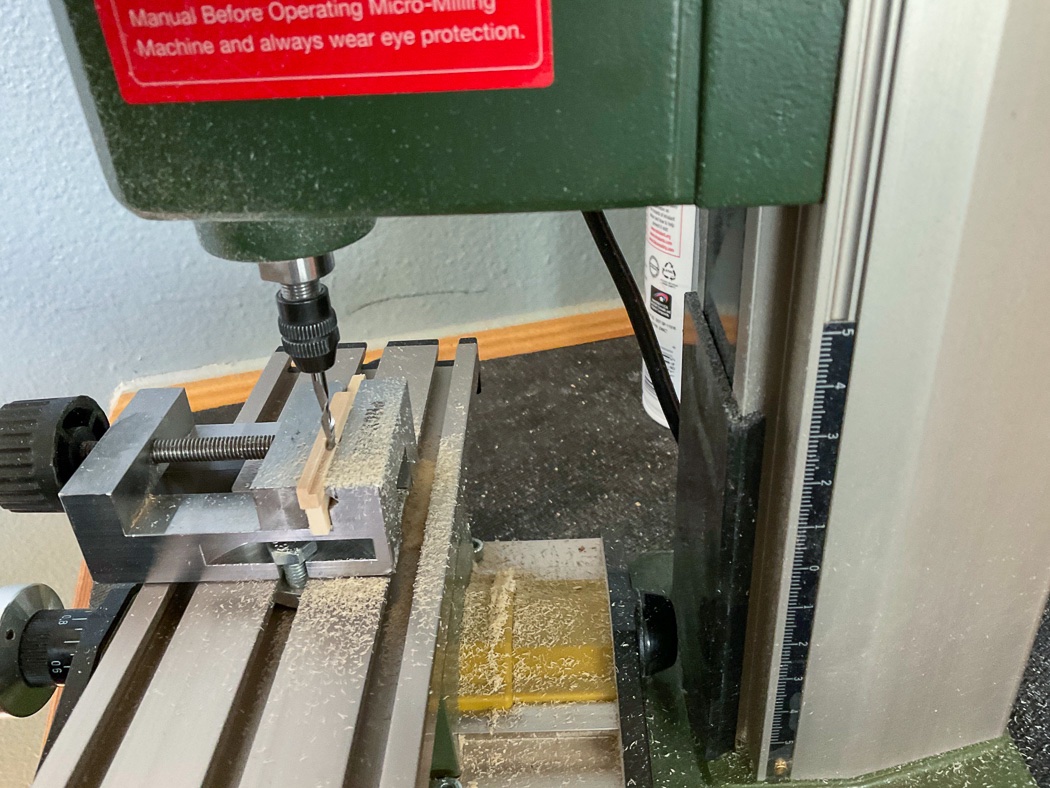
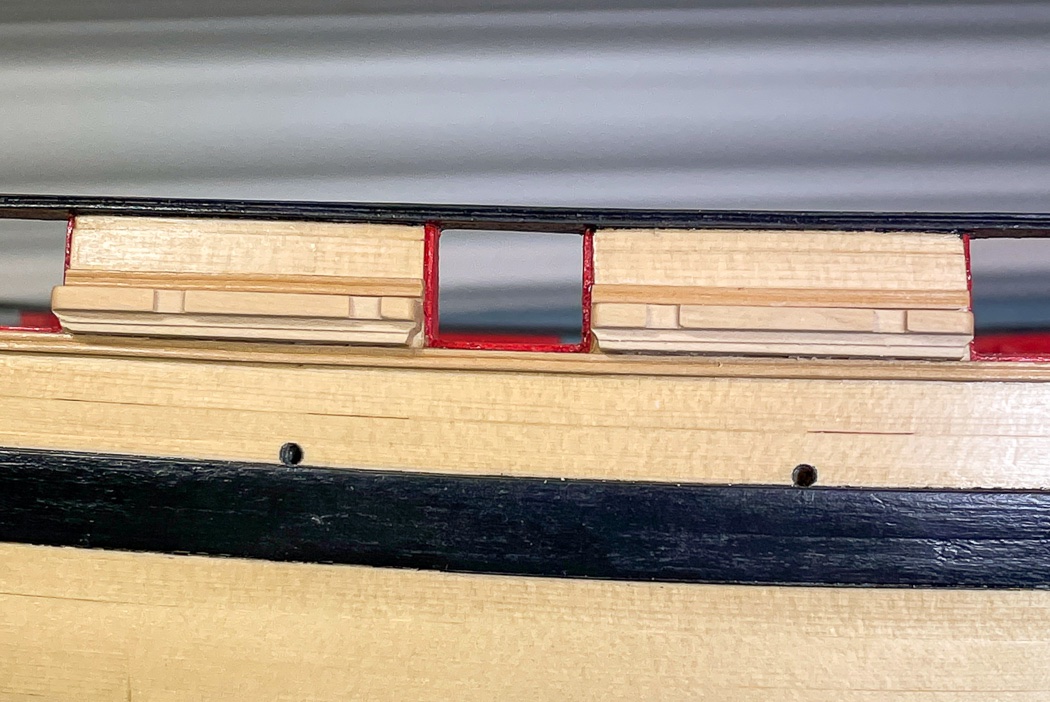
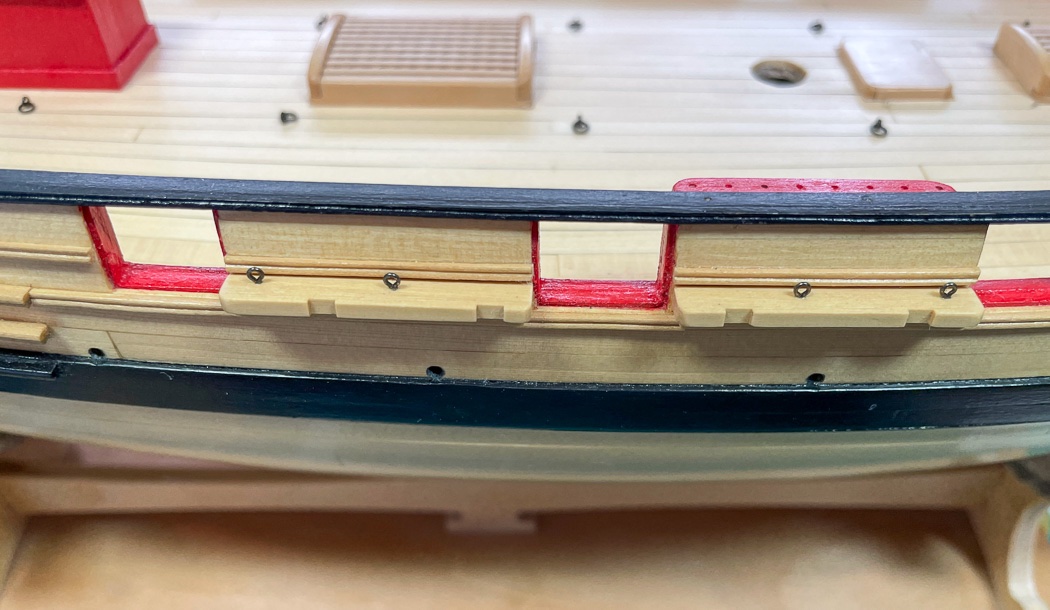
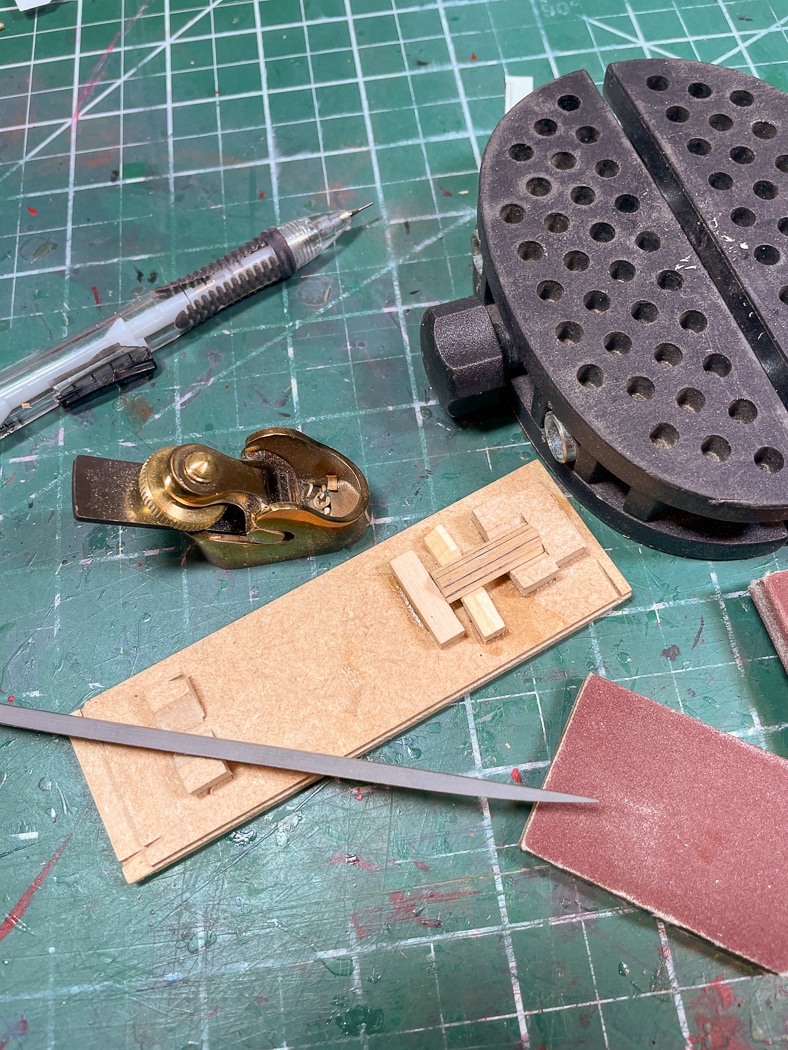
- 778 replies
-
- 17
-

-
- cheerful
- Syren Ship Model Company
- (and 1 more)
-
Very nice work. Cherry is such beautiful wood. I’ve used it on two models, I like how it ages, looks even better after a few years.
-
Thanks for the kind comments Garthog. They really do look authentic with application of the powder. The only thing is they don’t up to a lot of handling once it’s applied, they mar easily, then it’s out with the softest brush to buff it up again. The two long guns, 6 pounders I think, do in fact have a small bore. I’m not sure if it’s accurate or a manufacturing choice. Chuck’s mini kits, of which these are, are so good I’m sure he had a reason. Maybe the brass barrel being so long and skinny wouldn’t hold up with a larger bore.
- 778 replies
-
- 2
-
-
- cheerful
- Syren Ship Model Company
- (and 1 more)
-
It takes a little work and application, especially for the barrels, but it really is good stuff once you get the hang of it. Rusty Brown from the Doc O’Briens Weathering Powders set. Be sure to get the weathering powder brush set too. I use three different very soft brushes to apply, burnish, and buff it. I do like how they look, won’t do another cannon without it.
- 778 replies
-
- 1
-
-
- cheerful
- Syren Ship Model Company
- (and 1 more)
-
Thanks Alex. I went to high school in Heidelberg, we lived there for 7 years. Our graduation and our prom were held in the castle, beautiful city.
-
There are many people much better than me, both them are. I’ll use any tool I can to do my own best work. Chris Watten puts hie prototypes together with a Stanley knife. Such things are beyond me.
-
Thanks Rusty, representative of some points along the way😂
-
Thanks Chuck. I’ve become a big fan of Weathering Powder, it gave such a very different and much nicer look to the carronades. Thanks for sharing that in the monograph. I am happy to have rounded my last axel for a while.
- 778 replies
-
- 1
-
-
- cheerful
- Syren Ship Model Company
- (and 1 more)
-
Not sure what that lesson would be. I enjoy the use of all tools, including those with or without power. I don’t think something is better or worse based on the tool used. Look at the incredible work of Marslav who uses CNC with his mill. That’s also art.
- 778 replies
-
- 3
-
-
- cheerful
- Syren Ship Model Company
- (and 1 more)
-
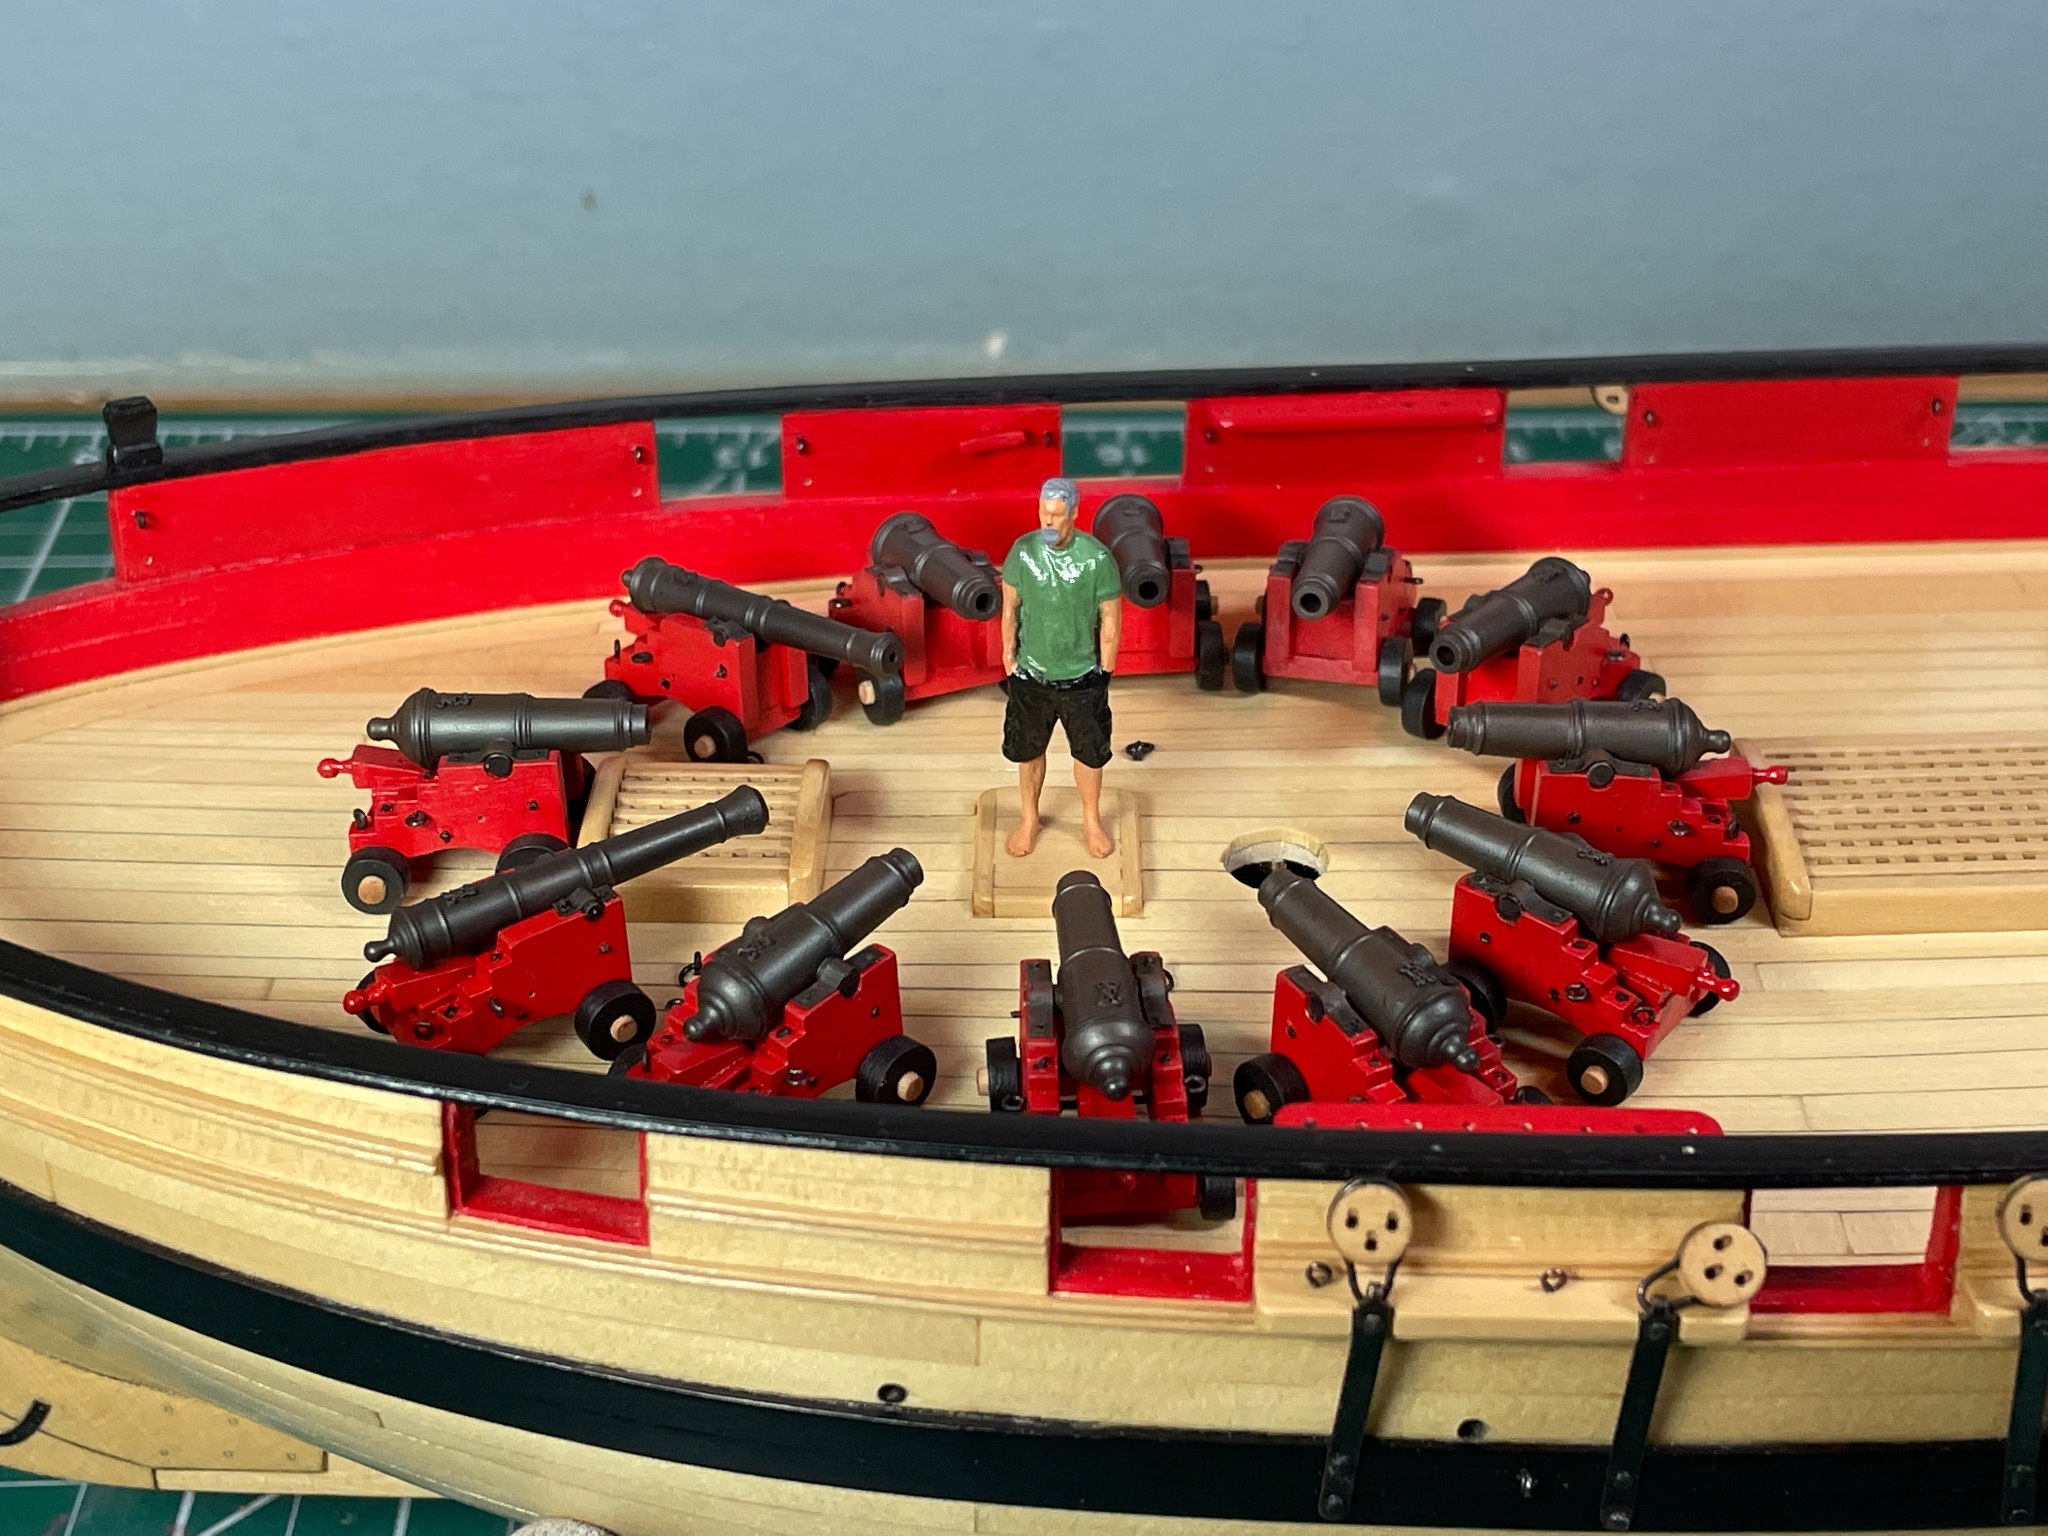
My Arsenal is complete Now which way do they point...

- 778 replies
-
- 18
-
-

-

-
- cheerful
- Syren Ship Model Company
- (and 1 more)
-
Thanks BE. I have a lot of such happy days and determining angles😳 It’s all fun though...afterwards...
- 778 replies
-
- 1
-
-
- cheerful
- Syren Ship Model Company
- (and 1 more)
-
Is there a source for the needed Cherry wood from the materials list?
-
Thanks Garthog, I appreciate the comment. You should get the mill. Relatively inexpensive and very handy.
-
Thank you. The Alaskan Yellow Cedar really is pretty wood, and easy to work with for a model.
- 778 replies
-
- 1
-
-
- cheerful
- Syren Ship Model Company
- (and 1 more)
-
I appreciate all the likes and those taking the time to comment. For Chuck to refer to my post as outstanding is special. I can respond that Cheerful has been and continues to be an outstanding experience. Thanks to all for the encouragement. I hope the log helps others to enjoy this model as much as I have.
- 778 replies
-
- 1
-
-
- cheerful
- Syren Ship Model Company
- (and 1 more)
-
Very impressive making your own blocks from an old ruler! I make mine by completing the order form on Chuck’s website 🤣
-
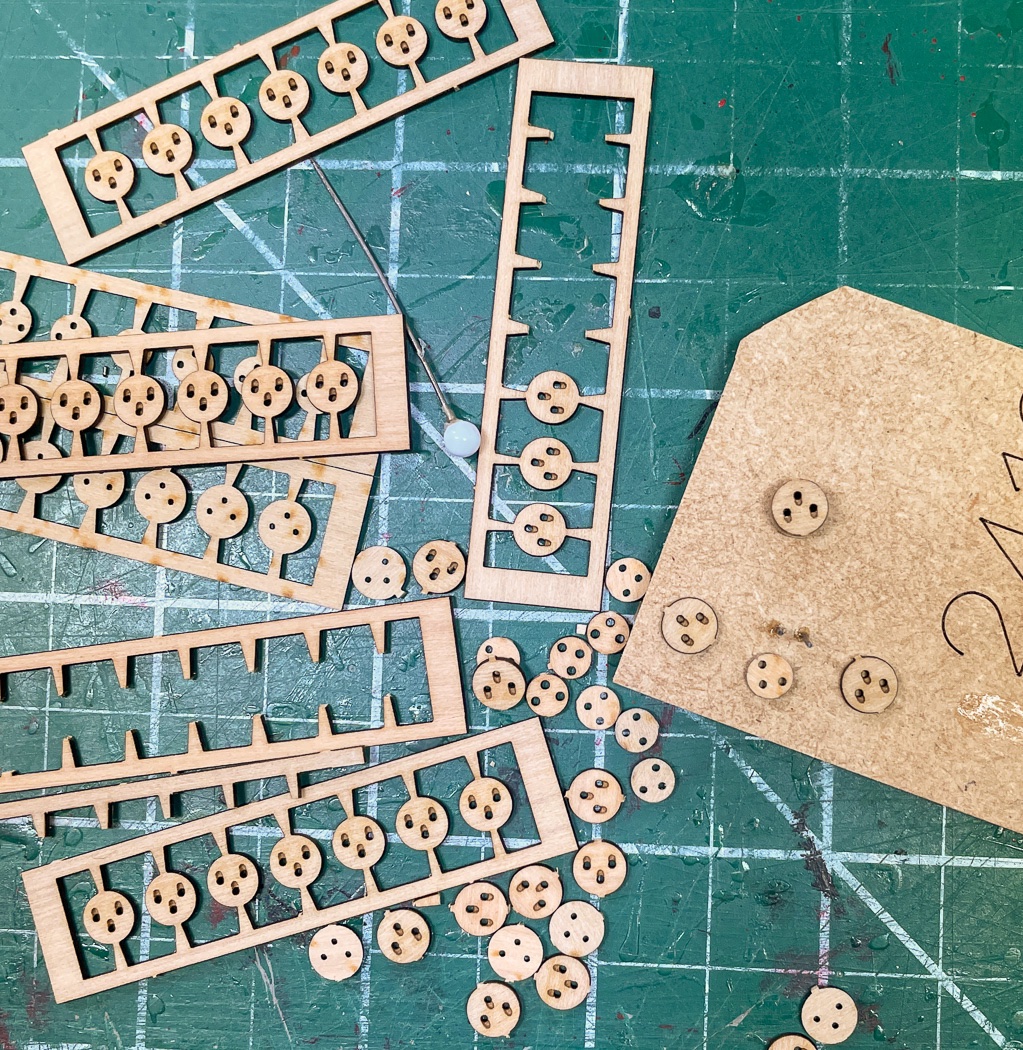
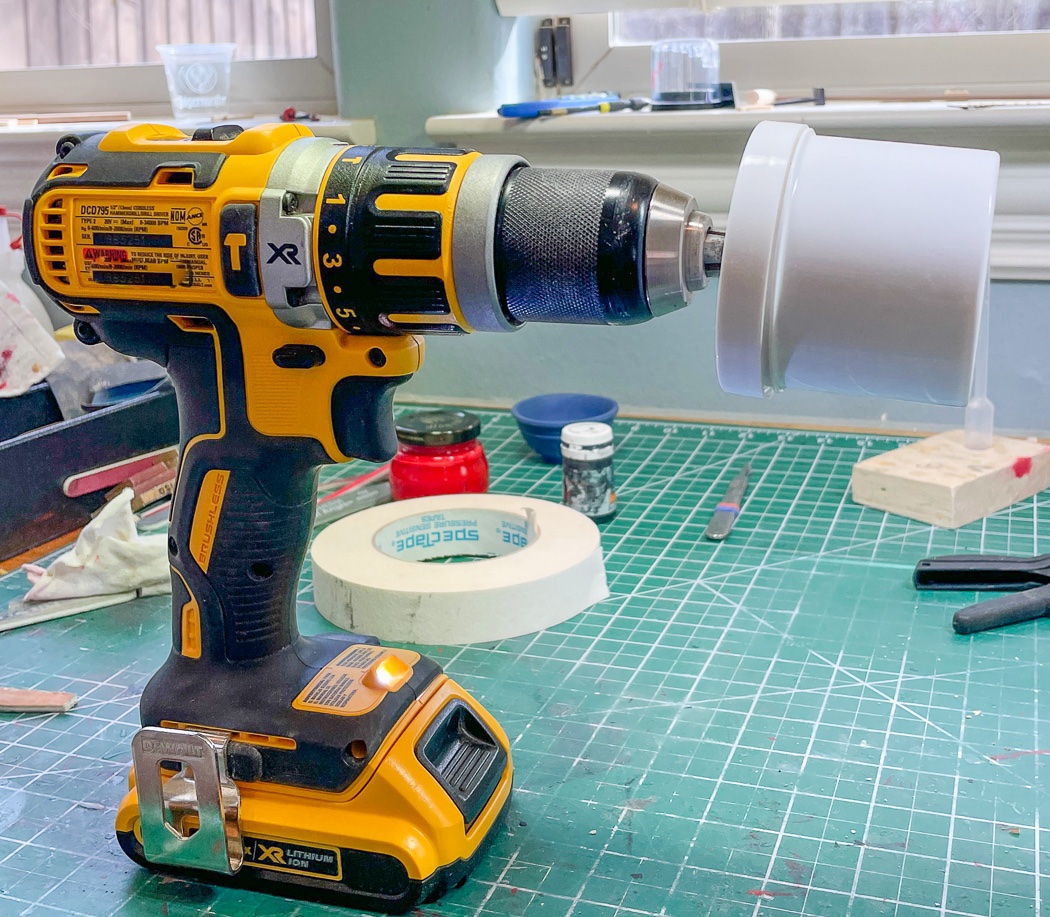
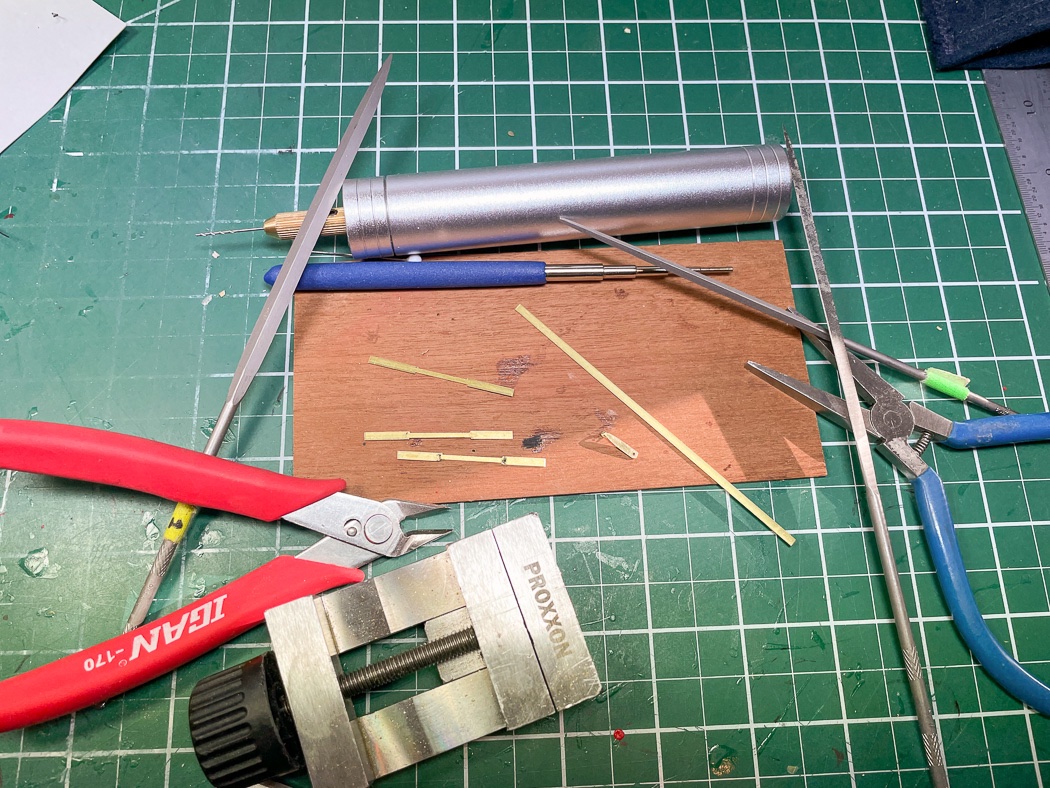
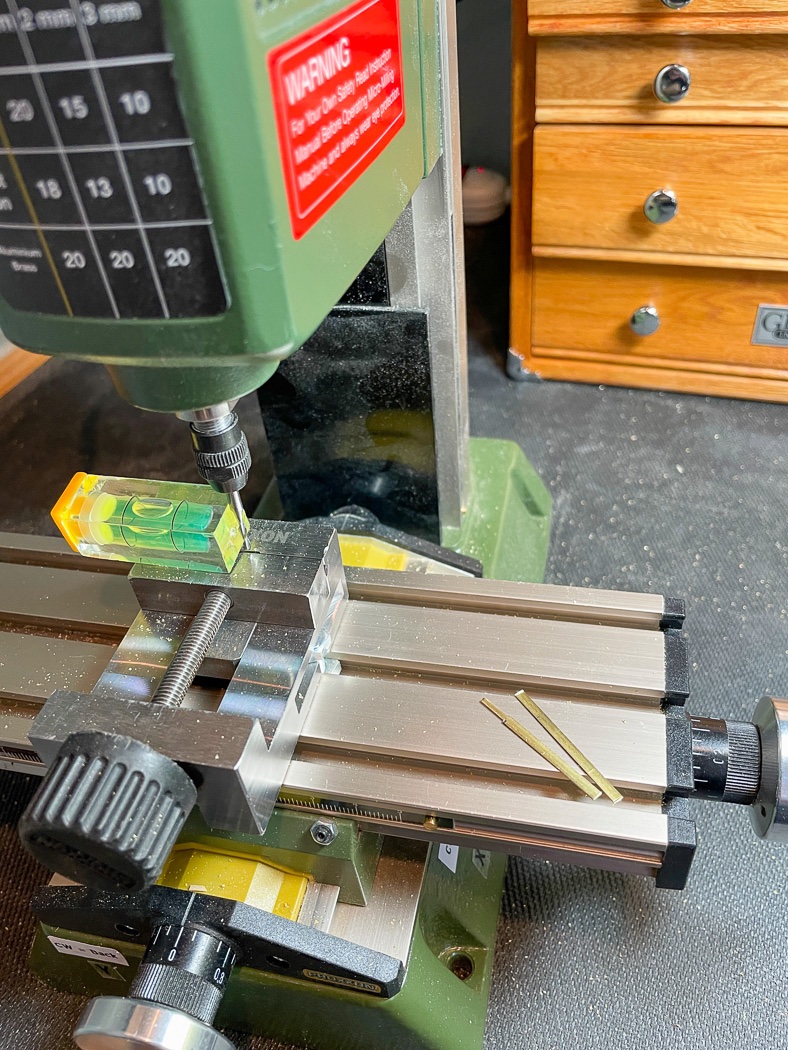
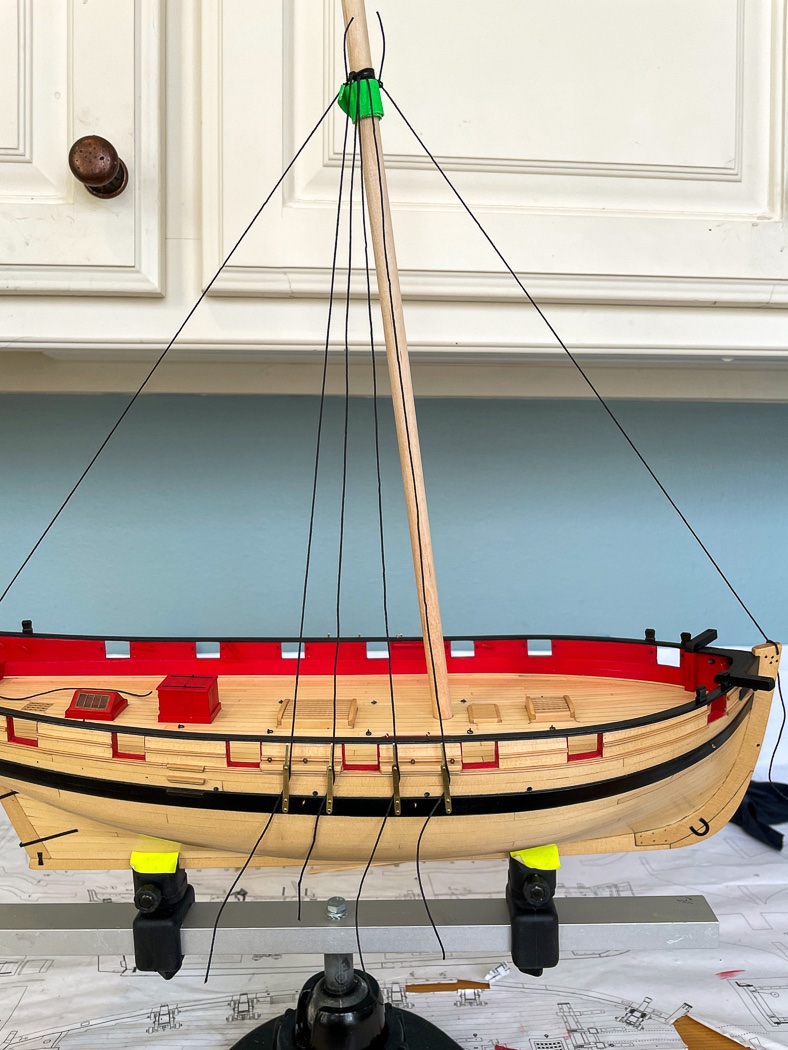
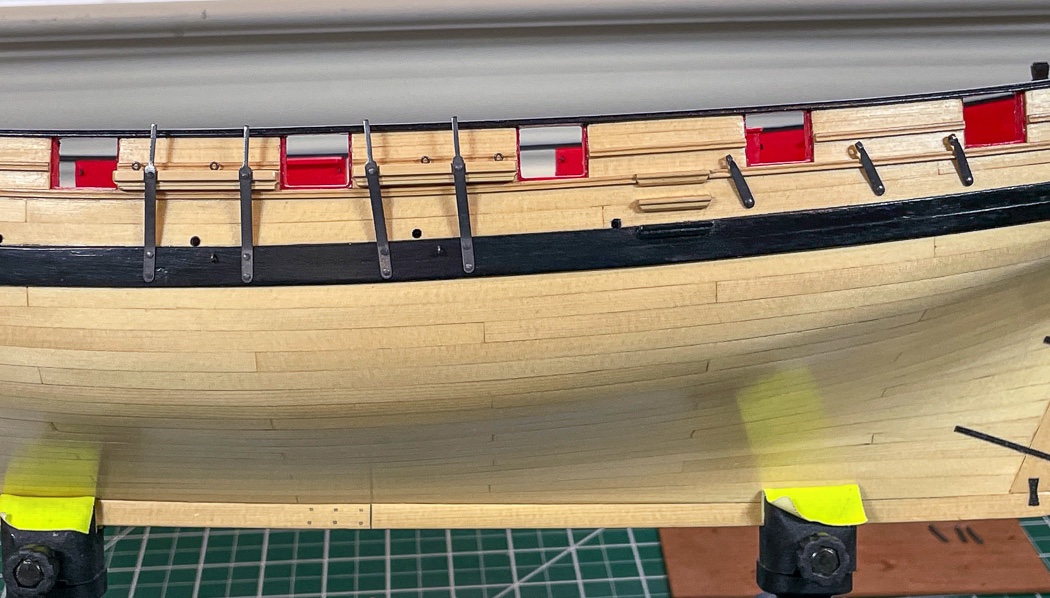
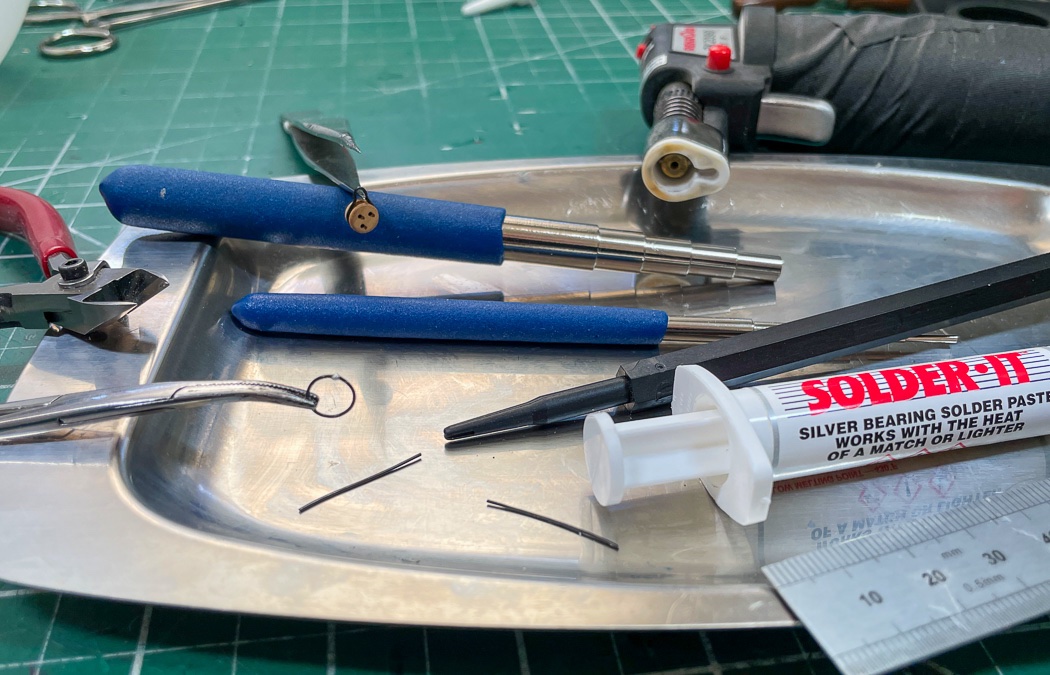
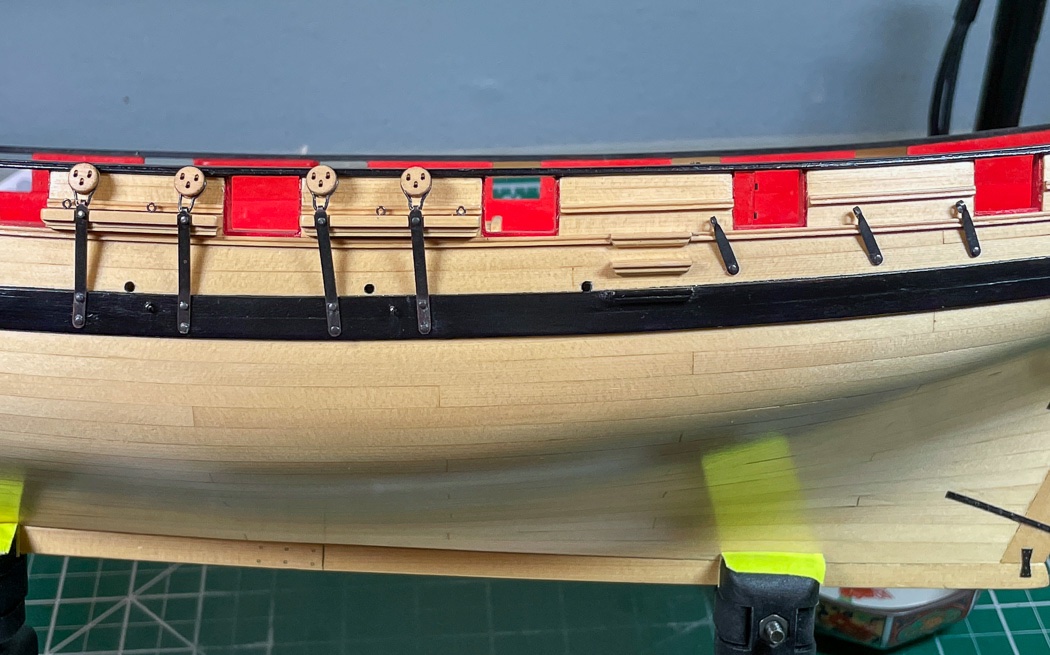
Channels, Chainplates, Dead Eyes, and Strops This is that moment when you know you’re not in kit world anymore. No PE to cut out and assemble and or laser ready wood to shape and paint, for this segment of the build everything is made from scratch. By now I sound like a broken record, but here again was something I’d never done. While Chuck’s monograph was as clear and helpful as always, I still had to figure out a way make each of these components. I had never worked anything from metal, I know - what limited skills I have. First up is the channels, take a stick of wood, make it pretty and capable of holding deadeyes and chainplates, then make four of them. The best purchase I’ve made for my modeling is my Byrnes saw, nothing beats it. Quickly moving into second place is my Proxxon MF 70 Micro Mill. I’m learning more and more how to use it, still basic stuff, but things I’m not really sure how I would have made without it. I chose to make these from my stash of boxwood. I like the yellow cedar but boxwood works better for more intricate pieces, it is a harder wood and holds shape nicely. The boxwood and yellow cedar are complimentary on the model, adding just a little tone difference. Chuck’s mini-kits come in both woods, I chose the boxwood for all of mine, even the ones I painted. - Next up is making the 6mm deadeyes. I made a simple jig to line up the three pieces, a small center and two outer pieces, basically a vanilla Oreo cookie, glued together after removing the char. I wanted to give the deadeyes a little character, a bit too neat right off the sheet, so I tumbled them in this MicroMart block tumbler. It has a 220 grit sandpaper bottom, sides, and a 4 part spindle also covered with 220 grit. I connected the spindle to my drill, tossed the blocks inside and spun it until I liked what came out. Two things if you haven’t used one of these; I was more successful with it sideways as shown and I needed to reverse the drill (as in screw out not in) to match the the sandpaper. I’m left-handed so maybe I assembled it backwards, I do that on occasion, it’s a right-hander’s world. I finished them up with wipe-on poly. Then is was time for me to become a blacksmith and work in metal, I'd put it off as long as I could. I approached this step with a bit of trepidation. The monograph was clear enough on what to do, I just wasn’t sure how I was going to make 6 (near) identical backstays and 8 (near) identical chainplates from a strip of brass. For starters, it hadn’t been easy to find the right thickness and width of brass, but fortunately I’d completed this hunt a few months ago. Now I have enough to make 176 chainplates, just in case. My first step, seemingly as always, was to find out how many different tools I could use - this is just a sample. I always hand drill everything made of wood with pin vises. However, this cheap battery powered drill was essential to drill the holes in the brass, I’d have been twisting forever otherwise. The vise from the Proxxon mill proved equally handy off the mill to firmly hold the pieces. To make both the backstays and chainplates requires a bit of shaping and filing. I kept the shape simple so I could repeat it multiple times, jewelry making is not in my future. I of course could have filed these by hand, but hey, there is a mill sitting right there. It was slow going, for me, to set zeros on two of three axis for each side, 22 times (I did the backstays working from the center as shown in the previous photograph). Having finally completed the chainplates it was time to determine the proper angles using a temporary mask and string, a process most of us know and applies to any model (well not modern war ships I suppose). With the holes marked and drilled then it’s a dry fit to confirm everything is lined up. I only needed about a third of the length to attach the strops, but I didn’t know that when I was making them. And then off to the blackening station. I chose to blacken rather than paint these. The result is a more worn, gun metal look. I was originally going to paint them Iron Work Black like other parts of the model but then decided I liked these. I think it provides a little character, more of a ‘I didn’t buy these from the store’ look. I normally like to explain how I did something in the hopes it will help others in some way, or at least provide a way they don’t want to do it. I had someone ask me recently in a PM to explain how I did seizings, so I went into great detail and even linked a YouTube video. The person replied, oh I don’t want to do it like that. Sigh... Anyway, my advice for making deadeye strops is go find another build log. I had to learn every step of the way here. I’ve never soldered anything for a model, never used solder paste (though its kinda cool, you apply it, hit with a torch and it flashes into a finished connection). Now I’m going to use it for some ring bolts just for fun. I had many fails. First make a circle and solder the opening (ok, got it, at least after I learned how to use the solder) then shape that around the deadeye in the traditional shape, Pop, there went the solder joint, start over. I settled on a length of wire 22mm long. I couldn't get 21mm to work without the joint popping while bending it around the deadeye, I started with 24mm, tried 23mm - really these small differences mattered - they were too big, so 22mm it was. After many attempts I got 8 to shaped around the deadeyes and mounted on the chainplates. So yes, I made it all myself from brass strip and black wire. But I’m not the one to ask on best practices even though it turned out ok and I held to my standard of doing it over until I got it right. This stage took me a full month. Of course it was partially due to Snowageddon here in Texas, rolling power outages, the lowest temperatures since 1949, real snow to play in with the grandkids. I was playing outside with them on a Friday after it finally warmed up to 24 (F) degrees (from below zero earlier in the week). On Monday, three days later, it reached 76 (F) degrees…Texas… I admit was frustrated a bit during this phase, so many fails. I thought more than once to use some retail ready fittings in lieu of my own but none would really work without cheapening the model, and I would have regretted it later. I am glad I did it all myself, I would encourage anyone who gets this point to do the same, if I can anyone can. The next time a model calls for metal work I now have some experience, I bet I could do it in half the number of fails. On to fun stuff, I'm not far from finishing the hull. I'm going to finish making everything including the bowsprit before gluing anything on. Thanks for stopping by, I hope you were mildly entertained.
- 778 replies
-
- 21
-
-
- cheerful
- Syren Ship Model Company
- (and 1 more)
-
I have this on my shelf and will also follow along
-
I have this on my shelf as well. I’ll look forward to following along with your build.
- 185 replies
-
- 1
-
-
- queen anne barge
- Syren Ship Model Company
- (and 1 more)
-
That’s a great idea, I may not decide which way to go until I reach that point, it will be nice to have that option.
-
Those look great, like BE I did them for my Pegasus, mine are still looking good after all these years. Like most rigging I discovered getting the right tension without being too tight was the key - that and gentle tugs a line at a time to get it right. As always a nice tutorial!
- 725 replies
-
- 1
-
-
- vanguard models
- speedy
- (and 1 more)
-
I’m the first shipment 😁
-
I like to demonstrate my lack of nautical knowledge. I have no clue which boats are which and why there are 8 different ones...boat..oars...long...short apparently doesn’t cover it😂🤣