


glbarlow
-
Posts
4,127 -
Joined
-
Last visited
Content Type
Profiles
Forums
Gallery
Events
Everything posted by glbarlow
-
 Thanks for the comment. Chuck states that’s the case in his monograph, and reminds us it’s a model. I’ll look forward to see how your approach comes out. The mast cap was fun to make, historically I bet they didn’t have a Proxxon mill to spin it on 😂
- 778 replies
-
- 1
-

-
- cheerful
- Syren Ship Model Company
- (and 1 more)
-
Great work on that detailed painting, that takes a really steady hand!
- 201 replies
-
- 4
-
-
- Duchess of Kingston
- Vanguard Models
- (and 1 more)
-
I appreciate the video but I barely know how to use it as it is and I don’t speak that language...😂🤣
-
Thanks for the comment. I actually have three prior logs here, Vanguard, Fair American, and Pegasus. Unfortunately Pegasus and Fair American were lost in the great 2013 systems crash and I wasn’t smart enough to keep a backup. Vanguard is still here though. The links in my signature line carry you to either gallery photos or those logs.
- 778 replies
-
- 1
-
-
- cheerful
- Syren Ship Model Company
- (and 1 more)
-
The low spot may be problematic as your gun ports will then out uneven, my suggested method might have helped. I recommend you remove itshape it, and do it again. You can bevel the garboard plank (one closest to the keel) to fit tight against the keel, You don’t need a rabit. Be sure to also taper, cut the right angle, and bevel the leading edge at the bow. Don’t put on the stern post until 2nd planking is son but sand and thin at the stern so both planking equal the width of the stern post. it doesn’t look you faired the hull before putting on the patterns, that will make fairing harder. I also broke that stem piece, more than once as I recall. You’re painting it black eventually just ensure you have it straight and it will be fine. Rigging lines go through those holes so it has to be strong enough to support that. All of this is described in other logs, I always read every thing I can find about the next step in whatever log I can find, beats reading the fact. The instructions in the model are thin, you need all the help you can get. That still applies to me and I’ve built 9 models.
- 139 replies
-
- 1
-
-
- Lady Nelson
- Amati
- (and 2 more)
-
I was reluctant at first but I'm now a big fan, I got them from MicroMark here. There are other brands I'm sure, the doc o’brien seem to be a micro mark exclusive. The key is a light touch - a dedicated set of soft brushes are also essential, I have these. I brush it on with one brush (a little goes a long way) then use two other brushes to burnish to a finish I like. Even if you over do it it can be wiped off with a soft cloth. Only caution is do the weathered pieces separate from any other painted piece (I took my windlass apart to do the black "metal" pieces and did the pawls before adding them to the bowsprit step. You saw the cannon barrels, that's an essential step for me going forward. Definitely try it out, you'll be pleased with the result.
- 778 replies
-
- 5
-
-
- cheerful
- Syren Ship Model Company
- (and 1 more)
-
Welcome to the forum and the Lady Nelson. As John mentioned I built the Lady Nelson after a long layoff from modeling. I’d encourage you to check out my log from the link John provided or from my signature line below. I wrote it on. A different, very quiet, forum then copy and pasted it after I came back here to MSW to stay. I also posted photos in the galleria section of the finished model that might prove helpful. One thing you’ll see there is how I use the plans to trace the outline of the hull, cut a board from that, then use the board to shape the gun port patterns. You’ll also see I struggled with the transom too and, among other things, where I elected to scratch build the bowsprit step because it was so out of scale preventing a good fit of the bowsprit. Be sure to fair the hull properly before adding the first plank and add some balsa filler at the bow. You do want all the bulkheads to be square as well. The whole basis of the ship starts with the frame, obviously, you want that frame to be as near perfect as you can get it so take the time to get this seemingly boring part right. I’ll follow your log and see if I can be of help from time to time. The LN is a great first model, it’s the same as any large kit, just less and small. The techniques you learn and use will serve you well. Have fun!
-
Thank you Chuck! The winch is up next and will yet be a new challenge. It’s a superb model, I do really enjoy the work!
- 778 replies
-
- 4
-
-
- cheerful
- Syren Ship Model Company
- (and 1 more)
-
I’m very glad to hear that, it’s my goal to help others as I’ve been helped on this forum Thank you, you’re still on my go to list when want to check how to do something. Thank you Bob, I appreciate the kind comments. Just so you know both CA and PVA were involved in the production 🤣😁 I appreciate the comment, I enjoy posting the updates in the hopes they are helpful. Also, thanks everyone for dropping by and the Likes!
- 778 replies
-
- 2
-
-
- cheerful
- Syren Ship Model Company
- (and 1 more)
-
I’m sure I did miss a zero, it’s a turn of the wheel, but I probably meant my accuracy with it 🤣😂🤪 It’s a great tool, I’m looking forward to learning and more coaching.
- 778 replies
-
- 1
-
-
- cheerful
- Syren Ship Model Company
- (and 1 more)
-
Hull Planking Question
glbarlow replied to tomsimon's topic in Building, Framing, Planking and plating a ships hull and deck
I'm not sure I was factoring a log cabin into first world homes - the variance in most HVAC systems keeps the humidity within a range that it would not affect CA glue. I was not intending to get into a home construction dialog, but I'll withdraw the general point and just say specifically that the humidity range in my home does not affect the models I've build using CA glue and let it go at that. -
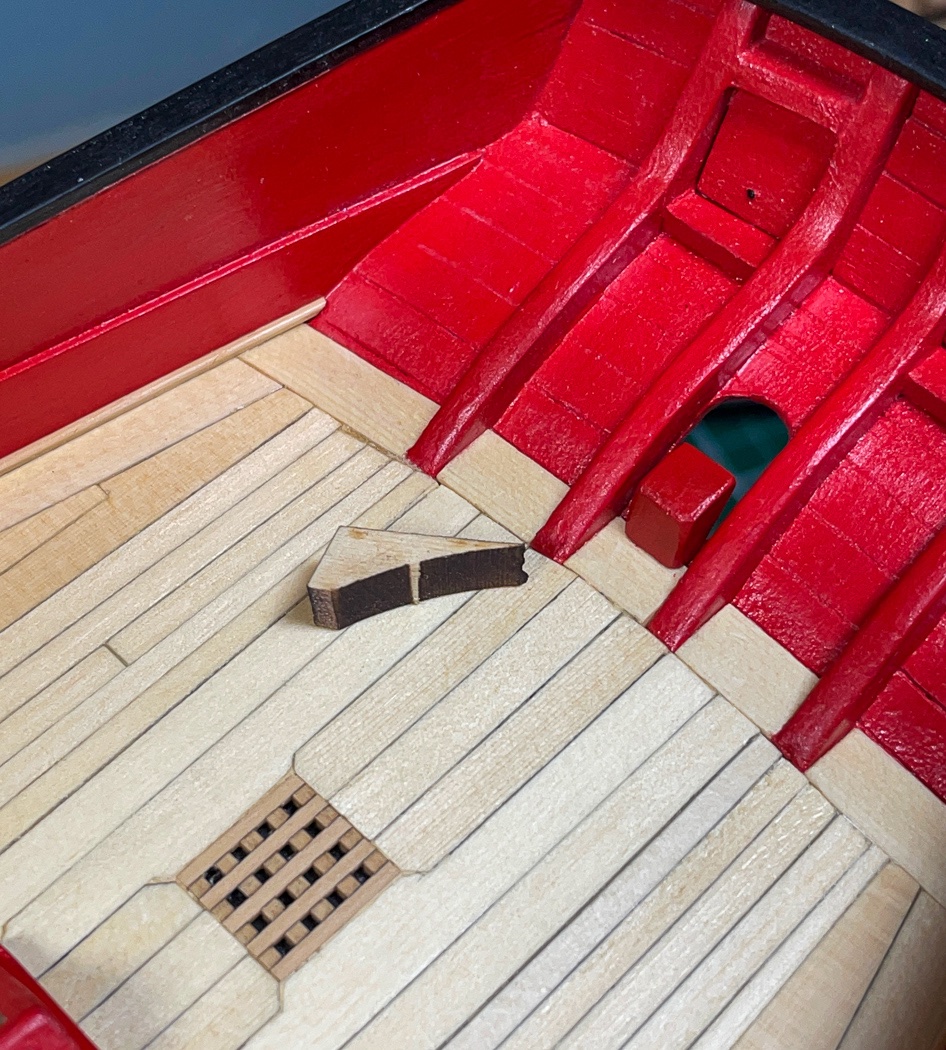
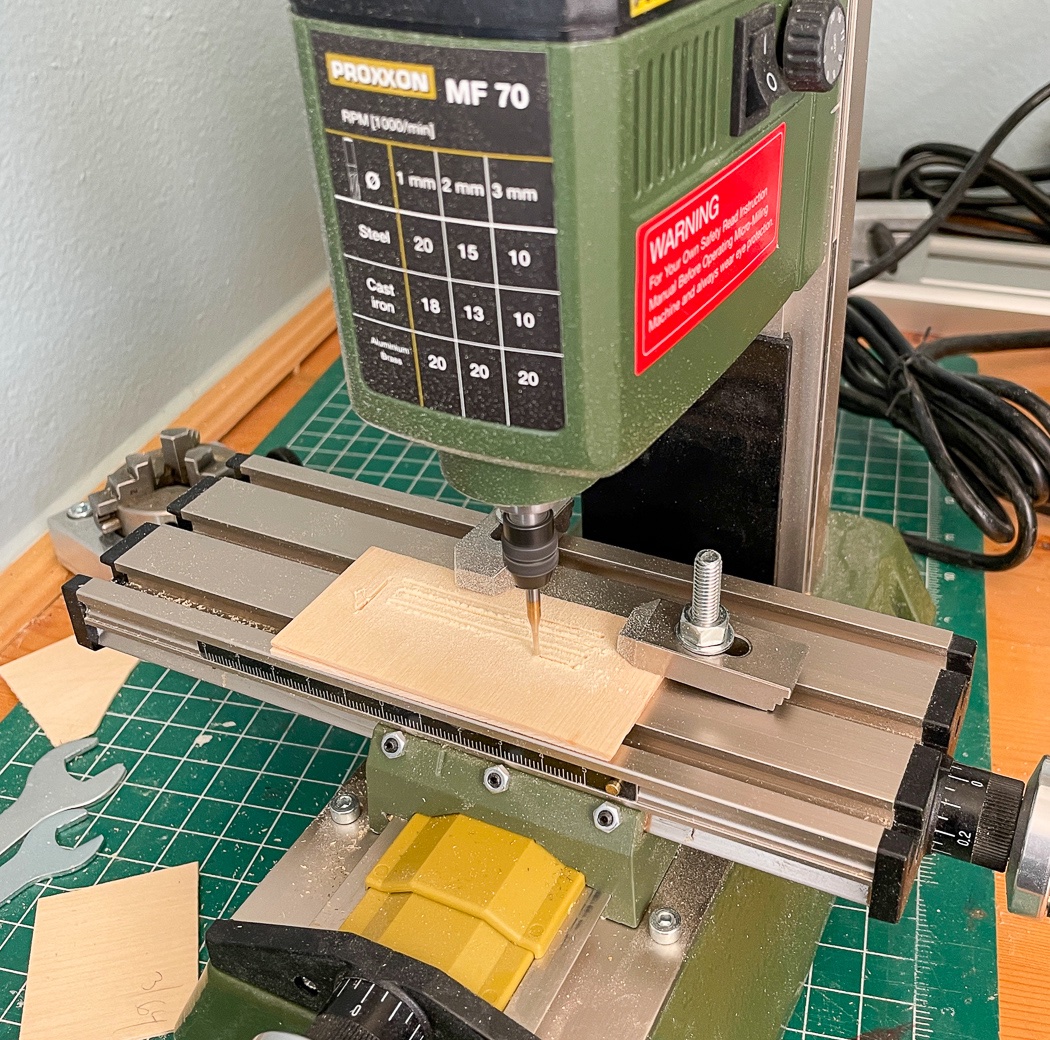
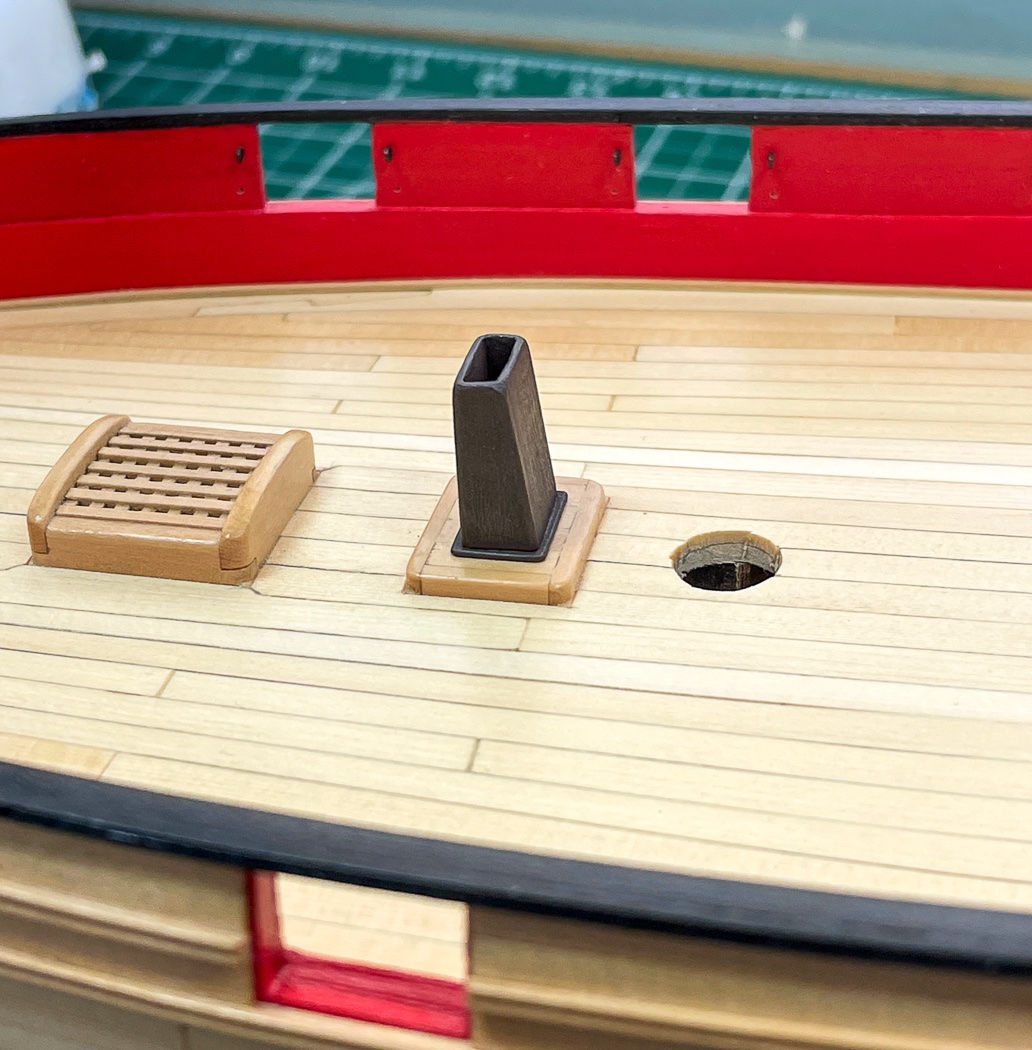
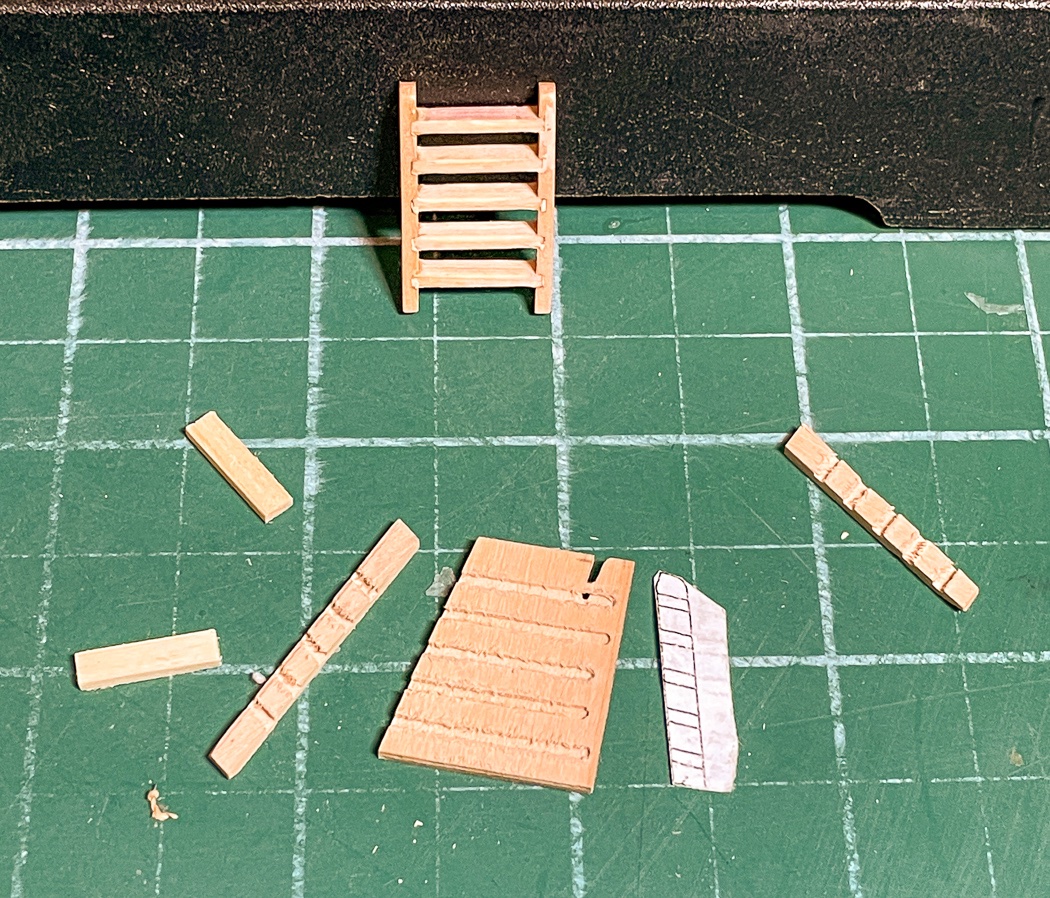
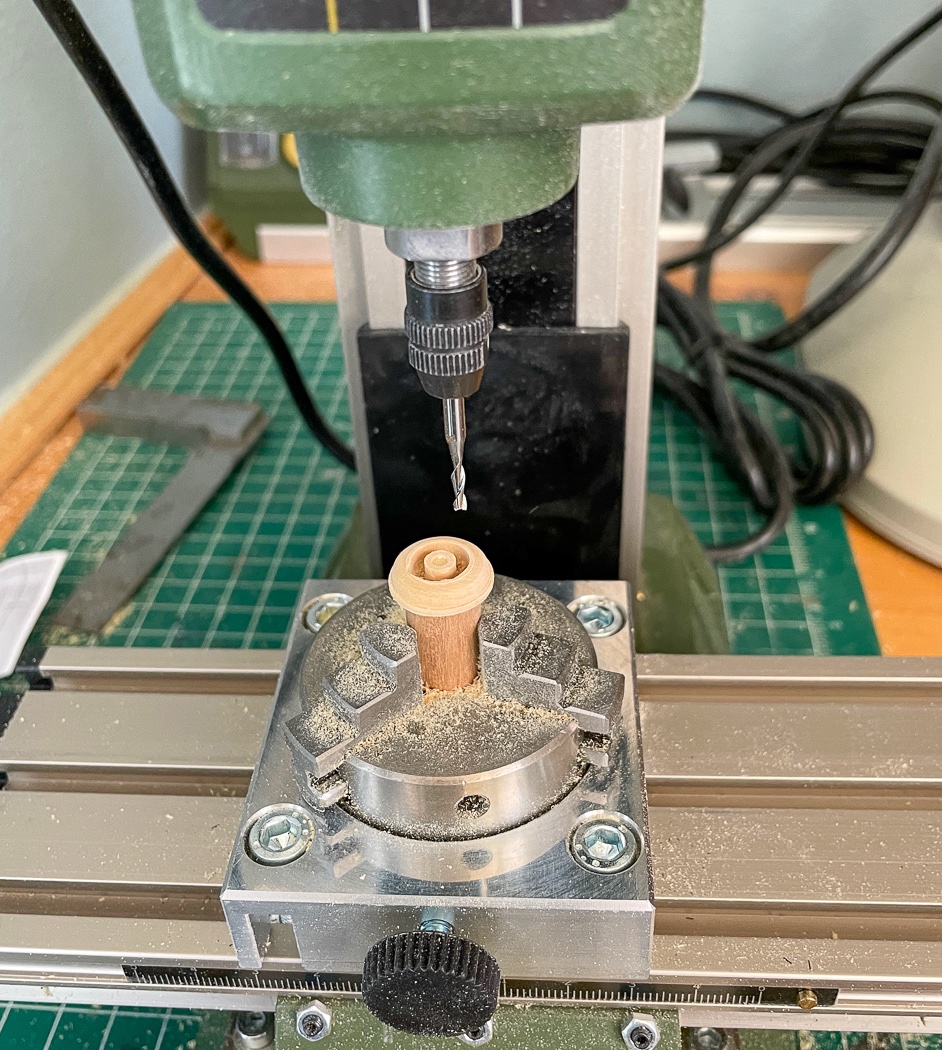
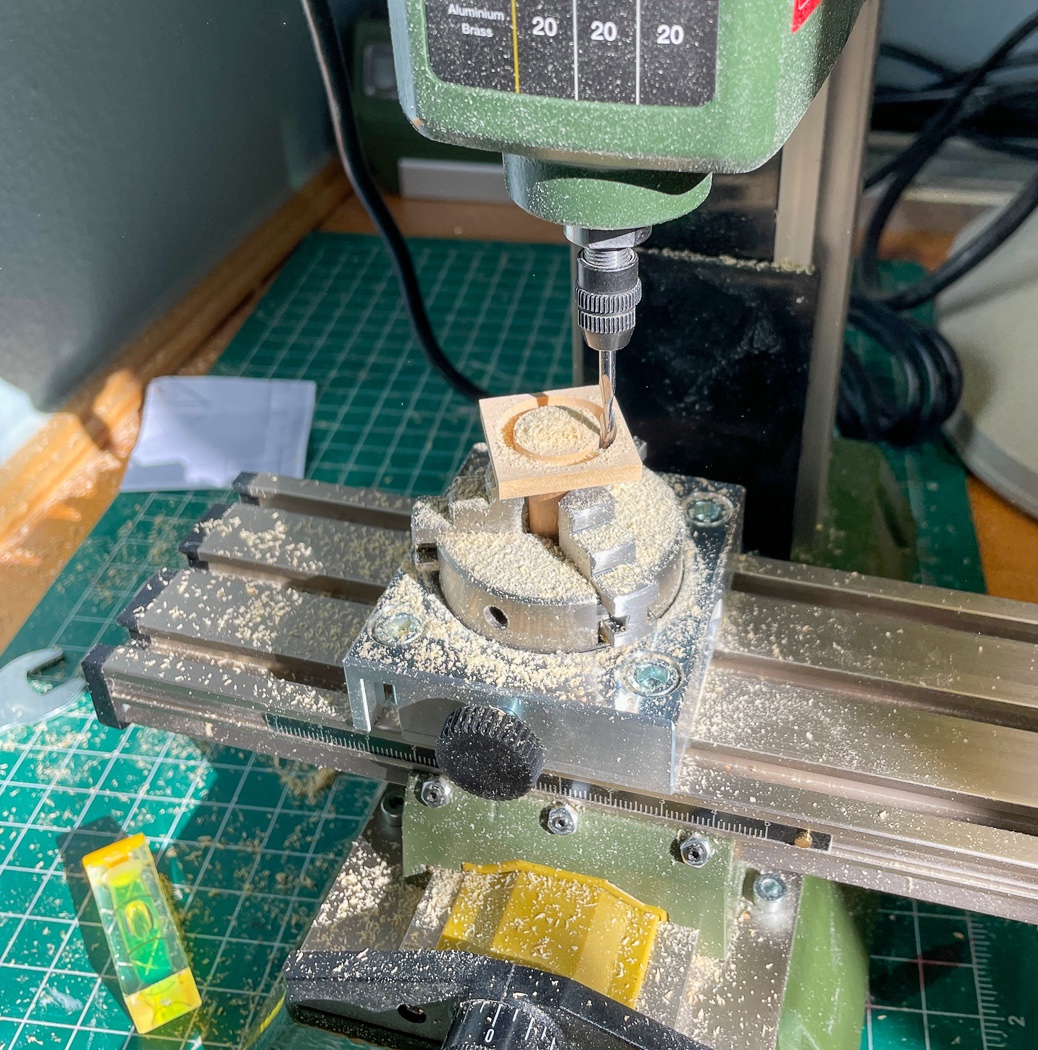
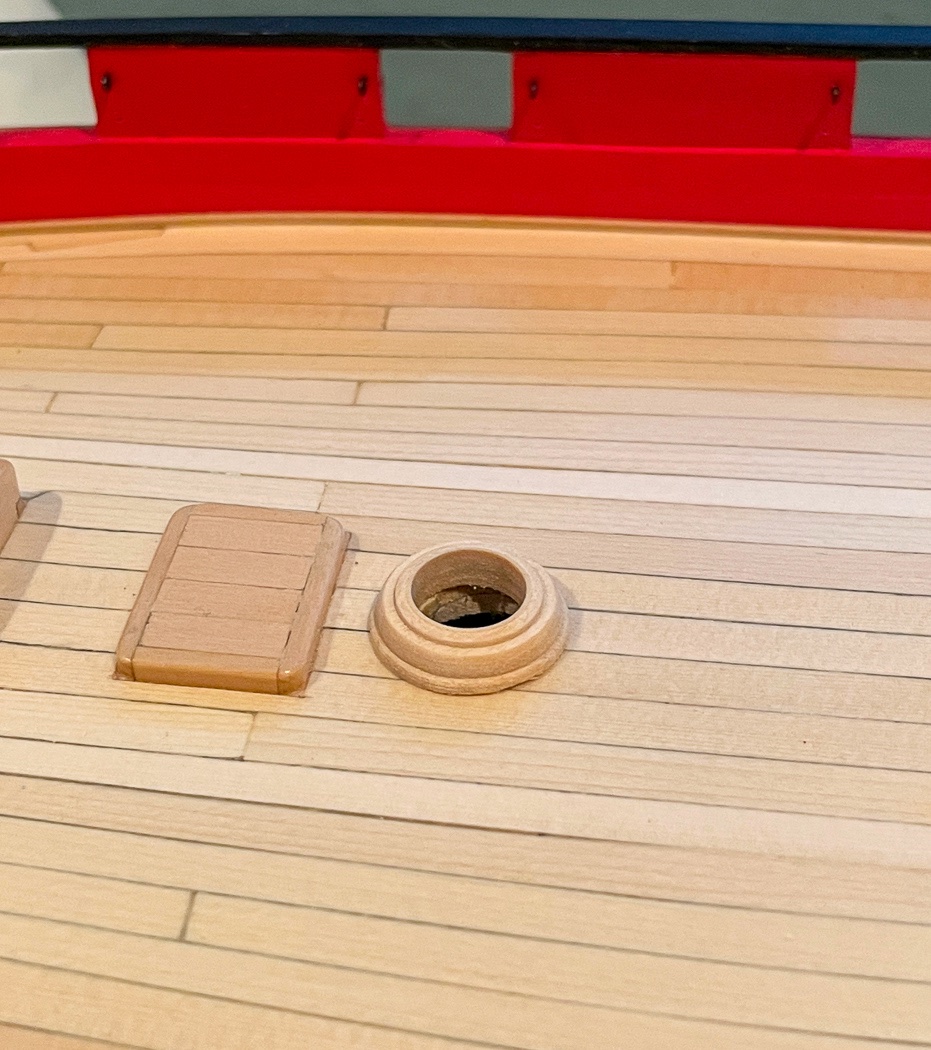
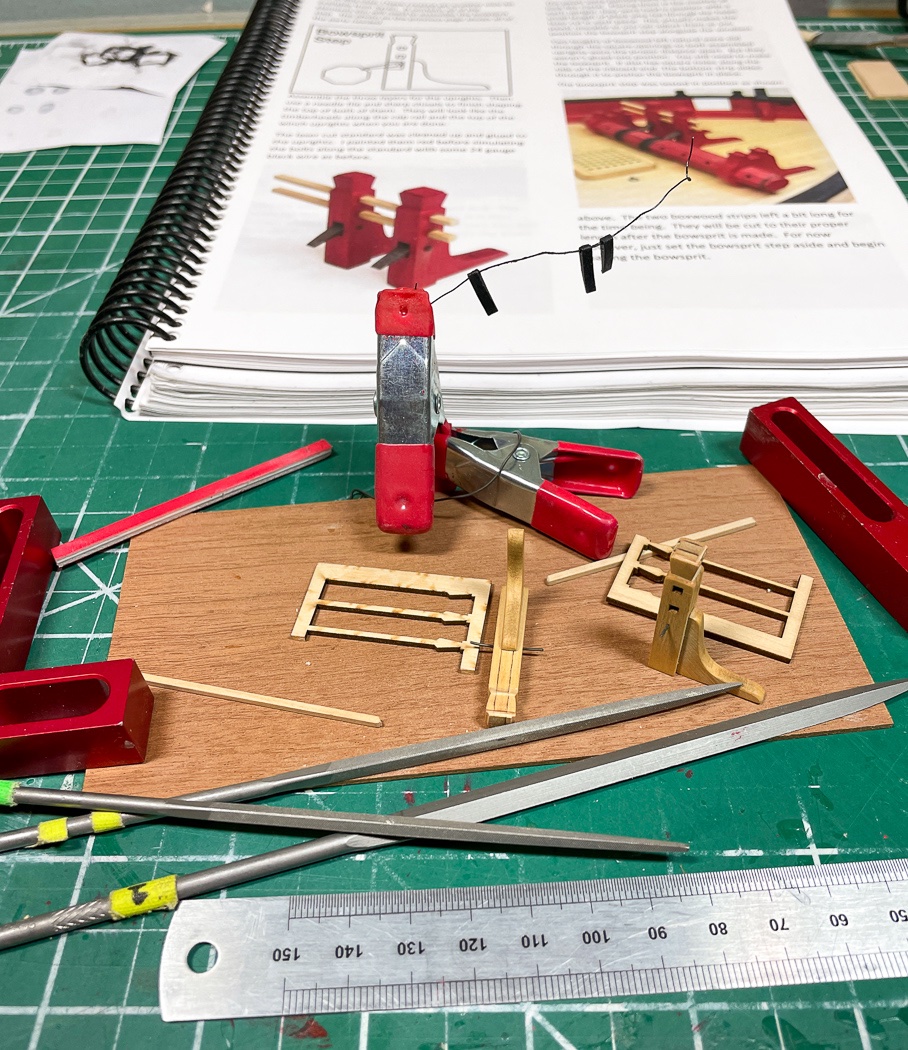
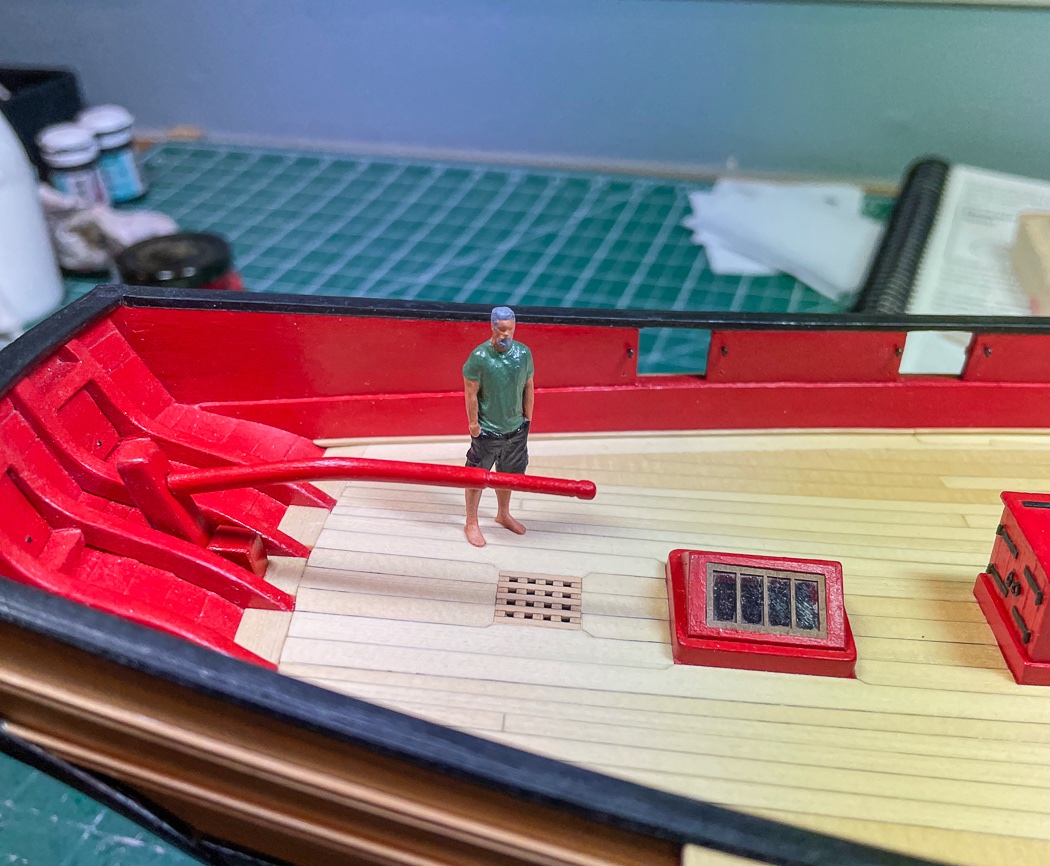
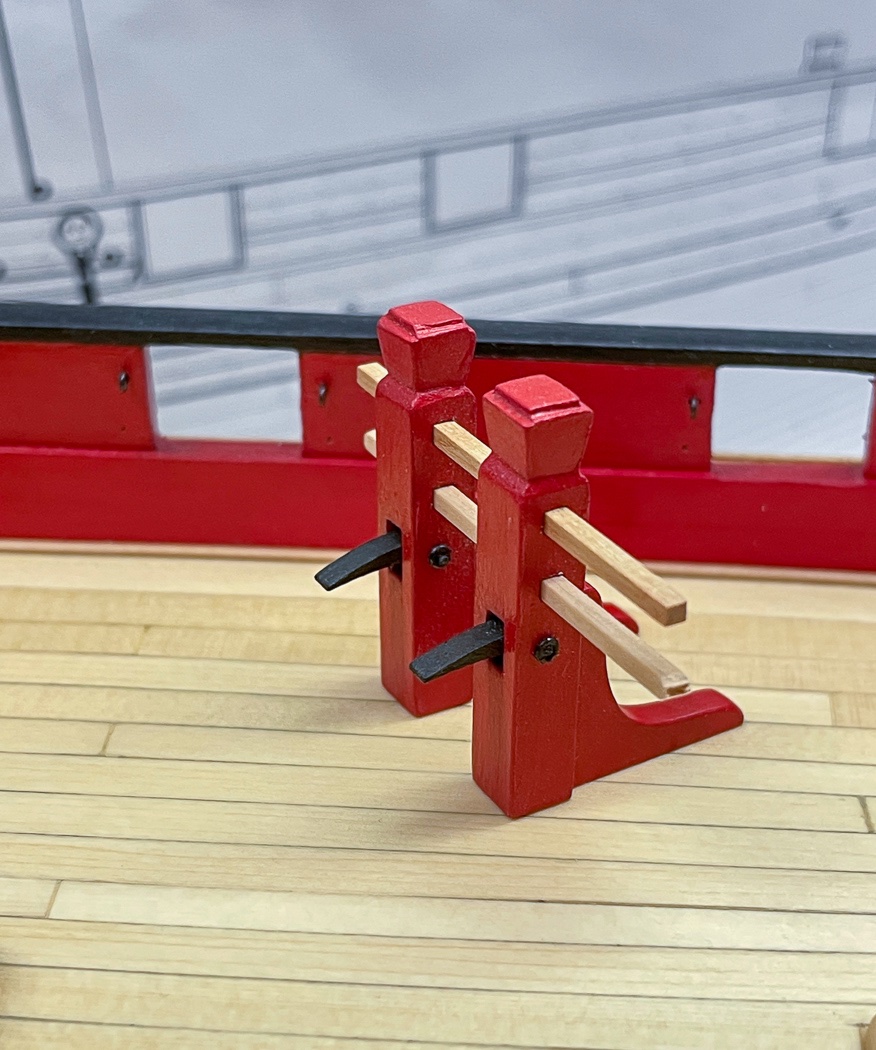
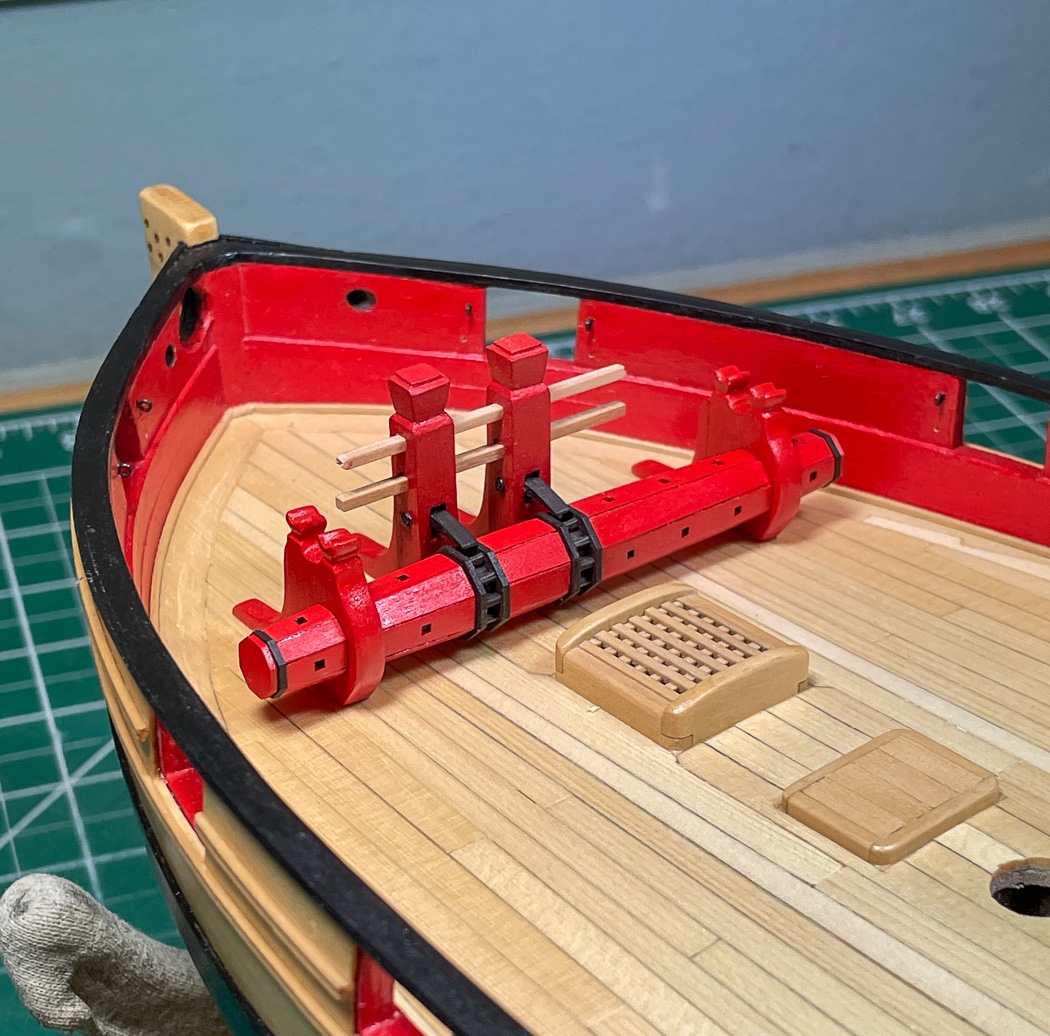
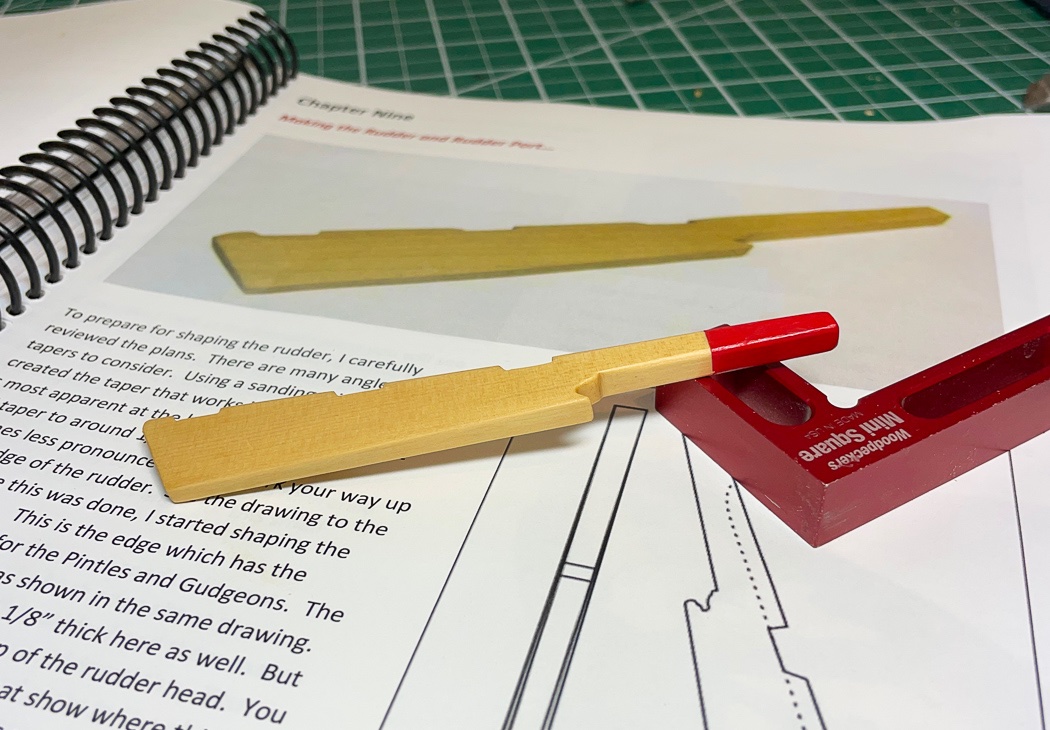
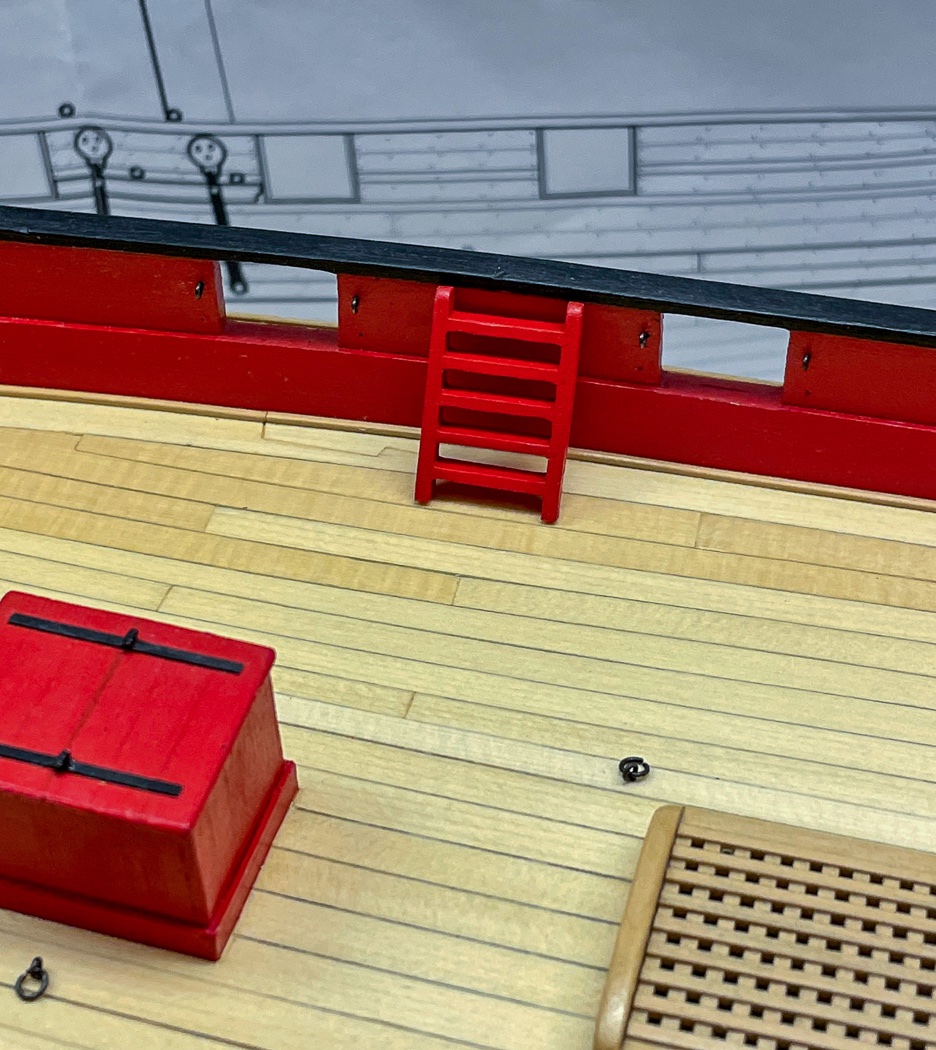
The deck build out. Happy New Year! With the holidays and family work is going slow on Cheerful. I’m off book from Chuck’s monograph, choosing to do some random small projects that I could do independently as I found workshop time. I don’t plan to glue stuff to the deck until I have most of it built and ensure everything fits together. So nothing shown below is mounted, just temporarily sitting in their future homes. Having first built the stove and mounted it below decks I then added the galley stove pipe (ok, so I didn’t build a stove:-D). The stove pipe is straightforward, I took the dimensions from the plan and cut the four sides from 1/64 yellow cedar sheet then painted with Admiralty Ironwork Black. Though not on the plans I also added a .025 piece to the bottom to simulate the lead sheet that would have sealed the pipe between the deck and the stove below. I rounded all the edges quite a bit and also applied Doc O’Brien Rusty Brown weathering powder to the outside and Smoky Black powder to the inside to help simulate it being metal. I had acquired some thin lead sheeting for this galley pipe but it just looked clunky, so out it went. The weathering powder looks great in combination with the Ironwork paint. Next up was the extension of the stern post into the deck. I like how Chuck accounts for historical accuracy but remembers it’s a model and not the real thing. This small post starts as an overly large laser cut piece from the starter kit that I shaped to fit. Though small, it took quite a bit of time to shape and fit properly, there are more angles than you’d think. The photo shows the starting point (from the included extras) and the final result which now looks like the stern post was cut through the deck as a single piece - no way to know the difference. A small thing but kinda cool. Part of getting the stern post to fit is matching it up with the rudder. It requires some shaping to taper it from top to bottom on the trailing edge and a different taper on the leading edge. The plans are very clear so I used my various sanding tools to get what I liked, painted red the portion that goes through the deck, and applied multiple coats of WOP to the rest (probably a few more coats yet to go). Its’ a nice and proper look I think. Since I was working on the stern I also cut and shaped the tiller from some scrap boxwood. I was mindful of the shape necessary to peg into the rudder and curve it to "hand height" above the deck at its end, mini-me verified the height and length were ok. Nothing is glued, the tiller is just sitting temporarily pegged into the rudder, it will be better aligned once glued. I used the lathe (really I was looking for an excuse to use it) to shape from a square straight piece then my plank-bending station to create the curve. I cut some subtle grooves in the “handle,” I wouldn’t want a hand to slip off the tiller during a storm. I don’t know that my method to build the tiller is one I’d repeat - I put dry heat wood bending to the test with the thickness of this tiller, it took multiple times to slowly get the wood to bend to the needed curve. It may have been smarter to rough cut it the curved piece with a scroll saw and shape it from there. But hey, I got to use my new lathe so… It’s possible I may make this again, I’m not completely sure I like it. The mast cap was next, along with the chance to use my mill (Cheerful has been my excuse for a workshop upgrade or two). I have left the inside edge intentionally a bit small and the bottom not sanded, I’ll sand it out to fit the mast and the deck once I make it up later on. Here’s the final version (maybe) with WOP added. As Chuck points out a real cutter would probably just have tarred wrap at the base of the mast, but where is the fun in that. This technique comes from @DelF who was kind enough to explain to me how to go about making it. I’ve made about seven or eight “practice caps,” improving a little with each one. One thing I’ve learned is how fine the measurement on the mill X,Y, and Z axis handles are, it’s easy to set measurements at .1mm difference once you get the hang of it, and not so easy if you haven’t. I started with a square boxwood blank glued to a wood dowel then tightened the dowel into the Proton dividing attachment with the mill bit above and centered. I moved it out 10mm then cut the outside and back in 4.5mm to cut out the center. It’s key to have the piece fully glued to the dowel (I learned). I used my recently acquired Proxxon router bits (not shown) to shape the outer edge and then a small bit to cut the top ring. To be clear the attempts in the mill photos are not the one shown as the final product. I kept learning how to apply the various bits and managing the three axis of the mill, rejecting copies until I finally got one I liked. It’s pretty incredible what the mill with the dividing attachment and various bits can accomplish. Back to the mill for the ladders combining techniques learned from Derek and @Rustyj. I cut the 5 rungs in a single sheet of yellow cedar, used the plans to determine the angle, cut the struts, shaped and sanded it all and added the steps. Since I’m at it, aside from @Chuck obviously, I also give credit to @Blue Ensign for the help I get from his Cheerful log. Paint it red and I have my bulwark ladders. Making one wasn’t as difficult as making two exactly alike and adjusting the angles to the ships bulwarks. There are lots of ways to scratch build ladders, this was yet again my first attempt having only had to assemble kit ladders before so it’s the way I did mine. It was kind of fun. And then it was building the Bowsprit Step using one of @Chuck mini-kits. The design of these kits are amazing. In this case the uprights are composed of three layers, by doing so the notch for the pawls is created when the three are glued together. I shaped the tops with needle files and sanding sticks. I simulated the bolts by cutting the stem off an eyelet and gluing it over the wire that passes through the post holding the pawls (fun fishing that wire through) then snipping the wire flush with the eyelet and painting it Ironwood Black. The pawls, like all metal simulating wood, were also painted Ironwood Black and dusted with Rusty Brown weathering powder. The pass through strips are left long and loose, they will be cut to fit once assembled with the bowsprit. I had build the windlass from Chuck’s mini-kit a long while ago, it was finally time to match it up with the bowsprit step, at least temporarily, on the deck. I won’t glue any of this until I have the bowsprit made, all three have to be in alignment and fit together - so its off to my storage shelf for both items. I’m off to other deck projects, I’m thinking the winch next, but we’ll see. There are bowl games to watch today.
- 778 replies
-
- 22
-
-
- cheerful
- Syren Ship Model Company
- (and 1 more)
-
Floor polish? Very curious, how does that work?
- 201 replies
-
- 2
-
-
- Duchess of Kingston
- Vanguard Models
- (and 1 more)
-
Really Great planking! From what I’ve seen the painting on this ship really makes it pop. Rusty’s white hull against the pear looks really good. If it were mine I’d paint it, there is still plenty of pear to be seen
-
Such smooth, crisp paint work. Do you tape it off with Tamiya tape, it looks like you had no leak through?
- 201 replies
-
- 1
-
-
- Duchess of Kingston
- Vanguard Models
- (and 1 more)
-
I like the additional bulkheads and fillers at the bow. These are a really big deal from a planking standpoint and one of the many quality upgrades that separates Chris from the Industrial kits. Chuck also did this with Cheerful, so much easier to get a proper bow formed and better than having to fill in with chunks of balsa.
-
Wipe On Poly Techniques
glbarlow replied to Freebird's topic in Painting, finishing and weathering products and techniques
We keep the good stuff for ourselves 🤣😂. The $13 here is for a quart, wouldn’t make sense to me to buy other stuff to mix it, but at £30 a pint I can understand. -
We pay for quality, I’d rather have a well designed kit made from better wood and pay more than save a few dollars. In fact if it’s a “budget minded” design I won’t buy it in the first place. I want Chris to be successful, meaning he requires a fair profit for his work, I’m happy to pay a fair price for his kits so he can keep making kits. On the other hand, many of the small trivial details are ones that, should I want them, I’m happy to scratch build and as Chris says, make it my own.
-
I spent a full day scratching two ladders and another half day on fabricating a tiller, the small stuff takes as much work as the big stuff. I enjoy it even if there isn’t much to show for it. Your Flirt is coming together nicely!
-
Excellent work and result as always. Such great detail so carefully researched, the deck clutter really make it work. I’m sure your justifiably proud of the completed set. Happy New Year, I’ll look forward to following your next project.
- 261 replies
-
- 6
-
-
- muirneag
- vanguard models
- (and 2 more)
-
Yes they are and I’ll undoubtedly build them🙃. I built the 4 for Vanguard, I was recalling just how much fun those were...🤨
-
As in I don’t relish making one let alone multiples. Those little things are tough to build🤣🤪