


glbarlow
-
Posts
4,127 -
Joined
-
Last visited
Content Type
Profiles
Forums
Gallery
Events
Everything posted by glbarlow
-
 Is replace that. Balsa won’t hold up very well
 -
There are more photos of my finished model in the gallery here. HM Nelson. Not sure what you’re looking for exactly, hopefully it’s there.
- 55 replies
-
- 1
-

-
- lady nelson
- victory models
- (and 2 more)
-
Assuming it’s basswood it’s no problem. Even if you scorch it a bit it’s easily to lightly sand off.
-
Painted they look ok, I considered that at the time as well but thought, my limited skills aside, that it might end up clunky so I moved on. I wish my log still existed, lost in the 2013 crash... I hope you get back to it, it’s a great kit. At least until I finish Cheerful, still my favorite model.
- 164 replies
-
- 1
-
-
- fly
- Victory Models
- (and 4 more)
-
Fairing this ship is important, especially at the bow, run lots of battens to ensure it’s a smooth flow. Be super careful measuring and placing the ports on the frame. Eventually there will be a only a 1/64th rabit around them, this seemingly harmless step carries forward what happens on the rest of the model. The thick wood used gives you the opportunity to get them lined up. I’m happy to see you’ve got the start and I wish Project Wood Source, and seemingly every other similar business hadn’t closed its doors...
-
You can carefully drill holes in the grate, better than drilling the deck.
-
Great detail and tutorials as always, once again posts for the reference file. Those are the nicest seizing I’ve ever seen. I always rig everything I can to the masts before stepping them, so much easier than later.i use a paper grid behind the shrouds with both properly spaced horizontal lines and vertical ones to stay on track with rat lines. The paper background has the advantage of my not going cross eyed by removing everything behind the shrouds.
- 725 replies
-
- 1
-
-
- vanguard models
- speedy
- (and 1 more)
-
That’s a creative and great presentation, very clever. I might build this boat just to copy your stand...
- 165 replies
-
- 1
-
-
- finished
- model shipways
- (and 1 more)
-
Are you beveling the bottom inside edge of the plank?
-
New To Building Ships Help and advice needed
glbarlow replied to Richard O's topic in New member Introductions
I’ll join the others in highly recommending Vanguard Models. https://vanguardmodels.co.uk/ I’ve built a number of models designed by Chris Watten when he worked for other companies, he now has his own company freed from restrains of commercial manufactures that economize with mass produced fittings. Chris’ designs are the very latest in creative modeling, his materials outclass all the others, and most importantly his detailed instructions and plans have no peer in the world of kits. Check the website to see, you can download instructions to get a better feel. I’d recommend HM Flirt given your description. Chris is also an active ontributor on this site and their are multiple build logs (Flirt and Speedy are similar enough) to follow for additional help You really need look no further than @chris watton -
You only nee 3 on the wins to bend planks, but it’s all about learning by doing. No soaking needed I don’t prepare the next plank until the prior one is installed. Can’t get ahead of yourself.
-
Thanks Derek, your mill lessons were put to good use.
-
Thank you, I’m sure your new log will be as well.
- 778 replies
-
- 1
-
-
- cheerful
- Syren Ship Model Company
- (and 1 more)
-
It is both good practice and good form - Whatever the first planking is what the second planking will be at least in terms of shape.
-
Your paint work really stands out and the pieces are fit together so precisely - nice work as always!
- 201 replies
-
- 2
-
-
- Duchess of Kingston
- Vanguard Models
- (and 1 more)
-
Thanks, yes it is. Well worth it, more so when I learn more ways to use it.
- 778 replies
-
- 1
-
-
- cheerful
- Syren Ship Model Company
- (and 1 more)
-
Thanks! I decided at the beginning I was going RED with my choice of red 😉
-
It’s a good message and accomplished exactly that.
-
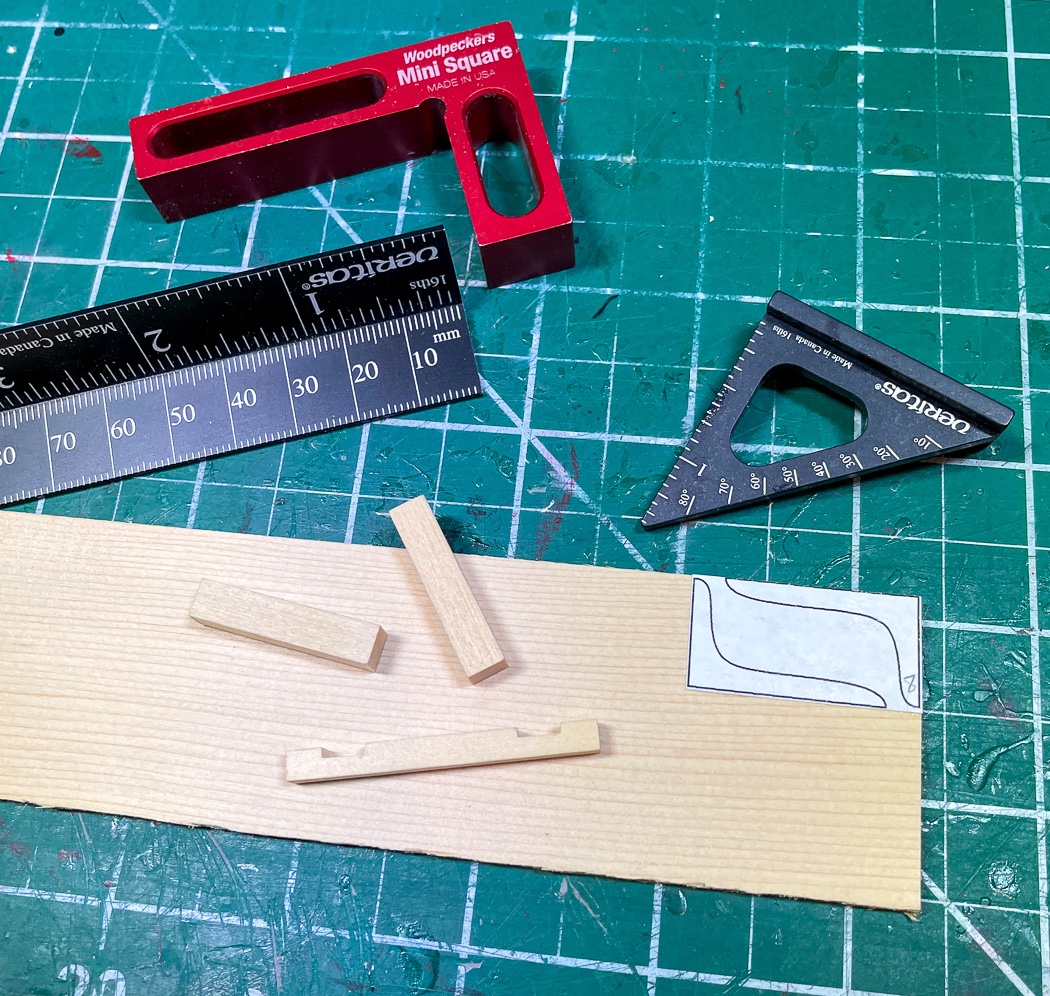
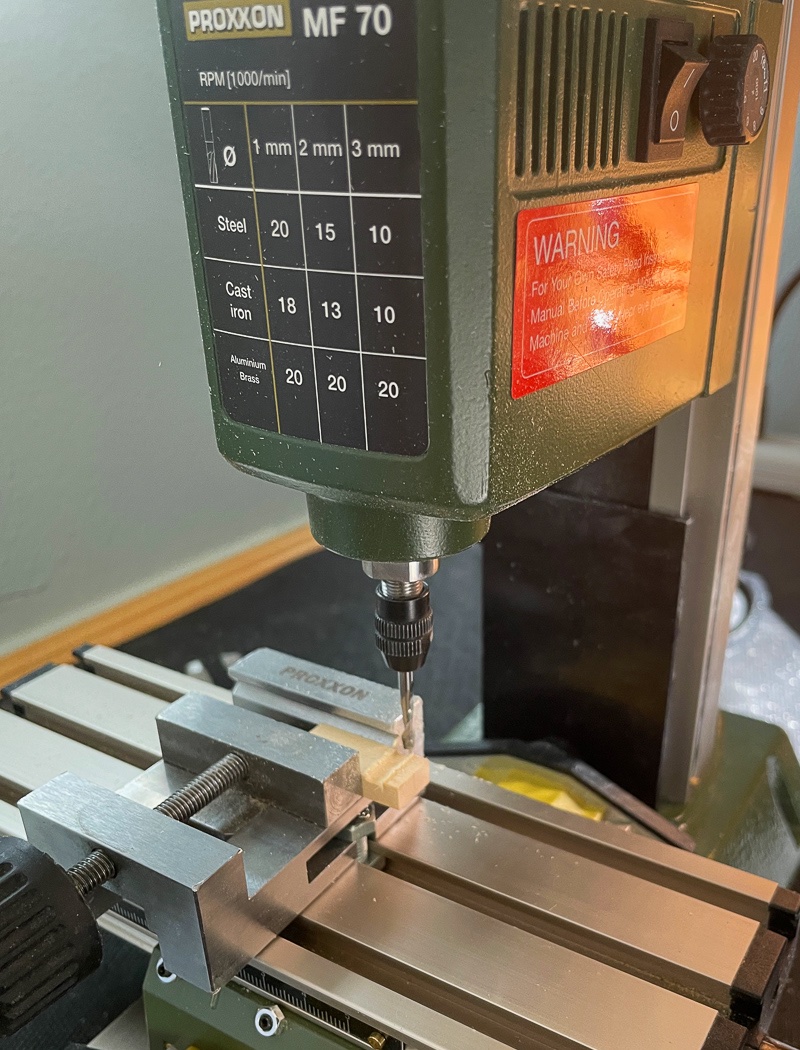
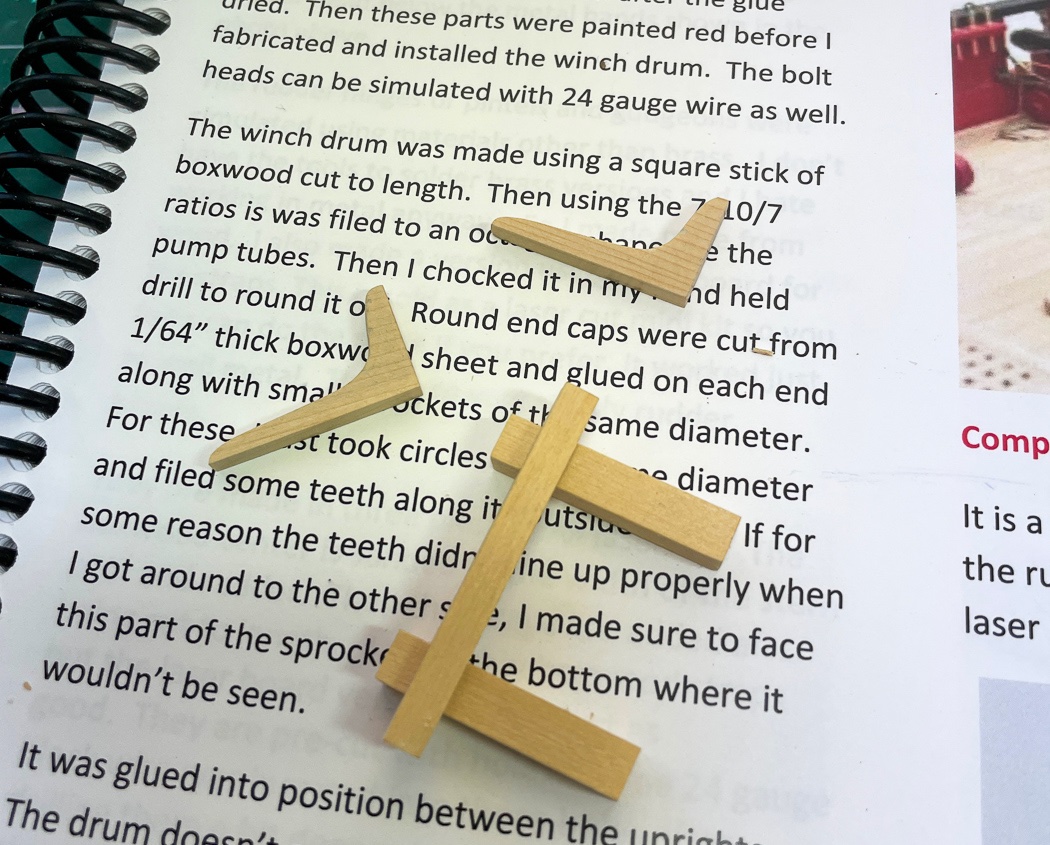
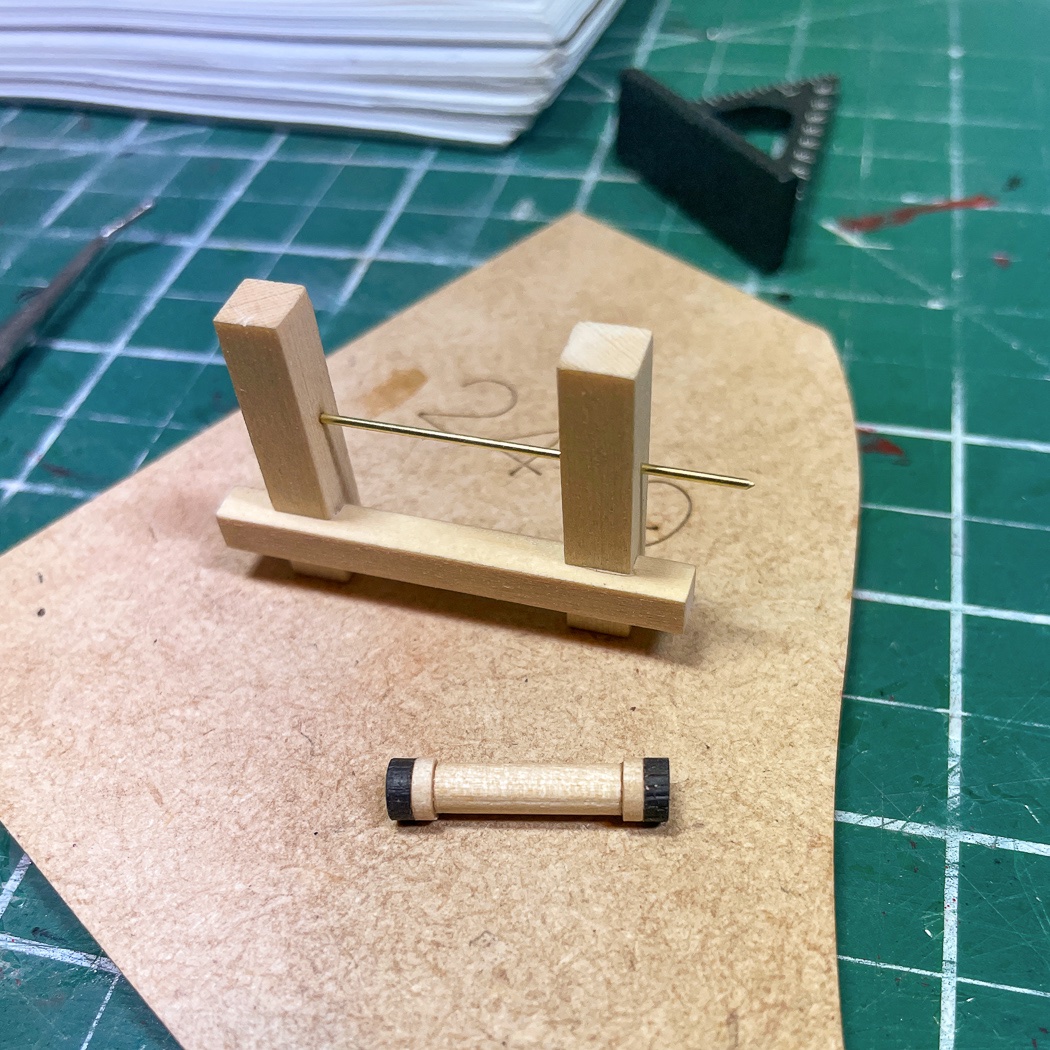
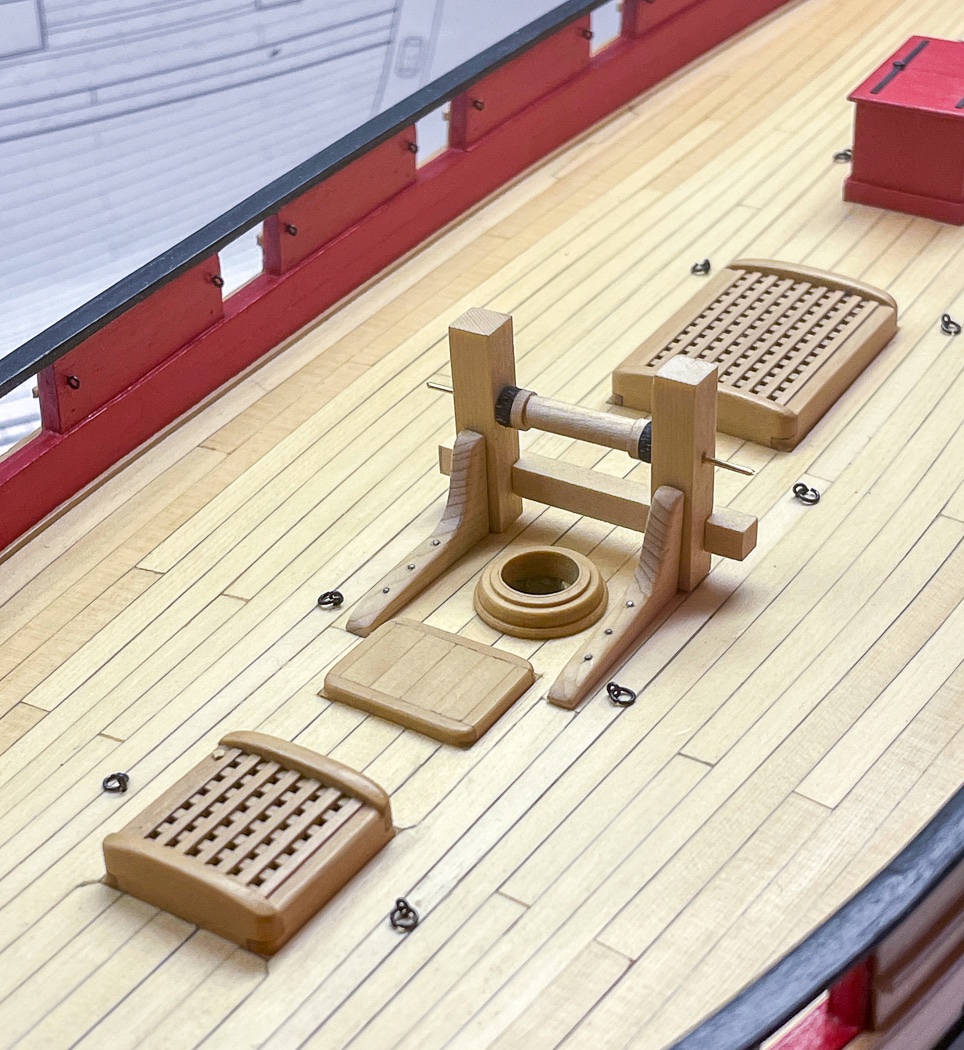
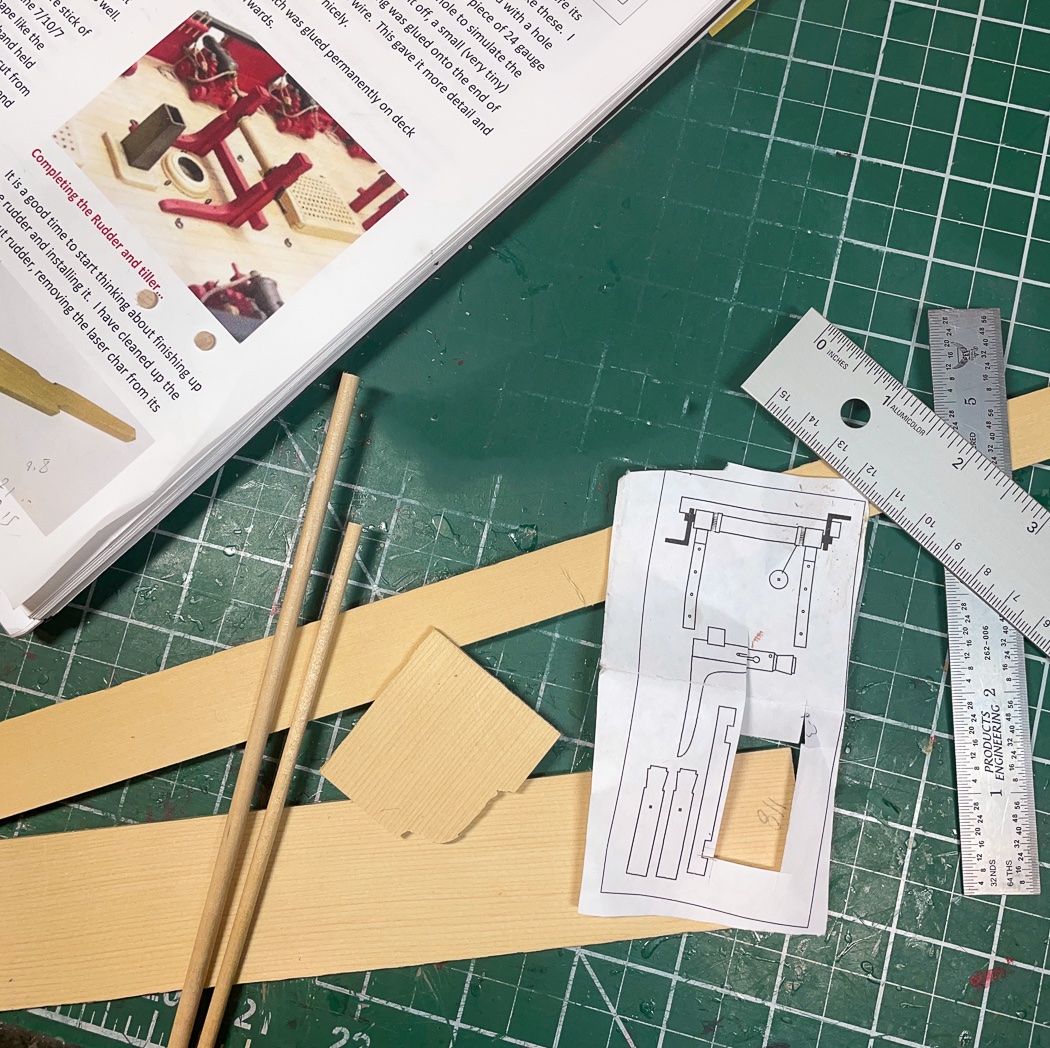
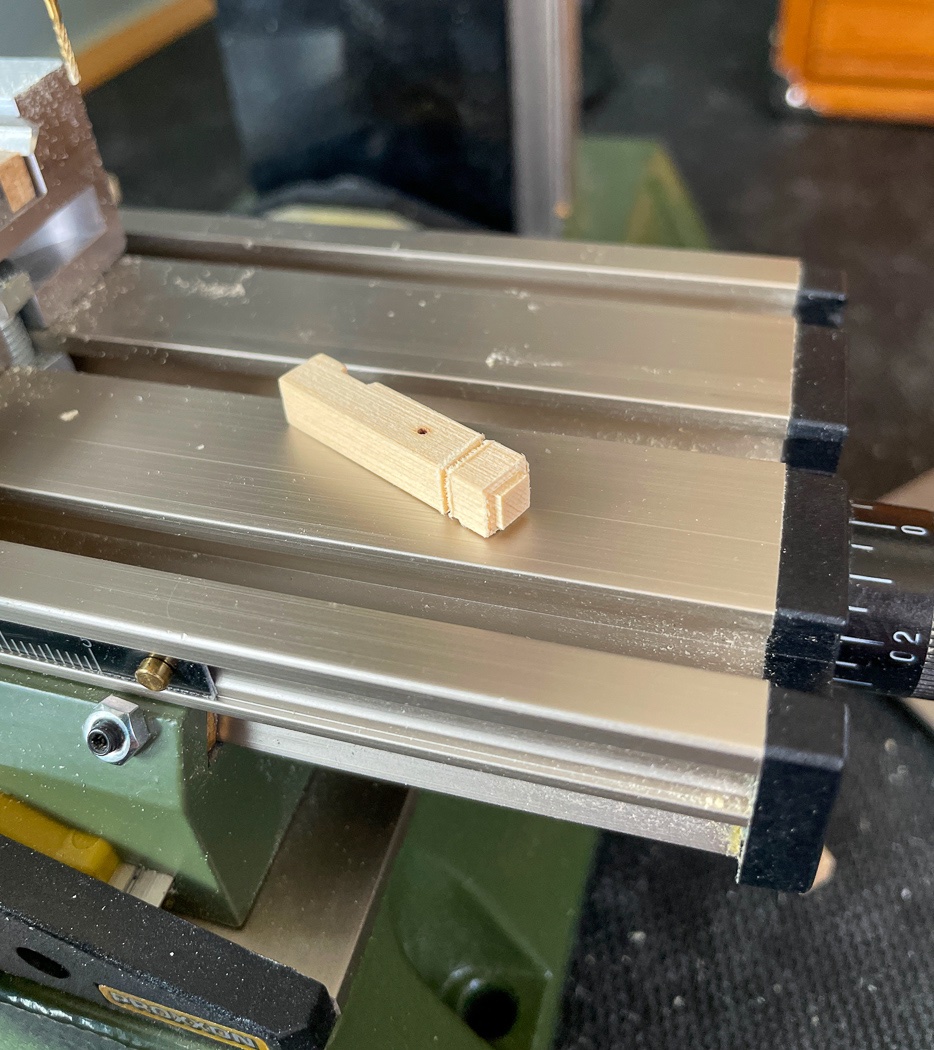
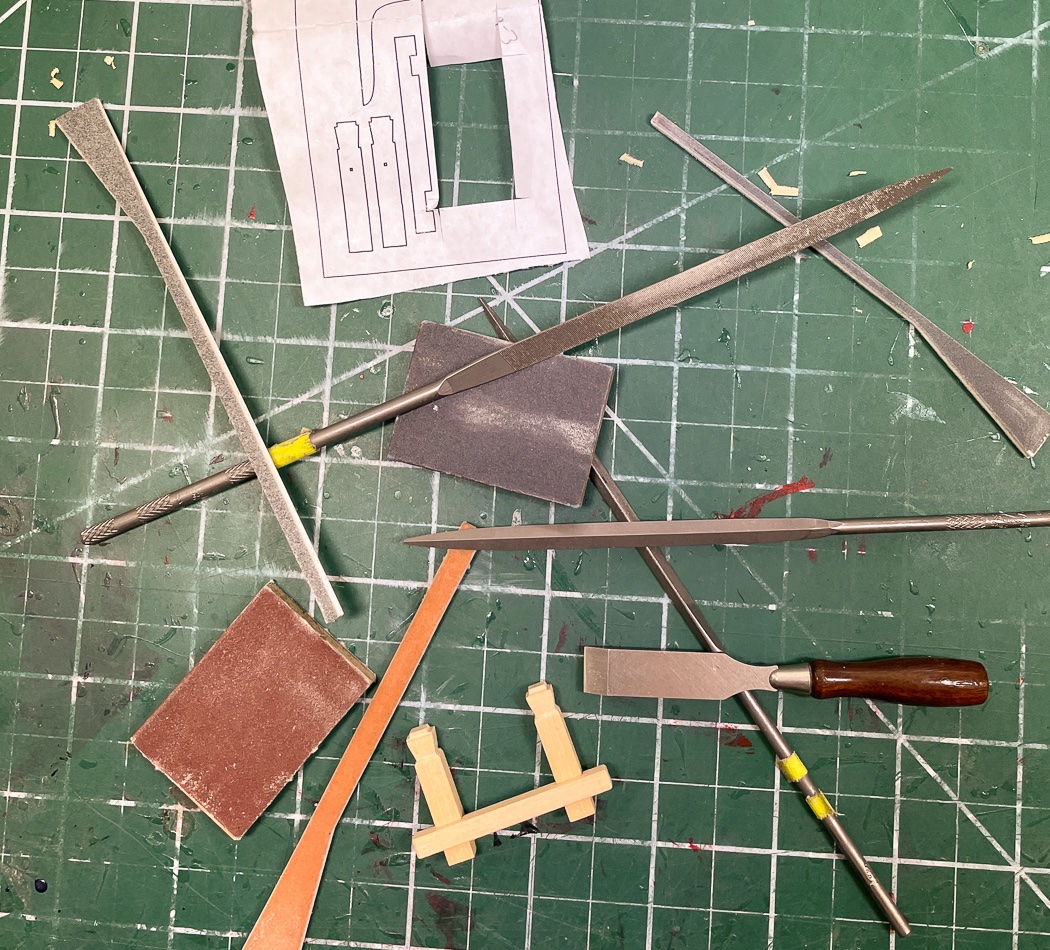
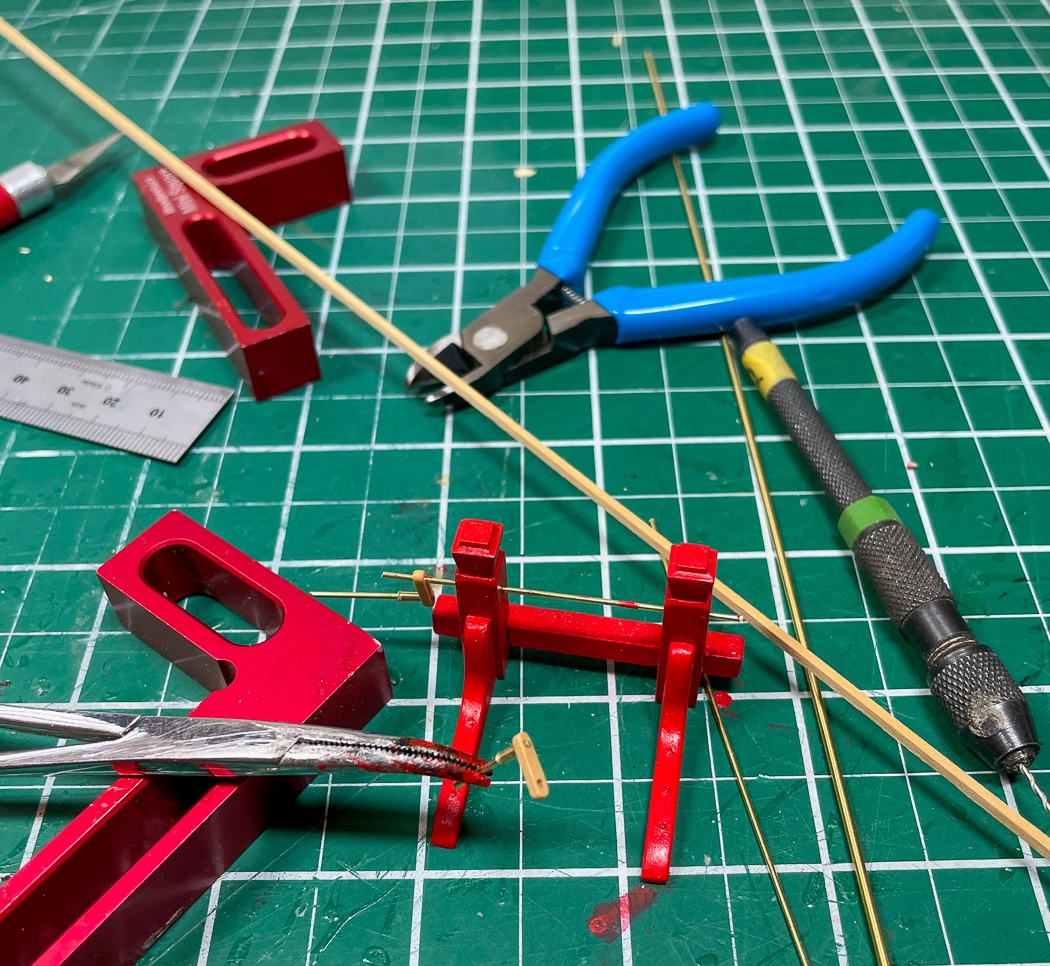
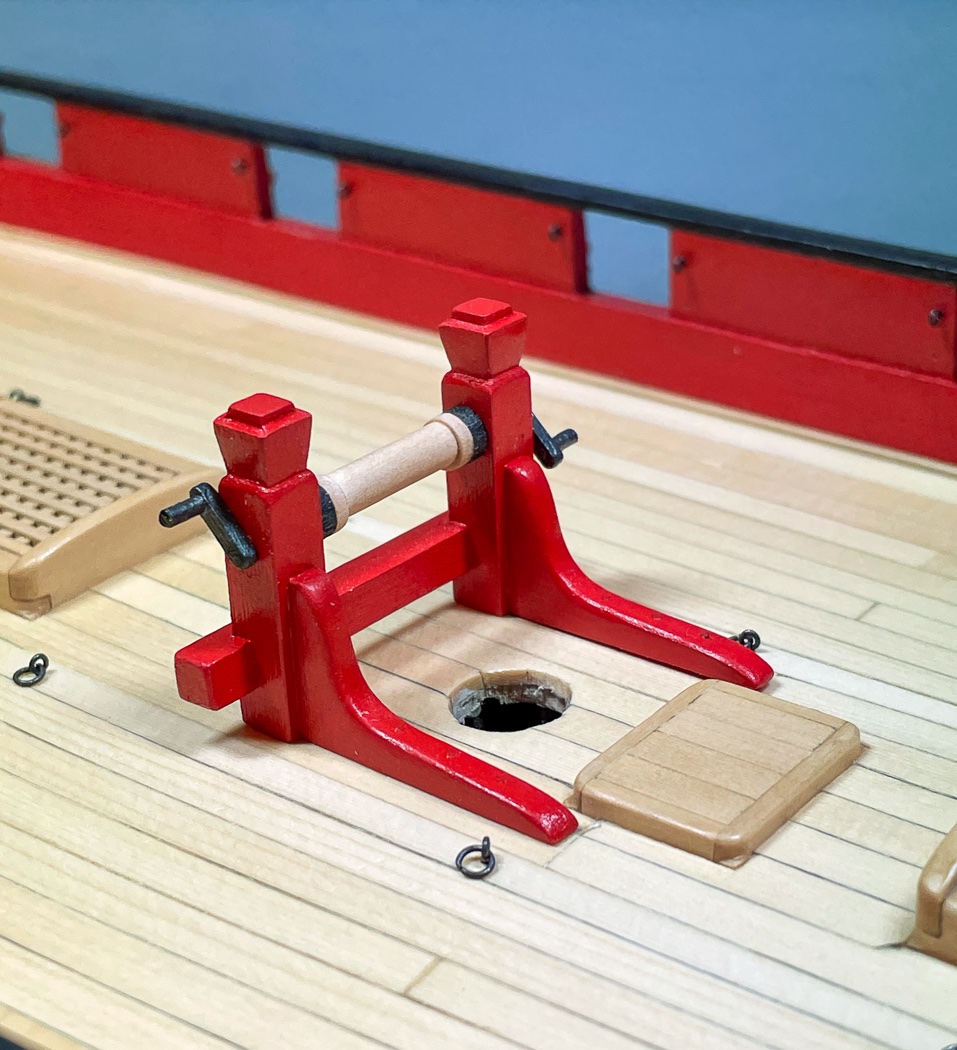
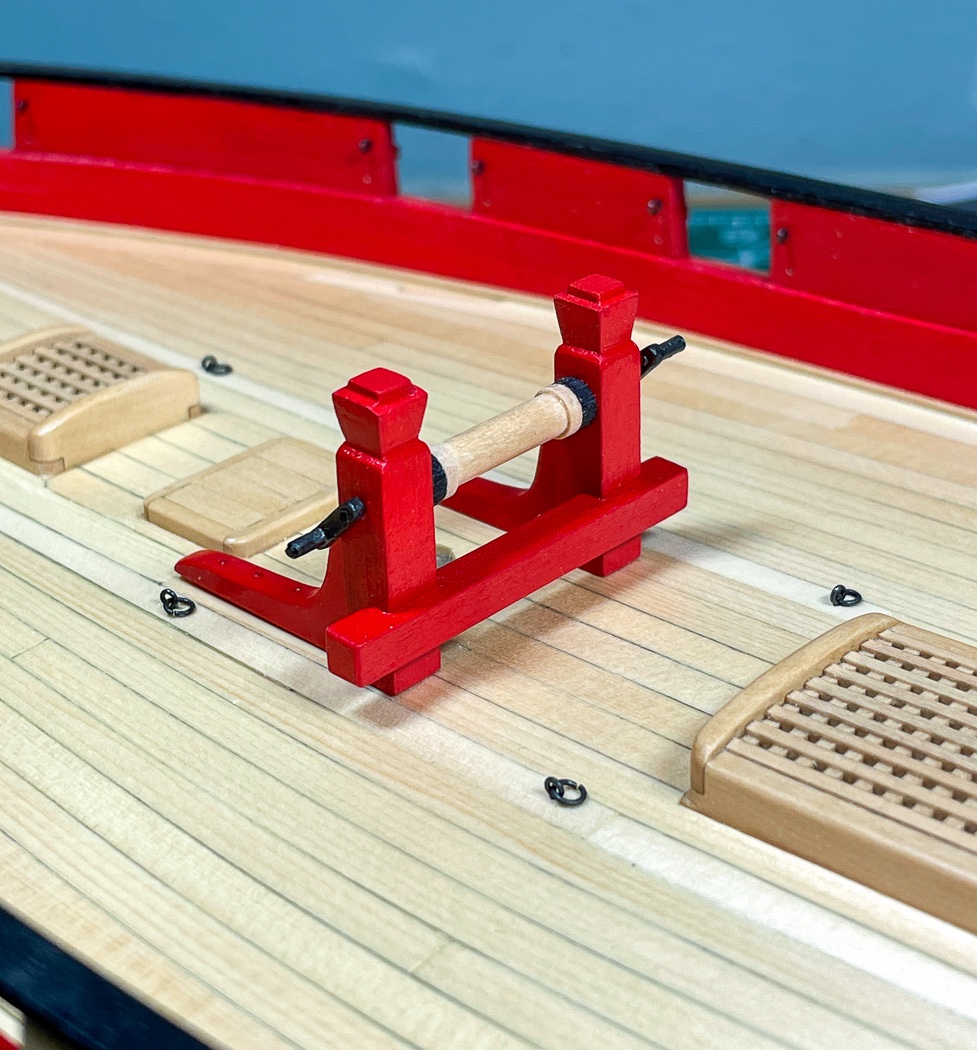
This was fun. I’ve scratch built a few things here and there in my modeling but Cheerful’s winch is the first ‘complex’ thing I’ve made from nothing but some wood and a set of plans. As I’m prone to do I thought I’d share how I made it - once again acknowledging there are many ways to do things, this is just mine…and it was my first. The mini-kits available for Cheerful are great little projects in and of themselves, however in the case of the winch Chuck elected to leave us to fend for ourselves. So I gathered up the material I’d need, two thicknesses of wood strip, one of wood sheet and two basswood dowels I had in stock along with some brass rod and brass micro-tubing and off I went. First I cut square pillars from 7/32 stock and the crossbar from 3/16, thanks Byrnes saw. I cut out the pillar supports from a copy of the plans, rubber cemented them to 1/8 sheet wood, then cut them out using my scroll saw - cutting right along the line through the paper while keeping my fingers. Then it was to the mill. I learn a little more each day about how valuable and useful the Proxxon MF 70 can be. I’m still fumbling a bit maintaining consistency with the X,Y.Z axis control, while they can be very precise the knobs are be a bit tight. Stating the obvious, t’s important and a bit of a challenge to get zero set. I used a piece of paper between the bit and the wood. When I could barely pull the paper between them, literally scratching the paper and not the wood, I set the knob for that axis at zero. I used the mill to cut the notches in the cross bar and a more shallow notch in the two pillars, so that the cross bar sits out from the pillars when connected. I also used the mill as a drill press, drilling a hole through both pillars together for mounting the winch drum. Again the obvious, it’s critical for the milled parts to be level and square top and back. The Proxxon vice accessory makes this easier, I cut various spacers from scrap MDF to help with the alignment. I now had the easy part done. The winch drum, a small thing, was more problematic. It consists of the drum, raised spacers, and sprockets. I thought about using the lathe, I mean I have it and all, but the crown, the raised portion of the drum (like a spool of thread) had to be equal to the sprockets which I had no clue how to make. So I used a larger basswood dowel, sliced off two pieces, then used my chisel to cut notches around the dowel, painted that bit Ironwood Black, dusted it with Rusty Brown weathering powder, and sliced off two sprockets. I glued all 5 together for a completed drum. With this done I had all the major components. Time for a little dry-fit test. Following the plans proved important, as it always does, since the overall width of the winch supports have to fit between the deck ring bolts and stove pipe hatch. Then it’s back to the mill to shape the pillars. I went through a lot of practice attempts, and despite great advice from others I just wasn’t happy with my attempts to cut the angled top consistently on eight sides (two pillars). I know how now, I just need more practice - it’s a surprising small angle as it turns out. So I opted for an alternate approach, I cut in the top 1mm from the top and 1mm in with a 1 mm bit, yes you can be that precise, creating the cap. I moved in 5 mm and cut a .5mm slice to form the base of the cut in. That was it for the mill. I thought about going ‘fancy’ on the crossbar but it’s not shown that way on the plans so I just rounded off the edges by sanding. I used my freshly sharpened (I know how to do that now too) Veritas Chisel to slice in the angle using the .5mm cut as a stop and finished it up with needle files and sanding sticks. I was able to create the eight consistent sides this way, something a proper use of the mill could have done faster (well, maybe not by me), but I venture to say not better. After painting the assembly and adding in the drum using brass rod inserted into both sides the last step was the handles. There are of course numerous ways to go about this. I chose to create the handles using small boxwood strip shaped and sanded, drilled holes into both ends, make the handles from brass rod with small micro tubing glued over it, the other end added to the brass rod on the drum then the rods cut flush. Of course it being ‘metal’ I first painted them Ironwood Black and added the weathering powder, it makes a difference even on these small handles. And I now have a completely scratch made winch, it goes on the shelf with other deck items until later. I’m kinda proud of it, obviously since I devoted a post just to it. I offer this to those considering building Cheerful: It has presented me with the opportunity to try so many new things I’d not done before despite having built nine kits. I’m treading new ground with each step. At first I was kinda wishing for another mini-kit for the winch but now am quite happy with the opportunity to build it on by own. I also once again thank others for their help and inspiration and can only hope I can provide a little inspiration myself for others take on this great model.
- 778 replies
-
- 10
-
-
- cheerful
- Syren Ship Model Company
- (and 1 more)
-
Congratulations, welcome to the Cheerful club. Looking forward to following your progress. I wish we had a ‘Wood project source’ on this side of the Atlantic.
-
I think my Lady Nelson log and I know my Cheerful log explains Chuck’s method for lining the hull for planking and bending planks to fit. Getting the taper and curves right is important and whatever plan you have needs to be adjusted as you go. I don’t think I’ve seen the method you’re using, I hope it works out well
-
I never put them in glass cases, that would spoil the affect for me on the shelf ) too bulky in my humble opinion. I just turn them on the shelf every 6 months (like they do with the real Constitution :-D) so it fades evenly and (gently)use compressed air and a soft brush to (gently) dust them off. Some of them have been on the shelf over a decade and still look fine. You can always buy a bigger house 😄
-
Very nicely done, congratulations! The AVS is a great model, I learned a lot from building her, those skills will transfer nicely to your next model. I’m looking forward to following your Cheerful build. It’s a wonderful challenge and I’m sure you’ll enjoy building her.
- 164 replies
-
- 2
-
-
- first build
- model shipways
- (and 2 more)
-
Wow... I’d be so confused trying to keep track of what I was doing with that many active builds, I can barely keep track of one 🤣. They all look great though. Granado was one of my favorite builds and stands proudly on my shelf.
-
Looking great, more and more interesting as you go.
