Elia
-
Posts
551 -
Joined
-
Last visited
Content Type
Profiles
Forums
Gallery
Events
Everything posted by Elia
-
 John, I have used Liquitex soft body acrylics on Arethusa. My white mix consists of a white base and trace amounts of Burnt Umber and Thalo Blue. And when I say trace amounts, particularly the blue, I mean really tiny amounts. The blue can very easily overwhelm the white....making it a sky blue in no time. When I painted my deck and rails I had custom mixed each of my colors. I have since learned that is easier to mix a gray color, such as the deck color, and then use that to tint the other colors. This gives a consistence of tone across all of the colors on the ship. Liquitex soft body paints, I find, are still too thick to yield a thin smooth coat of paint. They also exhibit a slight sheen or glossiness. I 'cut' my acrylics with Liquitex's Matte Medium. This thins the paint while maintaining to some degree the pigment (versus thinning with water). It also has the benefit of giving the paint a matte finish. It isn't dead flat, but it is better, to my eye, than the glossier stock acrylic paint. If I recall correctly I applied two coats of paint on the white surfaces. Cheers, Elia
 -
Gary, Your schooner looks very sharp. I like that white waterline stripe. And the transom looks good to me. I personally think you can still pursue this as Benjamin Latham. And I think it would make a very fine Ben Latham. I look forward to seeing you next update. Cheers, Elia
-
Frenchguy, Thanks for that link. I've read some on Billy McCoy and have seen some photos of Arethusa (Tomoka) during the rum running years. There were some photos I hadn't seen before there. The photo of Rye Whiskey stacked like hams in the hold was amusing to me, as were the deck photos. Cheers, Elia
-
Patrick, Jay, Lawrence, Thanks for the dory comments. And thanks to all of those who've "liked" my posts. Tonight I spent some time with putty filling in the small open faps between the planks. I'm not sure how either the mold material nor tbe casting resin flows and what width gap won't or will show up, so a little filler I think will help in the process and aid a good flow of the resin from the planks adjacent on the sides and to the stem and trasom. We shall see. Something I'm not certain of, either, is how thin I can make some of the little frame details and get resin flowing into them. With a little time this weekend i'll work on the molds. Lawrence, You are a dory building machine! I find when I'm making multiples of some item I fine tune my process as I progress and usually my first efforts aren't up to the quality or consistency of my later efforts. I think all your dories look very good and any of them will complement your fibe schooner model. Cheers, Elia
-
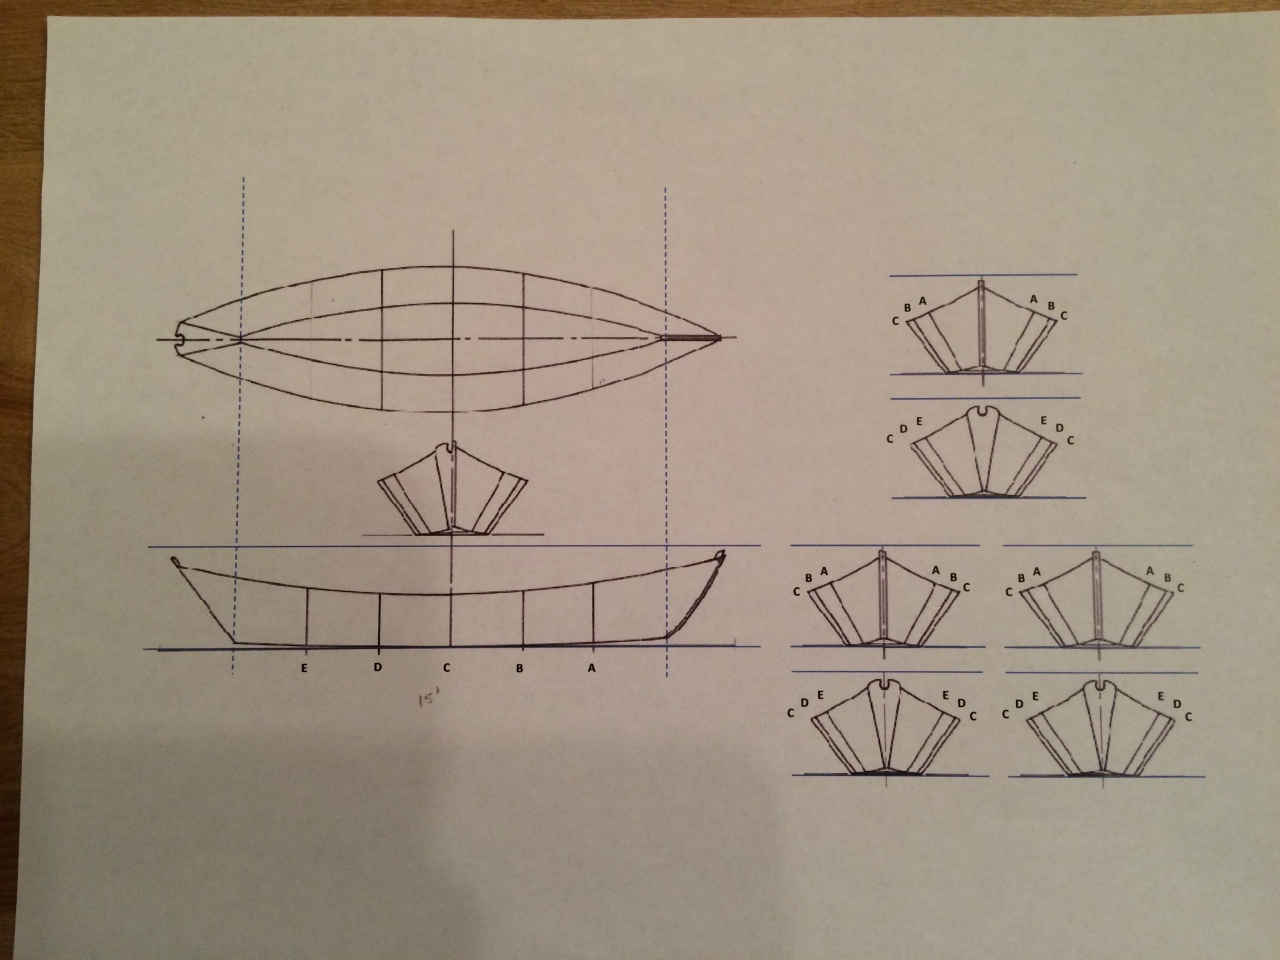
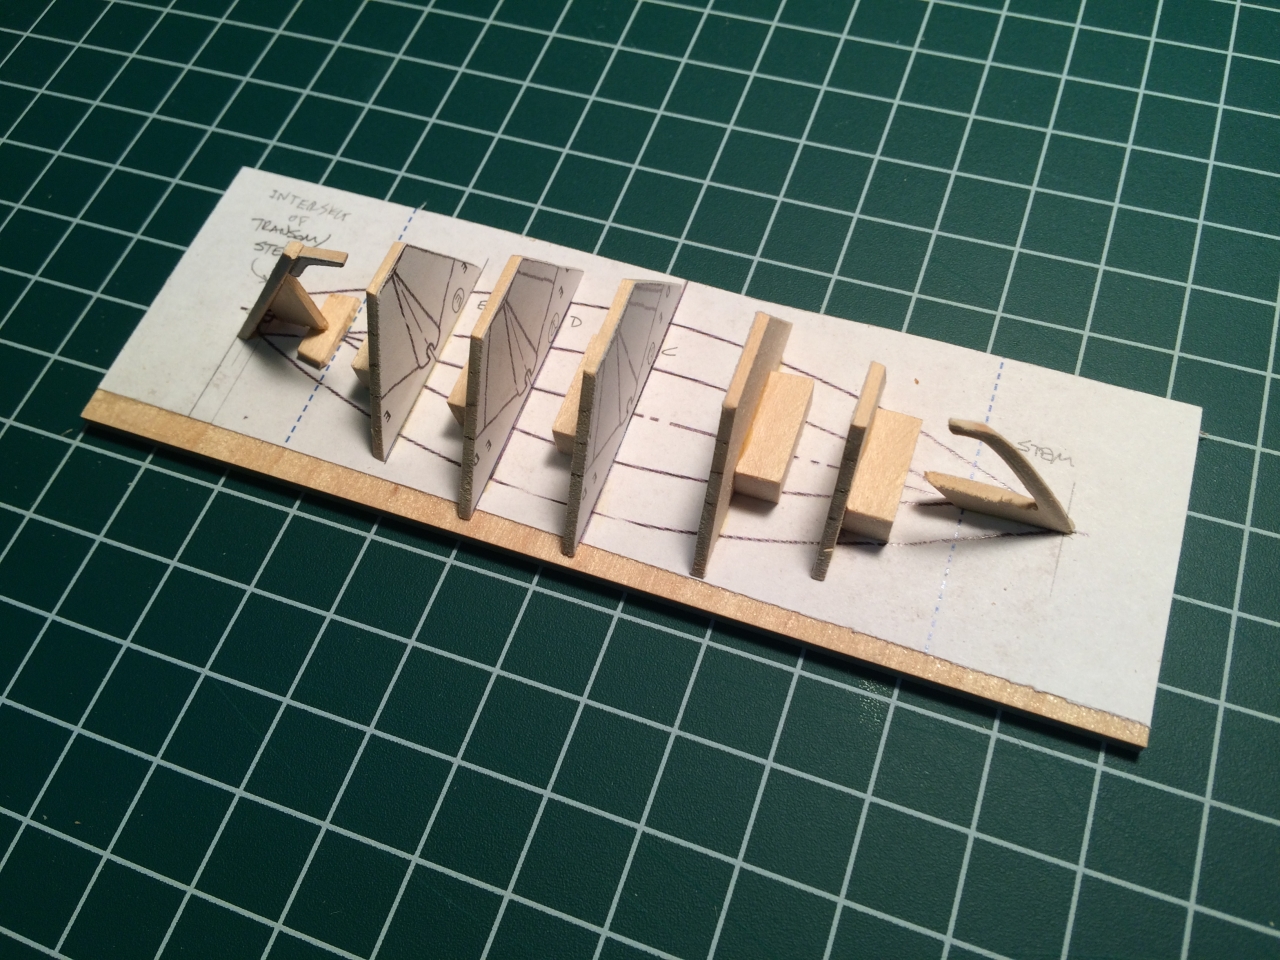
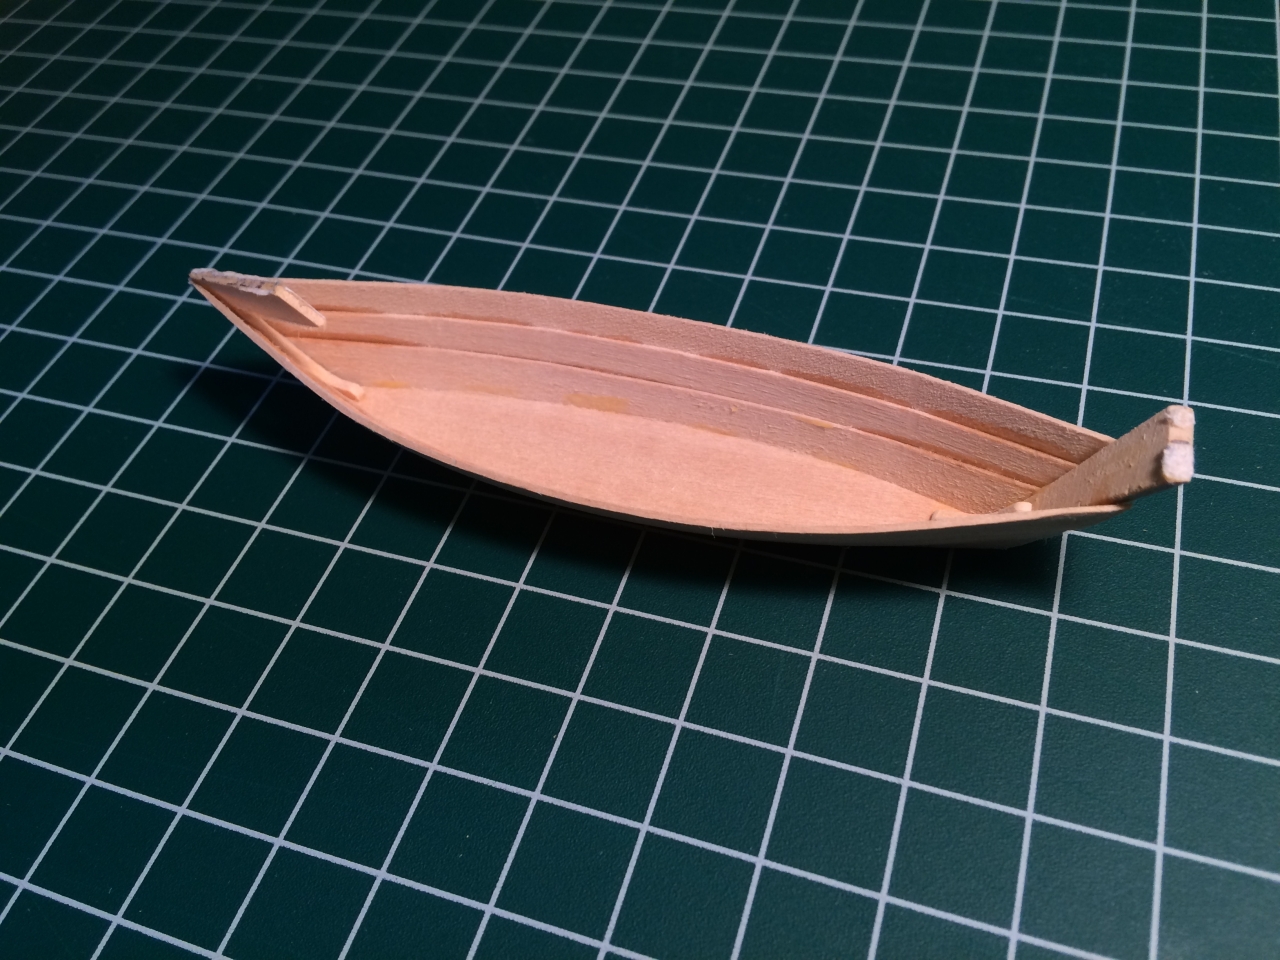
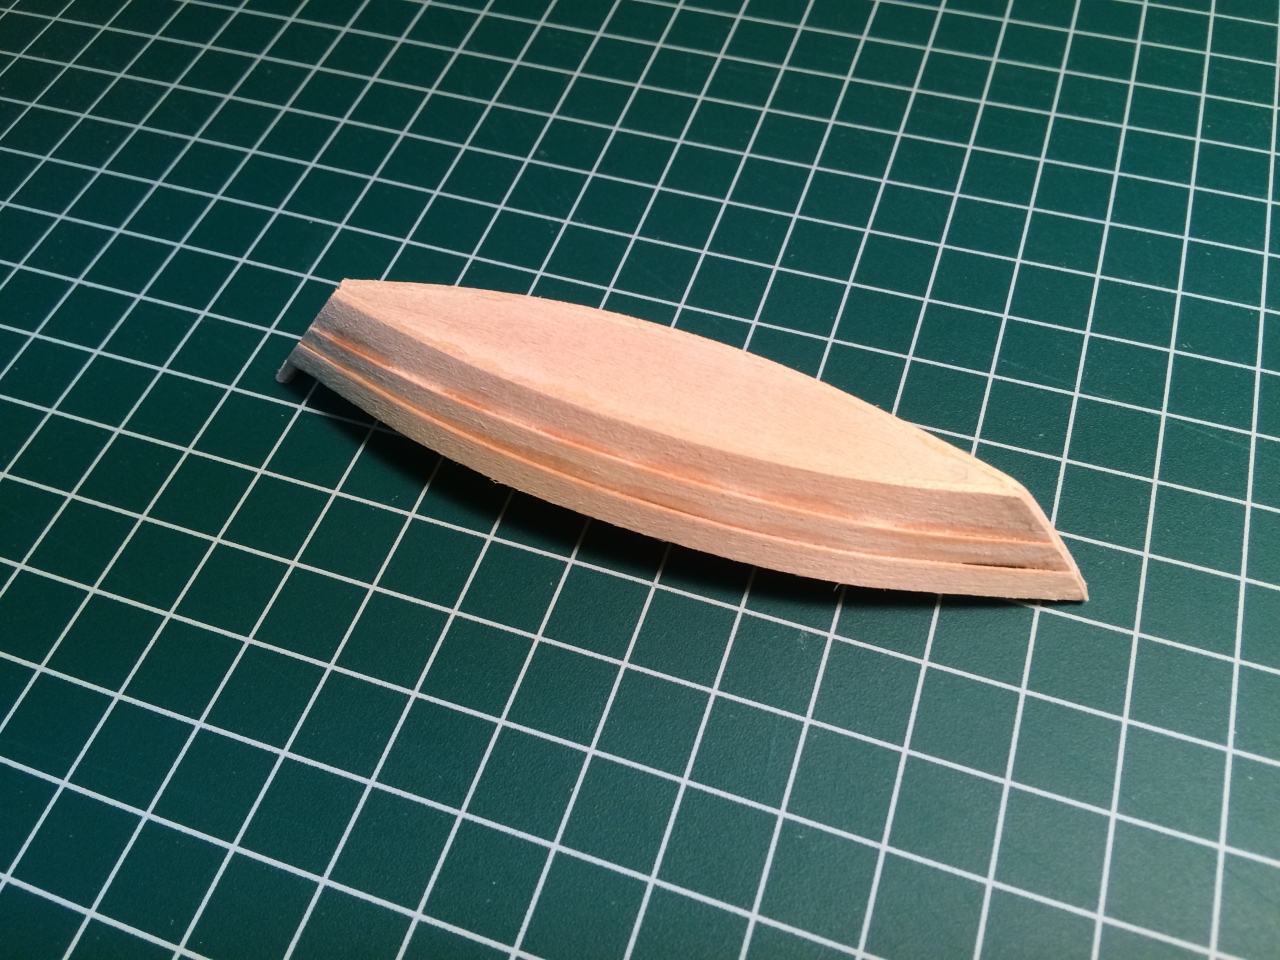
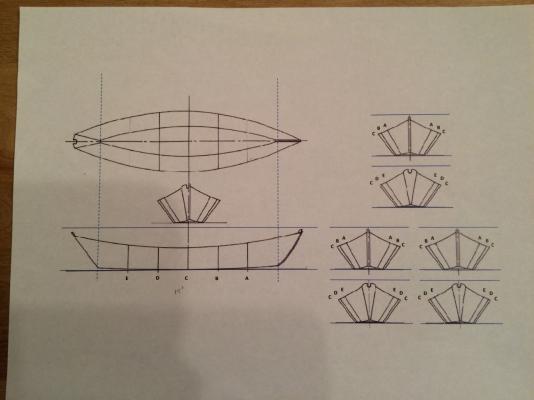
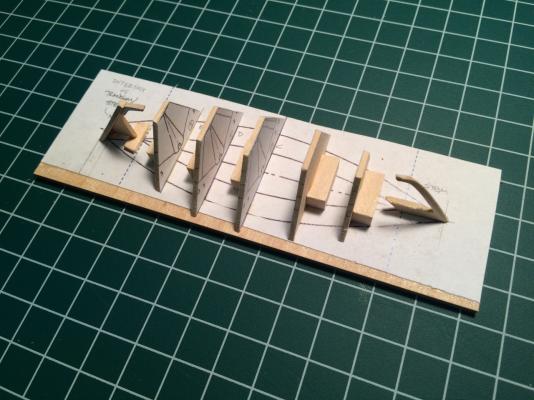
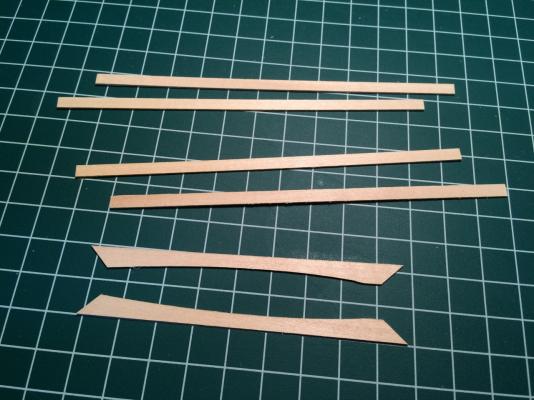
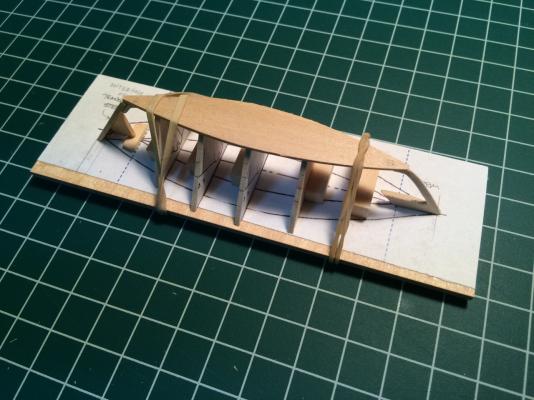
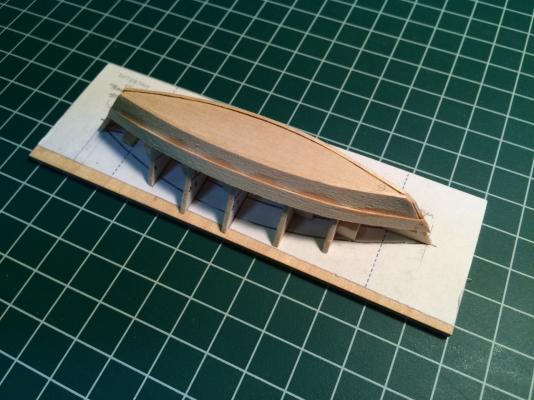
Last fall I began tinkering with making a dory for my schooner with the idea of casting them in resin. The reasoning for casting them was that I didn’t think my build precision and tolerances could yield a stack of dories (5-6) in which the nested dories would resemble real stacks of dories which pack together fairly tightly. I used a plan for a 15 foot (measured along the bottom of the dory) version. This is representative of the dories used during Arethusa’s era, and the length of dory used for halibut, cod, and other larger dory trawling fishing. The first photo shows the plans I used. The second photo shows the bulkheads aligned on a small build board. The transom and stem were extended to the build board and glued in place. Later on they were judiciously cut off the build board once the planking was complete. The third photo shows the strakes used on the sides of the hull. The largest width strakes could have been left straight; I chose to pre-cut the lower edge to aid in alignment with the bottom plank. Take note that the upper strakes are purely straight planks with no in-plane spiling. This was very common. The fourth photo shows the bottom surface glued and secured in place. The bottom has a slight rocker or camber (fore-aft) to it. The fifth photo shows the second strake glued in place. The lap strake assembly method presented slight challenges to me. I tried applying the very small bevel to the mating surfaces of the adjoining strakes. When assembling it was difficult to get the strakes to stay in the correct spot as the bevels and the clamps (applying force - to the beveled surfaces) resulted in the upper strake/plank moving. The sixth photo shows the dory with planking complete and cut off the build board. You can see the extended stem and transom in this photo. The seventh photo shows the dory upside down. I’ve done a little clean up on the dory, having trimmed down the stem and transom and will add the rail strips. I received a starter resin casting set for my birthday and my casting attempts will follow shortly. Cheers, Elia


- 200 replies
-
- 17
-

-
Stephan, I suspect one wouldn't see the caulking once the deck was painted. The caulking would have been installed between the deck planks during the hull build up, followed by painting. In photos one can see the caulking of the decks after some time at sea, where the hull and deck have flexed and stained against the forces of the sea, masts, and rigging. As Mario suggested - you could do a trial to see if any is visible beneath some amount of paint. Mario, David, do you guys have build logs of your models? If not would you consider starting them? Cheers, Elia
-
I essentially followed the Ben Latham plans, though as a scratch build I had improvise a little. The steps I took were: 1. Using two views (side elevation and plan view) of the transom develop both a true edge view and a true projected view. The true edge view is essentially a view taken as if your eye is in the buttock line 0 plane (i.e. The ship's fore-aft vertical center plane), above and aft of the transome. The transom has a very gentle curve of bow to it. The Ben Latham plans already include these on sheet 1 of 2 of the plank on bulkhead plans - far left side, mid top-to-bottom of the sheet. The curve of the transom bow is shown as a single curve. Below it is the true projected view of the transom plug. 2. I made a simple shaped jig which followed the arc of the transom. 3. I wet soaked two sheets of (I think) 1/16" thick stock and rubber band clamped them to the jig. 4. Once dry I glued the two pieces together, also clamped onto the jig. I took care to mark the buttock line 0 marks on the upper and lower edges of the blanks. 5. Once that dried I transfered the true projected view to the transom and cut it out of the laminated blank. I think I only cut around its periphery. My memory is a little foggy on this step. I may have done a little pre-beveling....I don't recall. 6. I then had an 'almost finished' transom core (meaning I made it thin enough that I could apply exterior and interior planking once it was sanded to shape). 7. I then could glue this onto the keel. At this pount the aftmost surface edges stand proud of the loft and need to be faired in along with the frames (bulkheads) just forward of it. 8. Once it was sanded and faired it takes a rather odd look - the bevels along the sides and bottom are extremely long due the fact that the transom sits 'almost' (but not quite) with the counter and horn timber. Using a batten or plank you should see the strip lay fair to the bulkheads forward of the transom and lay across those very shallow beveled edges of the transom. I hope this wasn't too much, nor too difficult to follow, and hopefully helpful. Cheers, Elia
- 50 replies
-
- 1
-
-
- benjamin w latham
- model shipways
- (and 1 more)
-
Hank, Super work there! The level of detail and it's fineness continues to impress. Maybe I missed this earlier... You noted you hadn't made the photoetch for some parts yet... Are you creating your own phorietched parts? Those photoetched ladders, rails,and thin, little details really add realism to the model. Cheers, Elia
-
Shipwrights, It has been some time since I last posted progress photos and I'll let you in on why there haven't been any... I think I really messed up. I was at the point of staining my masts and spars and decided to use some minwax stain. I applied the pre-stain conditioner, let sit the requisite time, wiped off the excess as directed, and applied the stain. I used the pre-stain conditioner having read that it helped create an even stain coloring, with reduced dark and light regions. I was very happy with the masts and spars in their unfinished state. I was horrified to see the results of the staining - very obvious dark and light regions. OMG as the kids text. Not good. Not only were they dark and light..I wasn't happy with the general pigment. So... I have created a thinned acrylic paint 'wash' to apply over the stain (oil based) to help even the overall look. We shall see. When I get a little further with trials I will show the results. Elia
-
Russ, Thanks for stopping in and sharing your work. That is fantastic! That painting captures much of what I imagine the energy on deck was when bring the catch in....with rolling seas...great stuff. Just wondering - is that Arethusa in the background? Cheers, Elia
-
Patrick, Igor, Dimitris, Lawrence, Thank you all for the birthday wishes! It was a very nice day. And I received some modeling stuff. Patrick, I've passed 50 by a few... it is hard to imagine/remember being 21... I'm quite happy with my current state (except for random aches and such). I'll go check on my mailbox - i must have too many things saved - I'll clear it out. Cheers, Elia
-
Dimitris, Very nice work on those stanchions and rails. I find the deck layout and furniture very interesting. It's quite different than a typical ship-of-the-line, with the cabin extending out from beneath some deck portions. It seems to be maybe reminiscent of a clipper ship. ? As always - it great to see and follow along with your progress here. Cheers, Elia
-
Beautiful work, Patrick. I have great respect for your skill and execution on this and your other similar models. Amazin,g tiny scale work. Congratulations! I'll be on board watching your next little 'Faberge' sail boat. Cheers, Elia
-
Patrick, Boy she sure looks great with those sails. She is such a little gem of a model. Beautiful. Cheers Elia
-
Dimitris, Very nice work on the stern rudder housing - your typical high build standards! I had wondered what the little white 'box' objects were and where they went... Are they storage lockers? I also wonder what those little 'deck extensions' are to which you've installed hand rails and stanchions (all brass). Very nice work there. Cheers, Elia
-
Michael, The carb and manifold look superb and compliment the rest of thar little jewel of an engine. Beautiful work. And a big congratulations on your and Judy's anniversary! All the best, Elia
-
Gary, I've been following along, watching your build and have been somewhat perplexed by the directions for the seine boat. With the apparent amount of keel depth protruding beyond the formers I find it difficult to imagine wrapping a 'frame' strip all the way over the former, from one side to another without a kink in the 'frame' strip occuring. If the keel were sanded down to the level of the formers then I might see that working....but then the notch in the keel at each former would apparently be very thin. I went to look at the build log of a former DDM and MSW 1.0 member, Jim Lefever, over at shipmodeling.net, where he has both a build log of his Benjamin Latham and his seine boat (in which he apparently didn't follow the MS directions). Here is a link to his seine boat log. It might give you some ideas on how you approach its build. http://shipmodeling.net/photopost/showgallery.php?cat=984&ppuser=2811 Cheers, Elia
- 50 replies
-
- 1
-
-
- benjamin w latham
- model shipways
- (and 1 more)
-
Simon, A very hearty congratulations on the new arrival! No doubt progress will be slowed - though to a wonderful diversion. Cheers, Elia PS the dories look great!
-
Ed, I'm in complete agreement with the others - absolutely superb work on the decorations. Beautiful. Elia
- 3,618 replies
-
- 1
-
-
- young america
- clipper
- (and 1 more)
-
John, Sweet work on that deck framing and the margin plank. Cheers, Elia
- 745 replies
-
- 2
-
-
- francis pritt
- mission ship
- (and 1 more)
-
Dimitris, As always - very nice work. I must have missed one detail. In that sequence of photos the 'bow rudder housing' appears to be able to swivel 360 degrees around. Cheers, Elia
-
Pasi, Those masts and spars look great. Very nice. What are next? Top masts and largest yards? Cheers, Elia
-
Bob, Just catching up with your friendly little build here. Beautiful work. That new deck looks quite sharp and yacht-like. And i like those cabin wall windows lined in brass. Very clean execution of it all. All the best, Elia
-
Patrick, Those winches look super, as does the entire ship. Beautiful. I don't pipe up much but always eagerly watch your progress. What a gem you've built. Elia