HOLIDAY DONATION DRIVE - SUPPORT MSW - DO YOUR PART TO KEEP THIS GREAT FORUM GOING! (Only 20 donations so far - C'mon guys!)
×


DelF
-
Posts
1,409 -
Joined
-
Last visited
Content Type
Profiles
Forums
Gallery
Events
Everything posted by DelF
-
 Neat work on the jibboom Glenn!
 -
Thanks everyone, and thanks for all the likes. Not my favourite either Tim, so I do a few occasionally throughout the build just to break it up a bit. Makes me more inclined to experiment with different methods. I often 'freewheel' for a bit if I'm not feeling up to spending all my free time on a model. It's a hobby after all, not a race to finish. Having said that, I really enjoyed the time last year when I had Speedy and the English Pinnace on the go at the same time, each providing a break from the other when needed. Have you tried making up some of the deck furniture and/or masts to give yourself a break from planking? Another great idea! I've got some spare copper left over from the main hull.... I'm also inclined to agree with you about painting. So have I - see my profile picture on the left.
- 725 replies
-
- 2
-

-

-
- vanguard models
- speedy
- (and 1 more)
-
How to stain or dye boxwood?
DelF replied to tkay11's topic in Painting, finishing and weathering products and techniques
I agree with Allan. Apart from my current build which includes excellent blocks from Vanguard Models, I make my own from old boxwood rulers that you can still pick up from ebay for a few pounds. I protect them with pale shellac which darkens the wood very slightly and leaves a lovely finish. Perhaps you could try the natural look first, before experimenting with other finishes? Derek -
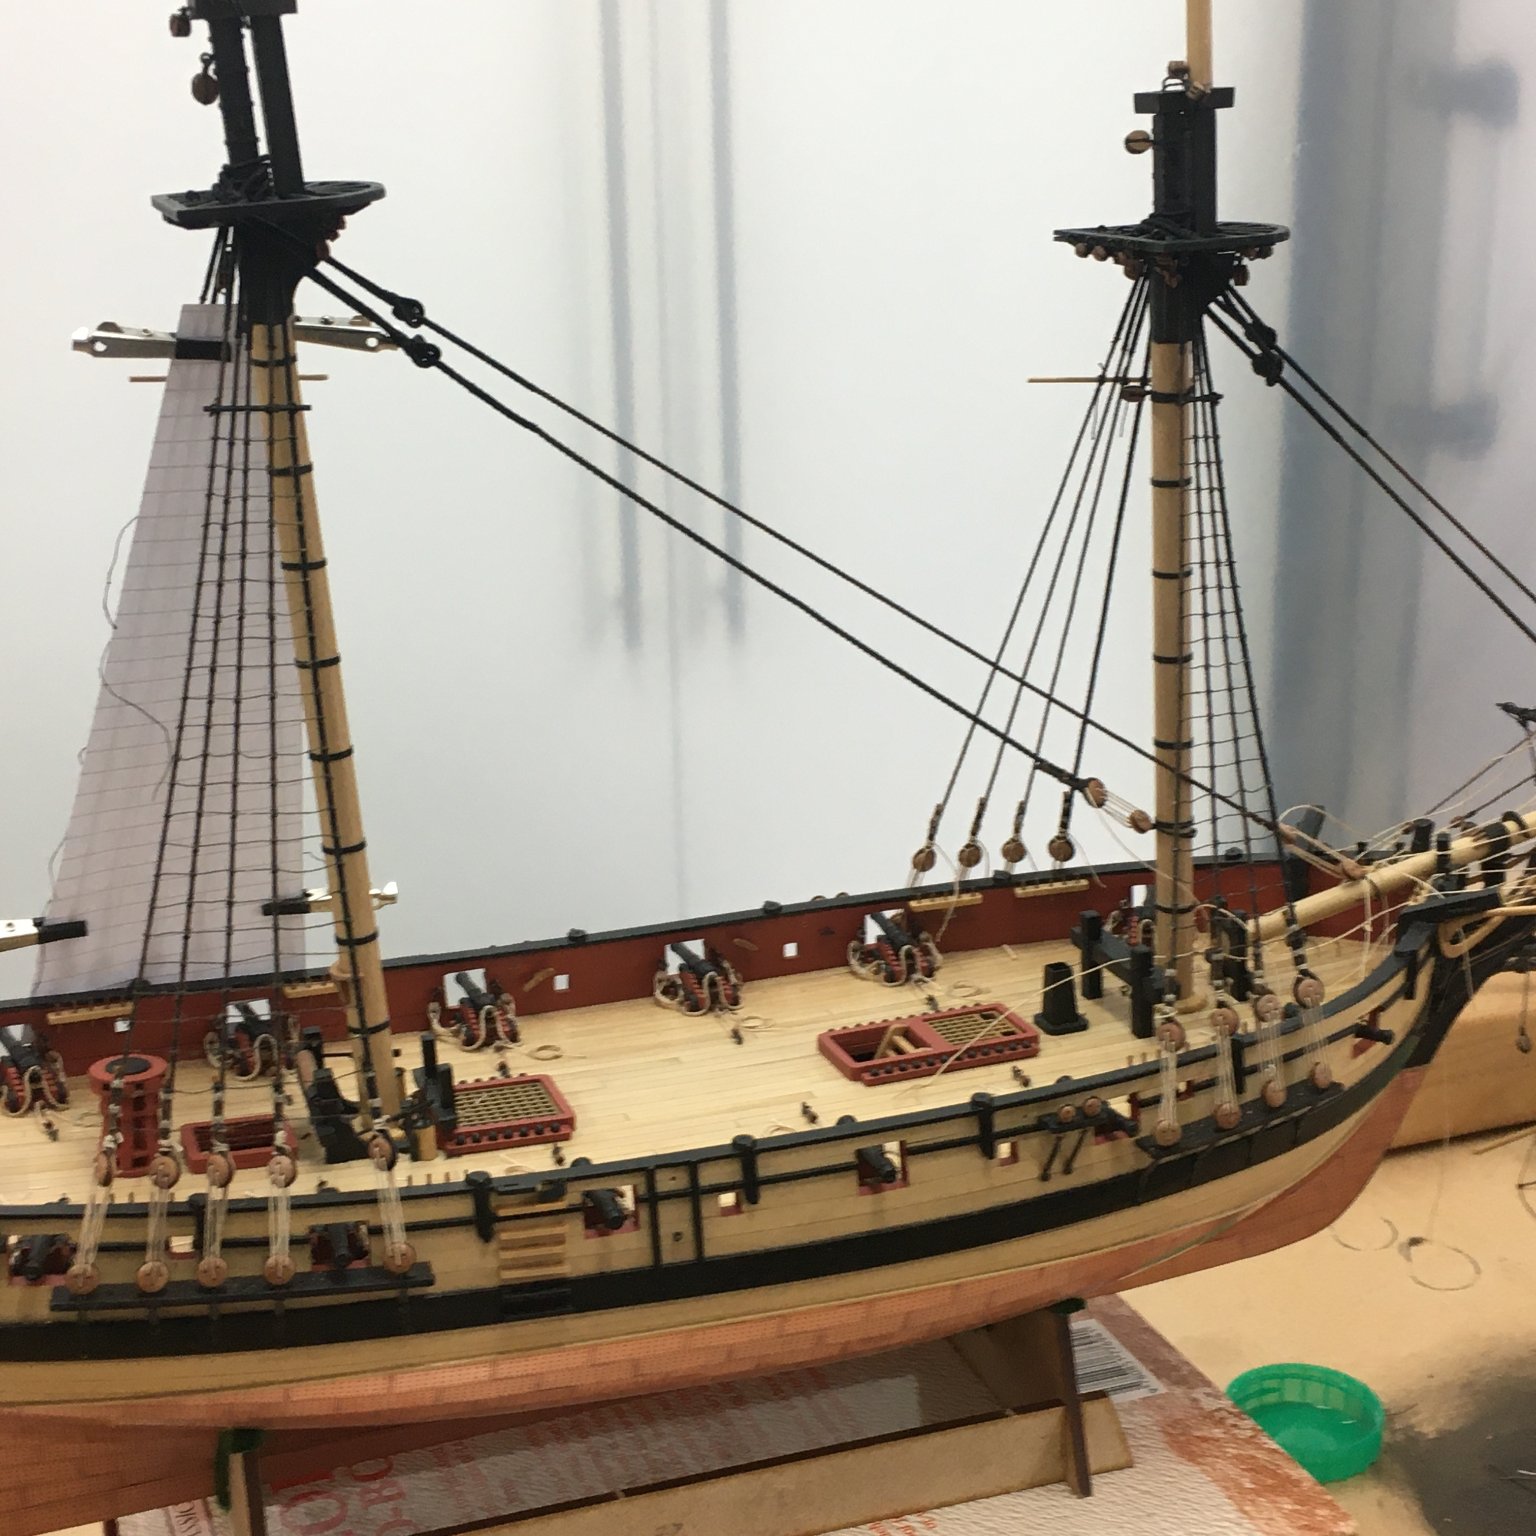
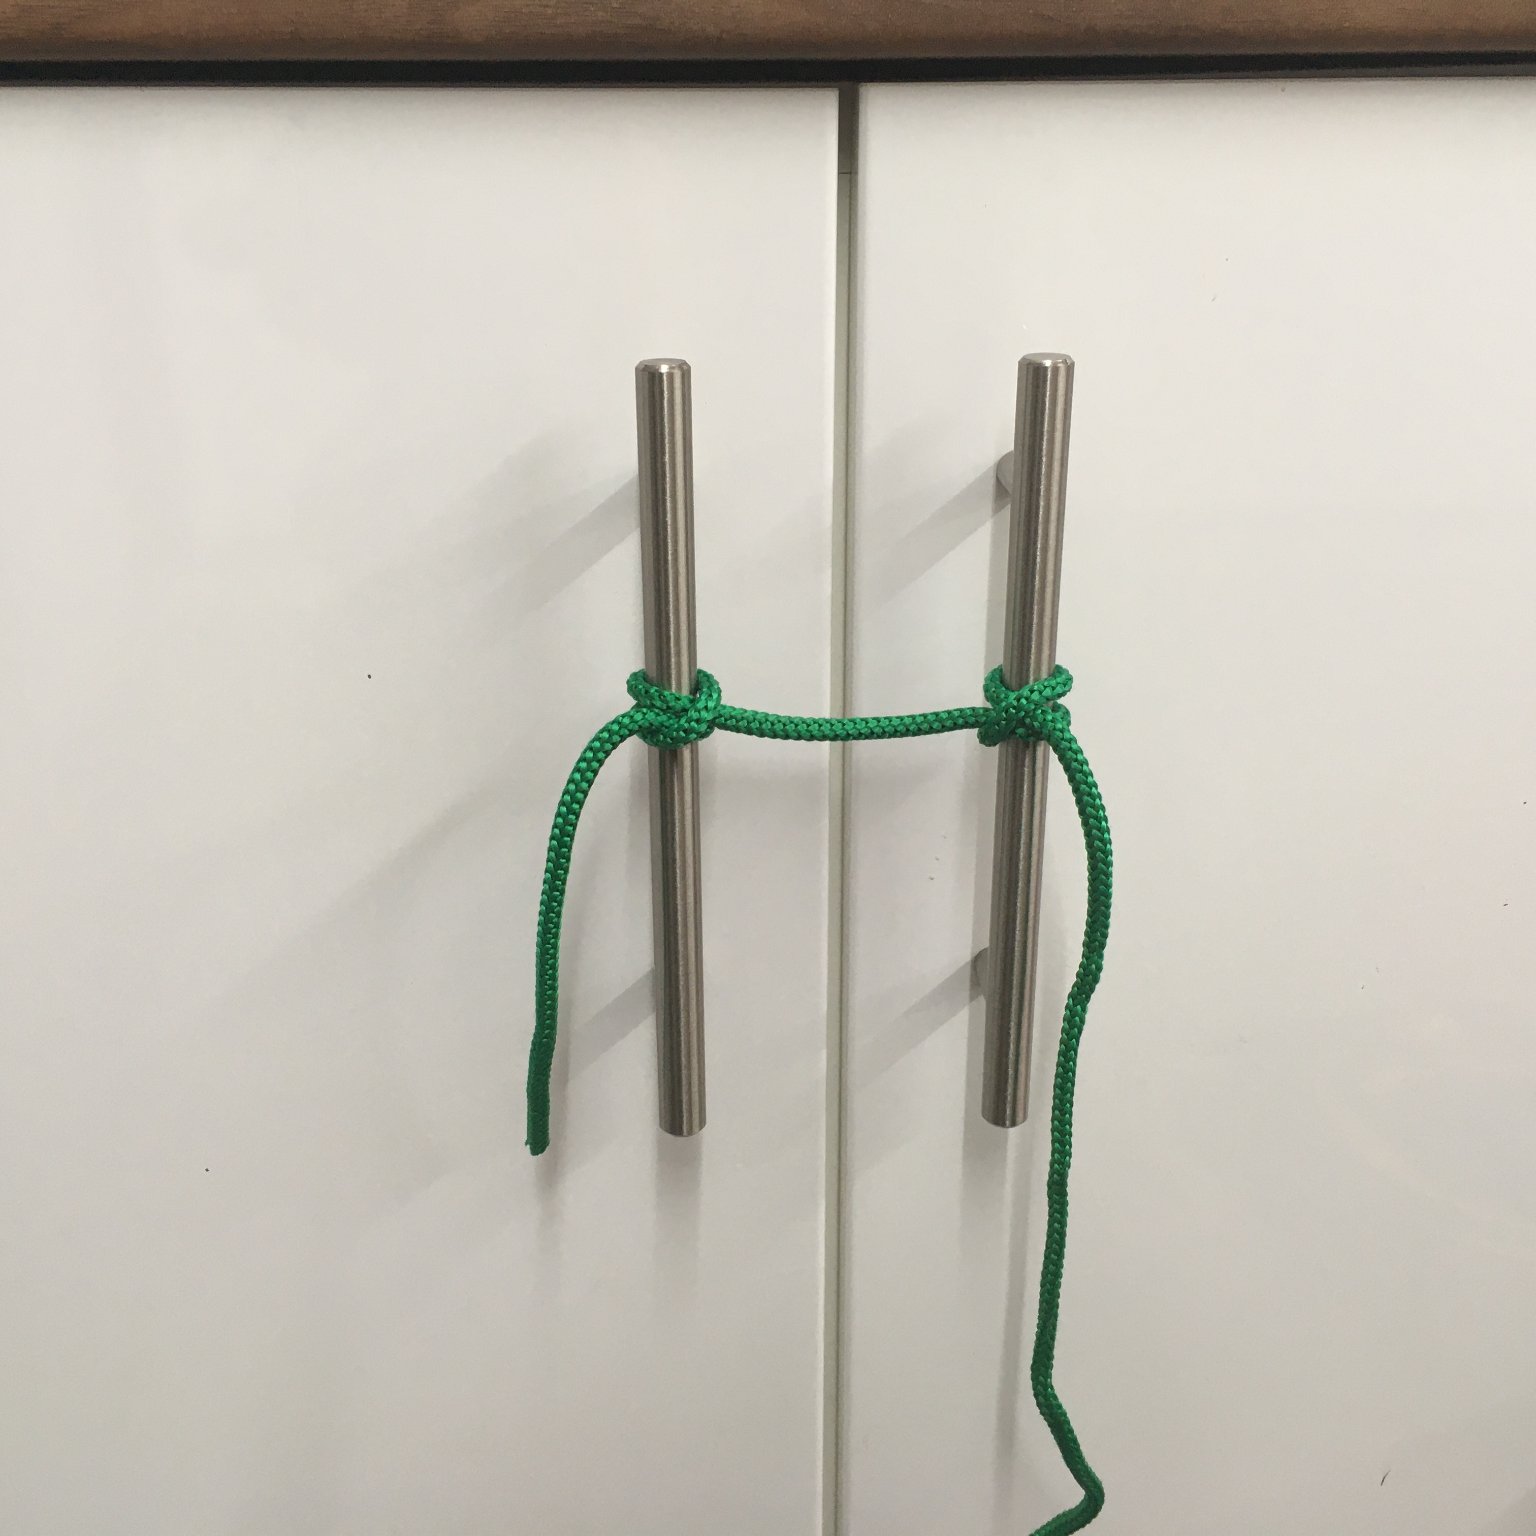
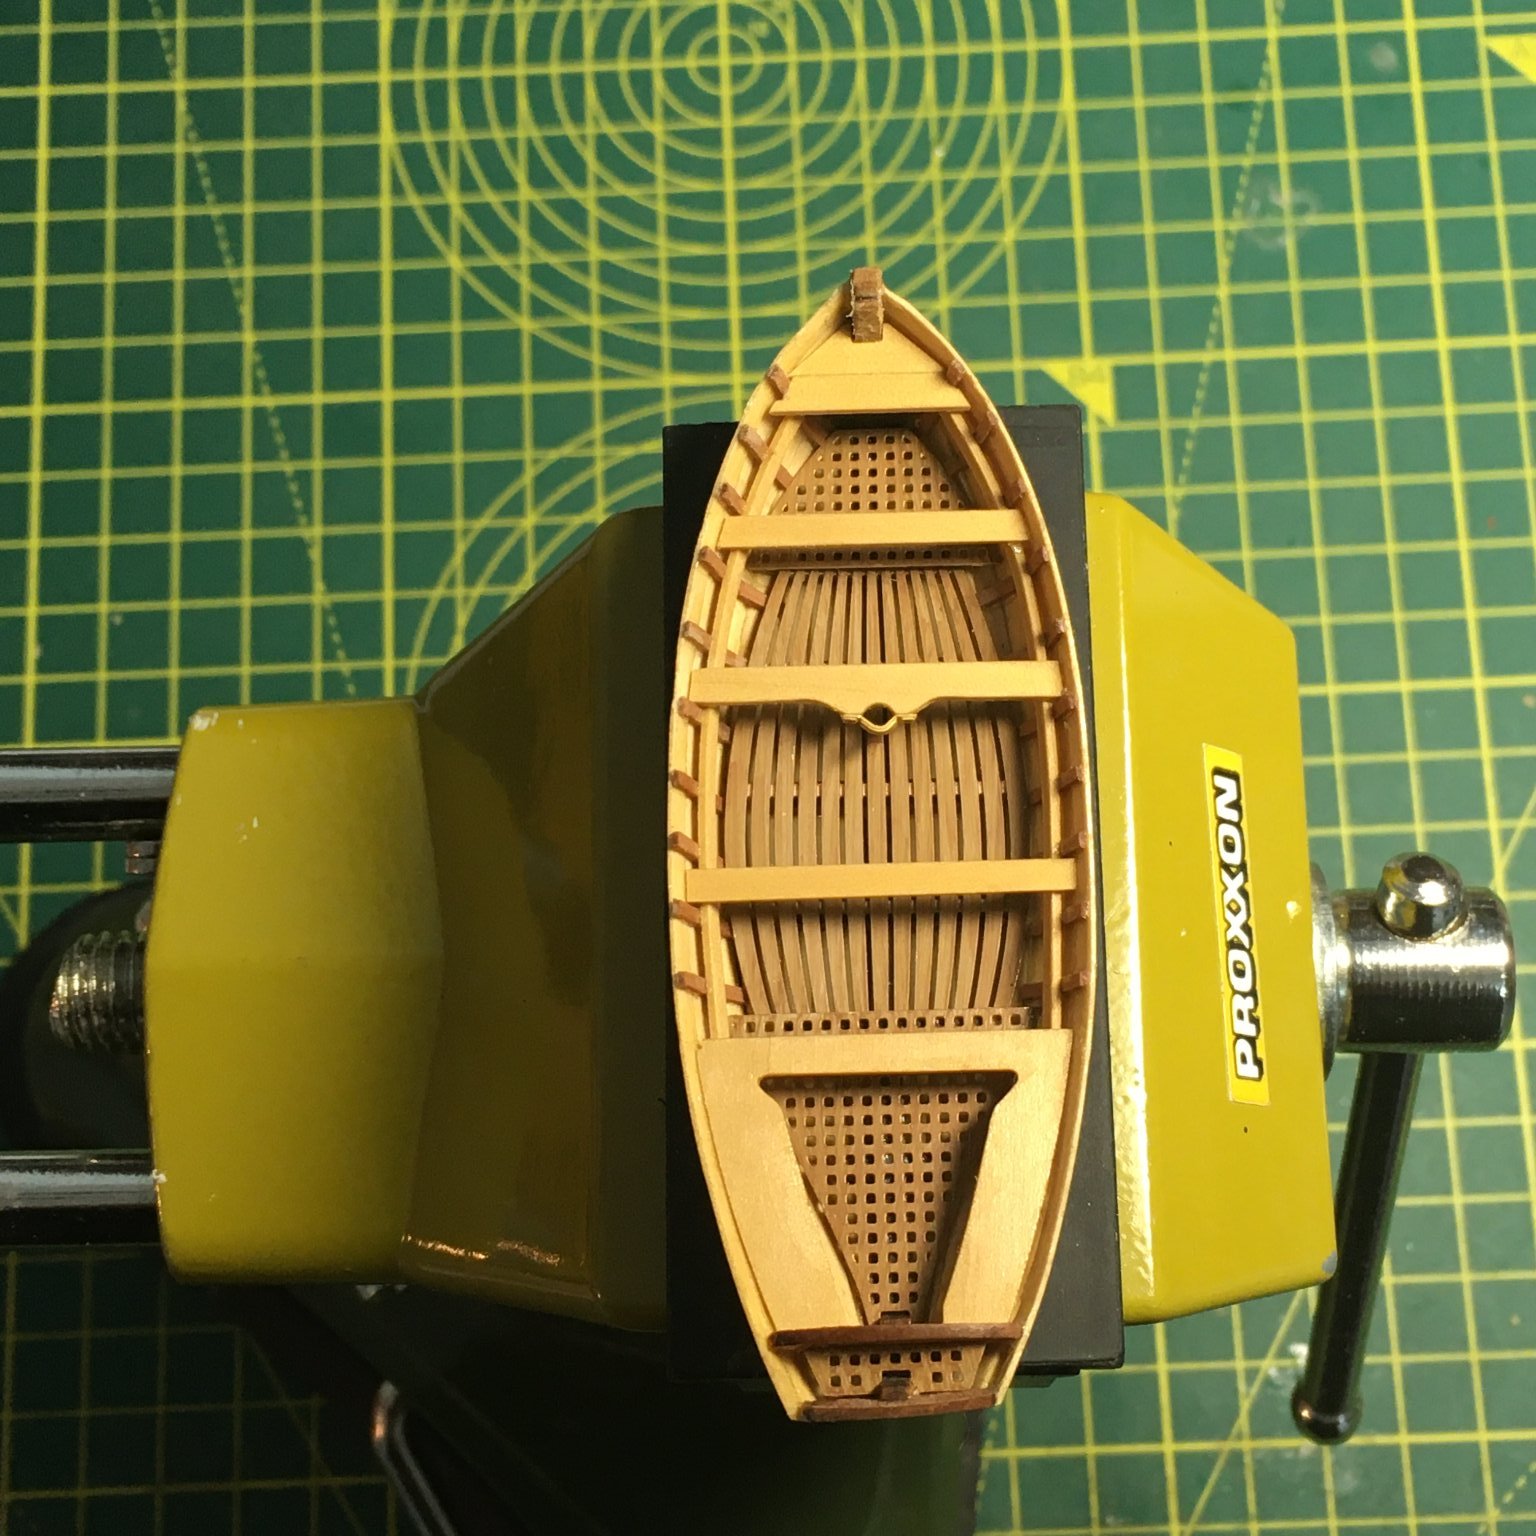
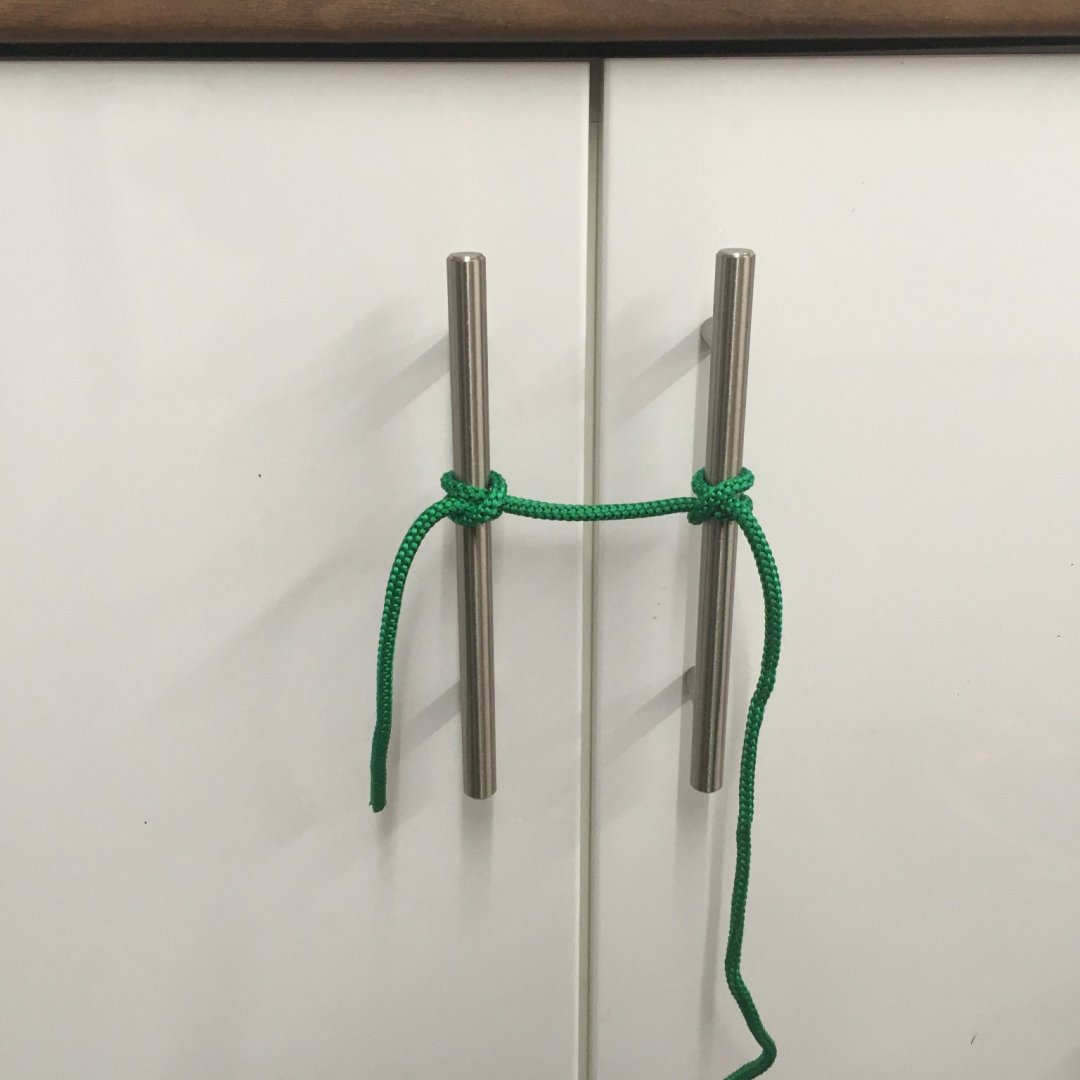
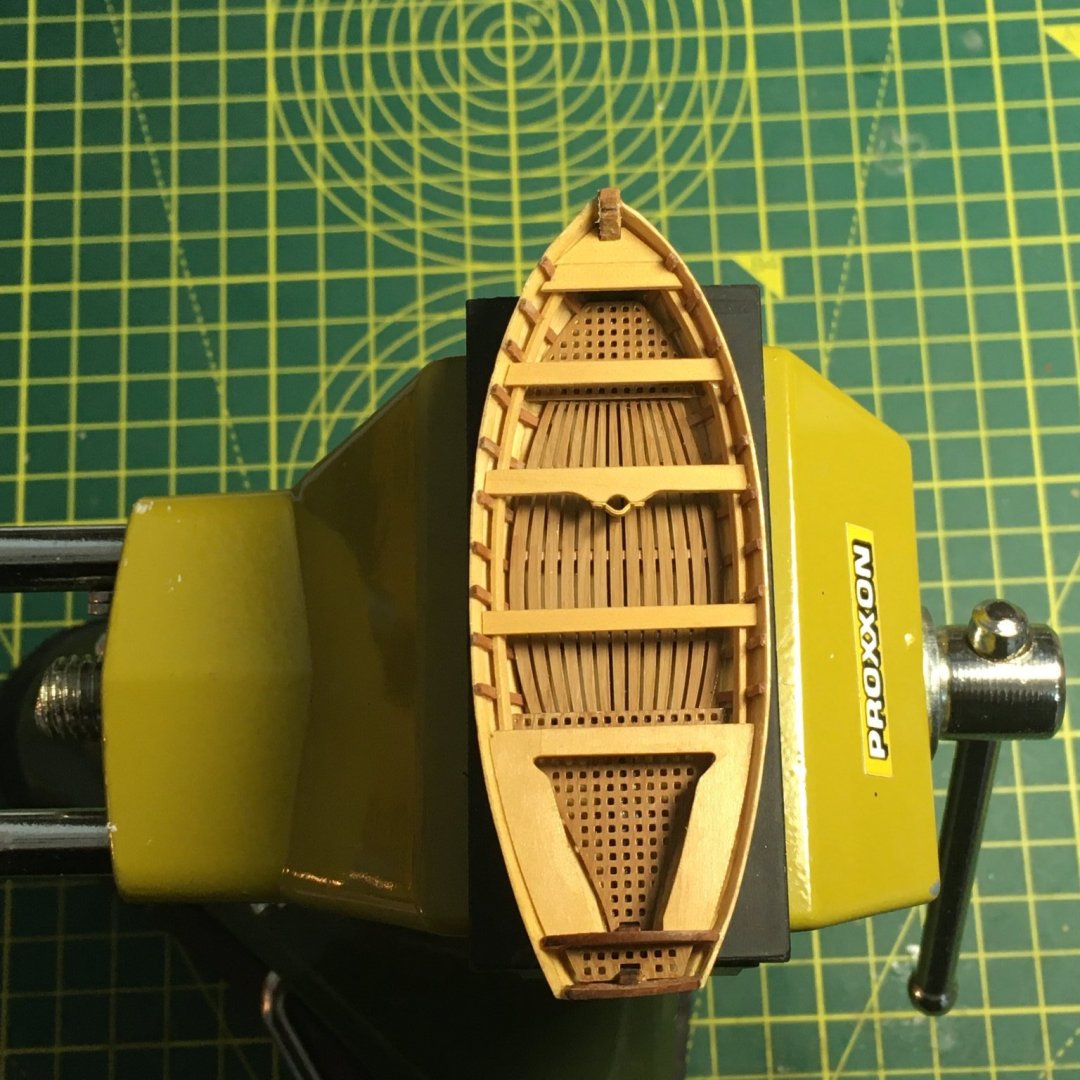
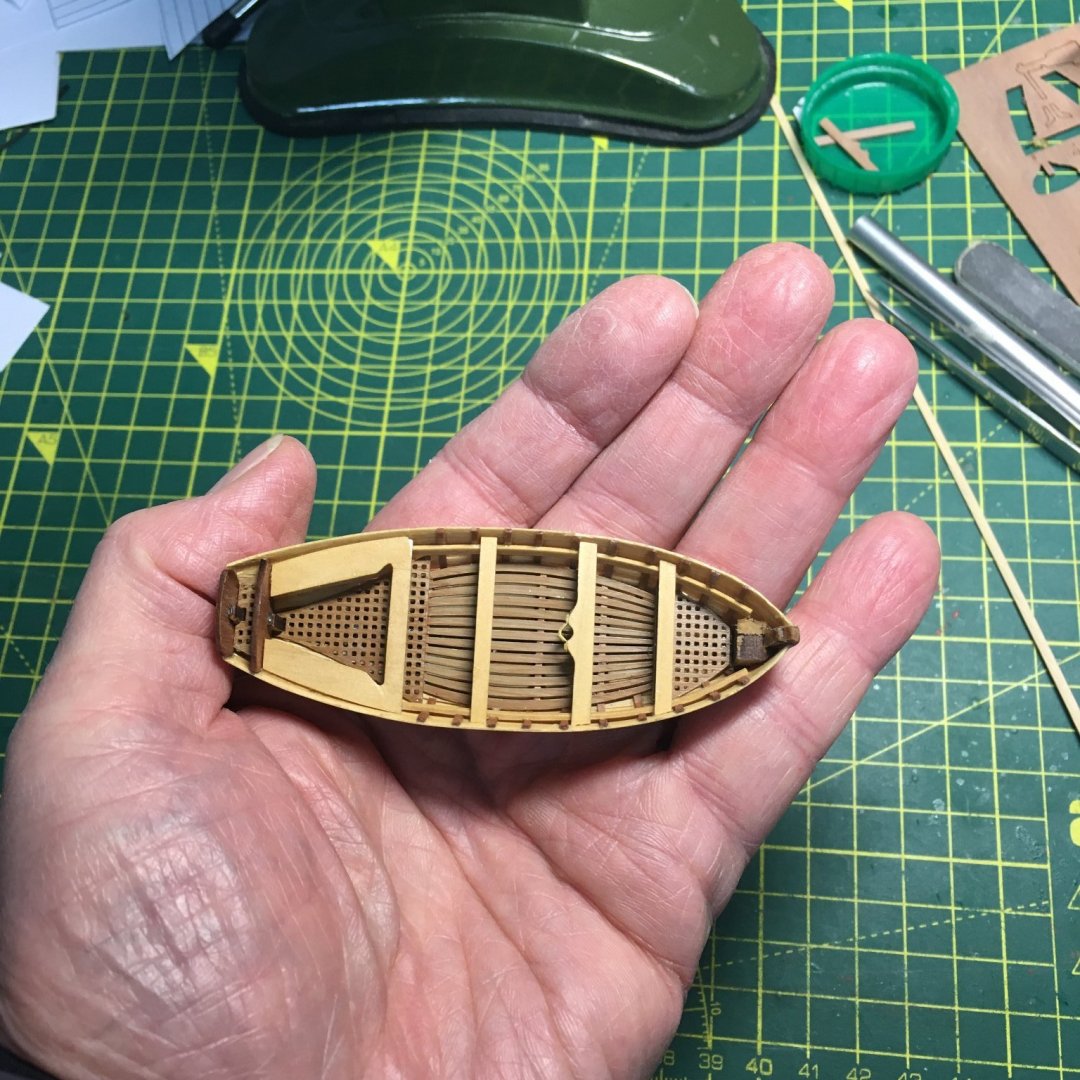
Ratlines & ships' boat Steady but slow progress on the ratlines. I don't hate this part of the build as much as some folk seem to, but I do get frustrated at my inability to produce good, consistent work. This is despite practicing on cupboard door handles! Pretty good at that scale! Anyway, I've finished the lower starboard shrouds and have just started on the port: To break up the rattling I've done some more work on the ship's boat. I'm certainly glad I went for the boxwood option when I see the result so far. The kit supplied boxwood strips for the boat's hull planking, and there was enough left over to replace the pearwood thwarts as well. I departed from the manual slightly by fashioning a little platform in the bow to hide part of the MDF structure that would otherwise show: Without the platform: Platform fitted: I haven't yet decided whether or not to paint the hull. It seems a shame to cover up the boxwood, and with a bit of tidying up and a couple of stealers it might look OK bare - especially when it's sitting in a cradle on the deck. Back to the ratlines! Derek


- 725 replies
-
- 11
-
-
- vanguard models
- speedy
- (and 1 more)
-
Blimey, I thought Jim was fast! More great progress Glenn, which I'm following with interest though I'll probably read it all again when I eventually start my Duchess. I was particularly interested in your method for folding the stove - I managed to break mine on Speedy which resulted in much swearing and ca! Derek
-
I cheat and use a guide. All the advice Paul gives in his videos is still valid, whether or not you go freehand like he does. The best guides I know are made by Richard Kell (here). His No.1 guide is especially useful for miniature or very narrow chisels.
-
Thanks for the recommendations Eric. I think I'll treat myself to at least one of these. For those who learn better from direct demonstrations, you can't do much better than Paul Sellers' excellent Youtube videos on woodworking. He has about 18 on sharpening all manner of hand tools, including the following two on chisels. Interestingly, in the first he uses diamond stones, and in the other he uses wet n' dry paper stuck to plate glass: Derek
-
Beautifully crisp and neat work Glenn, and another great log entry - she's looking superb. My approach to carpentry in a nutshell! I get the same response from the wood. Glad you fitted these - the crew will be relieved. I'm more used to seeing these in the bows, but their position on Cheerful might explain the term 'poop deck'. Also, I couldn't see any drainage holes in the stern - I hope the seats of ease don't drain into the captain's quarters?
- 778 replies
-
- 2
-
-
- cheerful
- Syren Ship Model Company
- (and 1 more)
-
I agree with Darrel - she's coming along very well.
- 382 replies
-
- 2
-

-
-
- Vanguard Models
- Duchess of Kingston
- (and 1 more)
-
Thanks everyone, much appreciated. Very kind of you to say so Glenn, but I'm still learning like the rest of us. And that's not false modesty - when I look at the work of some of the true masters on the forum, people like Marsalv and Doris for example, I feel like I'm still a novice. Haven't you got that nautical dictionary yet Glenn ? ...and fun toy is right. I don't really need the metal working lathe for ship modelling, but it's good fun for little projects like this. If you ever decide to go for a lathe a wood working version like the Proxxon DB 250 I use would be much more useful (and a lot cheaper).
- 725 replies
-
- 3
-
-
- vanguard models
- speedy
- (and 1 more)
-
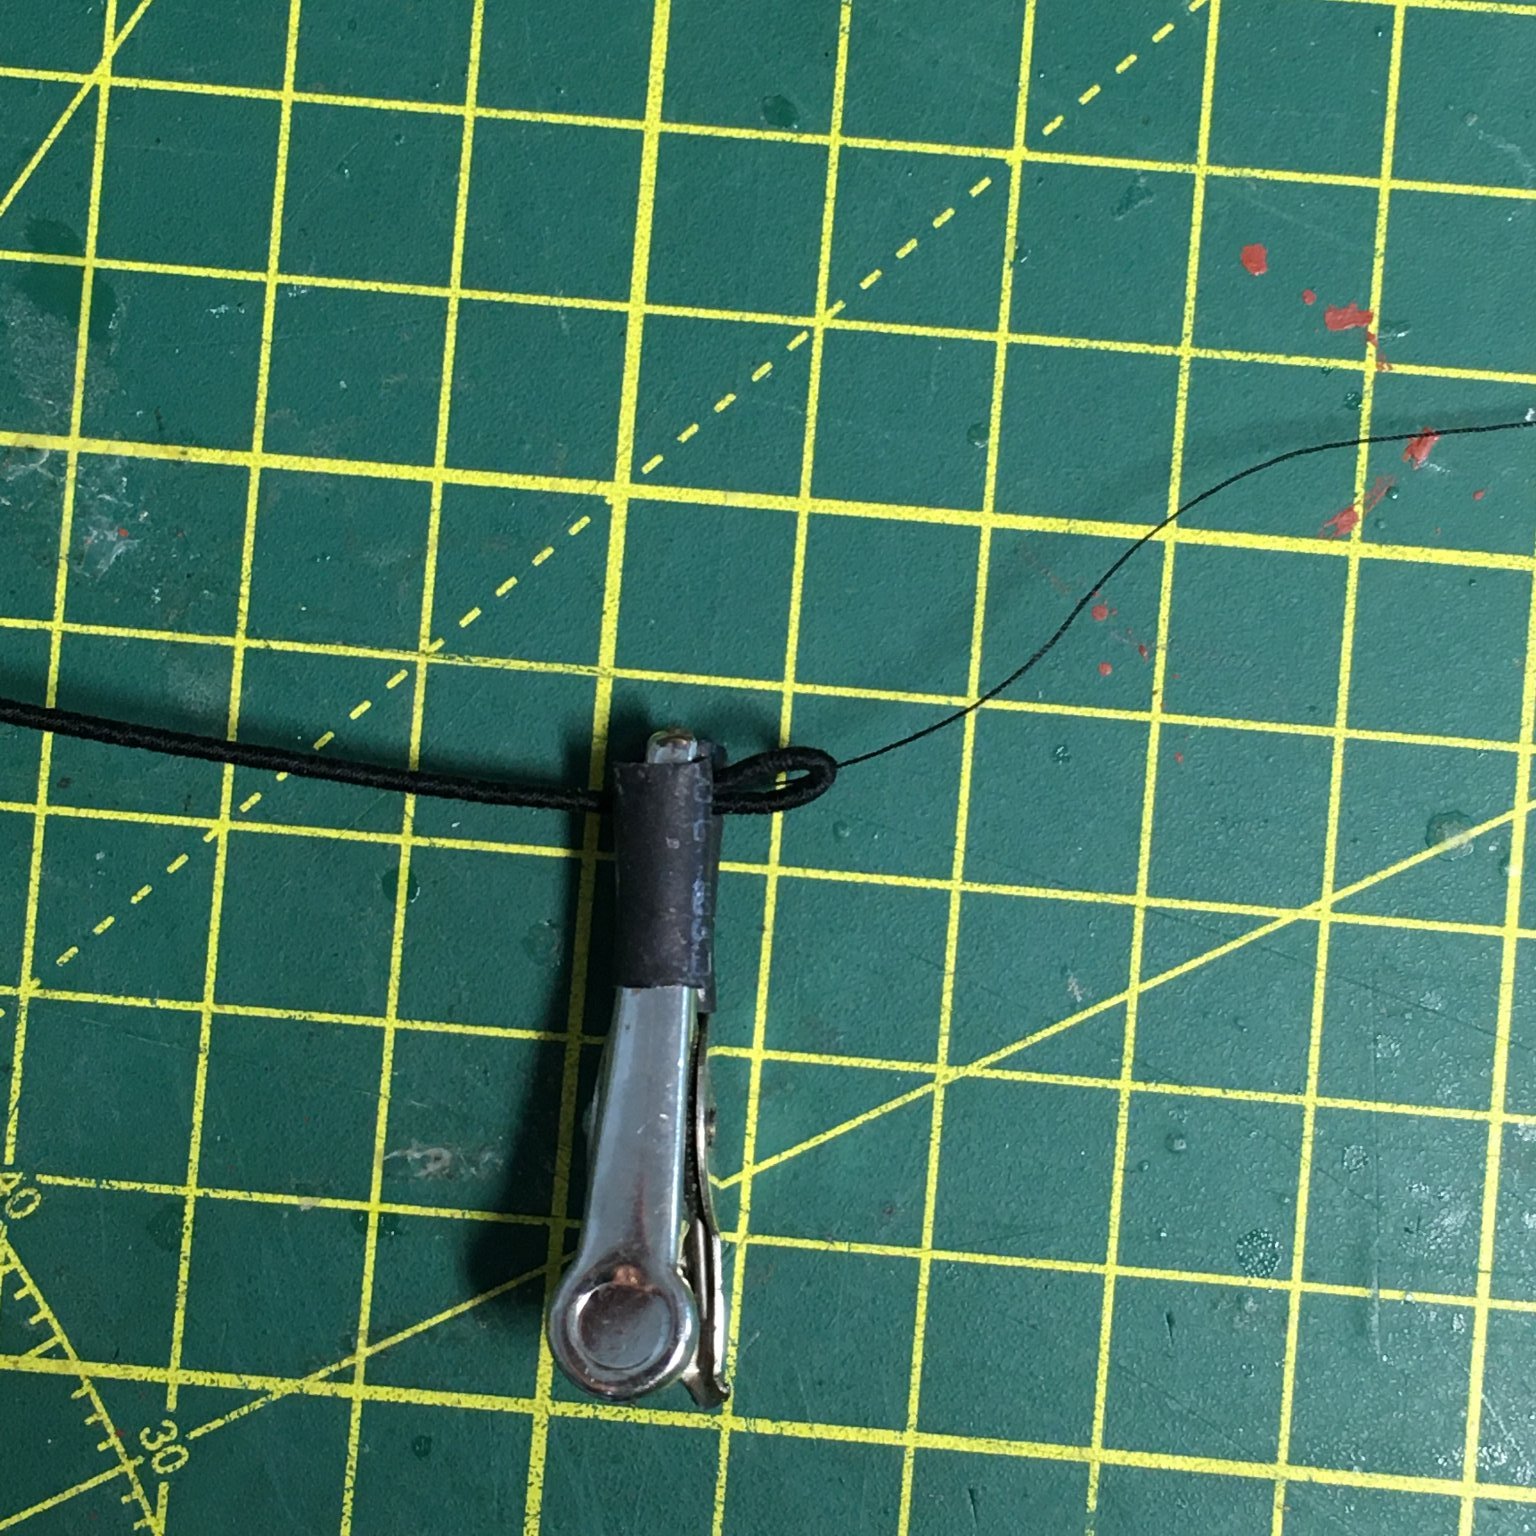
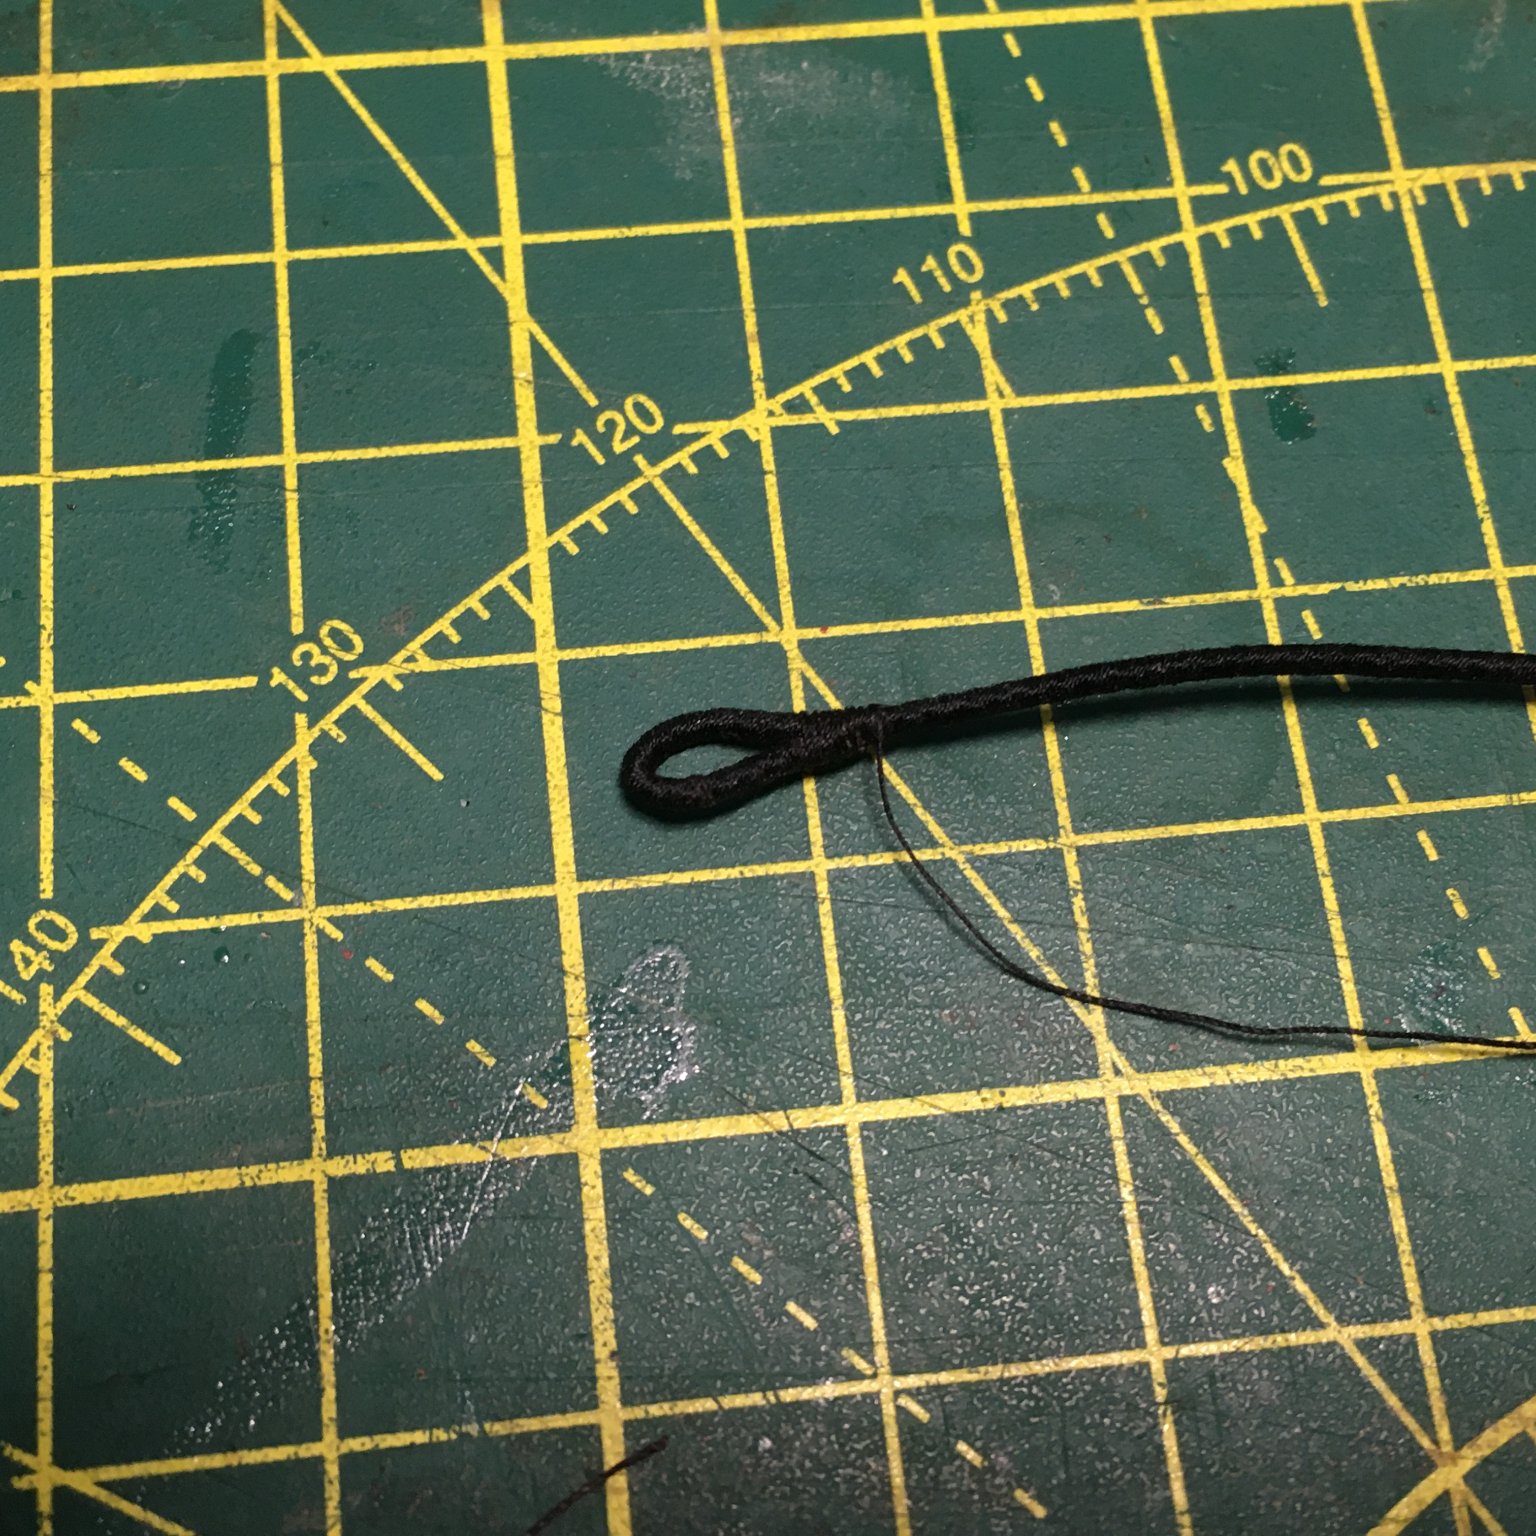
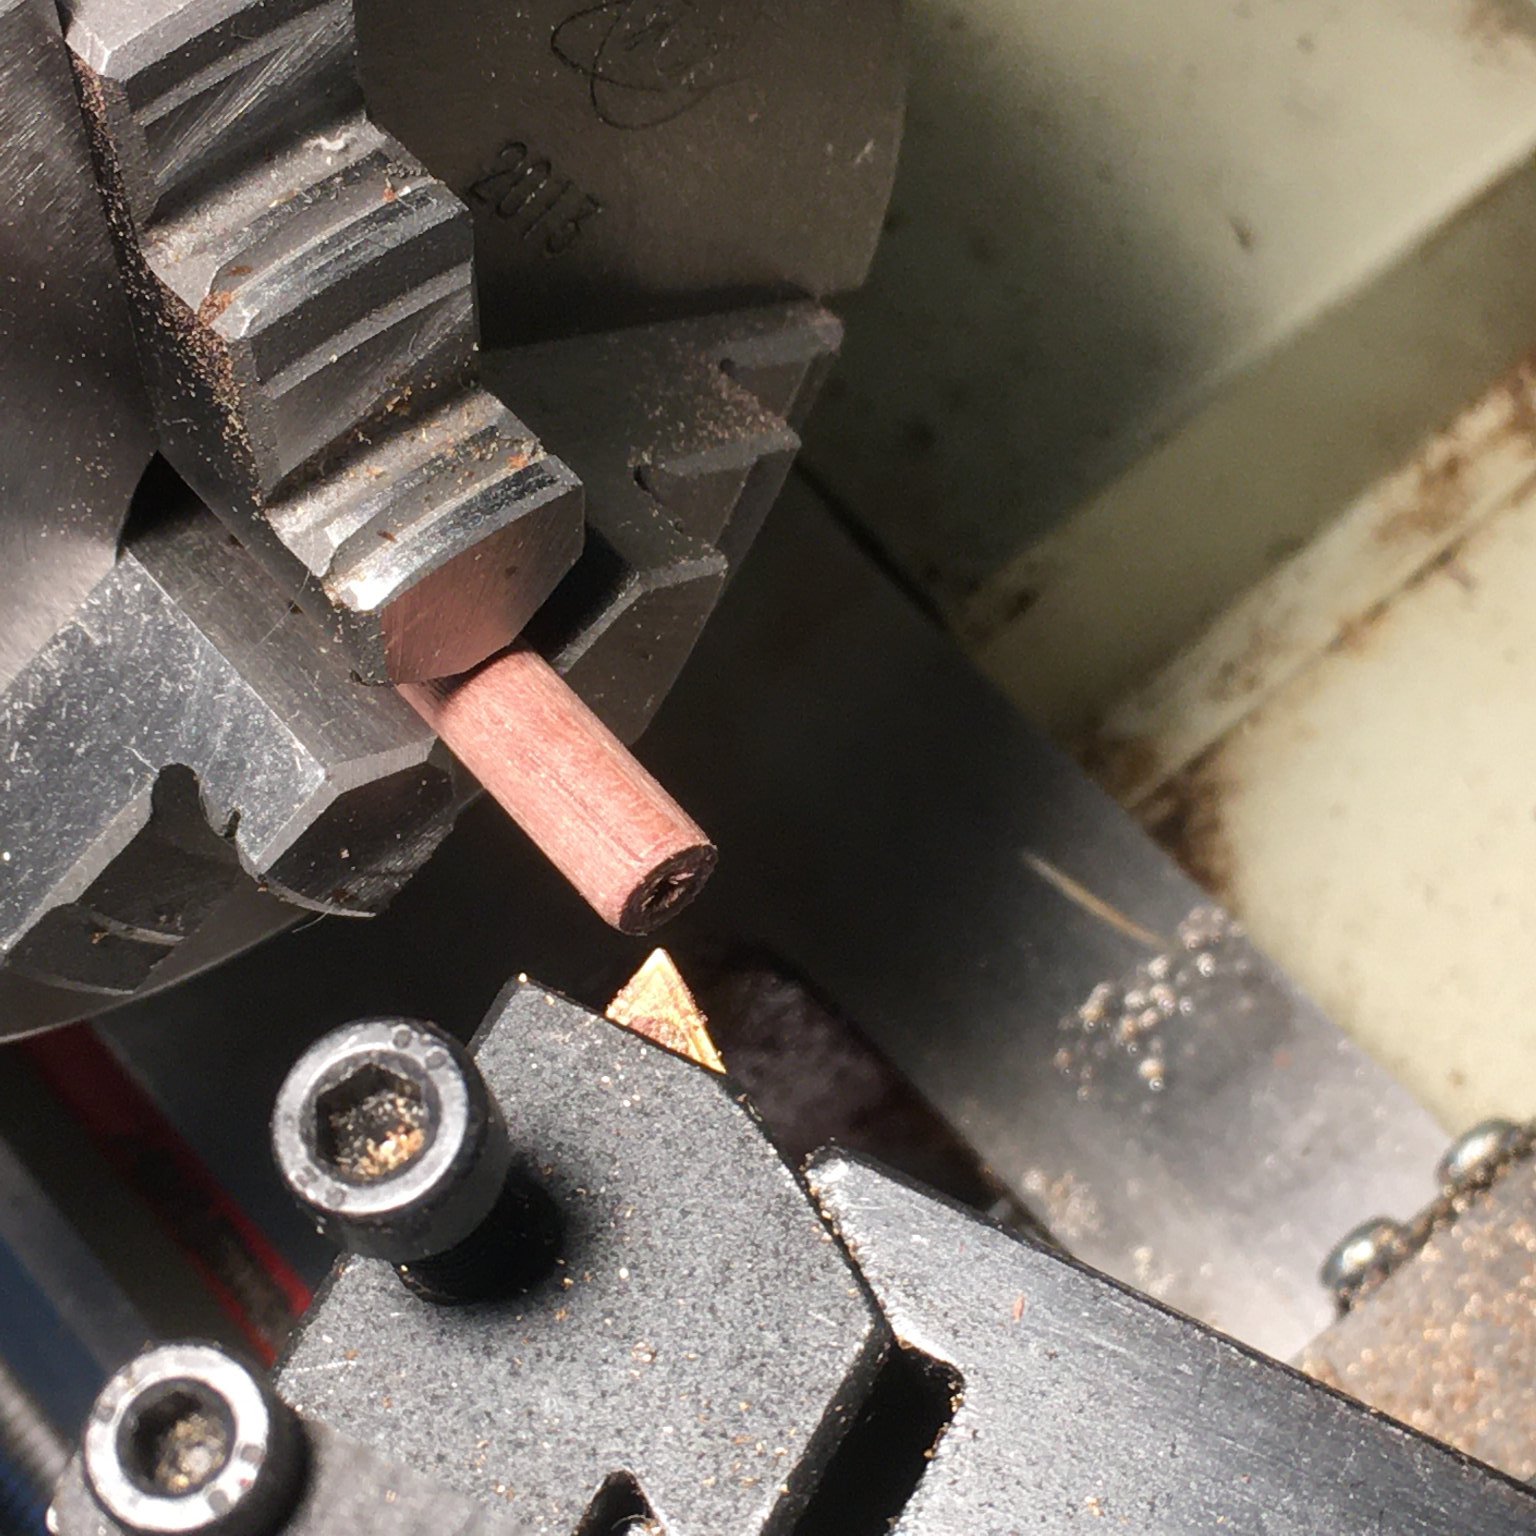
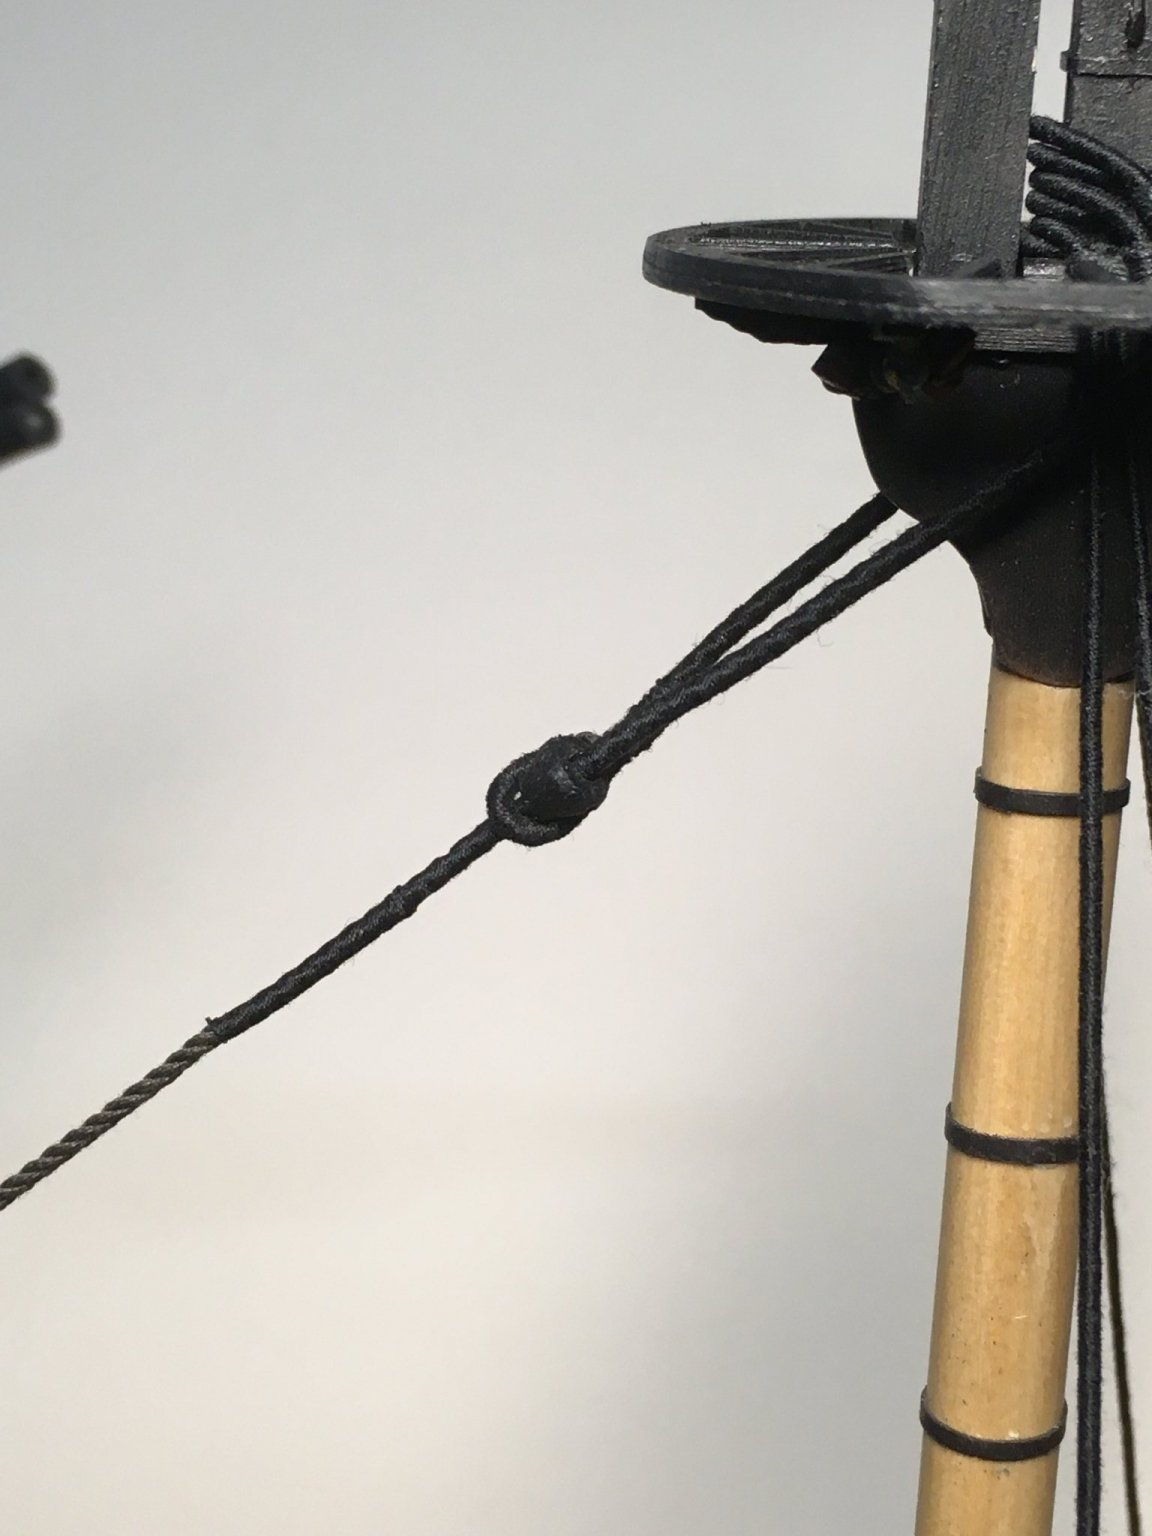
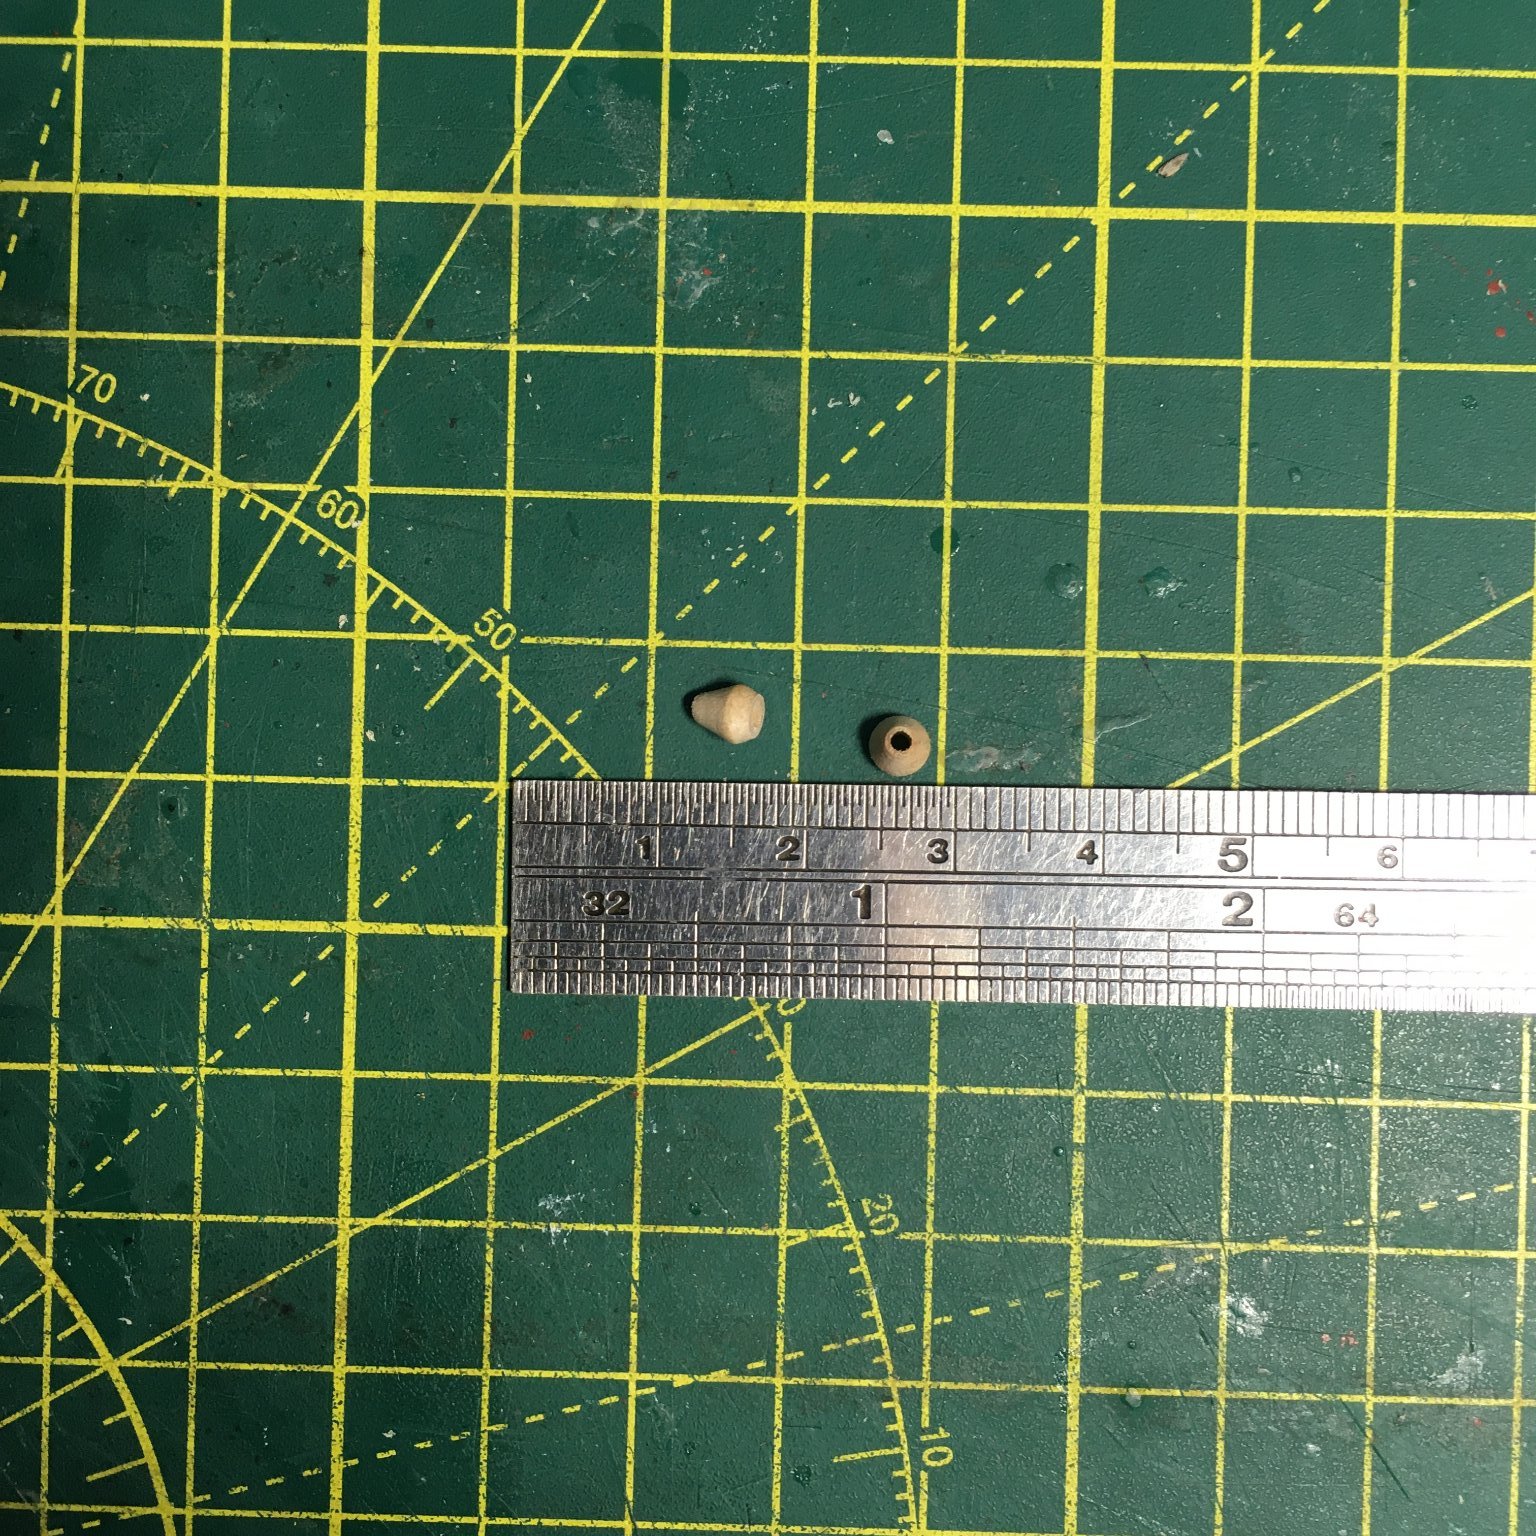
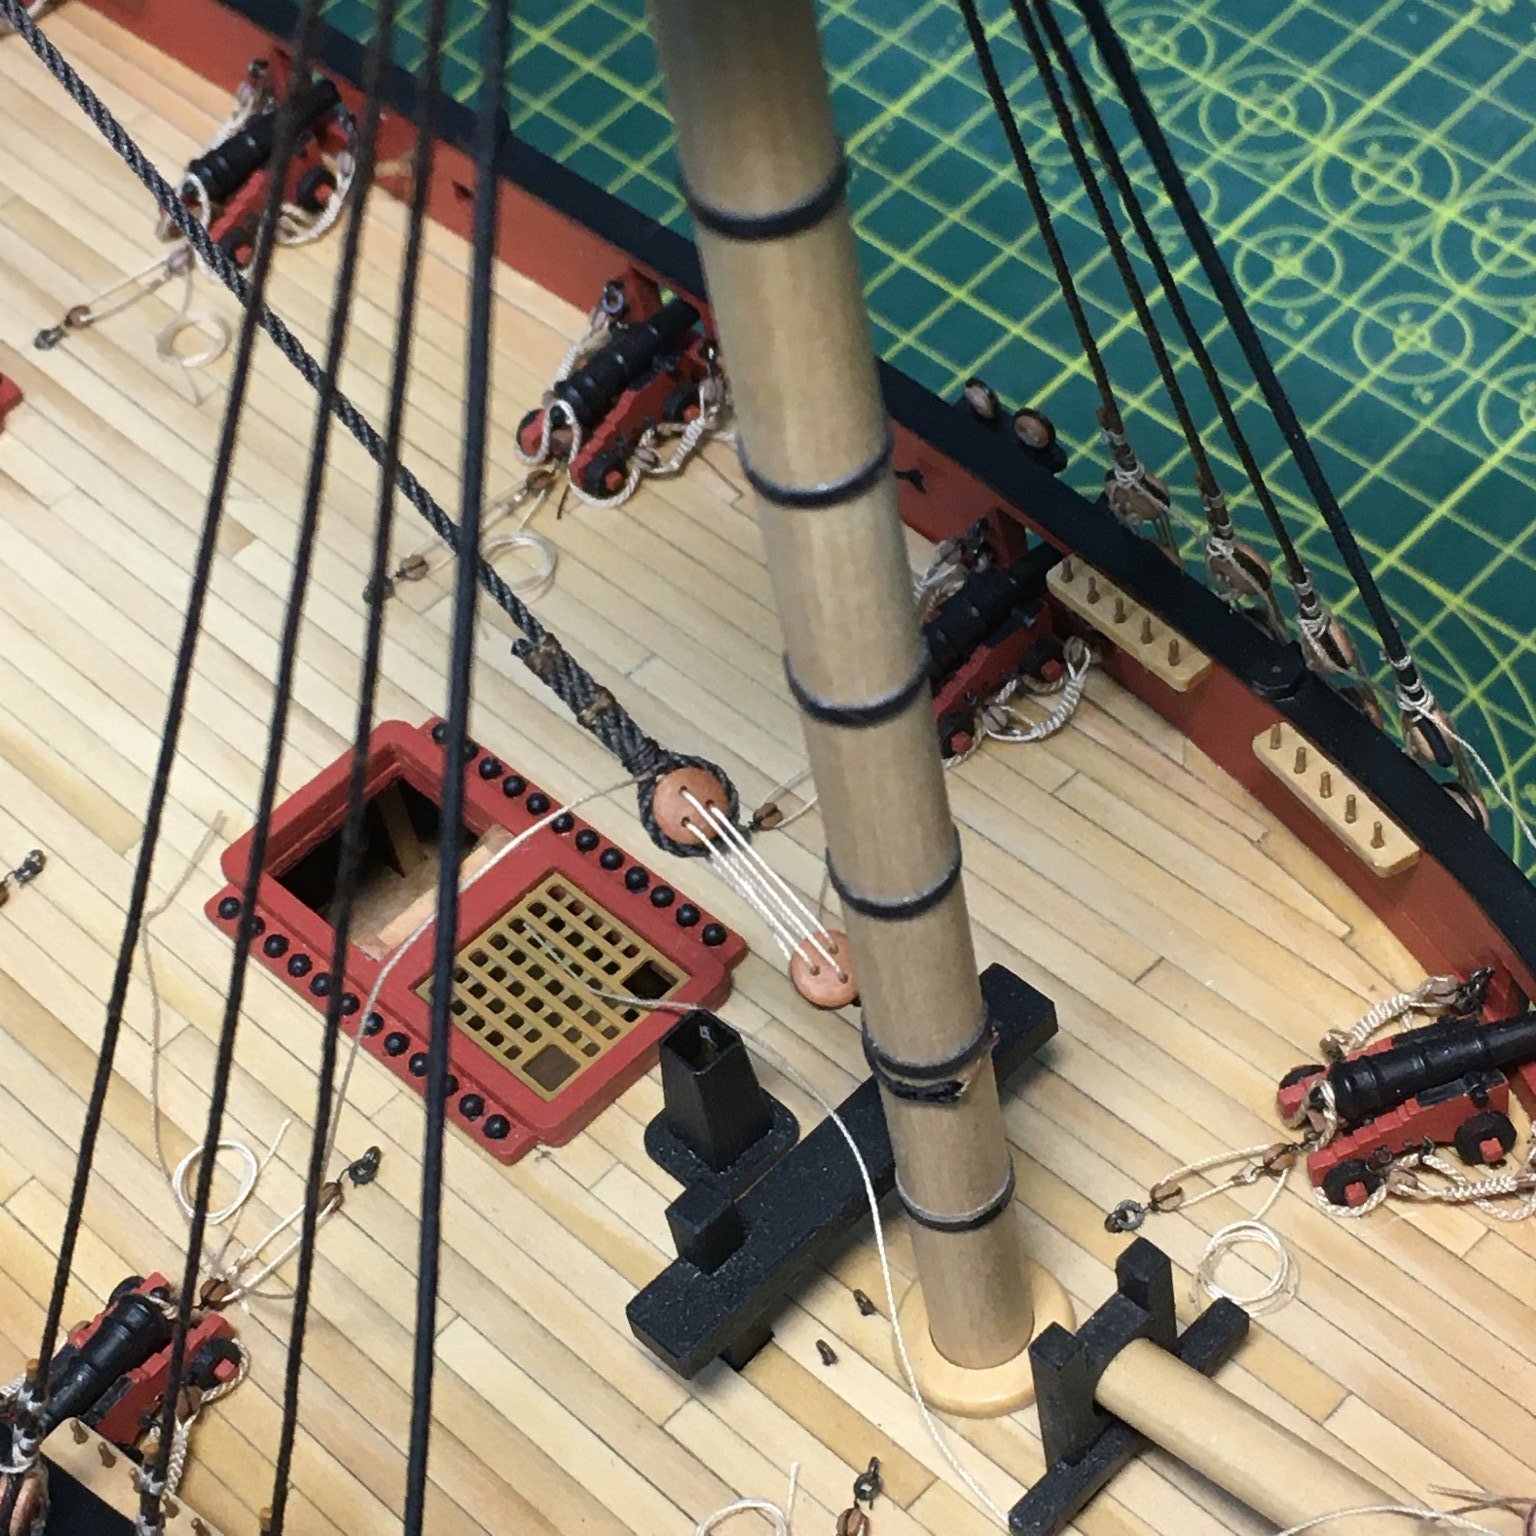
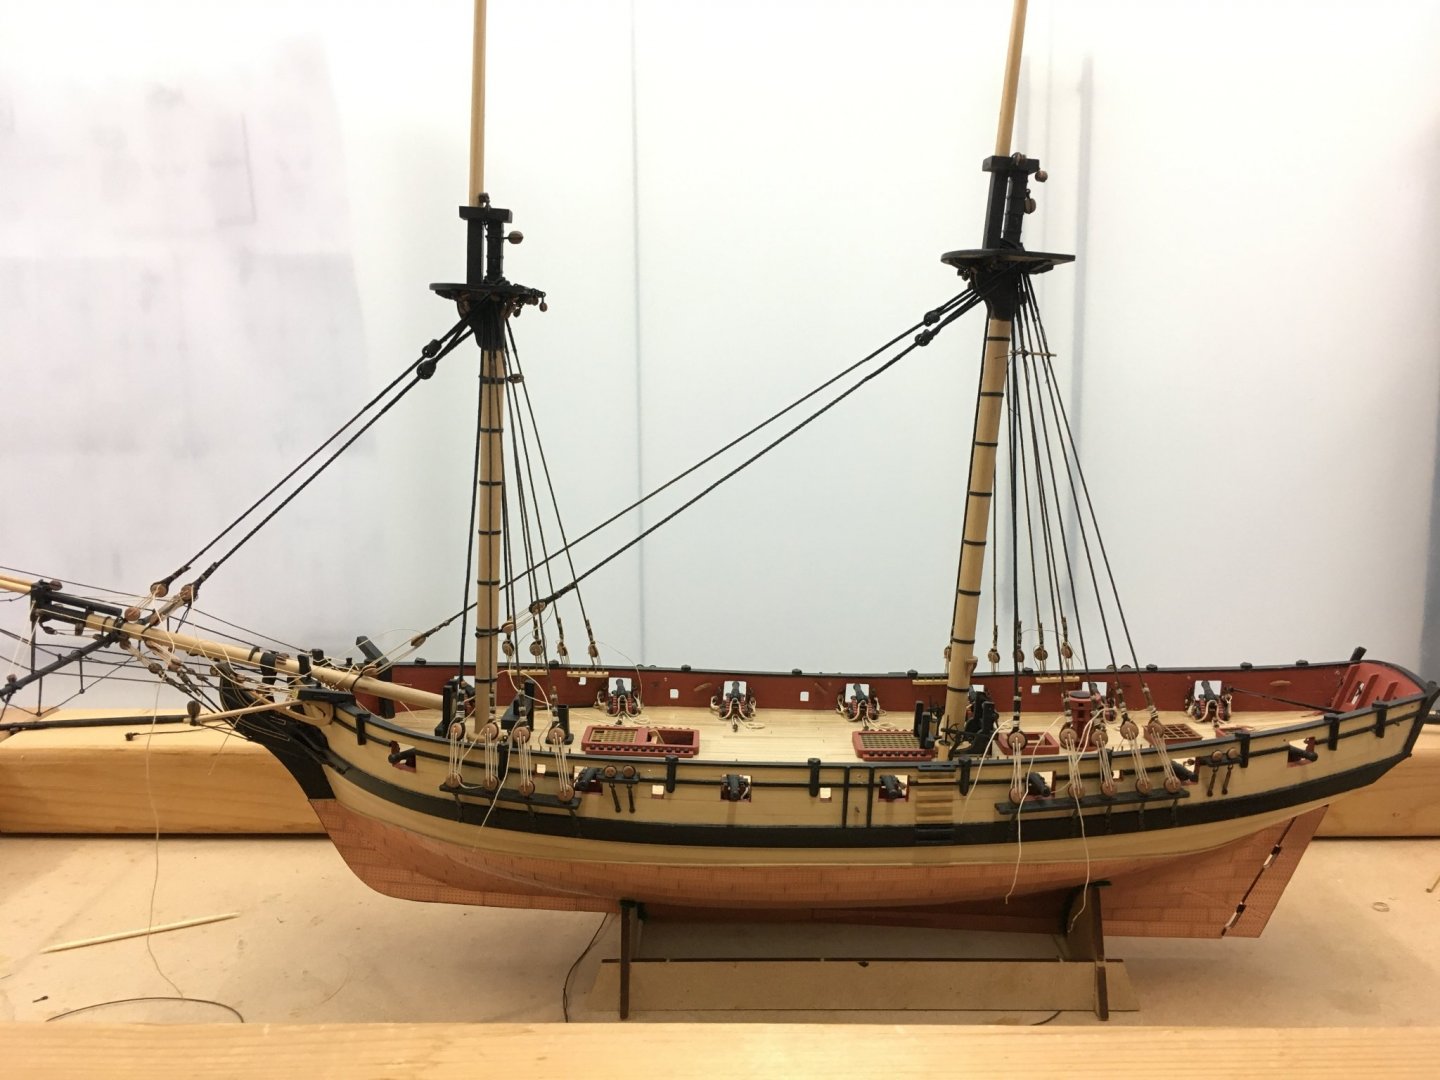
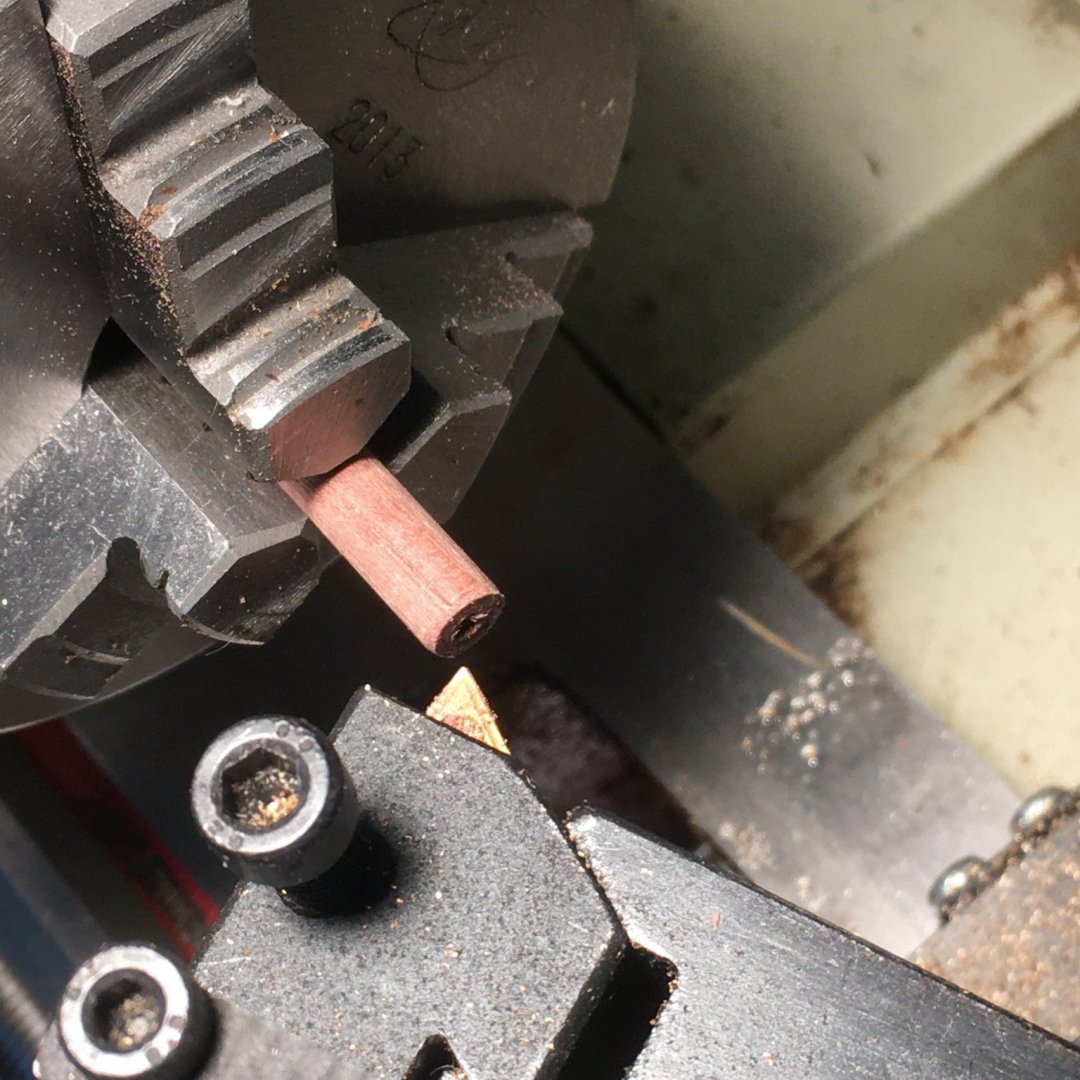
Lower mast stays I thought I'd fit these before tackling with the ratlines: I used 1.3mm line for the main and fore stays, and 1.0mm for their preventers. Each was served from the eye down to a point about 6' (30mm) below the mouse. To serve the eye I used a method I'd read in TFFM but not tried before. Unfortunately I didn't film it all, but basically I left about 12mm/0.5" unserved at the eye end of the line, and when I threaded the serving line through the stay to start the serving I left a good long length spare. When finished serving, I used a scalpel blade to cut the unserved rope at an angle. With PVA applied, I brought the cut end round to form the eye and clamped it whilst it dried. Hopefully this shot will make the description clearer: When the glue had dried I wound the spare thread round the join to cover it: I put a half hitch in the final loop, applied a drop of dilute PVA and trimmed. Next I had a bit of fun with the mice (mouses?). The kit supplies two sizes of black beads for these which look fine from a distance but I thought I'd make my own. I didn't want to go as far as full size practice and start weaving mice, so I again followed TFFM and made them from wood on the lathe. I started with a hole large enough to accommodate the served stays: Then set the top slide at a 20 degree angle to cut a taper: I parted the mouse with the cutter at an angle to bevel the other end. The mouse should be three times the diameter of the stay, so this told me where to part the mouse. The resulting mice I think are a slightly more realistic shape than a round bead, especially when painted to match the stay: Finally, I seized 5mm deadeyes into the other end of each stay, using slightly darker thread than I did on the shrouds to preserve the detail better. And the lanyards are not bright white in real life, honest! Next job will be preparing for ratlines. I'll probably do the futtock staves first, and practice my clove hitches. Having said that I'm tempted to try half hitches which might be less bulky at this scale. I'll experiment. Derek


- 725 replies
-
- 14
-
-
- vanguard models
- speedy
- (and 1 more)
-
Looking good Glenn. You might want to try the fly tying thread I used on tiny blocks in my Speedy log. Takes some getting used to, but I find it invaluable at this scale.
- 382 replies
-
- 3
-
-
-
- Vanguard Models
- Duchess of Kingston
- (and 1 more)
-
Very sad to see the Model Dockyard go. I've been using them for around 20 years and always found their service excellent. I wish Nick Tonkin a happy and well-deserved retirement. Just seems a pity no-one is taking on the business, as there are already too few good suppliers to the model ship community.
-
That slimmer ladder was well worth the effort Edward. The difference may not be that great in terms of objective measurements, but to my eye it looks much more in scale.
-
Thanks for sharing this Glenn. I'll make I note in the manual for when I (eventually!) get to this stage. Glad you're getting on well with the magnifier - I found it makes a big difference.
-
That decoration is so much better than the old-school castings in kits like Royal Caroline, and contrasts beautifully with your fine planking.
- 201 replies
-
- 2
-
-
- Duchess of Kingston
- Vanguard Models
- (and 1 more)
-
I struggled with the brass strips too until I tried annealing them. After heating a strip for a few moments with a gas torch and allowing it to cool, I found I could bend it easily into the the required curves. Just a cheap torch working off lighter gas, nothing fancy.
- 124 replies
-
- 1
-
-
- panart
- royal caroline
- (and 1 more)
-
Thanks Eric - I hope you find it of some use in your own build. Derek
- 77 replies
-
- 1
-
-
- model shipways
- pinnace
- (and 1 more)
-
Hi Eric I've just found your log, and I'm impressed with your work, especially the neat job you've made of cutting out the frames and thinning the ribs down. I found that one of the trickiest parts of the build. One of the next jobs for you could be almost as tricky - the internal planking from the thwarts upwards. I've described in my log how I cut each plank in half lengthways to make it easier to follow the internal curves. I ended up using a lot of filler, but that part's painted so it doesn't show. Anyway, it's a fun kit to build and produces a beautiful model, so I shall follow with interest from now on. Derek
- 123 replies
-
- 1
-
-
- Model Shipways
- Pinnace
- (and 1 more)
-
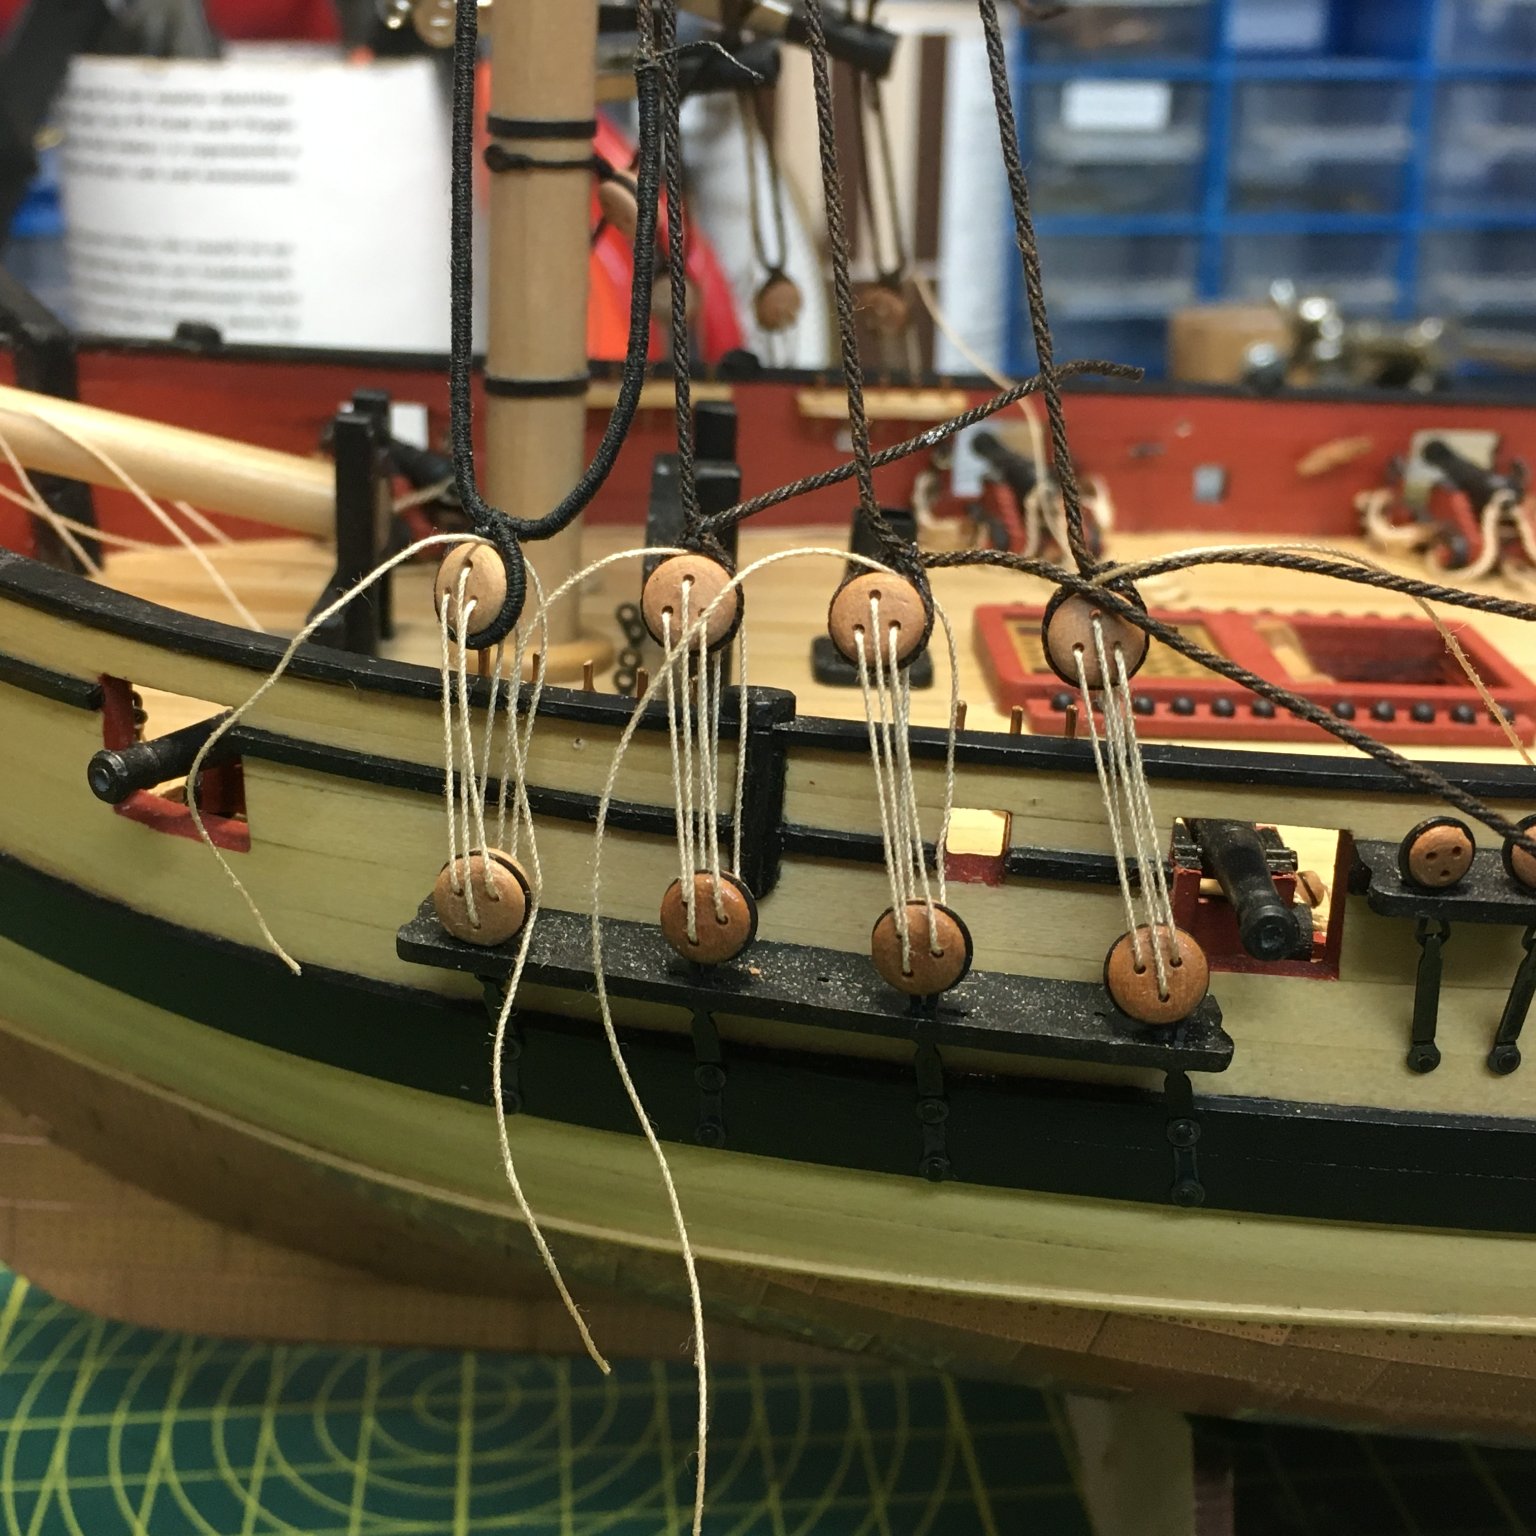
Hi Glenn Thanks. Glad you find the log helpful. However there's not a great deal of further advice I can offer on levelling deadeyes. I just try to hold the shroud tight on the jig while I move the marker thread to the bottom of the loop. No matter how careful I am I usually find one or two deadeyes are slightly out of line when I first rig the lanyards. Most times, I can level things up by extra tightening the lanyards on deadeyes that are sitting too high. Occasionally (and it happened once on Speedy's main shrouds) a deadeye will end up too low and there's no alternative but to unpick the seizing and redo it. To that end, I only do the cross seizing during the levelling process, not the round seizings. That way, if I do have to redo a shroud, I've only got one seizing to unpick. The downside is that once I've got everything level I have to unreeve all the lanyards so I can put the round seizings on. I found a picture illustrating this stage: Hope that helps. Derek

- 725 replies
-
- 7
-
-
-
- vanguard models
- speedy
- (and 1 more)
-
Thanks for the kind comments and 'likes' - they're much appreciated. Thanks Tim. I'm still in two minds. I'll wait till later in the build to judge the overall effect. I may end up just slightly darkening them to make them stand out a bit less but not hide the detail. Thanks Glenn - considering the number of fine modellers on this forum I take that as a great compliment. The truth is I had to work out the seizing method again from scratch, having forgotten how I did it on my last fully rigged ship. Proves the value of keeping a log! I like the method because at 1:64 scale it looks reasonably authentic without being too bulky. Yet again the Quadhands proved its value, allowing me to hold several lines simultaneously just where I wanted them. I'll certainly use a paper grid when I rattle down the shrouds, combined with the every-5th-shroud-first technique discussed earlier. Building work permitting 🔨😬 ⛏️ Derek
- 725 replies
-
- 1
-
-
- vanguard models
- speedy
- (and 1 more)
-
Thanks Barbossa, I appreciate your kind words and feedback. If you have seen my first log (here) and earlier entries in this log you will know that I am often torn between historical accuracy and aesthetics - aesthetics usually wins! Thank you also for your advice on ratlines. I tried that method on my last fully rigged ship and it worked very well, so I shall certainly use it again. However I am sure many members are not aware of the method (I only found it relatively recently, in The Fully Framed Model) so you are quite right to draw attention to it. Derek
- 725 replies
-
- 1
-
-
- vanguard models
- speedy
- (and 1 more)