
HOLIDAY DONATION DRIVE - SUPPORT MSW - DO YOUR PART TO KEEP THIS GREAT FORUM GOING! (Only 13 donations so far - C'mon guys!)
×


druxey
-
Posts
13,290 -
Joined
-
Last visited
Content Type
Profiles
Forums
Gallery
Events
Everything posted by druxey
-
 Clinker and clench are different names for the same thing! I remember the advertisements in the '70's in Model Shipwright for this kit. Couldn't afford it back then, but lusted after one!
- 102 replies
-
- 3
-

-
- speedy
- model shipwright
- (and 1 more)
-
Welcome back, Alex! Beautiful work, as usual.
-
Absolutely, Shipman! I'm sure I too, with my faults and foibles, qualify for that diagnosis as well....
-
I wonder whether the treasure trove of recently discovered Black Sea wrecks may hold the key to some of these mysteries. I understand that they will be examined more closely this summer....
-
I remember, as a kid, seeing him and his models in London at Model Engineering exhibitions. I was too young to truly appreciate his work then. He was an odd character who today may have been diagnosed as being on the autism spectrum.
-
Outstanding work! Ausgezeichnete!
-
A fascinating way to solve the engraving issue without photoetching! What diameter bit did you use, Gerald?
- 281 replies
-
- 2
-
-
- falls of clyde
- tanker
- (and 2 more)
-
Nice going, Ed. And congratulations on the 100th page of this thread!
- 3,618 replies
-
- 9
-
-
- young america
- clipper
- (and 1 more)
-
Pandora by marsalv - FINISHED - 1:52
druxey replied to marsalv's topic in - Build logs for subjects built 1751 - 1800
Lovely! But don't forget the water holes in the spritsail. -
Oh dear, Keith. Hopefully the new and revised version will have zero runout!
-
I noticed slight 'eyebrows' over windows and doors worked into the thatch in the last photo.
-
Erik: there are so many things to consider when lining out. Please read the article (link below) to better understand what you need to do. Also, there are a lot of boat-builders in Scandinavia. Perhaps you could talk to one of them as well! https://modelshipworld.com/index.php?/search/&q=a primer on planking&sortby=newest&search_in=titles
-
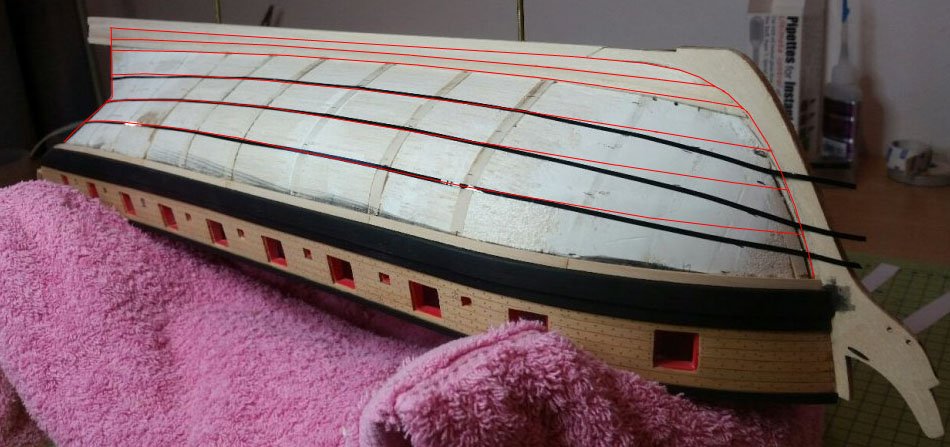
It is hard to tell at long distance, but you are having some problems Erik. Before you go further, may I suggest you replace the black tape with thread? This minimizes the thickness issue. I'm attaching a version of your photo with red lines showing roughly how the lines should go. Note that the lowest planks at the bow, especially the garboard, end earlier to allow enough room for the rest of the planking. At the stern the lowest planks widen at the stern post. Try again and play with the thread positions until you get smooth curves from every angle of view. Have you read A Primer for Planking, pinned on this site?
-
I tried to access the image you mentioned. The image (if it is the same one) is a stereoscopic pair but, once again, the screen resolution was too low to see exactly what you are querying. Sorry, but I did try!
-
The rope you refer to is called a strop. It is basically a single loop of rope lashed together between the block and hook. There are many ways of making this loop up at scale size. Perhaps the simplest way is to lash a length of line into a small loop, capturing the hook first. Then take the two ends of the line around the sides of the block, glueing them. Cut and glue the line ends neatly at the top of the block. Usually hooks engage an eyebolt. I suspect the wire is twisted to make a stem. Is that why the hole required is larger than the diameter of the wire?
- 5 replies
-
- 2
-
-
- tiller rigging
- blocks
- (and 1 more)
-
Miniature chain is available from several sources online. I just checked and there is as fine as 40 links to the inch in brass.
-
Lines can be any (constant) number of degrees apart. And yes, in principle, that is it. See Antscherl's Primer on Planking, this site: http://modelshipworldforum.com/ship-model-framing-and-planking-articles.php (Scroll down and click).
-
No formula required! Draw two straight lines parallel to each other, almost the width of your paper apart. Draw a number of points along one line slightly less far apart than the narrowest plank. On the other line, draw a number of points slightly wider than the widest plank. Join the lines up across the sheet and voila! Your fan. Of course, you could simply start from a single point on one side of the paper instead.
-
You can blend edges better if they are torn and ragged rather than straight. The effect you are achieving looks great.
-
Aiee! You are including every possible running line? Incredible, Ed.
- 3,618 replies
-
- 11
-
-
- young america
- clipper
- (and 1 more)
-
Cross-border mail can be notoriously slow at times, I've found. It's probably the Canadian and U.S. postal systems, not the vendor.
-
Dilute washes of acrylic paint will tone the material nicely.