-
Posts
13,402 -
Joined
-
Last visited
Content Type
Profiles
Forums
Gallery
Events
Everything posted by druxey
-
Impressive height! Coming along really well, Rob.
- 3,560 replies
-
- clipper
- hull model
-
(and 2 more)
Tagged with:
-
One would need to use trigonometry, I think. The issue is you need to know one side and two angles or two sides and one angle. Not knowing the distance camera to subject means that all one can manage is an educated guess.
- 3,560 replies
-
- clipper
- hull model
-
(and 2 more)
Tagged with:
-

Work Table Recommendations ?
druxey replied to DanB's topic in Modeling tools and Workshop Equipment
As large a surface as you can comfortably fit in. You can never have too much bench space! -
I use very thin paper, well stretched, to paint on, using acrylic paint. It should mold well around the different plank levels. Also, put on in short lengths, it is easy to manage. You could pre-paint the base color over the chesstrees and fenders and simply add the detail after. As for trimming, I pre-trim the lower edges of the pieces and trim the upper edges (under the rail above) when dry. Any slight irregularity, should it occur, will be hidden under the shadow line of the rail.
-
And 90% rubbing alcohol (isopropanol) for de-bonding white or yellow glue! We all make oopsies....
-
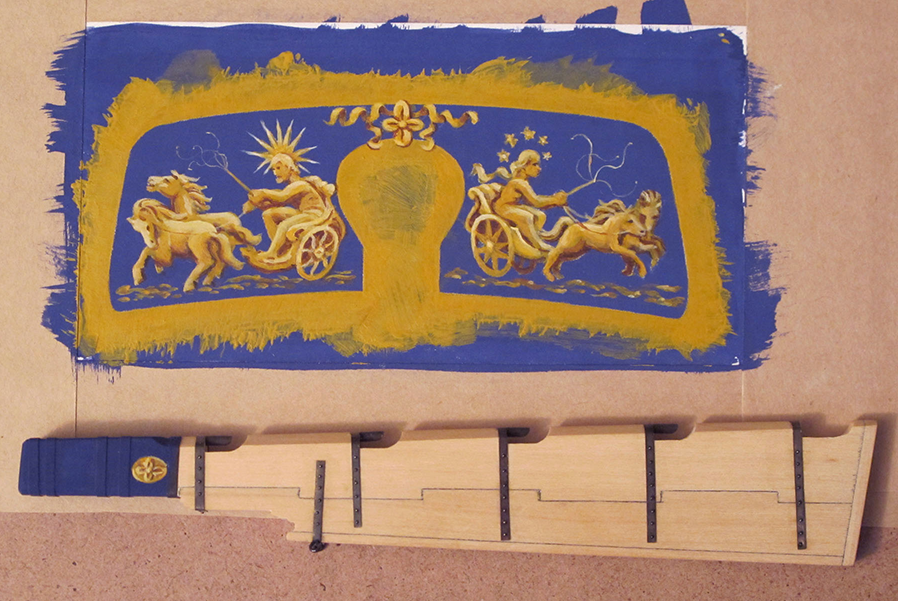
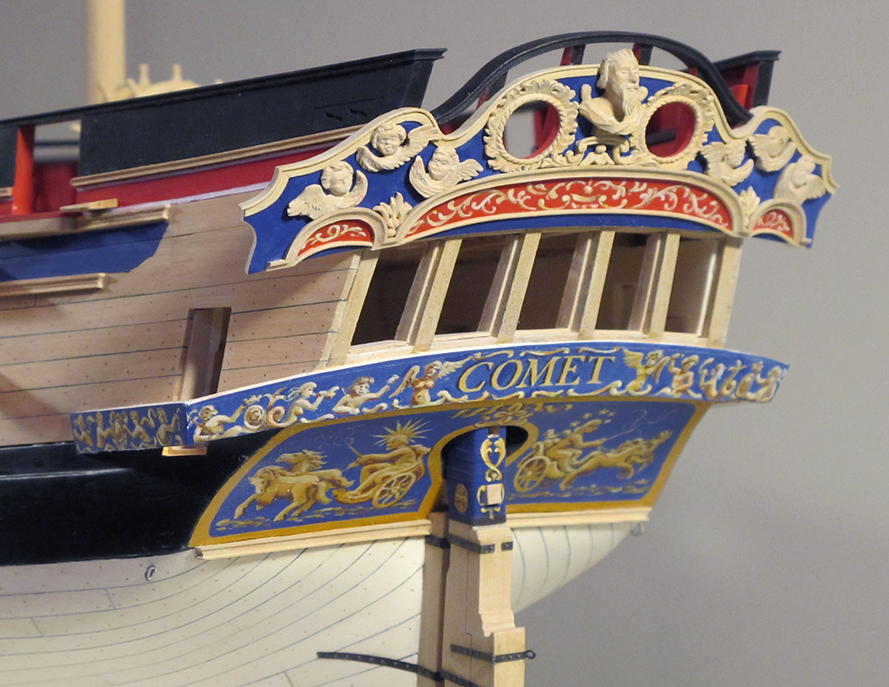
All looks very nice, Mark. Good process thinking on your run of moldings as well. Hdd you considered painting friezes on paper off-model and gluing them on in sections? Many contemporary models were painted this way. It obviates the need for awkward masking or working against gravity. And, if you mess up a piece, it's easily replaced. The friezework on Comet was done this way:
-
Joint not perfect? A little filler will fix it. Good frame iron recovery!
- 23 replies
-
- Model Shipways
- Shipwright Series
-
(and 2 more)
Tagged with:
-
So many things to juggle at once! But you enjoy a challenge - don't you? I realize that some compromises are needed in this area. Have fun with it.
- 2,699 replies
-
- heller
- soleil royal
-
(and 9 more)
Tagged with:
-
The 'bag' or curve of the pattern appears to be almost down to the cheek in your photos. Of course it may be the angle the pic was taken at, but the Berain shows a considerable gap between the lowest head rail and the upper cheek. Perhaps more revision is in order?
- 2,699 replies
-
- heller
- soleil royal
-
(and 9 more)
Tagged with:
-
That is coming along splendidly! I like the freelance touches you've added.
- 26 replies
-
- muscongus bay lobster smack
- Model Shipways
-
(and 1 more)
Tagged with:
-
Nice progress, HH, even if a little frustrating at times. I find that it's much easier to do final shaping of standards on channels after they are fixed in place. There is a better chance of getting them similar in profile that way. also there is no issue in holding them while you shape them. Headwork is always a bear. Your present pattern looks good. The head timbers athwartships have a bevel in order to meet the rail(s) at the correct angle.
- 2,699 replies
-
- heller
- soleil royal
-
(and 9 more)
Tagged with:
-
A guide as to lantern level; the door needs to clear the tafferel or it won't open! Also, it should be at a height comfortable for someone on the deck to place the light into. "Form follows function", as usual.
- 1,784 replies
-
- winchelsea
- Syren Ship Model Company
-
(and 1 more)
Tagged with:
-
The word 'patent' seems to have caused a stumble. It is not a model submitted for a patent, but one built to a patented design! Well done, Bruce and Patrick, in attributing the number to a particular serviceman.
-
This is an interesting, well-built model of some age. The builder was obviously very familiar with clinker style planking. It is odd that all the internal parts are either missing (those three small screw holes) or were never completed.
-
It seems that you have become the beta builder, Bob! I appreciate you being patient as you wait for bits and bobs to arrive. A little bird has told me that future kits will have in-house beta test builds before they go on the market.
- 146 replies
-
- Harriet Lane
- Model Shipways
-
(and 1 more)
Tagged with:
-

Matching Deck Colors
druxey replied to hof00's topic in Painting, finishing and weathering products and techniques
Washes are very thin transparent coats of paint thinned with either water or a solvent, depending on the type of paint used. -
It's called serving. It is usually done by wrapping the thread around the line on a serving machine. You can see examples of these machines on MSW and on line.
About us
Modelshipworld - Advancing Ship Modeling through Research
SSL Secured
Your security is important for us so this Website is SSL-Secured
NRG Mailing Address
Nautical Research Guild
237 South Lincoln Street
Westmont IL, 60559-1917
Model Ship World ® and the MSW logo are Registered Trademarks, and belong to the Nautical Research Guild (United States Patent and Trademark Office: No. 6,929,264 & No. 6,929,274, registered Dec. 20, 2022)
Helpful Links
About the NRG
If you enjoy building ship models that are historically accurate as well as beautiful, then The Nautical Research Guild (NRG) is just right for you.
The Guild is a non-profit educational organization whose mission is to “Advance Ship Modeling Through Research”. We provide support to our members in their efforts to raise the quality of their model ships.
The Nautical Research Guild has published our world-renowned quarterly magazine, The Nautical Research Journal, since 1955. The pages of the Journal are full of articles by accomplished ship modelers who show you how they create those exquisite details on their models, and by maritime historians who show you the correct details to build. The Journal is available in both print and digital editions. Go to the NRG web site (www.thenrg.org) to download a complimentary digital copy of the Journal. The NRG also publishes plan sets, books and compilations of back issues of the Journal and the former Ships in Scale and Model Ship Builder magazines.


