Erebus and Terror
-
Posts
410 -
Joined
-
Last visited
Content Type
Profiles
Forums
Gallery
Events
Everything posted by Erebus and Terror
-

THE BLACKEN-IT TRIALS
Erebus and Terror replied to Erebus and Terror's topic in Metal Work, Soldering and Metal Fittings
Yes indeed, Druxey. Thanks for posting the information. Blacken-It seems to abhor lead, which is why it seems to eat solder, white metal, and pewter. Unfortunately it seems to dislike low quality brass as well, which can contain lead, iron, and other metals. I've recently lost some hard-fought pieces to ongoing corrosion. Unfortunately, I have no way of testing the brass, but I can confirm that K&S brass doesn't work well with Blacken-it. I may be forced to move to copper, which seems to work well with Blacken-It (but I will try Jax and Liver of sulpher first). My slow progress lately on my build is a direct result of metal problems (the model will be covered in metal and I need to work out a stable solution). -
THE BLACKEN-IT TRIALS
Erebus and Terror replied to Erebus and Terror's topic in Metal Work, Soldering and Metal Fittings
Actually looking again it's more than pretty good. It's a very nice consistent black-grey all the way along the canon. I'd call that a success (and gives me hope for Jax). Try buffing it and see how you like it. -
THE BLACKEN-IT TRIALS
Erebus and Terror replied to Erebus and Terror's topic in Metal Work, Soldering and Metal Fittings
Hi Bart, That actually looks like a very decent result to me. Try buffing the canon with a soft cloth - it will remove the flatness and bring out the highlights. In my experience deep blacks are almost impossible with hobby-level chemical blackening agents. You really need a hot blue process for that. I think the Jax did a pretty good job, from the look of your photos. Just my two cents... -
THE BLACKEN-IT TRIALS
Erebus and Terror replied to Erebus and Terror's topic in Metal Work, Soldering and Metal Fittings
Hi Bart, In my experience Blacken-it only works well with high quality metals and works very poorly on white metal and solder. I'm still having issues with corrosion on K&S hobby brass. I Believe it has something to do with high levels of iron and tin in the brass. I've done new trials using copper and have had a much more stable and suitable result. EdT (a frequent poster on the forums) has recommended using copper and I believe this is the best advice for consistent results. I have also purchased some Jax brass black and some liver of sulphur and will also put them to some trials with brass and post here in the fall. Brass is far cheaper than copper, and is more suitable for some parts, so I hope to find the best product for consistent results. dgbot has given some great advice. Longer bath times with lower concentrations seems to work best. I would recommend using de-ionized water if possible, especially if using brass. Best of luck! With patience, good results are possible with Blacken-it and brass. But be prepared that corrosion can still occur - even after neutralization and waxing/oiling. -
Beautiful musket. What an inspiring build!
-
Antony, Thank you very much for the photos. It's an interesting model and the builder was clearly working directly from the the original 1813 plans. The merchant roots of these vessels are clearly visible in this model - and I'm intrigued at how different the hull shape appears by 1845. This may be the only model of the Terror in her original configuration.This would have been her configuration when she bombed Baltimore during the War of 1812 (her bombs helped inspired the American national anthem). Many thanks again! This is a very welcome addition to this log. Cheers, E&T
- 346 replies
-
- 1
-

-
- terror
- polar exploration
- (and 2 more)
-
Wonderful documentation, Ed. Now to model 418 boxes of oysters!
-
Great to see all your detailed preparatory work prior to assembly. Good call on the cherry!
-
Harriet McGregor by Boccherini
Erebus and Terror replied to Boccherini's topic in - Build logs for subjects built 1851 - 1900
Excellent metal work! -
A true masterpiece in the making. Excellent work.
-
A cross section on a cross section. Genius idea and superb craftsmanship!
- 662 replies
-
- 1
-
-
- bonhomme richard
- frigate
- (and 1 more)
-
Excellent work as always, Ed. A POF build log is the only way to appreciate the construction of these ships. Thanks very much for sharing it with us all. The fir/oak debate is very interesting. The Royal Navy fir/pine-built frigates often have a lesser reputation as well, but many of them proved to be just as durable as their oak counterparts. And I have a soft-spot for them, given that much of the "fir" timber came from Canada (mostly red pine).
-
Thanks Antony. She has a long way to go before she can match the quality of your Victory section!
-
Beautiful work on the filling planking, Ed. Six inches thick! I'm enthralled by the architecture and history of these vessels. They really were something else altogether.
-
Michael, David B, Ben, John, Mark, Ed, and Druxey: Thank you for your very encouraging comments. Coming from modelers I admire so much, they mean a lot. Ed, I believe the tank was set on deck when the prop was in use. It was meant to sit on the chocks, and there would have been no way to support it otherwise. The screw was only to be used when the weather didn't permit the use of sails. You are absolutely correct that the tank underscores how cramped for space they were. The ship needed to be provisioned for three years. A few letters from Greenland (their last contact) survive and indicate that the decks were so full that they only had a narrow path fore and aft, and that they were very low in the water. Captain Crozier described it like this: "We have now a mean draft of 16 feet and all our provisions not yet on board. " Apparently they even hung beef quarters from the rigging to save space below. Druxey, you are correct, the Maudslay, Sons, and Field name was in use since 1833, so the lids would have had that embossed on them. Good catch there, and I've edited my post.
-
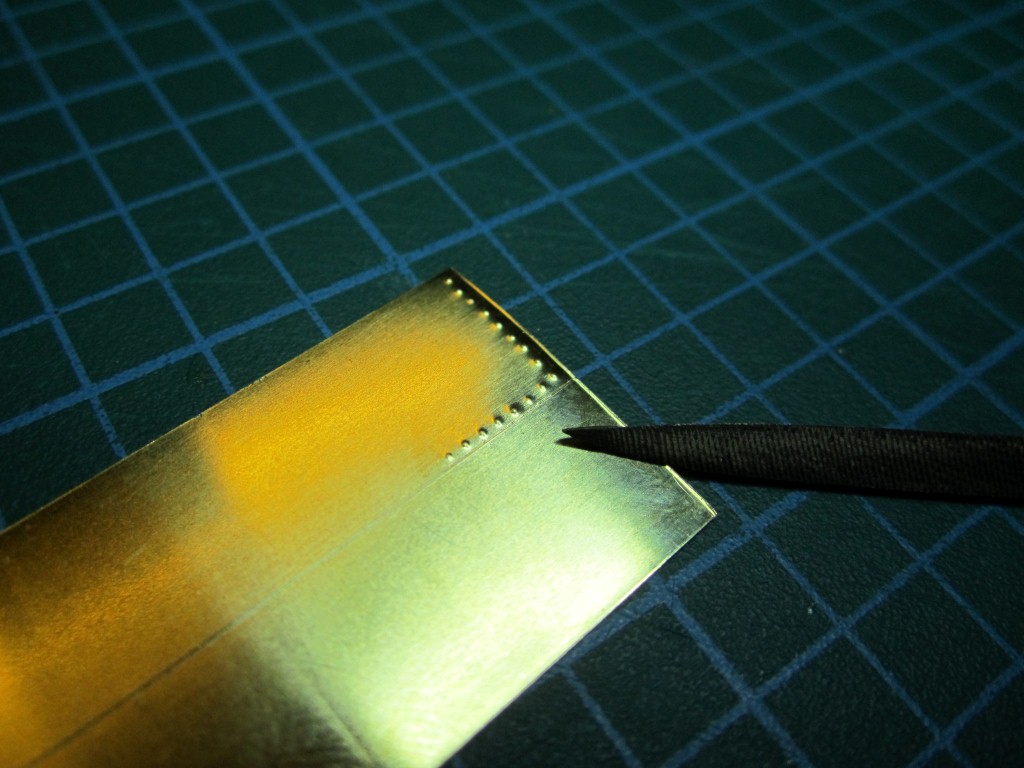
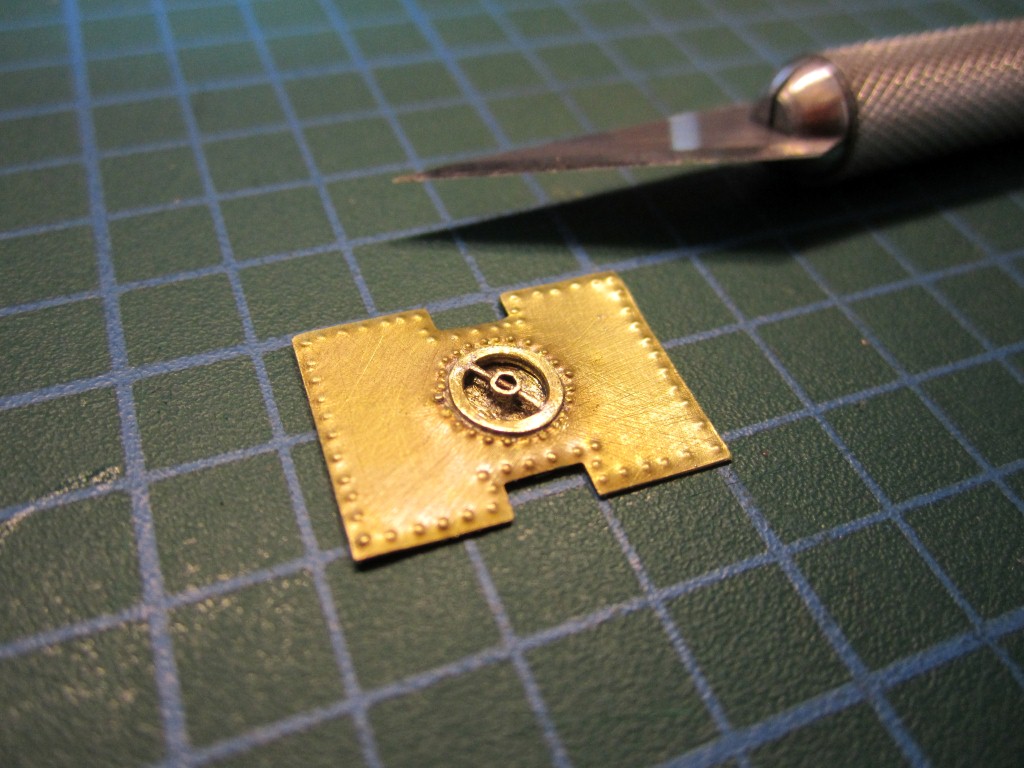
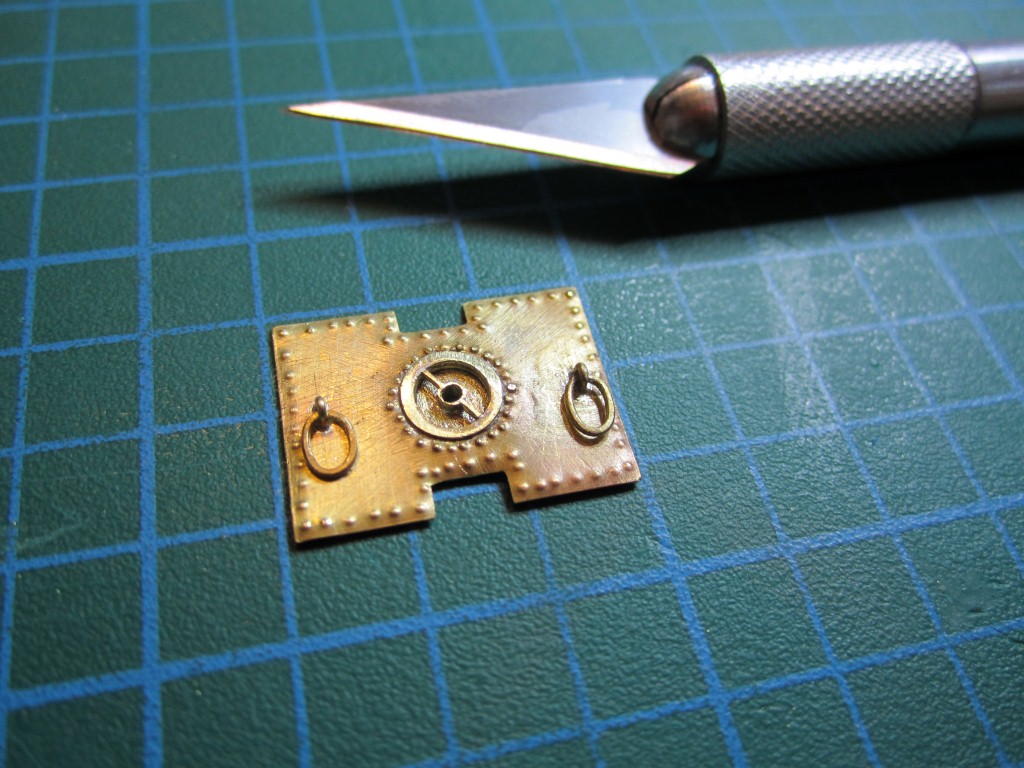
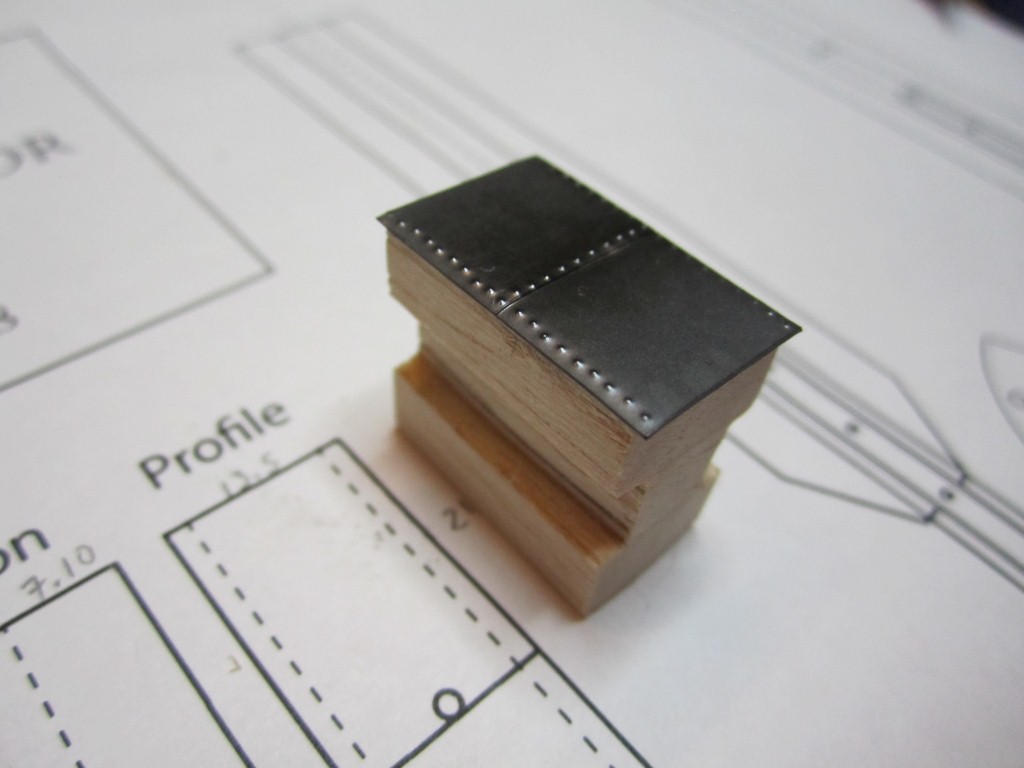
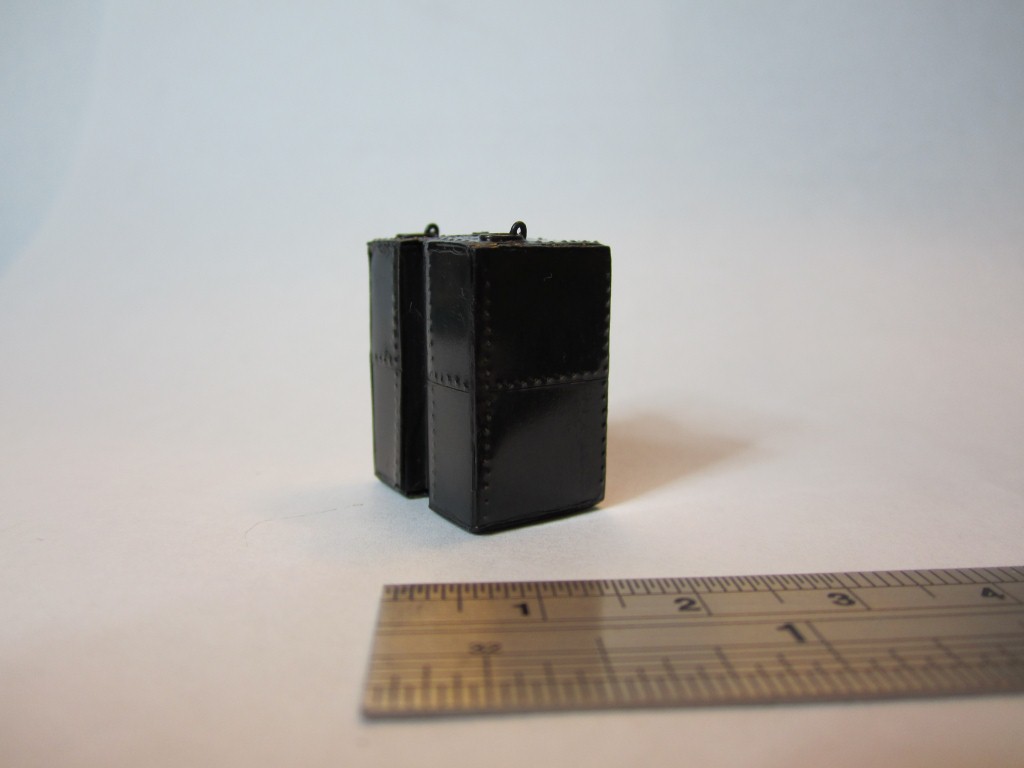
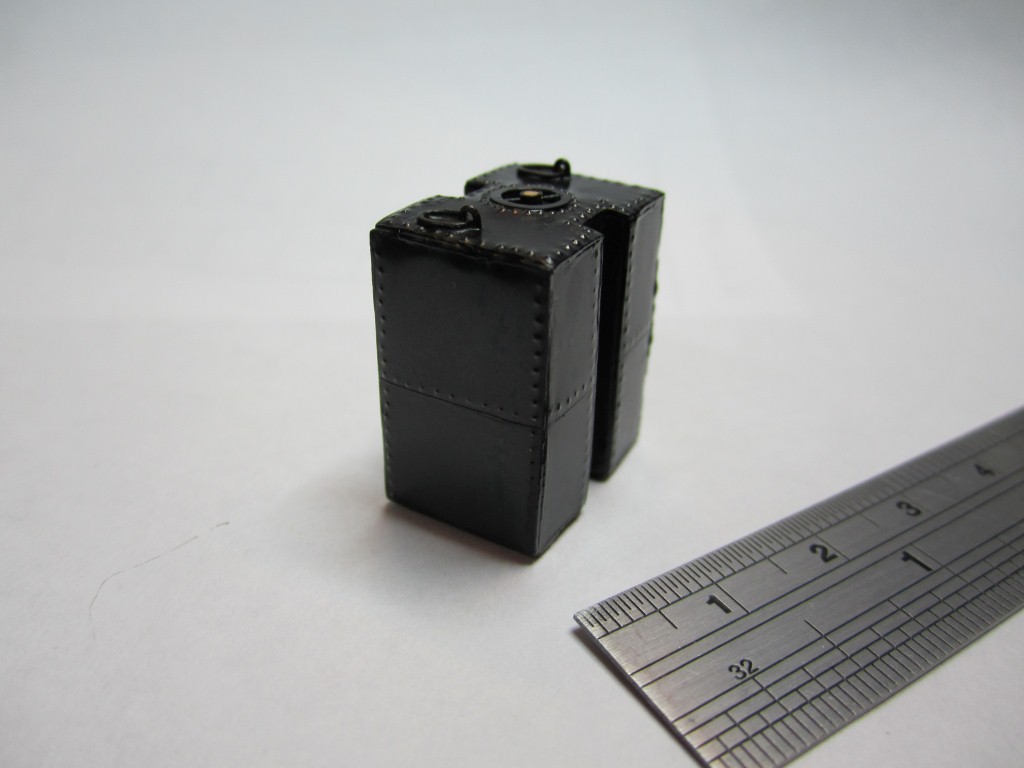
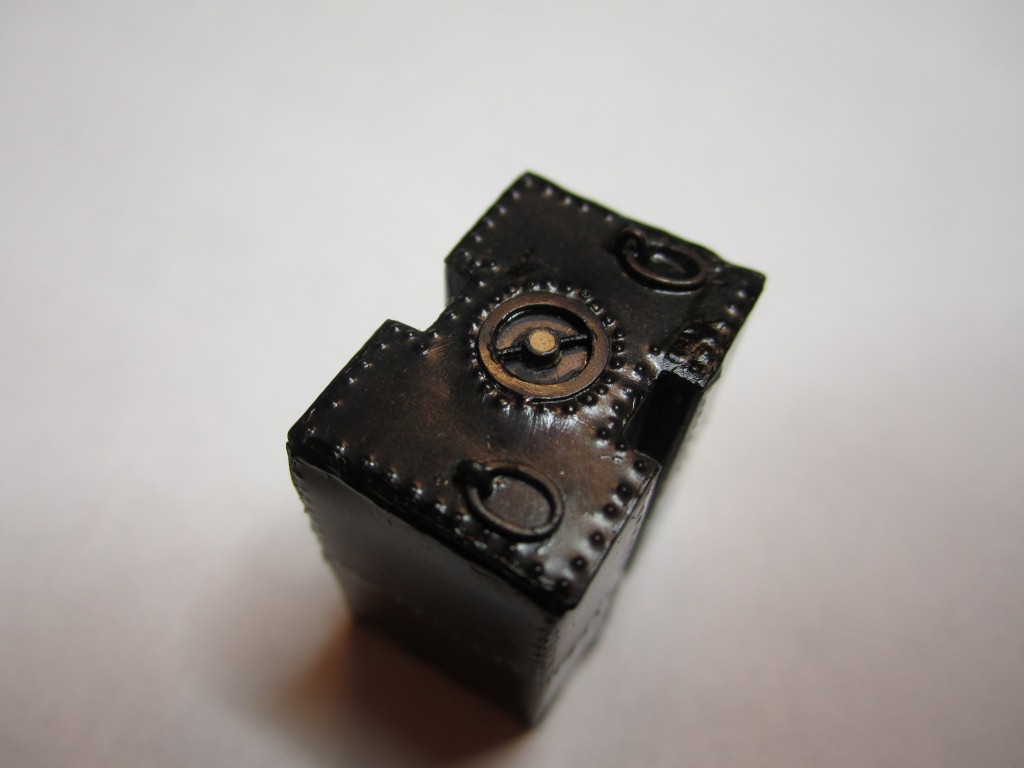
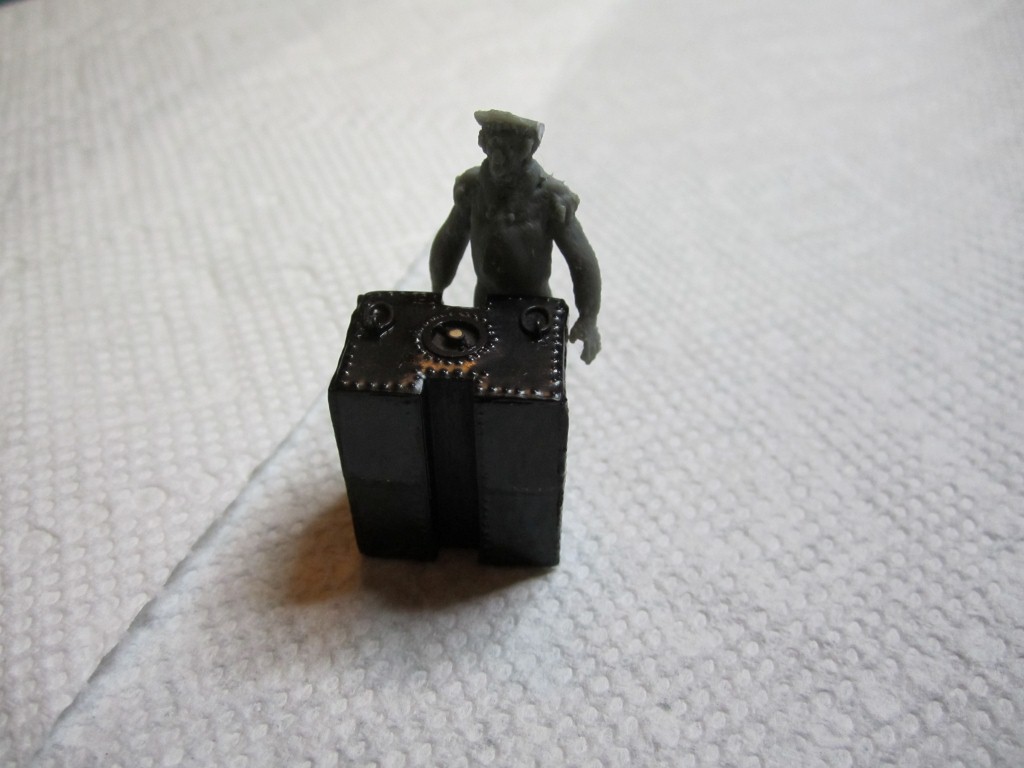
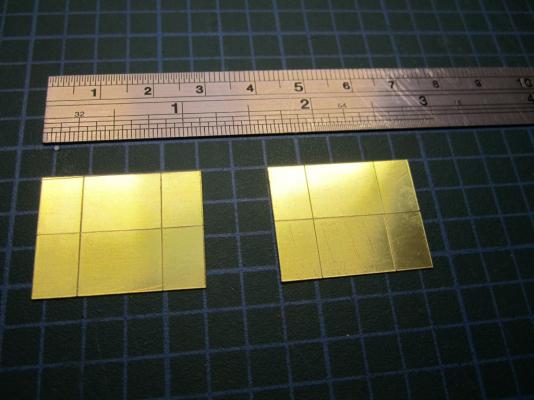
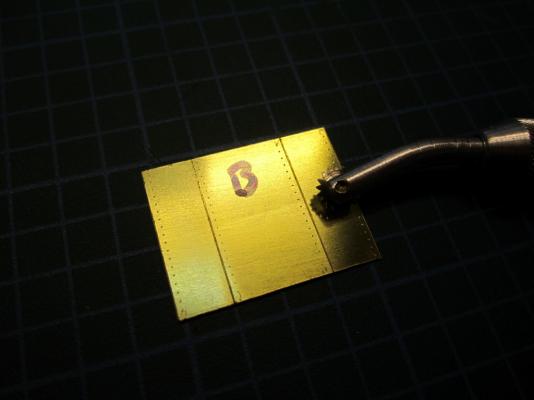
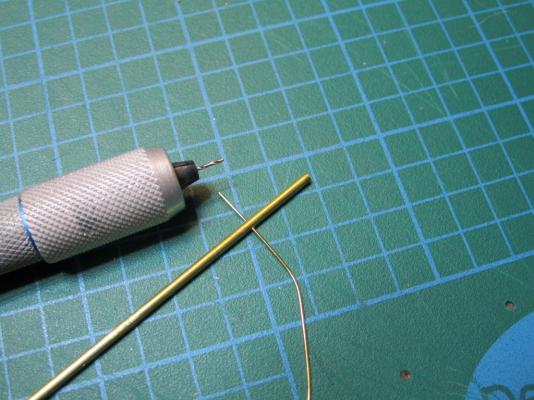
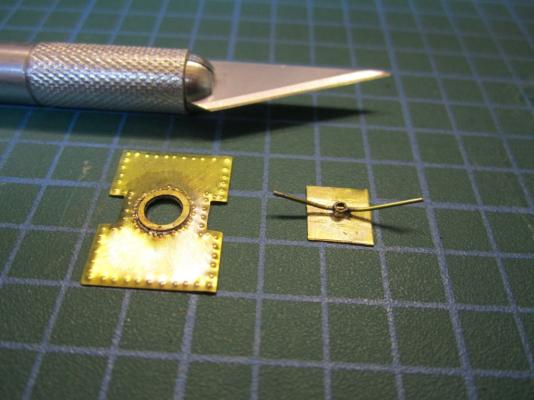
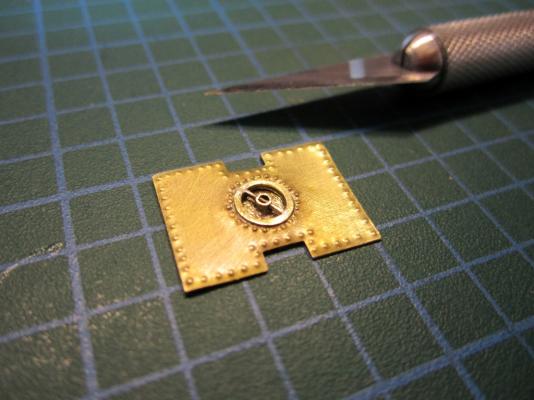
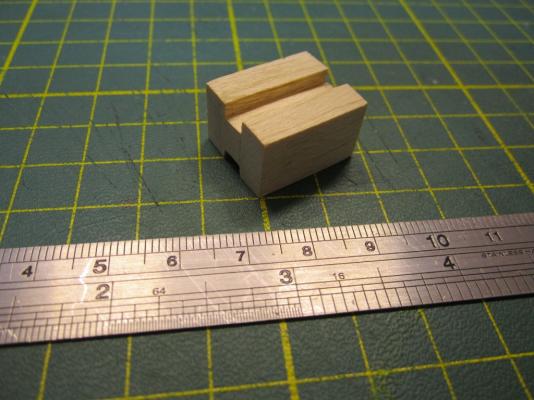
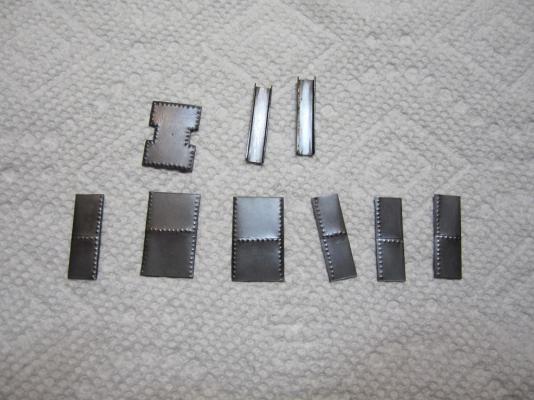
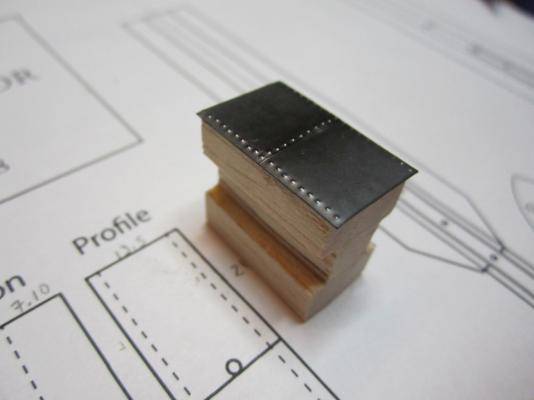
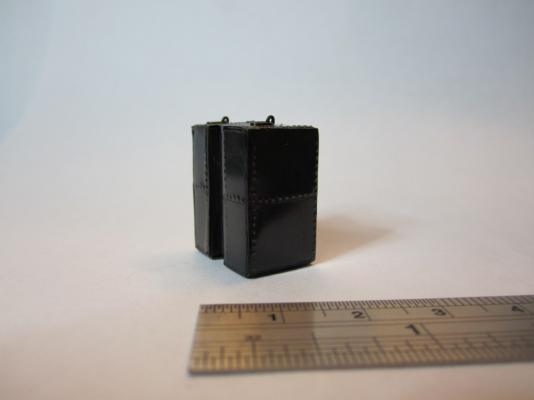
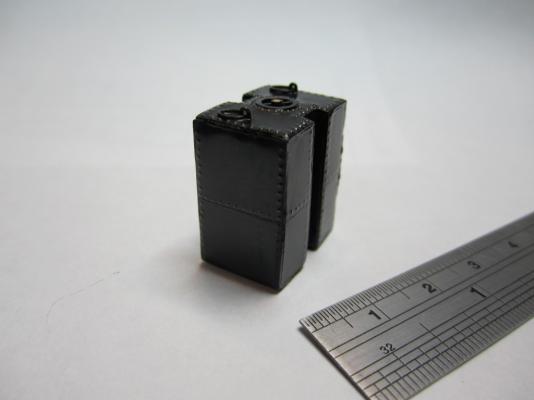
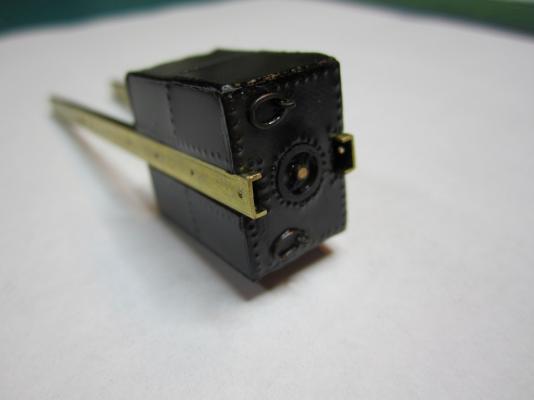
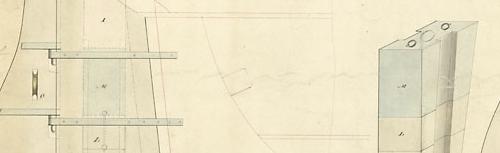
HMS TERROR’S CUSTOM STERN TANK As I’ve documented in previous posts, HMS Terror’s stern well was to be filled with strengthening chocks when the propeller wasn’t in use. A unique feature of this design was described by Oliver Lang, the shipwright in charge of the 1845 refit, as an “iron tank placed over the chocks in which any small article of stores may be stored” (NMM ZAZ5683 [J1529]). Lang’s 1845 plan, while vague, suggests that the tank was similar to iron storage tanks used in Royal Navy ships of the era, with one major difference: the fore and aft faces of the tank had two grooves running along their length to seat it on the rails in the propeller well (see my previous post). Oliver Lang's 1845 design for the storage tank (right). National Maritime Museum, Greenwich, London (ZAZ5683 [J1529]). Iron tanks had been used in the Royal Navy since 1813 and were used to store all manner of dry and wet goods, and were often used as ballast tanks when stores were depleted or offloaded (Pearson 1992). An example of the types of tanks used in the Franklin era can still be found in the excellently preserved Dealy Island Storehouse, constructed by Captain Kellett of HMS Resolute. The storage tanks were iron, ca. 48 inches by 48 inches in size, with lines of rivets along the middle and alternate edges of each face and around their circular openings (Jane 1982: Figure 3, Figure 6). I copied this rivet pattern in my reconstruction of the Terror’s stern tank. The openings of these tanks were sealed with a recessed cast iron lid between 12 and 24 inches in diameter with a wire rod handle and a cork or wooden bung inserted into a circular opening in their centre (Pearson 1992:24). Maudslay, Sons, and Field, who were contracted to supply the engines installed in HMS Erebus and Terror (Battersby and Carney 2011:201), owned the patent to produce ship's tanks (Pearson 1992:25), and it is reasonable to assume that they built the custom stern tanks for the Franklin Expedition. If so, the "Maudslay, Sons, and Field" name should be stamped on the cast iron lids for the tanks, if they are ever found (e.g. Pearson 1992:26). As can be seen above, the profile dimensions of the Terror’s stern tank are shown on Lang’s plan, as well as a general indication of the size and position of the lid and two iron rings used to raise and lower the tank into position. The plans indicate the tank had the following profile dimensions: Height = 40 inches Length (moulded) = 25 and ½ inches I have estimated, based on the distance between the stern frames, that the propeller well and the tank were sided approximately 34 inches. References: Pearson, Michael 1992 From Ship to the Bush: Ship Tanks in Australia. Australasian Historical Archaeology 10: 24-29. Janes, Robert R. 1982 The Preservation and Ethnohistory of a Frozen Historic Site in the Canadian Arctic. Arctic 35(3):358-385. Battersby, William, and Carney, Peter 2011 Equipping HM Ships Erebus and Terror, 1845. International Journal for the History of Engineering and Technology 81(2):192-211. Sheet brass scored prior to cutting. A pounce wheel was used to mark the location of the rivets. The rivets were simulated by punching the brass from the reverse side with the sharp end of a file. The central opening and wire handle of the lid were made from brass tube and wire. The outer rim of the lid was soldered into place. The central opening (right) was trimmed and soldered to a plate to form the bottom of the lid (wire still needs to be trimmed to length). The completed lid soldered in place and cleaned up (sanding is still required and the central hole needs to be drilled to remove the wire rod). Rings for raising and lowering the tank soldered in place. The tank parts after chemical blackening. The grooves were made from existing brass stock. Soldering the entire tank was impossible, so a balsa form was created to glue the plates in place. Starboard side glued in place. The finished tank. The seams were glued, sanded and then painted to match the metal surface. The piece was then lightly coated in dewatering oil to simulate the laquer often used on the real tanks (and to prevent future corrosion). Detail of the top of the tank. The bung in the lid was made with wood-filler. The approximate position where the tank will sit in the well. I'm waiting for the oil to fully penetrate before I dry-fit the piece to the wood. The tank seated on the propeller rails. When the rails are glued in place on the stern the tank can be placed in the well or on deck depending on how the model will be displayed (e.g. with propeller in place or not). A crude model of Captain Crozier provides a sense of scale.


- 346 replies
-
- 19
-
-
- terror
- polar exploration
- (and 2 more)
-
Absolutely beautiful. I really like your notebook as well...
-
Ed, beautiful as always. I'm amazed by the architecture of this ship - and I thought bomb vessels were sturdy!
- 3,618 replies
-
- 1
-
-
- young america
- clipper
- (and 1 more)
-
THE BLACKEN-IT TRIALS
Erebus and Terror replied to Erebus and Terror's topic in Metal Work, Soldering and Metal Fittings
Hmmm. I think I will test the scotch-brite and vinegar. Muriatic acid is nasty stuff. How long do you leave it in the vinegar? -
THE BLACKEN-IT TRIALS
Erebus and Terror replied to Erebus and Terror's topic in Metal Work, Soldering and Metal Fittings
Jud and Bart, thanks again for your comments. The process sounds very interesting and I'll have to peruse the Brownells website. From my admittedly limited experience gun blue seems to be more durable than the brass blackening we apply - but I wonder if that is a function of the different metals and their quality. Very interesting comments! -
THE BLACKEN-IT TRIALS
Erebus and Terror replied to Erebus and Terror's topic in Metal Work, Soldering and Metal Fittings
Thank you everyone for the comments.... Bart, your story about the gun blue process is very interesting. I have never heard of heating the metal, though "cold blue" is a term often used, so perhaps heating is part of a different process. It's an interesting idea, and perhaps something to add to the topic as a test. E&T