

catopower
-
Posts
1,616 -
Joined
-
Last visited
Content Type
Profiles
Forums
Gallery
Events
Posts posted by catopower
-
-
Kit Instructions:
27 Installing Lanterns
• Use instant clear adhesive to attach the copper wire.
Drill a hole 0.8mm to 1mm diameter.
Insert wire, leaving 4mm length of wire sticking out.
Lantern ends paint black
Lantern body paint red
Attach 5 lanterns on each side.
(Use clear instant wood glue)
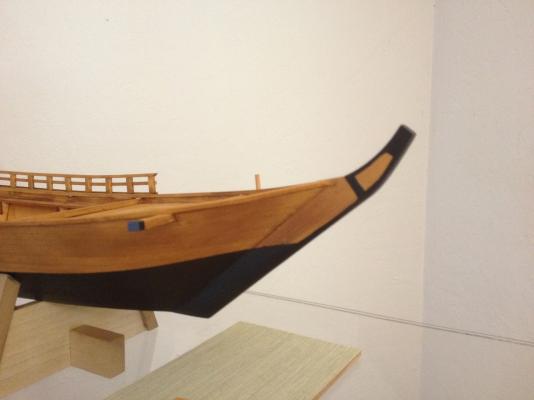
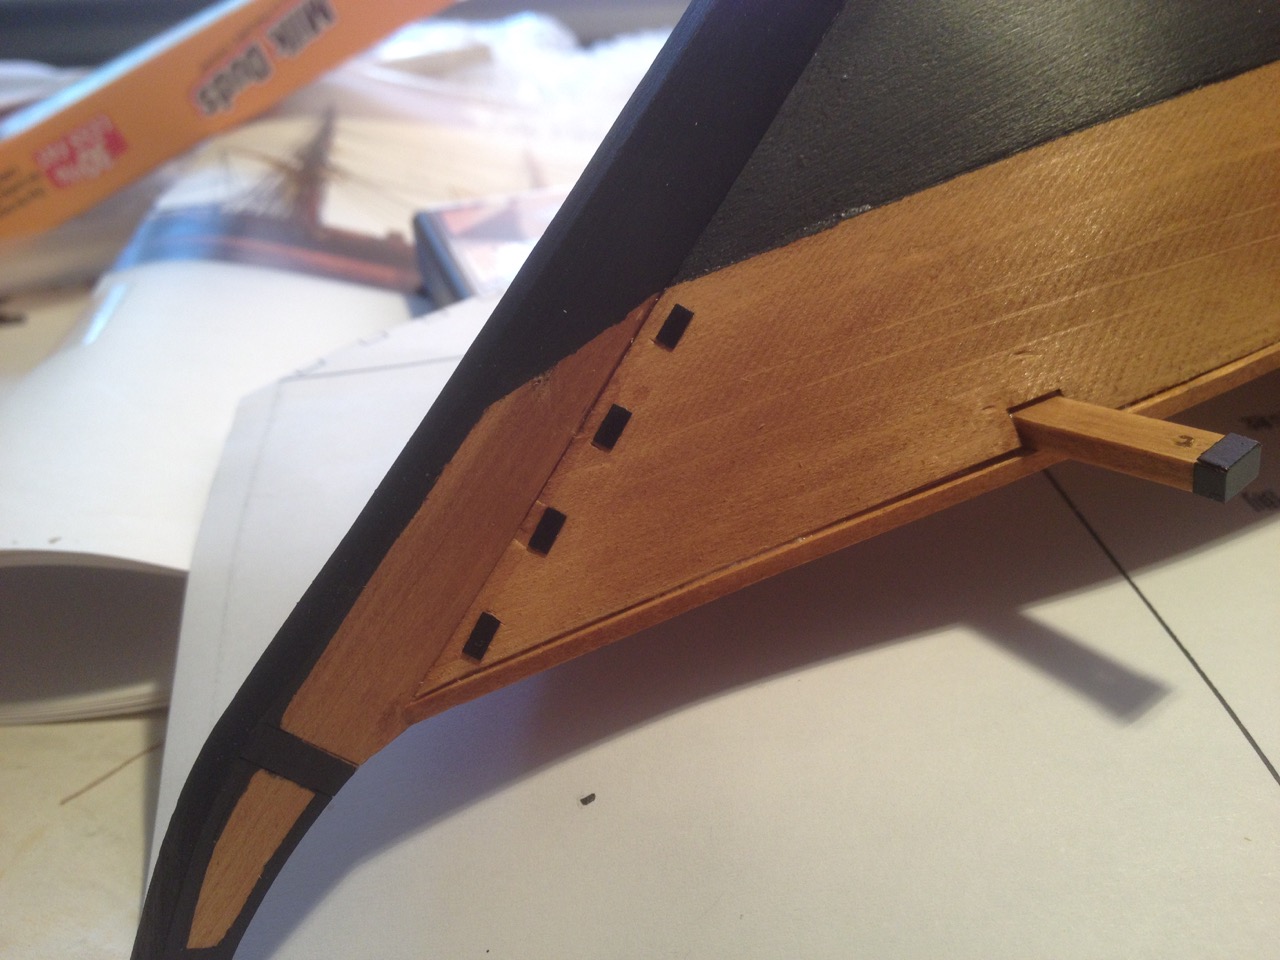
28 Stem Color
Paint black above the upper etched line.
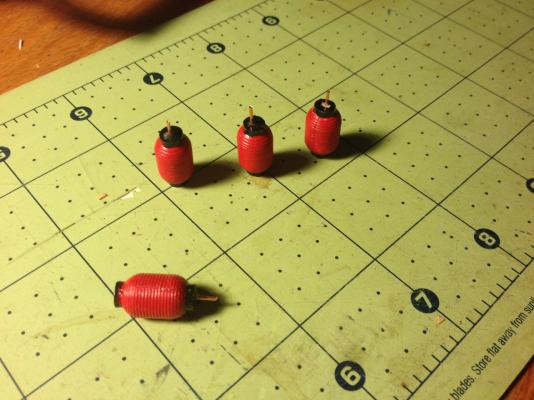
I skipped the installation of the lanterns in step 27 for now, but I did paint them and added the mounting wire. The lanterns are resin and I cleaned them up as well as I could and painted them using water-based acrylics.
Then, because I've altered the paint scheme on the model, step 28 didn't really apply any more.
As it is, the model now looks like this:
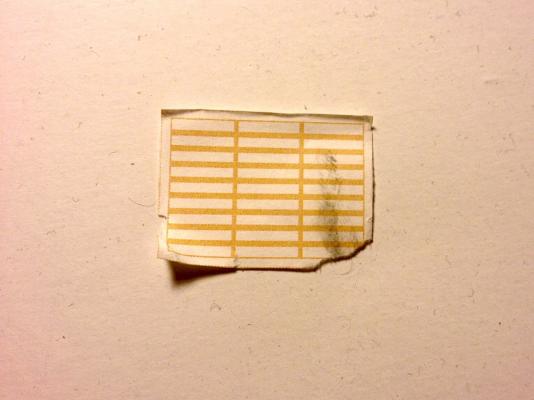
Sorry, it's a little bit blurry. Note too that I started adding the etched copper pieces from Step 29, which I'll get into next time. I sprayed the etched copper sheet with Rustoleum satin black and bent the copper caps to shape. After bending, the paint layer broke at some of the seams, to I resprayed the caps afterwards. These cover the ends of the beams as you can see in the photo.
The next step is probably the one step that requires the most patience in this whole build. It involves laying down rows of copper pieces, evenly spaced and in straight lines.
I'll get into some of the details later, but for now, here's a shot of how that looks:

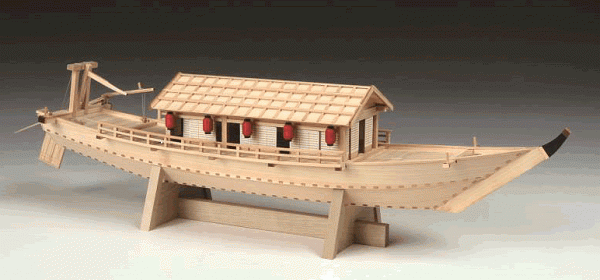
The original kit design calls for shiny copper parts, looking more like this, if you recall:
Clare
-
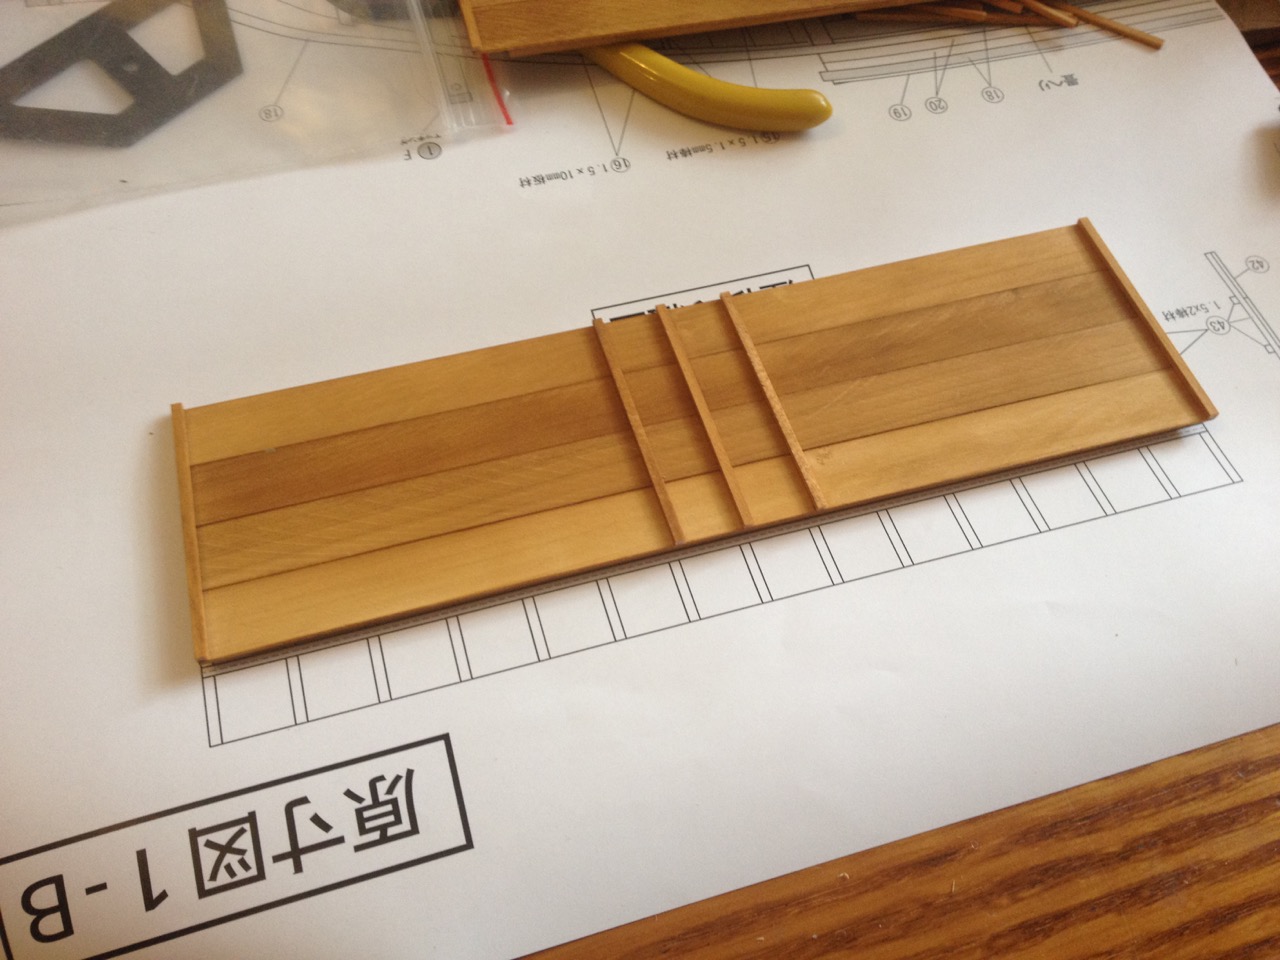
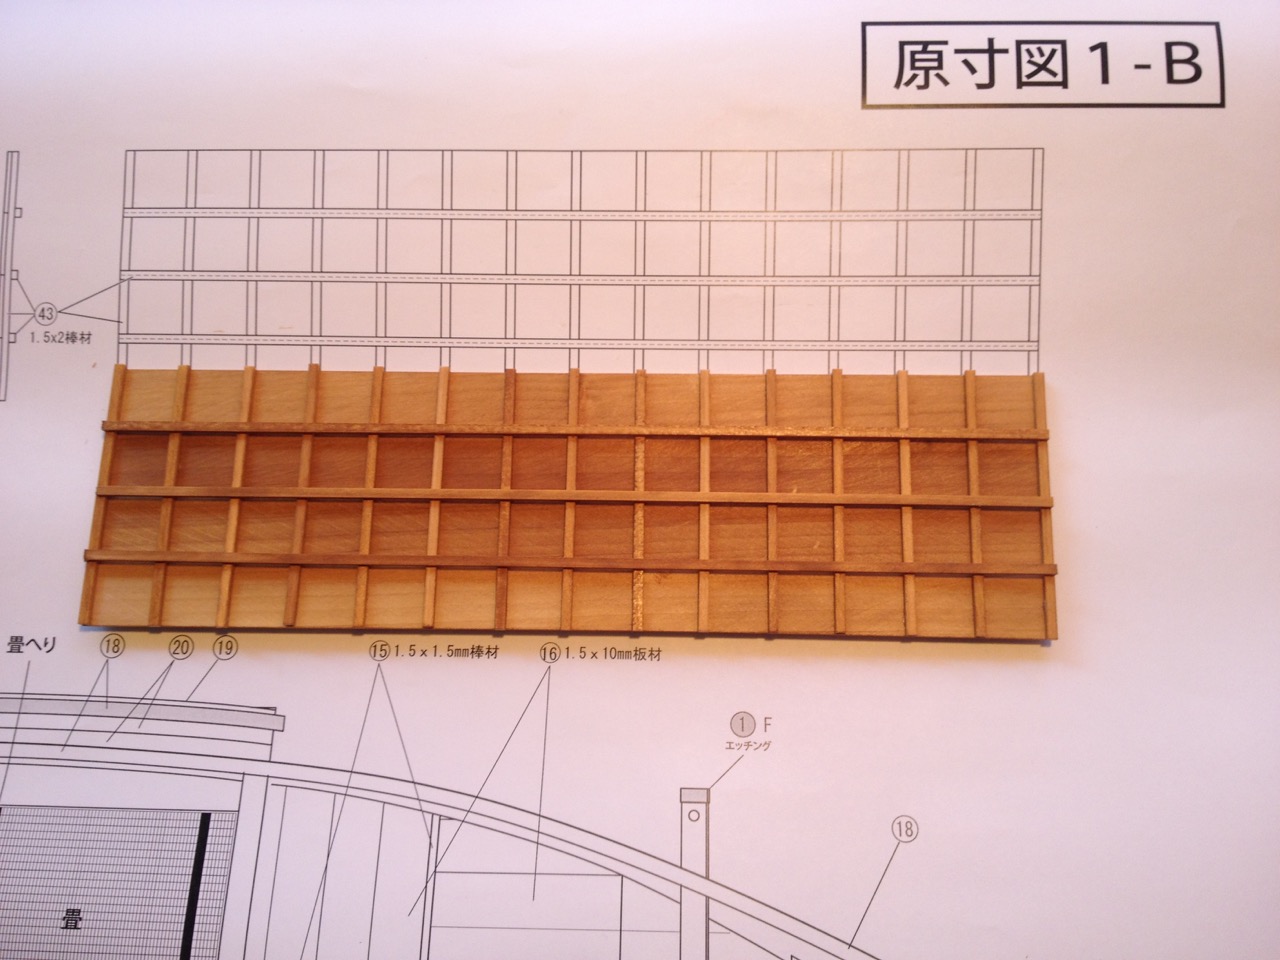
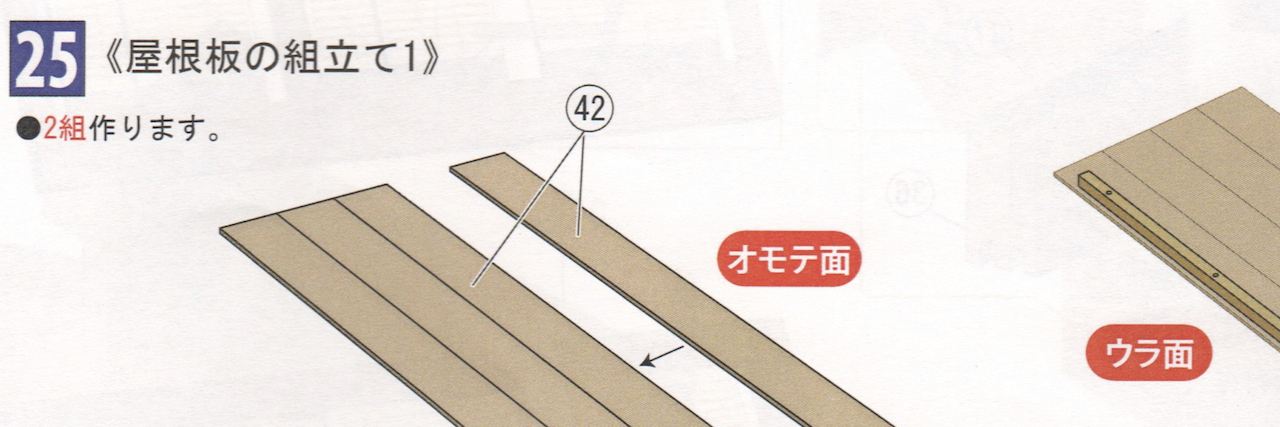
The next section is very simple and straight forward and involves finishing the roof panels and gluing them onto the roof framework structure.
This involves the most cutting of strip woods since planking the deck. All the pieces are 1.5mm x 2mm and 15 pieces are glued across the roof planking. Nothing special to know here except that one of the plans sheets shows this in full scale, so I simply used this to mark the locations of each strip.

With the shorts strips in place, 3 long strips follow the seams of the roof planks. The final result looks something like this...
The Japanese text here is really simple and simply says:
26 Assembly of Roof Panels 2
• Please glue evenly using the plans.
• Roof installation
and a label showing... Installation of a building strip #44
There are some pieces shown in the instructions to install at this stage, but I'm still considering ways to be able to only temporarily mount the roof panels so I can access inside for lighting.
Now, because I have more need to add this model to a display than I do to light it up, I'm going to put off lighting until after the rest of the construction is done. I can then display the models and after I take the display back down, that will give me time for the lighting details.
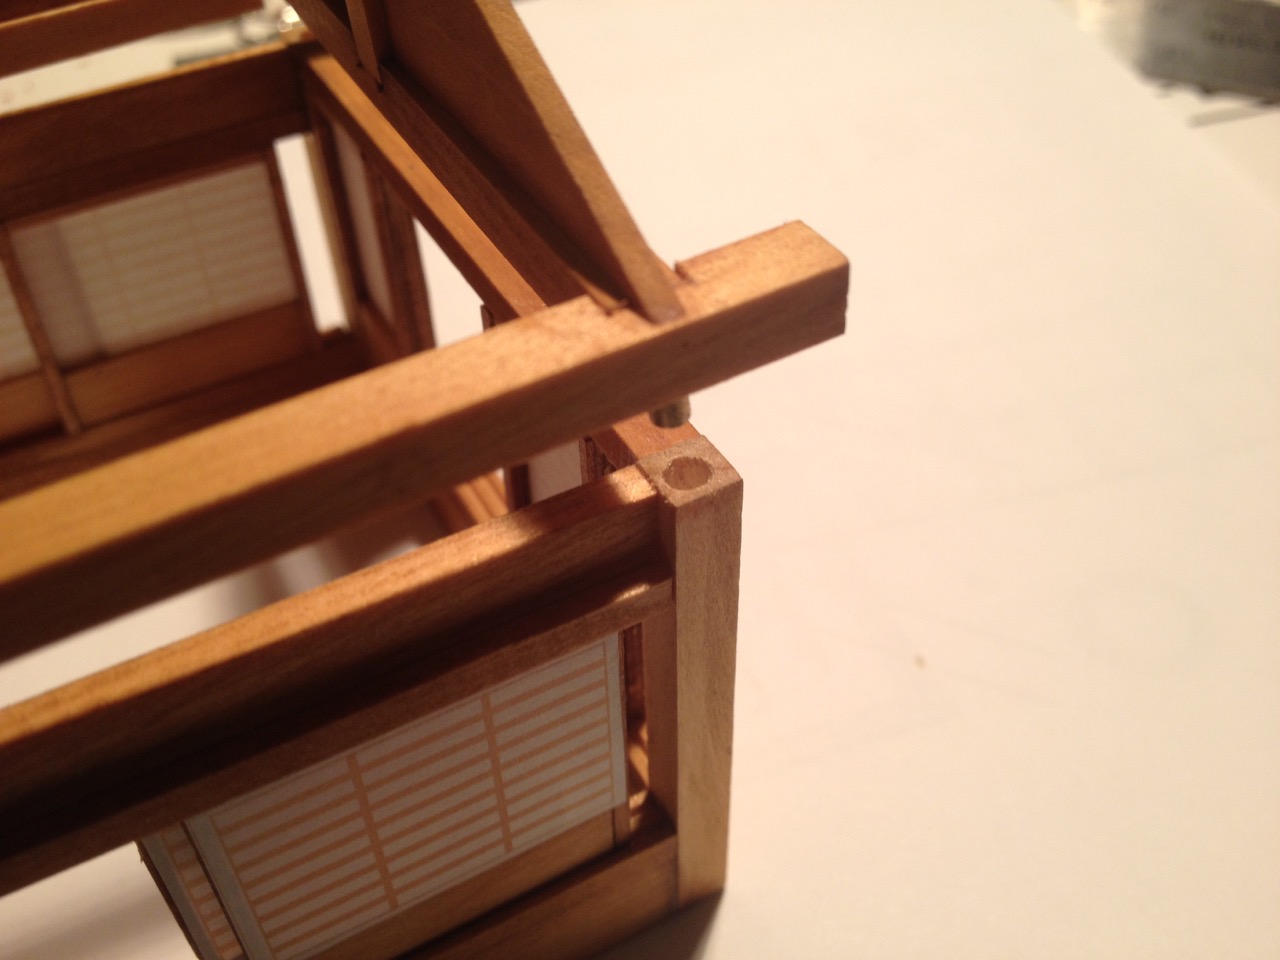
I have, in the meantime, drilled out holes in the corner posts of the deck house to allow for wiring. I've also added holes and brass pins to allow me to fit the whole roof structure on and be able to remove it as needed. Finally, I dug out channels under the ends of the roof framework to allow me to continue the hidden run of wires to the underside of the roof.
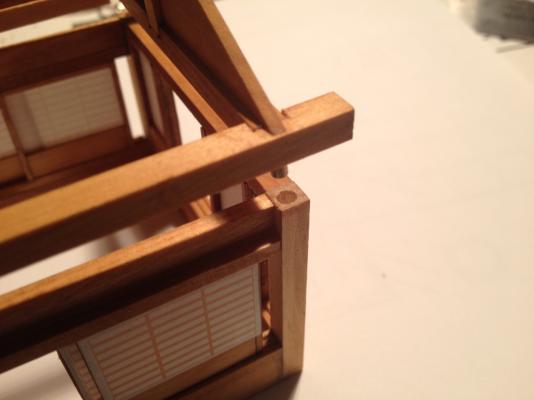
The next step in the instructions is to add the hanging lanterns to the edge of the roof. I painted the lanterns already, they are just resin moldings, so no LEDs there, but will not add them until I have a method worked out for making the roof panels removable.
This means that the next step for my model is to add the photo etched copper pieces which will line the hull of the boat.
Clare
-
Nice work Bob! That mast looks great on the model. I really like how they included the sheaves at the top end of the mast. That was a fun sub-project, that and the bitts that are located inside the cabin.
For the copper pieces, I used a contact cement, though it's not the stuff I have on the shelf now. I'm thinking that I had some Duco contact cement, but I don't see it online anymore. Or maybe I'm just losing my marbles... I have Dap contact cement on-hand, but it clearly states that it's not for use on metals containing copper.
Sorry, that wasn't much help. I'm going to look for some other contact cement for the Yakatabune model as I'm getting to that point on the model too. Duco still makes some stuff that sounds like contact cement, but it comes in small tubes instead of a bottle. I'll probably give that a try myself.
Hey, just curious, are you planning to use the kit provided sail, as-is? I did, but kind of wish that I had sewn it. Might be kind of small for that though. The pre-printed markings actually look unusually good. It even fooled a couple ship modeling buddies who thought I'd sewn them.
Clare
-
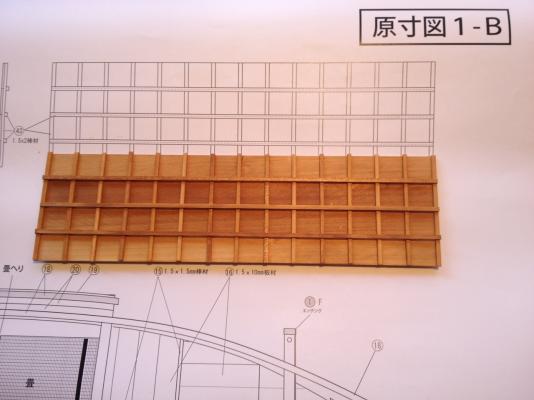
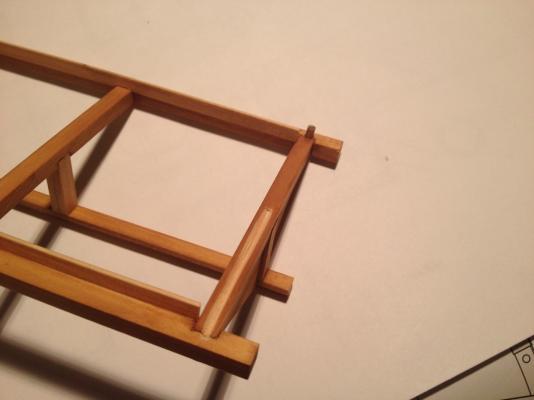
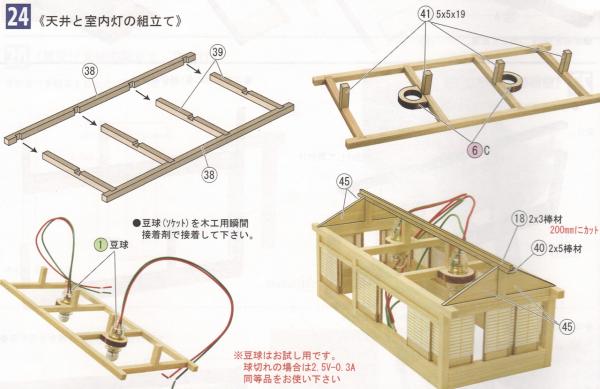
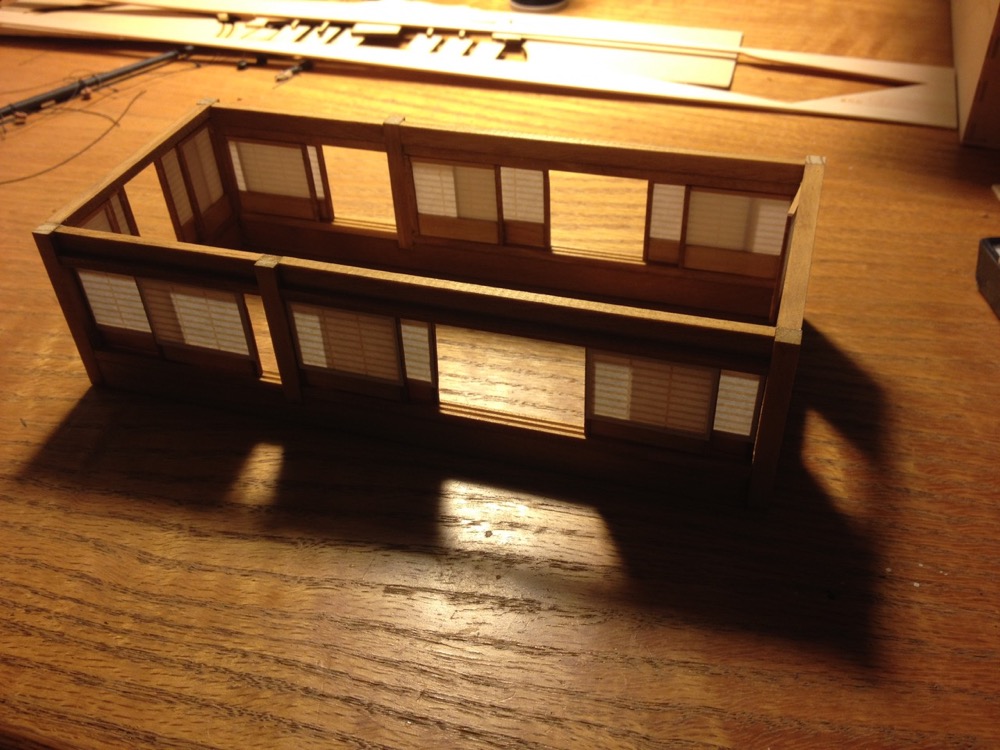
The next two steps are very straight forward and involve the deck house roof...
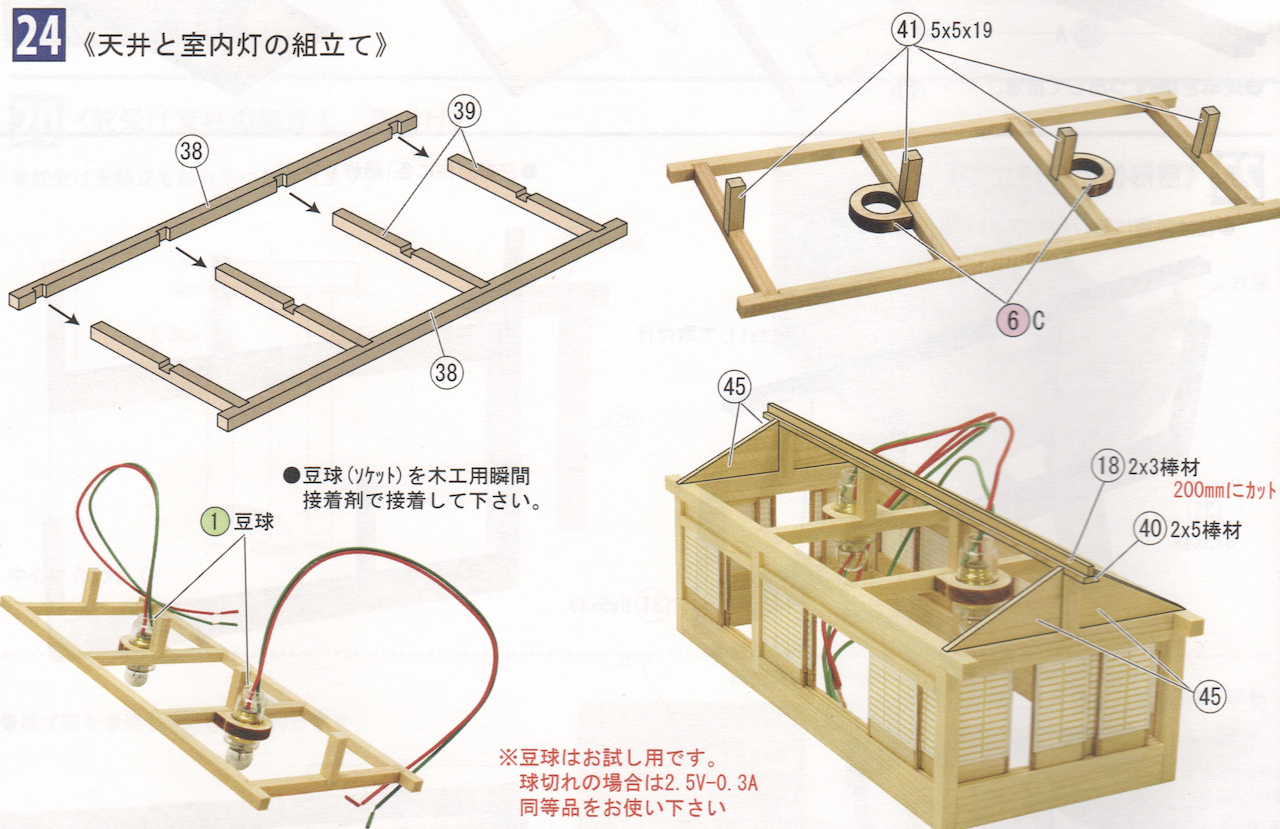
24 Assembly of the ceiling and Interior lights
• Glue the sockets using instant wood bond adhesive
There is a note in red at the bottom of this step that reads: Test the bulbs. In case of burn out, the bulb is 2.5 Volt, 0.3 Amps. Please use equivalent rating.
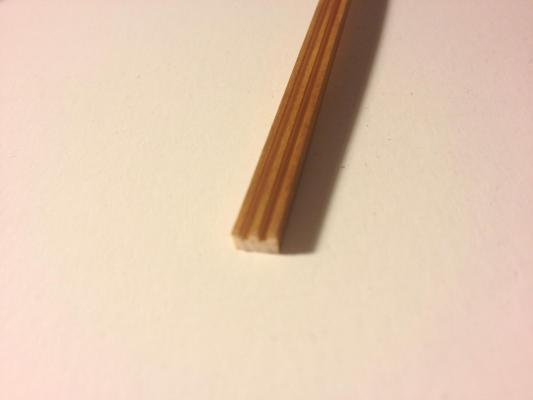
Most of the parts in this step are pre-cut and only require assembly. Only Part 18 comes from the supply of strep woods. This is a 2mm x 3mm strip which needs to be cut to 200mm.
Here's the section of instructions:
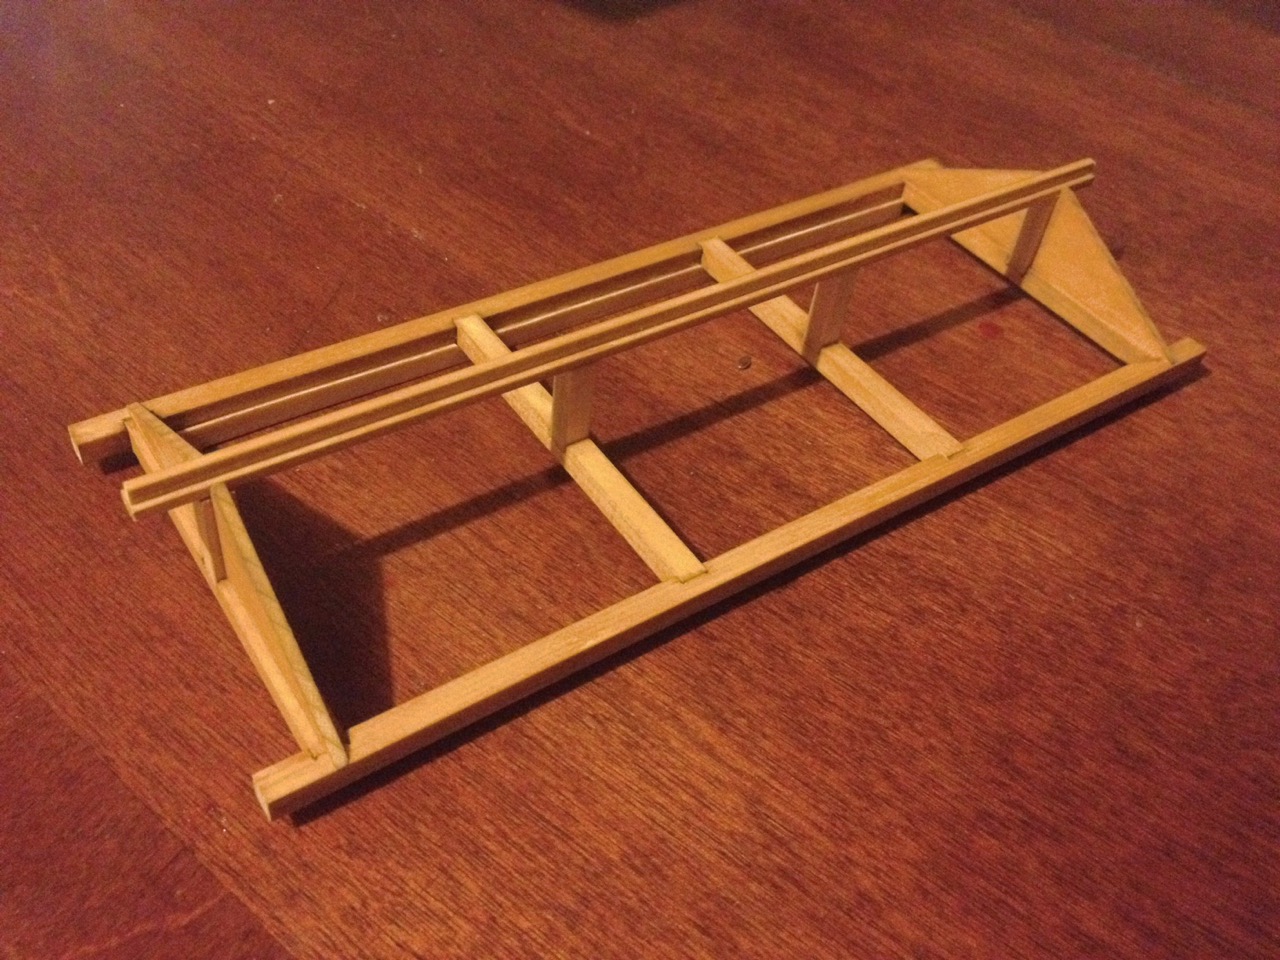
Here's the roof structure I built.

Because I'm planning on adding my own lanterns and using LEDs instead of the included bulbs, I didn't add the wooden mounts for the lights. I'll be dealing with lighting at a later time.
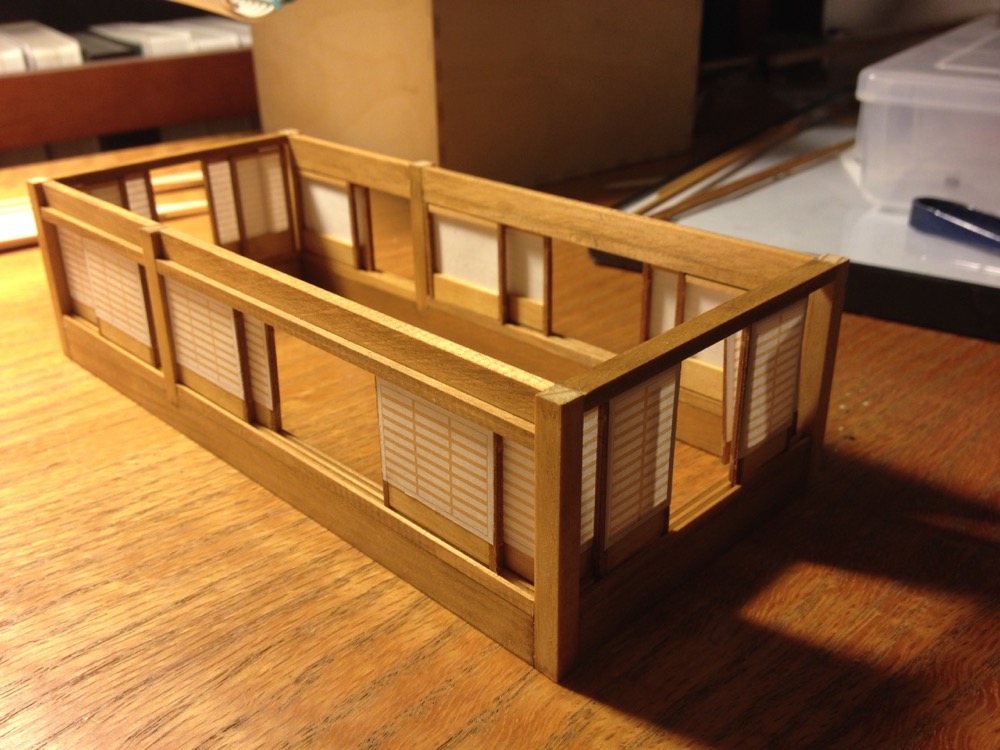
Step 25 is nice and simple and just involves creating the roof panels.
25 Assembly of Roof Panels
• Make 2 sets.
Again, the parts are all pre-cut, so this is simple assembly.

The labels in red simply say, on the left "Front Surface" and on the right "Back Surface".
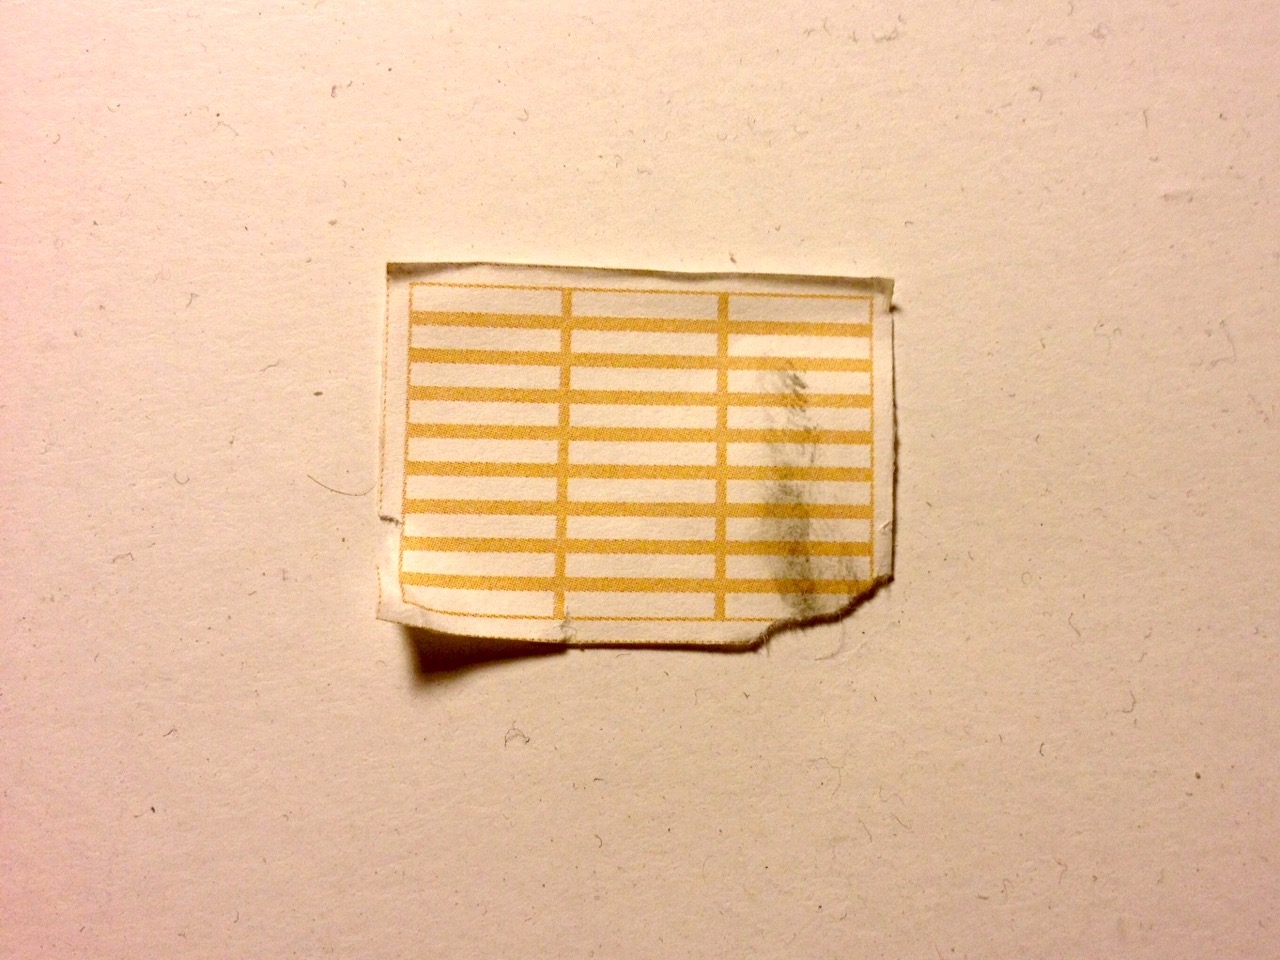
Now, I had one little accident with the deck house recently. I was working too close to it with a rag that had some wood oil remnants on it. The rag apparently touched one of the shoji screen panels and the oil marred its appearance. Worse, there was a spare included in the kit, but I couldn't find it. I came up with display options for keeping the panel hidden from view as much as possible.
Fortunately, I found the small piece of paper, which had fallen on the floor at some point, but was in good condition. So, I removed the old one, as can be seen in the above photo (the tear is from removing it from the panel), and replaced it with the new one. No problems...
Clare
-
-
Thanks for your comments Druxey. I couldn't play it though because it was out of tune. And to answer your question... No... No, there is no end!

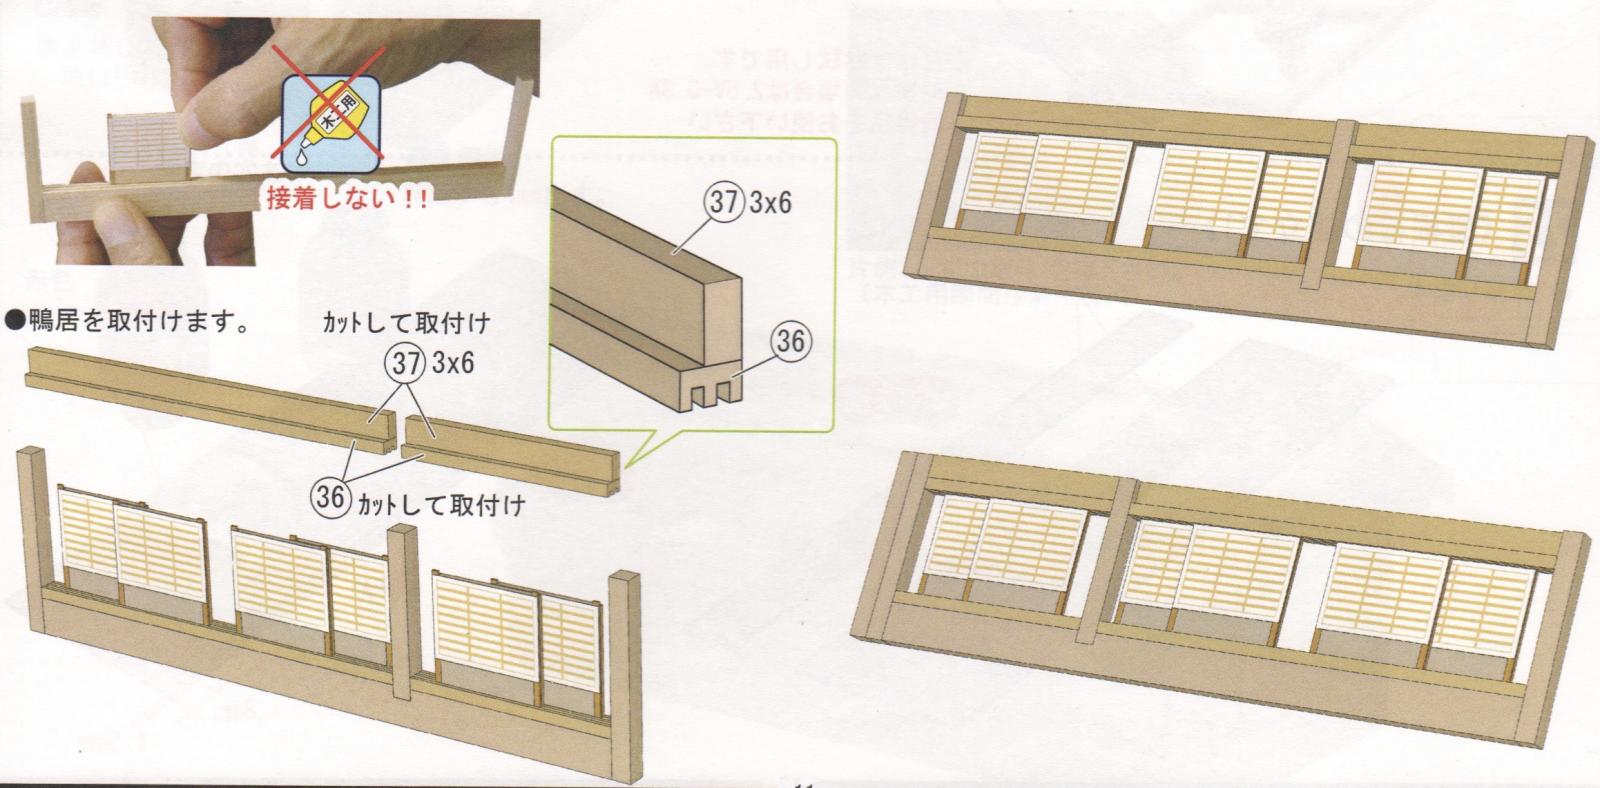
So playing catch-up just a little, here the rough text for step 22:
22 Assembling the sides of the boat cabin
• Install the vertical columns
• Cut and install part 36 to fit.
• The left and right cabin sides should be symmetrical.
• Add sliding shoji-A panels into the door frames. Do not glue!
• Install the lintels.
My Notes:
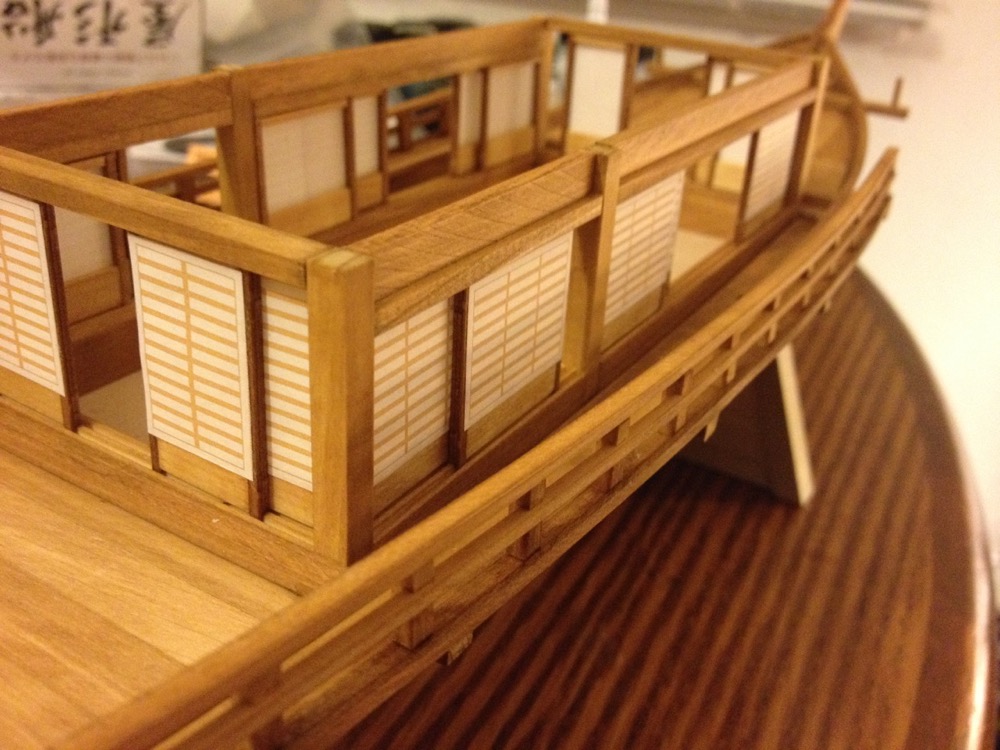
This is pretty straight forward. Part 36 is a pre-milled strip that the shoji panels fit into and it allows them to slide open and closed. The screens are supposed to fit so that the paper is on the outside. That means that you just have to pay attention to the fact that one cabin side has the panels facing one way and the other cabin side is the reverse. The illustrations in the instructions are pretty clear there.
Note the two sides of the cabin are mirror images.

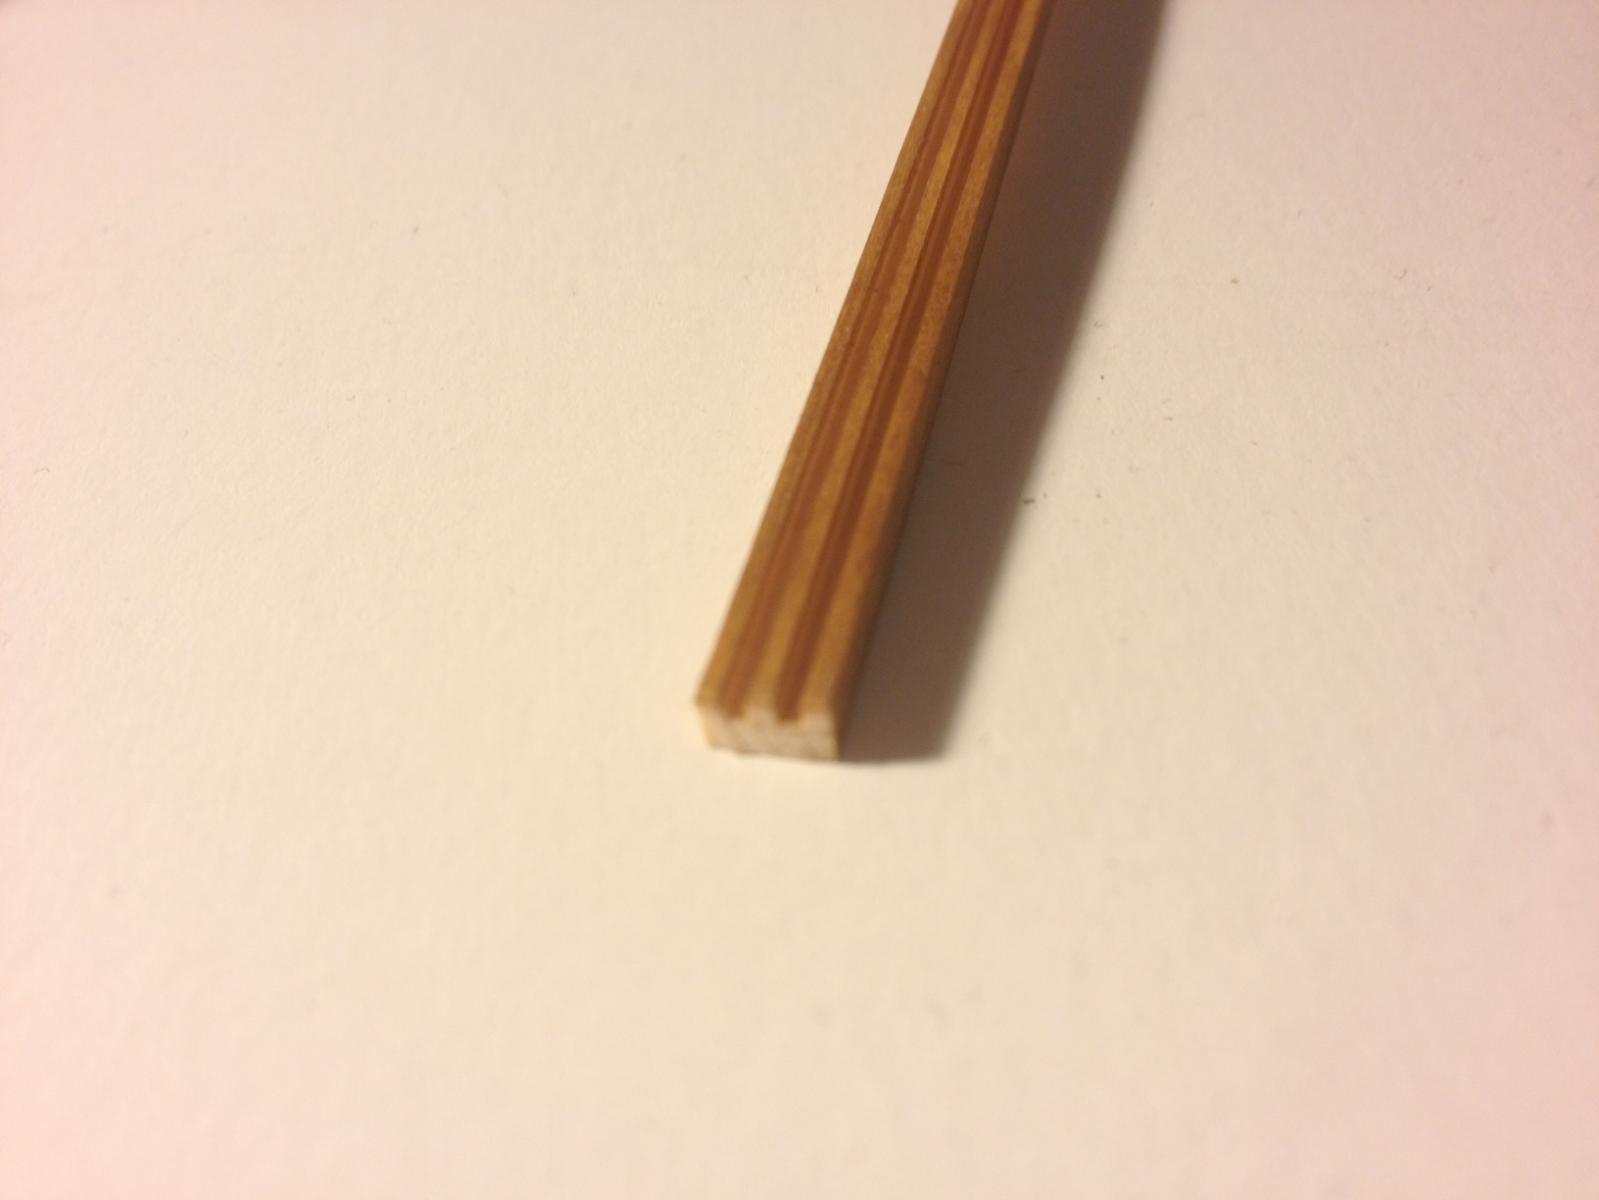
Note that when cutting the parts 36 and 37, you'll have to measure to make sure they fit properly.
Here's what part 36 looks like. Before the era of laser cutting, Woody Joe kits used to use a lot of milled wood parts, so it's not uncommon to still see a few pieces like these in their kits.
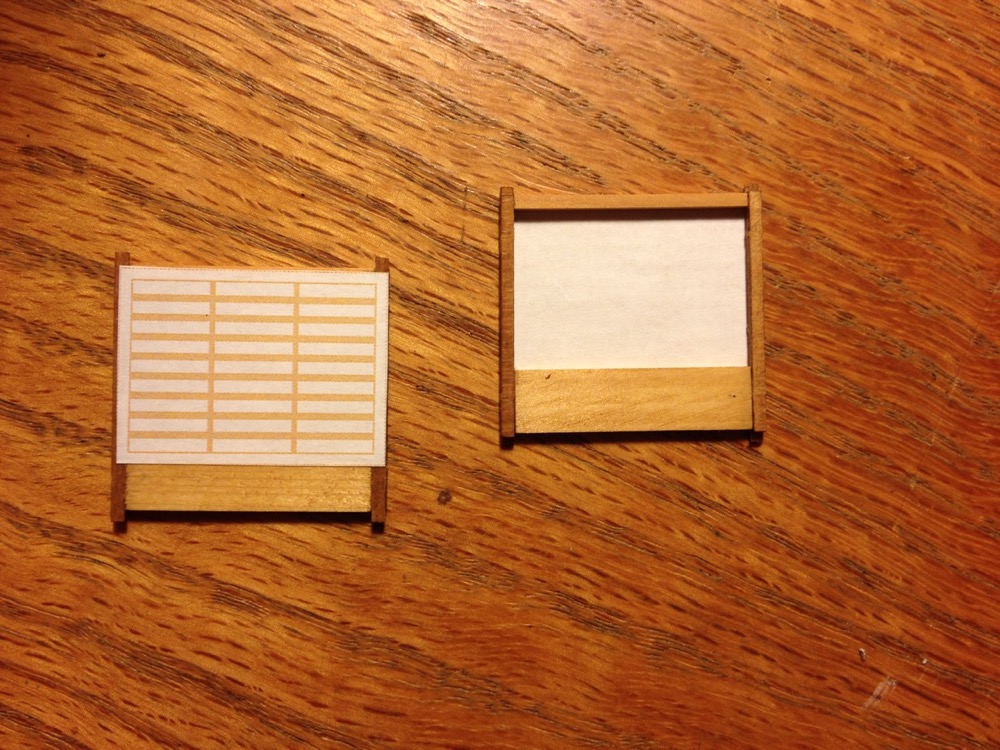
23 Attach Shoji
• Assemble the sills and attach the sides.
• Insert sliding Shoji Panel B
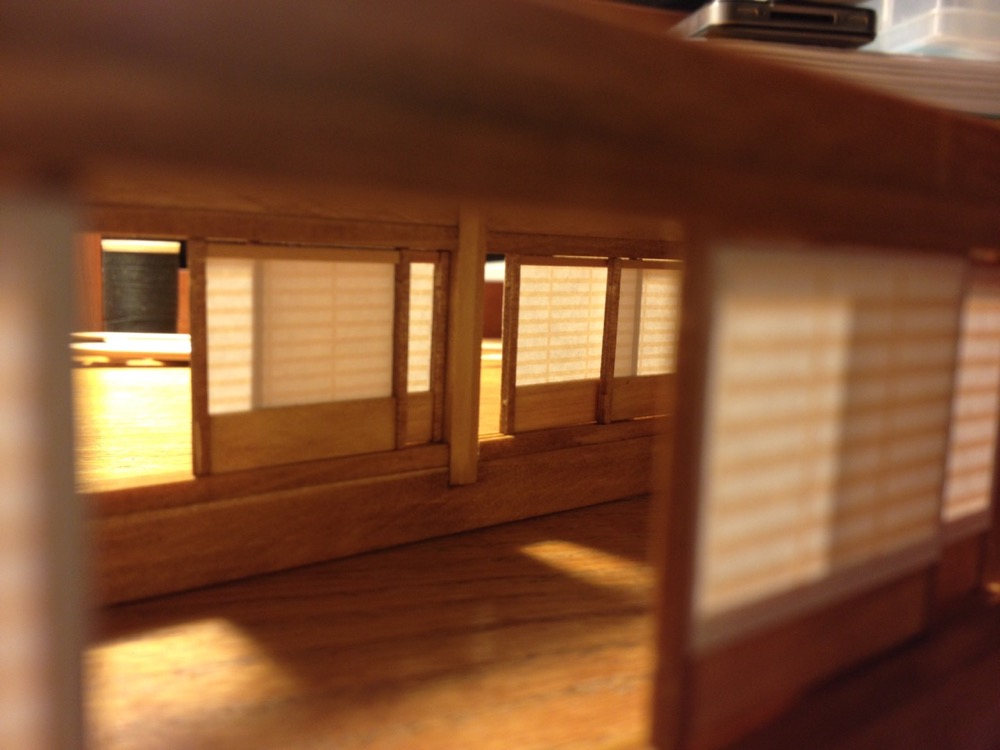
• Add the lintelsAfter completing steps 22 and 23, the cabin looks something like this...

Oh, and if you want to minimize light leakage from the kit or other internal lighting you may add, make sure that the lintels, that's the upper piece above the panels, is flush with the tops of the vertical posts. I wasn't too careful with that, so I may have to add some kind of very thin shim or something.
Clare
-
Ed, congratulations! I didn't know it was going to be out so soon. I've really been looking forward to this.
Unfortunately, Bob and his publishing company is a serious drain on my bank account! Okay, let me see... if I cut back on the grocery budget, put off the cable bill until next month, and get a garage sale organized, I should be okay...

Clare
-
I too have been using Illustrator for many years. I'd actually stopped using it for some time. Then, when I needed to create some drawings, I realized that I could do them in Illustrator, so I started up with it again. Had to relearn a few techniques along the way.
Among the uses for ship modeling, besides technical drawings, I've used it to create artwork for photo etching metal and I also used a laser cutting service that took my *.ai files directly and used them directly in the cutting process. Very handy!
Clare
-
Daniel,
I don't know which kit's you're referring to exactly when you say that you don't think they sell very well. But, I can tell you that Ages of Sail, as a retailer and distributor, sells a lot of the Amati Ship in Bottle kits, both the Hannah and the Golden Yacht kits. It's probably the most popular class of kits there is.
I'm sure you're correct about being inexpensive to build from scratch, but I think the kits are great at introducing people to the hobby. Of course, many of these sell as novelty gifts, but there are people who want to try their hand at the hobby.
Clare
-
-
Beautiful work Richard! That's turned out to be a really nice looking model. I have one unstarted on the shelf. Seeing how wonderful yours looks is making me think I'm going to have to take it down and build it. Problem is that I can think of at least 4 people that I'd like to build one for...
By the way, I think leaving the laser char on this model actually works to your advantage. It's such a natural looking color that it makes a nice contrast with the very light colored wood, making the details stand out better.
Funny that the instructions don't mention the ropes for the rudder. Good catch.
Clare
-
-
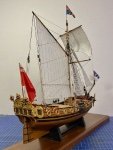
On a roll with the Yakatabune, I need to figure out if I'm going to want to paint it or leave it completely natural with shiny copper plates.
To help me decide, I took some blue painter's tape and painted it black. When dry, I stuck some on the model to see what kind of effect it would give.
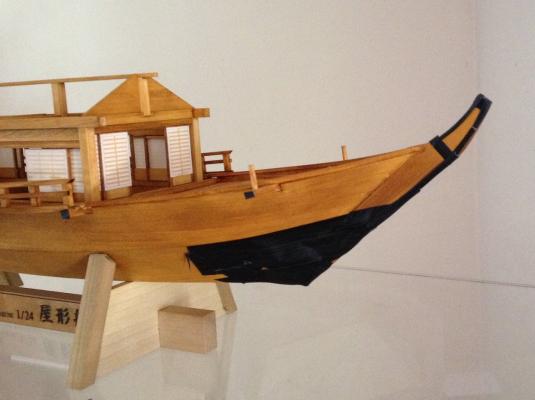
One thing I've noticed is that as they say with clothes, black has a slimming effect. It makes the boat seem sharper and trim, which I like. I think it's getting a paint job...
Meanwhile, just in case I come up with a different lighting plan, I thought I'd copy the lanterns by making a mold of them. One possibility is to cast them in clear resin or using opaque white stuff and just hollowing them out a bit and then paint the outer surface.
I'm in no big rush to light the model. I don't expect it to help in a the window display, where it's well lit. Given that there is no rigging to get in the way, the model design is such that the deck house is easily removable and I can make the roof removable too, so I can actually add that feature in later on.
Anyway, I have some concerns about light leakage and a glow showing through the thin wood roof. If I am planning on making a roof removable so that you can more easily view the interior, I won't want to coat the inside of the roof with something that blocks the light. Anyway, we'll see how things go.
Clare
-
-
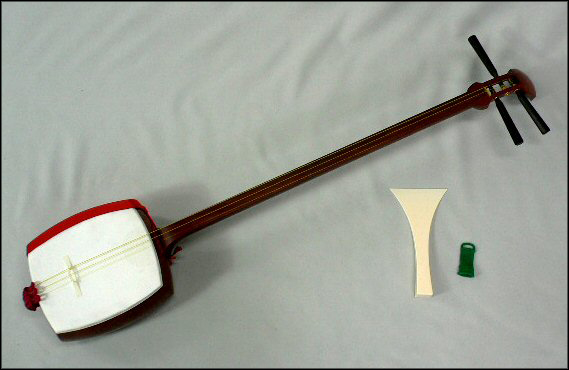
I appreciate everyone's comments and faith in my mini (micro?) shamisen making skills. Well, I had to push forward and see if I could a halfway decent job on it. I found some drawings on the Internet and resized them down to proper scale. For the wood, I have a nice piece of Peruvian walnut that seemed perfect for the job.
I can't really explain what I did beyond that. It was just a matter of making it.

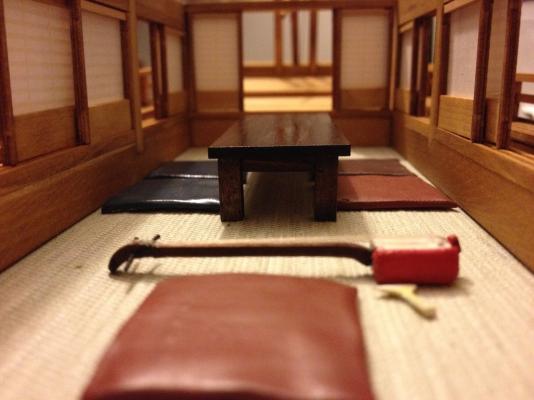
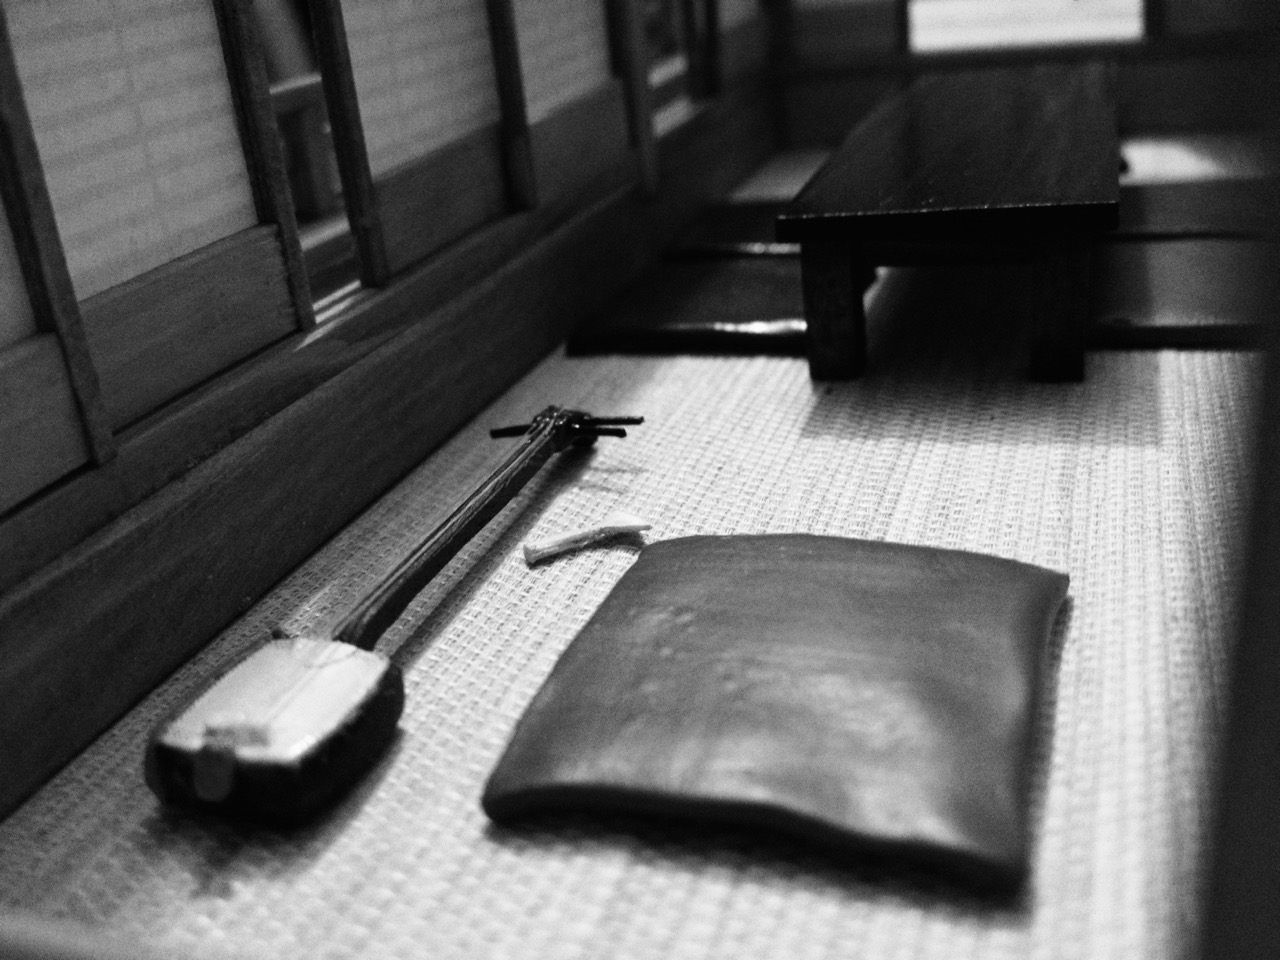
Final shamisen is about 2-3/4" long. The tuning pegs are called Itomaki (ee-toe-mah-key) and I just made them from blackened sewing pins. The fan shaped object is a plectrum called a bachi (bah-chee) that's used to strike or pluck the strings. Oh, and those are 3 strings you see in the photo. I had some tan monofilament thread I used for that.
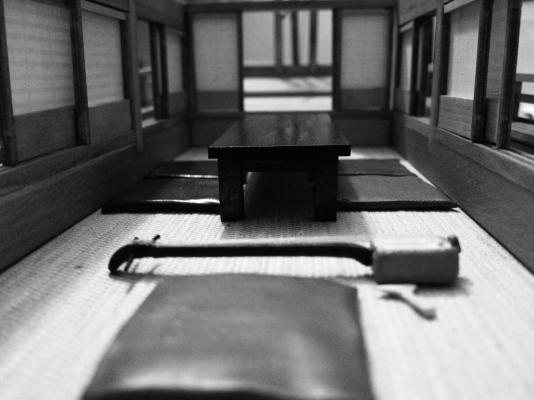
The entertainer's shamisen set aside in the Yakatabune's Tatami Room.
The entertainer's shamisen set down between songs.
Since we're looking at probably 19th century life, I thought a couple black and white photos seemed appropriate.

 I think the only other detail items I may make are sake cups and bottle. One could go crazy making small plates of food, hashi (chopsticks), and so on, so I'll have to stop myself before I go overboard. I still have to think about lighting, wiring, and maybe some painting.The kit calls for only a tiny amount of black paint on the tip of the stem and that's about it. I'm thinking about painting the lower hull black and also the metal plating that covers nails, beam ends and such. This would make the boat look a little more like those boats pictured in Ukiyo-e paintings. The only thing holding me back on the painting is that those boats are mostly different from the boat represented in the Woody Joe kit.Clare
 -
Small update,
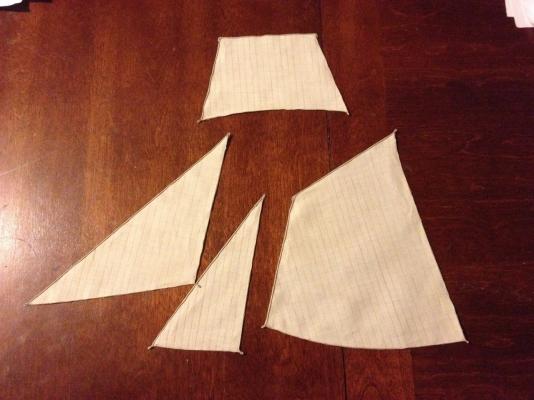
I worked a little bit on the sail set I bought for the Alert. It was a separate purchase I made from Shipyard shortly after I got the kit. The sails are nicely printed on one side, but the back sides are blank, so I just traced out the lines on the back using colored pencil.
Afterwards, I took some .4mm model rope and used it for the bolt ropes. At this scale, it makes sense to simply glue the bolt ropes into place without sewing, which is all the kit instructions call for as well. Personally, I've had good results doing this at 1/4" scale as well.
I also received the swivel guns from Syren Ship Model Company, so I quickly went to work adding the trunnions and blackening them all using BlueJacket's Brass Black. Interestingly enough, the swivel guns' short trunnions were a perfect fit for the small cannon carriages. These are beautifully turned barrels.

I haven't made a final decision on using paper or pear wood blocks yet, but I just ordered some more pear wood blocks from Chuck just in case.
Clare
-
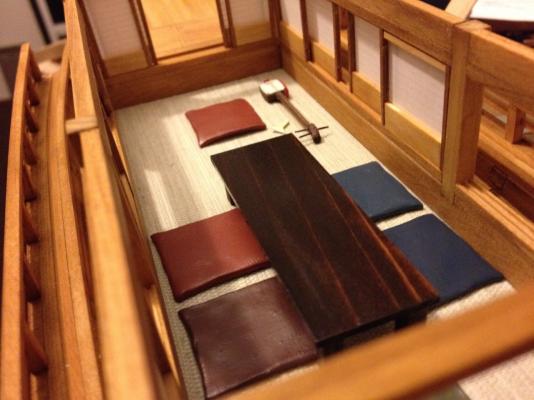
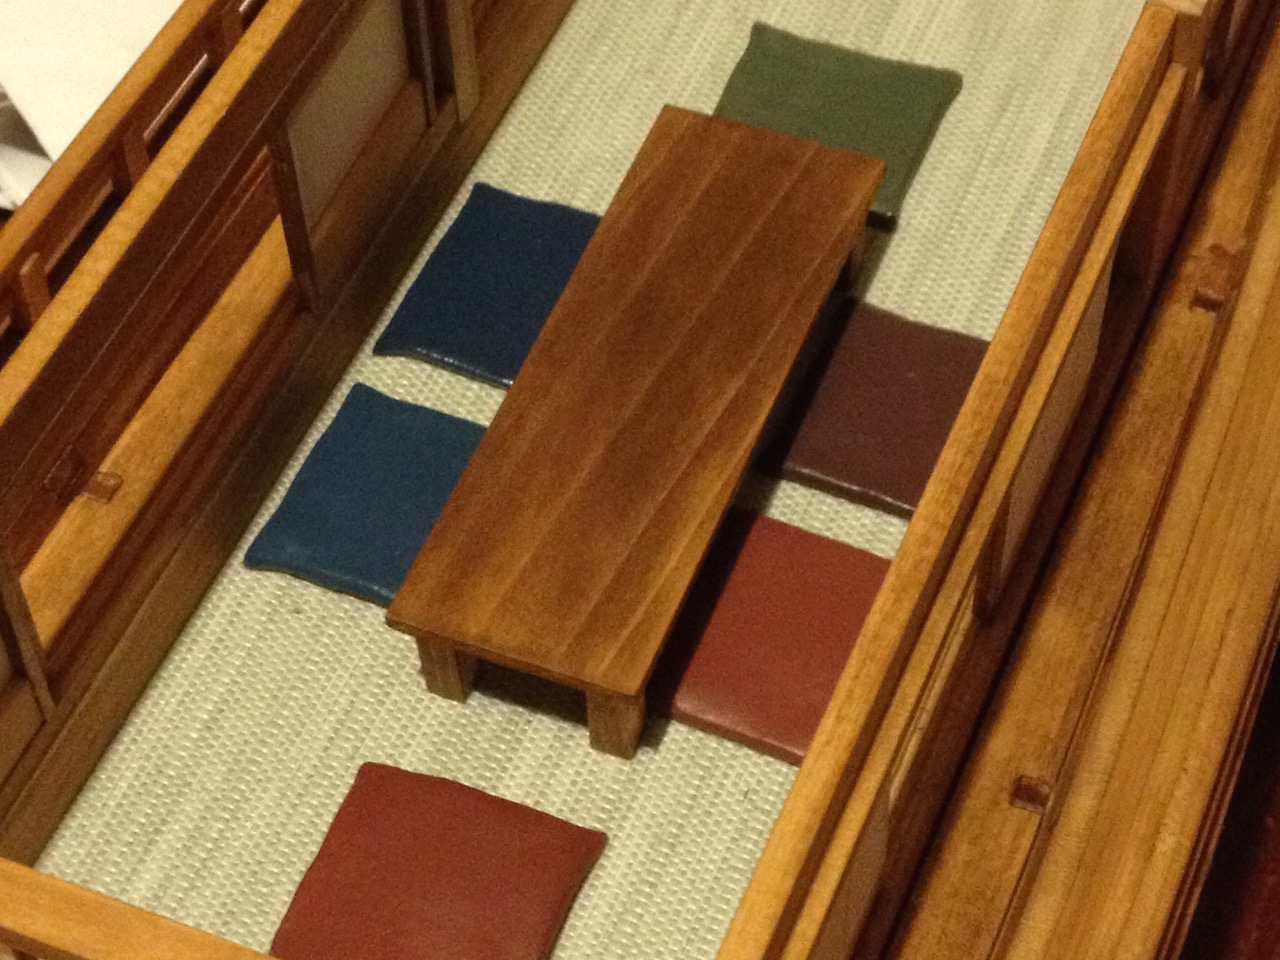
Since I was already on a roll looking at detail of the tatami mats, I started thinking about the table and some decor. The table is included in the kit.
I'm not positive about this, but I believe the table is called a zataku (zah-tah-koo). I was steered wrong when I was describing the table to a relative and they came up with a name that I don't recall at the moment, but it referred to a kind of individual tray/table, which this is not. I'm planning on finishing it in a dark brown color.
For people sitting around the table, there were individual cushions called zabuton (zah-boo-tone). These are kind of flat cushions about 2' square. I guess they're several cm thick when new and probably flatten out over time. I started playing around with making these out of sculpey to see how they'd turn out. Before I knew it, I made 6 of them. I figured these would be a mix of colors, and I chose colors that were mostly subdued. I think these kinds of colors are more traditional natural Japanese dye colors. The cloth used for making these might have had some kind of small repetitive pattern on it, but that would be too small to discern, so I just used solid colors.
I have yet to give the pillows a coat of some kind of matte finish, so they're a bit shiny right now.

In the meantime, I'm messing around with trying to model a shamisen to place inside. The shamisen is a 3-stringed fretless lute that sounds a lot like a banjo. It is played with a fan-shaped plectrum. I myself have been playing the shamisen for about 10 years now and I'm with a group that performs traditional Japanese folk music. So, it seems only right for me to try to include one here. We'll see how successful I am at that.
Here's a picture of a full-sized one that I'm using to help me model one in 1/24 scale.
Wish me luck!
Clare
-
Thanks everyone for the nice comments. This is a fun build and I'm learning quite a bit from it.
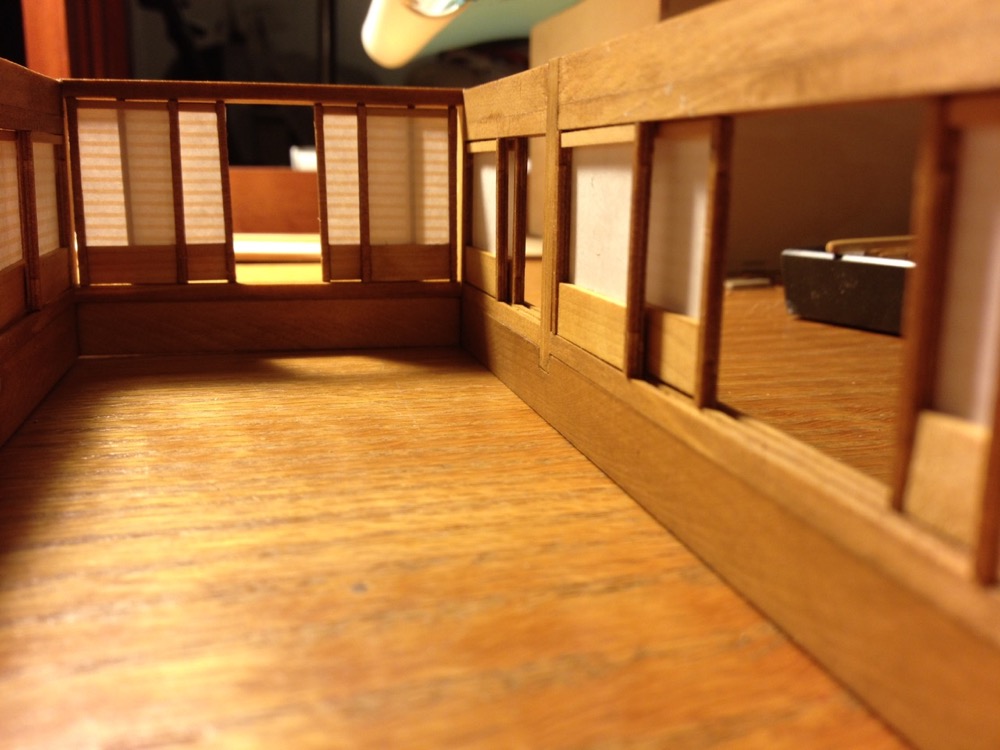
When I look at those close-up photo form inside the deck house, I imagine being inside and drinking tea or sake, maybe listening to music played by a geisha, feeling the gentle rocking as the boatman sculls us along the river on a warm Summer's evening. Of course, everyone's invited along – good company is mandatory!
Tatami Room
The floor of the cabin is covered with Tatami mats, roughly 2" thick straw-filled mats, so I did some reading up on the Internet.
Tatami were originally a luxury item used by nobility, but they became popular among common households by the 18th century. Tatami mats are made in standard sizes. A full sized Tatami is twice as long as it is wide, and there are half-sized, square Tatami. While standard sized, apparently, sizes varied a little depending on region. Assuming this boat is from the Tokyo (Edo) area, Tatami are 0.88m x 1.76m.
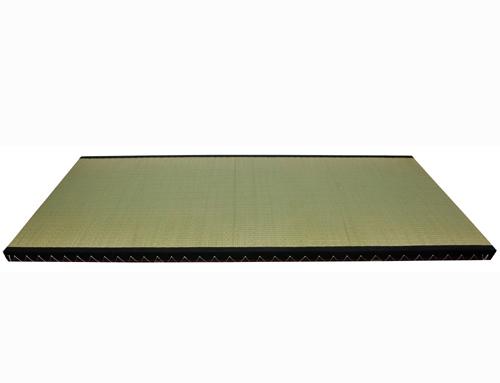
Found this image on the Internet of a full-size mat. This is from oriental-decor.com
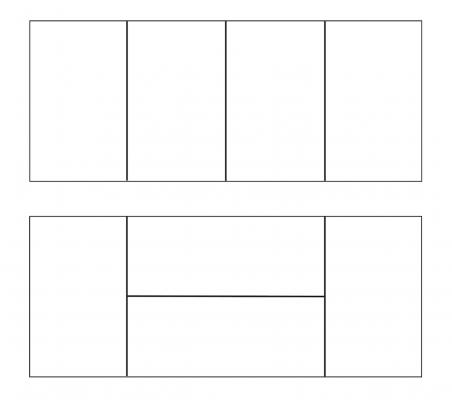
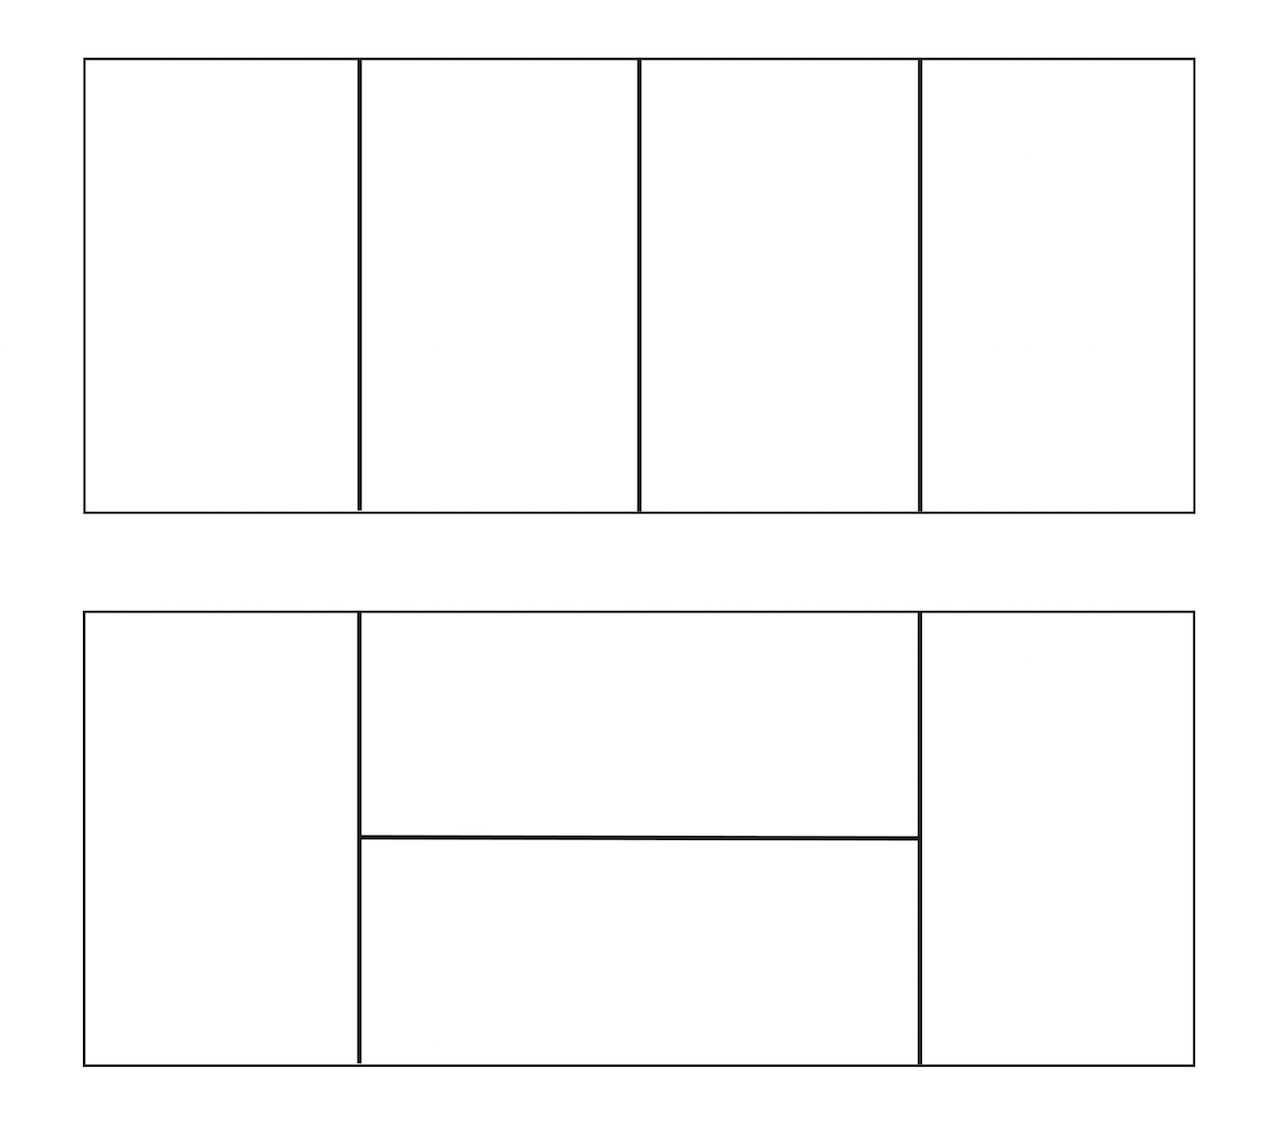
The layout of the Tatami determined the dimensions of rooms. The yakatabune's cabin is a 4-Tatami room, since 4 mats, laid side by side, exactly cover the floor. From this, I determined that the actual scale of the model has to be 1/25-scale, rather than 1/24-scale.
At the top of the image attached below, I show the layout of the Tatami as described in the kit. I'm considering using a different layout for better visual interest (see the bottom layout in the attached image below). Also, there will be a small table that will straddle the seam in the middle of the alternate layout I'm considering, and I think the layout means that fewer guests will be seated on top of a seam.
After I came up with my alternative layout, I found another image on the Internet that showed some room layouts. Notice that there is only one layout that is the same dimensions as the yakatabune's cabin, and it is the same as my alternate layout.
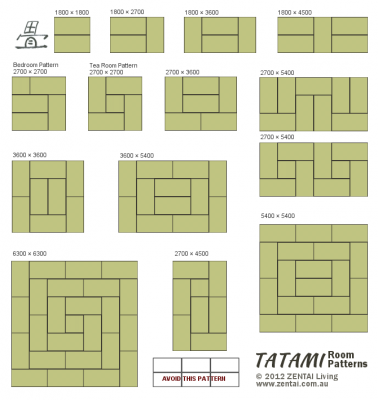
Found this image on the Internet of some room layouts. This is from store.zentai.com.au
An interesting note from the source for the above image indicates that Tatami are never placed in such a way that the corners form a "+", as it is considered to bring bad fortune. I think the Chinese would call it bad "Feng Shui". I guess this means that the kit's proposed layout is okay. To me, seating guests on the seams of Tatami also seems like it's not great Feng Shui.
Yeah, I'm kind of jumping ahead here, but it's all part of research!
Clare
- UpstateNY, GLakie, Salty Sea Dog and 4 others
-
 7
7
-
-
Thanks Mario,
Woody Joe doesn't do direct sales anyway. I recommend ordering from my friend Kazunori Morikawa at Zootoyz.jp. His site is in english and service is very good and prices are reasonable. Here's a direct link to the Woody Joe ship model kits: http://www.zootoyz.jp/contents/en-us/d67_Woody_JOE_Wooden_Sailing_Ship_Model.html. The Yakatabune kit is about halfway down the first page.
Clare
-
Before going one with my build, first things first. Took the model to a ship model meeting last month and by the end of the meeting, found the tiller broken off, lying on the deck. It was a simple, clean glue break, but I left it for a few weeks and didn't do much on the model. Then this past Saturday, I needed to take something over to work on our model workshop on Hyde Street Pier, so I took the Yakatabune. I was really glad I did because nobody else showed up and I got a bit of work done.
Anyway, the tiller was a simple glue attachment, so this time, I drilled it out and peg it this time, using a piece of 1/32" stiff brass wire.
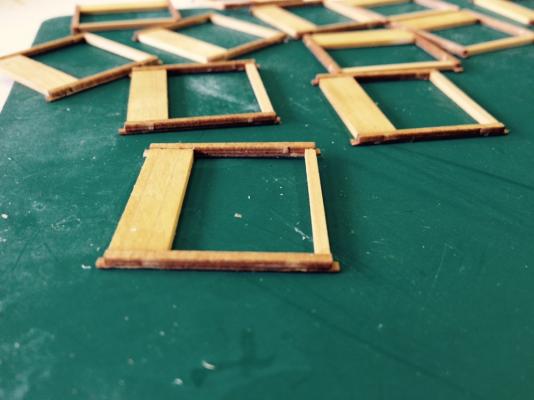
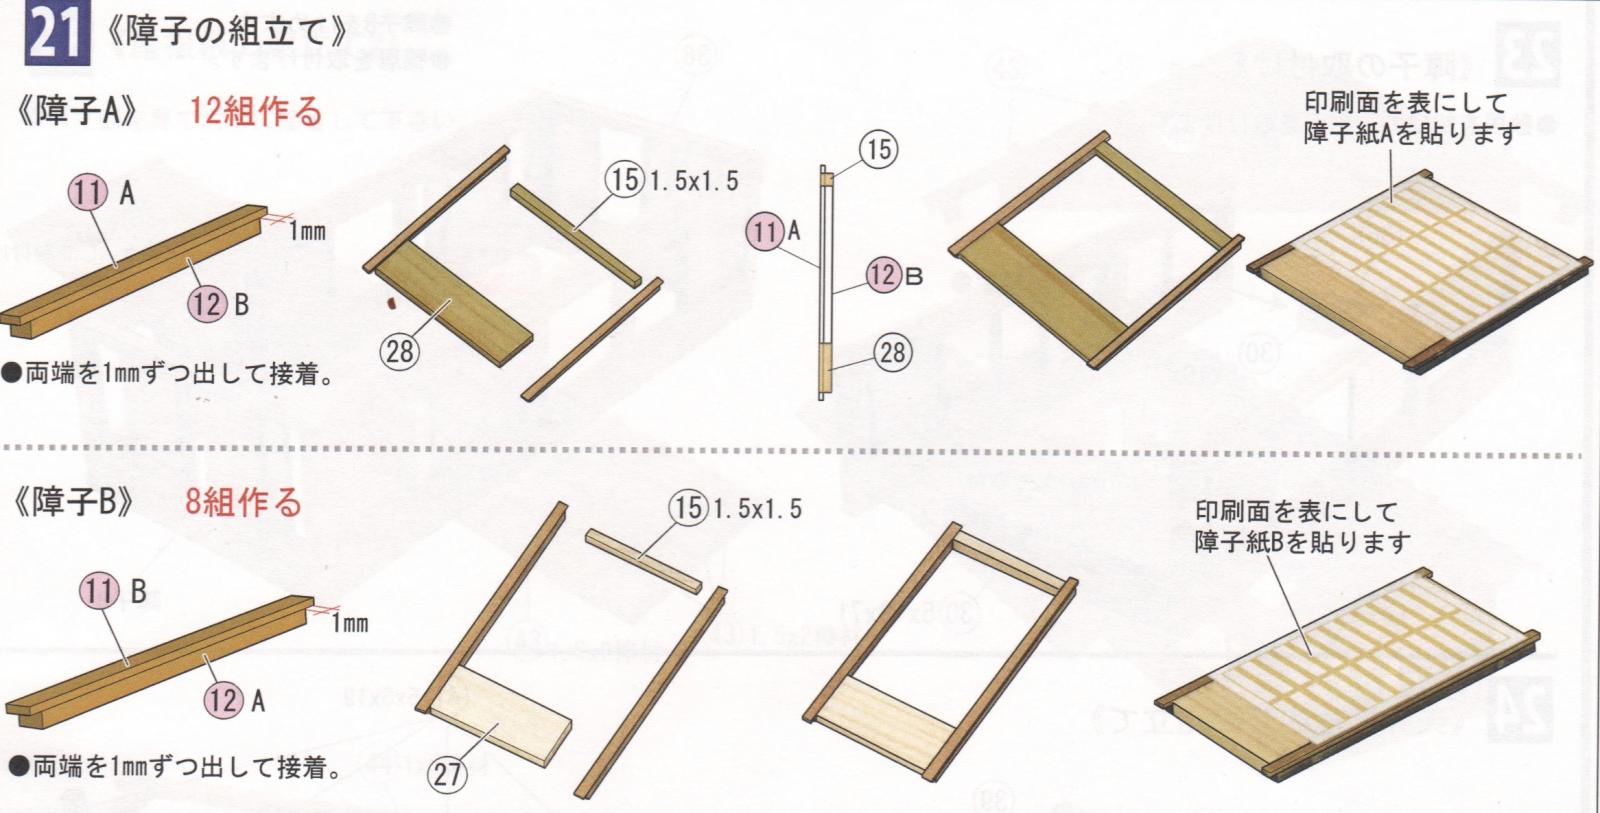
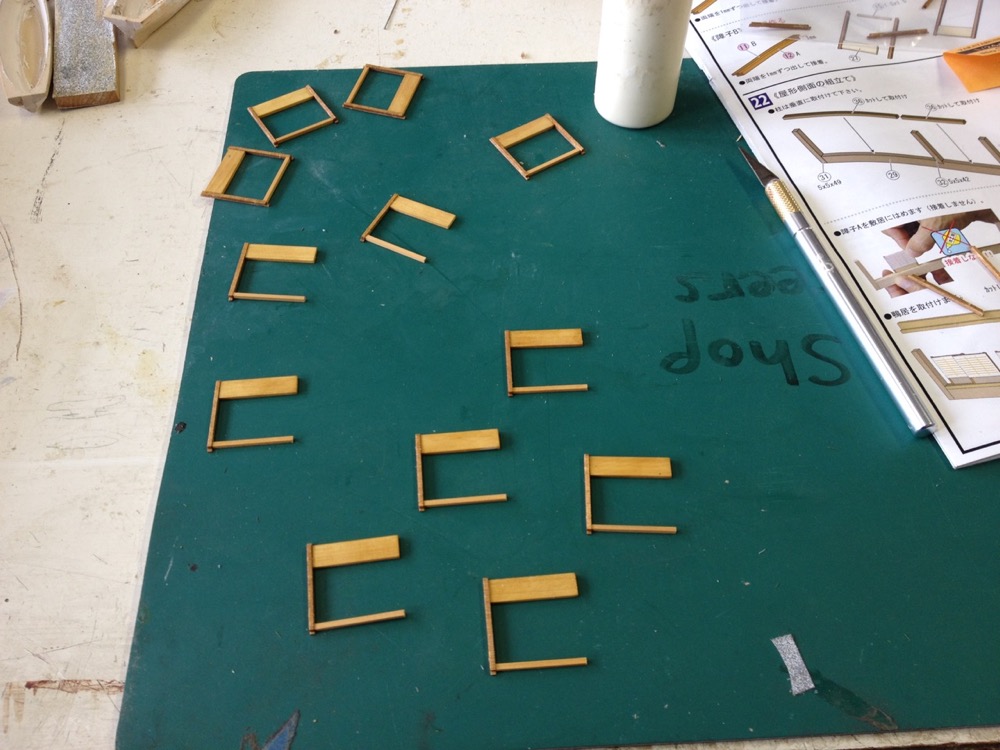
At the workshop, I continued with the next step, Step 21, which deals with the sliding screen panels.
The instructional text:
21 Assembly of Sliding Doors
• Sliding Doors A, make 12 pieces.
• Use Shoji paper A, printed side up.
The last line was hard to translate correctly, but the gist is that part 11 should stick out 1mm on each end when it is glued to part 12. It makes more sense when looking at the instructions. This line refers to the image at the very left side.
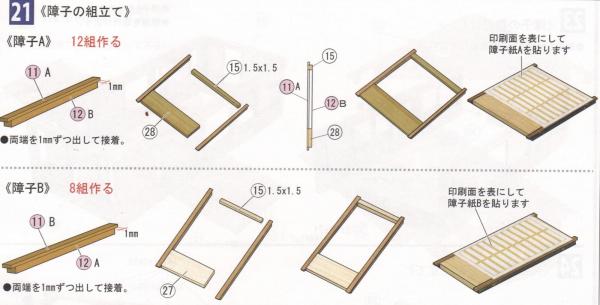
There is a second half to these instructions that is almost identical to the first, except that it refers to another set of sliding doors...
• Sliding Doors B, make 8 pieces.
• Use Shoji paper B, printed side up.
i didn't add the paper yet screens yet. That's coming up next.
 ClareEdit: The 1mm ends of part 11 form tabs that fit into slots, allowing the screen to slide. Part 11 is on the FRONT side of the doors. If the shoji screen paper is going to fit securely, the door pieces need to all be flush on the front side. Problem is that the other pieces are a different thickness than the 11/12 assembly. So, you just have to be aware. I didn't catch this initially and had to adjust, re-gluing some pieces part way through.
 -
-
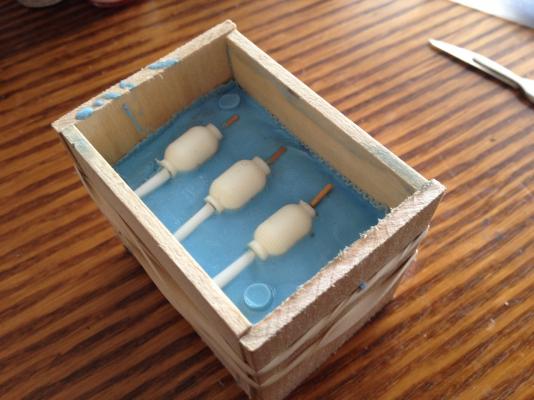
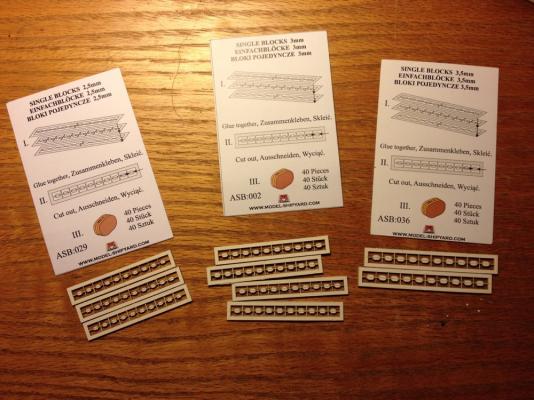
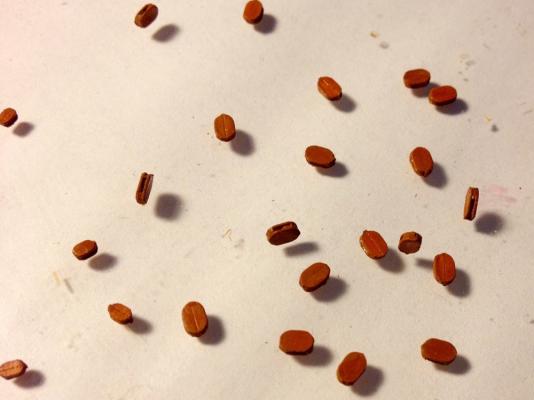
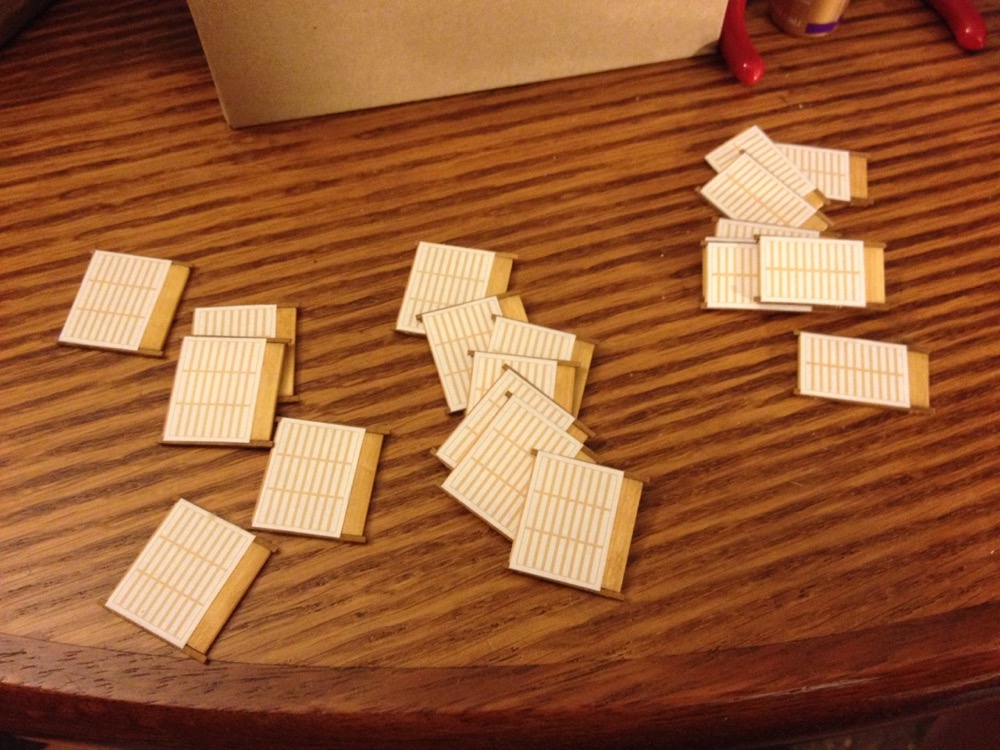
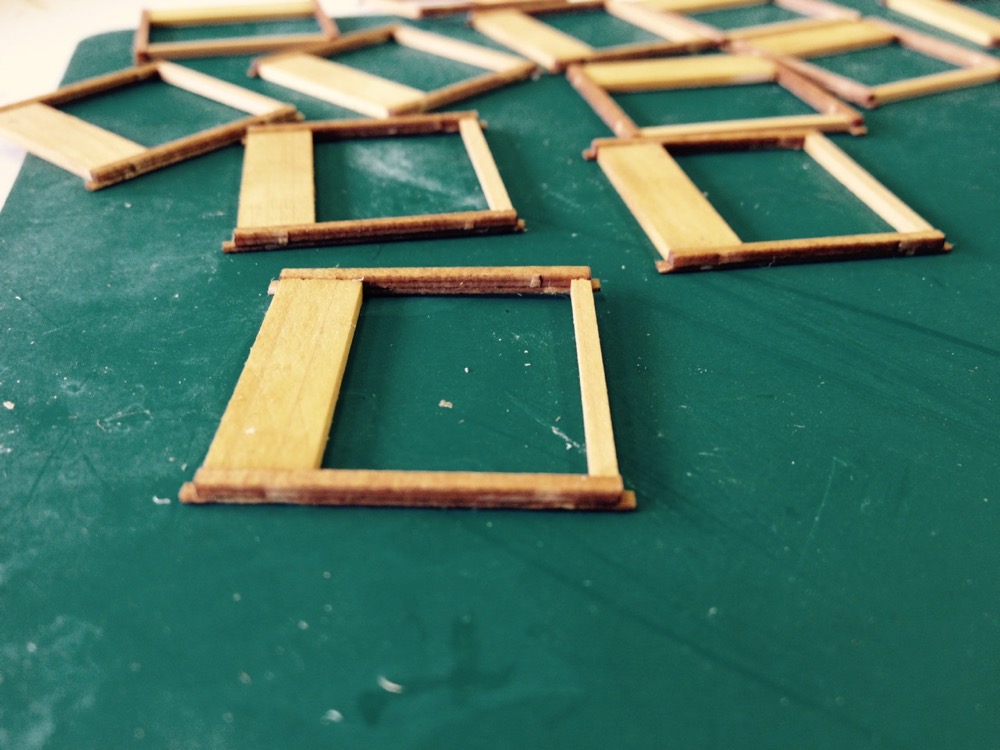
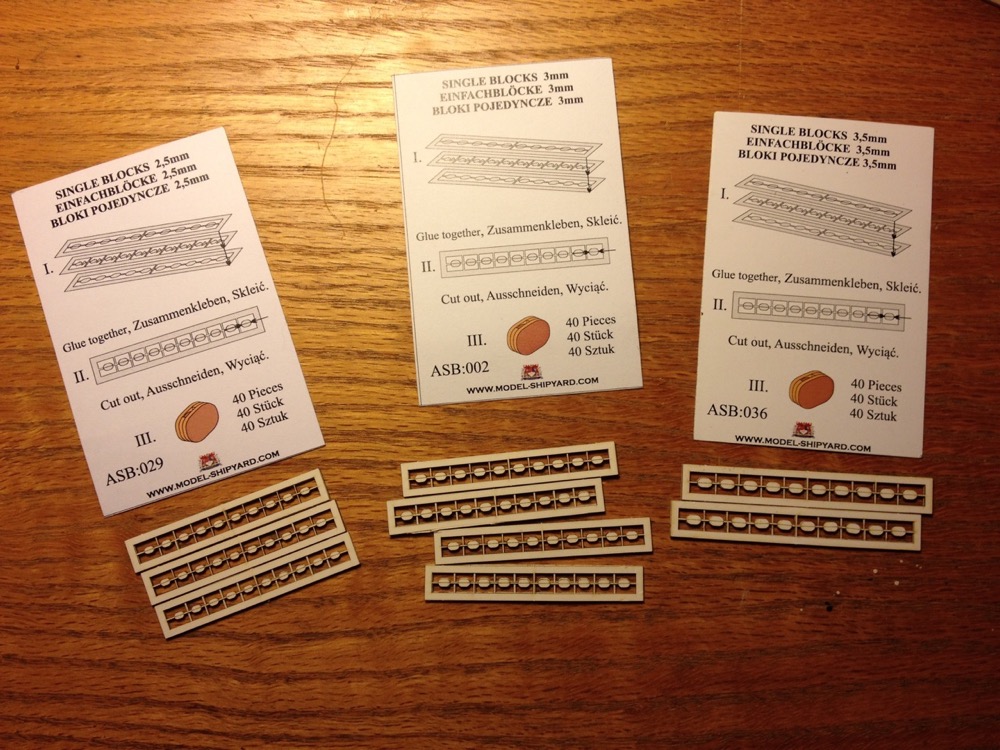
Thanks Chris, Mark, Slog, for the advice. I'm moving ahead with the turned brass cannon barrels. Regarding blocks and such, I needed to work on something fairly mindless, so I started working on the paper blocks. I figured I'd see how they turn out. If they're not so good in the end, I'll switch to purchased wooden blocks.
The paper blocks have one advantage over the Syren blocks in that this is a small model and with the paper blocks are available in 3.5mm size, which I can't get in pear wood.
So, in paper blocks, I now have 2.5mm, 3mm, and 3.5mm sizes. 2mm blocks are available from Shipyard too, and rigging calculations would normally call for them, but that's awfully small to assemble. Anyway, I don't have any of the 2mm paper blocks on hand, and the kit itself calls for these sizes I do have.
Here is a sample of the unassembled blocks. These are the same kits that come in the boxed kits.
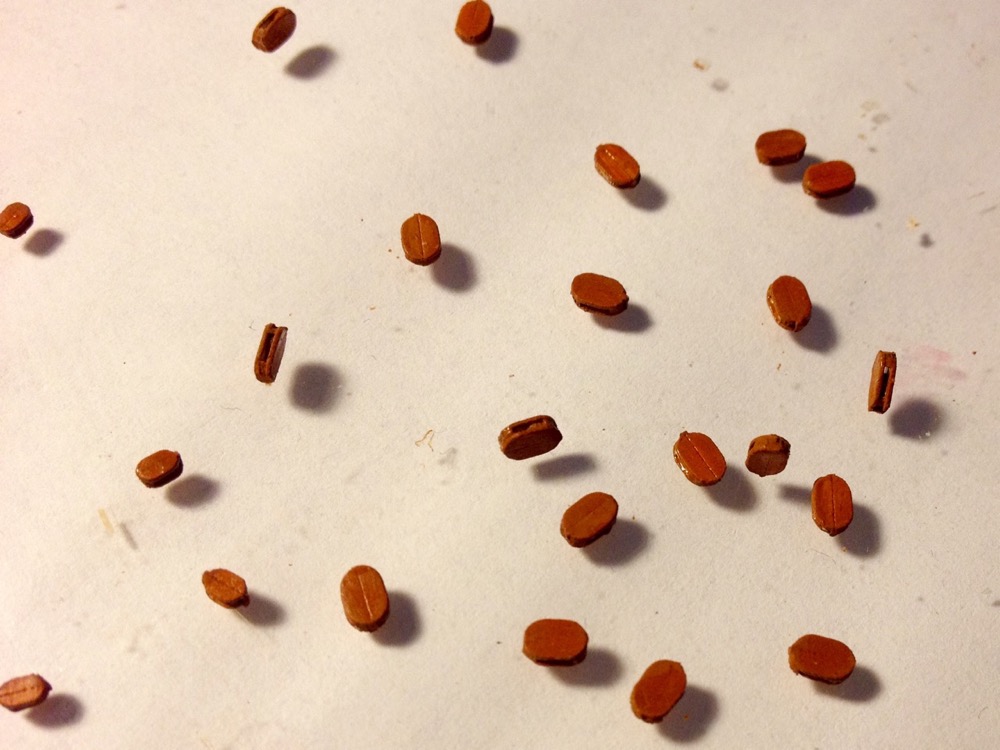
A nice, cool but sunny Sunday morning, cup of coffee and ship modeling project – A perfect day!
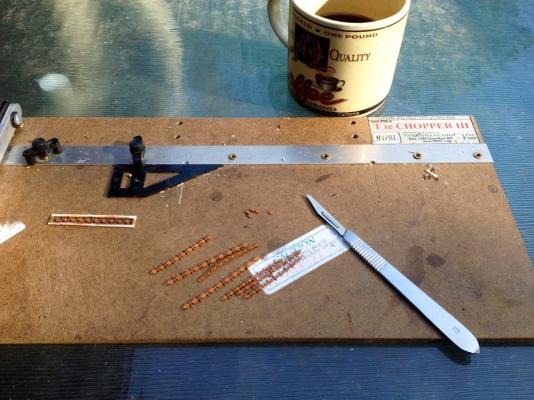
Here's a close-up of painted, CA reinforced and touched up blocks
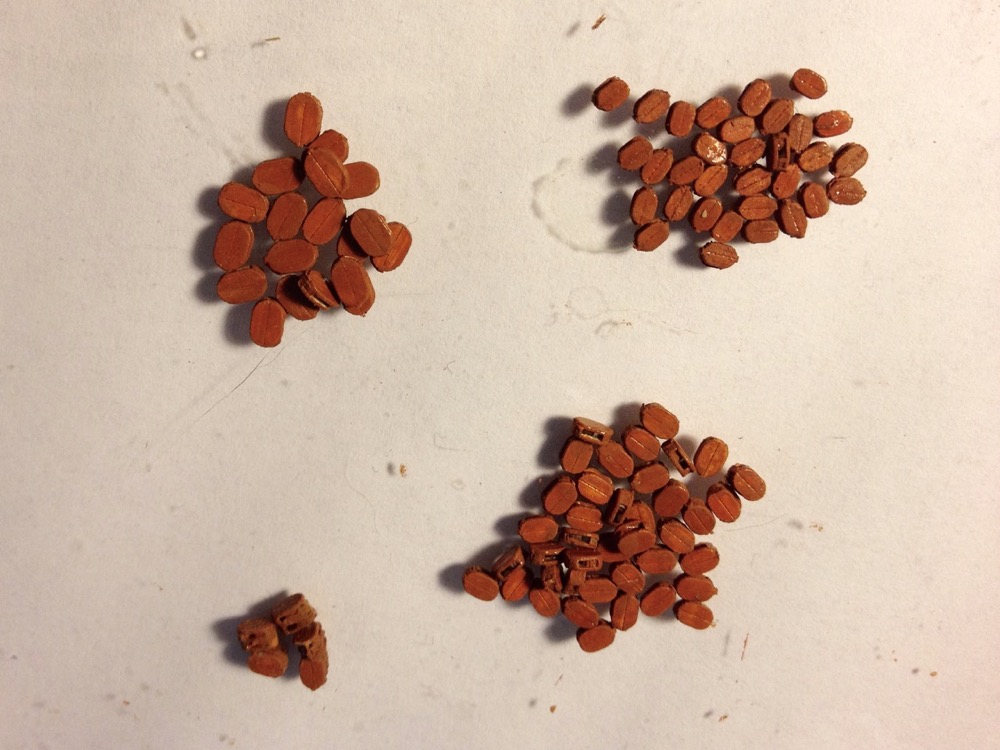
Sorted by size and cleaned up a little more.
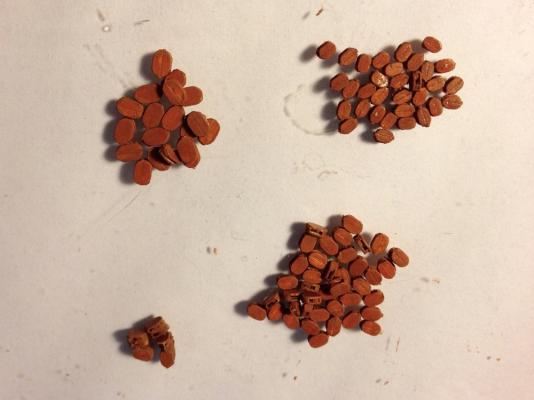
This certainly took a bit of effort to pre the blocks. I painted them while still in their sheets, I also glued them up in batches, which is easiest to do on the sheets. The process of assembling is exactly the same as the Syren built-up blocks, except that because they have to be painted, they need touch up. Also, cardboard isn't a very strong material, so I made sure to wick in some thin CA glue.
I have yet to see how well these hold up when rigged, but at least their ready when I need them.
Clare
- Captain Slog, druxey, Ryland Craze and 7 others
-
10
-
Hi Slog,
A good question. Shipyard has 4 main product lines and two of those product lines include ship model kits. One product line is their "Laser Cardboard Kits," which includes this HMS Wolf kit, and the other are their "Paper Models."
The Paper Models are all 1/96-scale and have parts you have to cut out yourself and they are printed in color.
The Laser Cardboard Kits are boxed edition kits in 1/72-scale. The parts are all laser cut from plain white card stock, and the necessary paints are included in the box (as well as paint brushes). Some items like decorative friezes are not laser cut, but are printed in color.
Hope that helps!
Clare


how do you decide on what kit to build
in Wood ship model kits
Posted · Edited by catopower
1. Start by looking at all the kits I'd like to build
2. Eliminate all of those I can't afford, which is about 95% of those
3. Go back and add ones that MAYBE I could get if I stretch my budged a little (or a lot)
4. Look as which of those kits will be a nice step up in difficultly from previous builds.
5. Throw all caution and rationalizations aside and ignore steps 1-4 and go the one that just appeals to me most.
The final kit usually ends up being something unusual that not everyone else is building, is an actual, researchable historic vessel or small craft, and gives me an opportunity to learn about the ship, the technology, the period history or culture that often isn't commonly known, at least to me.
Then, like so many others, I usually put it in the closet with all the other kits I haven't had time to get to...
Clare