

catopower
-
Posts
1,616 -
Joined
-
Last visited
Content Type
Profiles
Forums
Gallery
Events
Posts posted by catopower
-
-
Hi Grant, Ken, Carl, Bob welcome!
Hope you enjoy the build. It's been an exciting start. I saw one of the blogs on the build of this kit maybe about a year ago, but couldn't find the kit anywhere. When I found one in a listing in Japan, I snatched it up, hesitating only to make sure it would actually get to me one way or another.
I've been in contact with boat builder Douglas Brooks for about 2 years now and, following his work, I've been wanting to try scratch building a boat he refers to as a Bekabune, a seaweed harvesting boat from Tokyo Bay. It is relatively simple and small, but I didn't want to fully commit to it yet because I felt there were just too many questions in my head about the building methods. With him the only source of information, I didn't want to be bugging him all the time.
I think the Tosa Wasen model project will help me through some of those building issues. I'm getting a sense of the difference between the two boats, what kinds of things might have been simplified in the kit design, construction techniques, etc.
I don't expect this to be a long project – I'm already on step 8 of 41. But, I do have a rigging repair I'm finishing up at the same time and then some. Plus, I'm translating each step to make sure I'm not missing anything major, and that takes time. Still, though I'm in no rush, I'm betting I'll be done by New Year.
Clare
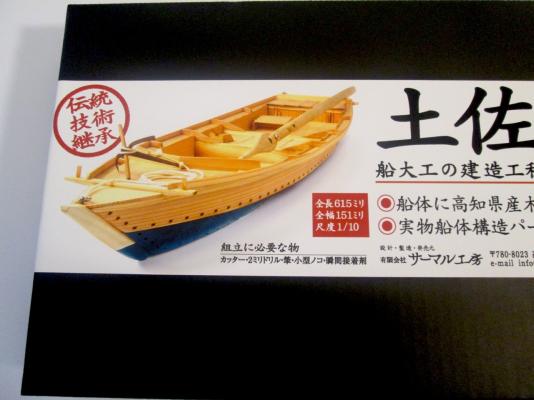
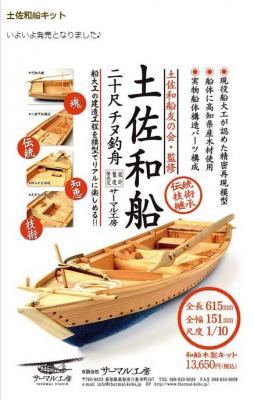
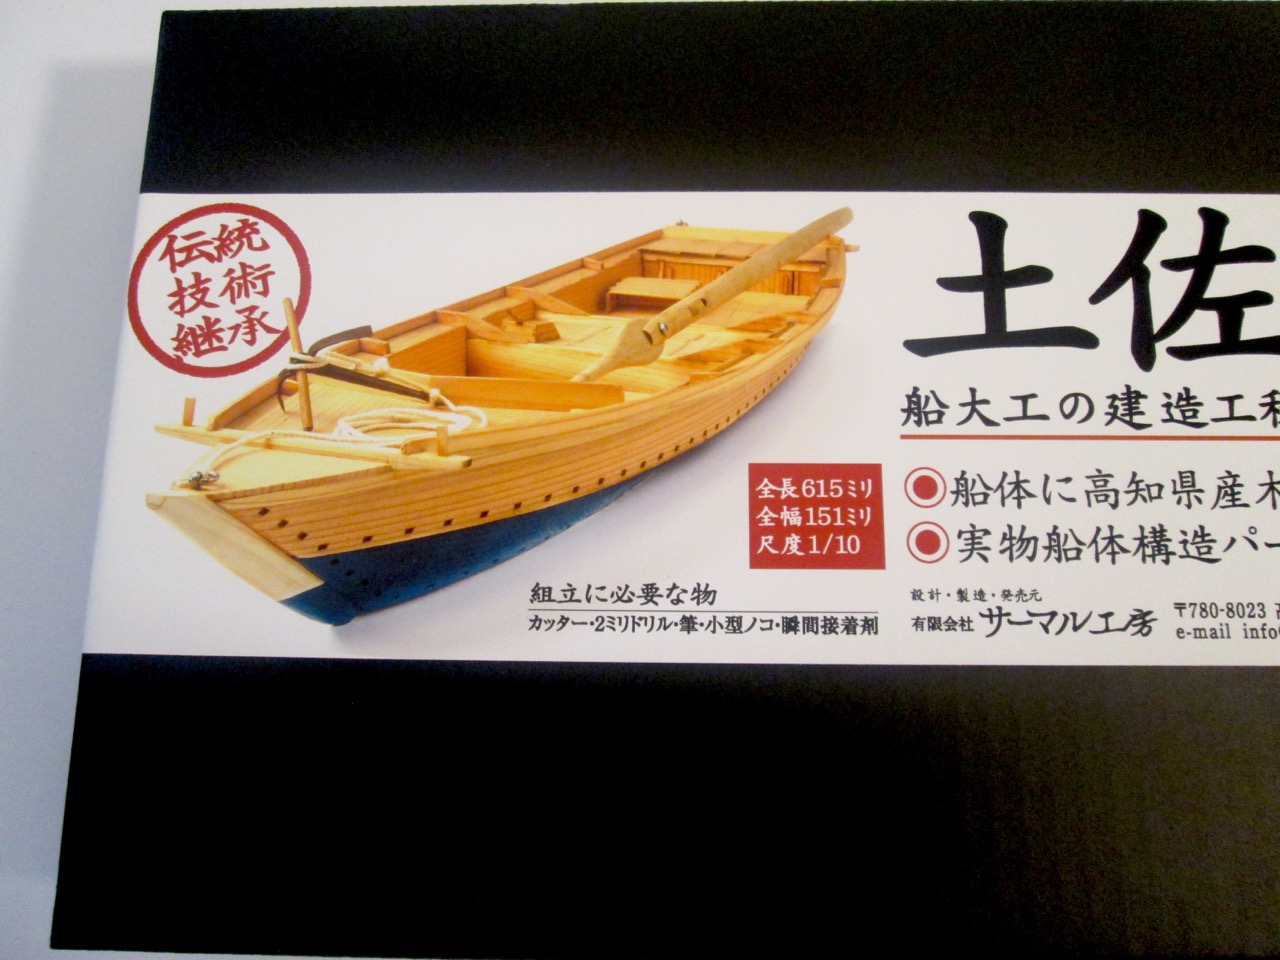
-
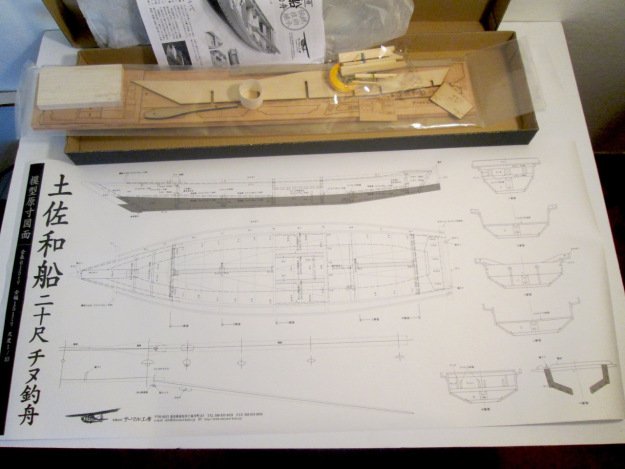
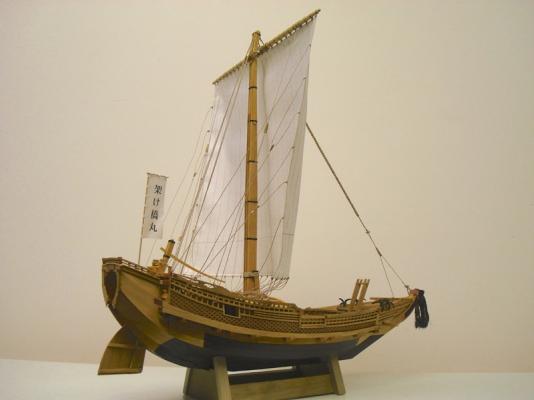
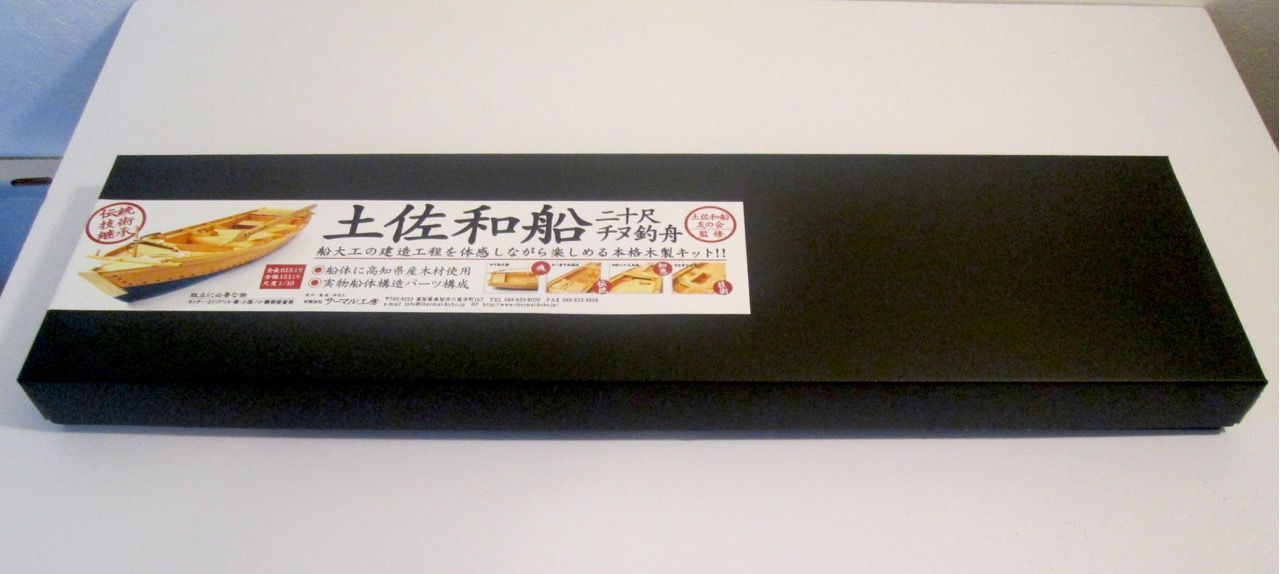
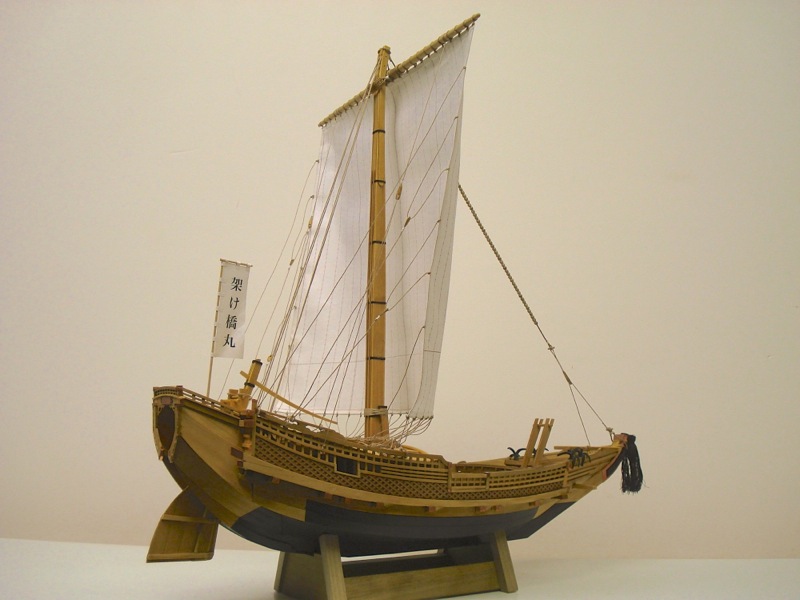
I purchased this kit from a dealer in Japan, having found it on the Internet some time ago. This is a very accurate model of a traditional fishing boat from a region called Tosa on Shikoku Island, which is one of more Southern of the 4 main islands of Japan. The kit was produced by a company called Thermal Studio, which is actually a manufacturer of glider kits. I suspect that there is some personal connection between the owner and the Tosa Traditional Boat Society. The manufacturer indicates that this kit is made under the supervision of that group.
I won't go into too many general kit details, since I already discussed the details of the kit on Model Ship World here: http://modelshipworld.com/index.php/topic/12018-110-scale-japanese-fishing-boat-kit-from-thermal-studios/
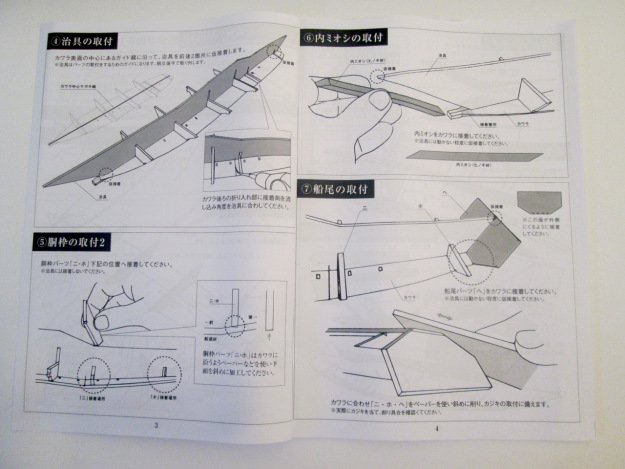
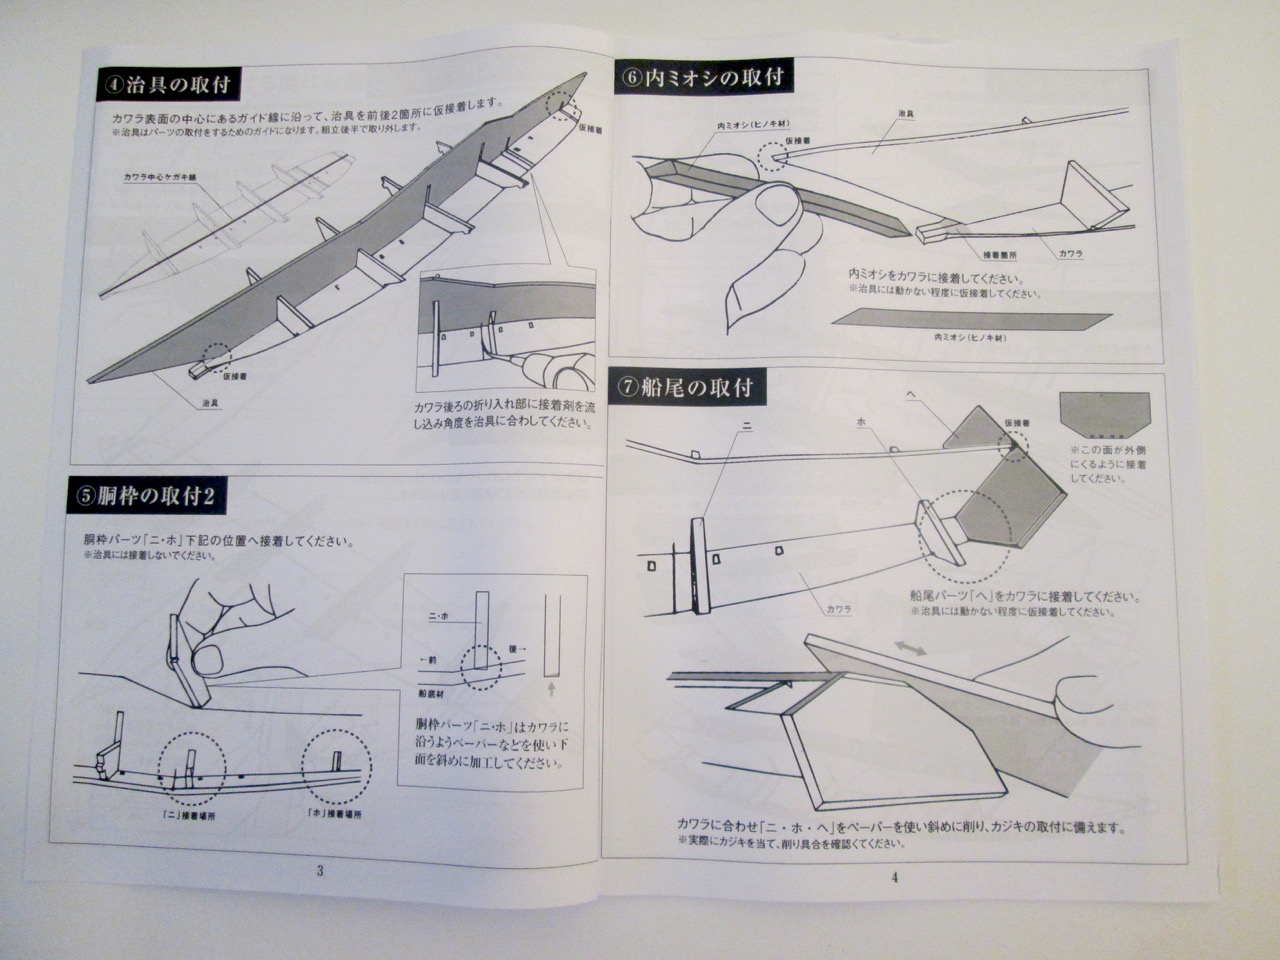
The build begins with the floor piece. There are apparently different regional names for this and I don't know what the name is in the Tosa region. The term カワラ, or Kawara, is shown a lot for it in the instructions, so I assume that's the regional term in Tosa. I'll have to send an inquiry about these things at some point.
The first step in the kit is to bevel the bottom edge of the kawara. To aid in this, there are laser scribed lines. Interestingly enough, the sheet with this part is actually scribed on both sides. I've never seen that in a model kit. This means that the manufacturer had to register the wood and the laser in some way so that the cuts on one side line up with those on the other side.
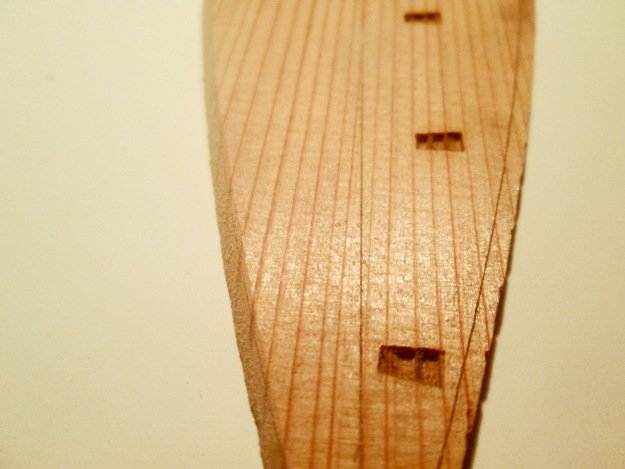
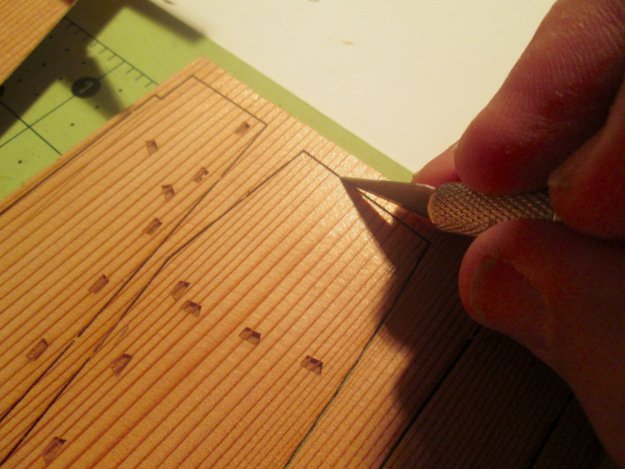
Something interesting about working with the Japanese cedar. Where those dark lines in the grain show, that's where the wood is more dense. When carving, you have to be aware of that because those lines are harder to cut through than the lighter colored wood in between. These dark lines are also harder for the laser to cut through. So, if you look in those etched trapezoidal holes, you can see lines of wood that line up perfectly with the grain. I started to trim out those ridges in the cut-outs. There aren't that many really, so I'll probably continue with that as I go.
The other issue with those lines is that they can make the laser scribed lines very hard to follow. Woody Joe uses laser scribing to mark the beveling lines on their kits too, but they use light color Hinoki, so I 've never had to deal with hard to see scribed lines before.
The next thing is to partially cut through the Kawara at the dashed line.
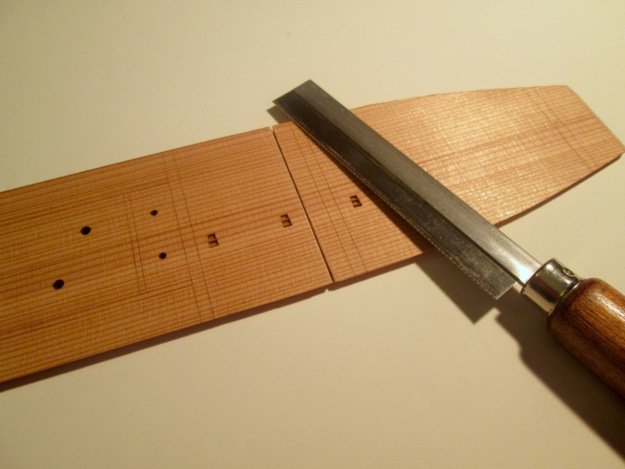
This is where the bottom of the boat angles upwards. In his book Japanese Wooden Boatbuilding, Douglas Brooks describes this as Kirimage (kee-ree-mah-gay), or "cut bending". I don't know about the Tosa boats, but the Aomori boat he worked on used a technique like this, though there's more to it.
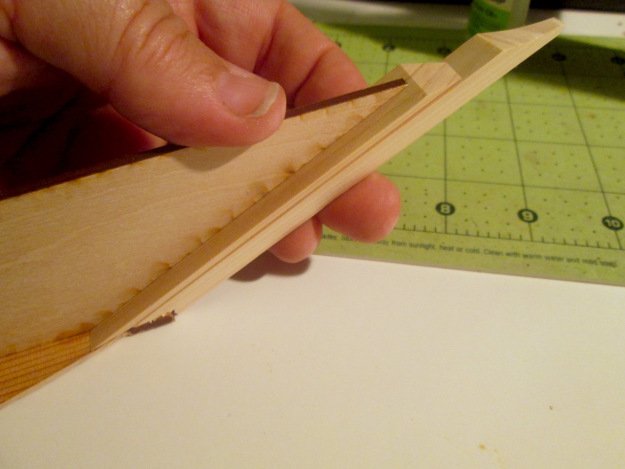
In my case, I thought this was a good opportunity to bring out my Japanese hobby saw, which is a very thin pull-type saw. The problem was that it was too thin. It cut nicely, but didn't leave room for the piece to bend upward. So, I pulled out my old razor saw and I cut the line several times, holding the blade at different angles, so that it would cut more of a V-groove.

With that done, I could add the floor frames. These are permanent frames, thought a long strong-back piece serves as a temporary alignment guide. This was interesting because so many Japanese boats are frameless, or close to it. At some point I'll look into this further. On the real boat, these may have been added after the planks were in place.
There was a fair amount of char on the edges of these and all the other wood pieces. The kit includes a large flat sanding block that made clean-up of these parts pretty easy. I did notice that there was a fair amount of smudging on the wood faces though. I cleaned these up as best I could. I used the sanding block, but tried to keep working very lightly.
I test fit the stem to how it was all going to work. The stem is made up of an inner piece and an outer one. The outer stem gets added later, but the inner one goes on next. I wanted to make sure I understood the design before continuing.
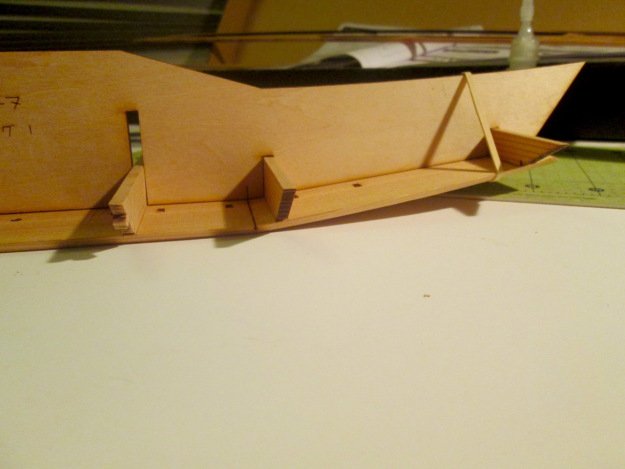
First, I had to made sure the strong-back was properly aligned. The main issue was to keep it centered and perpendicular to the Kawara. The piece is also to be spot glued at the very ends to keep it in place until it is removed in a later step.
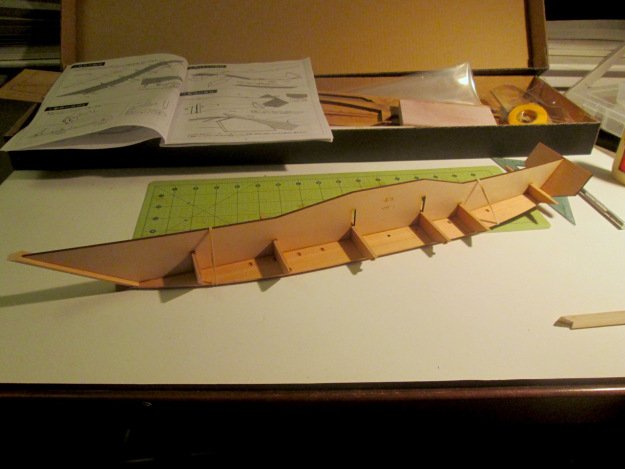
Here's where I'm at now. Steps 1 through 6 have been completed. I have only to bevel the stern most frame and the transom to complete step 7, then comes the lower planking. Japanese boats use very wide planks that are often very thick. On the Tosa wasen, the planks appear to be as much at 18" wide.
I went ahead and started prepping the lower planks. Where I am cutting in the photo, the laser does not completely cut the dark lines of the wood, so I have to go over this with the X-Acto a few times on each side to cut the pieces free.
Clare -
Actually, it makes more sense for me to review the kit here so it's not mixed in with the build itself.
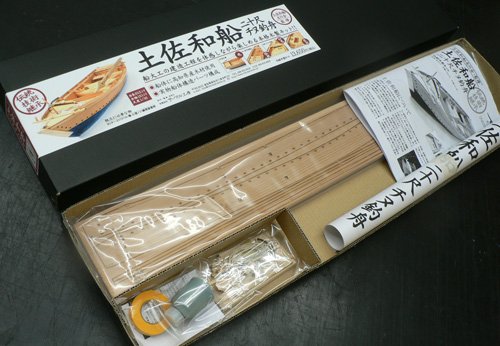
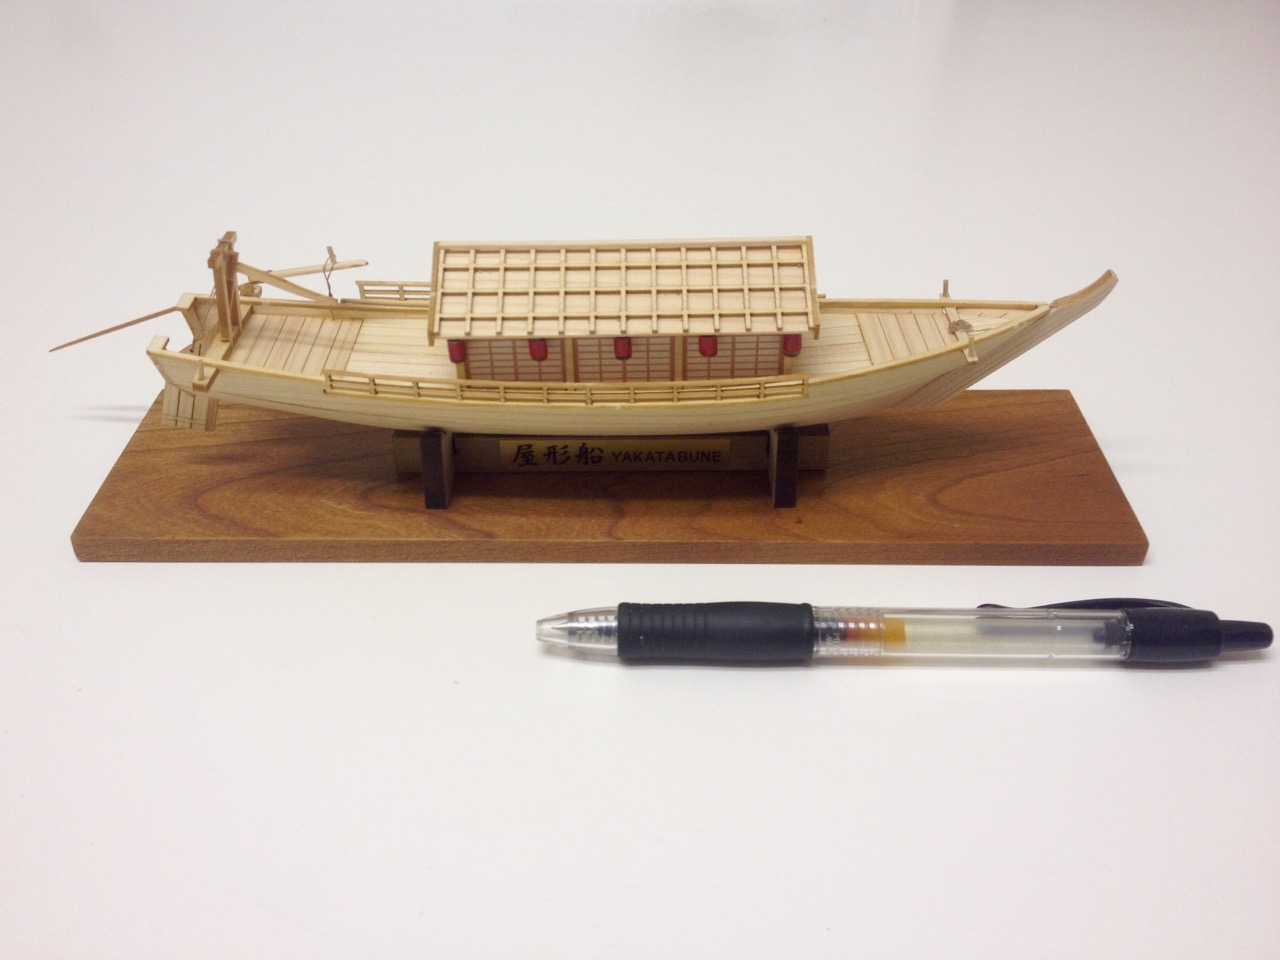
The kit is not all that heavy, about 1-1/2 pounds, but it's in a long box. I think this kicked the shipping cost up a bit, which was just about $30. Still, a ship model kit, particularly one this rare, for around $170 total, is not bad. That's just about what I paid for the Woody Joe Hacchoro and the Yakatabune kits I bought from Zootoyz.

Having ordered through Amazon Japan, the only seller of the kit did not ship internationally, so I had it sent to someone that then re-shipped it for me from Japan and they didn't charge me any service fees. He's done this twice for me and I don't want to impose on him any further. There are companies specifically set up to forward packages from Japan. I just finished setting up an account with one called Tenso.com. Next time, I'll try them out.
By the way, it looks like I may have been wrong about this kit being out of production. I thought it was no longer manufactured because the company that makes it, Thermal Studios, primarily makes large model glider kits and doesn't list the Tosa Wasen kit at all. However, I emailed them about it and if we understood each other correctly, they produce the kit. Perhaps it's more of a local item since they are apparently close to Tosa, Japan, and seem to have some kind of connection with the Tosa Traditional Boat Society.
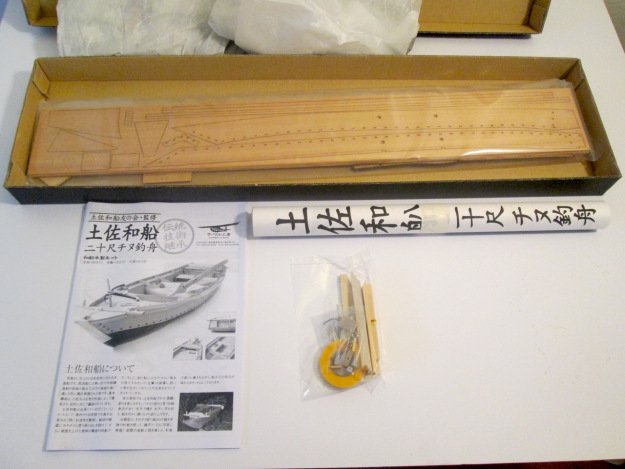
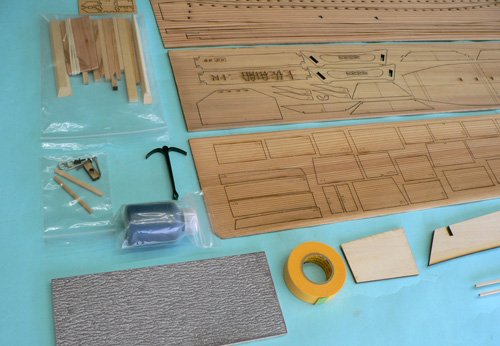
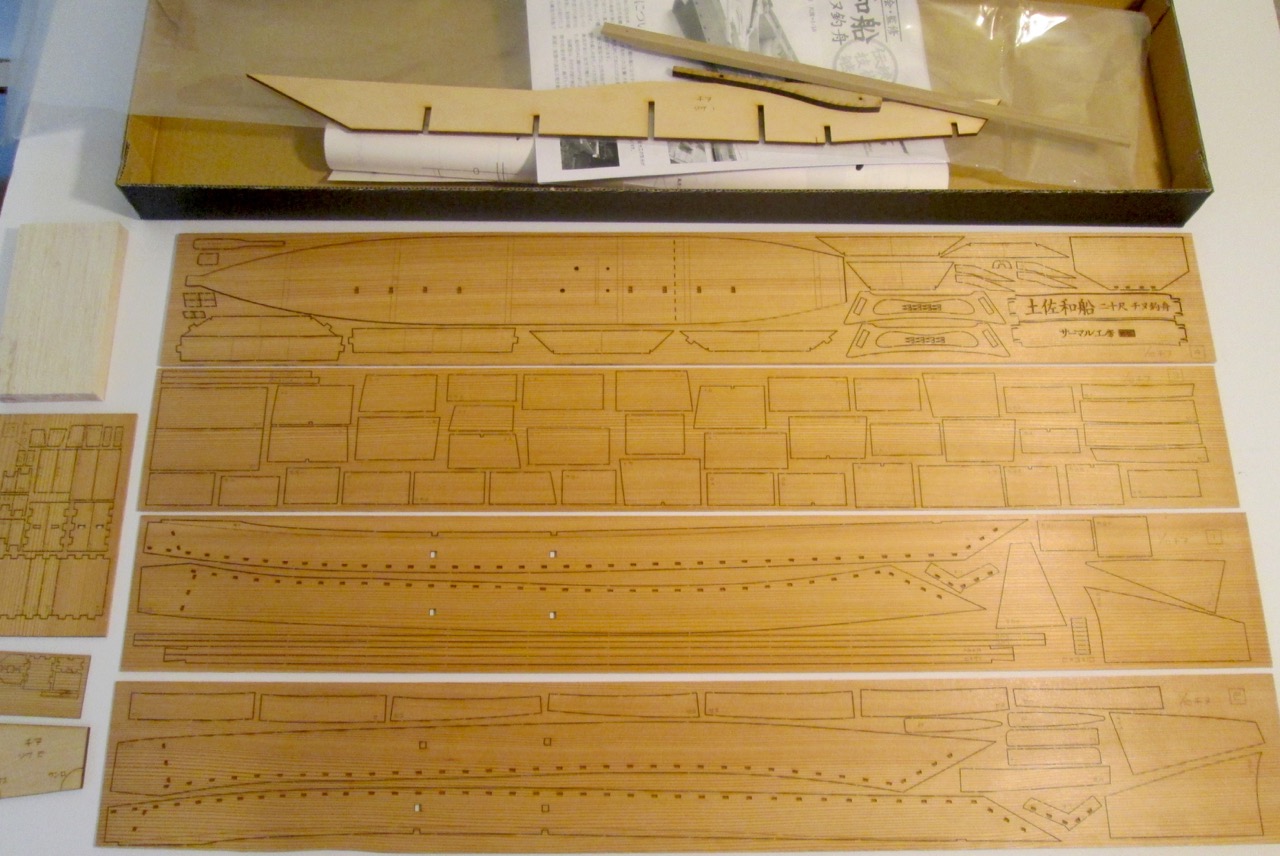
The kit itself is basically made up entirely of several laser cut sheets, plus a small bag with various kinds of parts, some other separate laser cut and milled wooden parts, instruction booklet, plan sheet, and even a sanding block.

The laser cut sheets are made from Sugi (that's "Sue" plus "Gee" with a hard "G") or Japanese cedar, just like the real Tosa boats. Sugi is aromatic, though not as strong scented as Hinoki used in so many Woody Joe kits. The parts are laser etched with Japanese characters to identify them. This makes locating parts a little more time consuming than if they were numbered. But, I guess it's just a matter of pattern matching.
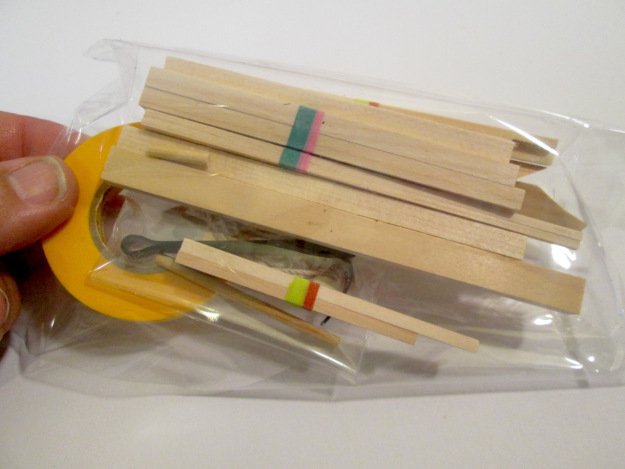
The bag of parts contains all the milled wood parts, all short pieces. Also in the parts bag is the metal anchor, the anchor rope, metal rings and fastener. The kit also includes a roll of yellow hobby masking tape, and for some reason, some plastic applicator tips used for applying CA glue.
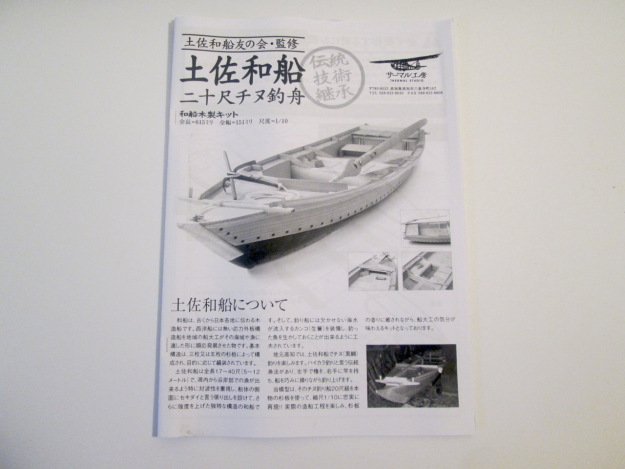
As expected, the instruction booklet is all in Japanese. The black and white printed book is 26 pages long and includes a parts diagram on the back cover, showing all the laser cut parts on their sheets. The diagram is pretty small and you really need a magnifying glass to read it. But, magnified, the part identifiers all appear to be readable. Instructions are divided up into 41 steps, with each step being clearly illustrated and each looking to be pretty simple steps.
Time will tell if the Japanese text printed in the booklet is really necessary or if the model can be build solely by the drawings. But, in addition to the booklet, there is also on large plan sheet that gives a nice overview of the boat at full scale, which, by the way, is 1/10 scale.
Overall, this looks like a really nice kit and it's not that expensive. An additional bonus is that the manufacturer, Thermal Studios, created a blog showing photos of the construction steps. This is really nice because it reinforces the written/printed instructions, giving you another view of the steps. Also, using Bing or Google translators, you can view the blog pages in English (or whatever your native language). This isn't always that great, as the translation can be pretty questionable, but it often helps.
Thermal Studio's Building a Wasen Blog
Having attended Douglas Brooks' talk at the NRG conference this past October, and having been reading through his book on Japanese Wooden Boatbuilding, I can say that this kit looks very authentic and true to the way that the traditional Japanese shipwrights would have actually constructed their boats.
This kit would make an ideal study project for someone who is interested in following the work described in Mr. Brooks' book. Personally, I've been planning on scratch building the Urayasu Bekabune that he discussesin his book. I think that building this kit first will help me a long ways towards understanding Japanese boatbuilding so that I can eventually attempt that scratch project.
Clare
- Cap'n Rat Fink, GuntherMT, Canute and 8 others
-
 11
11
-
Hi Denis,
The real gratings were wood. Iron gratings don't show up until the steel hulled ships of the late 19th century.
The brass gratings in the Amati kit I think were intended to create a very accurate representation of wooden gratings. The idea is not to leave them brass, but to paint them appropriately. As I recall, the gratings show fine detail in proper scale.
Personally, I would consider using them, as there's no real advantage to buying manufactured wooden ones. Most of the time, the wooden ones are out of scale and may not fit as precisely as the kit design intends. The only time I'd consider wooden ones is if you got ones produced by Chuck Passaro's Syren Ship Model Company in 1/64-scale, or if you were going to make your own, which is a bit of a process.
Clare
P.S. This thread is posted in the wrong topic. Should be in the Deck Furniture or Kit Discussions sections or something similar as it is not a build log.
-
Well, the kit showed up on Friday, wouldn't you know it! I wasn't home and it was shipped via EMS, a fast Asian shipping service that requires signature, so I had wait until Saturday to go pick it up at the post. But, I now am in possession of the kit and it looks great!
I'll start a build log on it immediately, starting with an overview of the kit.
Thanks all,
Clare
- Ryland Craze, mtaylor, Canute and 1 other
-
4
-
Generalizing all Italian as having bad instruction kits does a disservice to kits like those of Amati's Victory Models line. And if you look at say, a Mantua kit, is it really any worse that 70% of Caldercraft kits? Only three Caldercraft kits that I am aware of have excellent instructions. The majority have 6 printed pages and half of those are parts list.
I think the real dividing line is between old products and new ones. Many of the newer kits have better instructions in general. However, you're almost never going to find great written instructions in a European kit because they have to be made to serve a large population of diverse languages. As a result, they have to rely on a great deal more visual instruction.
People in the USA are a bit spoiled because it's easier for manufacturers here to write instructions as they only have to care about writing in English. It's not the way of the world.
Also, there's a tendency to think that it must be easy to write instructions and that it doesn't cost much. But just writing an article or two on building a model, I can tell you that it's time consuming. It's a bit of a struggle to decide what needs to be included and what to leave out, because you can't give complete instructions on every little step. Then to have to get it translated into multiple languages and make sure the translation even makes sense?
The trend seems to be to move further toward the visual guide – follow the photos. No language issues to contend with. No writing, typos, editing, translating. It's just the way things are.
The best way to learn is to start with a simpler model and figure out what kinds of issues you run into a as a ship modeler. As has been said before, after a few models, you can pretty well just work from the plans. I agree that Midwest are the best to start with, but sadly they're going to be increasingly harder to find.
I usually recommend getting a couple ship modeling books like Ship Modeling Simplified by Frank Mastini to start with. But, of course, if you're already here on MSW, then just ask questions, post build logs and soak up the knowledge!
Clare
- mtaylor, Canute, skipper1947 and 3 others
-
6
-
Happy Thanksgiving All!
Unfortunately, that means there's no mail service today and I just checked tracking and the kit just passed through US customs in neighboring San Francisco yesterday. It's so close I can taste it! It's a little like chicken...
Well, I should have it by Saturday anyway. So, I'll just have to be patient.
For anyone as anxious to see more, as I am, here are a couple of the photos from the Amazon-Japan listing I ordered from:
Clare
-
Thanks everyone. I'm anxious to start a build log, but I should probably wait until I actually have the kit in hand!
So, in the meantime, I found another blog with photos of a finished model that looks really nice:
http://thermal2.exblog.jp/17591843/
If you have trouble connecting, or just don't feel like visiting the site, here's a photo from it:
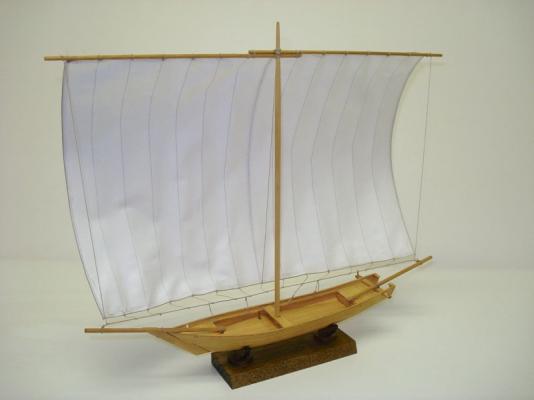
What I really like about this kit is the scale. It's not just that 1/10 is a big scale. It's also the same scale that traditional Japanese boat builders generally use for drawing their plans. Apparently, these are usually drawn on planks of wood and only show the bare minimum information necessary, which is less than what we're used to.
I've been in communication with Douglas Brooks and I should make an attempt to scratch build a traditional Japanese boat, but this will help me get a better sense of how they go together. I have to say also that the Woody Joe kits I've built have definitely helped me develop a better understanding of Japanese traditional construction. Even though the kits aren't built in the same manner, the overall design is more apparent to me now.
In fact, I'm feeling like I'm almost able to build one of the complicated coastal transports from scratch. I see at least an attempt on the horizon... okay, it's a pretty distant horizon.
Time for me to go back and imagine where the kit might be in its transit!
Clare
-
Okay, I just had to share about this. I've seen this blog before that features a 1/10-scale traditional 20 foot long Japanese fishing boat from southern Japan. This looks like an awesome model and when I first ran across this blog, I was sad to discover that the kit is apparently out of production:
http://thermal2.exblog.jp/18578474/
Then, today, Kazunori Morikawa of zootoyz.jp posted the link on his Facebook page. I saw this and just HAD to take another look to see if I could find the kit. I went onto Amazon.co.jp and THERE IT WAS! Only 1 available. At around $140, it was a lot cheaper than other projects I've been spending money on, so I grabbed it up. I have someone in Japan who can ship it to me so I had it shipped there. I hope to have it in my hot little hands in less than 2 weeks.
This kit is not a Woody Joe kit, but Woody Joe's Hacchoro and Yakatabune kits are probably most similar to it. This kit is rare enough that I may just have to build a copy of it from scratch and keep the original intact.
Here is another Japanese blog site with a few photos of a finished model:
http://thermal2.exblog.jp/17591843/
I'll definitely have to start a build log for this one if all works out. I'll report back later!
Clare
- Landlubber Mike, RichardG, gjdale and 11 others
-
14
-
grsjax, I remember the kit, but unfortunately, I never built it.
I built a couple of the original Laughing Whale kits, the Sharpie and the Swampscott Dory. The Dory is now made by BlueJacket. I also still have the big Laughing Whale kit of the Muscongus Bay Lobster Smack in the closet. Had it for something like 15 years thinking it would be neat to build it for RC sail.
In general, the kits are a bit rough in the die-cut area, but their subjects are nice boats. The plans are pretty simple, but usable. Instructions are very basic as I recall.
With a little work, should make a fine model. Hope to see a build log soon!
Clare
-
Dr. Per, they still list it on the website. But, I've contacted him on two occasions over the past couple years and he says he doesn't make them any more. I don't know if it's good or not, but was willing to try it out. I was finally ready to bight the bullet last year or so and found out they were discontinued.
Clare
-
Hi Dr. Per, don't take it too hard. It's difficult to overcome a name that is so connected to such an extremely successful show.
That said, perhaps we can all work a little harder at not taking over another person's thread with off-topic comments?
I myself have purchased a few of the Vanda-Lay products. When working on my first scratch builds, I used their Acra-Mill Plus set up to help me make my own blocks. It actually worked quite well for cutting the strips to size, thicknessing them, and then slotting both single and double sheave blocks and also slotting them for the stropping rope.
The AcraMill Plus uses the same "universal" tool holding clamps, which I agree aren't a great design. They do work, but as you said, they can mar the plastic of the Dremel tool. Also, it's possible to clamp too tightly and affect the motor itself.
But, the parts are well machined, and the Vanda-Lay tools are particularly useful when you don't have much room to work.
They also used to make a Treenail Maker that I wish was still available.
Very good review!
Clare
-
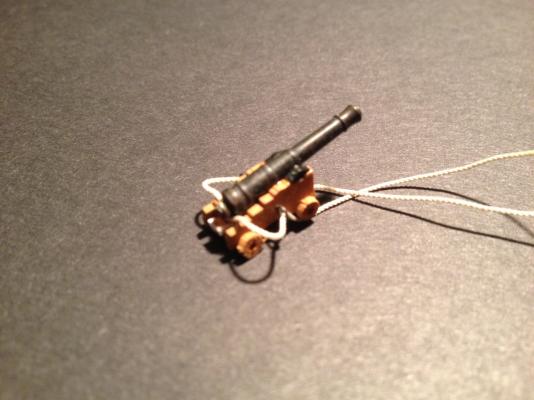
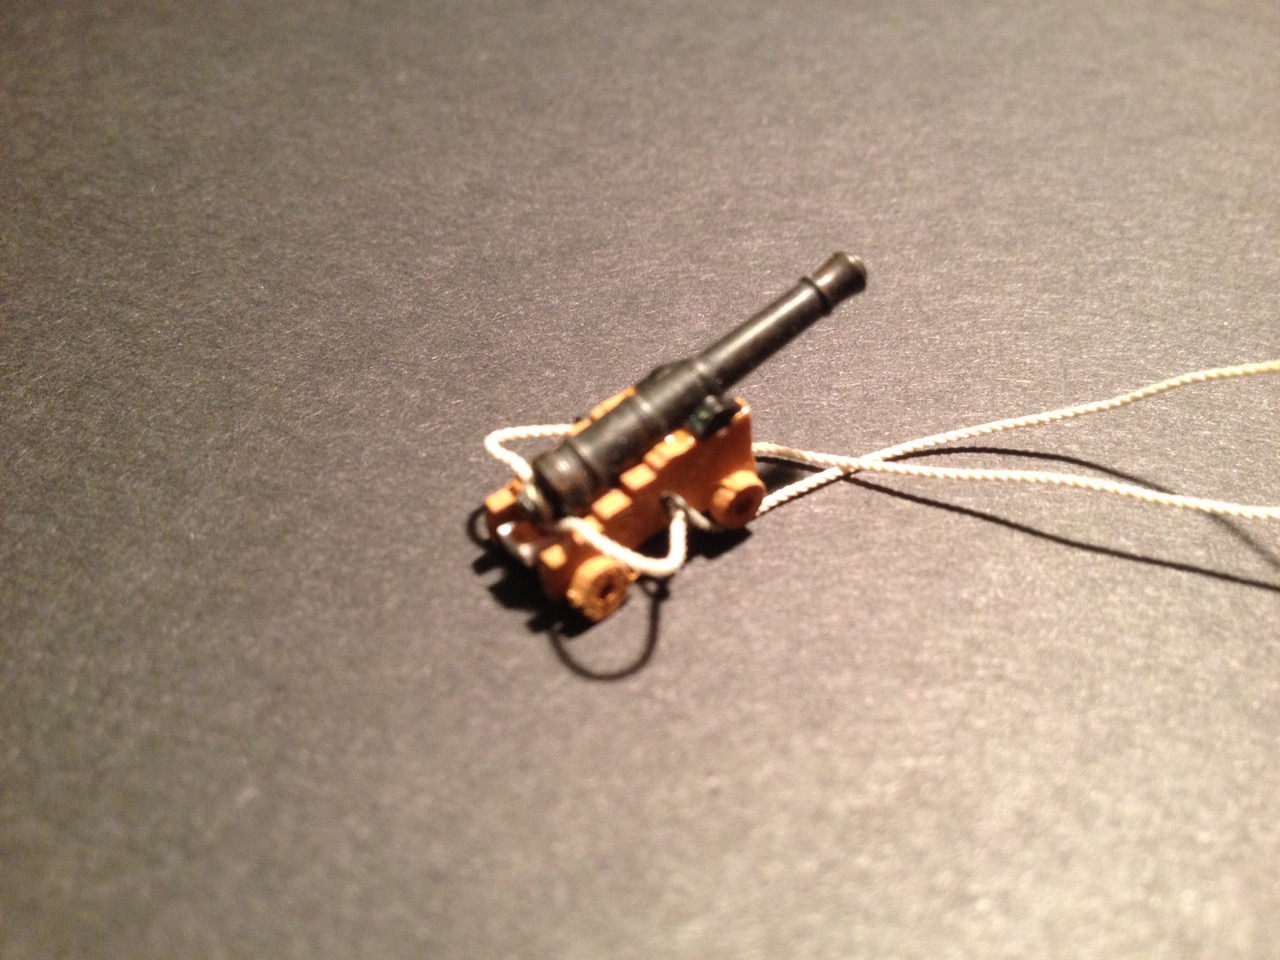
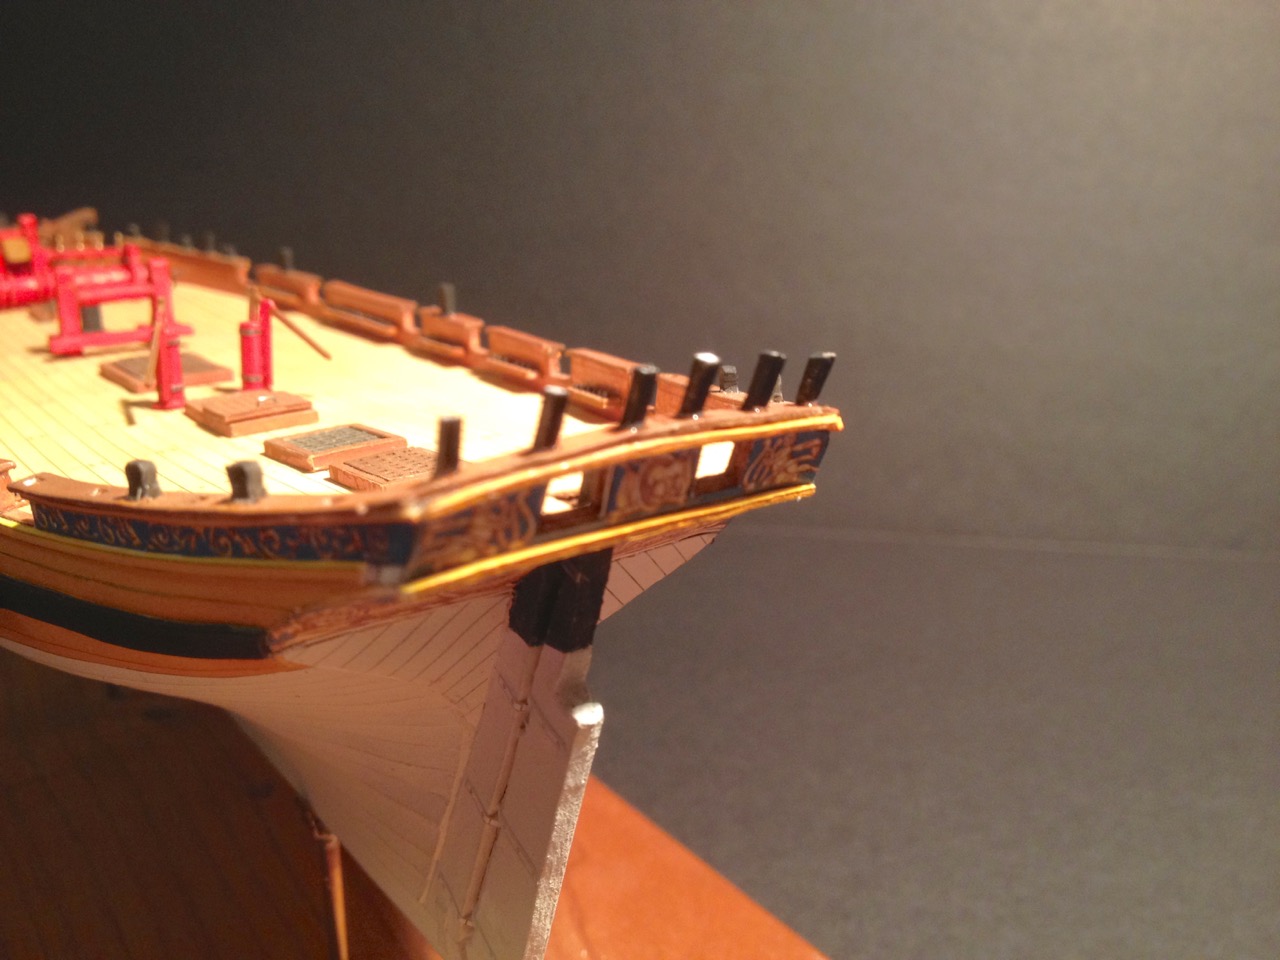
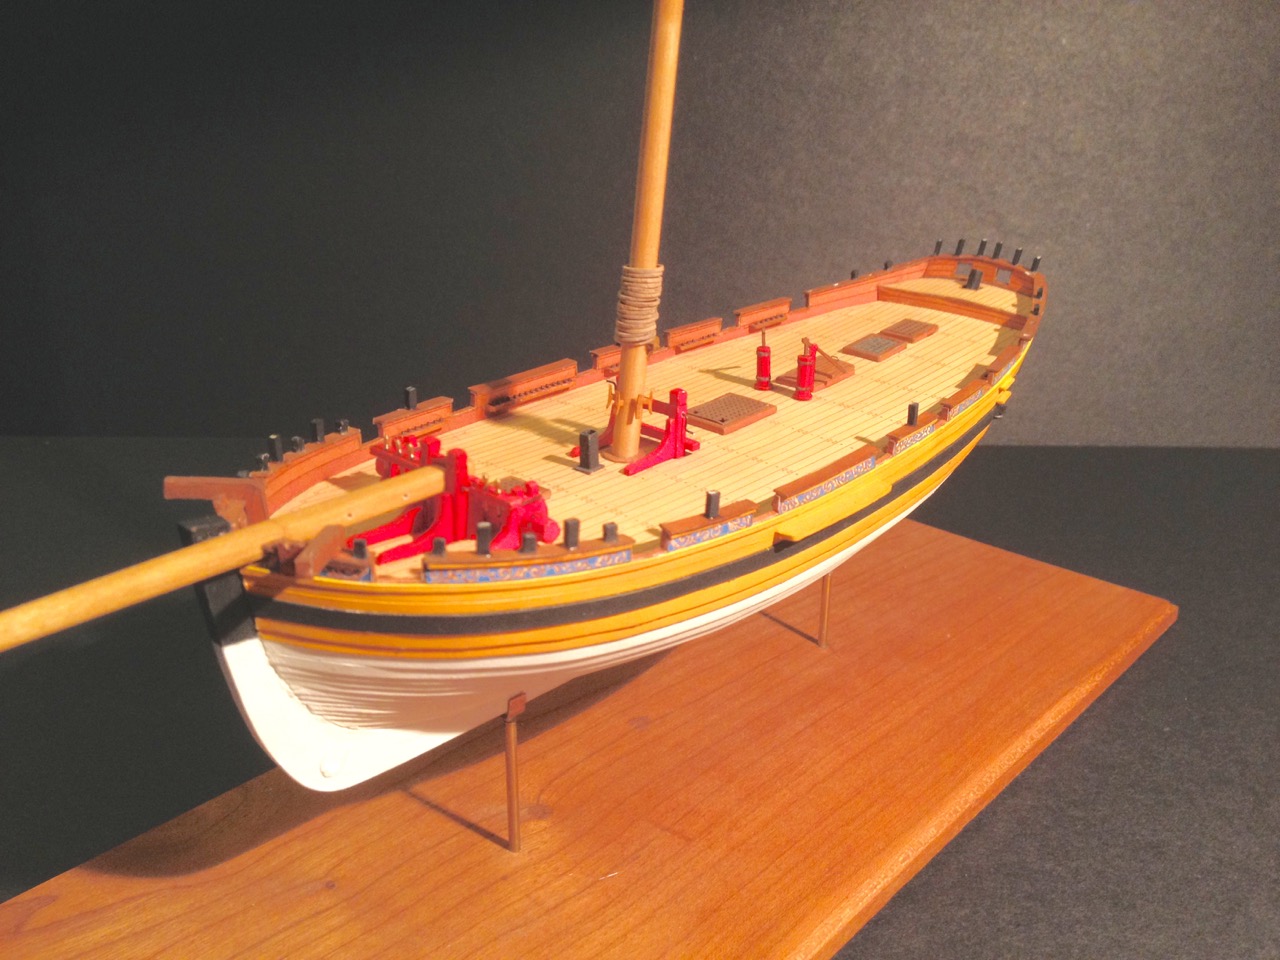
The taffrail is now complete. Was a bit of a challenge getting it all together, but it seemed to turn out okay. I still have some small details to add, mostly the beds for the mounting of the swivel guns. Besides that, nearly all the hull detail on this model is done.

Next step will be to add the cannons into place. 1/96 is probably too small for me to rig tackle blocks, but I'll think about it. This ship has 12 guns to rig. It's not like it's a 38 gun frigate, and there is a lot of open space on the deck, so I'll have to give it some thought.
Also, rigging is coming up pretty quick and I have to start working on the shrouds and adding blocks to the mainmast. More on that next time.
Clare
- ianmajor, Canute, Mirabell61 and 11 others
-
14
-
Didn't do much on the Alert while finishing up the Yakatabune model. But, now that that's out of the way, time to put some work in on the Alert again.
This year, I decided not to risk any damage to the model by bringing it to the NRG conference, but a number of people asked about it. So, I kind of regret not taking it. For one thing, it serves as a great advertisement for Shipyard paper model kits in general. However, this model is far enough along that I now need something in the earlier stages of construction again. I do have an HMS Mercury kit in 1/96 scale that will probably do the trick. I also have the GPM detail kit for it. Plus, I believe that there's a set of sails and a masting kit at Ages of Sail that's been part of a box of stuff that's just been hidden on a shelf for the last year and a half. So, that may be the next background paper model project.
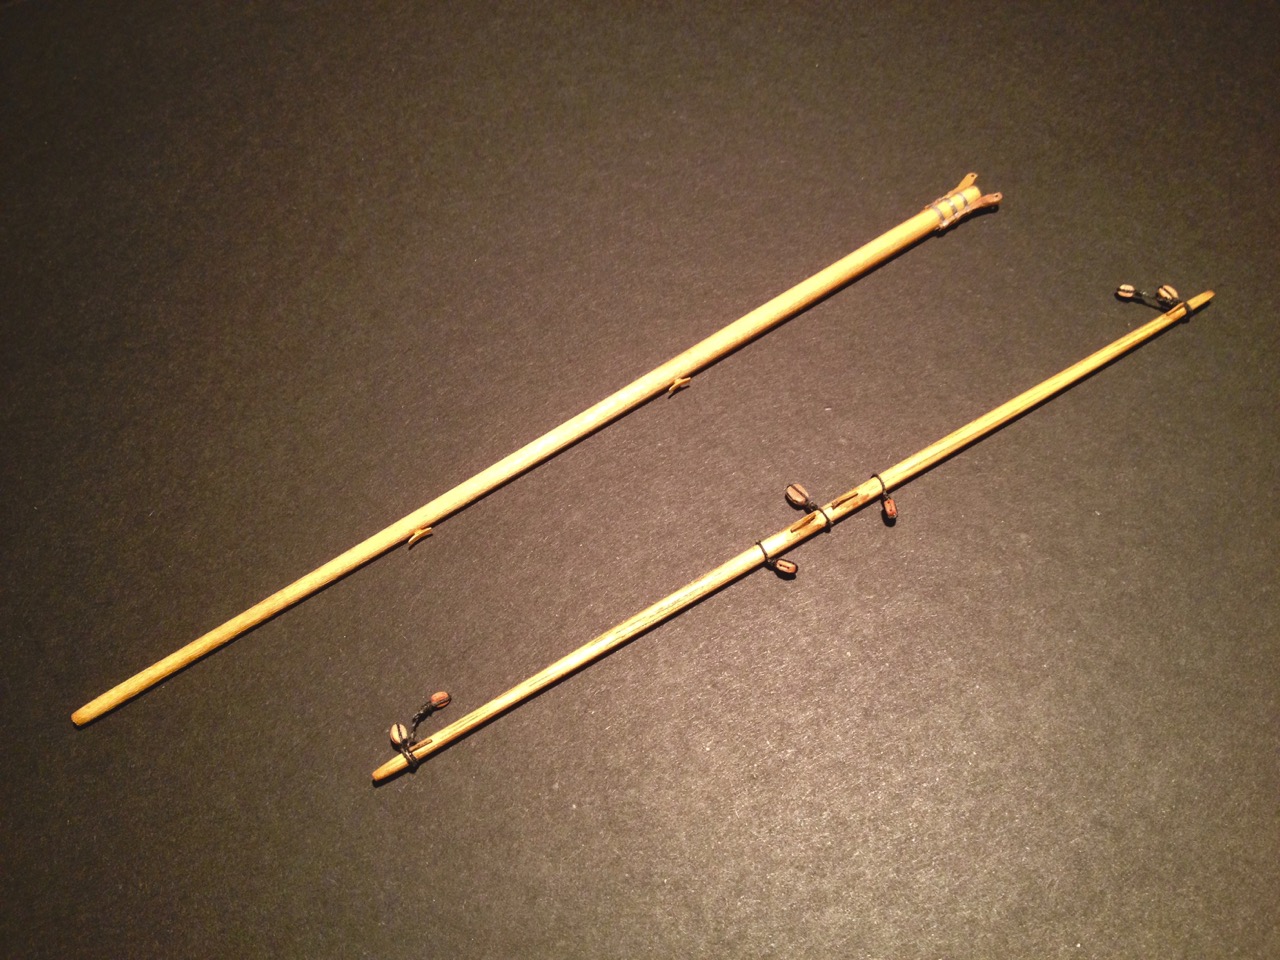
In the meantime, I cut a thin strip of photo paper that I printed a black line on. I then painted the edge of the thin strip and cut it in short length to serve as trunnion caps on the Alert's cannon carriages.
I've also been working on the spars and added the yard to the topsail and the gaff to the mainsail. I also added swiss pear blocks to the spreader yard, but I've been feeling like I want to make as much of the model from paper as possible. So, I'm going back and adding paper blocks in place of the swiss pear ones. They don't look as good, but the more of the model that is paper, the better, since it IS a paper model.
I've also started adding the stanchions of the taffrail that surrounds the quarterdeck. This is one of those things where I "thought" myself to a standstill. Having thought less about it, I've now started to make a little progress again.


I'll swap the blocks and see if I can't finish the taffrail soon. With that and adding the cannons done, it will officially be time to rig.
Clare
-
Bob, your Higaki Kaisen is looking great. Sorry you didn't make it to the conference with your model. I was hoping to meet you.
As it was, this year's conference was sort of the opening of Japanese traditional boat models. Speaker Douglas Brooks gave a talk that was extremely well received and he was very happy about how well the conference went for him. I think he sold almost all the books he brought. There were two models he brought that were built by his teacher in Japan, so there was some Japanese boat models there.
Any thoughts of making it to next year's conference in San Diego?
Regardless, I'm enjoying watching your progress on the model and getting some inspiration from your work!
Clare
- Ryland Craze, GLakie, mtaylor and 4 others
-
7
-
-
-
-
-
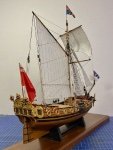
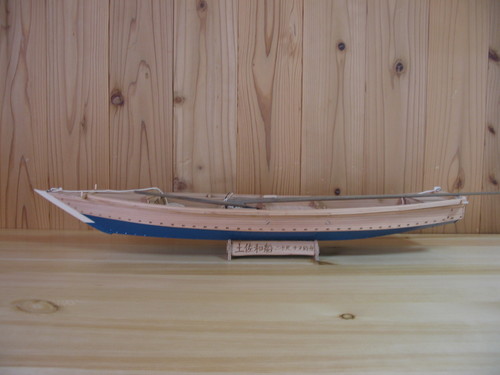
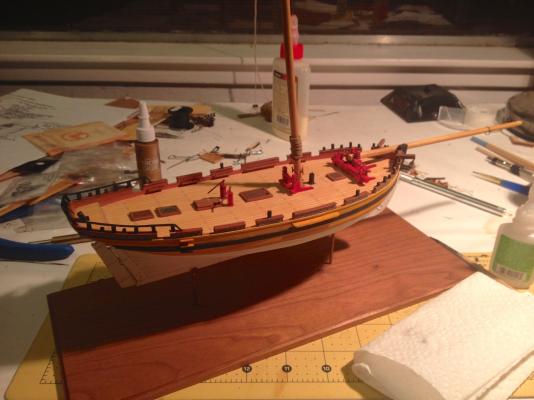
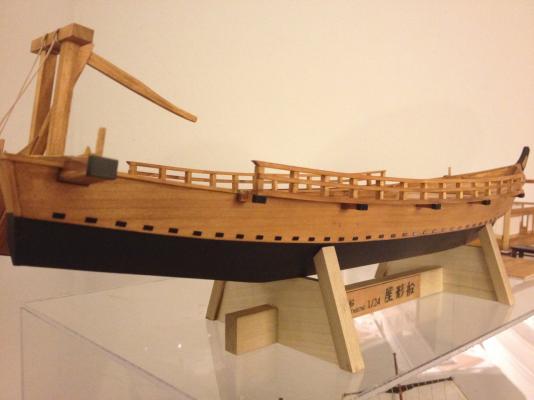
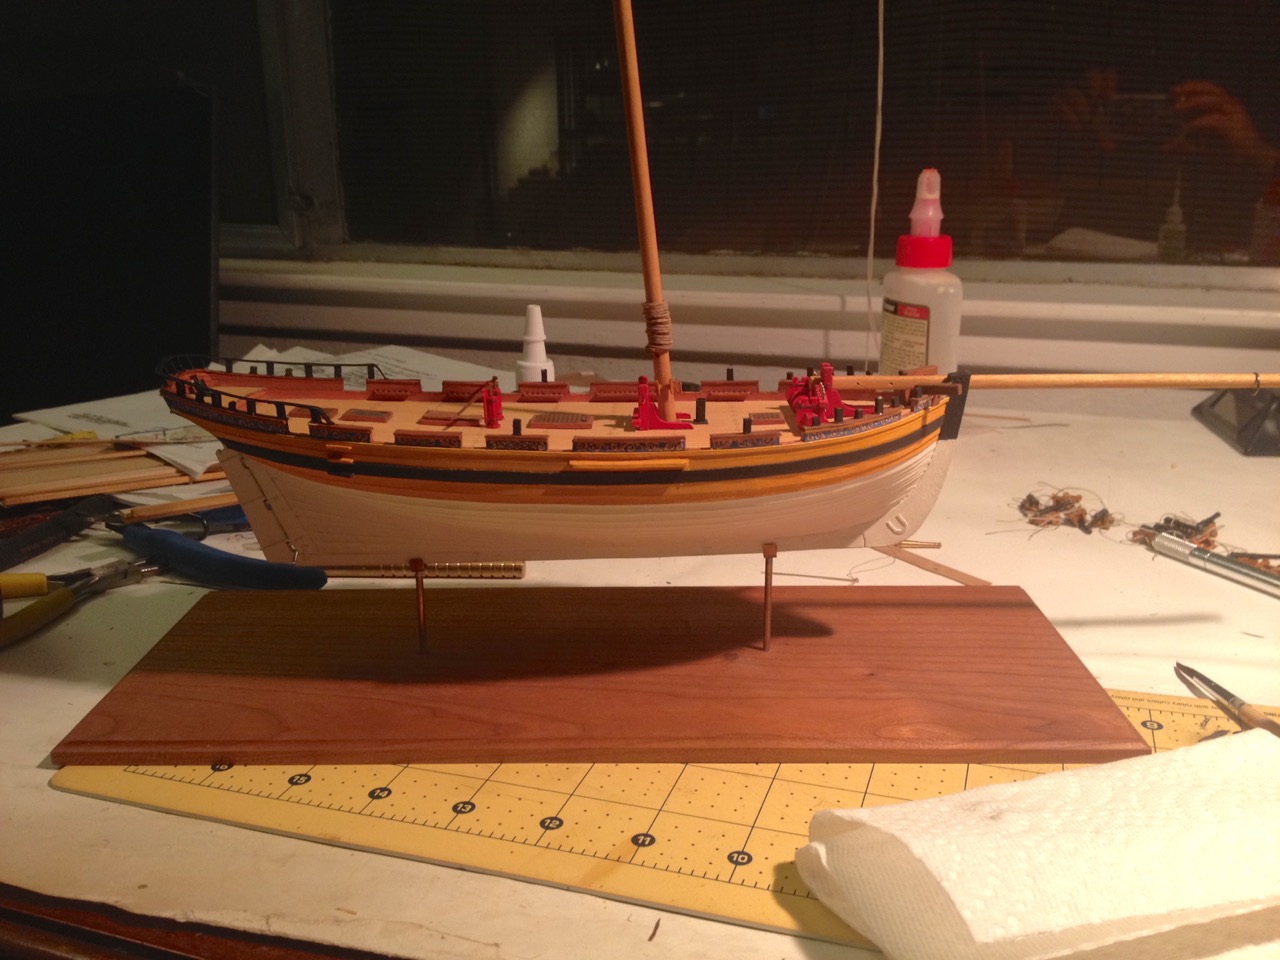
Well, I'm just going to jump to the end of the build here because I'm there! I added some paint details inspired by the Japanese paintings of these boats in Edo times. Yesterday, I whipped together a display pedestal to match the two I built for the Higaki Kaisen and Hacchoro models.
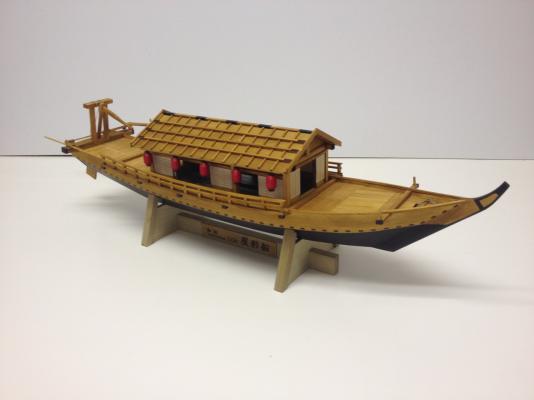
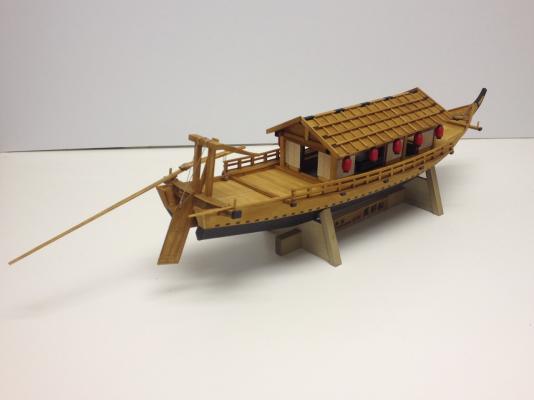
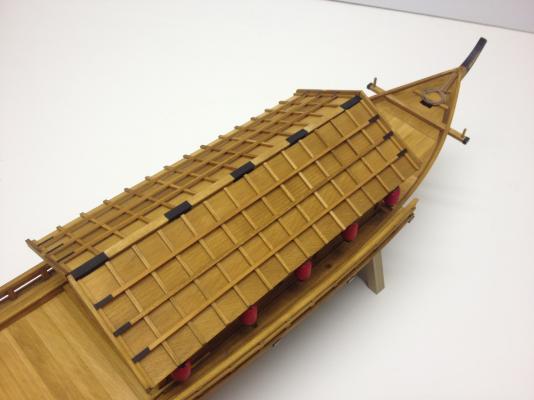

Now, I can get back to other projects for a bit and experiment a bit with ways to make the hanging lanterns inside to light up the interior a bit. Pretty hard to see in there right now.
At this point, I'm mostly out of larger scale updated Edo Period Japanese boat kits. However, I do have two of their older coastal transport kits (Sengoku Bune), which pre-date laser cutting. Those kits are larger than the Higaki Kaisen. What I find interesting is that they are also more like traditional ship modeler's kits. That is, they provide patterns for cutting the hull strakes from sheet wood, frames are not pre-cut, but have to built from posts and beams, etc. Many parts are pre-cut, but there is no weight or space wasted on die-cut sheets. Instead, all the pre-cut parts are neatly packaged for you.
There were two of these Woody Joe coastal transport kits. The Kitamae-bune, is now out of production, and hopefully, we'll see an updated version soon that's as nice as the Higaki Kaisen. The other is the Sengoku-bune, which they still sell. This one is kind of a generic version of the coastal transport, not quite as large as the Kitamae-bune, which operated from ports along the Western shores of Northern Japan.
Either of these would make a better display model than the Higaki Kaisen because they are larger. They are incorrectly labeled as 1/30-scale kits, but are closer to 1/53 to 1/60-scale. Been thinking that a 1/48-scale model would be ideal for display purposes.
Also, it may be time to try to scratch build a boat based on the work of boatbuilder Douglas Brooks, who'll be speaking at the NRG conference in a couple weeks.
I'll keep you posted!
Clare
-
-
Hi Druxey, I thought it would be a lot more difficult and time consuming than it's turned out. It's a good thing I was dwelling on the one translation in the instructions. Otherwise, I'm sure I would have done things a much harder way!
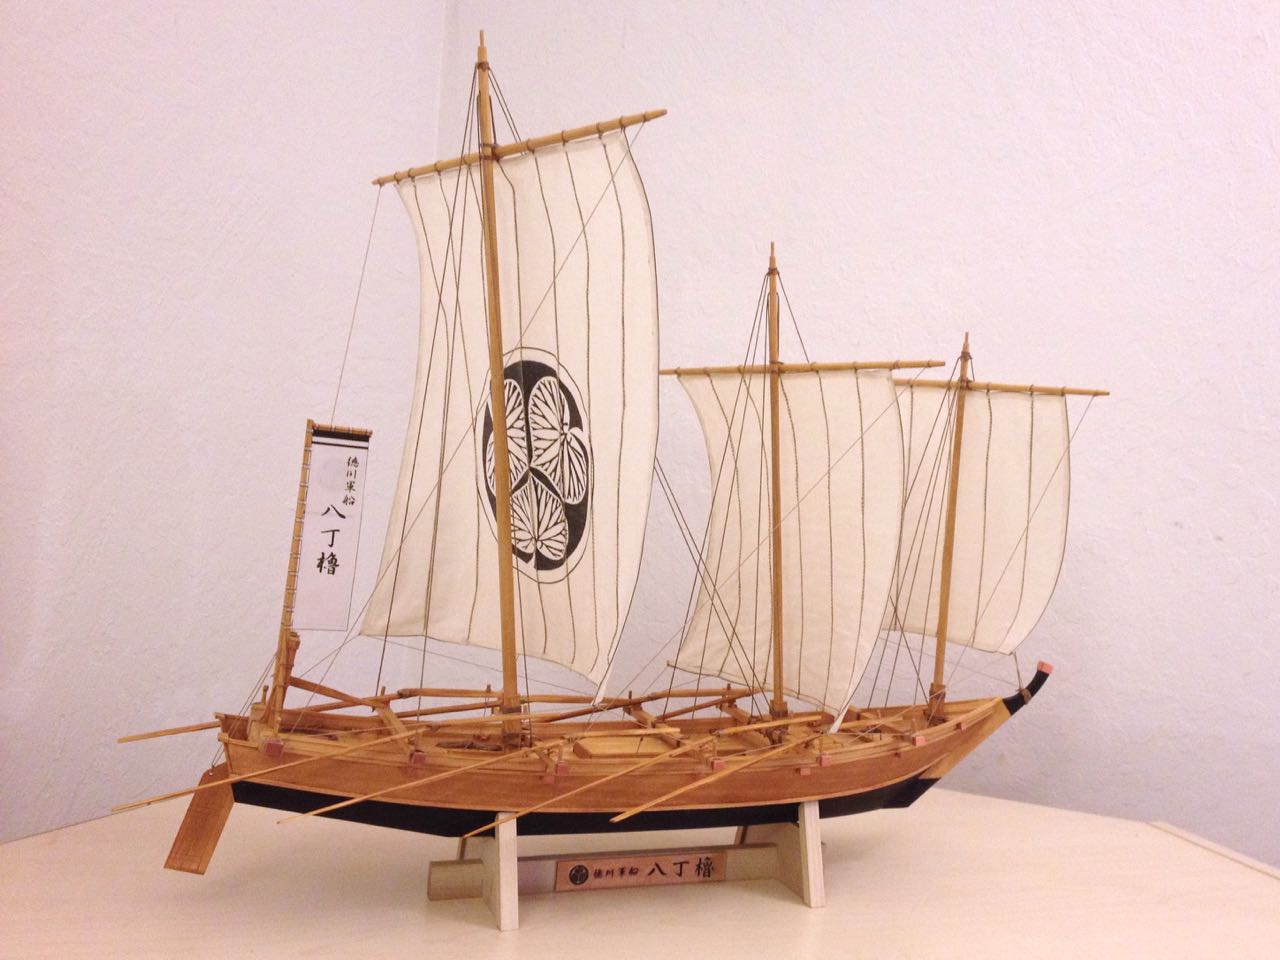
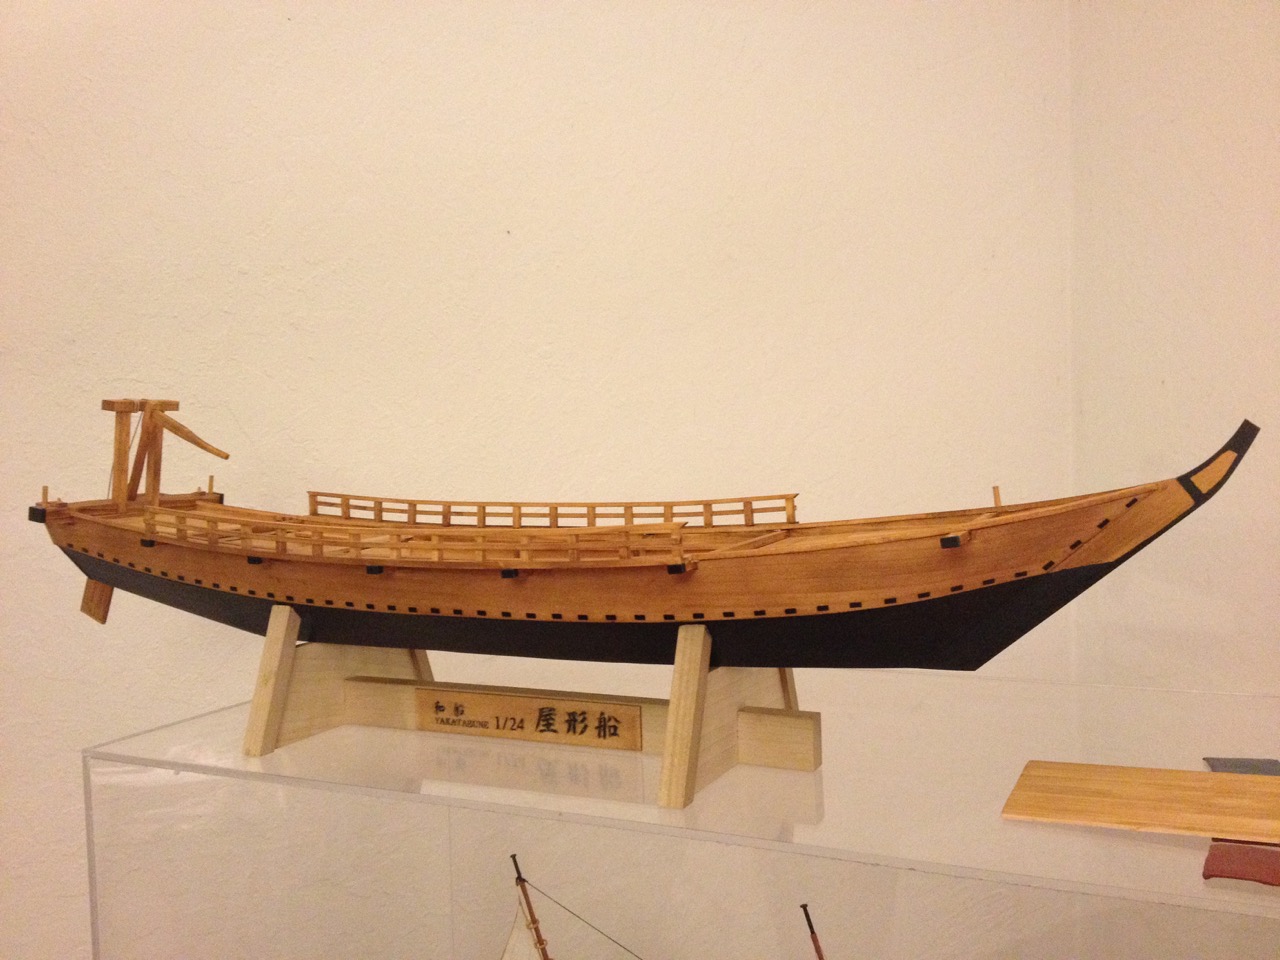
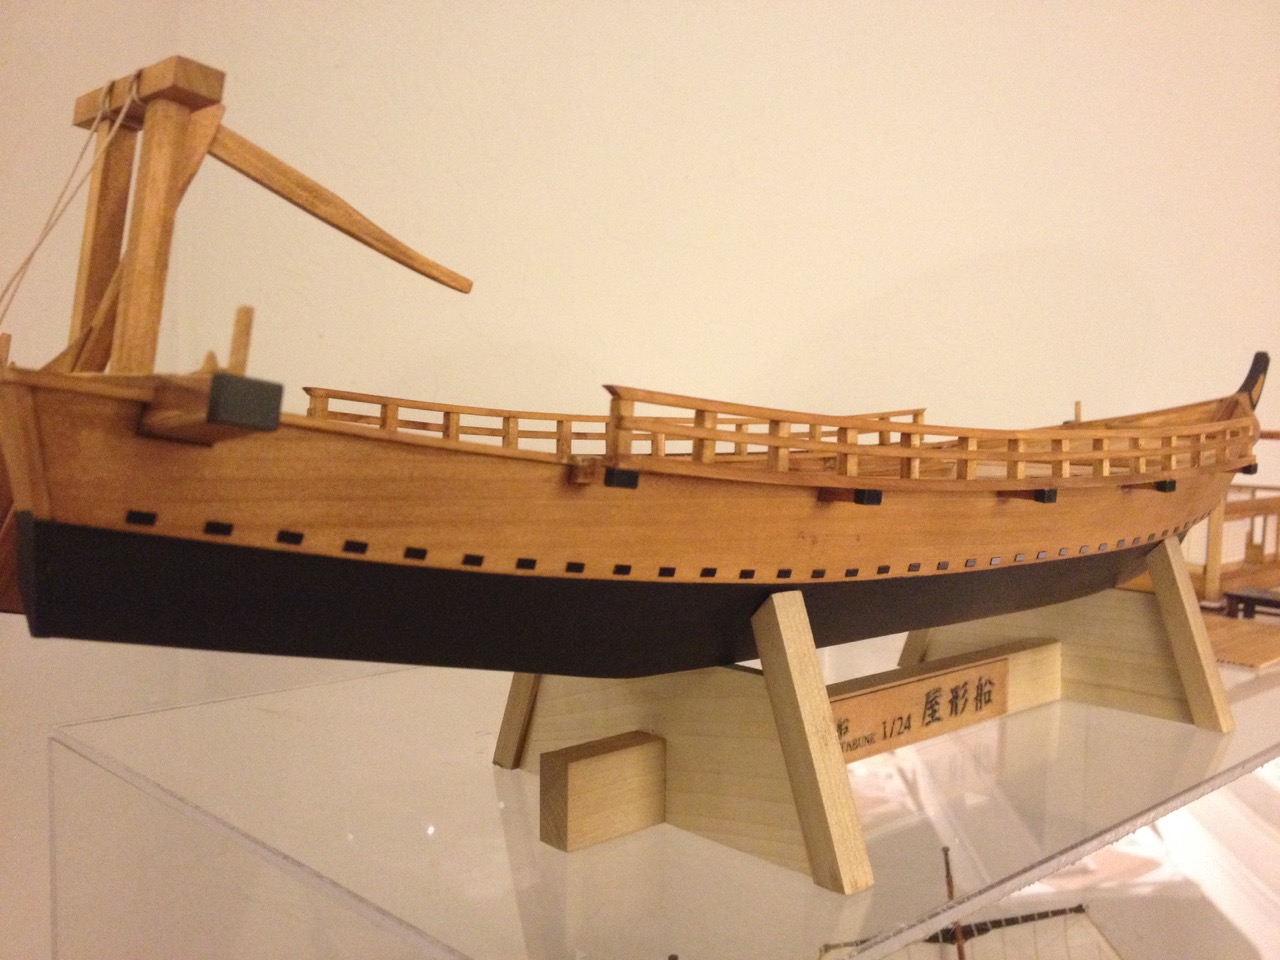
Jeff, here's the Higaki Kaisen I was referring to along with the other Woody Joe kits I've built since...
Higaki Kaisen
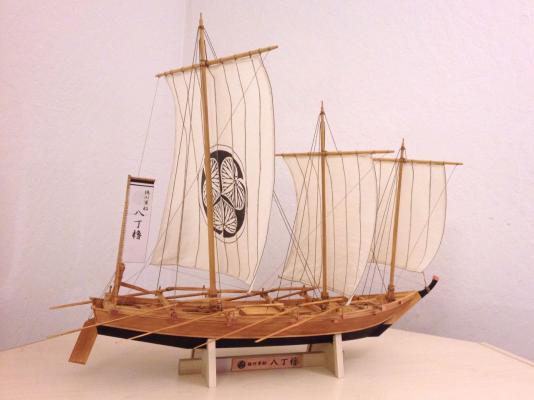
Hacchoro - Fishing Boat
Hobikisen - Fishing Boat mini-kit
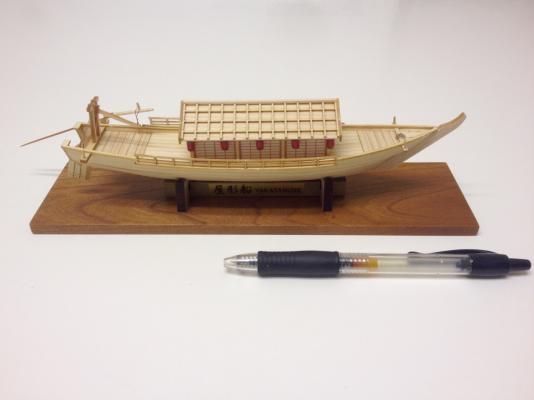
Yakatabune - mini-kit
Clare
P.S. Make sure to check out Bob Riddoch's Higaki Kaisen build here: http://modelshipworld.com/index.php?/topic/7020-higaki-kaisen-bob-riddoch-woody-joe-172-scale/#entry206798
-
Hi Jeff, thanks for the nice comments. You know, I wasn't into Asian ships or watercraft either until about 2 years ago when I found Woody Joe's Higaki Kaisen kit and some articles about the ships. Now, I can't stop!
The next Japanese watercraft I do will either be an attempt to scratchbuild a small Japanese boat, while learning how the actual boats were constructed, or I'm going to build another ship like the Higaki Kaisen, but one that is a larger scale.
Clare
-
Thanks Bob. I think this is working out pretty well. The model is supposed to have a row of plates at the base of the upper plank as well as the lower plank. But, since I've painted the lower plank black, I'm not sure that it's necessary to add the plates there. Real plates were actually inserted into recesses, and I know that on many boats, the lower recesses were often filled with putty instead. I presume that would then be painted over after the puttying.
The trick after all this is done is that there were often plates, or maybe they were just painted areas, on the deck house too. Not quite sure how I'll deal with that yet.
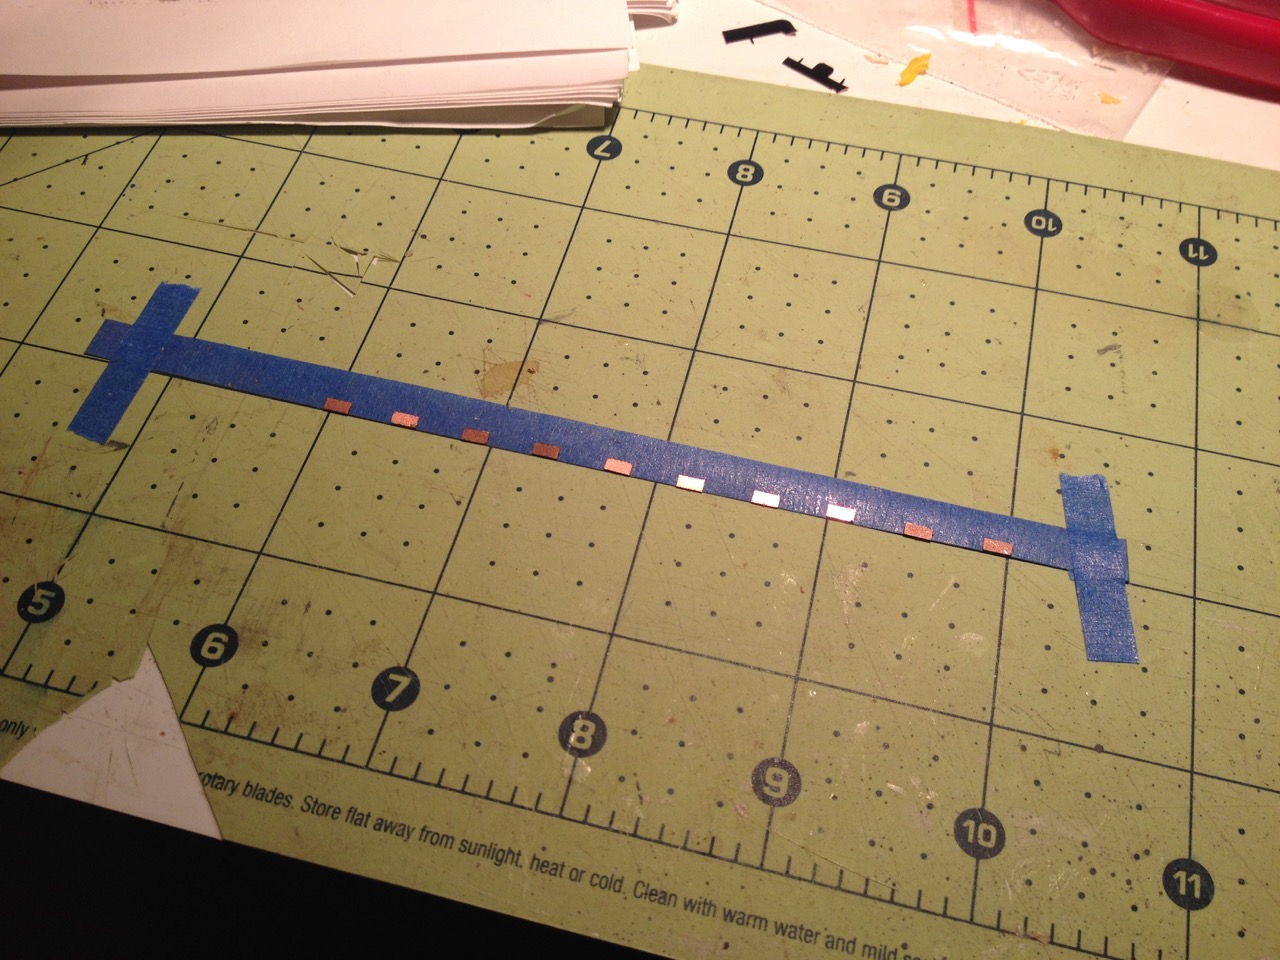
But, in the meantime, I was able to finish off the row of plates on one side of the boat. Turns out that a section of text I was having trouble translating was telling me to do pretty much the following:
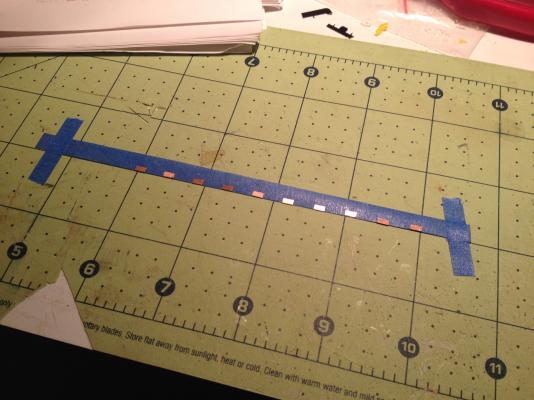
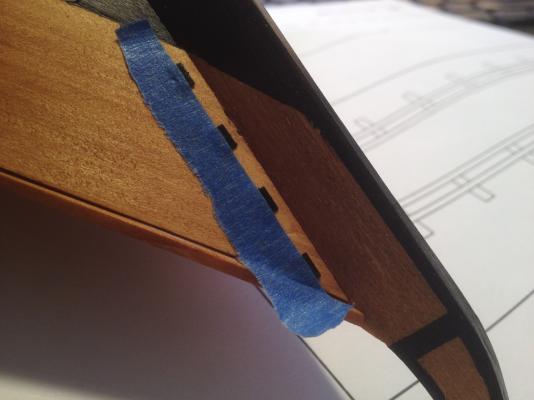
Laying out a strip of masking tape with sticky side facing up, in my case I chose blue painter's tape, I taped the tape down to a flat surface and placed one of the copper plates on the sticky face, right at the edge. Then, using the plans as a guide, I laid down copper plates with 7mm spacing in between.
I trusted my skill with 5 minute epoxy since it's viscous enough for me to control and to keep a very thin layer, so I started with a needle, putting just a touch onto each plate, then going back and spreading across the plate with the side of the needle, regularly wiping off excess from the needle. I then peeled the tape up and laid the tape, sticky side down, along the edge of the plank, so that the plates were held in place in proper position until the glue set.
I think the Woody Joe instructions suggest applying instant adhesive one plate at a time and then rolling the tape down so that it holds the glued plate into place, then applying to the next plate, and so on.
This actually didn't take all that long. I carefully peeled up the tape after the glue had set, but while I could still push the plate slightly with my thumb nail to straighten and make final adjustment.

With this one side complete, I feel like I'm nearing the final stretch on this model!
Clare
Edit: Forgot to add this shot of how I was using the tape method at the bow...


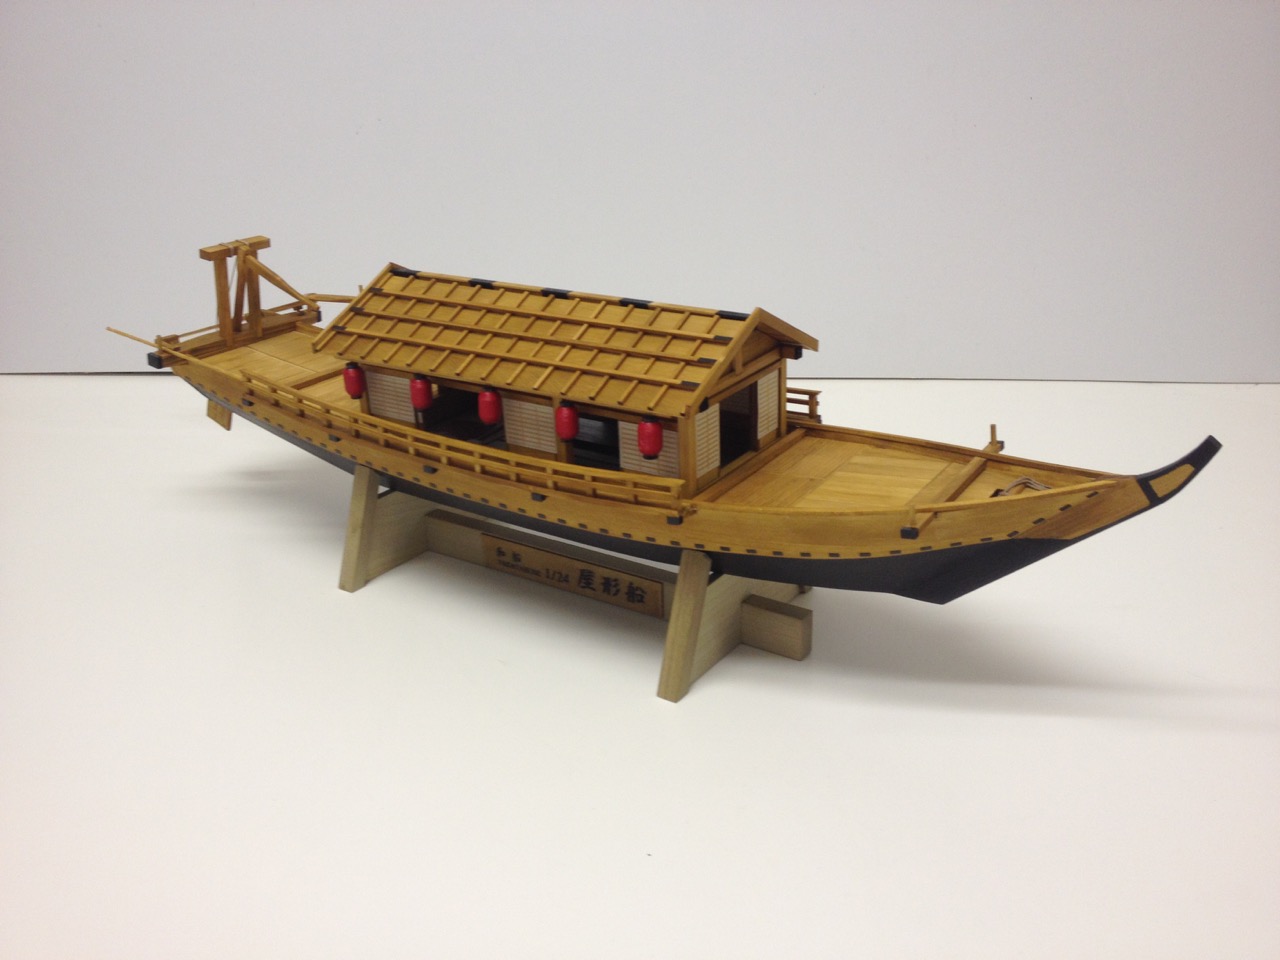
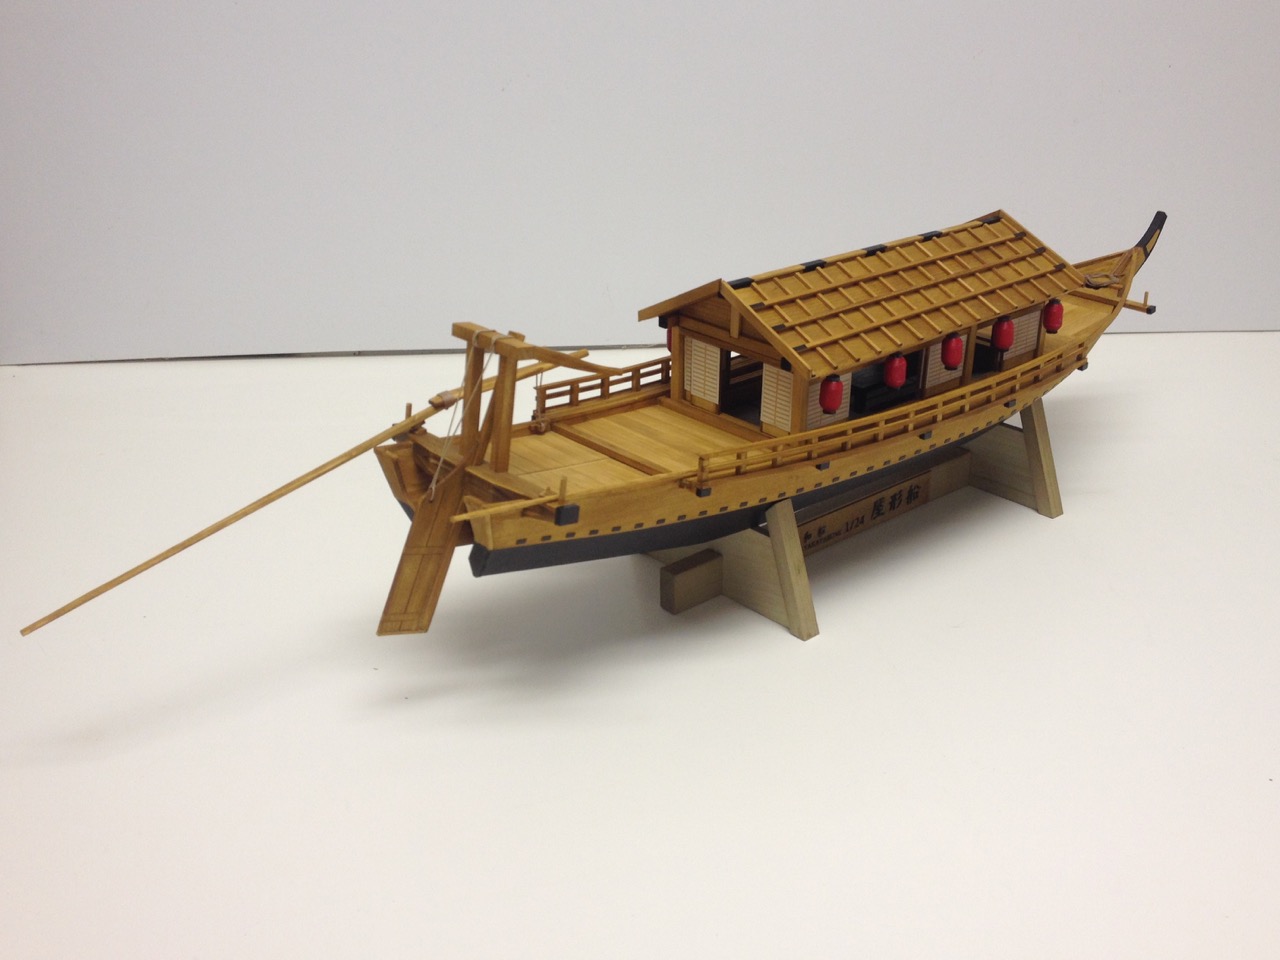
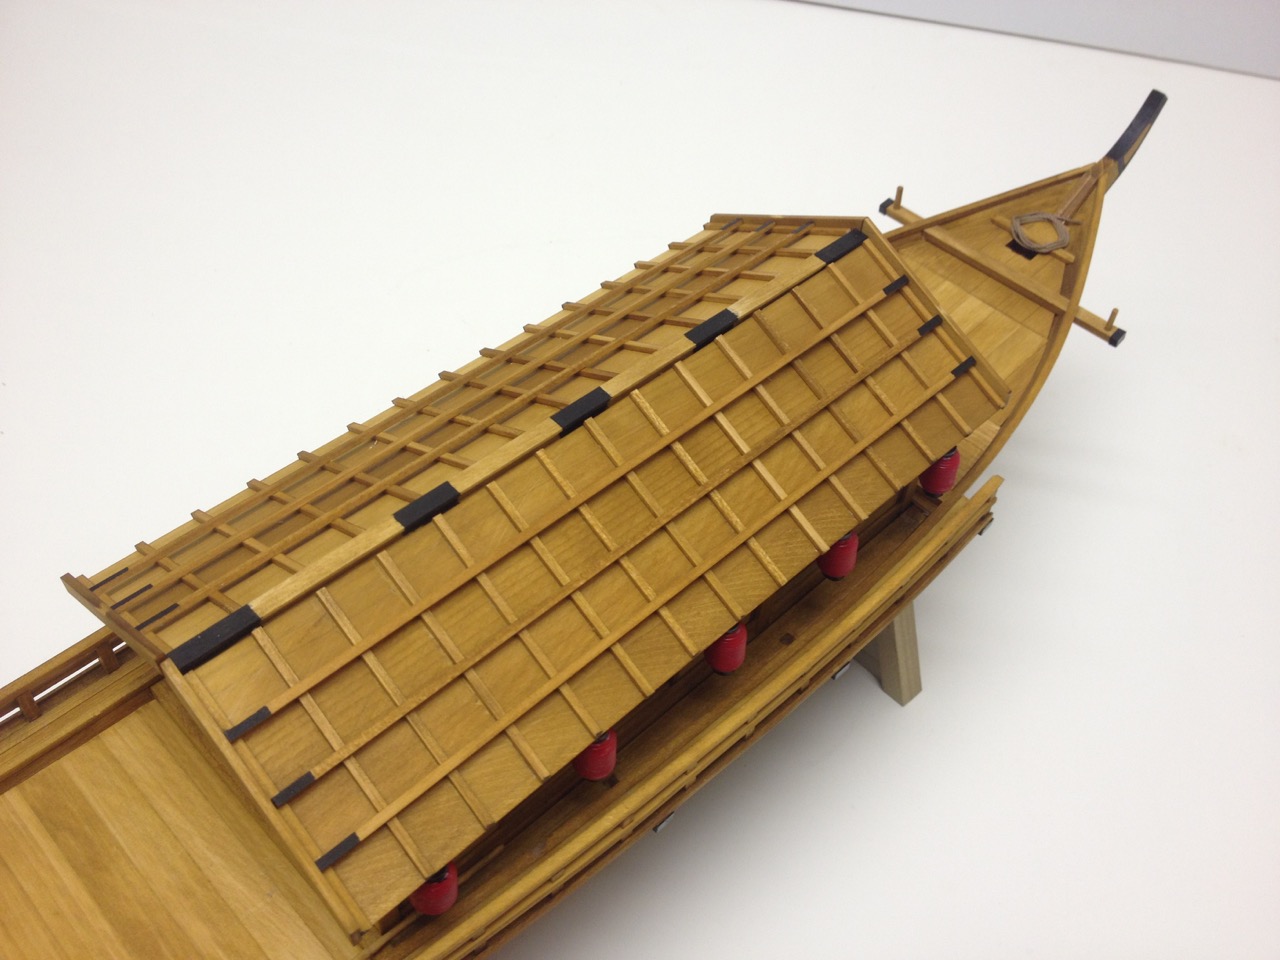
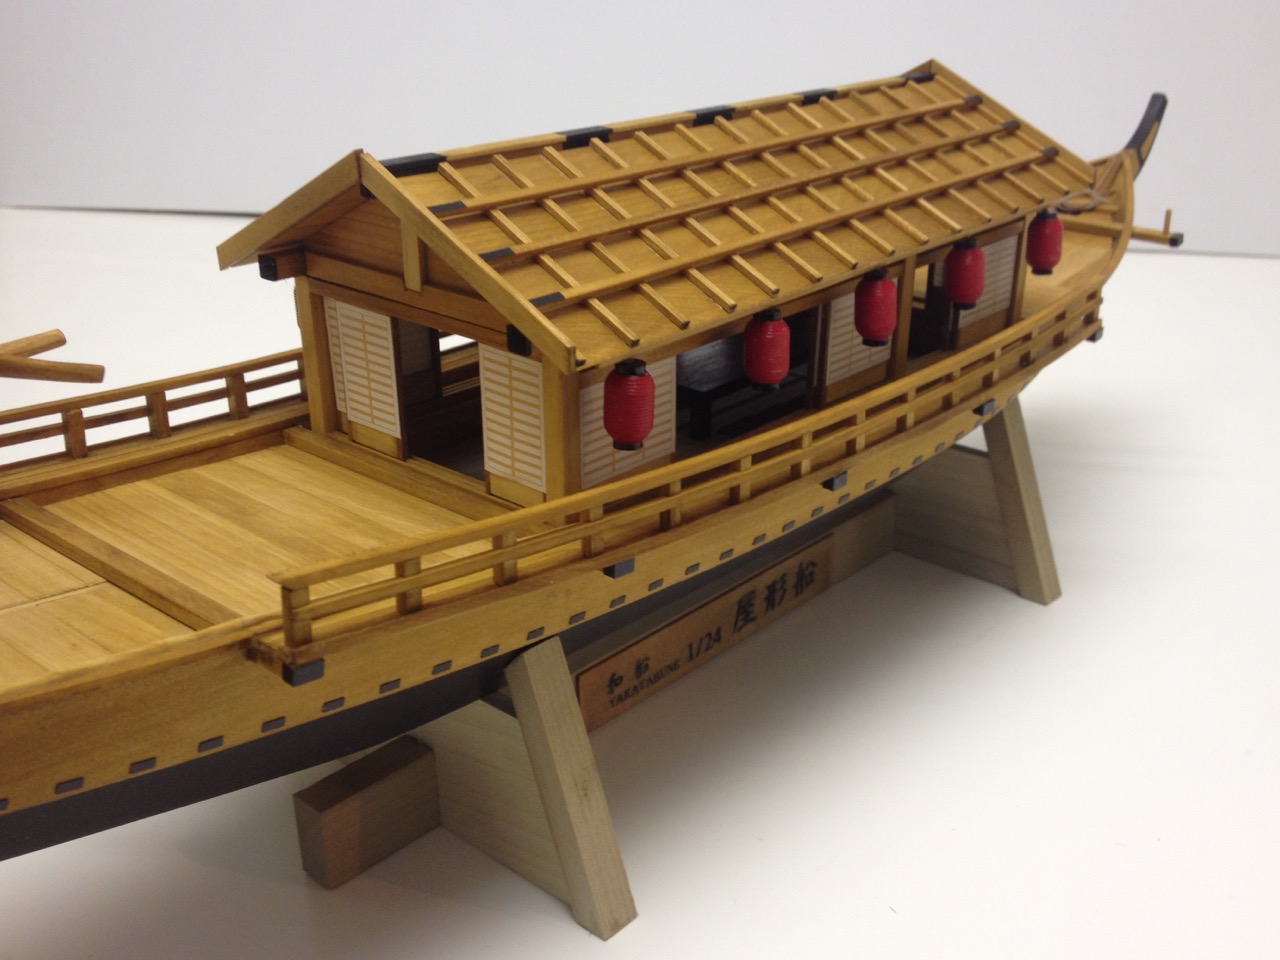
Tosa "Wasen" by catopower - FINISHED - Thermal Studio - 1/10 scale - SMALL - Traditional Japanese Fishing Boat
in - Kit build logs for subjects built from 1801 - 1850
Posted · Edited by catopower
Welcome, there's plenty of room for all!
I don't expect we'll be here all that long. Though it's not a simplified construction model, the design is not complicated.
The next stage of the build is the hull planking.
On a traditional Japanese boat, there are basically only 4 planks, 2 on each side, with the upper planks making a nearly vertical surface. The kit refers to the lower planks as カジキ or Kajiki and the upper planks as タナ or Tana. The term Kajiki is the same term used for the lower planking on the Bekabune as described in Brooks' book and blog. And in fact, the Tosa term for the upper plank, Tana, is related to that of the Bekabune, which is the compound word Uwa-Tana, but run together the "T" becomes a "D" sound and becomes Uwadana.
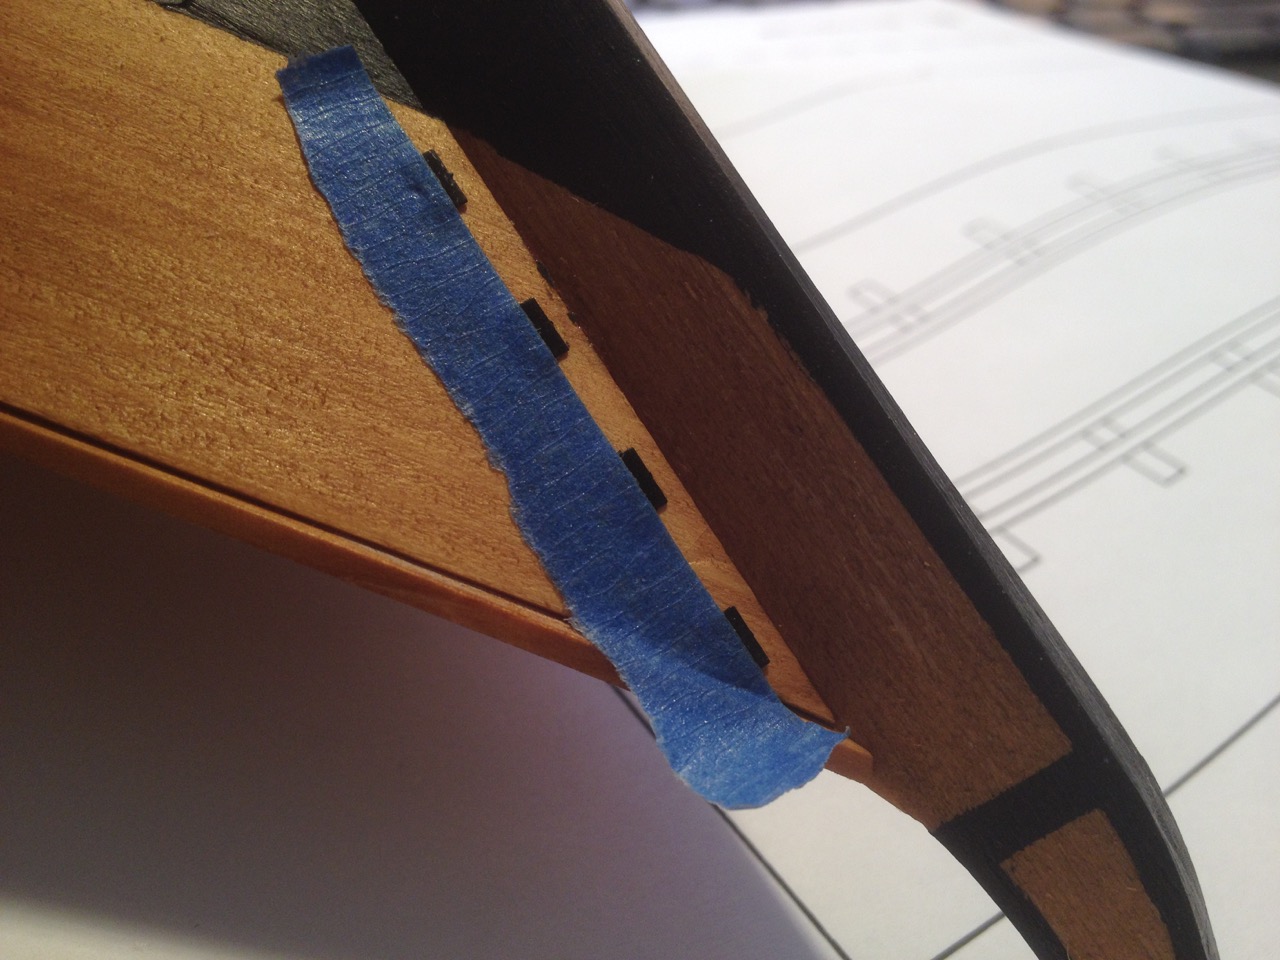
Diagrams in the kit show that the leading edge of the lower planks need to be tapered. There are measurements shown in the instructions, but the exactly shape of the tapered area is not precisely defined. It ended up being a matter of getting something to look like the shape shown in the diagram – a shape that reminds me of the tip of a samurai sword.
After tapering the leading edge of the planks, it's then a matter of fitting the planks on. The laser-cut planks have square openings that line up with square tabs that protrude from the central beams on the model. These are actually located slightly aft of center, but they are at the widest point of the boat.
I found that mating the planks to those notches was a pretty tight fit, but it was good that the fit was snug, as this helps hold things together while gluing. I glued the planks to these notched frames first and let that dry, which seems to be how the instructions want you to do it. Next, the planks were fit to the transom and glued only at the transom.
From what I could tell, it seemed that the top of the planks should be kept low against the frames, so that the planks ended up sticking up above the frames by only a small amount at the stern. On the forward half of the boat, the planks seemed to mostly line up with the top of the frames.
The planks were then glued to the stem, which is called the Miyoshi (mee-yoh-shee). The planks had to be positioned so that the very forward edges were flush with or just barely past the stem. After the glue dried, the rest of the planking was glued to the bottom and the frames using medium CA and the applicator tips supplied in the kit. Those, by the way, were a perfect fit for ZAP brand glue bottles.
I found it a bit of a struggle to hold the boat while trying to glue the lower planks into place. The strong-back in the center is only glued in at the top and bottom of the transom and the stem, so it's very flexy. It took a while to learn to hold the whole thing while bending the planks and gluing them into place.
I should also mention that the kit never has you soak any of the planking. It's long and thin enough that it flexes pretty easily. I suppose it might have made sense, as a ship modeler, to try to pre-bend the planks. But, it certainly wasn't necessary and I managed without soaking or pre-bending the planks.
I left the whole thing to dry and then came back and sanded the upper edges of the lower planks. When dealing with the upper planks, the will overlap the edges of the lower planks, and to make a good bonding surface, or watertight surface in the case of the real boat, the outer edge at the top of the lower plank has to be sanded roughly vertical.
On the real boat, iron nails would be drive into the bottom edge of the upper plank and into this flat edge of the lower plank. Of course, there's more to it than that, but that's the basic idea.
At this stage, the model is just about ready to receive the upper planks or the Uwadana.
Clare