Bob Cleek
-
Posts
3,374 -
Joined
-
Last visited
Content Type
Profiles
Forums
Gallery
Events
Everything posted by Bob Cleek
-
Of course! The "Traditional Boats of Ireland Project" web page is from the same people who put together the book of the same name I mentioned. The book isn't cheap (or wasn't when I bought it new,) but if you liked the web page, you'll love the book.
- 69 replies
-
- 1
-

-
- Galway hooker
- fishing
- (and 2 more)
-
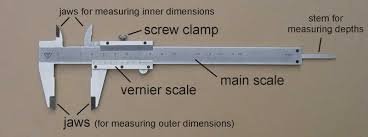
Like everyone, I suppose, I have a "junk bits box" into which go all miscellaneous bits that are 1/8" or larger. Sometimes I go through them to find a "sacrificial bit" that I won't care about dulling. Sometimes I cut the shaft off one when I need a bit of rod of its diameter. On the other hand, one of each size of all of my good bits are kept in drill indexes. The rest are stored in boxes, often in envelopes, plastic zip lock bags, or, for the very small ones, the clear plastic tubes they come in from the store. All are organized as to size. It's very important to keep everything stored where you can get to it when you need to find it. Drill indexes are very important not only because they keep the drills from banging around in a jumbled box or drawer, but most importantly because it saves huge amounts of time. You can immediately go to the drill index and pull out the exactly size bit you need. You don't have to go fiddling through a mess of bits with a micrometer or calipers trying to find the right sized bit or the sharp one rather than the dull one. The first thing every well-taught craftsman learns is to keep his tools organized: a place for everything and everything in its place. For a pro, time is money, but for amateurs, time is progress on the task and a lot less frustration. (Do as I say, not as I do. ) For the small numbered bits, an index is essential. For a start, the classic Rogers index, which will set you back about $30 with the full set of bits, is invaluable. Those tiny bits have a way of disappearing if you aren't careful with them and I can't even pick up the smaller ones without a good set of tweezers if they are laying flat on the workbench they are so small. The plastic cover is also a great feature that protects the fragile tiny bits. These are so small that you would have to measure them with a micrometer to be sure of the size. The printed sizes on the index eliminate that entirely: Larger bits are often sold in sets that come with indexes, as well. There are many different styles of index. The index boxes keep the bits free of dust, which attracts moisture and promotes corrosion. You can give them all an occasional squirt with WD-40 to make sure they don't rust. it's also easy enough to make your own indexes by just taking a piece of material, wood would be the most obvious, and drill a hole with each drill bit you have, label the holes, and stick the bits in the holes. However, if you are going to buy a set of bits, it makes sense to get a set that comes with an index that suits your fancy. You'll know your current bits aren't worth using when they are dull. Like one Supreme Court Justice once wrote, "I can't define pornography, but I know it when I see it." Sometimes a problem with a bit's performance isn't because it's dull, but rather because the type of bit is the right one for the job, particularly when drilling metal, but if a bit won't cut metal as you expect it to, or it chews up your wood and doesn't make clean-edged holes, it might be dull. Trying a new one is usually the best way to tell. If new bit cuts better, you know the first one was dull. If not, you have a new bit on hand for when the first does inevitably get dull! There are many different bit types and different bit point angles. Over time, if you read up, you'll get some idea of what they all do. It's a learning curve thing. You may even get to the point of sharpening your larger bits yourself, but that's story for another night. The point is, however, that every bit is worth keeping. Larger dull bits can be resharpened on a grinder or in a bit sharpener, if you want to get into that and if you have larger bits, sharpening is way more cost effective than buying new ones. Smaller bits, not so much. Bits can be useful in other ways, as well. Every so often you will have need for a little piece of rod and an old drill bit can save the day. They can be cut easily with Dremel cut-off wheels. Modelers should get in the habit of saving odds and ends which may be useful in a model someday. (At least that's what I tell "She Who Must Be Obeyed!" ) The best tool to measure the size of a drill bit, if you can't read the size stamped on the shaft in larger bits, is a drill index. Just keep sticking it in the holes until you find the hole that it fits exactly and read the size off the index. Failing that, a micrometer or a caliper is the tool for the job. Micrometers are more accurate, but a caliper will be very handy, if not essential, for any number of measuring tasks when modeling. They come in mechanical "Vernier" and electronic "digital" versions. The mechanical calipers' measurements are read off a scale like a common ruler. The digital ones have a digital readout. I'm partial to the mechanical ones because the digital read-out ones need batteries and I'm a Luddite at heart, anyhow. The one advantage of the digital ones is that you can set the fancier ones to read out in imperial or metric measurements, and even in decimal equivalents of imperial measurements. Don't be scared off by the prices you see charged for some of these measuring tools. You get what you pay for, and high accuracy tolerances cost the big bucks because what you are really buying is a scientific instrument. That said, you don't have to spend the big bucks for the fancy highly accurate measuring devices unless you want to, though. We don't need NASA level tolerances when building ship models. A mid-range price point instrument is fine for modeling purposes and you can get by even with the low-priced ones. Shop around and make your own choice. (And like all fine instruments, keep them in their cases when not in use and don't drop them on the floor!) Micrometer (above) Mechanical Vernier caliper (above) Electronic digital caliper
-
With the stories I've heard about $37 screws, $640 toilet seats, and a $7,622 coffee maker, I wonder if any of us could afford such bits! https://www.latimes.com/archives/la-xpm-1986-07-30-vw-18804-story.html
-
Come to think of it, a few years back, ModelExpo had a sale on drill bits by size and I ordered a bunch of different sizes. I had the exact same problem and an email to them got solved in the same way. Apparently, the kids the manufacturer had chained to the workbenches in China weren't all that concerned about putting the correct number of bits in the right tubes! I thought it was a fluke and forgot about that until now. They sent the replacements right away, though with no questions asked.
-
I will be following your gléoiteog build with interest. I have a Galway Hooker on deck for my next build, a larger gleoiteog or a smaller leathbhad, if i ever can get my shop reorganized. I've done the research and, compared to other types, there's precious little available on the hookers, really, and some of the sail plans published aren't accurate at all. I can count the number of reliably accurate published plans drawings on one hand. (Notably, Chapelle's "Boston Hooker's" sail plan is nothing like the distinctive rig of the hookers and, contrary to his description in American Small Sailing Craft, there was no difference between the Galway Hookers and the Boston Hookers, the latter being built at Boston by a transplanted hooker builder from Galway.) If you can afford the astounding prices they're asking for a used copy (as much as $675 for the out-of-print 160 page paperback, but it can be found for much less if you search for it) Galway Hookers: Working Sailboats of Galway Bay, by Richard J. Scott, will be found invaluable. It is the only authoritative source detailing the methods employed for building these boats, for which no plans were ever used. They are built "basket style," by setting up four molds: a midship mold and one forward and aft of midships, a transom mold and the stem. These molds were made from patterns handed down through the generations, perhaps as far back as the mid-Eighteenth Century, by the handful of boatbuilders on the coast of County Galway and enlarged or reduced to suit the size of the vessel to be built. Scott's book gives all the other proportional scantlings and measurements which were dictated by oral tradition, all being derived from the length of the vessel. (e.g. "the mast is as long as the boat is long; The bowsprit is half the length of the boat," sort of thing.) With the backbone laid down, the patterns were set up and battens run from stem to transom and the frames were then built to fit inside the "basket" formed by the battens which, together with the patterns, The framing method of single futtocks alternately lapped was unique to our experience until the recent archaeological find of a Sixteenth Century Basque fishing boat, which more strongly evidences that the evolutionary genetics of the Galway Hooker may have been Iberian than was previously known. Traditional Boats of Ireland, History, Forklore, and Construction is another great book, but it only briefly covers the hookers, giving them equal space along with all the other Irish working watercraft, of which there are many. While the hookers have enjoyed a resurgence of popularity in recent decades, they remain something of a local phenomenon. The best connection is probably the Galway Hooker's Association: https://www.galwayhookers.ie/ Padraig O'Sabhain's 304 page thesis The centrality of the Galway hooker to dwelling in the island and coastal communities of south west Conamara is linked on the Association's home page and, while I haven't had time to read it all, looks to be a something fun to curl up with on a rainy night. One catch about researching the Irish hookers is that everything about them, from the names of their variants to the parts of the vessels are expressed in Irish Gaelic which uses Roman letters, but does not have the same phonetics as English. While I grew up in a home where Irish was spoken, we never learned it as children because it was the language my grandmother and mother spoke as "code" when they didn't want the kids to know what they were saying! That was only natural for my grandmother from "around the corner" from Galway in County Cork. When she was growing up, the British did all they could to stamp out the language. Children were forbidden to speak it in school. In today's Irish Republic, Irish is taught in all the schools and far more widely spoken than during the British Colonial period. Who'd have ever thought I'd have had any need to learn it later in life! (I figure you know this stuff, but others who may have an interest in modeling the hooker might not.) I plan to build a static model to a larger scale, perhaps 1:24, to permit depiction of all the classic details. Good luck with your build!
- 69 replies
-
- 4
-
-
- Galway hooker
- fishing
- (and 2 more)
-
Our posts "crossed in the mail." You've found a good temporary solution. I would note, however, that the paper-backed Brodart mylar dust jacket cover is archival and has a neutral acidity. The mylar prevents the face of the book from sticking to adjacent books when on the shelf. The paper backing permits torn and creased dust jackets to be flattened out in the paper and mylar "sandwich" without the need to use tape on them. Next time you're by your local library, see if they can sell you a proper archival cover.
- 9 replies
-
- 3
-
-
- book
- dust cover
- (and 1 more)
-
I use what the public libraries use to protect their dust jackets. Brodart library supply company makes the most commonly-seen ones. Other companies, such as Gaylord Archival do also. They come in a wide range sizes in cut sheets, which don't make a lot of sense to me unless all your books are the same size, or rolls, which allow you to use one size which can be folded to fit a wide range of book sizes. I use Brodart's "Just-A-Fold Original" style. I buy them by the roll and cut off what I need, which is economical. (A large library would have the full size range, for convenience's sake.) I have them on most all of the books in my reference book library. A roll will last practically forever. I bought a roll the 14" high size decades ago and have yet to consume all of it. Brodart now sells a package deal that looks handy with three rolls of different widths, 10", 12", and 14". They have an acid-free archival paper backing and a clear archival plastic cover. You sandwich the dust cover between the paper and the plastic and fold over the excess. If you only want one or two covers, perhaps you may be able to talk a local library into selling you what you need for a small job. Here's Brodart's "how to do it" PDF that tells you how to best select the many options they offer: http://www.shopbrodart.com/_resources/www/brodart/_system/content/images/PDF/2017_BJC_Guide.pdf http://www.shopbrodart.com/Library-Supplies/Book-Jacket-Covers/ https://www.amazon.com/s?k=brodart+fold-on+book+covers&i=office-products&gclid=CjwKCAiAiML-BRAAEiwAuWVgghlKRBuEVApXKK-nQWH3GS5EjrIUT6NkhSahCvShZFseVdpuF-f_GBoCPWoQAvD_BwE&hvadid=318674205520&hvdev=c&hvlocphy=9032112&hvnetw=s&hvqmt=b&hvrand=17492042603946677432&hvtargid=kwd-400194176838&hydadcr=28992_10194946&tag=googhydr-20&ref=pd_sl_6rbppx1ax4_b
- 9 replies
-
- 4
-
-
- book
- dust cover
- (and 1 more)
-
Looking for info on scroll saws.
Bob Cleek replied to Moab's topic in Modeling tools and Workshop Equipment
In most, the "bellows" that blows the air is simply a rubber bladder that is compressed by the arm's downward movement with a piece of plastic tubing connected to it. These rubber bladders crap out on a regular basis and are easily replaceable. I'll bet if your saw is still in production, the manufacturer has replacement air bladders for sale.. -
As you probably know, you can obtain the lines, sail, and deck plans for the vessel from Mystic Seaport, although these do not appear to include construction drawings. https://store.mysticseaport.org/ships-plans/emma-c-berry-noank-well-smack.html. Unfortunately, she has not been documented by the Historic American Engineering I don't expect she was a sufficiently wasn't a sufficiently important vessel to have ever had detailed construction drawings. She would have most likely been built "by eye" to requested dimensions with the decisions as to construction left to the boat builder. All things considered, I think your best bet is to pay a visit to Mystic and bring your camera, note book, and a measuring stick, marked in black and white bands, which can be included in photos as a scale for measuring items in the photos later. I'd suggest calling ahead, as well. I expect that even with the pandemic protocols, they may be able to let you climb aboard and document whatever you want. You'll have to get in her and count the frames and so on, if a large scale "as built" model is your goal.
-
For those needing drill bits, I just noticed that ModelExpo is having a great "loss leader" sale on an entire set of #61 through #80 bits (the same as the Rogers circular bit index,) five of each size in clear plastic tubes in a nice wooden box with a decent pin vise for only $35. That's as low a price as I've ever seen for micro-bits. When you need more individual sizes, ModelExpo sells these bits in packs of five for $3.49. The same bits without the wooden case and pin vise would run about $70, so the bits alone are half price and the box and pin vise are a bonus! If I didn't already have a good supply, I'd grab one in a hot minute. https://modelexpo-online.com/MT2001-Set-of-100-Number-Drills-5-each-of-61-80-in-a-Wood-Box-Pin-Vise_p_1411.html
-
Stitching sails with sewing machine
Bob Cleek replied to Jorge Hedges's topic in Masting, rigging and sails
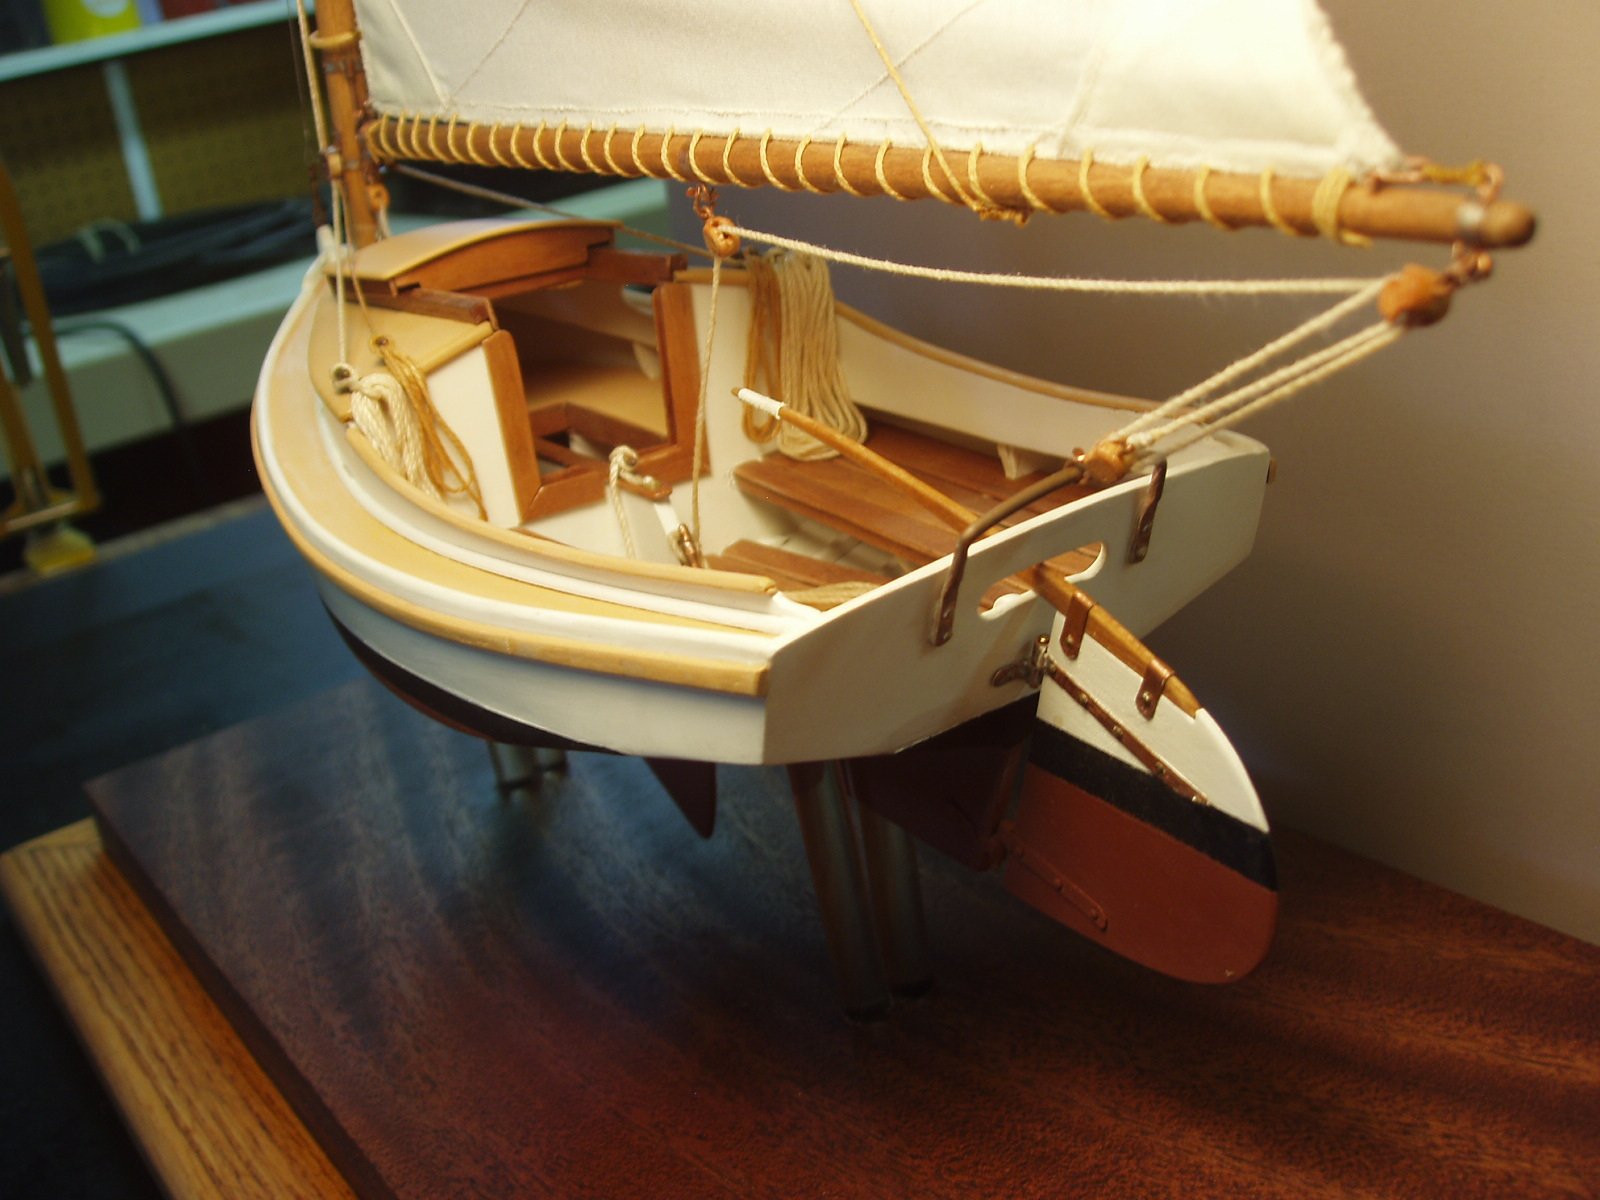
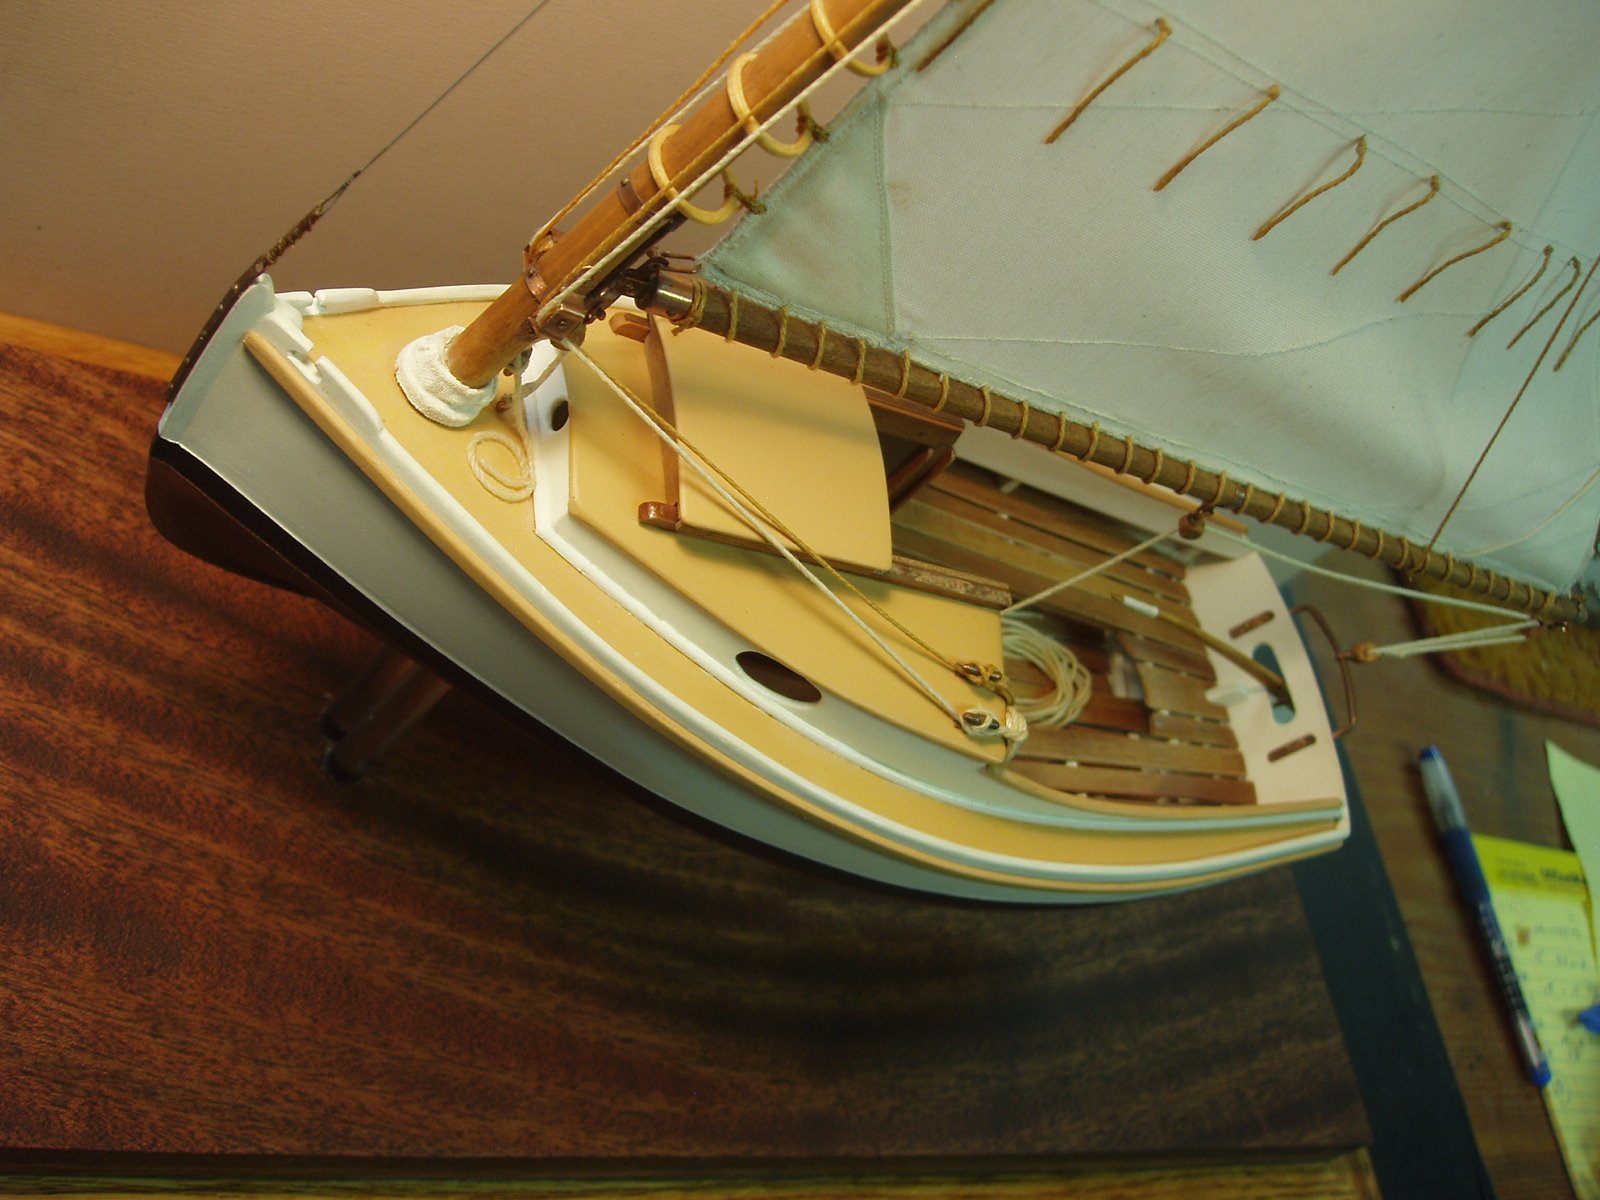
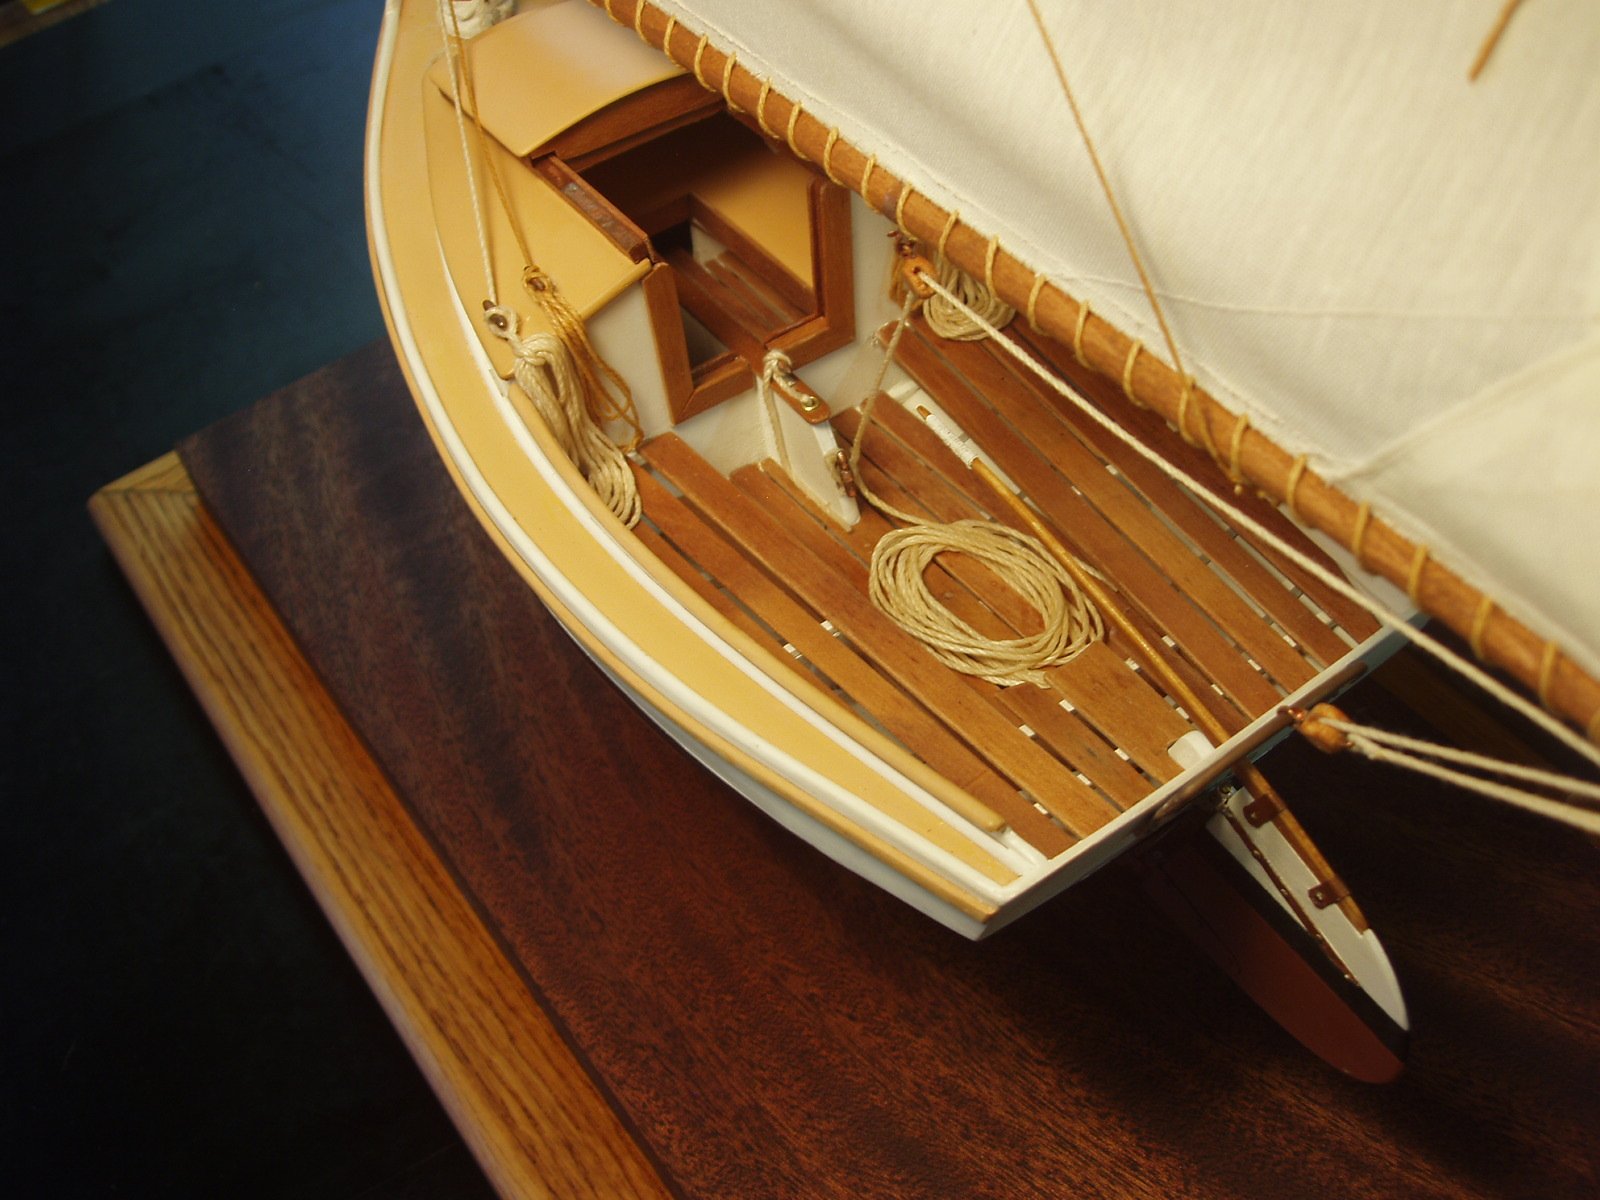
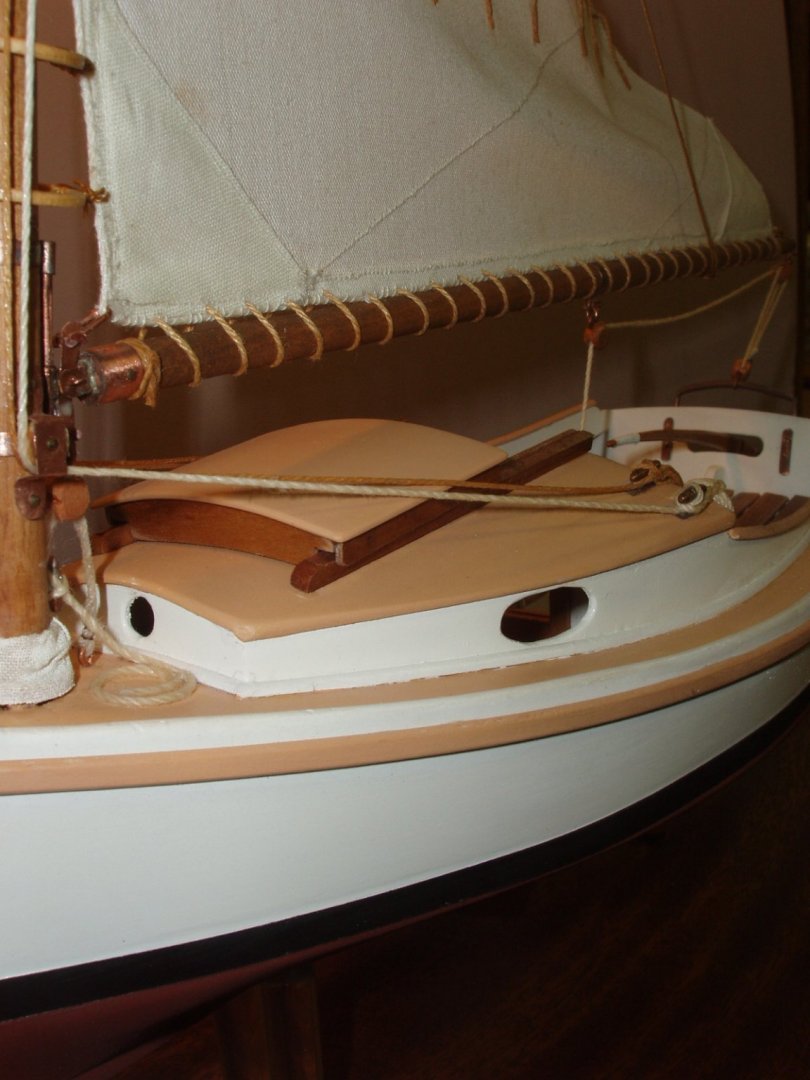
As said, it's a matter of scale. You can get away with it, barely, at 3/4" to the foot, as below, if you use very fine thread and the closest stitch setting. but corners hand stitched with the same thread produces a bit cruder results and bolt roping is a real challenge. On this model, I didn't sew the panels together, but rather simply stitched through the single sheet of fine cloth. There's no seam overlap on the panels, but the line of stitching does produce an impression of reality. I didn't have any better close-ups of machine-sewn sails, but these shots of a three-quarters inch scale catboat give some idea of as much as one might expect of a home sewing machine. Below that, I wouldn't recommend cloth sails at all. (The copper fittings were left to develop a natural "penny brown" patina on their own, thereby simulating bronze. The photos were taken before that process had taken place.)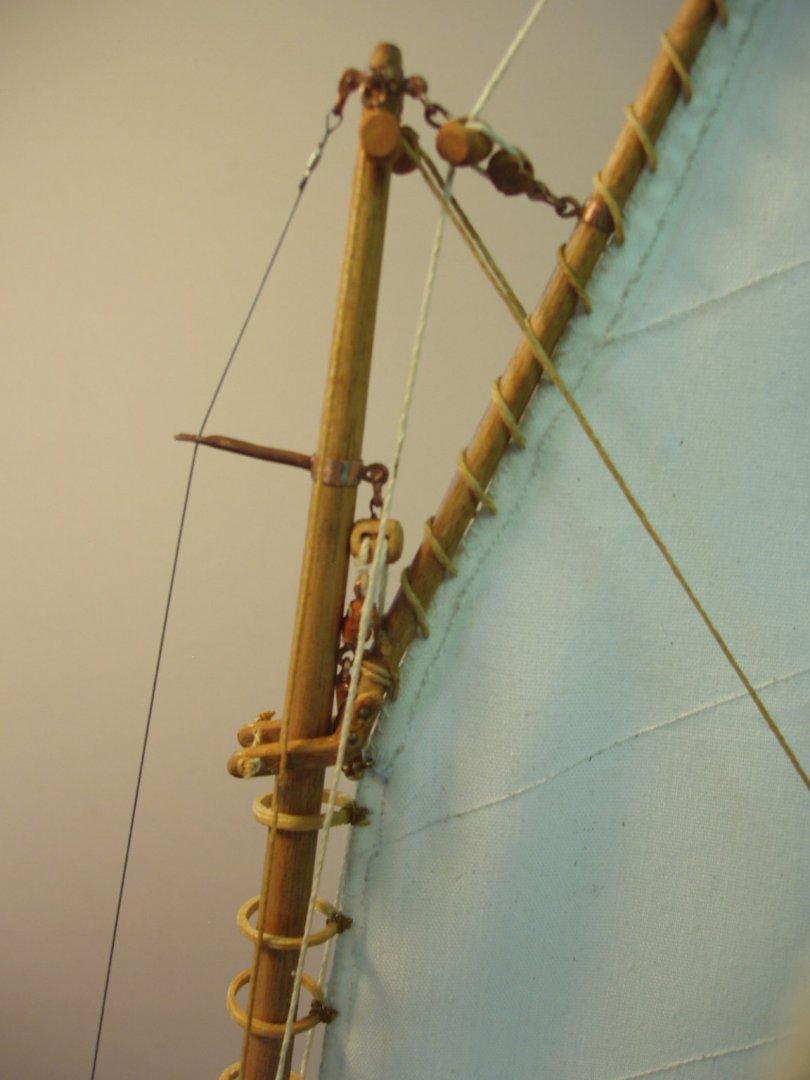


-
Electric sword or reciprocating saw
Bob Cleek replied to stuglo's topic in Modeling tools and Workshop Equipment
I never could see the point of the Micro-Lux line of tools for ship modeling. Perhaps they have their place, but they've always seemed to me to be in the same category as the Loom-a-Line, but at a much higher price point. Maybe they are okay for cutting gourds or 1" scale dollhouse construction. Dunno. -
2021 NRG CONFERENCE
Bob Cleek replied to kurtvd19's topic in NAUTICAL RESEARCH GUILD - News & Information
One of these days, you might consider San Diego. They've good a great maritime museum with real sailing ships, the Miniature Engineering Craftsmanship Museum nearby, which is on my "bucket list," and the fleshpots of Tijuana, which are only 25 minutes away! Sailors just love San Diego! See: https://www.craftsmanshipmuseum.com/ (Affilliated with Sherline Co.) These are fully operational working miniatures! The Duesenberg is 1:6 scale and made of over 6,000 parts. The engine is true to scale and runs just as the original on gasoline hitting on all twelve cylinders! -
Reducing mast circumference without a lathe
Bob Cleek replied to Charlie pal's topic in Masting, rigging and sails
Indeed, that's true. If you've got the right dowel and have learned to do it with a sanding block while spinning the dowel, that's often the fastest way to get the job done. -
Reducing mast circumference without a lathe
Bob Cleek replied to Charlie pal's topic in Masting, rigging and sails
Well, you're doing it the hard way. Doweling is readily available, but often it's not of a suitable wood species. Also, dowels are often not perfectly straight, nor inclined to stay that way. That's not a big problem for short lengths for pegs and such, but for a long spar, not so much. What you need is a spar gauge. You can then take any size square piece of straight grained wood without any grain runout and taper it on all four sides on your table saw, or with a plane, and then use the gauge to mark the lines to plane to yield a perfectly octagonal tapered stick. After that, sanding it round is a cinch. The only catch is that it's a lot easier on a full-size spar than on a scale-size one because of the dimensions, but a modeler shouldn't have too much problem making a miniature spar gauge to suit the task. full size spar gauges use pencils to mark the lines on tapered spar stock. A modeler's spar gauge does better with sharpened nails which scribe the lines instead of penciling them on. This web page tells you everything you need to know about making perfectly tapered round spars using a plane and sandpaper: https://www.pettigrews.org.uk/lm/page030a.htm -
MicroLux/Micro-make power chisel
Bob Cleek replied to wlell's topic in Modeling tools and Workshop Equipment
I can't imagine why anyone would want to try to use a "power chisel" to shape a mast. The easiest way to shape a spar is to use a plane to turn the piece into an octogon and then chuck it in a drill press or hand drill motor held in a vise and sand the dowel while it's spinning. A lathe is another obvious option, but, considering the tooling costs for taper attachment and steady rest and the setup time, planing and sanding is a lot easier. Particularly with the planing, building a "planing sled" jig for your desired taper angle will make turning out a large number of spars a piece of cake. I don't do a lot of wood carving, but it seems to me that there isn't a hundred bucks worth of advantage to a vibrating chisel over a good set of well-sharpened hand carving chisels and I suspect there are a lot more blade shapes available with manual carving tool lines than with the power chisels. (It seems there only five blade shapes for the Micro-Mark model.) If i had a hundred bucks to spend on a tool for shaping spars, I'd go first cabin and spend $85 on a Lie-Nielsen Model Maker's Block Plane, a high-quality recreation of the old Stanley No. 100 squirel-tailed model maker's plane and the rest on a sleeve or two of sandpaper. https://www.lie-nielsen.com/products/Model Maker's Block Plane -
Compound Plank Bending
Bob Cleek replied to Neil10's topic in Building, Framing, Planking and plating a ships hull and deck
I suggest you try this method using a hair dryer on high heat but without the water in the pan or the pan on the stove. Once the hair drier heats the wood sufficiently, I'll be it bends just as well as with the boiling water on the stove and with a lot less mess and risk of burning yourself. A hair curing iron or clothes iron applied directly to the wood are other good heat sources. -
It's sure not very well known, but that doesn't mean it's not good for modeling. Backyard ornamentals can produce some great modeling wood, too small for commercial purposes, but still great for small stuff. It's basically a climbing fig and part of the large ficus family. It's not in the wood database online. This may be of some interest:: https://uses.plantnet-project.org/en/Ficus_(PROSEA_Timbers)
-
So very, very true! The older we get, the more we realize how easily history, ours or the culture's, is lost.
- 8 replies
-
- 2
-
-
- Brigantine
- 1800s
- (and 3 more)
-
Yeah, the internet has its limitations when it comes to nautical nomenclature and "google translator" is even worse! I pity the guys who buy kits with instructions in Italian or Spanish. Danged if I know what that "stick" is really called. You're doing the research necessary to build a really fine and accurate model. I'm hoping to see the construction phase of the project! I wish I'd made a photographic record of Galilee when I had the chance. I lived a couple of blocks up the Napa Street hill from her last resting place in the mud adjacent to the Napa Street Pier and came to be known as "Galilee Harbor" back in the 1970's. I could have climbed aboard and taken all the photos I wanted of her back then. At the time, I really wasn't all that interested in her history. At one time there were all sorts of old wooden sailing vessels sinking into the mud along the Sausalito shoreline. The only reason I knew her name and not the others was because the houseboat community where some of my friends lived was called "Galilee Harbor."
- 8 replies
-
- 1
-
-
- Brigantine
- 1800s
- (and 3 more)
-
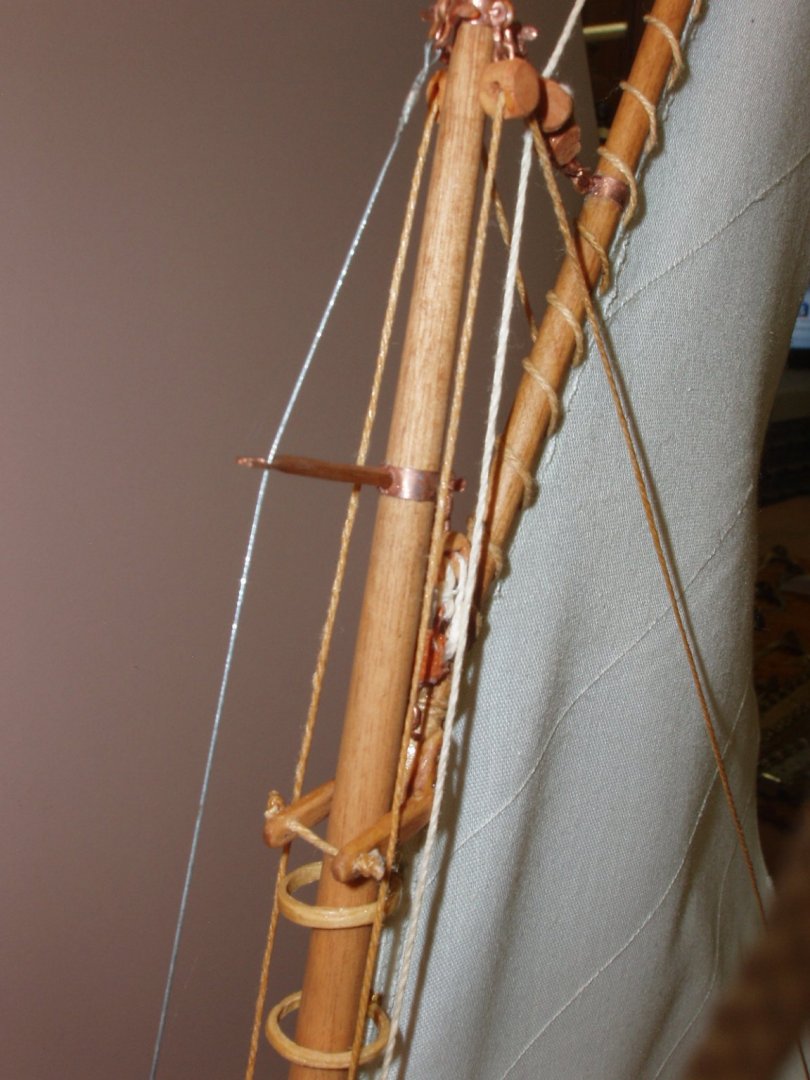
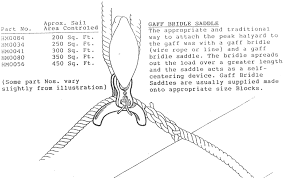
Call it what you will, but the two types of mainsails were very much contemporaneous for hundreds of years before Turner designed Galilee. A jib-headed sail has an essentially triangular shape and a "pointy" head with a single halyard. A gaff-headed sail has four corners with two halyards, a throat halyard which hoists the throat of the gaff boom and a peak halyard which hoists the end of the gaff boom. Galilee definitely has "a single attachment fitting." It's the bridle or saddle running on the short bridle at the head of the sail with the fall of the mail halyard attached. The "stick" which holds the two ends of the bridle apart when under tension, isn't a "yard," which crosses a mast, nor a "boom," which has sheets that control a sail. If named for its function, it is clearly a "spreader" or a "batten." I would called it a "head batten," in the same way it's modern equivalent is called a "head board." Galilee has but one main halyard. Her sail is triangular shaped. It's indisputably a "jib-headed" mainsail. The purpose of the spreader and bridle is the same as the purpose of the main halyard crane: to provide a fair lead of tension from the halyard crane to the mainsail without the halyard fall (bottom) block being pulled toward the mast and chaffing, thereby interfering with the operation of the main halyard tackle. The bridle spread by the "stick" on Galilee's main is the contemporary equivalent of of a "headboard" on a modern jib-headed mainsail. The "stick" between the bridle ends is under a compression load created by the weight of the mainsail (and perhaps the main boom, depending upon whether it were fastened to the mast with a gooseneck or boom jaws.) That load is not particularly related in any way to the loads generated by the wind on the sail. Those wind loads are transferred to the sheets and create a compression load on the main boom far greater than the load created by the weight of the sail and boom, which contribute nothing to the load on the main boom. A properly designed main boom would not likely break under the load of any wind on the mainsail. (As the wind blows against a sail, the vessel heels, thereby proportionately reducing the pressure on the rig by reducing the amount of area directly exposed to the wind as the angle of heel increases.) However, an uncontrolled jibe would create a shock load when the boom fetched up against the mainsheet on the opposite tack which could cause a fracture as pictured above. To prevent such damage, many contemporary vessels of Galilee's size employed a patent "shock absorbing" mainsheet horse which I believe Galilee had, but which, apparently, was not up to the task in the instance pictured. Gaff-rigged main showing use of halyard crane with tackle attached to the gaff boom throat, causing throat halyard to run free of the mast. Gaff boom bridle saddle on bridle with halyard fall block attached: Modern mainsail headboard:
- 8 replies
-
- 2
-
-
- Brigantine
- 1800s
- (and 3 more)
-
As for the small numbered bits, I find I break them regularly if I'm not careful. I also find that buying replacements one at a time at a hobby store, if you are lucky enough to still have one in your neighborhood, is inconvenient and costs a lot more than buying in bulk. It seems certain sizes get used more than others and, consequently, need to be replaced more often than others. I discovered that every so often outfits like Micro-Mark or Model Expo will have sales with a percentage discount on everything in their catalog. I decided to "bite the bullet" and buy tubes of ten or twelve bits in the sizes I break frequently when they are on sale and keep them always in stock in my shop. It's a huge savings over buying them one at a time, if you can find them, and my work progress isn't halted for want of a bit anymore. I use a Rogers circular bit holder for my "working bits," of course.
-
"And I am comfortable keeping my fingers closer to the blade than I would with the Byrne saw without fearing an injury." Getting comfortable keeping one's fingers closer to the blade... without fearing an injury" is often the cause of "missing some pieces."
-
Yes, a very light stain rubbed across the plank seams will end up in the seams and show darker. If you want light colored decks, seal the decks with a clear sealer, then apply the stain and rub it all off the sealed deck, leaving the stain in the deck seams. When it comes to deck seams, the thinner they are, the better. At scale viewing distance, there isn't much to them.
-
Clear nail polish thinned with acetone works, as well, and the bottles come with a handy built-in brush. Getting the acetone into the bottle can be a pain, though. I use a hypodermic syringe to fill the bottles through their narrow openings. Nail polish will dry glossy, but if you thin it enough, there's no gloss when it soaks into the line.. It's handy for its quick-drying characteristics and the built-in brush.