md1400cs
-
Posts
2,864 -
Joined
-
Last visited
Content Type
Profiles
Forums
Gallery
Events
Everything posted by md1400cs
-
 Well Ulises, ¡Dios mío. Impressive indeed. I would, and have always wanted to do the Soleil Royal, but as you know, I was born in France. So a dream for me. And as you know I lived in DF for two years. Hmm no longer called DF (:-) Hmm did the French invade? Chapultepec Park is so beautiful Cheers, Michael
- 786 replies
-
- 5
-

-
- Royal Louis
- Finished
- (and 1 more)
-
Iain, Superb paint work. And as EJ_L stated that pin striping is very difficult especially in close pairs. You are also an airbrush artist - well done. Cheers, Michael
-
Ulises, Nice update. These 1700's ship kits seem very difficult, and complex. ======== Under your table is the Santísima Trinidad. After this one that should be "a walk in the park" for you (:-) Full ship I assume? I also have that one "in waiting" (OcCre as well), but it is the cross-section. Michael
- 786 replies
-
- 3
-
-
- Royal Louis
- Finished
- (and 1 more)
-
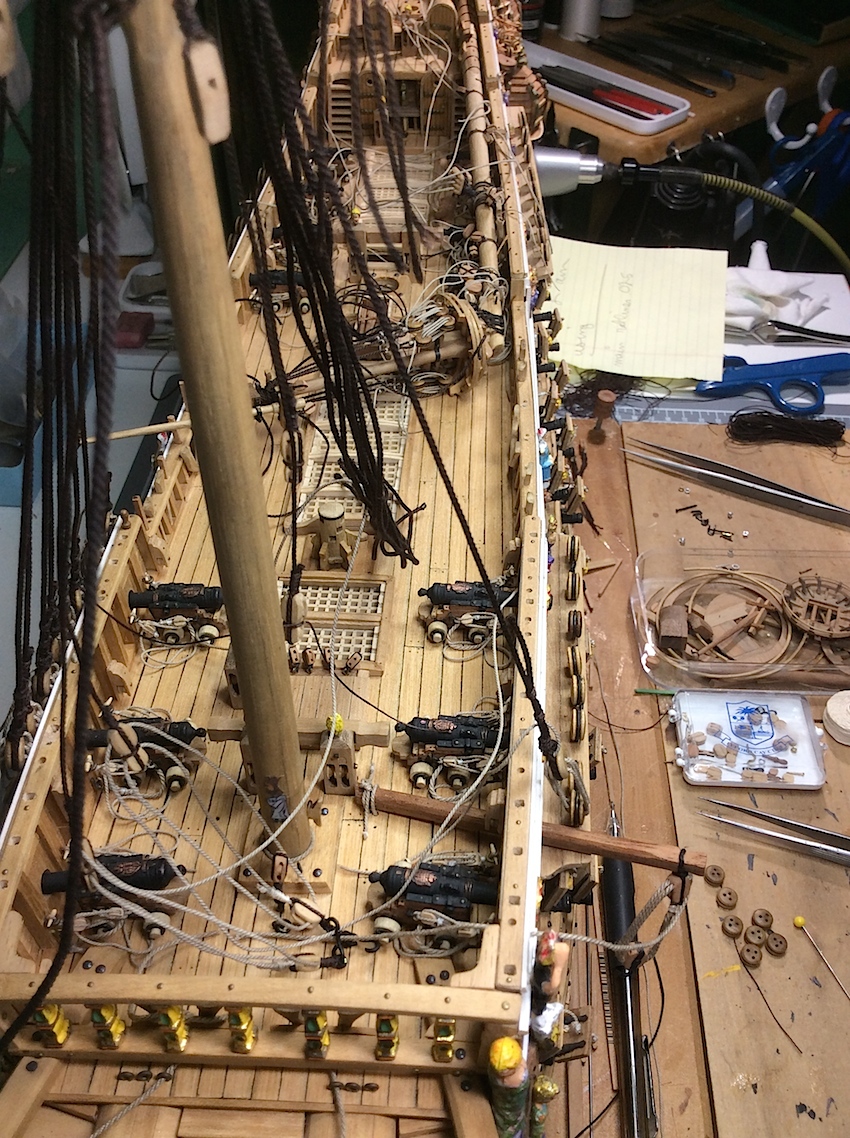
B.E. Thanks for still dropping by - always a pleasure hearing from you & thanks for your kind words. Frank, Yes Nigel is very astute indeed. Glad that this idea may also be useful for you as well. Appreciate you comments about the mast. This morning it occurred to me that almost all of this extra detailing will be hidden below the crowsnest large platform, and the sail yard ha ha .... still enjoying the process. We all need to balance our builds. I have not read one positive comment on any build log regarding installing ratlines and their many hundreds of knots (:-) MIchael
-
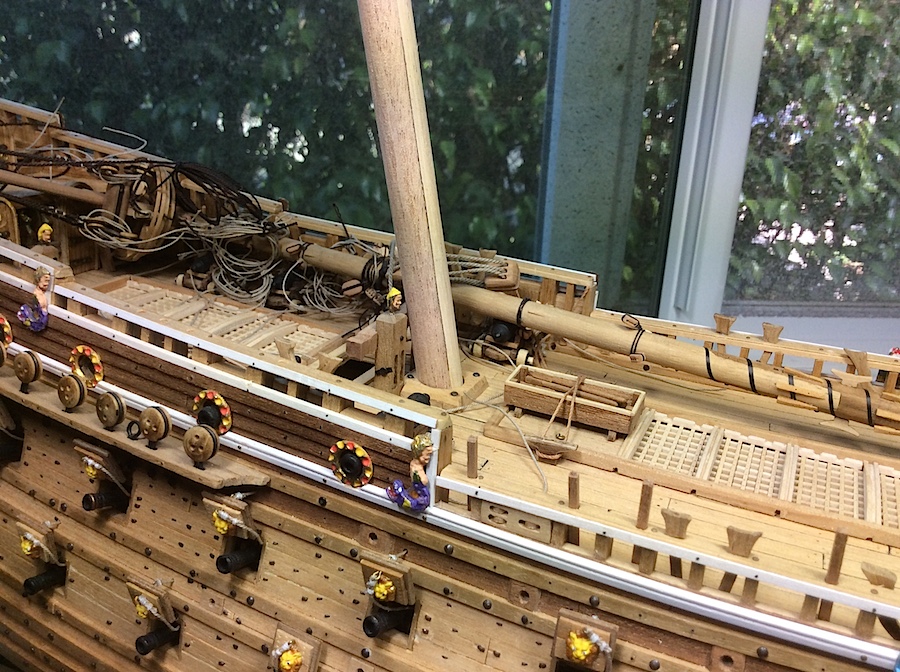
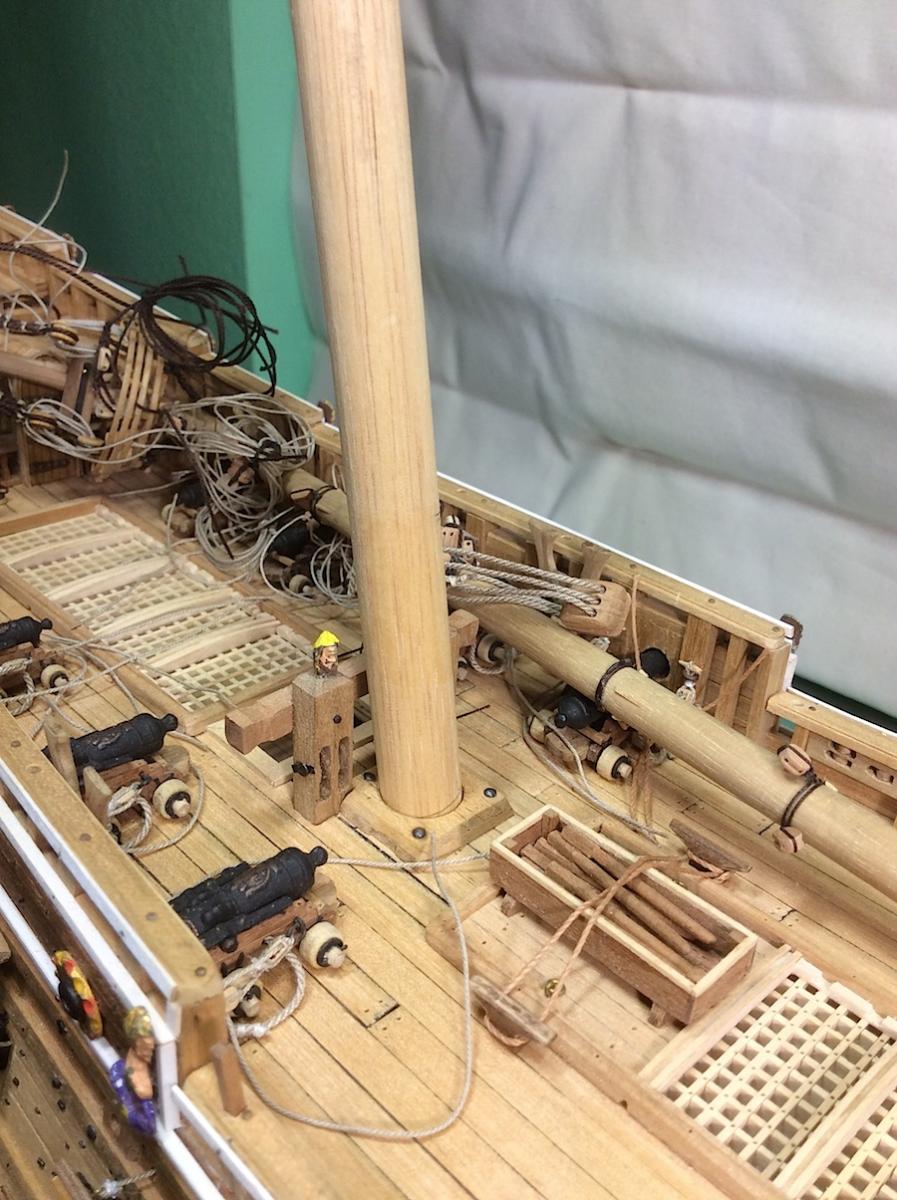
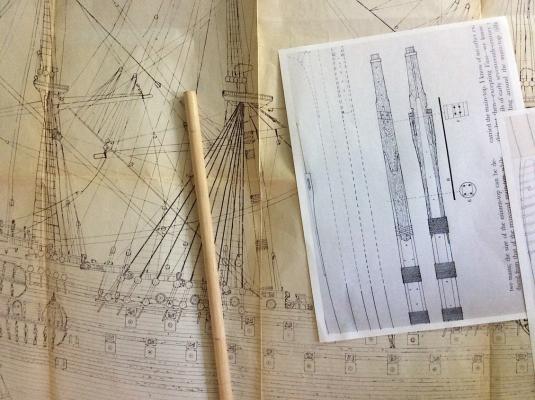
Continuing with the mainmast; Needed to approximate the length for the laterally mounted sidepieces that will include the two pulleys. That done, penciled in where mast cutout areas should be. Photos are self-explanatory so keeping this update brief. So far so good - Glad that I did not have to start all over again Nice to get back to wood (as I keep repeating J) Now onto the side pieces. This will most likely be a bit more complicated..


-
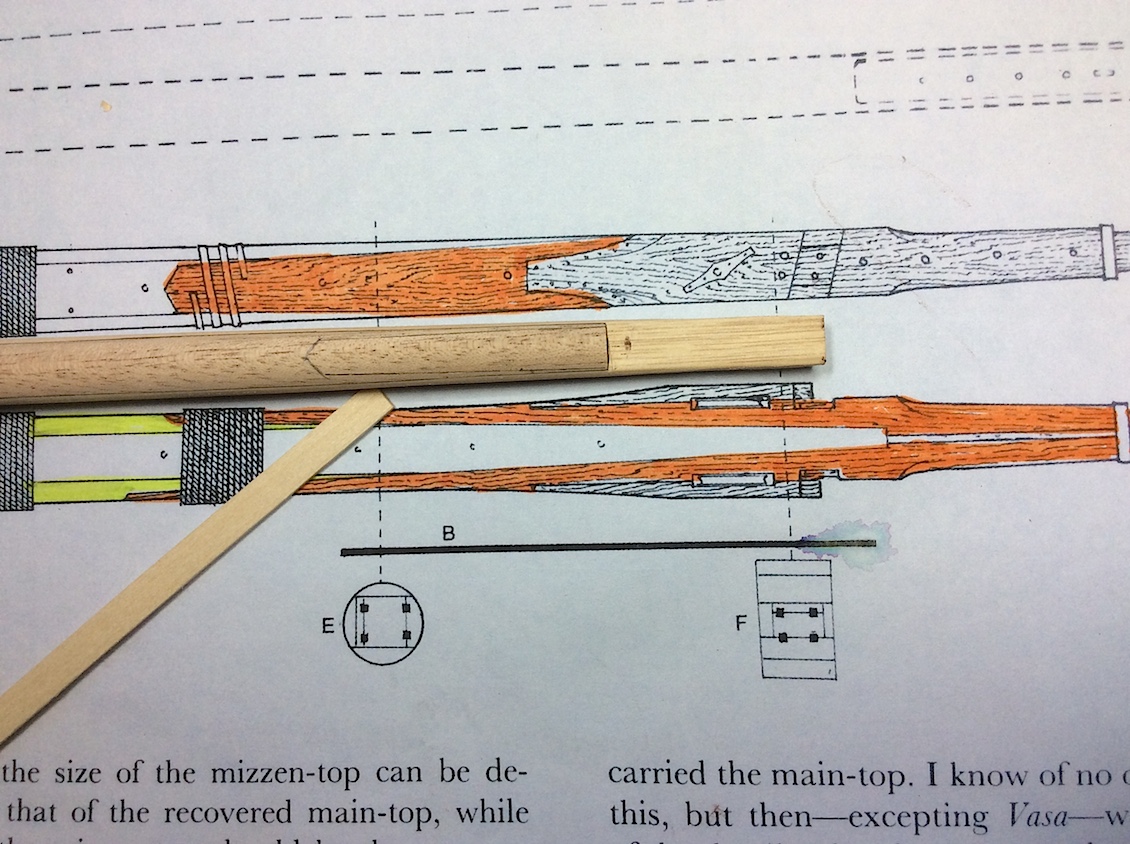
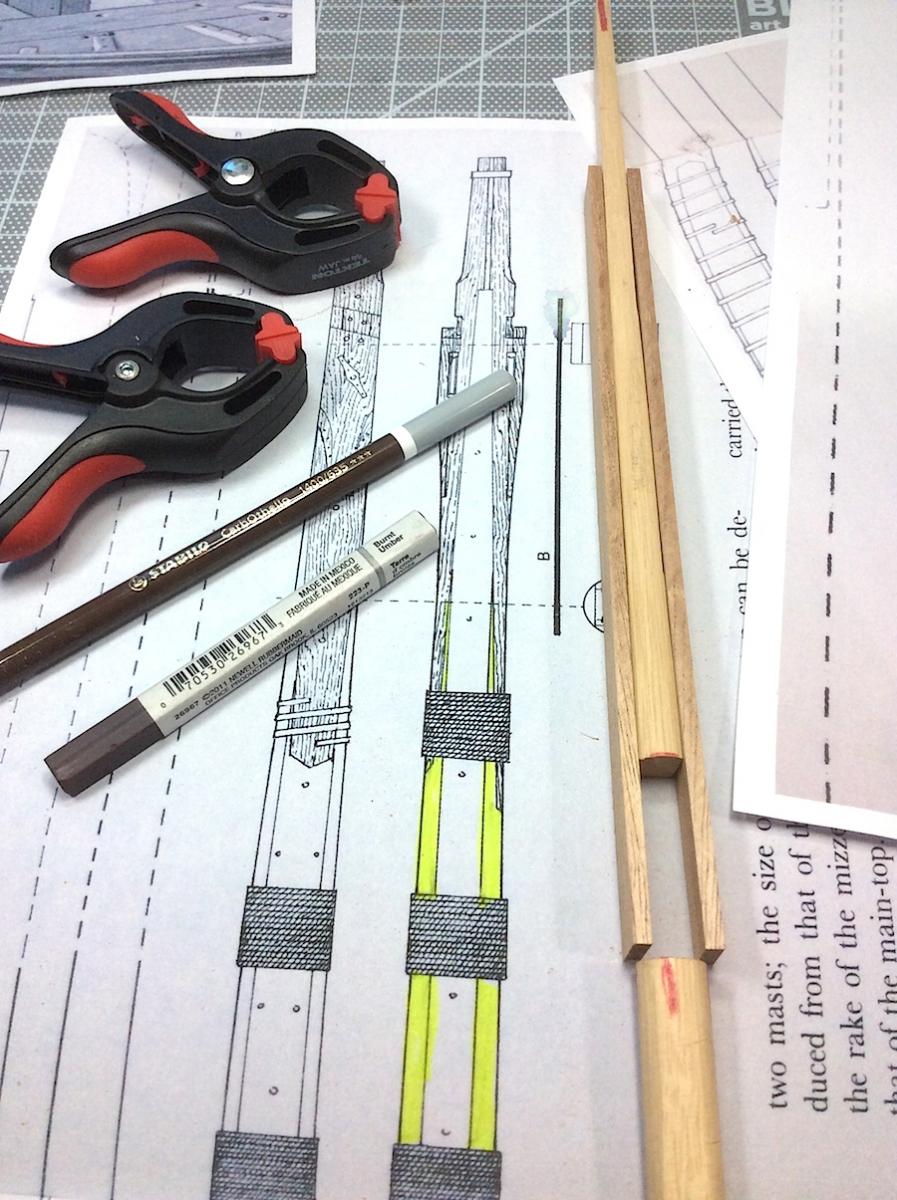
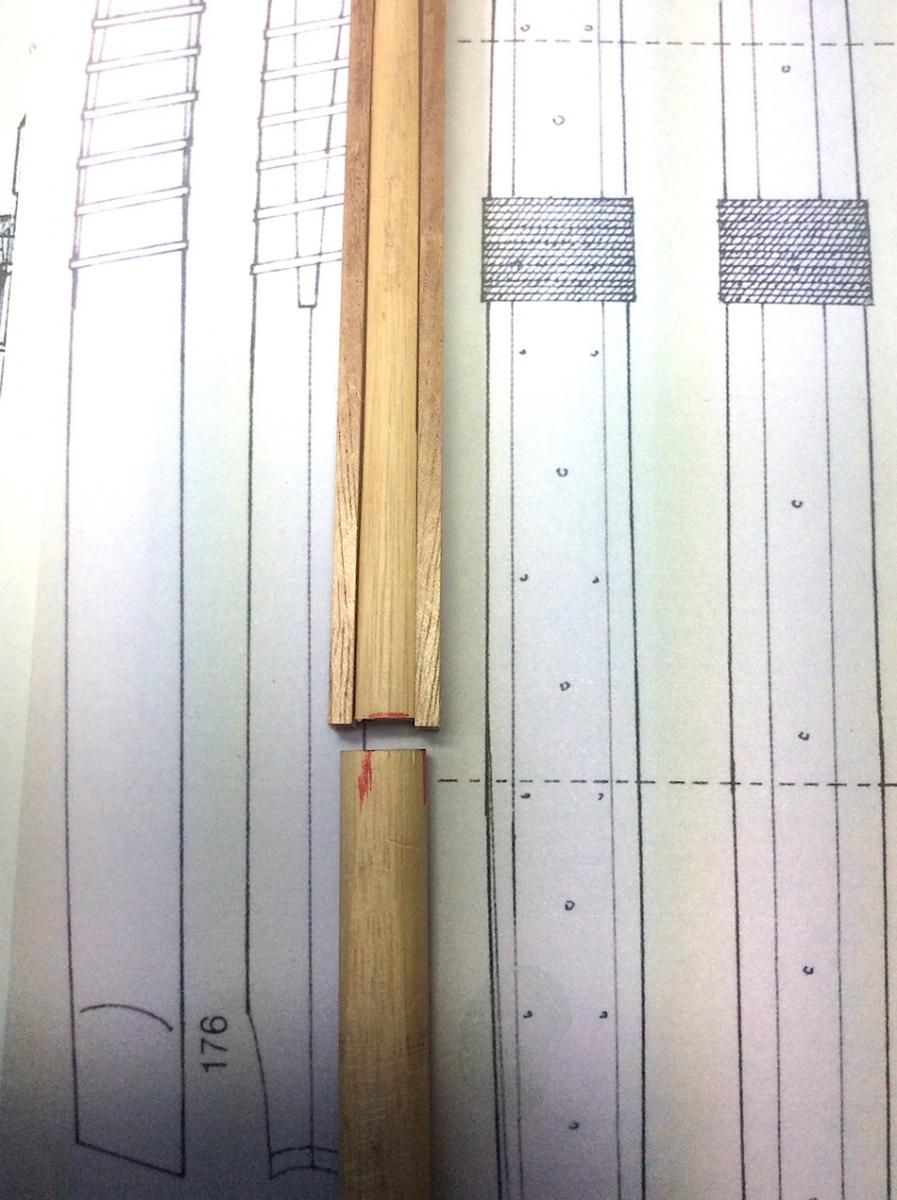
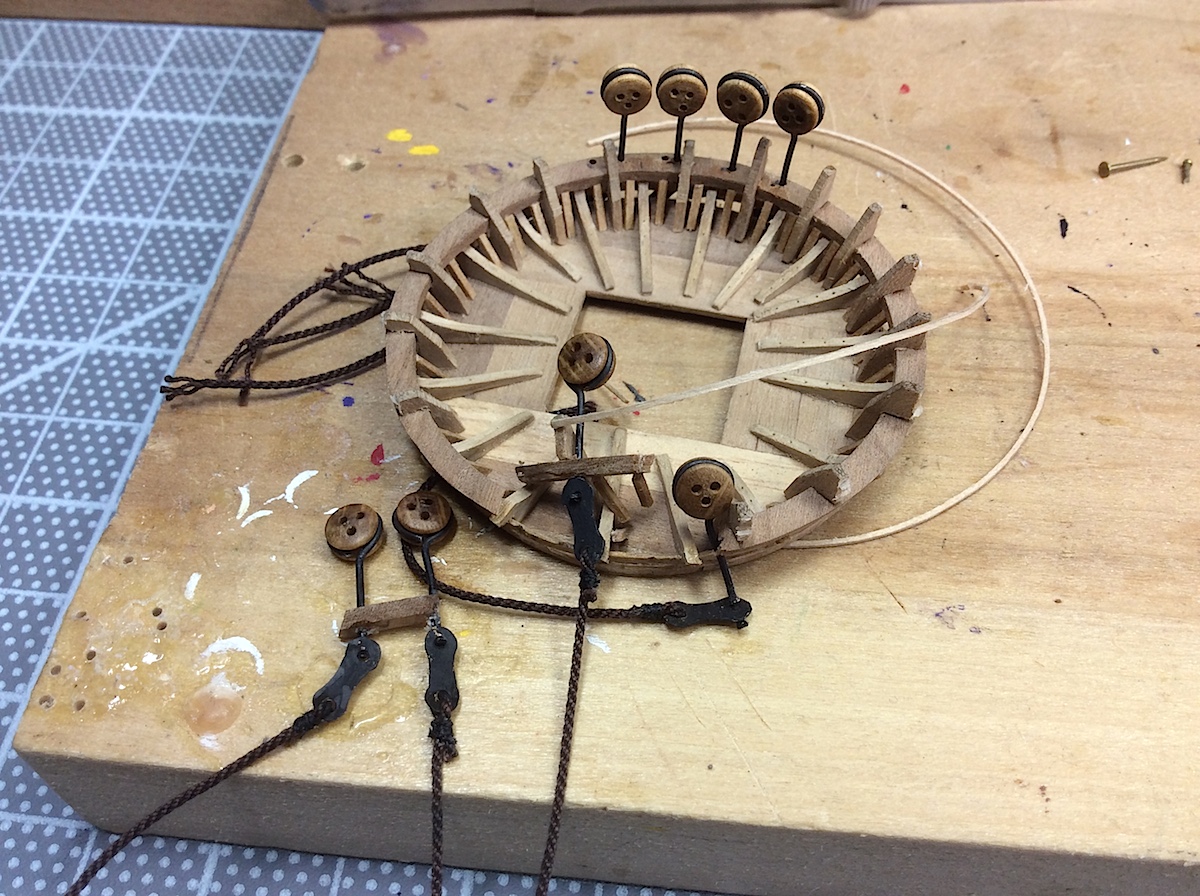
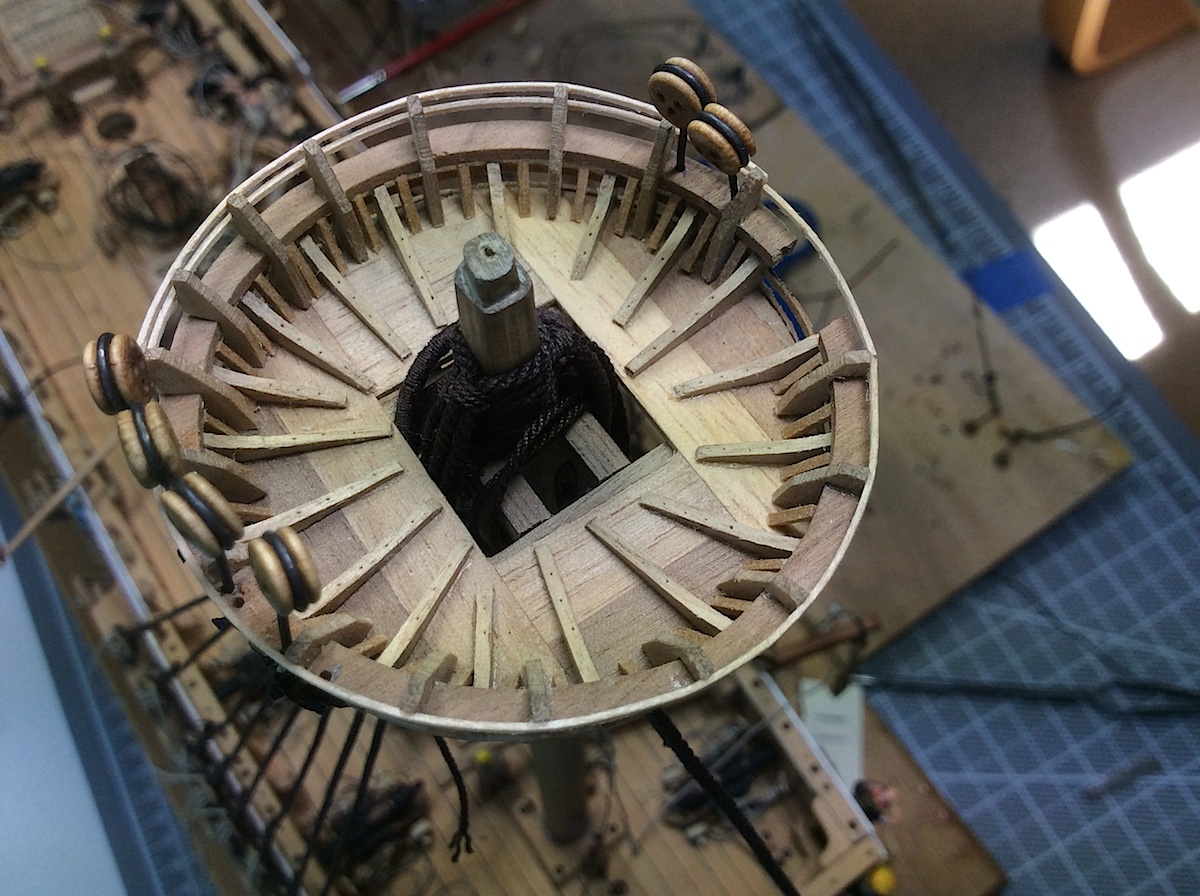
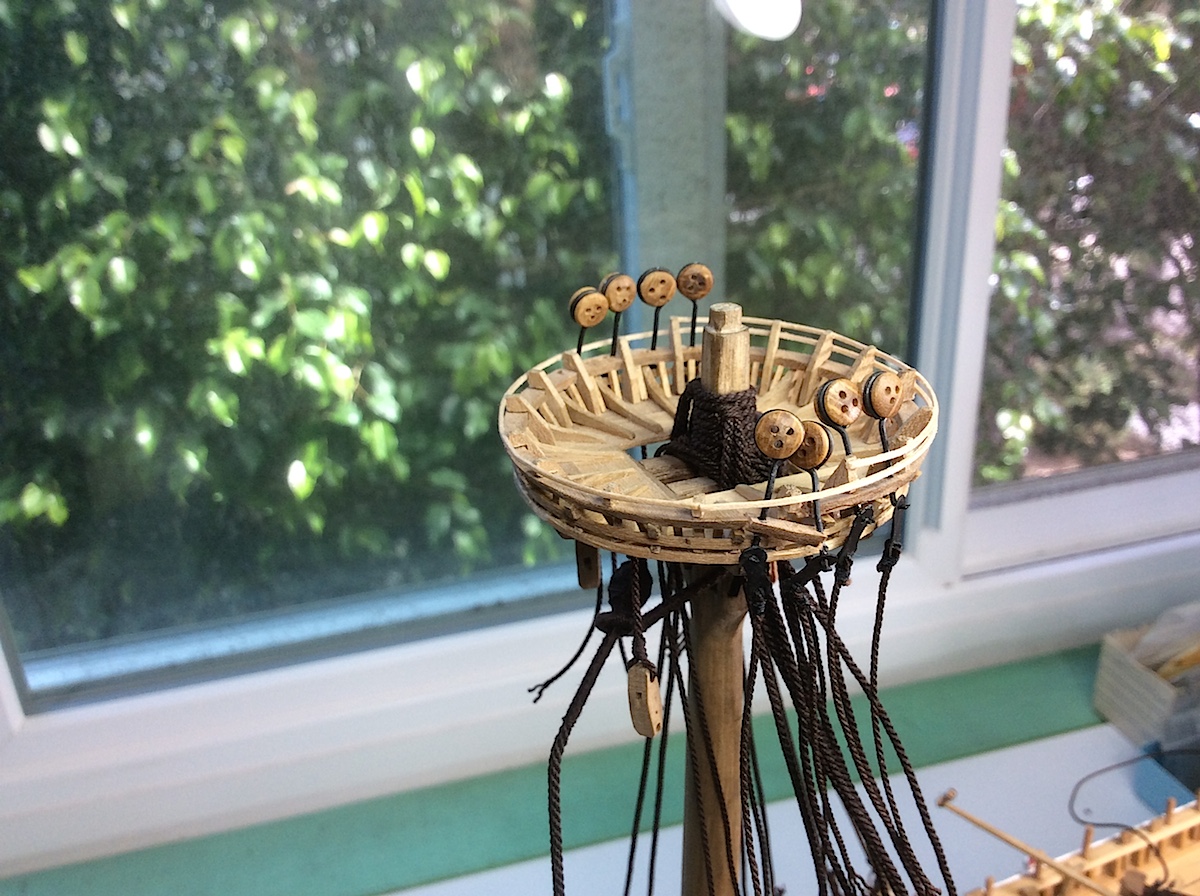
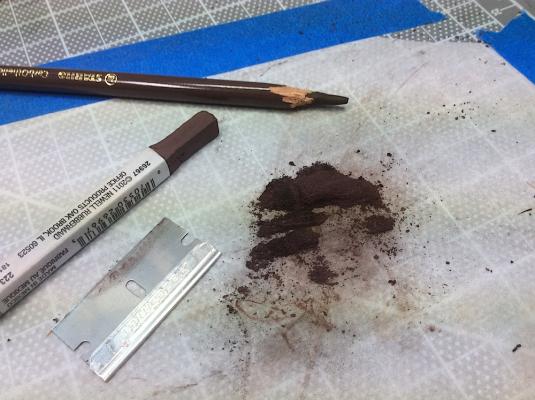
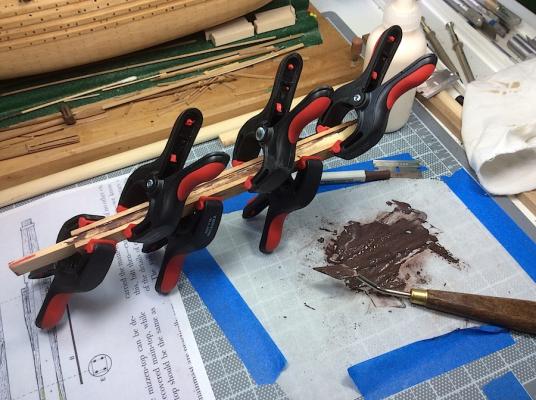
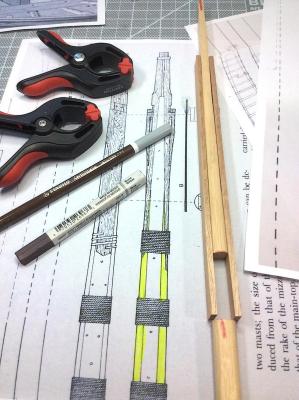
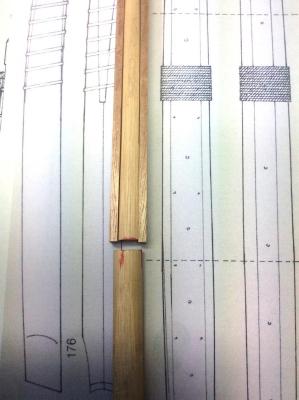
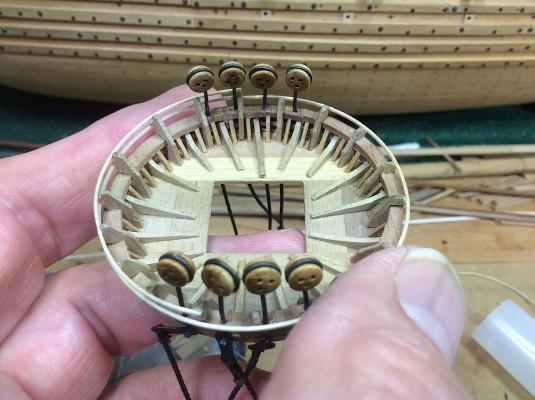
HI Mates, Quick back-to-back update; used the “Nigel Method” to simulate the tarring of the main mast pieces. Very happy with how it is coming out. Big thanks Nigel. I was going to use black paper or something. The pencil and glue idea is perfect. Still a work in progress, mast is dusty from sanding. I also plan to use a light stain to darken it a bit. That dowel is too white. OK now for the top part bits. And cap. Regards, Michael I think that the Museum used filler pieces that were probably missing after recovery.


-
Lawrence, Thanks for your comments. Yes my hired help with the crow's nest were excellent....mast may just be a bit of overkill, but I'm enjoying the learning challenge. If it does not workout I still have a lot of leftover dowel, add a bit of stain and throw it into the hole (;-) Mates, thanks for the "clicks" always much appreciated. Michael
-
Thomas, Good point. I used Watco Danish oil on the hull, and weatherdeck of my first model some 40 years ago. Hull still as nice as the day that I oiled it. Also, as you mention the wood looks So natural with invisible protection. Michael
- 608 replies
-
- 2
-
-
- la couronne
- corel
- (and 1 more)
-
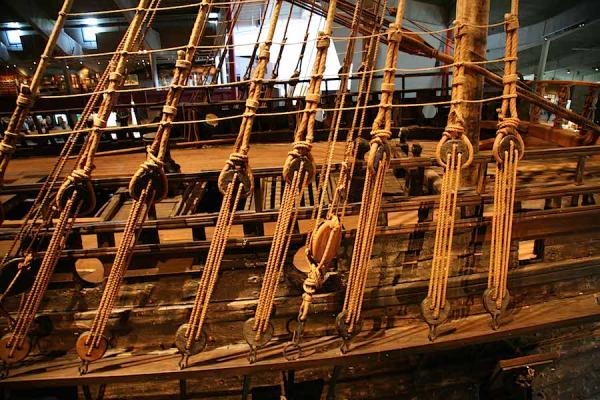
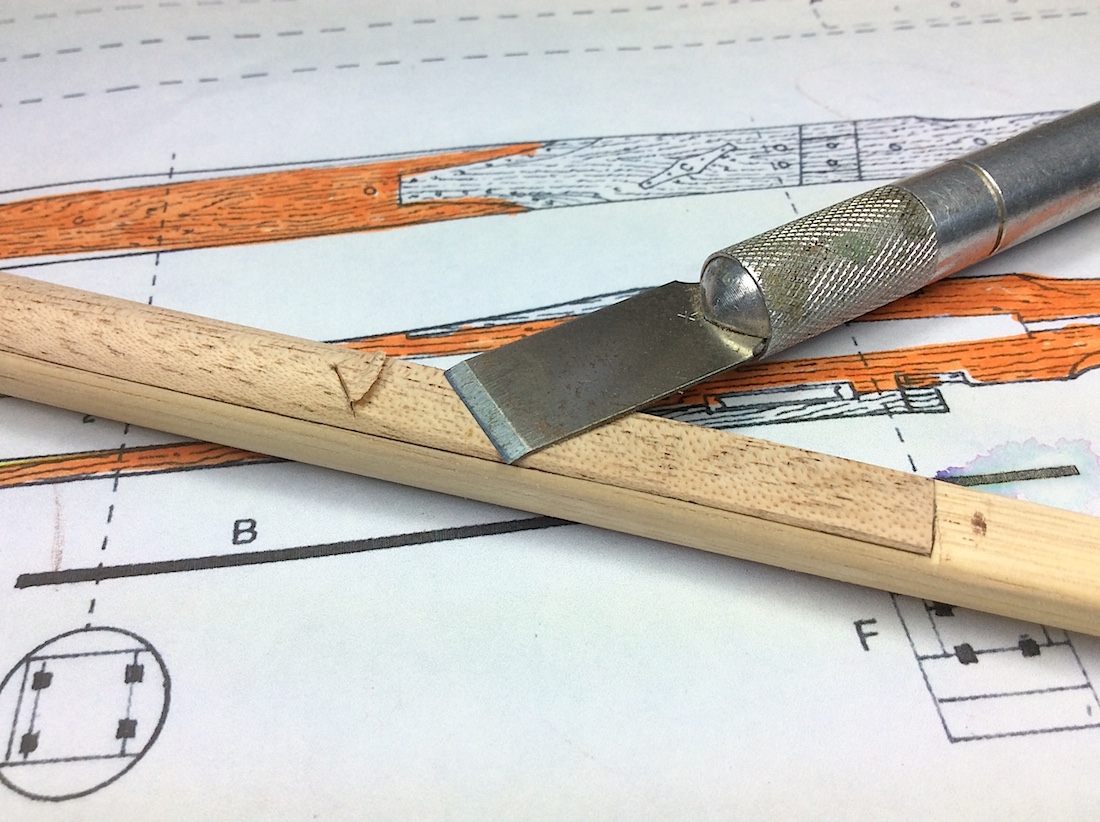
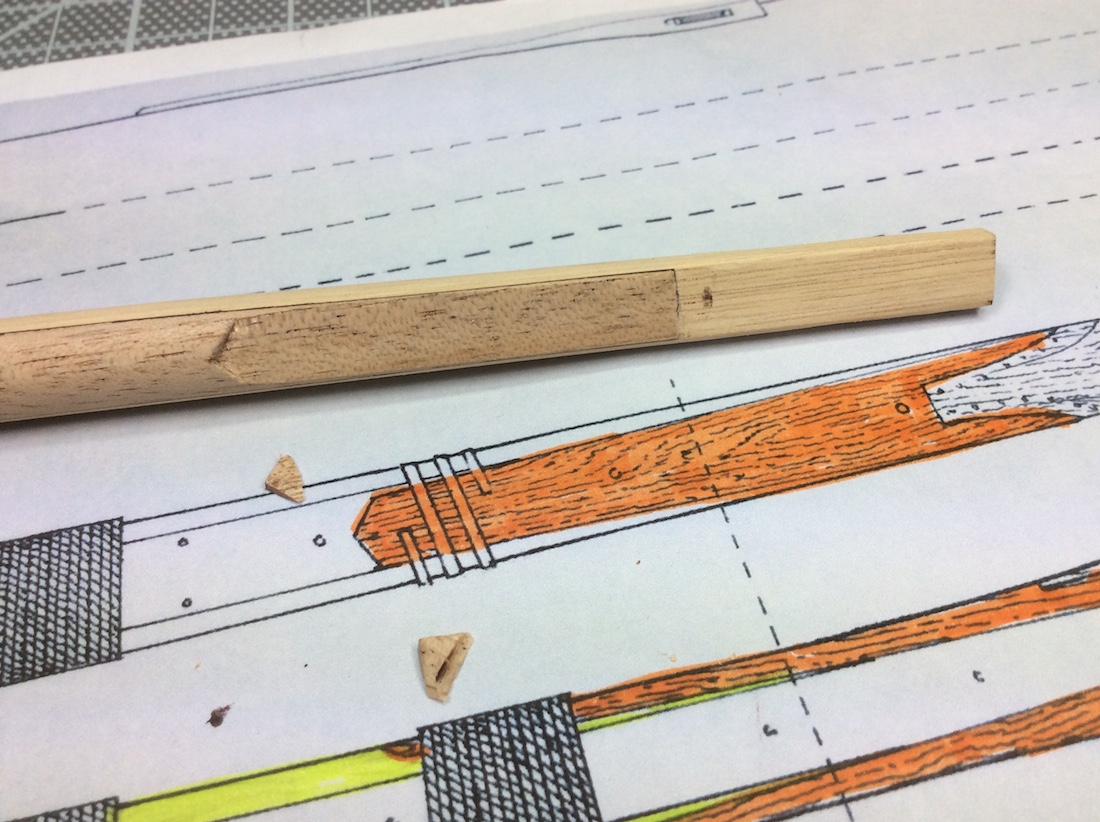
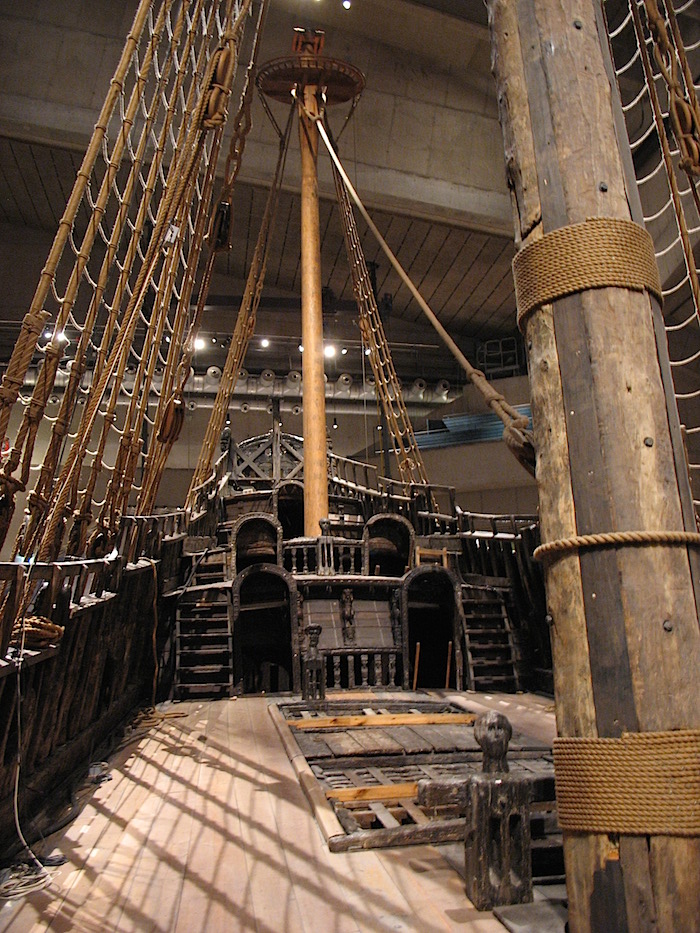
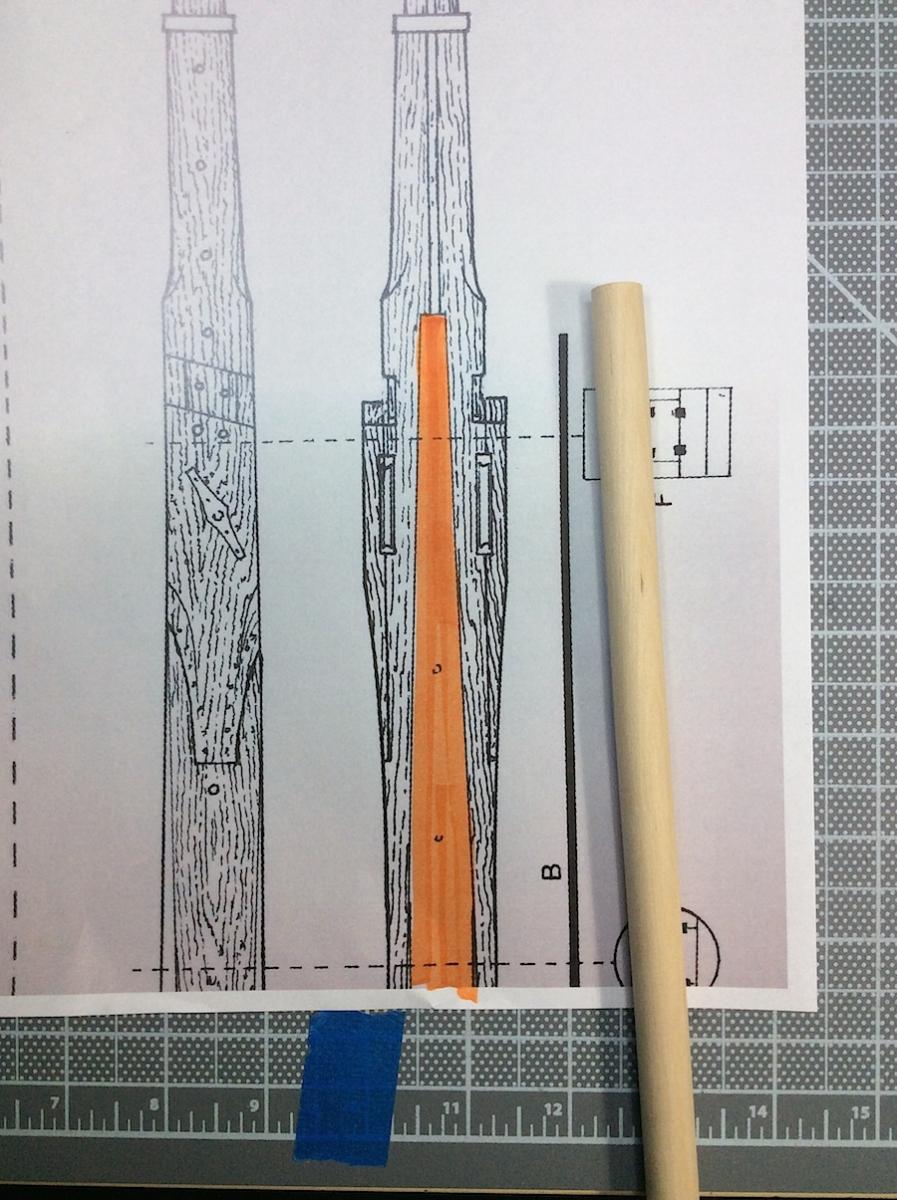
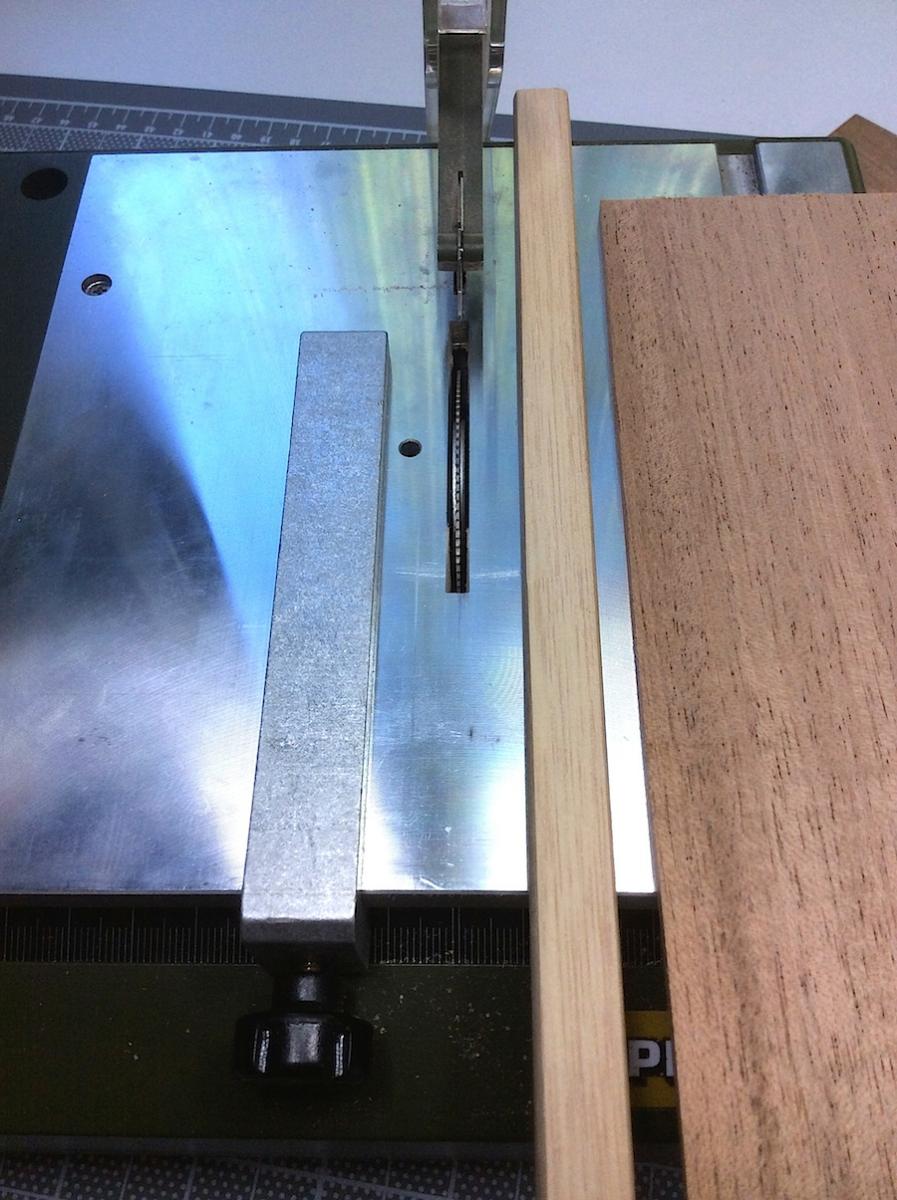
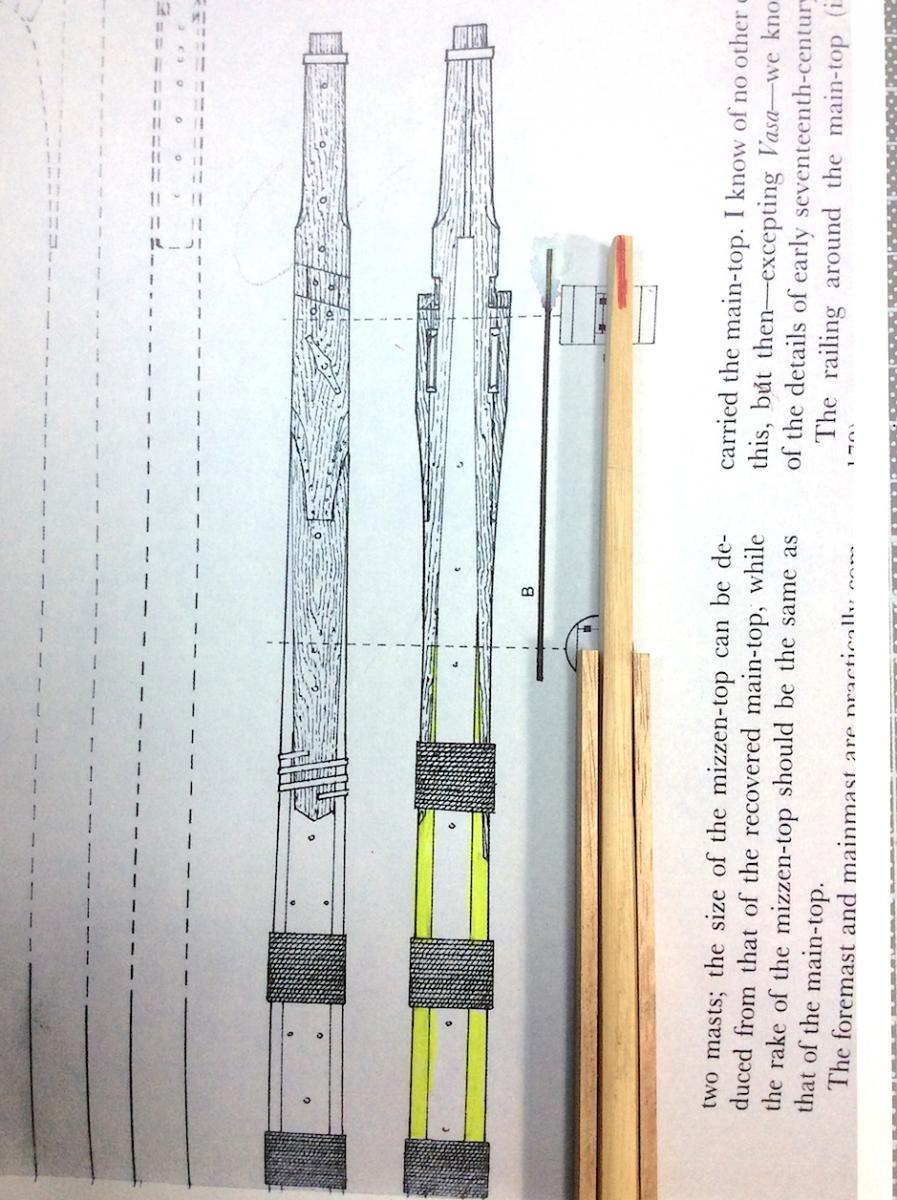
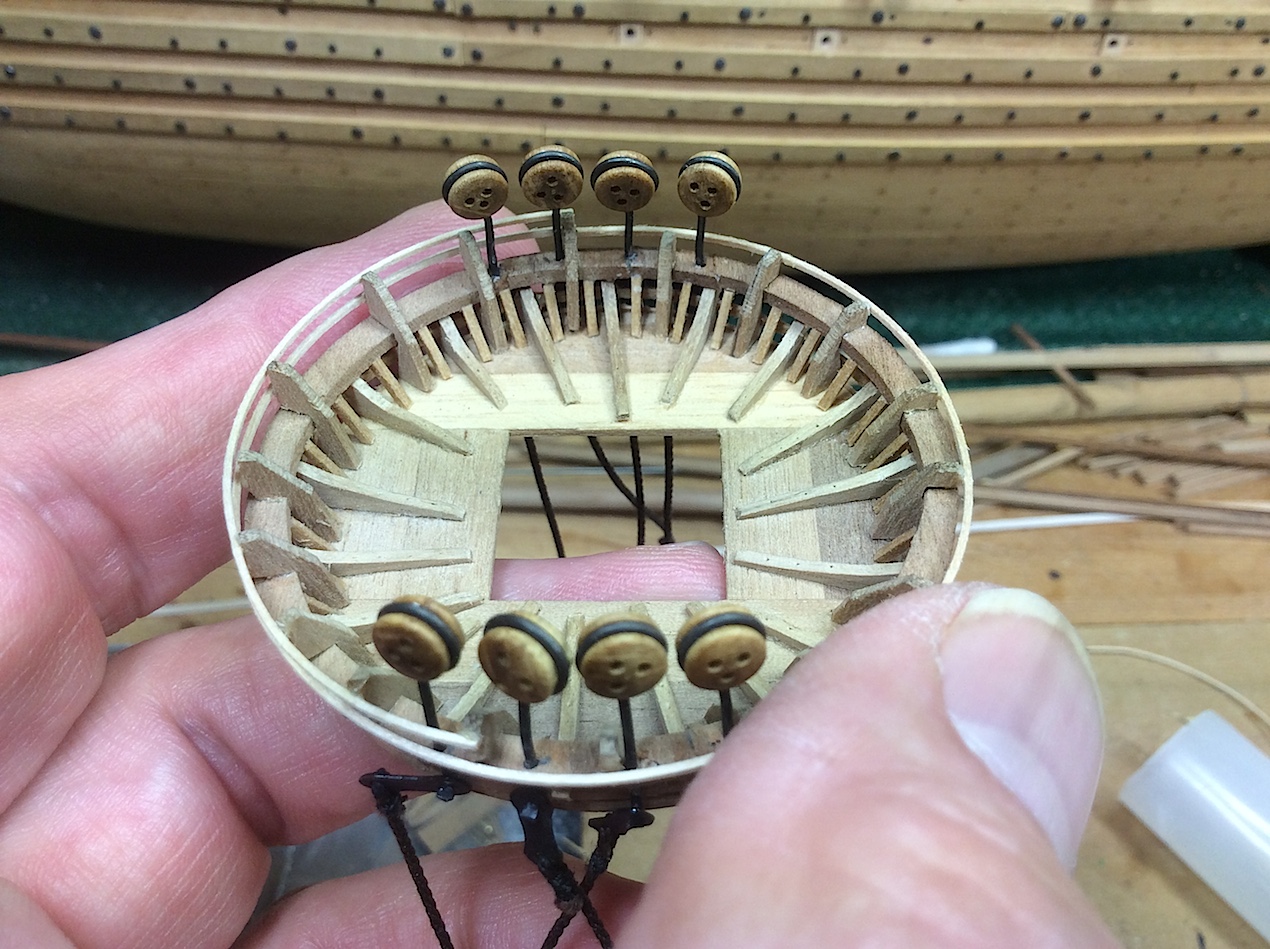
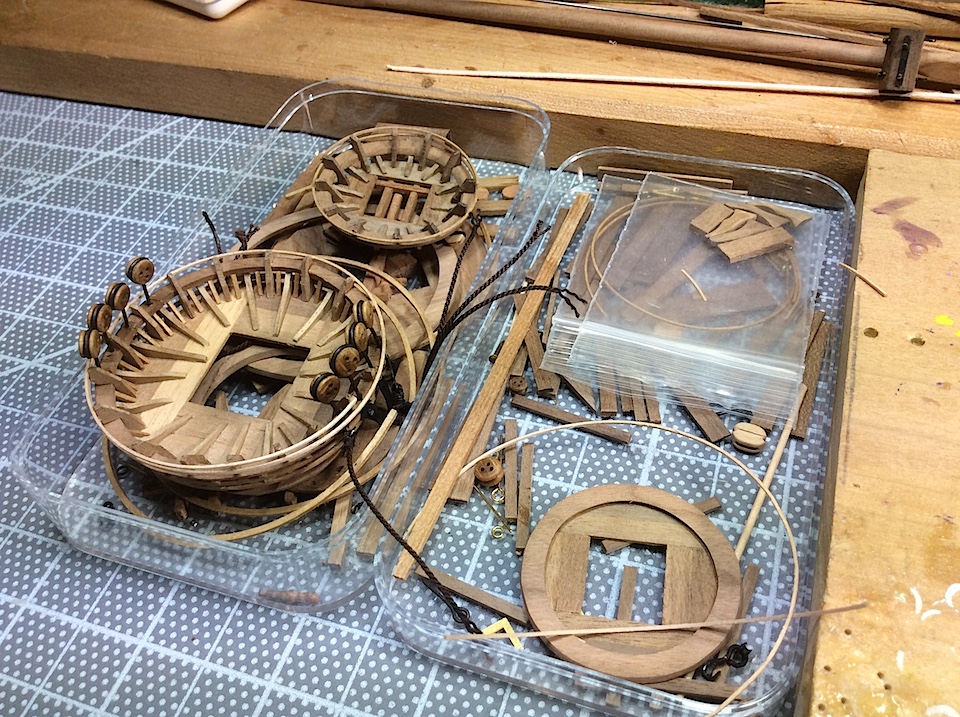
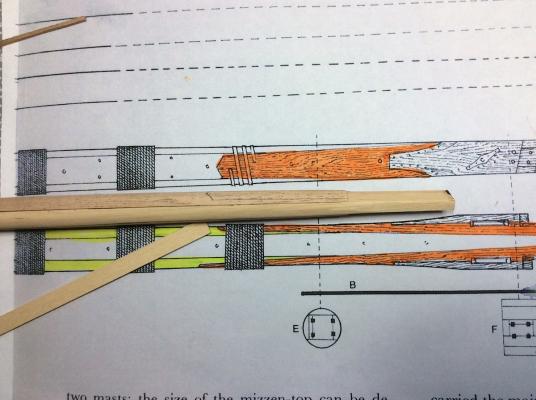
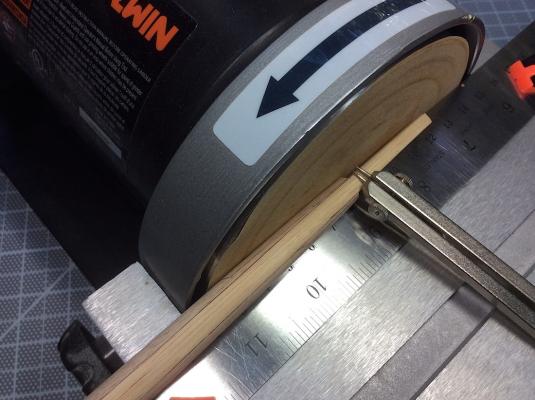
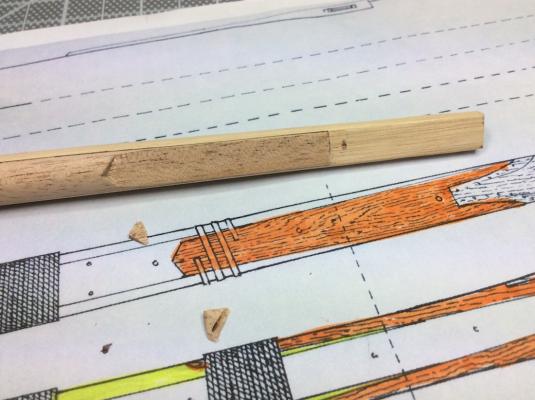
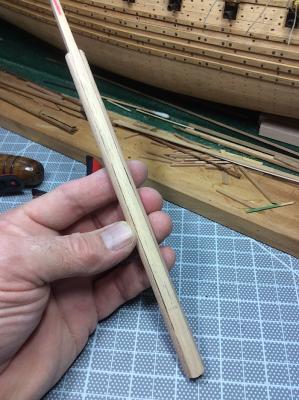
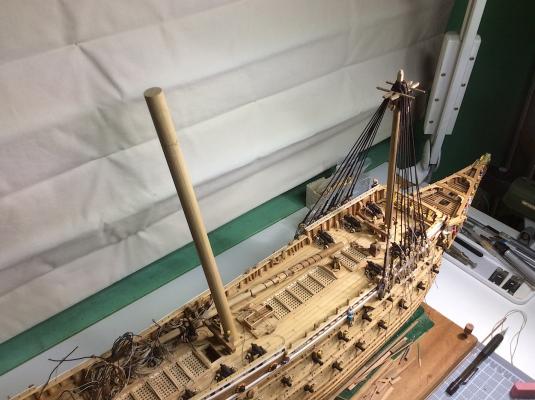
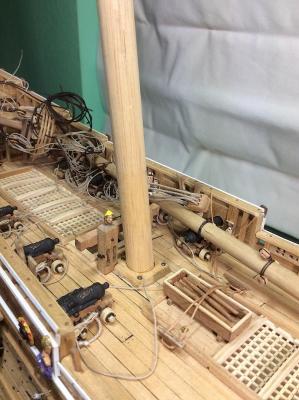
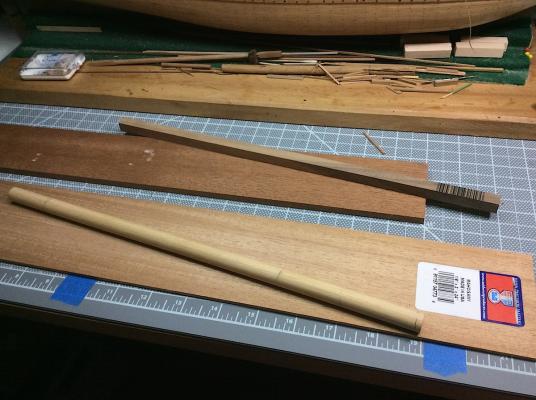
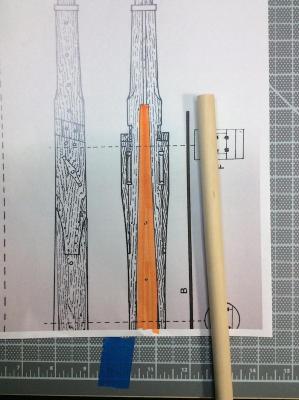
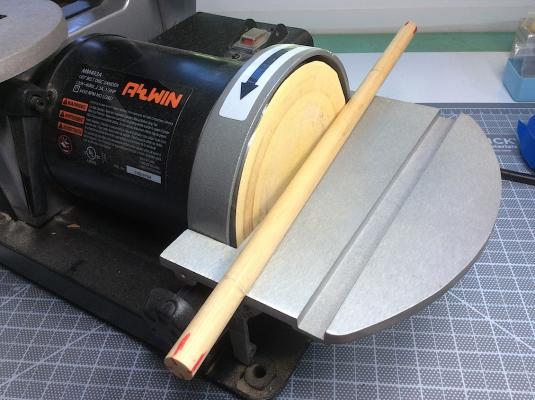
Hi Mates, Thanks for the Likes, comments, and/or just dropping by. ================== Starting preliminary work on building the mainmast. Using Landström as primary reference. According to Fred Hocker these line drawings are correct. Page 251 of Vasa I also have line drawings of main that look just about the same. SO here goes. I was not sure about cutting lower portion to approximately the correct size. So instead decided to focus on the upper proportions. I can truncate the assembled extra length later. After sourcing proper extra wood bits. (Lucky to have a Blick’s Art Supply store just a few blocks from the condo) First step was to thin both sides of the primary dowel. Then cut the needed side filler bits Next step will be to glue these two side fillers to the newly thinned out main dowel. I will use Nigel’s Brilliant idea of powdering a watercolor pencil and mixing it to the glue. After sanding (possibly lathing) to round the mast, the dark glue should simulate any tar caulking that would have been added during original assembly of these parts. PS: The actual mast is actually made up of a center core and has FOUR filler side bits. Overkill – I happy with just two side fillers. I will then need to reduce the combined parts to the diameter that original dowel. Not sure yet how to get this right. TBD Last pic – planning ahead for the upper top section of the lower mainmast. To be continued, Michael


-
Mates, Thanks for all of your kind "clicks". It's been a bit of a learning experience for me to move forward - at a "slow boat to china" progress. As I mentioned - now for mainmast construction. This bit will be new, but looking forward to the challenge. I will post my interpretations. PS: igorsr you are also so kind (:-) Cheers, Michael
-
Hi Mates, Thanks for your thoughts and "clicks". So it is "repaired" - Not B. Hills plastic surgery results (;-(. There are scars), but much cheaper ha ha.What did I learn? Not to install parts prematurely. Big learning lesson for me. Platform (crowsnest) will stay in the tray for a while. Now, happily, on to the mainmast. Again thanks so much Mates for your support, and encouraging posts. Michael


-
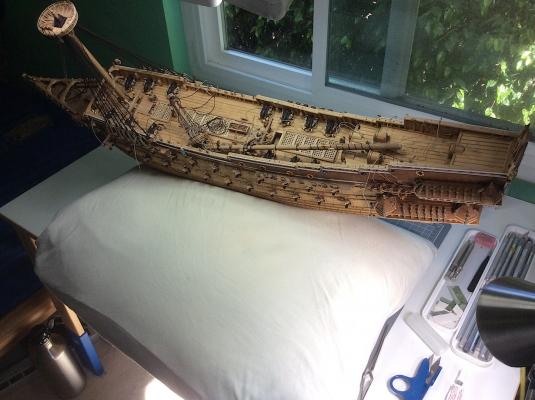
Mates, Thanks for your thoughts. It does appear as if many of us have had table-top shipwrecks. Ouch !. J - brilliant idea, thanks. I will follow through with this idea. There is a foam store nearby, I will fashion fit a large piece that will fit this project. Thanks for the post- I would have never thought of this type of cradle concept. Cheers Michael
-
EJ, I have been actually been "stealth" following your build, but it's time that I actually declared how impressive your work is. For example your second hull planking is perfection indeed. Love the upper hull muted colors. It all works together very well. This ship has always intrigued me. Some post back there was a link to HD plans those look very good. I hope that you downloaded them. Now I will actually get updates. Awesome work!! Cheers, Michael
- 608 replies
-
- 3
-
-
- la couronne
- corel
- (and 1 more)
-
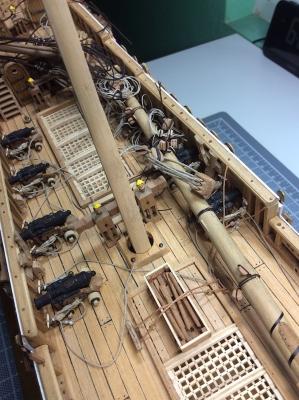
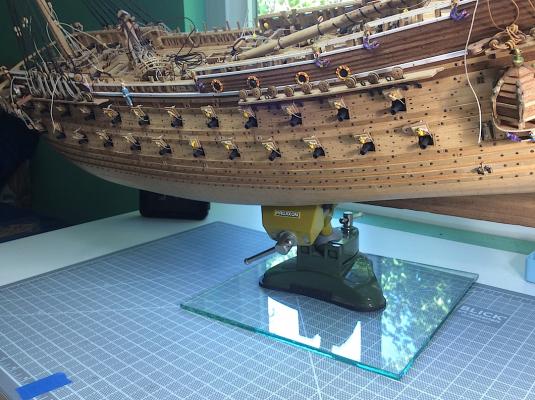
Hi Mates, Thanks for your thoughts regarding this damage. Igorsr - Thanks so much for your interest in following this build log. Very kind of you, Update on the crashed platform; Decided to (this time [hindsight]) use my Proxxon Vice to complete the fix. FYI – This is the second time this ship has fallen sideways. The first time was – way back when – so no damage. BUT the ship was attached to the Proxxon Vice with suction pad. The vacuum was from the table to the vice. That did NOT work out. Vacuum suction escaped and ship with vice attached fell sideways about ten minutes later. Hmmmm. Purchased a piece of glass. NOW when I suction lock the vice, I first clean the glass, then clean the rubber bottom of the vice, then rotate the suction lever. The vice has NOT lost its suction since. PS: 2 Great addition to my tools! (vice) ---------------------------------- Still today I got so paranoid used a pillow in case ha ha, In any case damage worse than I thought. Turns out the ring had two broken bits, not just one. Managed to remove the platform using a flat rectangular Exacto blade twisting sideways between the platform and its lower braces. Now I will correctly, and much more peacefully, rebuild the broken bits as well as replacing the tiny wrap around rings. I was hoping to move forward and start work on the main mast that I hope to articulate as closely as I can to the original. I have enjoyed thinking about this segway into a new area. Wood and I are better friends (;-) So a slight delay. Again Mates thanks for dropping by the shipyard, always a pleasure to have you as guests. Regards, Michael

-
Frank, Yes it appears as if many of us have had breakage, replaced parts, and cost overruns along the way. I think that I will apply for a US Govt contract to continue with this ship, I won't have to worry about parts breaking, parts not working, added budget costs, not completing on time - sounds perfect ha ha...... Ok I'm on the phone to the Pentagon. They love buying, paying for, and still receiving applications for obsolete projects (:-) Michael
-
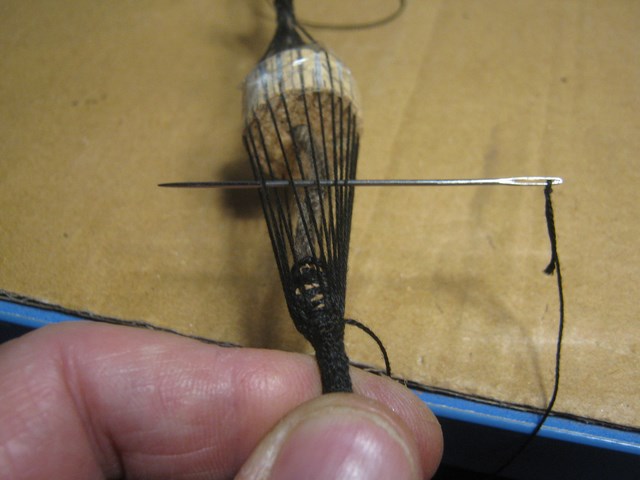
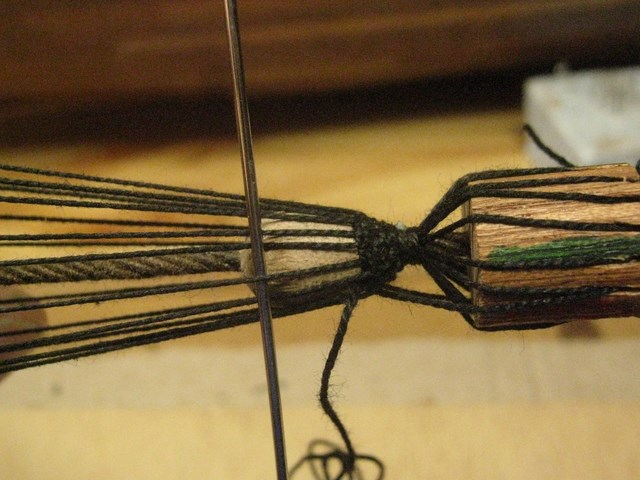
ARGHH!!....Making A Mouse For Stays
md1400cs replied to bigcreekdad's topic in Masting, rigging and sails
Capt. Poison. You win !! YES it was he. His builds are so "over the top" I went back through some of his amazing logs. That name just sorta struck me. Here is the page http://modelshipworld.com/index.php/topic/246-le-fleuron-by-cabrapente/page-16 Michael -
HI Mates George, John, Vivian, David thanks for your concerns. Vivian so nice to see you back posting on your build log (;-) EL_J after reading your much more involved damage, I feel embarrassed posting my, by comparison, little damage. That must have really been a pain. igorsr - thanks for your such nice comment -blush.... Ferit, thanks – noted, as usual your thoughts are always appreciated. So after yesterday’s double trauma (The also Dodgers lost ha ha). Today I sat and looked at the damage, found more (minimum) at the gallery. Did the repairs easier than expected. Glued the deadeye/chainplate with CA to its broken off ring. and then that section was able to be coaxed back into place. Then went back to shrouds/deadeyes. Hmm - noticed that for some reason the fish davit beam was loose and moving around. Then it “hit me” the davit absorbed the majority of the impact shock as the ship fell over. This “foresight” (of installing this bit) probably saved me from dealing with a lot more potential damage, especially to the platform and gallery. Well once-in-awhile an important win gets me by. J Luckily it was well glued and did not slide across the deck causing more issues Michael

-
Grrrrr curses, I was just finishing up the shrouds and deadeyes on starboard side. Needed to angle the ship a bit sideways. It slipped out of its “groove” and fell over onto the table. I wasn’t careful when “sideways” positioning it. Will leave this alone for now. Could have been much worse, I guess. Need to think this through. OK Now just full attention to watching my Dodger game J Michael

-
Vivian, Após a má sorte vem boa sorte. Looking forward to some future updates. Michael
-
ARGHH!!....Making A Mouse For Stays
md1400cs replied to bigcreekdad's topic in Masting, rigging and sails
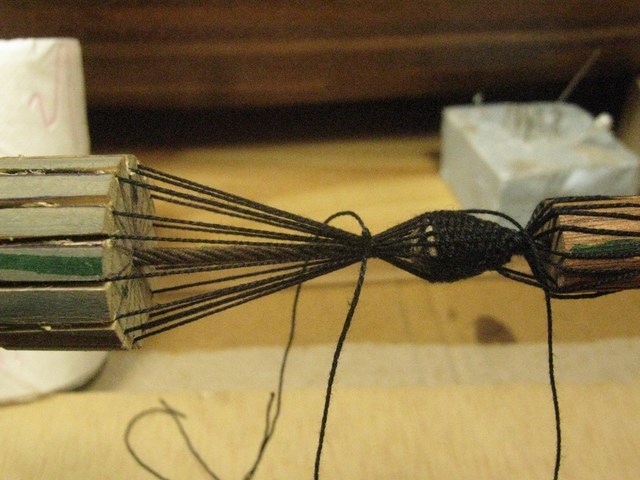
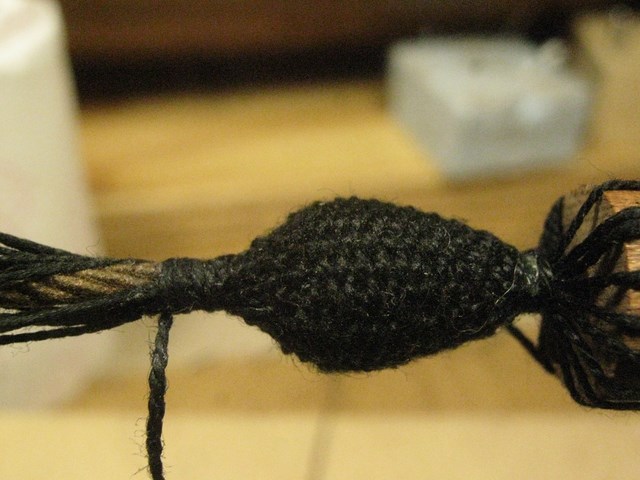
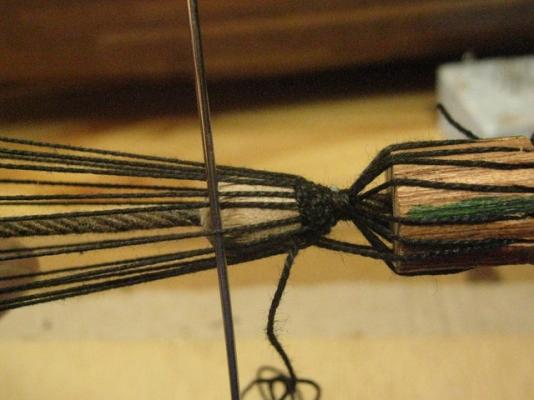
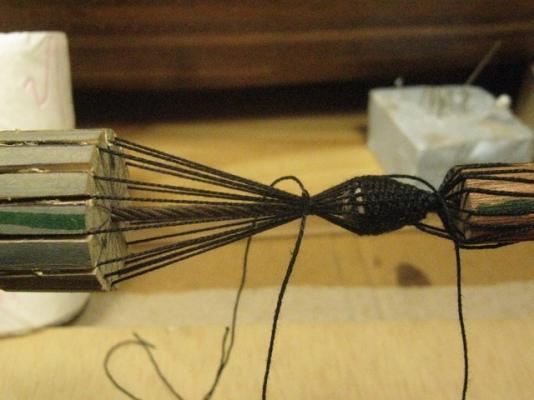
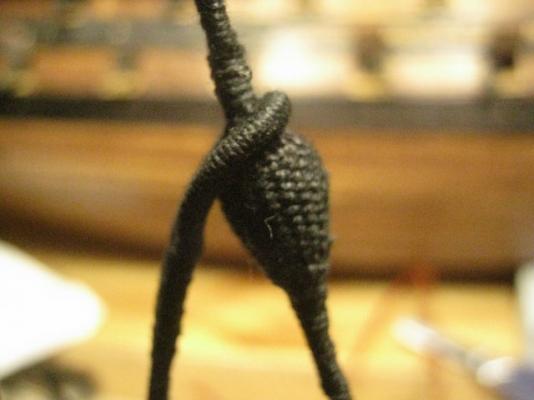
Yes there is. Embarrased that I can't link you to the log here at MSW, but I added these pics to my how-to folders. If anyone can lead bigcreekdad to the log that would be great. I also attempted to do a mouse in my build log, before seeing the photos below. I will try this new better method for the mainmast. http://modelshipworld.com/index.php/topic/329-wasa-by-md1400cs-corel-175/page-59 scroll to bottom of page hope that these help

- 7 replies
-
- 16
-
-
Dave, You just made my day (:-) thanks ! PS: You work with optics is so impressive. Been following (;-) Michael
-
Mates, Thanks for the likes and comments. Peter thanks for dropping in and posting. I, also, as a landlubber, have tended to follow the look of builds that I admire. And yes it seems as if the deadeye alignments are the examples to follow, but I would imagine that your notions are actually correct. Your description makes entirely good sense. I, then went back through some files, and did, in fact, notice variations with the museum's and the 1/10th. My mindset ignored "seeing" these. Noted, thanks I will continue to eyeball them, but I will also be less stressed if I see minor variations. Thanks again for your thoughts. Regards, Michael