
Supplies of the Ship Modeler's Handbook are running out. Get your copy NOW before they are gone! Click on photo to order.
×


mtaylor
-
Posts
26,270 -
Joined
-
Last visited
Content Type
Profiles
Forums
Gallery
Events
Everything posted by mtaylor
-
Hi James, Welcome to MSW. I think most of us will always regard ourselves as "noobs". There's just so much learn and one thing is mastered, you look ahead and learn something new. This is good for keeping the mind sharp and MSW is good for helping fill in those gaps.
-
Spit is the choice of "professionals" supposedly because of the enzymes in it help to remove the grit.
-
If the paint is too bright, put some red in a an old lid and add one or two drops at a time of black to darken it. I haven't done model painting in a long time and recalling what I did with the old enamel paints. Many paint stores (home improvement type) here in the States have machines that can take a color swatch (say the picture of the red you need) and then give you the "mix" of colors. The catch will be translating from house paint to the model paint in the hobby shop.
-
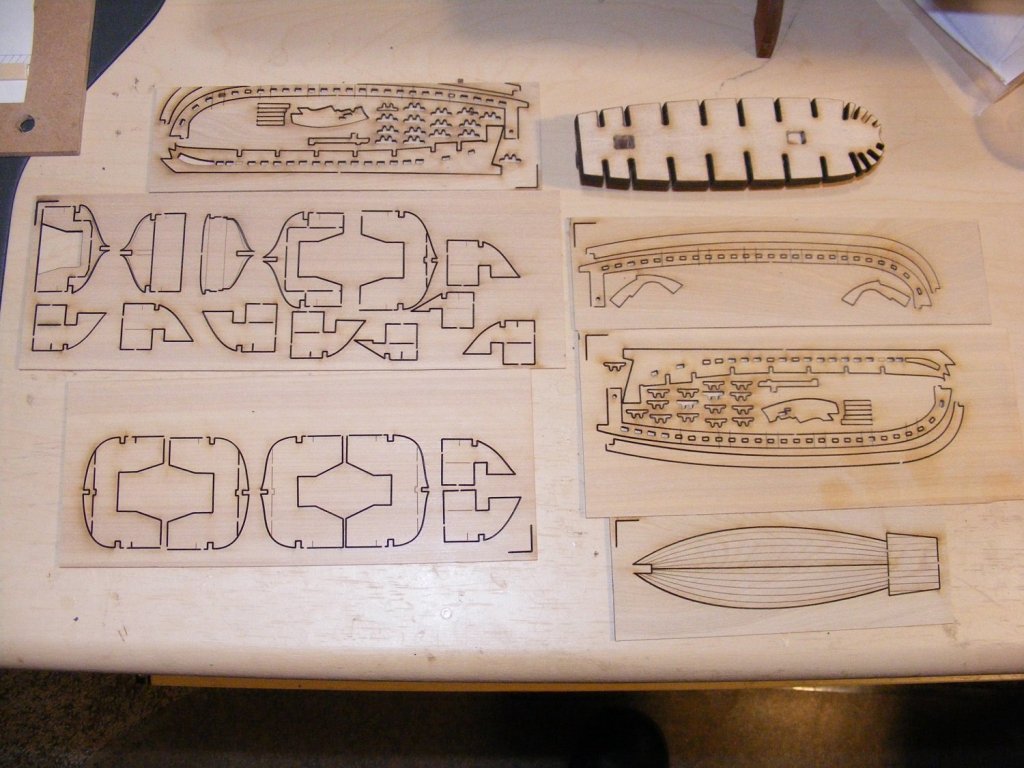
Thanks for following along this voyage everyone. Things have settled down a bit and I'm getting some shop time. So on with the build as time permits.. now where was I? Oh... the carvings have been set aside (again). I probably have a mental block for them. So it's back to the ship's boats. I've basically dumped all the old formers and bits that had worked on as I just wasn't happy with the way they were turning out. Felt like something was really amiss so I went off on a different tack. I hope this time will be the magic one. I've done a test boat (didn't complete it) that showed me the "true" path to enlightenment. Or something like enlightenment. I reworked a set of plans I bought and turned them into what I needed for the boats. I also decided to attack the 6" boat first and work down to the 4". Disclaimer: I sent the plans maker a copy of all the plans for these boats to see if they can use them. I'm also buying enough kits (3) so the build will essentially be on a one-for-one basis. After reworking the plans, I've cut the first pieces which are the keel, building jig and all the associated pieces out of boxwood. I found that plywood un-glued itself or the glue went up on smoke and I ended up with charcoal. There were two pieces of the build jig that I cut from 1/4" basswood and it's been cleaned up as necessary. I'm currently removing the pieces, cleaning off the char as needed and putting together the keel and building jig. I hope to cut out the ribs and planking from Swiss pear later this week. There won't be twarts, rudder, oars, etc. inside this boat as it's the "bottom of the stack" as such and the next boat will fird inside this one. The sharp eyed will detect a few errors in the photo such as a duplicate cutting due to my mispositioning the wood into the laser. It's a "just in case" spare now. There's at least one other obvious "I blew it" moment but those two parts have been corrected and recut. There will be more pictures to come.
-
Bearding
mtaylor replied to rafterrat_2005's topic in Building, Framing, Planking and plating a ships hull and deck
By boarding are you asking for the number of planks, etc. or amount of raw wood? -
Are you using the ANCRE plans/monograph? I have their Hermoine monograph and there's no color charts like on some of their other monographs. However, they do have several pages on the colorings.
-
Looks very good, G.L.
-
Anyone using electric plank bender?
mtaylor replied to MESSIS's topic in Modeling tools and Workshop Equipment
I'm one of the curling iron brigade... have two old ones from the Admiral, a 1" and a 1/2" . They seem to work pretty well. If you're frugal (ok... cheap like me) you sometimes can find them at 2nd hand shops or garage sales. -
Welcome to MSW Chris, or maybe it's welcome back? Looks like you're off to a good start on the Aggy.
-
Lou, Haven't you heard the "Dogs have owners, cats have staff"? In your case it's possible that the dog is part of the cat's staff as a playmate.
- 1,090 replies
-
- 7
-

-
- showcase models
- vendetta
- (and 2 more)
-
Lou, An old trick on tight bends with thicker wood... lightly cut some dados (I think that's the right word) into the wood strips. The closer the cuts, the tighter you can bend it but you'll still need to soak and/or apply heat. You'll have to play a bit to find out the depth of the cut also. The plank benders some places sell don't cut the wood, they crush it so it really doesn't work as well.
-
From the pictures, it looks to me like a of details are going to be hidden when the upper deck goes on. Pity that but then we see it in the period models too. I'd vote for paint the guns.
- 467 replies
-
- 8
-
-
- mikasa
- wave models
- (and 1 more)
-
Quote: " Every time I make a part or look back at previous old work I see a myriad of issues and say to myself, “Man I suck!” " I thought we all did that? Your planking looks pretty good from here also. Now stop beating yourself up.
-
Nice work on cutting her free, Al. That's always a surprise when you cut them loose, they're so light... and pretty strong.
-
Wonderful work and research, Steven. Here's the link for TAMU: http://nautarch.tamu.edu/academic/alum.htm
-
Recommendation
mtaylor replied to Jaeon's topic in Building, Framing, Planking and plating a ships hull and deck
The only advice I can offer at that moment (not having built that model) is to do a search here on MSW for "pinnace shipways". There's been quite a few build logs.. (you cans also search here: ) And lastly, Chuck (admin) designed this kit.... -
Recommendation
mtaylor replied to Jaeon's topic in Building, Framing, Planking and plating a ships hull and deck
Which model is this? Just curious. And also is the bevel (or is it wood thickness, can't tell from the photos) follow the rabbet? Lastly, some model kits (I'm noting AL here especially) have parts and have plans. Laying the part on the plan doesn't seem to work as the plans are not the size of the of wood. -
I'm going to toss this into this topic. It's very useful and came from a now retired wood supplier. Byrnes Saw Operation.pdf
-
Welcome to MSW, By all means, open a build log for this model. You'll get help and encouragement and make some friends along the way.
