HOLIDAY DONATION DRIVE - SUPPORT MSW - DO YOUR PART TO KEEP THIS GREAT FORUM GOING! (Only 72 donations so far out of 49,000 members - Can we at least get 100? C'mon guys!)
×


hexnut
-
Posts
406 -
Joined
-
Last visited
Content Type
Profiles
Forums
Gallery
Events
Everything posted by hexnut
-
Both the ship and the car are very worthy projects. It can be said that the Victory defined the spirit of The Royal Navy, and the Ford V8 defined the spirit of American hot rodding. We call them "flat-heads" around here, as the valves sit beside the piston in the block, not on top of it in the head like later engines... Good luck on both fantastic efforts.
-
Very cool. In the time that it has taken me to not build one of these, you've built two and a shipyard!
- 209 replies
-
- 1
-

-
- muscongus bay lobster smack
- midwest products
- (and 1 more)
-
Very Nice. The paint and wood treatment give this a truly classic look. Make sure Ralph Lauren doesn't steal it for advertising purposes...
-
Is that a 1948? I love the patina, especially on the hood, looks great with the steelies and whitewalls. What is the engine? BTW, the Victory looks very nice as well!
-
Basil Lubbock's The Blackwall Frigates (available online) has some photos and a cross-section, no plans or anything, but interesting info... https://openlibrary.org/books/OL7033101M/The_Blackwall_frigates David Lyon in ..All the ships of the Royal Navy 1815-1889 lists: 250'0" pp., 39'6", 1,800 b.m. That should at least put you in the ball park for hull adaptation... Good Luck!
-
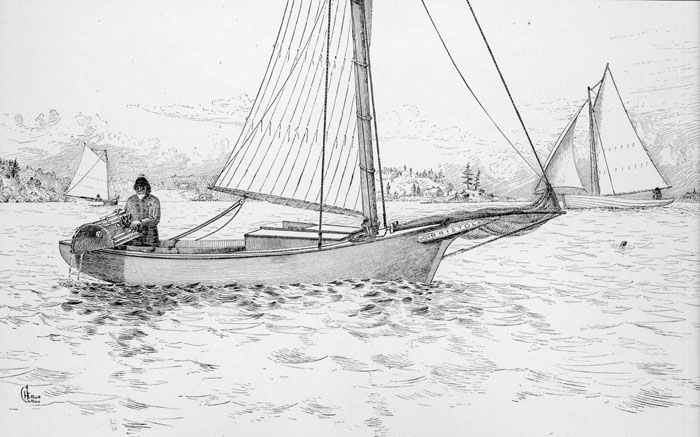
Here's a good illustration from G. Brown Goode's report: The Fisheries and Fishery Industries of the United States 1884-1887 http://celebrating200years.noaa.gov/rarebooks/fisheries/ Note that the coaming hits about upper thigh on the lobster man. Assuming 5' 8" tall or so, the cabin floor wants to drop a bit... My apologies for the pedantry--hey I'm a nerd...

- 86 replies
-
- 3
-
-
- muscongus bay lobster smack
- Midwest Products
- (and 1 more)
-
Thanks, Casey. I'm learning as I'm going as well (although more learning than going at the moment.) As far as cutting away portions of the false keel, once the bulkheads are glued in and the side battens installed, it's a pretty sturdy assembly. I chopped away a lot of false keel and bulkhead material before I got silly and started making my own parts. Pete, (Your MBLS buld is looking really nice, by the way.) It's not a matter of fit, but of ergonomics on the actual boat. With the cockpit deck position shown on the Midwest plans, the top of the coaming hits a 1/24 scale person about knee height, with less than a foot of ht. difference between the seat and the deck. One of the reasons I spent so long messing with the hatches is that I became interested in what the actual work flow was on a late 19th century lobster-catching set-up, which led me to the conclusion that a bit more cockpit depth would make for a much better arrangement. This was the post that Dee Dee made in his build log that IMO summed it up nicely: Cockpit Floor I added width to the cockpit and esthetically it works, but it’s not right. Per the Midwest blue prints, the cockpit floor is ~18” lower than the deck and the benches are 9” in height – not too comfy nor safe. Chapelle’s drawing shows the benches, but no floor. On page 272, there is discussion about the floor: “Five floors were the most used, and many boats had none. The floors, if used, were of plank and were placed on top of the frames rather than beside them or were located clear of the frames and fastened to keel and planking.” Long ago we owned a four digit wood hull lightning built in the mid 1950’s. I found some pictures of other Lightnings and the light bulb went on! Check out the photos below. Chapelle’s comment is now starting to make sense: “…..and were placed on top of the frames…” I’m thinking the floor planks would look similar to this mock up. This would drop the floor height to ~29” (top of the femur) making it safer, more comfortable seat height and much cheaper to build.
- 86 replies
-
- 3
-
-
- muscongus bay lobster smack
- Midwest Products
- (and 1 more)
-
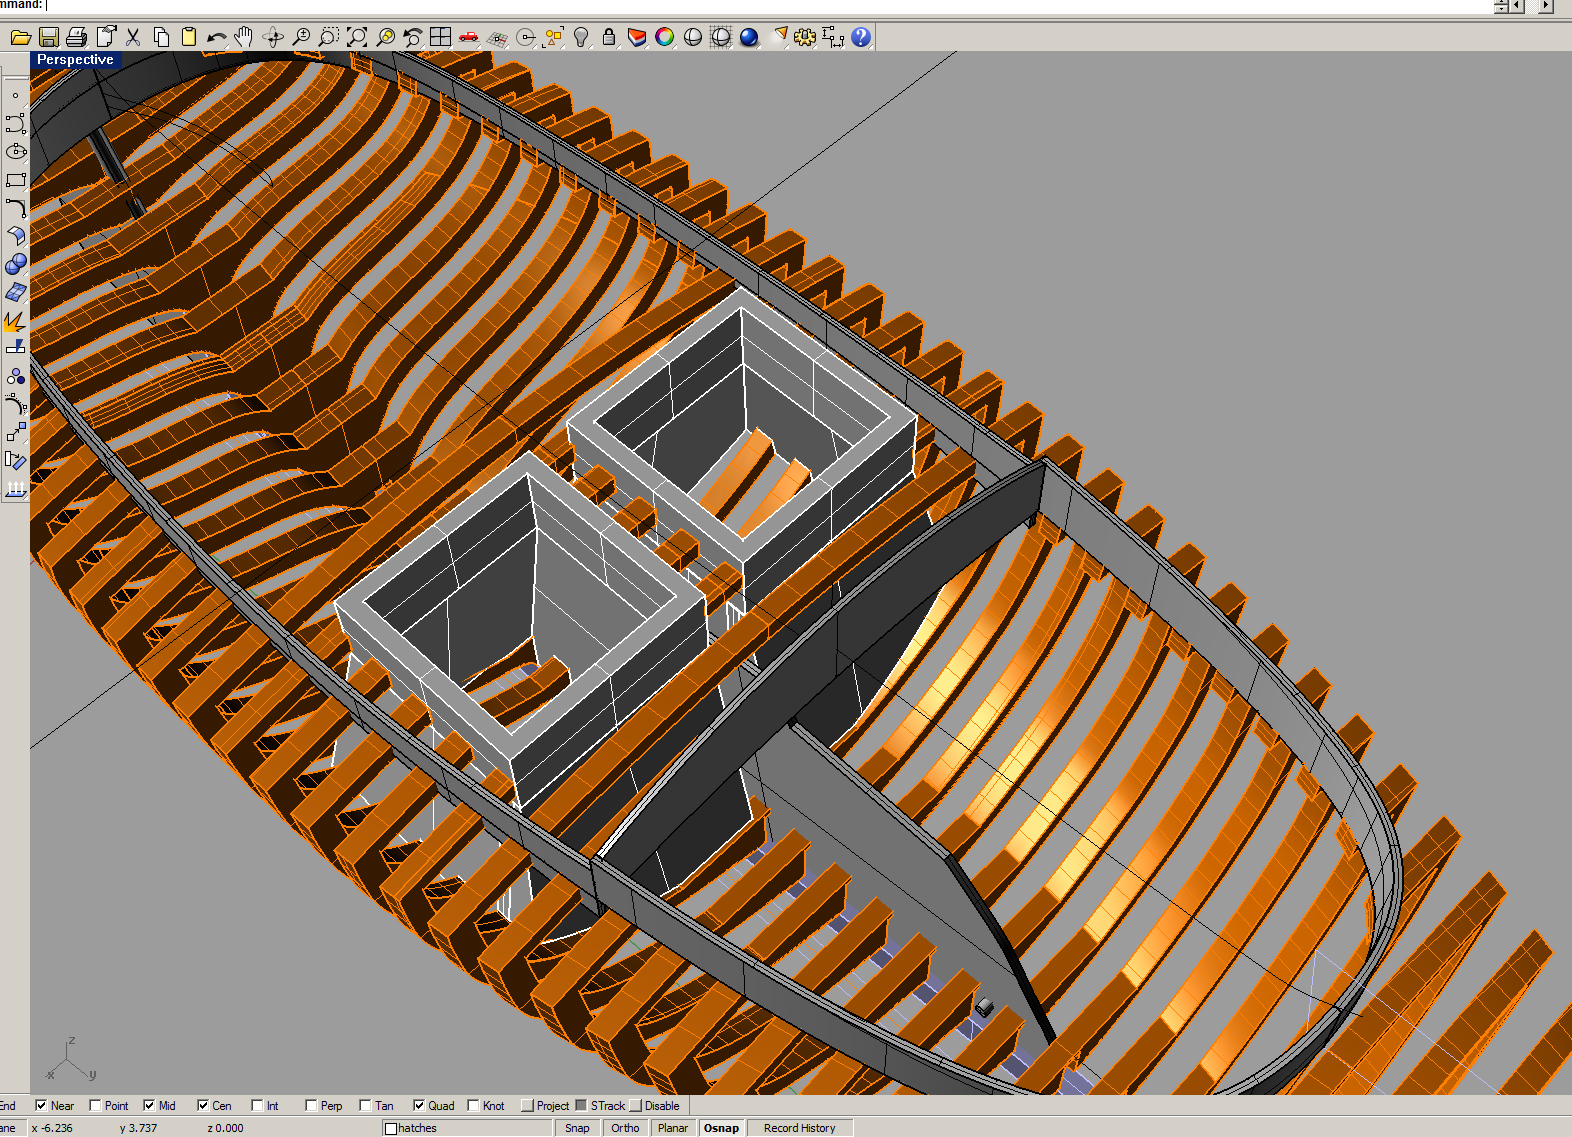
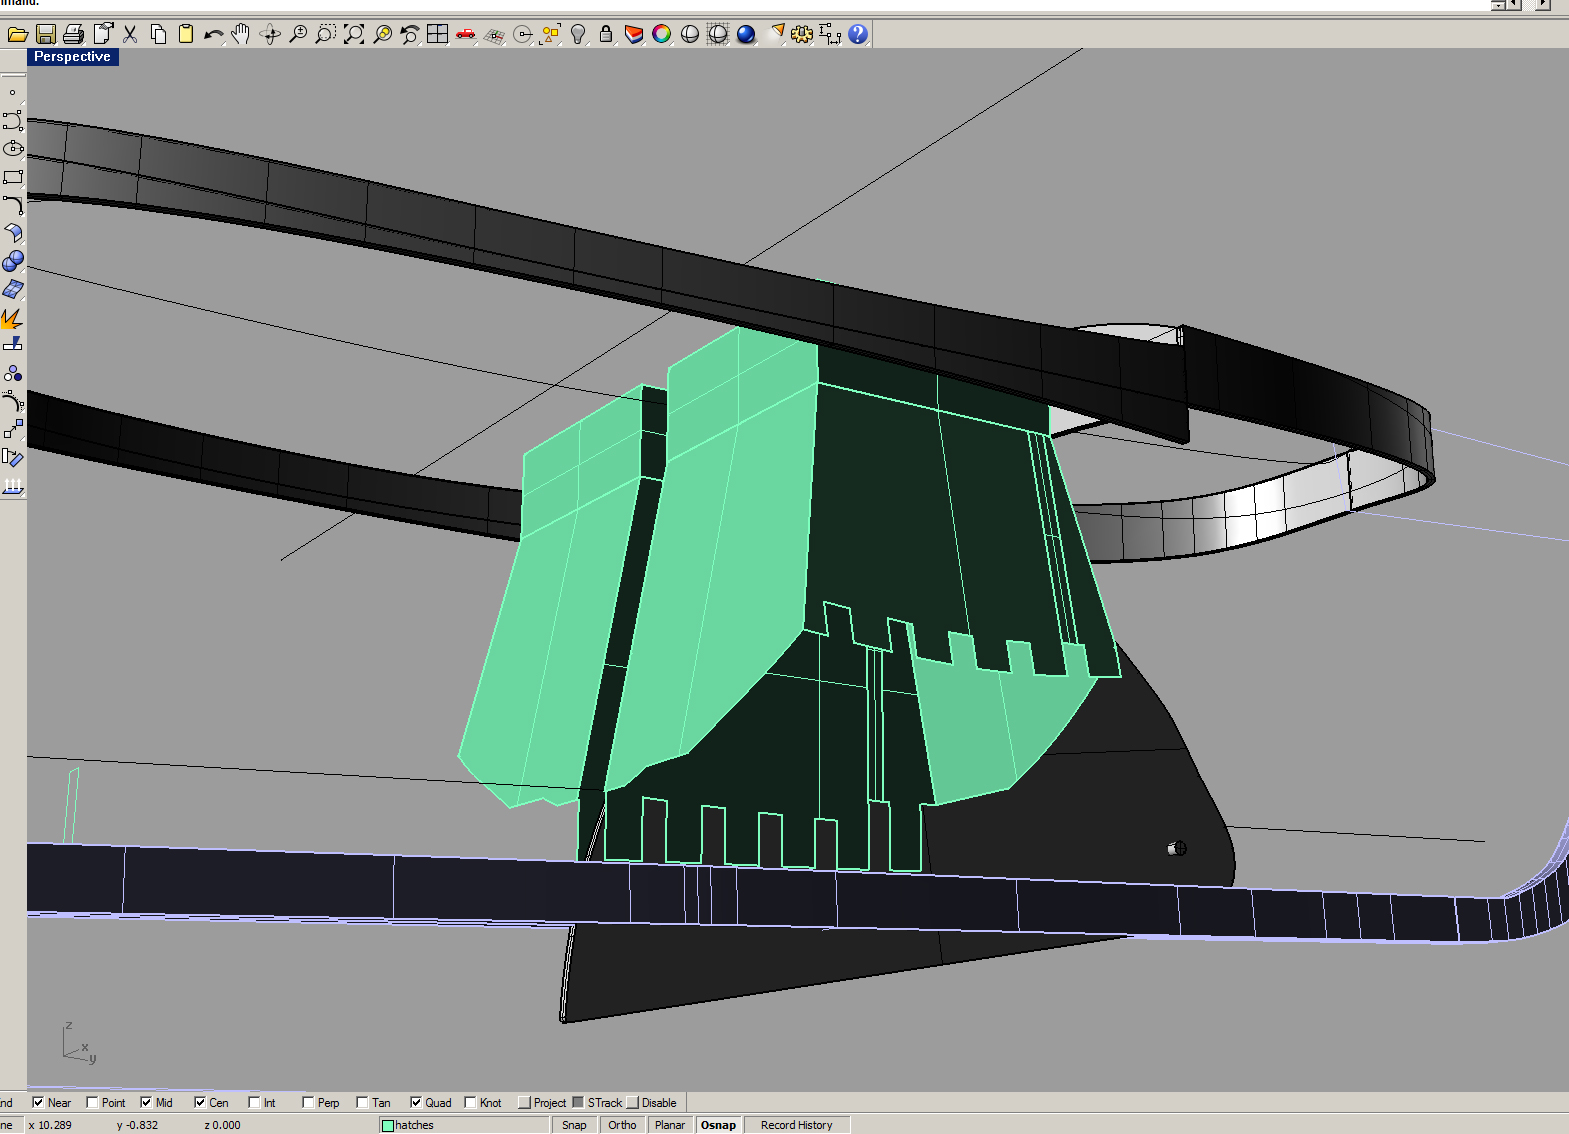
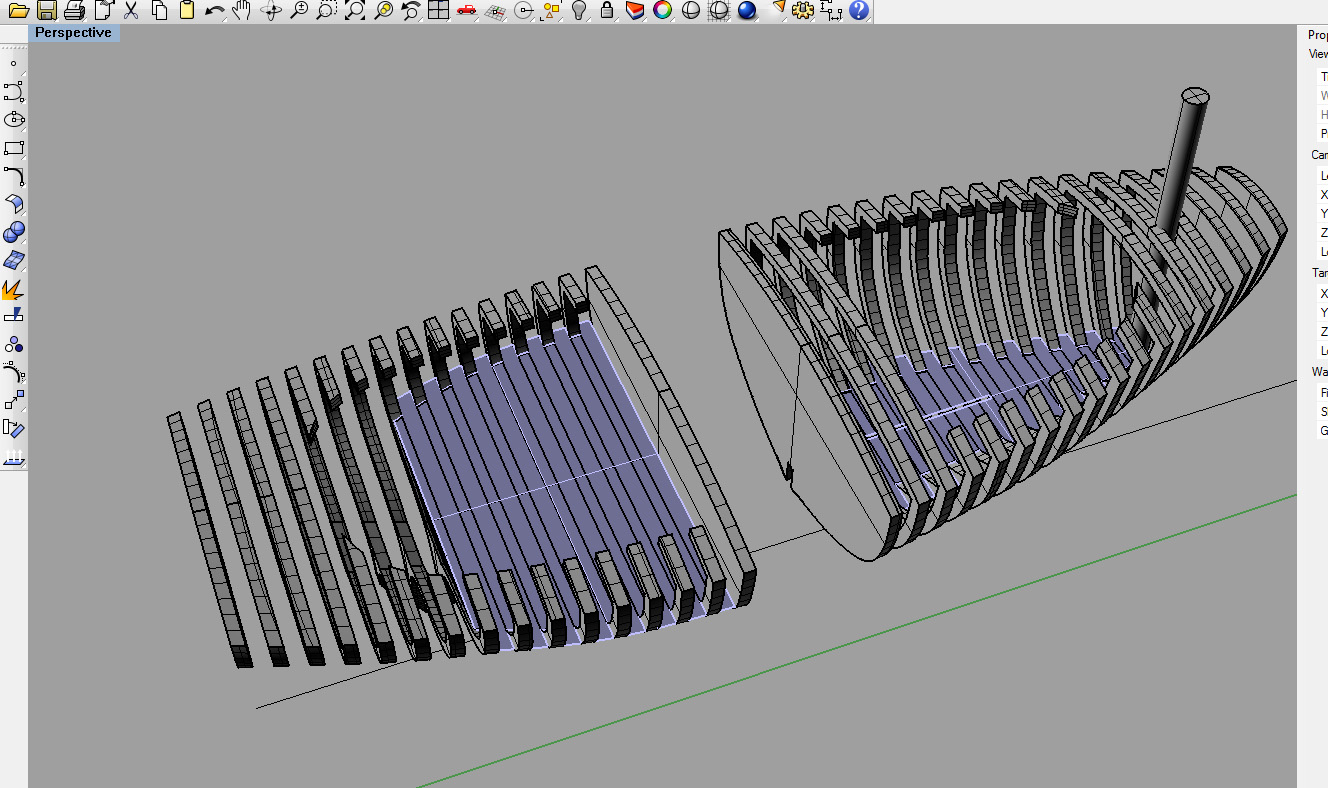
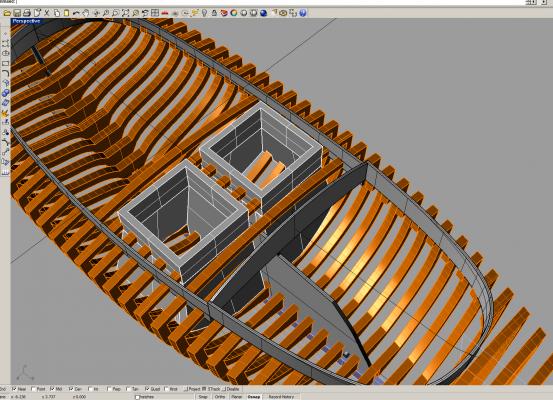
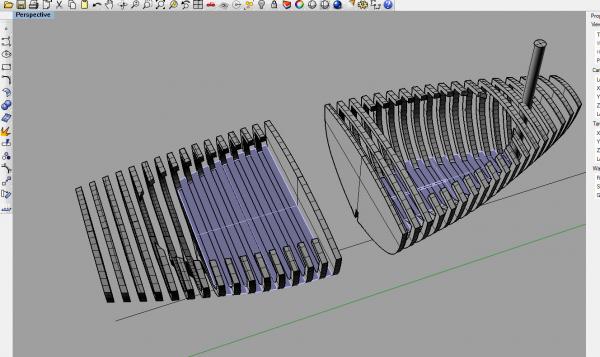
So yeah, I haven't done anything for a while, been more of a modelurker than a modeller. The usual excuses, work has been kicking my butt, as in a lot of it. Since I'm self-employed, that is a good thing, even though I can't indulge my hobbies to a great extent... Anyway, whining over. (for now ) Although I haven't been making anymore wood scraps, I did a bit more cad work, allowing me to make templates for the fish wells. I also redid the cockpit area, as in checking the space available for a human, I found that there really isn't any using the Midwest cockpit floor height. Props also to Dee Dee, who I believe had the definitive research source confirming the issue. Here's a couple of screen shots...
- 86 replies
-
- 1
-
-
- muscongus bay lobster smack
- Midwest Products
- (and 1 more)
-
I saw this reprinted on line--many of you may be familiar with it, but I found it really interesting... http://books.google.com/books?id=oOwOAAAAYAAJ&printsec=frontcover&source=gbs_ge_summary_r&cad=0#v=onepage&q&f=false
-
- 1
-
-
DeeDee, that looks amazing. Beautiful finishes and great detailing!
-
Looks great! I should really get my act together and do some more on mine... I did take a shot of a friendship sloop up in Essex, MA, good view of the rudder shape and gudgeons, (ignore the power conversion...) I don't know if you've done the rudder yet, but I know I was looking for info on it for a while...

-
Great discussion, since I had to learn what "entry level" meant the hard way. A few years ago, I bought the Mini Mamoli "Bluenose". On sale, it was still well over $20. I had never built wooden ships before, but I had done a lot of other types of models, plastic and mixed media. I opened the box, and the solid hull looked nothing like the shape of the Bluenose, there was a bundle of splintery wood and minimal instructions. I could see if they had rough-formed hull and a nice plan with station views, but the options were either find research material on my own and modify the kit, or just pretend the included lump was actually the Bluenose. Not what I had hoped for. My next try was the Muscongus bay sloop by Midwest. Under $20, clear instructions, simple and forgiving construction, quick and easy assembly. Much better confidence builder. So, 2 manufacturers approaches to 'Entry level'. One put me off wooden ships for a couple of years, the other gave me the courage to start messing with wood a lot more. I think the simplified approach to POB that Midwest uses is a great confidence booster, and a nice gateway into "real" planking.
-
http://www.thenrg.org/ship-model-plans-and-photos.php
-
Frank, I juist got a chance to go through this log, and your thoughtful weathering turns this from a great ship model into a work of art. I love how the decks are scrubbed and the rigging is taut,like a well-run crew would do, but the hull and sails show the wear of long voyaging. Do you do a lot of military and or railroad models? (I just ask because showing realistic wear is so important in those modelling areas.) Thank you sharing the "barnacle infestation" techniques!
-
I clicked the button for "like". I wish they had one for "completely amazed".
-
This looks really nice. Did you use ink or black paint to simulate caulking? (The reason I ask is that some finishes may lift magic marker-type ink up and smear a bit--ask me how I know... )
- 37 replies
-
- 1
-
-
- virginia
- artesania latina
- (and 1 more)
-
Harvey, those pump pictures are fantastic. I've been playing with everything from scaled-down schooner pumps to adapted kitchen pumps, but the ones you show seem so much more realistic on a fin-de-siecle coastal fisherman/lobsterman's budget. Whether or not they actually used this design in Bremen ME in 1890, I feel pretty comfortable putting something like this in the forward corner of the cockpit. Thanks!! (I'm hoping to make a Maine trip sometime this summer, if it works out, I've got a couple 2g memory cards for the camera.) Thanks Randy! I was just checking out your SFII build, very inspiring, great work on the carriages/wheels. I'm not nearly ready to tackle anything with that many masts and decks, but you have my admiration. thanks Keith, indeed! Thanks for the video, what a great story. The original kit is at the moment my hull-form mock-up, I don't know how many stock parts will make it into the final build. Mario, thanks for the encouragement. I only have to cut out 16 more frames and I will be up to where I was when I opened the box. I am glad I did it, though, I'm starting to really enjoy this little jigsaw puzzle. You're building a Galilee boat, that is awesome. I have been following what's been posted here avidly, I can't wait to see yours. I think It's really exciting to work on something where the archeaology is still ongoing, getting more of an understanding of what everyday life was like in Jesus' time and place. Thanks Tim, I appreciate it. folks like Harvey, Mario and others have already gotten me much farther along than I would have bumbling around on my own. I've always loved PT boats, looking forward to seeing yours take shape.
- 86 replies
-
- 1
-
-
- muscongus bay lobster smack
- Midwest Products
- (and 1 more)
-
This is looking great, super clean. The same thing I said about your Sultana, the precision with which you work gives it the aura of a much larger scale. A possible alternative to paint may be 'bare-metal foil'. http://www.bare-metal.com/bare-metal-foil.html I've used their stuff quite a bit for car and airplane models, the foil is very thin and self-adhesive. They make a nice copper. IMO, better in scale then the thick plates. It comes in 6"x111/2" sheets. With burnishing, seams are just about invisible if you want them to be.
-
Very cool. Thank you for re-posting this.
-
First of all, congratulations on the whaleboat and detail completion. You have a true showpiece! My vote would be the Dallas. If you can do that nice a job on a harpoon, I can't wait to see what you do with a carronade...
- 515 replies
-
- 1
-
-
- artesania latina
- whaleboat
- (and 1 more)
-
Has any one built the Elsie by Model Shipways?
hexnut replied to DSiemens's topic in Wood ship model kits
I don't know anything about the kit, but I'm doing research for making a small-scale Elsie and Chappelle's History of American Sailing ships has some great info, with hull plans cross-section and deck furniture and decking laid out, as well as a sail plan and some detail shots. His American Fishing Schooners has some more detail diagrams. I don't know if that helps or not... -
Bob, believe me it's an honor. If this thing turns out a tenth as well as your cat or the Spray I will be very pleased. Harvey, thanks for showing me your blog. That's one heck of a portfolio. Shots like the one of the Amie's bow showing how the planks curve up into the stem and the angles of the chainstay (bobstay?) plates are like gold for me. Love the the Herreshoff 12 1/2. Sailing the full-sized one must have been fun indeed. When you talked about your pumping adventures before the hull tightened up, it tallied perfectly with some of the research that I came across, talking about how many of these boats were in the water year 'round, fishing in the summer and lobstering in the winter. It said they would last pretty well, but would start to detiorate instantly if taken out of the water... Stupid question time-- Is the mast square or round at the step? Another thing thats been bugging me. I realize that your sloop is fitted out as a yacht, but I've been trying to figure out what kind of bilge-pumping system they used back in the 1890's? The big pumps on the fishing schooners are well-documented, but I'm having a hard time finding info on set-ups for the smaller boats. I haven't seen anything to indicate that the fishwells were vented via holes in the hole like the Emma C. Berry-type transport boats, but they must have carried a fair amount of water with live lobsters in them... Thanks!
- 86 replies
-
- 1
-
-
- muscongus bay lobster smack
- Midwest Products
- (and 1 more)
-
Thanks for the kind words, guys! Mario, You are still one of the standards for this build. I know you've been getting into more 'classic' builds-- are there more workboats in your future? Harvey, in my ongoing research, I saw some of the work that you have done on the full-sized friendship sloop. Beyond impressive! Do you mind if I ask the occasional stupid question about these hull types? Keith, the papyrus skills are core to everything. I use cad because it's a big timesaver for my job and I'm familiar with it, but I did the matboard stations and balsa mock-up so I could literally feel what the hull is doing. I'm a strong believer that I really need to hand draw and carve stuff to get a baseline understanding of how it works, I only use the computer stuff once I've got some physical modeling and sketching under my belt. Of course I have a long way to go before my wood model-building skills are on the same planet as you folks, but all feedback (+&-) is much appreciated!
- 86 replies
-
- 1
-
-
- muscongus bay lobster smack
- Midwest Products
- (and 1 more)
-
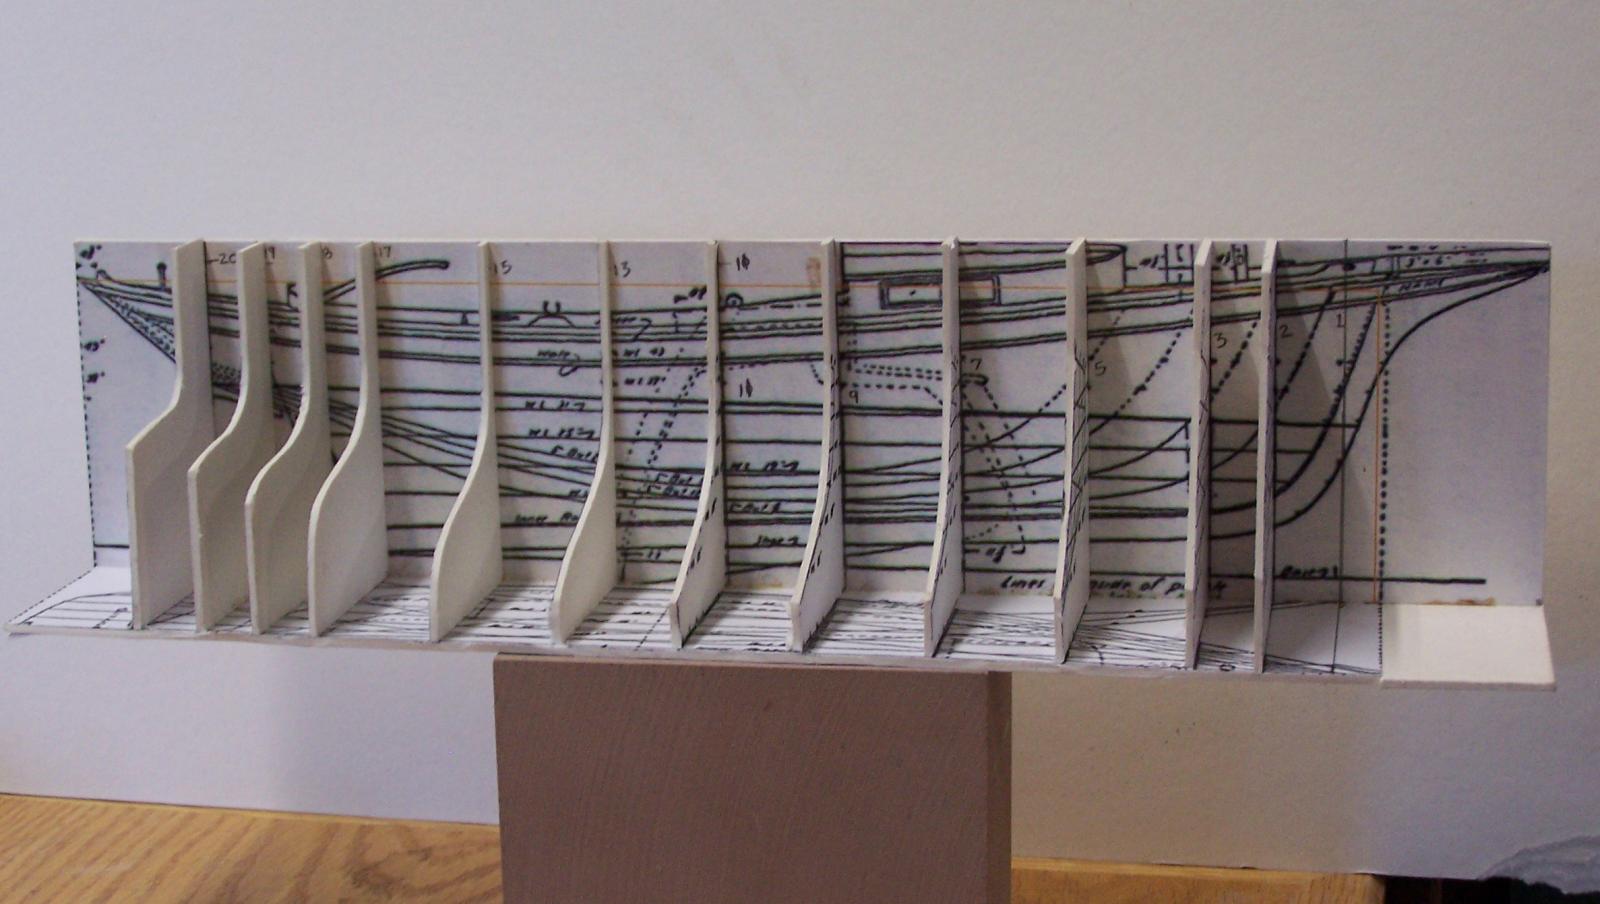
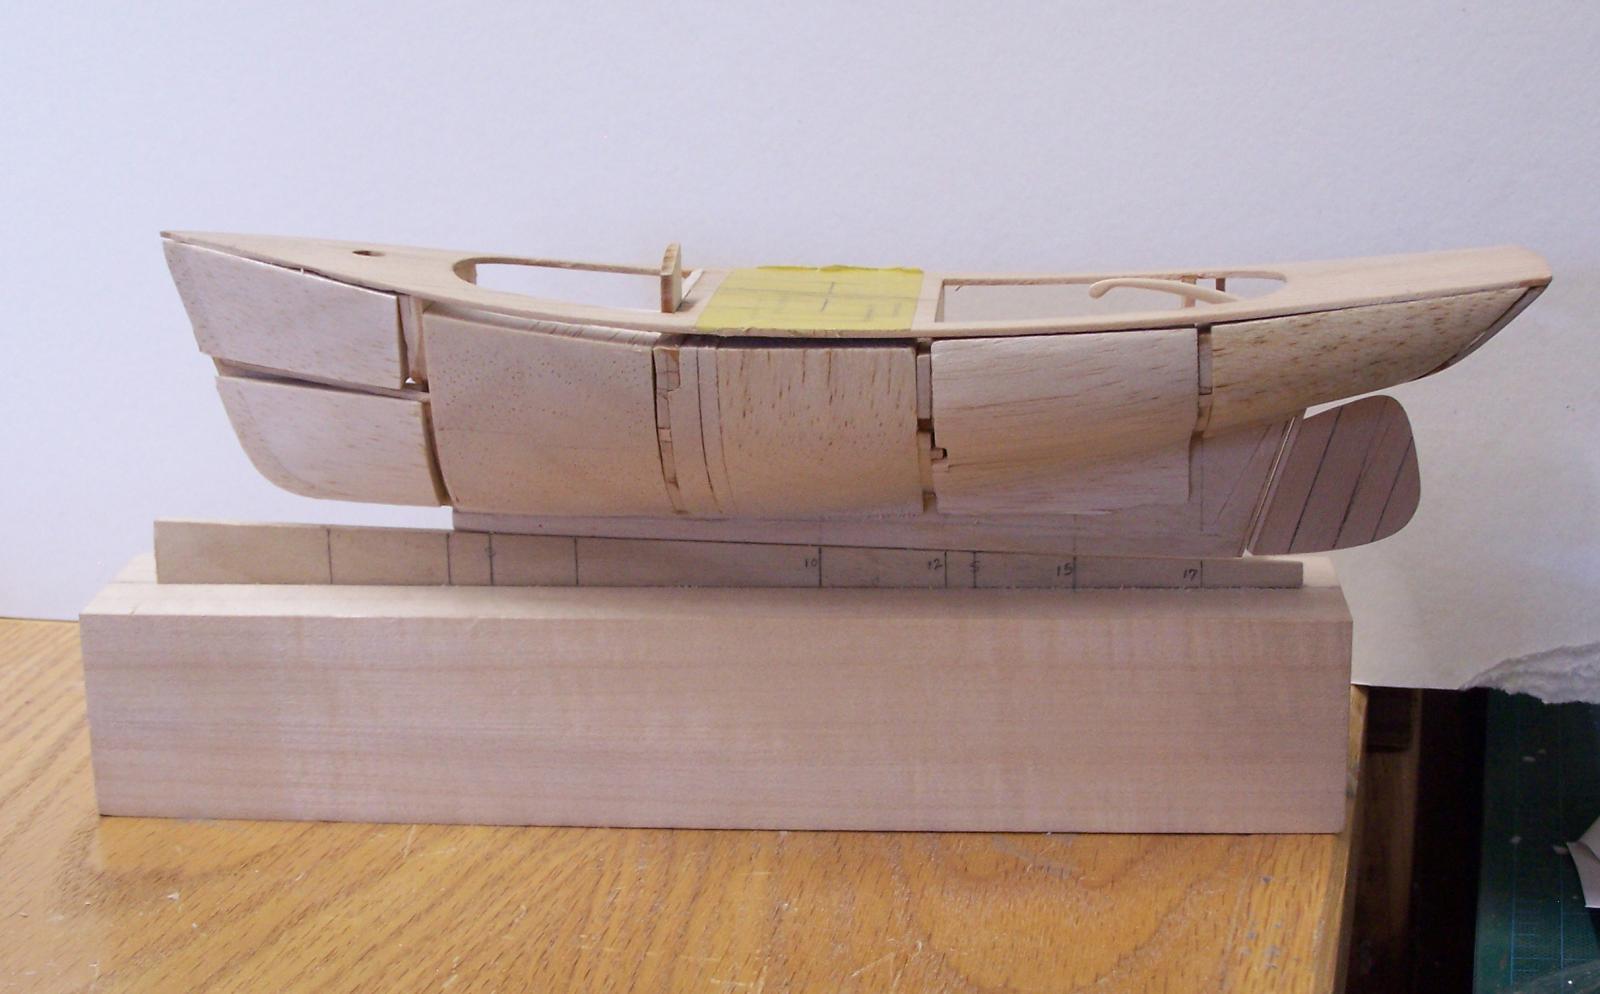
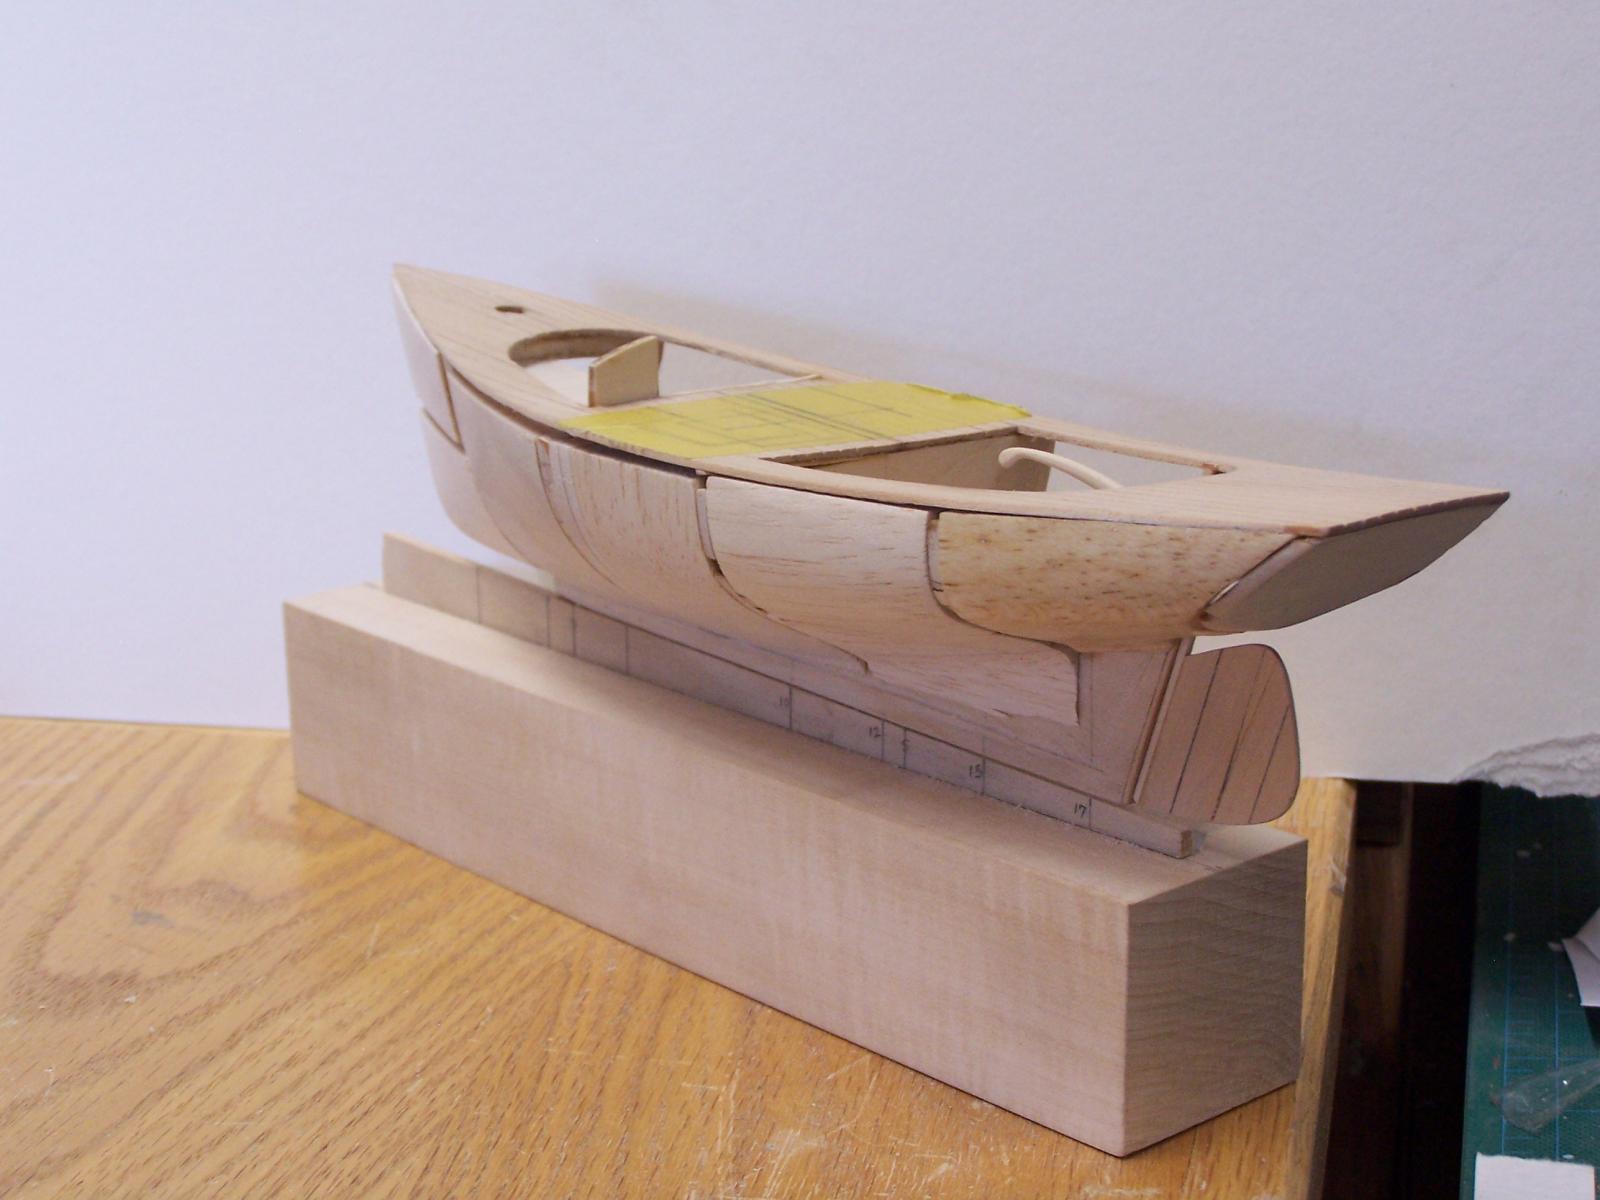
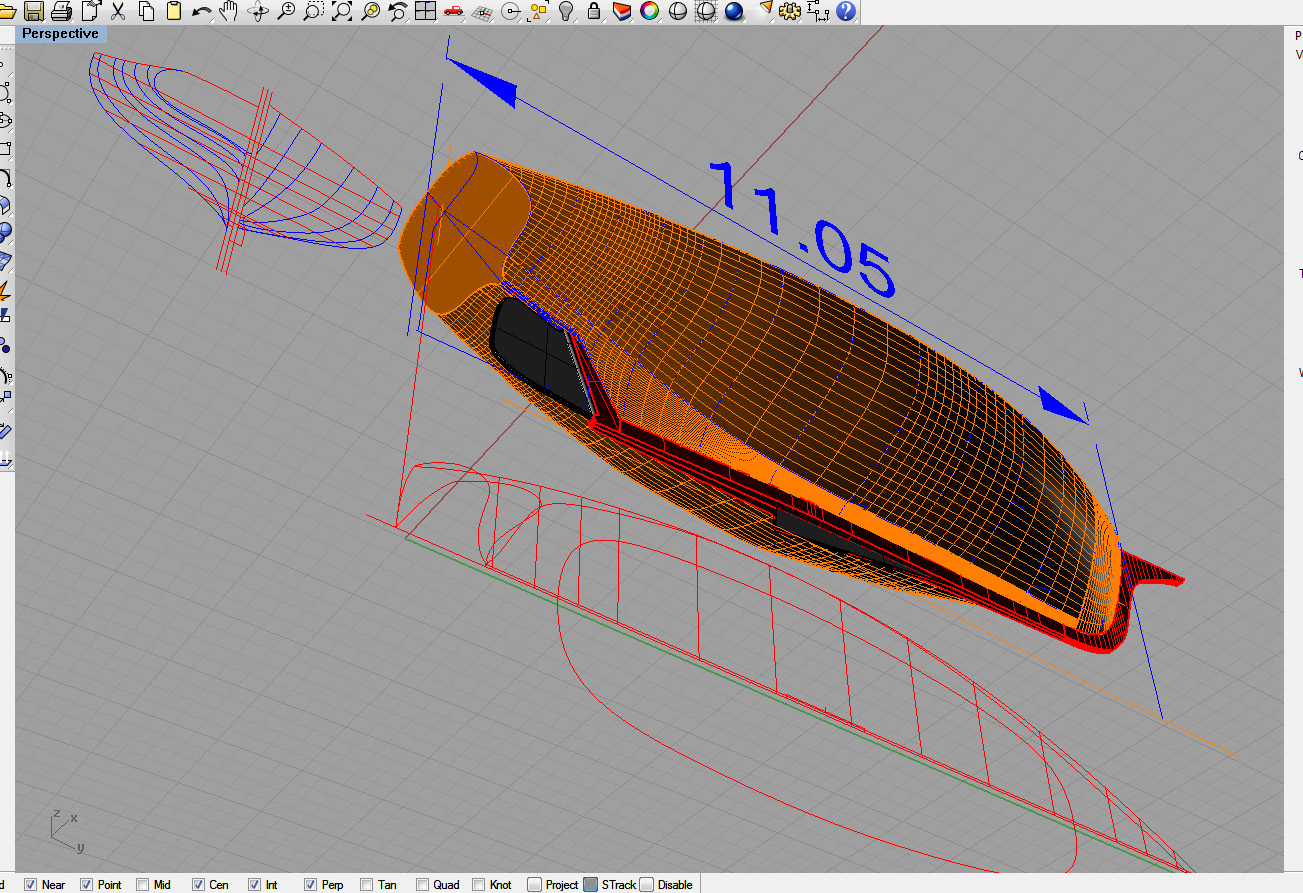
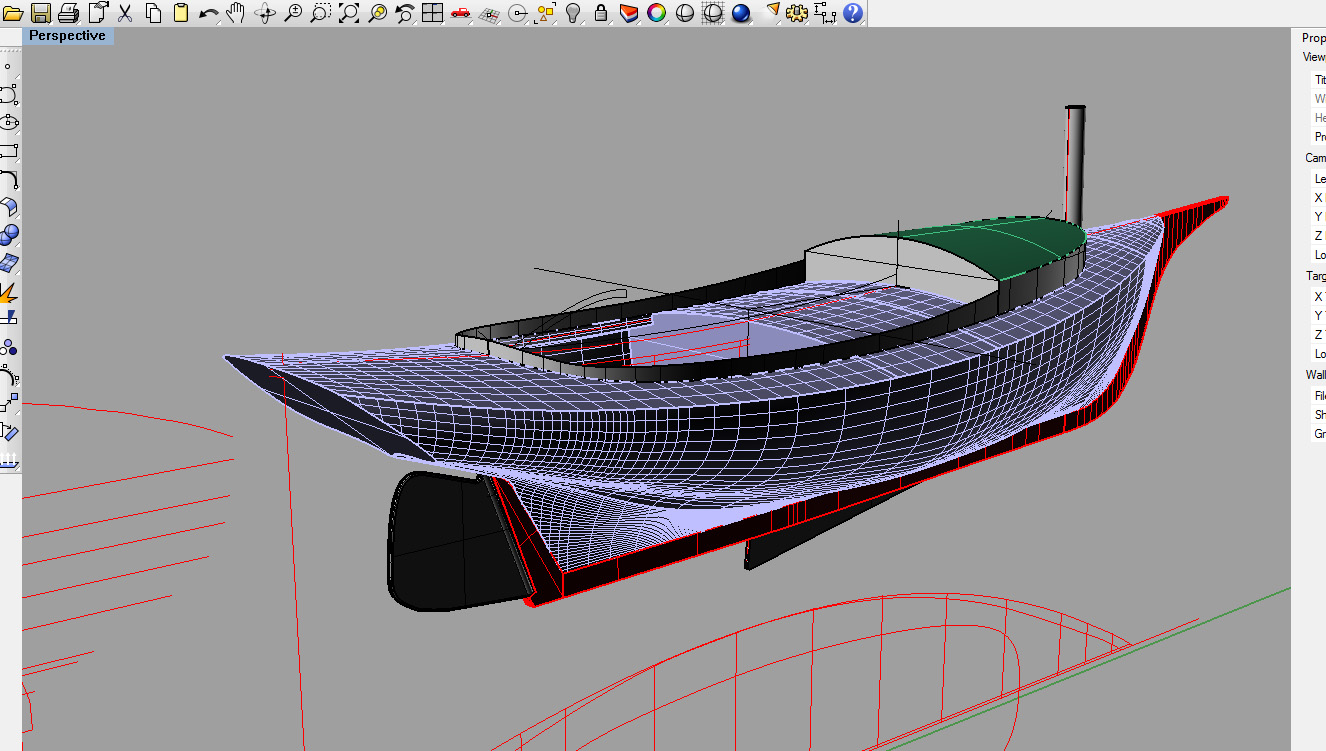
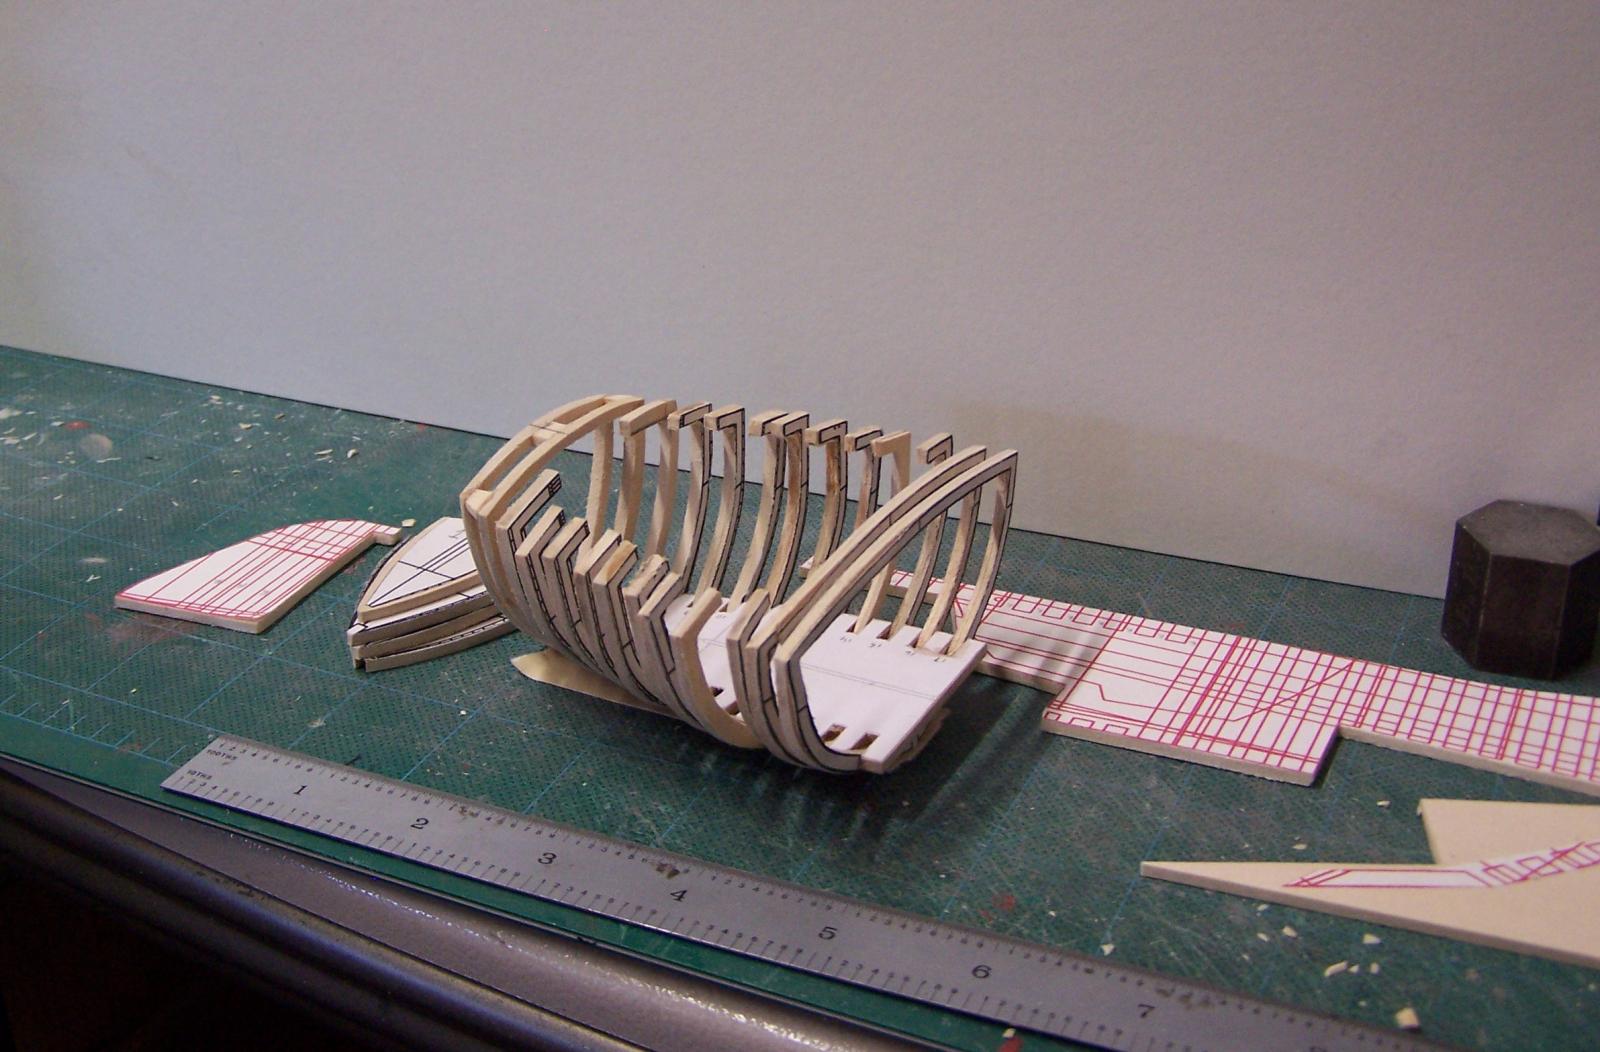
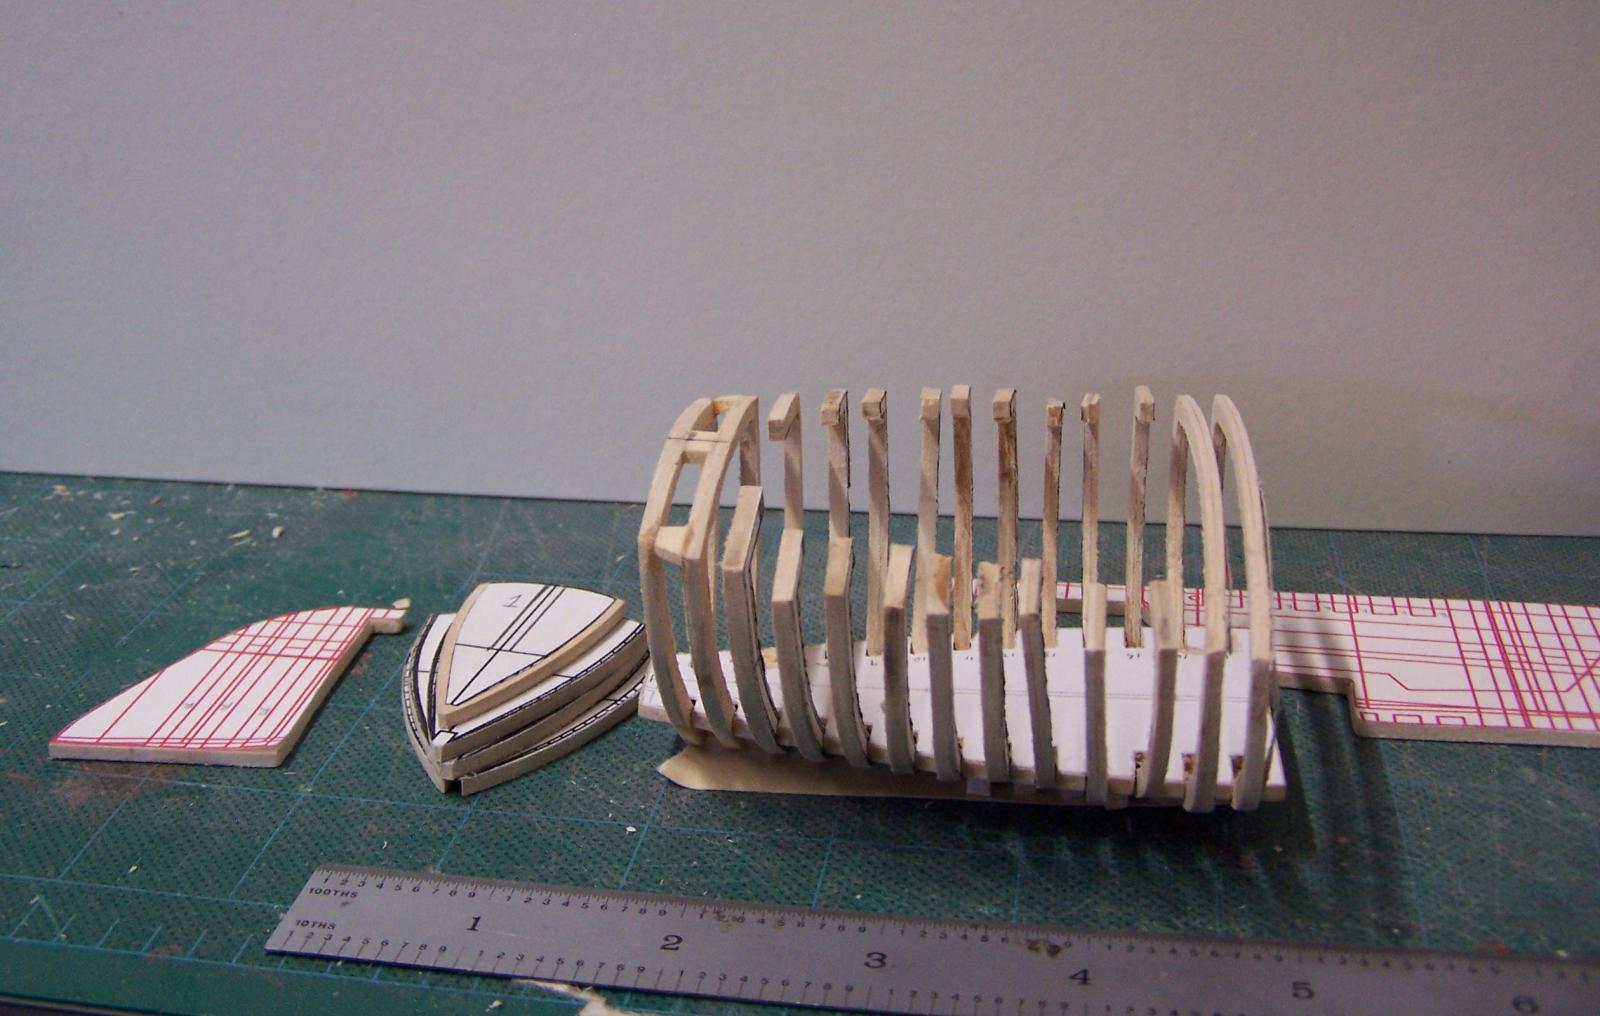
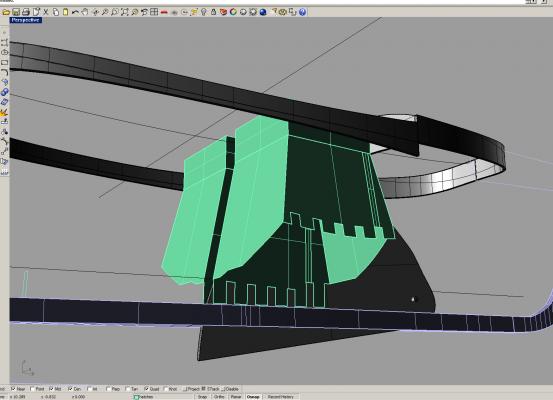
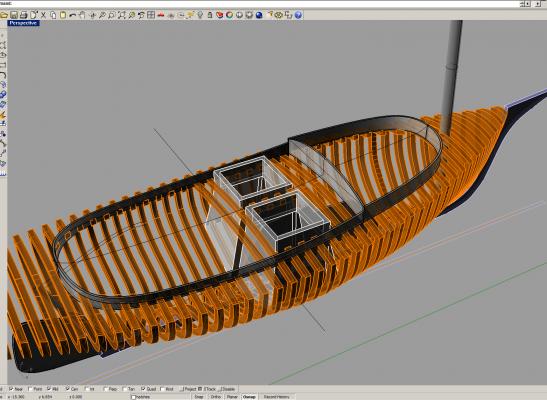
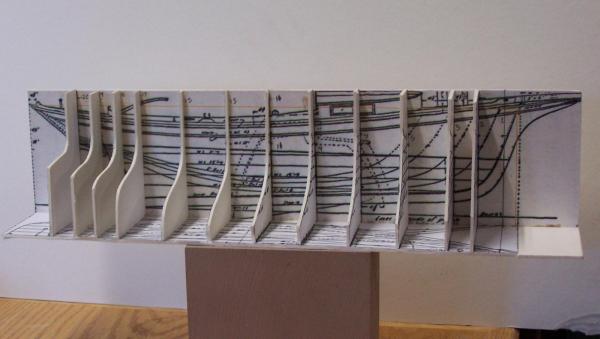
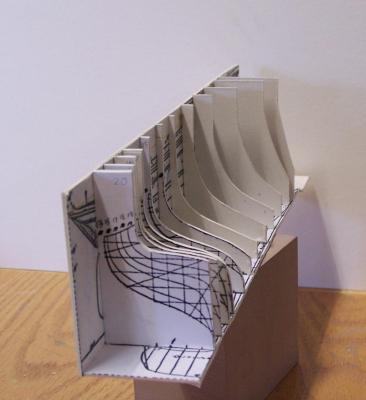
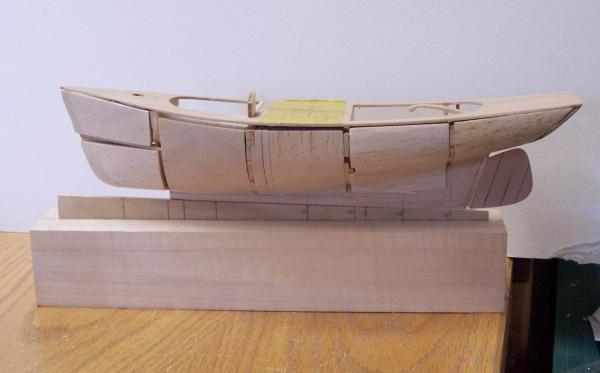
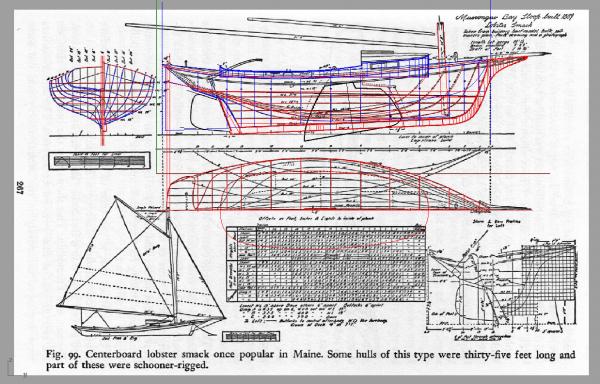
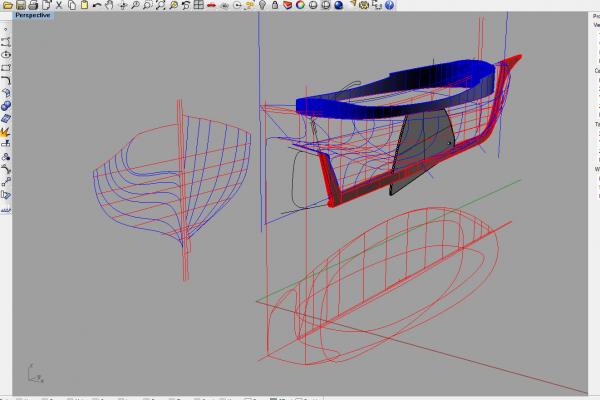
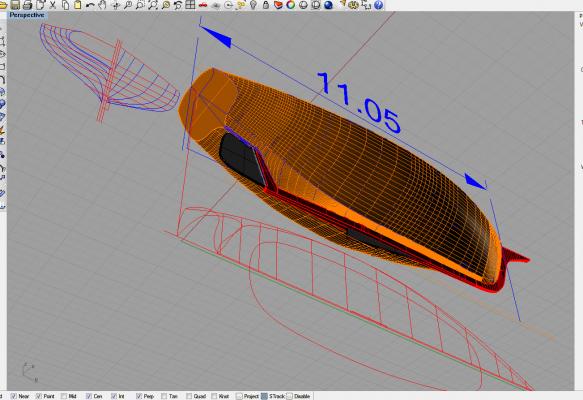
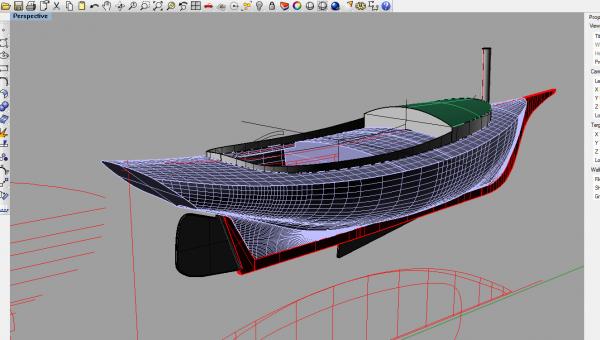
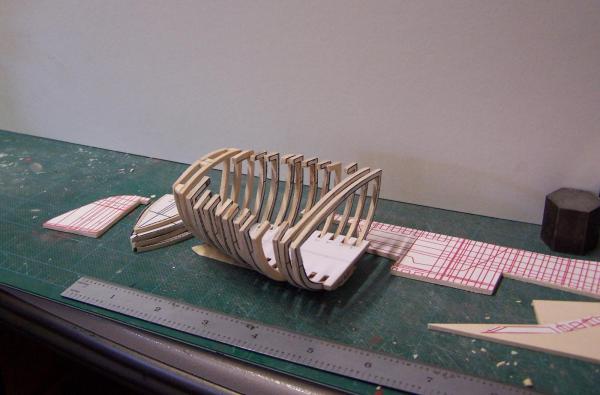
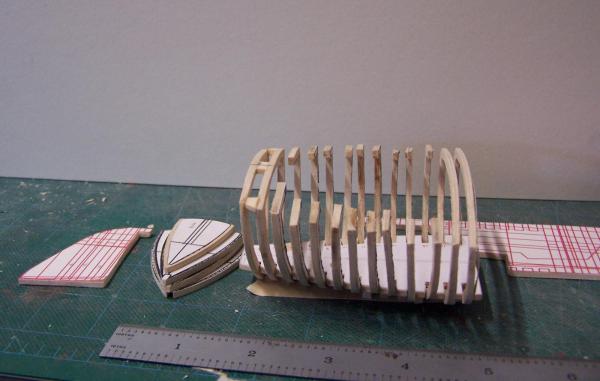
So... I haven't posted any progress on this thing lately, the usual litany of excuses. I've been doing stuff on it, although not really advancing the completion of the actual build. First, after blowing up the Chapelle plans to scale and going over them carefully, I realized there was a lot more I wanted to understand about the hull shape. So I made a toy: This then allowed me to hack out some balsa plugs to get a feel for some of the features like the slight tumblehome toward the transom and the curved transitional sections from the counter down through the bearding line... Now that I had a feel for the basic forms, I could get into some of the nuances, like the keel not being the same width along the entire run, but bulging out in a smooth curve around the centerboard trunk and getting the deck camber, as well as getting the stations, buttocks and waterlines agreeing. I then went to some cad, first, redrawing the plans: Laying them out in 3-D: Building the hull form: creating a "watertight" solid model: I could then cut ribs (scale 6" 0n cntr per a scantling diagram for a friendship sloop), for printing out: I could then start making actual wood bits, here's the rough-cut cabin section for a preliminary dry fit: So I've actually taken some steps backward, but I'm having fun!

- 86 replies
-
- 5
-
-
- muscongus bay lobster smack
- Midwest Products
- (and 1 more)
-
Garward, thanks for the nice photos. I like the ones that you surface polished. Crackers, to be honest, if I were going to paint the surface, I would probably use renshape or a sculpting medium. To me, the best feature of this stuff is the resemblance to marble, ivory or bone. As a matter of fact, the translucent white color makes it a bit hard to see details, so i rub a little graphite (6h drafting pencil lead) on the surface and scrape it away as I cut in details. Did you have a specific piece in mind to replicate?