hexnut
-
Posts
406 -
Joined
-
Last visited
Content Type
Profiles
Forums
Gallery
Events
Everything posted by hexnut
-
You have a gift for not only doing great work, but also presenting it nicely to teach the rest of us. Thank you!
-
Thank you very much for all of the comments. Nils, The amazing work that you've shown has been a great source of inspiration to me. Thanks! Nigel, thanks, I've been making stuff for some time, this is just the first time I've tried building small boats out of wood. As a matter of fact, I really haven't done much with wood since I've been a kid, still working out how to clamp things properly and not just hose down bits of wood with CA and accelerator... Maybe someday I will approach what you can do with the stuff... Dee_Dee and Pete, Thanks for the encouragement. You guys will probably build another 4 each of these boats by the time I get my centerboard mounted, never mind finishing the model...but I'll keep plugging away. David B, thanks! With all that you've been going through, to not only keep building ships without your usual tools and materials, but also to encourage the rest of us--talk about leading by example! Matti, As a fellow Sci-Fi enthusiast, it is really inspiring to see what your painting, detailing, research and fabrication skill set can bring to an historical model. Thanks! I have to a bit more cad work for the next bit, but hopefully I'll have more progress later this week. Thanks again!
- 86 replies
-
- 1
-

-
- muscongus bay lobster smack
- Midwest Products
- (and 1 more)
-
Very sorry to hear about the plywood, although the styrene replacement looks good. Did you use a vinyl cutter or did you hand-cut the paint masks?
-
I might have agreed with that not being practical until I saw Andy/RealworkingSailor's 1st post in "Maritime adventures" this year... Whatever you decide for "trimmings", the hulls are really well-done, realistic indeed. (If you wanted to stay work-boat themed, you could always go: "Feast of the 7 fishes" ) Can't wait to see what you add!
-
More things that I can't seem to keep my thumb out of the way of...
- 1,039 replies
-
- 1
-
-
- ballahoo
- caldercraft
- (and 2 more)
-
The latest addition to your lobster fleet is looking great! As far as the Herreshoff sloop, you know the absolute sure-fire way to find it is to start building a new one. When your progress approximates that of the original, it will spontaneously appear under your nose. At least that's how things seem to work in my environment...
- 153 replies
-
- 1
-
-
- musongus bay
- sloop
- (and 1 more)
-
Hammer implementation: I. Target discrimination: Group A: Thumb (not recommended) Group B: Not Thumb (recommended) Everything else is merely refinement of this basic principle. Digital calipers really are fantastic, very useful as a marking gauge with the lock, depth gauge, use with a square or bench block for height gauge, just don't confuse with hammer... On a serious note, The Ballahoo is looking REALLY good.
- 1,039 replies
-
- 2
-
-
- ballahoo
- caldercraft
- (and 2 more)
-
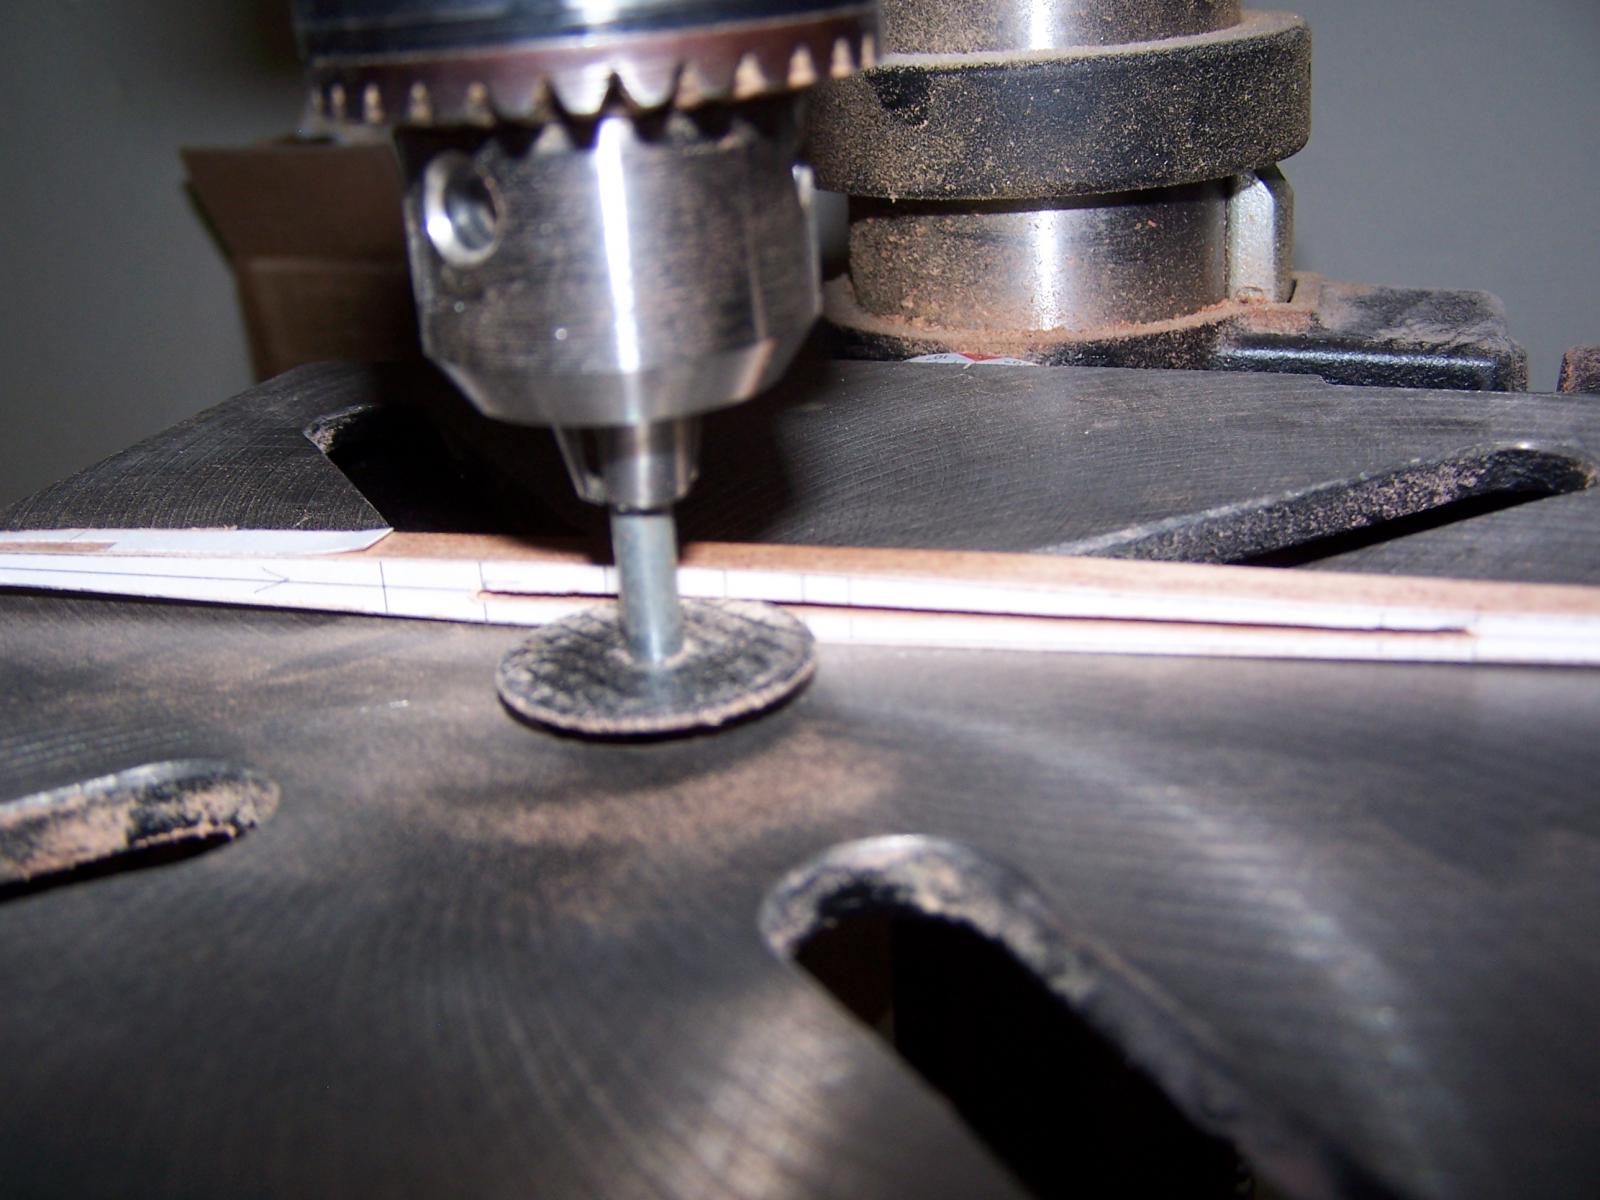
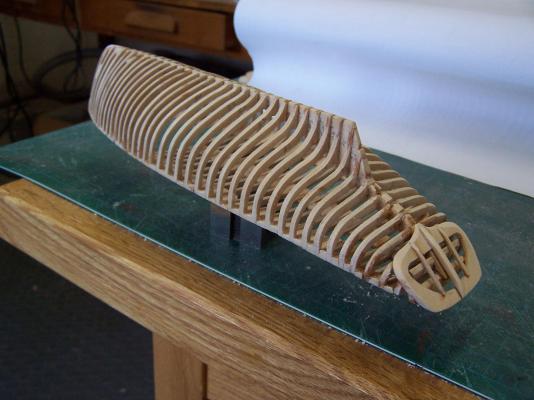
Thank you all for the comments, I really appreciate it. I have to admit, I'm trying to make planking easier, I've never tried it before, so it will definitely be a learning experience. I have gone through Chuck's excellent tutorial as well as others and down-loaded the fan lines pdf. I also want to finish filling in the bow just aft of the cutwater, I kept it open while putting together the frames so that I would have a straight and square surface to grab, I no longer need it now that the structure is done. I do want to add some of the interior stuff like the centerboard, wells and cabin details before starting planking, however, so that will probably be a while... In the meantime, I got the keel and cutwater pieced together (8 pcs. total), loosely based on Chappelle's Friendship scantling drawing. The work in progress also made it to the Northeast joint clubs show in New London, Joe/WackoWolf snapped a great picture of it, page 3 of the thread. (Joe takes much better pictures than I do.) Thanks, Joe!

- 86 replies
-
- 10
-
-
- muscongus bay lobster smack
- Midwest Products
- (and 1 more)
-
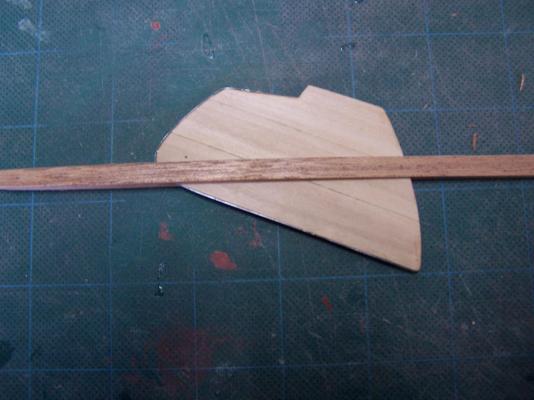
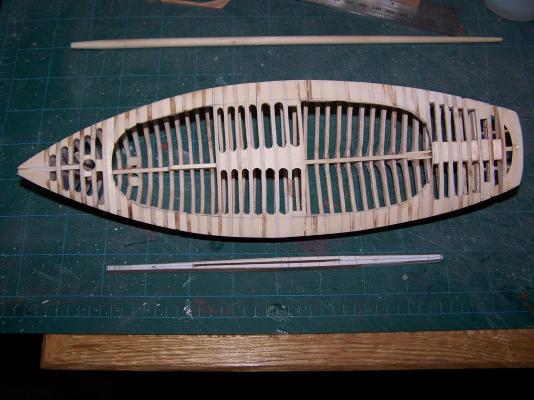
Thanks guys, much appreciated. Tom, I keep generating lots of reasons to be humble, but at least the glue blobs will be planked and painted over. Are you bringing the Vinal Haven to New London? I'd love to see it in person! As per request, here are some more pics: I also started making the keel and centerboard. The tapering keel is an interesting feature that I wanted to replicate, cutting the centerboard slot should have been very straightforward, but it took me 3 tries... Finally, here is the hull with the cockpit rough- cut out. I made the rear portion with the frames all the way across the top of the deck. This made it easier to register the top to a center-line, made it more twist-resistant during construction and allowed easier fairing of the compound curves in the deck surface. Besides, it was fun hacking through it once I had it glued together.


- 86 replies
-
- 8
-
-
- muscongus bay lobster smack
- Midwest Products
- (and 1 more)
-
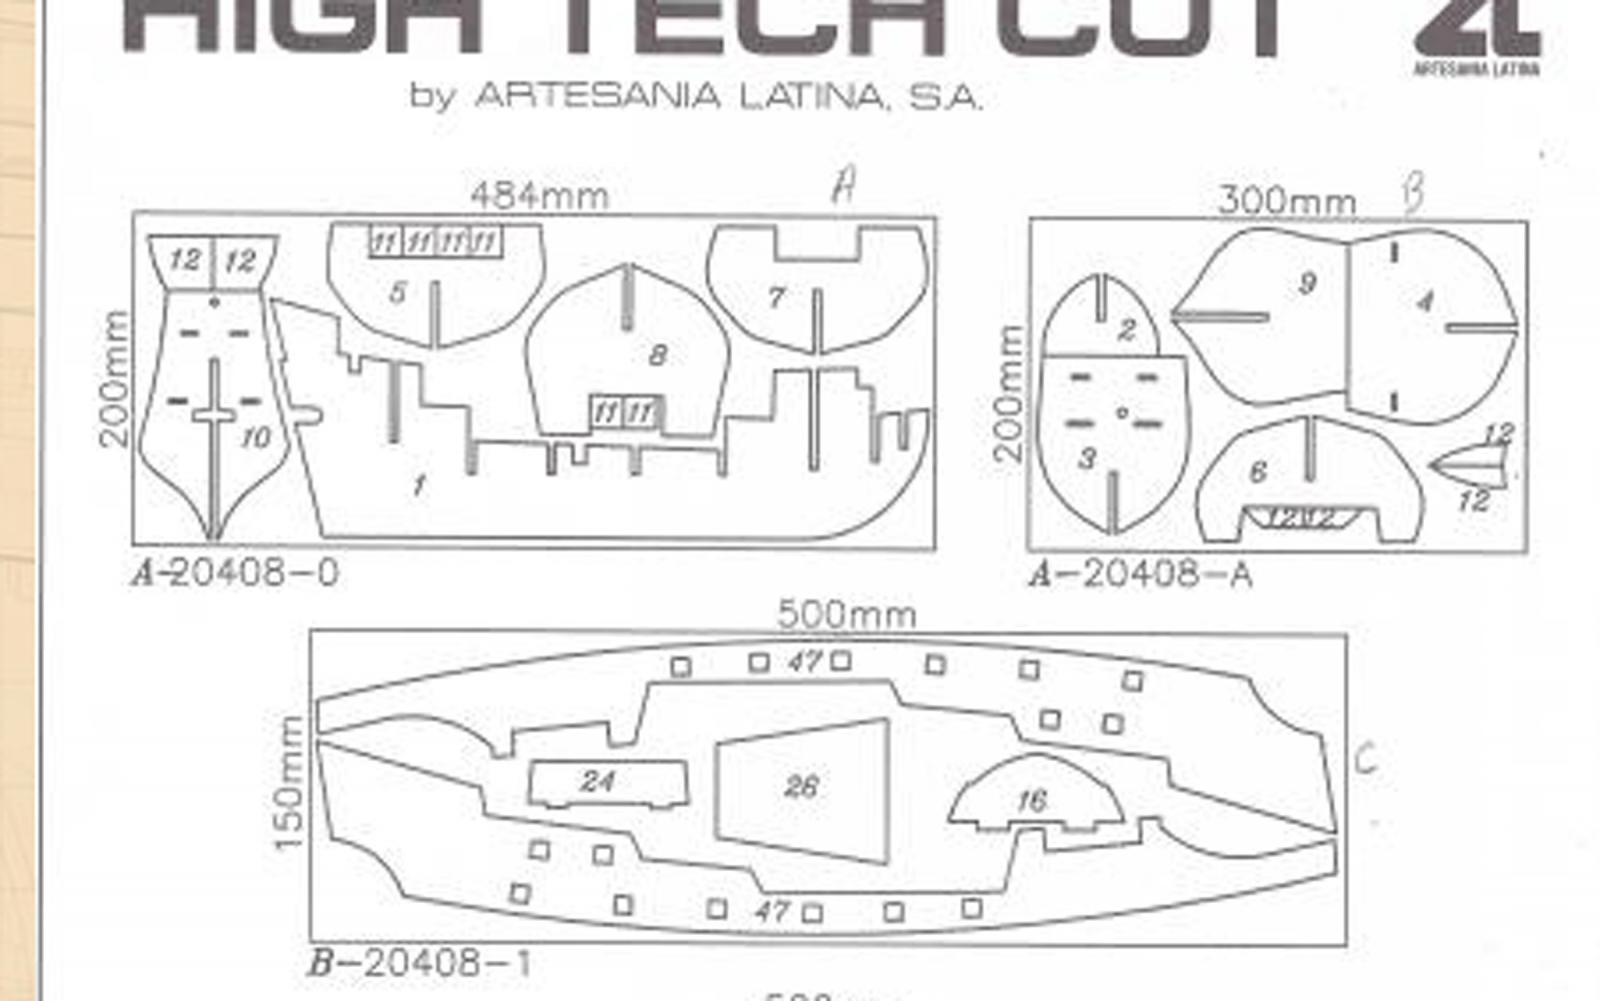
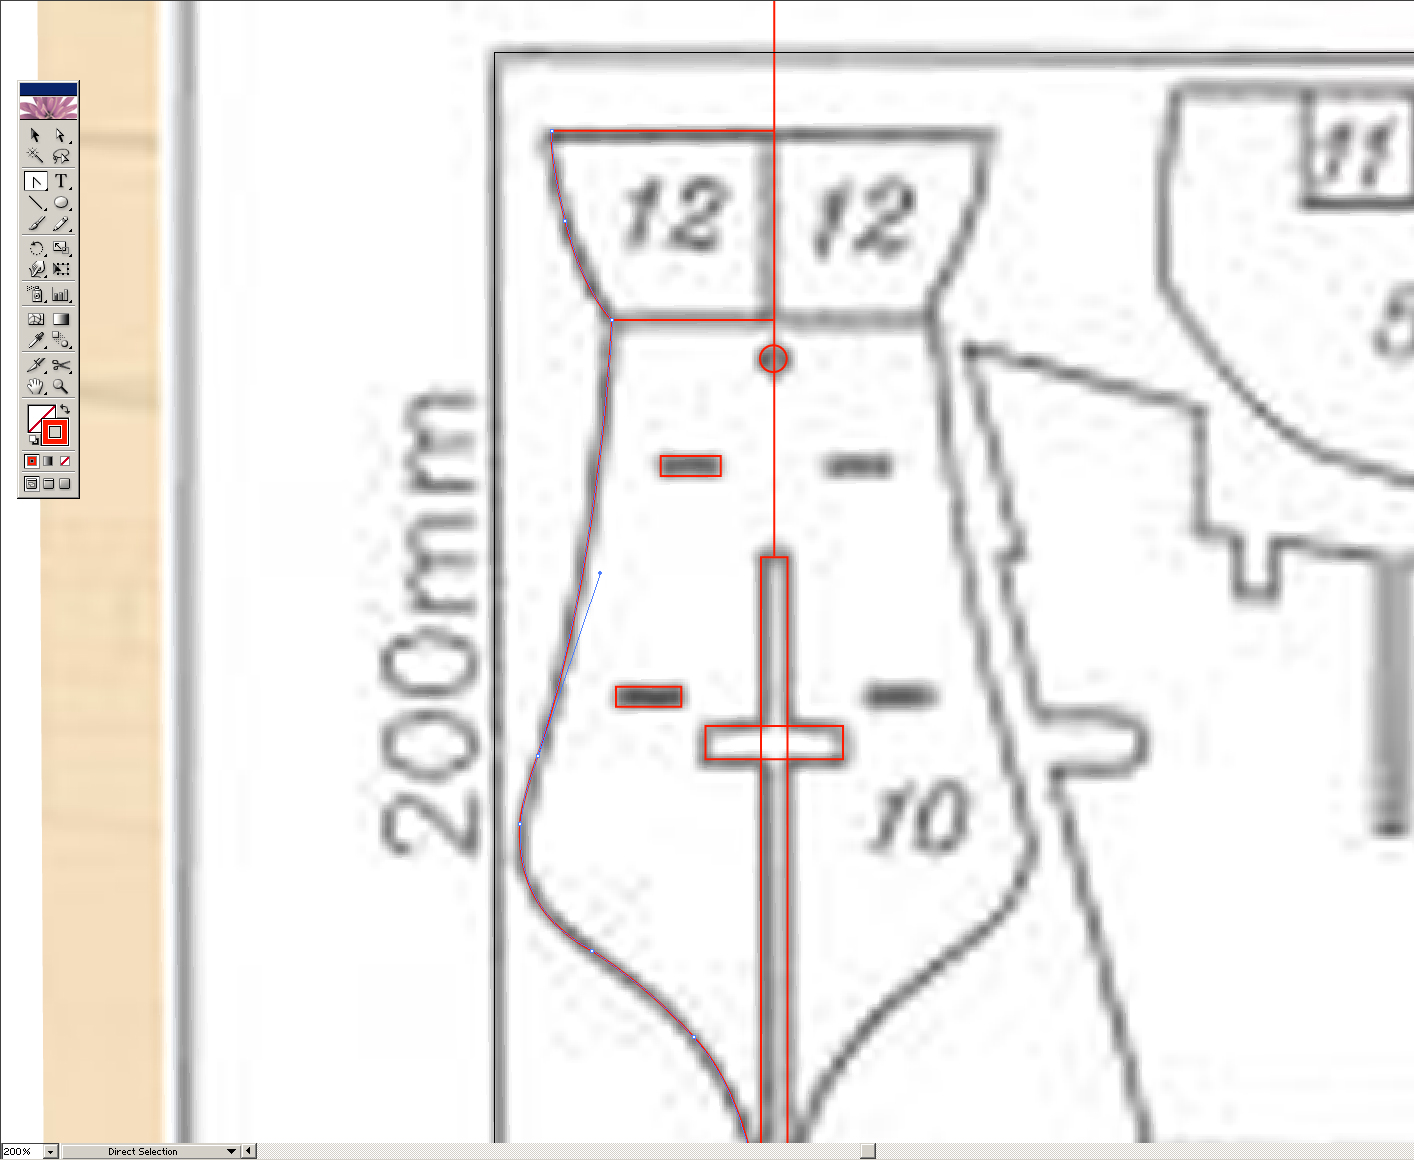
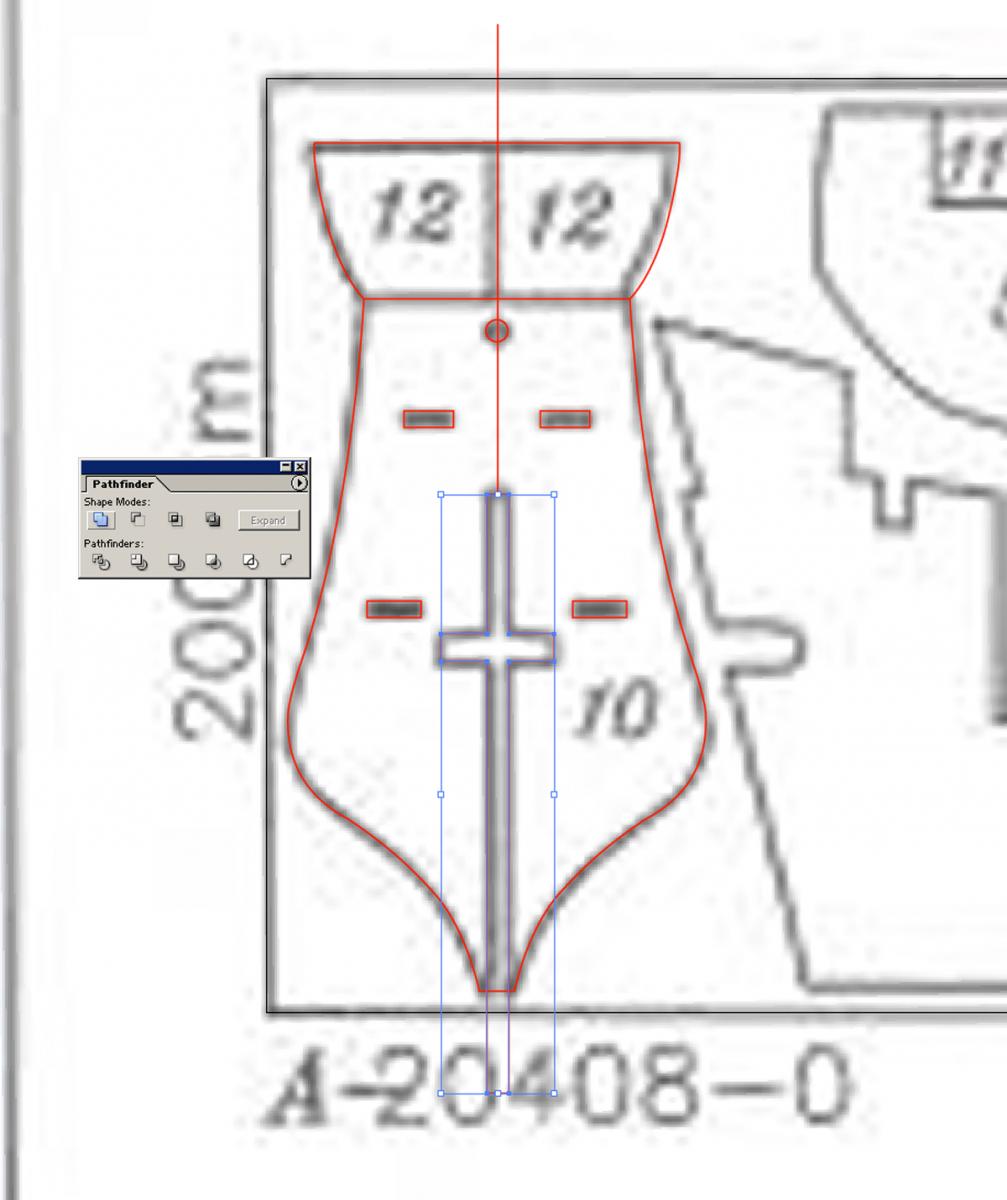
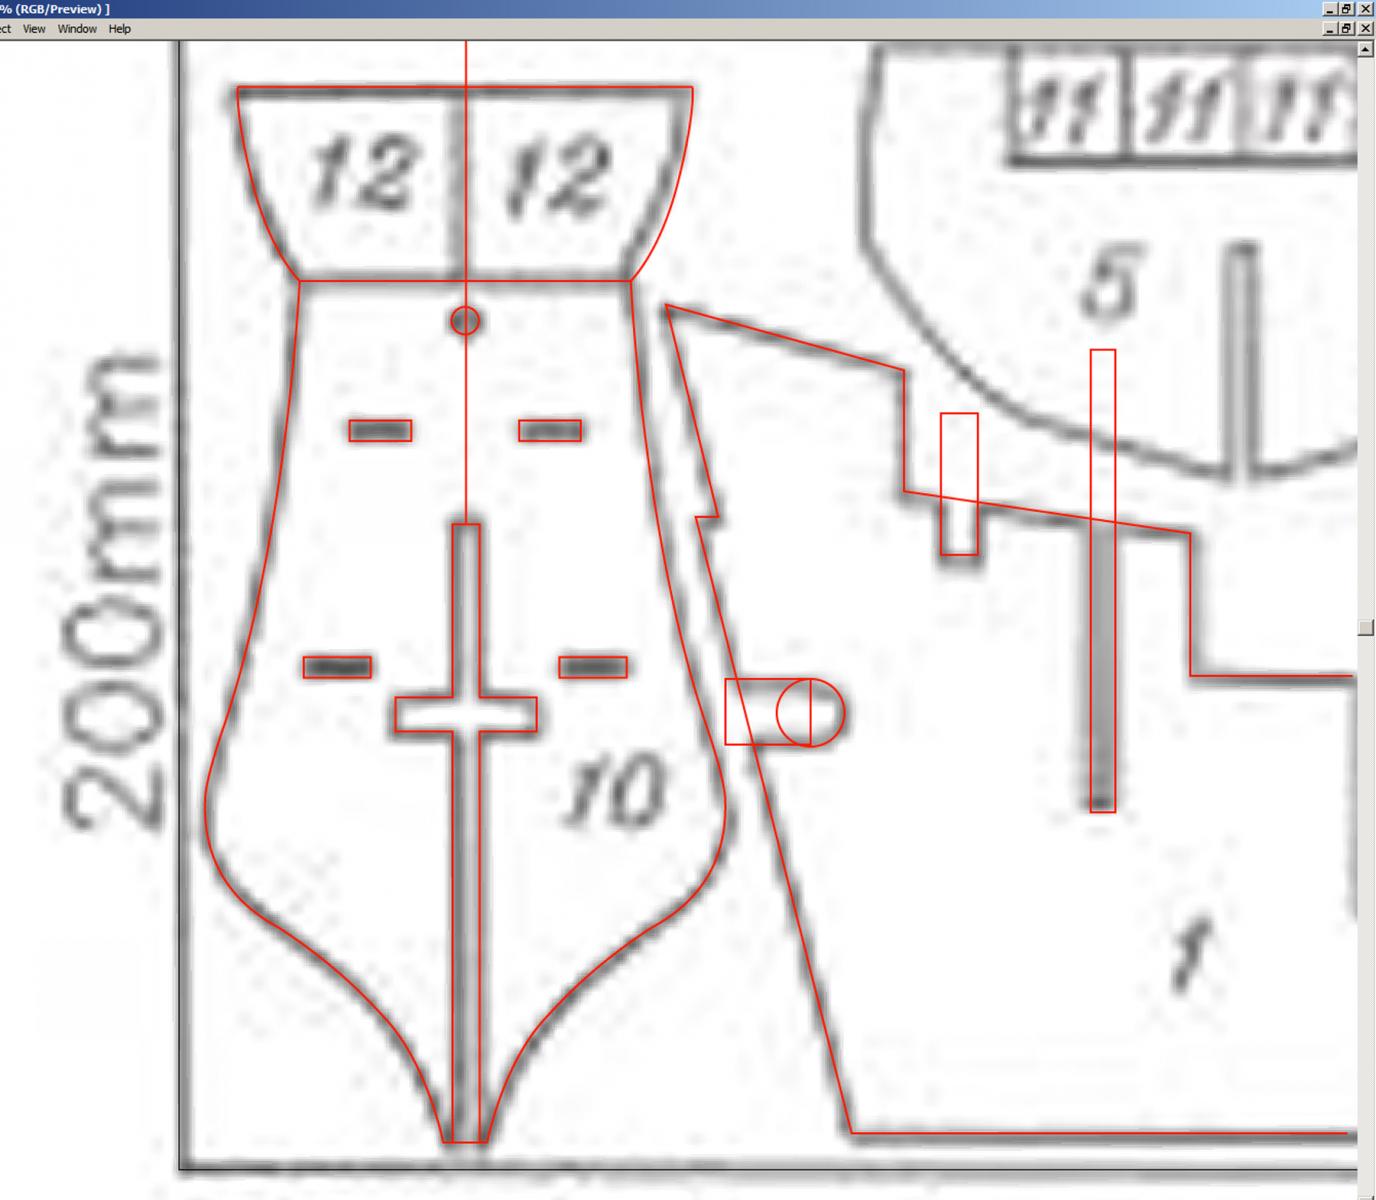
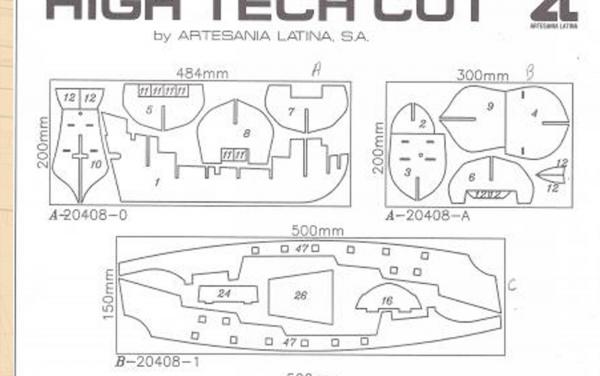
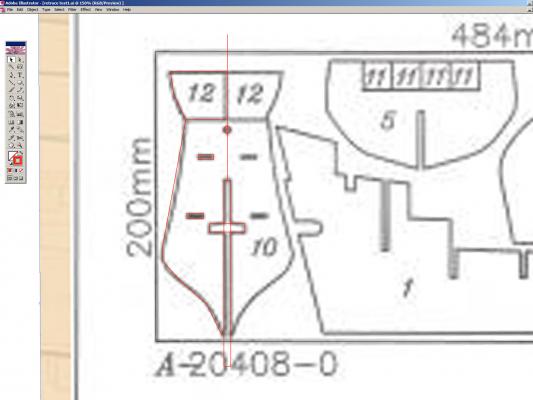
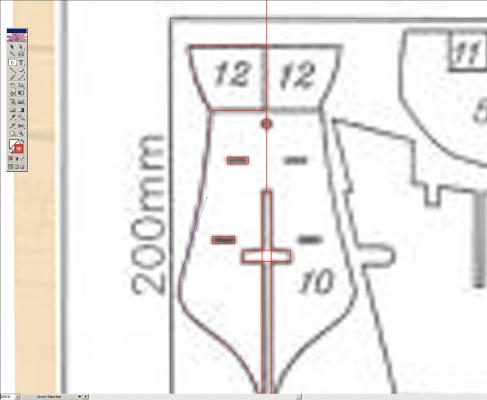
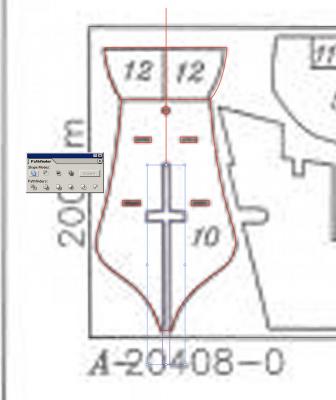
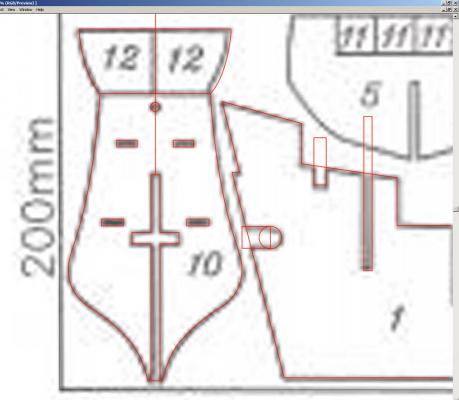
Hi Tim, if you have Illustrator, you are all set. I would, however, recommend against using auto trace. As Paul pointed out, it makes excess nodes, and it doesn't pay attention to straightness or dimensions. I tried a quick test, it's fairly straightforward to do it manually, and actually quicker and less frustrating than cleaning up after auto trace. 1) set your "Document set up" for "custom" and use one of your AL panel dimensions, i.e., 200mm by 484mm. (I just did this off of a screen cap, yours should be a bit more clear.) 2) import the bitmap file and size it so that the borders match, as Don said, to the center of the fuzzy bitmap lines. 3) Use the "rectangle" tool to make all slots and ports, as you can use actual dimensions to make them. This gives you a chance to optimize the templates for your specific material. are you making bulkheads from 3/32" ply? 1/8"? This gives you a chance to make what you want. Center shapes with the "align" tool where needed. 4) use the "pen" tool to draw out rough boundaries for your shapes. Don't worry about curves yet, keep nodes to a minimum. Be sure to use the shift key for hoizontal and vertical lines. 5)use the "change" (carat) tool to turn your corner nodes into curved nodes where appropriate, pull node handles into place. Use the "+" and "-" node tools if you need to add or subtract a node at this point, but in general, try to get a nice curve using as few as possible. 6) All of your lines thus far (except for the center slots) have been only to the center-line. Now use the "reflect" tool to copy and drag another set to mirror. (Notice how there are discrepancies on the 2nd side? You have now corrected errors in the original drawing! ) 7) use the "pathfinder " boolean to combine the slots in the center. 8) That's pretty much it, the last image shows the stern bulkhead complete and the false keel started. You can not only trace the plans, but improve upon them... Hopefully this was helpful...
-
This is looking great! Are you going to make a 1/96th Westland Wasp?
-
Your version looks a lot better than the Constructo box photo. Beautiful finish.
-
Hi Pete, good to see you and the MBLS back! I love the roof hatch and seat detail.
- 153 replies
-
- 1
-
-
- musongus bay
- sloop
- (and 1 more)
-
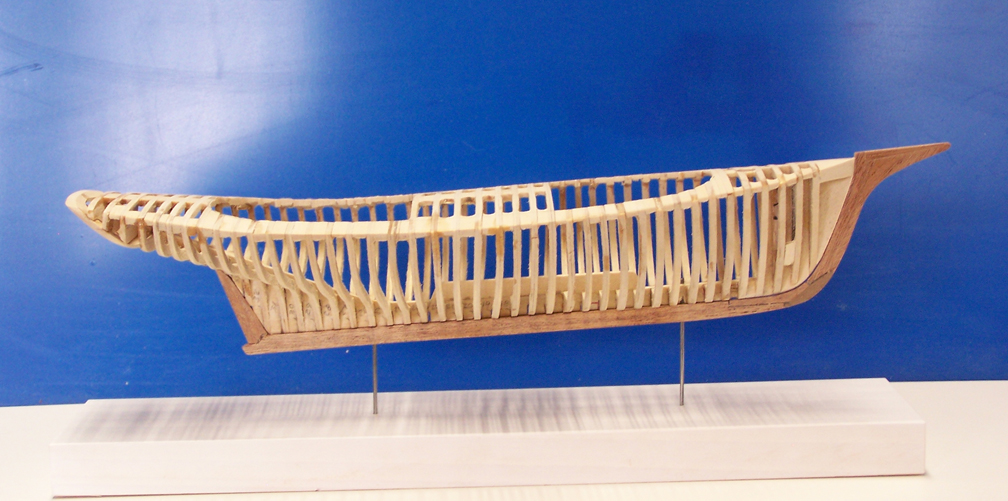
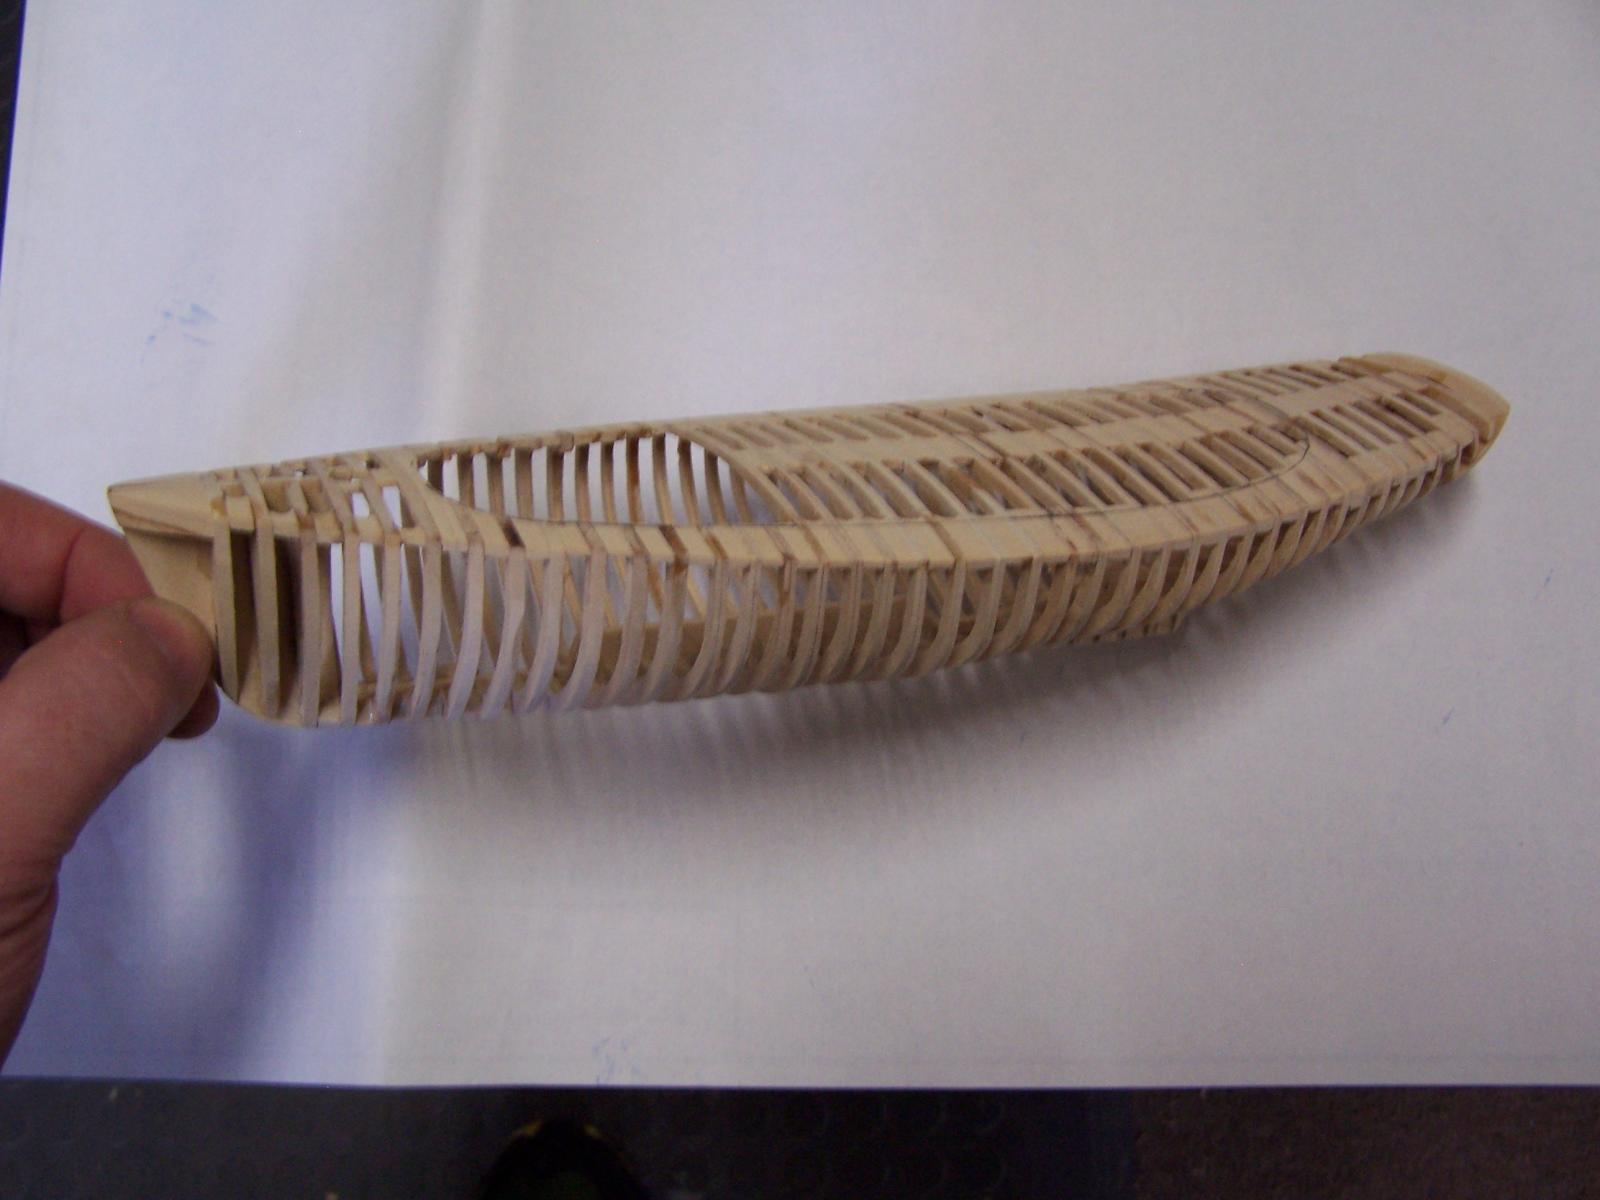
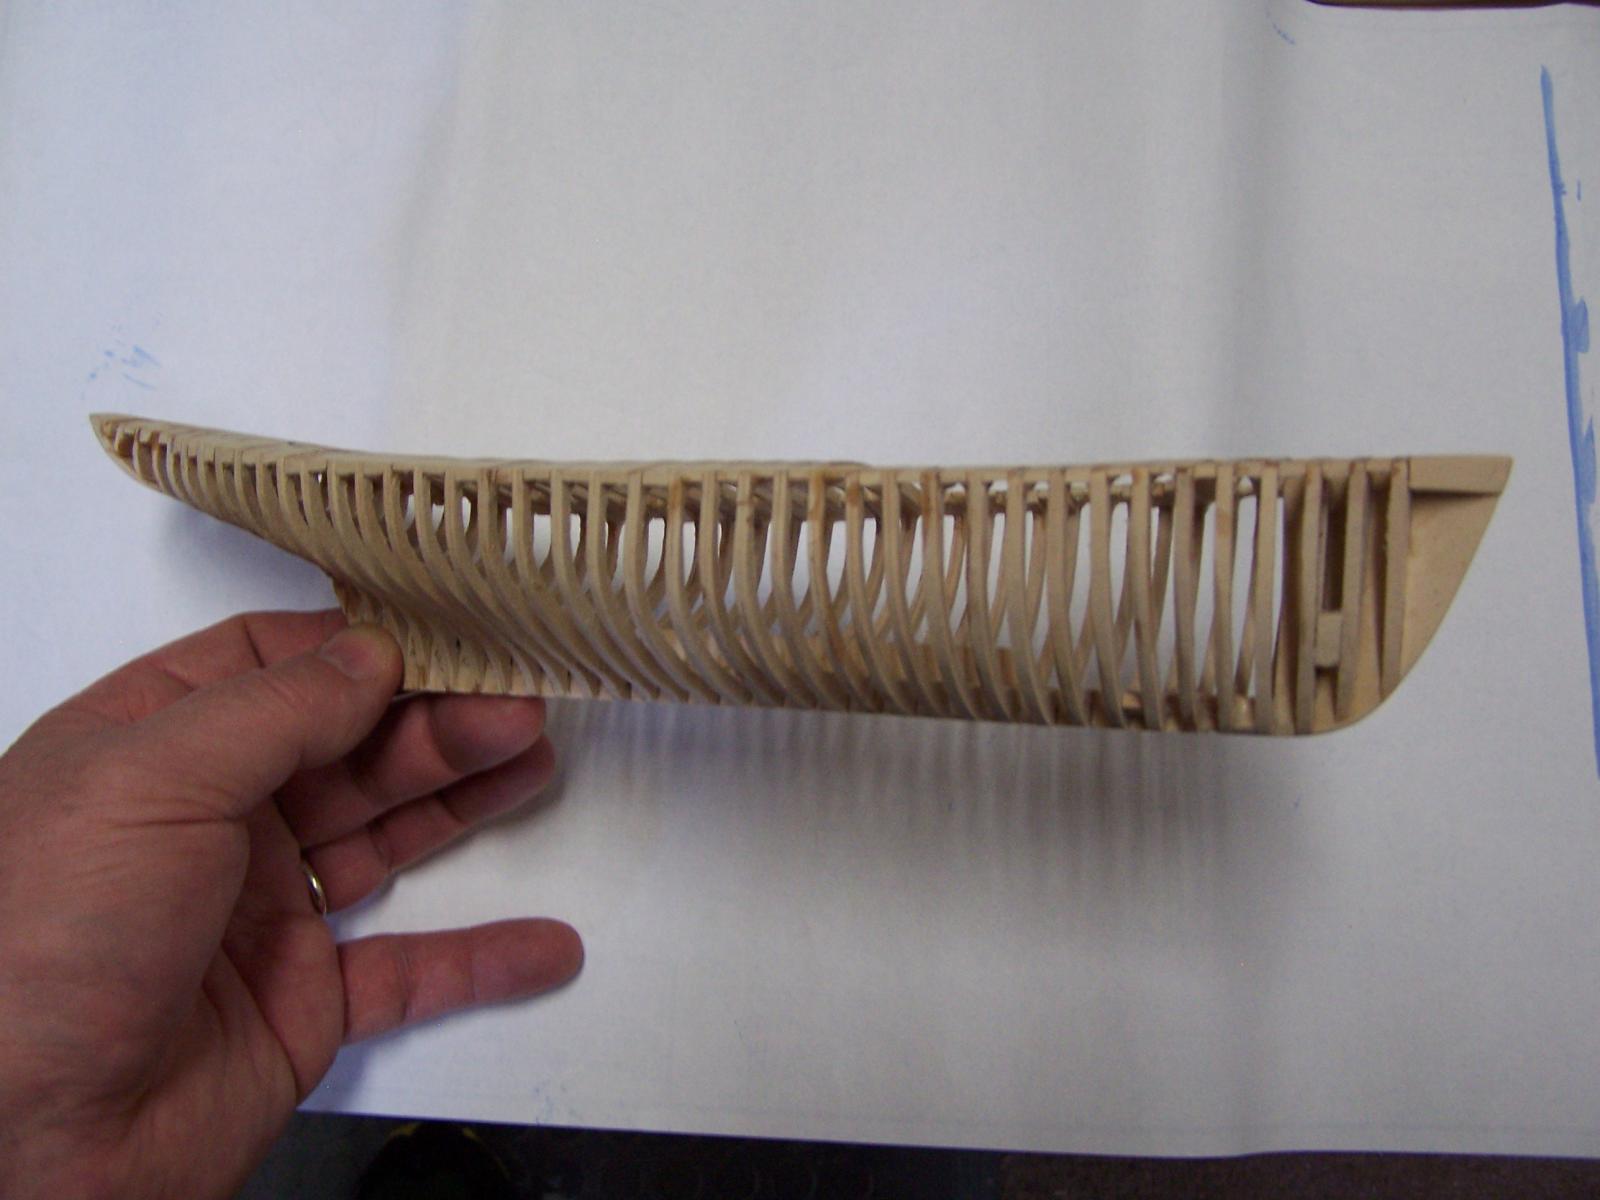
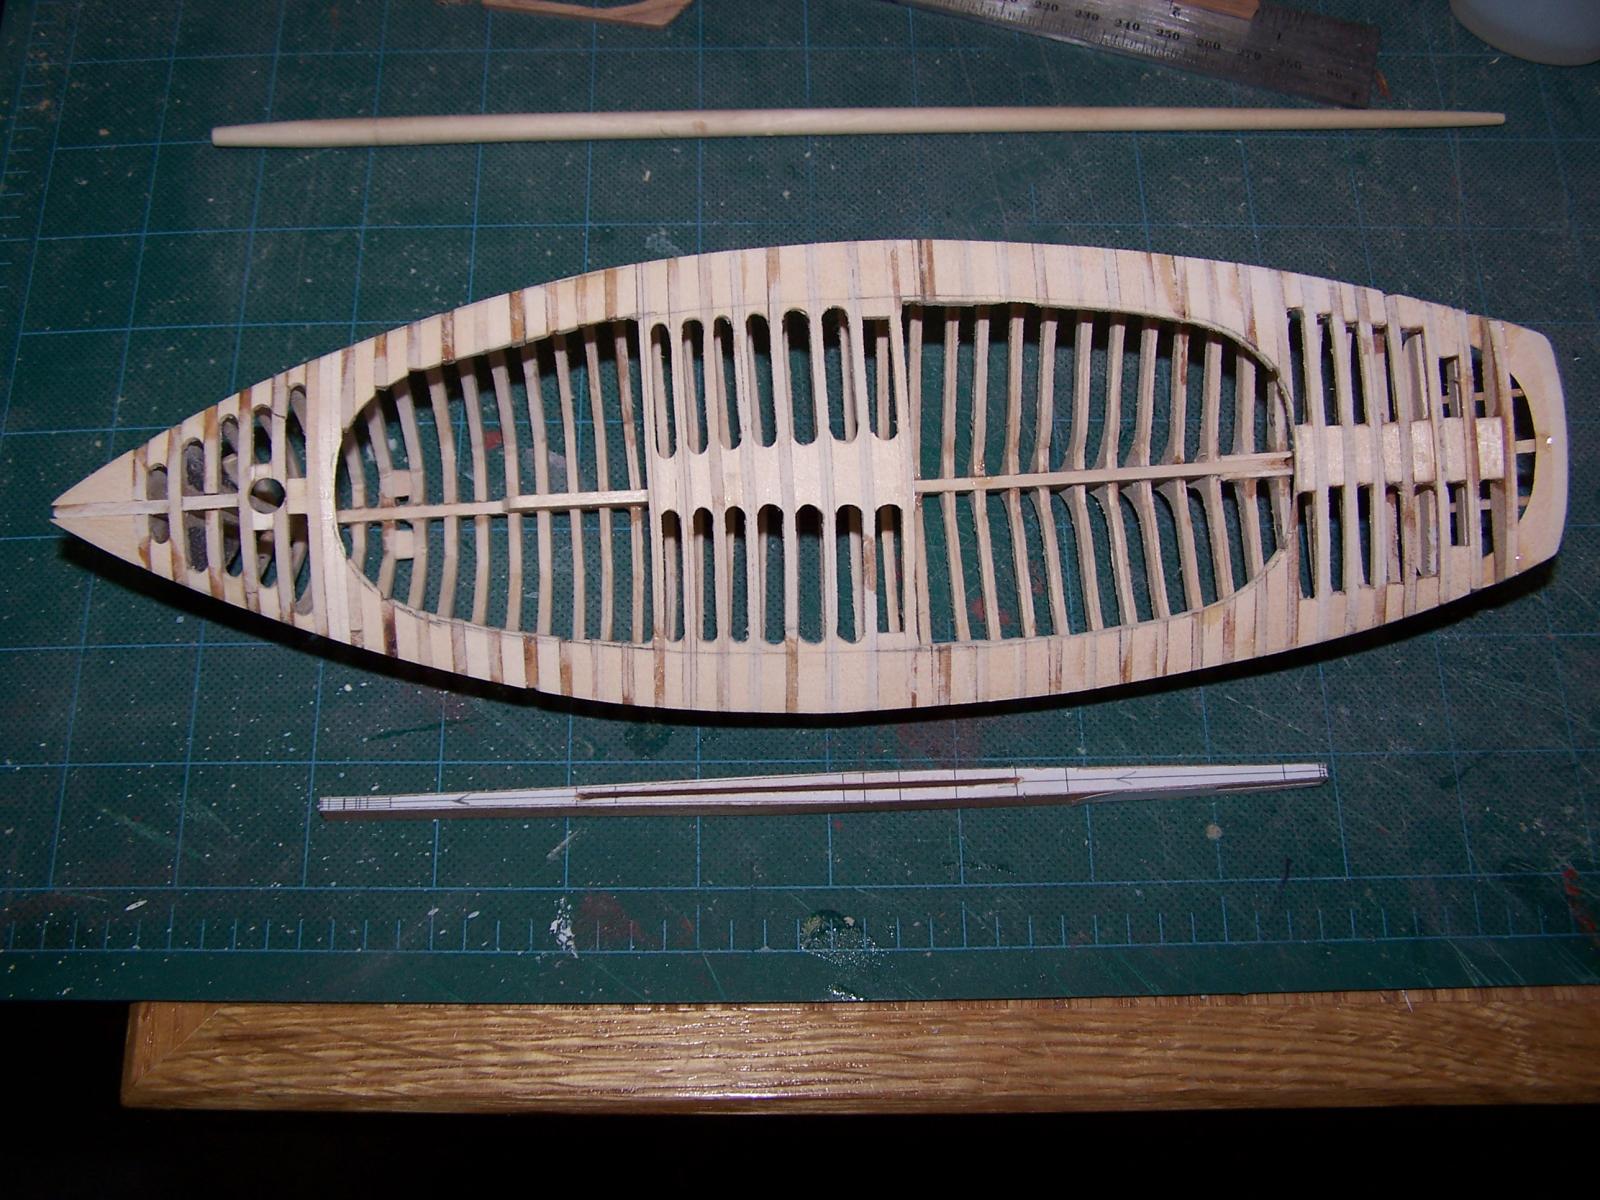
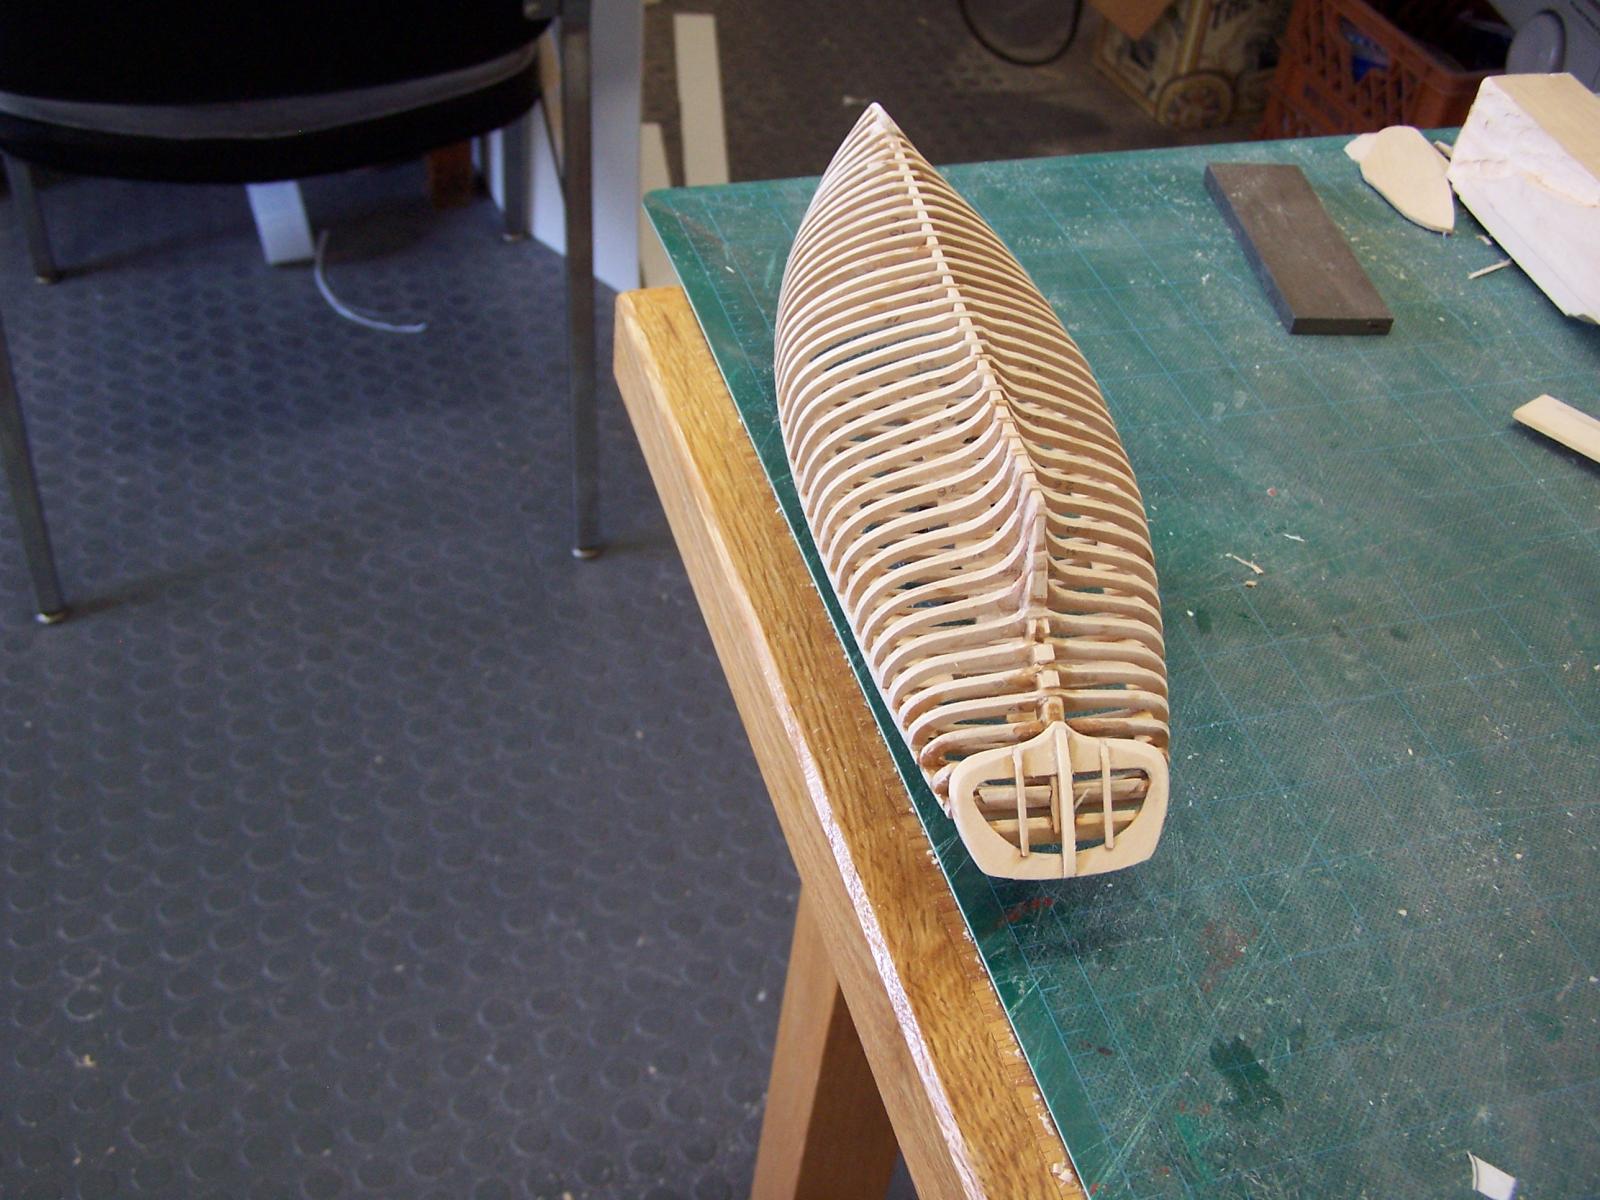
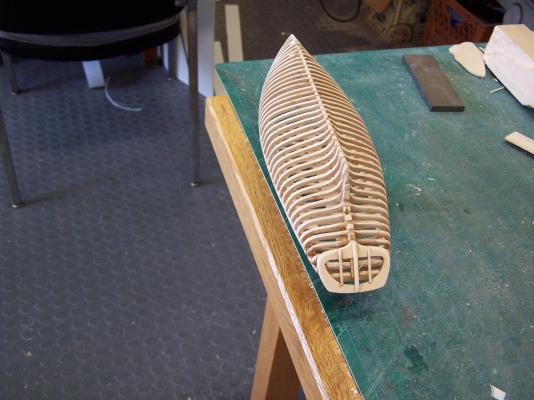
I finally got all the frames stuck together:
- 86 replies
-
- 9
-
-
- muscongus bay lobster smack
- Midwest Products
- (and 1 more)
-
It's really fun watching this come together. It looks like drilling all of those tiny holes is really paying off with the lighting effect!
-
Thanks for the mast hoop tutorial, that was great. I'm a ways away from that yet, but something to look forward to.
-
6 feet tall = .8 inch or 20.32 mm 5'8" tall= .755 inch or 19.17 mm. The good part about 1/90 scale is that it is easy to use 1/87 HO scale figures. As others have said, Preiser is among the best. Get the unpainted sets. "in the country" has some nice poses and easily adaptable clothing, some of the military sets have separate heads and hands ("resting infantry" is one of my favorites for conversions) that can be mixed and matched for a variety of figures.
-
There is a thread in the "Shore Leave" section titled: "What else do you model besides ships?" http://modelshipworld.com/index.php?/topic/4423-what-else-do-you-model-besides-ships/ A bunch of us would love to see what other great things you can do with paper and brass...
-
I've always admired models where the craft and technique is so good that it recedes into the background, and the model becomes an animated story, an illustrated insight into what it was like to live and work on one of these ships. Your "Supply" is a great example of this art.
- 389 replies
-
- 1
-
-
- supply
- caldercraft
- (and 1 more)
-
The mast hoops are every bit as upscale as the rest of the boat-- fine woods and instead of a humble coin under the step, dollar bills for the hoops! The finish looks great, as well as details like the horse/traveler assembly. Are you going to use tung oil or anything on the deck or leave it natural? A word of caution on the pivoting bowsprit: The boats I have seen with this feature have a separate fore-stay from the stem to the mast top. The tension between the forestay and the bobstay seemed to be critical to this rig for balancing the long boom and gaff, so the bowsprit often took on a "banana" shape after much tightening of the turnbuckle. I've seen friendship sloops with an additional forestay (many carried a forestays'l as well as a jib.) Are you going to add a similar feature?
-
http://forum.woodenboat.com/showthread.php?164895-How-a-boat-sinks-Muscongus-Bay-Sloop Heres the link, it's a very interesting discussion. I think the point of the default sailing configuration being " reefed up" with the full spread used only in light airs really rings true, it's like having a work truck with a 'creeper' first gear, you always start in second unless you really need to start a lot of weight up a hill, pull a stump or drive at the pace of a bale-loading crew without burning up the clutch...
-
Great post, Dee_Dee, to me, the following (posted in the thread "how a boat sinks" in wooden boat.com) makes the most sense: Roger Long Re: How a boat sinks - Muscongus Bay SloopI can't as a naval architect, see anything in this hull that would warrant calling it a dangerous type. I doubt many drove under when fishing. I can see where this particular hull might be slightly more vulnerable but I wouldn't label that a "cause" of the two sinkings. Traditional working boats like this have a lot more sail area that would be found on most modern designs of the same weight and waterplane area. They didn't have this to provide thrills for the people who fished them but to be able to get around in light air before engines were common. The people who made their living in these craft knew the vessels limitations and how to reef. The requirements of handling fishing gear would usually cause them to have sail area reduced in a breeze to the point that we would consider them dogs today. Put a bunch of people on a traditional boat who are out for fun and whose expectations of reefing have been shaped by modern craft, and all sorts of bad things can happen aside from driving the bow under.
-
http://modelshipworld.com/index.php?/topic/3378-papegojan-by-zibby-shipyard-card-scale-172-1627-classic-dutch-pinnace-armed-with-16-guns/ I believe it was the above. Really nice!
-
Wow. excellent work! I think if anyone asks how to paint a plastic ship, we can just show your presentation and say: "make it look like this."
- 228 replies
-
- 2
-
-
- spanish galleon
- lee
- (and 1 more)
-
A wonderful education in both research and construction techniques! I had the privilege of seeing your Swan 42 model at New London last year, does your commission (and logistics) allow you to bring the model to this year's show?