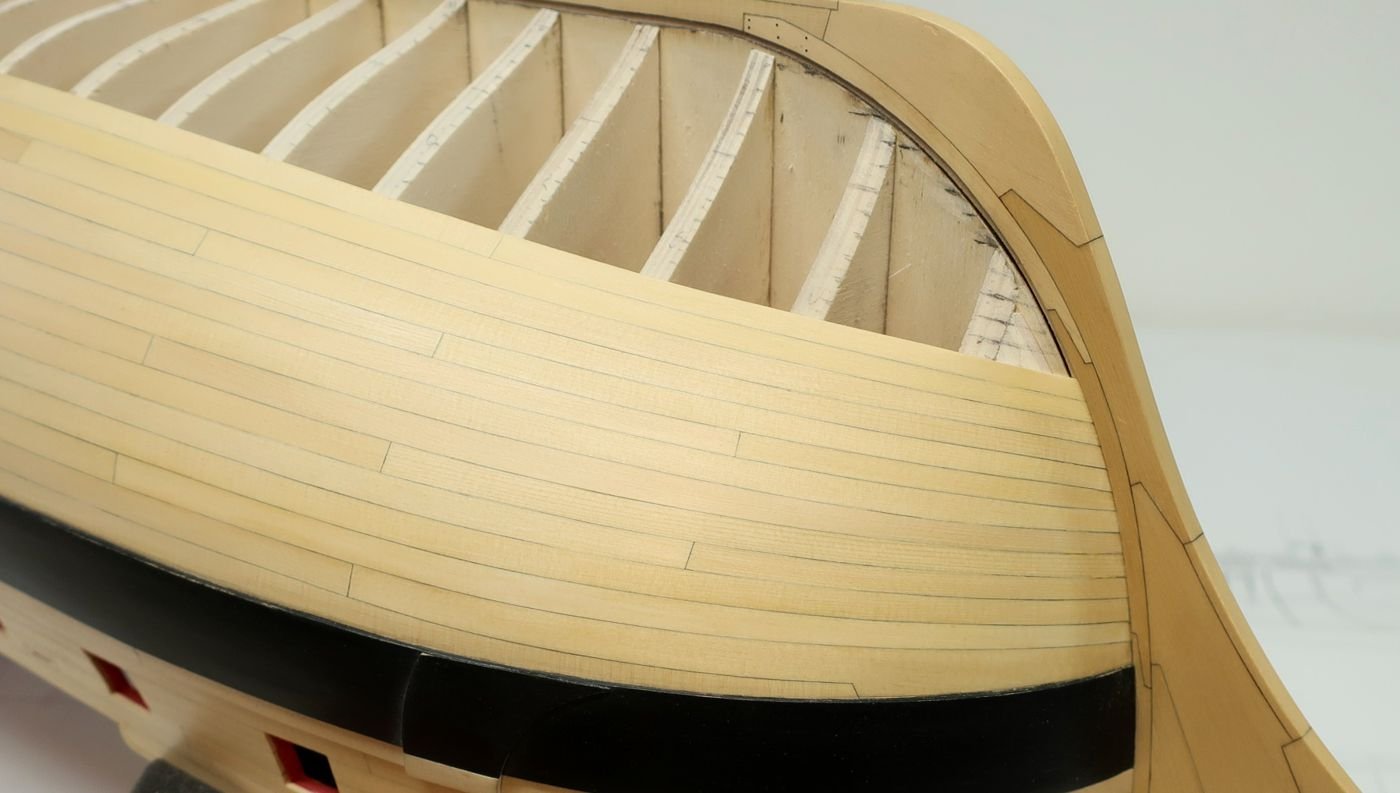
Juan Carlos Posted March 25, 2013 #1 Posted March 25, 2013 I post this for people with experience to give some feedback. I found that sometimes i could get the spiled part on my first try and sometimes i had to try more than once. I think I discovered why. When you put the clear tape with its edge parallel to the edge of the planking line you will get the correct curve of the plank. But, if you put the tape at an angle to allow it to lay flat and pretty, you wont get the correct curvature. you will either have to adjust a lot with sandpaper or repeat the process. The edge of the tape away from the planks should be a little ¨loose¨ when you put it on the hull. If that edge is tight, or straight, you wont get the curvature you are looking for. Can anybody confirm this? hamilton and avsjerome2003 2
cog Posted March 25, 2013 #2 Posted March 25, 2013 You are right. Just lay the tape straight over the hull without 'bending' it. The sides will stand out slightly, and you can get the right curvature by tracing the mounted 'plank' WackoWolf and hamilton 2 Carl "Desperate affairs require desperate measures." Lord Nelson Search and you might find a log ...
hopeful Posted April 4, 2013 #3 Posted April 4, 2013 Jaun and Carl, Would you please post a few photos illustrating your method? Thanks! BFN Cheers, Hopeful aka David “there is wisdom in many voices” Completed: Sharpie Schooner (Midwest) Posted in kit build section of forum Current: Sultana (MSW) Updating the build log and continuing on with the build Next: Lady Nelson (Amati Victory) Completed Sharpie Schooner: (Midwest) Current: Sultana (MS) Current: Phantom (MS) Next: Lady Nelson (Amati Victory)
hamilton Posted April 4, 2013 #4 Posted April 4, 2013 This sounds like a simple yet very effective method - the benefit of the adhesive seems obvious - now that someone has pointed it out to me! I'll give this a try hamilton current builds: Corel HMS Bellona (1780); Admiralty models Echo cross-section (semi-scratch) previous builds: MS Phantom (scuttled, 2017); MS Sultana (1767); Corel Brittany Sloop (scuttled, 2022); MS Kate Cory; MS Armed Virginia Sloop (in need of a refit); Corel Flattie; Mamoli Gretel; Amati Bluenose (1921) (scuttled, 2023); AL San Francisco (destroyed by land krakens [i.e., cats]); Corel Toulonnaise (1823); MS Glad Tidings (1937) (refit, 2024); HMS Blandford (1719) from Corel HMS Greyhound; Fair Rosamund (1832) from OcCre Dos Amigos (missing in action); Amati Hannah (ship in a bottle); Mamoli America (1851); Bluenose fishing schooner (1921) (scratch); Off-Centre Sailing Skiff (scratch); Admiralty Models HMS Echo (1781), cross-section. under the bench: MS Emma C Barry; MS USS Constitution; MS Flying Fish; Corel Berlin; a wood supplier Colonial Schooner Hannah; Victory Models H.M.S. Fly; CAF Models HMS Granado; MS USS Confederacy
Old Sea Dog Posted April 4, 2013 #5 Posted April 4, 2013 thx 4 the info Dave No problem can be solved from the level of consciousness that created it. Albert Einstein
hamilton Posted April 4, 2013 #6 Posted April 4, 2013 Great description, Janos - thanks a lot! hamilton current builds: Corel HMS Bellona (1780); Admiralty models Echo cross-section (semi-scratch) previous builds: MS Phantom (scuttled, 2017); MS Sultana (1767); Corel Brittany Sloop (scuttled, 2022); MS Kate Cory; MS Armed Virginia Sloop (in need of a refit); Corel Flattie; Mamoli Gretel; Amati Bluenose (1921) (scuttled, 2023); AL San Francisco (destroyed by land krakens [i.e., cats]); Corel Toulonnaise (1823); MS Glad Tidings (1937) (refit, 2024); HMS Blandford (1719) from Corel HMS Greyhound; Fair Rosamund (1832) from OcCre Dos Amigos (missing in action); Amati Hannah (ship in a bottle); Mamoli America (1851); Bluenose fishing schooner (1921) (scratch); Off-Centre Sailing Skiff (scratch); Admiralty Models HMS Echo (1781), cross-section. under the bench: MS Emma C Barry; MS USS Constitution; MS Flying Fish; Corel Berlin; a wood supplier Colonial Schooner Hannah; Victory Models H.M.S. Fly; CAF Models HMS Granado; MS USS Confederacy
WackoWolf Posted April 4, 2013 #7 Posted April 4, 2013 If I remember right Chuck did a write up on this subject, maybe he will put it in the database with some photos for everyone. Wacko Joe Go MSW :)
Chuck Posted April 4, 2013 #8 Posted April 4, 2013 Its already in there. See this http://modelshipworldforum.com/resources/Framing_and_Planking/Lining%20Off%20your%20hull%20for%20planking.pdf Chuck fnkershner, hopeful, augie and 1 other 4 Chuck Passaro - MSW Admin Sloop Speedwell - POF scratch Block Island Boat - POF scratch HMS Winchelsea - POB scratch build HM Cutter Cheerful - POB scratch build Royal Barge - POF scratch Medway Longboat- POF Scratch SYREN SHIP MODEL COMPANY
Shazmira Posted April 10, 2013 #9 Posted April 10, 2013 See this thread begun earlier as well http://modelshipworld.com/index.php?/topic/519-spiling-planks-with-scotch-tape/ freewheelinguy 1 Robbyn If you risk nothing, you risk everything! Current builds Syren (Model Shipways) version 2.0 AL San Francisco II Mordaunt (Euro Model) Completed Builds 18th Century Longboat designed by Chuck Passaro In the closet Battle Station Al Charles Morgan (1980s version)
fish Posted April 11, 2013 #10 Posted April 11, 2013 So if wider sheets of wood are required for spilling, why don't kits come with some sheets? It seems odd to me that they don't. It also seems that for your planking to look good and proper you must use the spilling technique? Aaron Chuck, fnkershner and Ponto 3 “The World is a book, and those who do not travel read only a page.” - Augustine Current Build: Artesania Latina San Francisco II 1:90 Scale On the Shelf: Model Shipways Armed Virginia Sloop 1:48 Scale
druxey Posted April 11, 2013 #11 Posted April 11, 2013 You are correct, Aaron. For planking to look right, it does need to lined out and spiled. I suspect kit manufacturers only provide stripwood because it is easier and cheaper for them. Also, many kit model makers are quite happy to plank a hull in a non-realistic way, so they don't demand sheetwood from the kit manufacturers. Be sure to sign up for an epic Nelson/Trafalgar project if you would like to see it made into a TV series http://trafalgar.tv
Ponto Posted April 11, 2013 #12 Posted April 11, 2013 So if wider sheets of wood are required for spilling, why don't kits come with some sheets? It seems odd to me that they don't. It also seems that for your planking to look good and proper you must use the spilling technique? Aaron After the "math" is done and max plank widths are determined, I suppose 2 or 3 of the supplied planks could be glued together giving you a wider surface to accommodate the "spiles"........ JP Built & De-Commissioned: HMS Endeavour (Corel), HMS Unicorn (Corel), Abandoned: HMS Bounty (AL) Completed : Wappen Von Hamburg (Corel), Le Renommee (Euromodel)... on hold Current WIP: Berlin by Corel On Shelf: HMS Bounty (Billings),
wthilgen Posted April 11, 2013 #13 Posted April 11, 2013 (edited) I've used painters tape 1" wide. I hold on to each end of the piece of tape and apply it making sure it touches middle of the hole first then both ends at the same time. Don't push, just set it over the hole. Once applied, I use the side of a sharpened carpenters pencil and gently rub the edges of the hole. I sharpen the pencil so the lead is about 1/4 - 3/8 in length. Remove tape, set on plank, add 1mm cut to shape, sand to fit numerous time until done. Edited April 11, 2013 by Billl overdale and Brian the extraordinaire 2 Current Build: La Nina, Latina - Wood / 1:65 On The Shelf: San Francisco II, Latina - Wood 1/90, U.S.S. Constitution, Revell - Plastic / 1:96 (Remake), H.M.S. Bounty, Latina - Wood / 1:48, H.M.S. /Mayflower, Latina - Wood / 1:64, La Pinta, Latina, Latina - Wood / 1:65, La Santa Maria, Latina - Wood / 1:65, Completed: San Francisco / Cross Section, Latina - Wood / 1:50, Coastal Submarine, Revell - Plastic / 1:144, Cutty Sark Wall Plaque, Revell - Plastic / 1:50, H.M.S. Victory, Revell - Plastic / 1:146, H.M.S. Bounty, Constructo - Wood / 1:50, Oseberg, Billings Boats - Wood / 1:25, Clipper Ship (Sea Witch), Unknown - Wood / 1:46, U.S.S. Constitution, Revell - Plastic / 1:96, Man Of War, Scientific - Wood / 1:50, Robert E. Lee, Scientific - Wood / 1:45, PT-109, Revell - Plastic / 1:72, U.S.S. Enterprise, Revell - Plastic / 1:720, R.M.S. Titanic, Revell - Plastic / 1:720, Numerous other wooded tall ships and boats from companies named: Ideal, Dumas, Pyro.
apprentice Posted April 14, 2013 #14 Posted April 14, 2013 After the "math" is done and max plank widths are determined, I suppose 2 or 3 of the supplied planks could be glued together giving you a wider surface to accommodate the "spiles"........ JP I tried it once and found it does not work well because the glueline is much weaker than the rest of the mateial. I keep a small stock of 0.5mm veneer for spiling. The trouble is veneer is available for a variety of wood but oak veneer is hard to get hold of. I ended up with teak for the spiled strakes and oak for the straight bits
mathewp Posted May 4, 2013 #15 Posted May 4, 2013 If you are going for historic accuracy,what method would you use, drop planks or spiling??? Chuck 1
Chuck Posted May 4, 2013 #16 Posted May 4, 2013 In most cases both...but only one drop plank at the bow usually. Chuck Chuck Passaro - MSW Admin Sloop Speedwell - POF scratch Block Island Boat - POF scratch HMS Winchelsea - POB scratch build HM Cutter Cheerful - POB scratch build Royal Barge - POF scratch Medway Longboat- POF Scratch SYREN SHIP MODEL COMPANY
apprentice Posted May 6, 2013 #17 Posted May 6, 2013 In most cases both...but only one drop plank at the bow usually. Chuck I am building AL's Mayflower. I divided the hull into bands and installed batans on the hull before planking. The batans ran naturally along the hull that ended sharply in the bow. In two bands, the width at the bow is just over two half strack width, with one band its half strack width. I spilled the stracks and install drop planks in the second planking. With two bands, its five stracks into two, with the other its five stracks into one. How can I install only one drop plank at the bow in this case? Have I made a mistake along the way? I have a photo of the hull after the first planking but I do not know how to attach it with the massage Appreciate if you could give me the benefit of your experience.
Chuck Posted May 6, 2013 #18 Posted May 6, 2013 Yes I would still only put one. They will get pretty narrow. Here is a site that shows teh Mayflower II being planked. Read through all of the months of construction to see the planking being fixed. There are some good pictures. There were no drop planks at all on teh replica. I would still say its Ok to use one at the bow though. Directly beneath the wales. http://blogs.plimoth.org/captns-blog/?m=201301 Chuck Chuck Passaro - MSW Admin Sloop Speedwell - POF scratch Block Island Boat - POF scratch HMS Winchelsea - POB scratch build HM Cutter Cheerful - POB scratch build Royal Barge - POF scratch Medway Longboat- POF Scratch SYREN SHIP MODEL COMPANY
harrypsk Posted May 6, 2013 #19 Posted May 6, 2013 So if wider sheets of wood are required for spilling, why don't kits come with some sheets? It seems odd to me that they don't. It also seems that for your planking to look good and proper you must use the spilling technique? Aaron I have this frustration myself. I'm working on the Constructo Mayflower. Since I will double plank it, I am using a wider walnut strip for spiling the first layer. However, this isn't going to work for layer 2 due to color differences. I've searched the web A LOT for bokapi sheets and am coming up dry. This is my first 'big' wooden ship so my first plank layer is an experiment waiting to be covered! But with the supplied veneer I don't have the required dimensions for spiling layer 2. As for the clear tape method, for me it has been the best way to do a decent job of curve transfer for spiling. Current Build: Constructo Mayflower
fnkershner Posted September 1, 2013 #20 Posted September 1, 2013 Ok I guess I am late to the party on this thread. As many people here know I am deep into the planking on my AL Harvey. I also have already sanded the second layer off and started completely over. I am close to 1/2 way done on this 2nd try and it does look much better and I am learning. Here is the rub. I understand spiling and I think I know how to do it. But as mentioned here it requires planks wider than those provided by the kit. so I assumed this was limited to scratch building and basically I ignored spiling. I focused instead on using the least amount of stealers and no drop planks if possible. So far so good. But I am getting to the point that Chuck very accurately describes in his planking practicum. One edge of the plank does not lay on the bulkhead and you get what he describes as a clinker look. So I am almost completely at a stand still. Is there no way to complete the planking without spiling? This is the 2nd layer and I want it to look good. If I have to, I will order the wood and cut my spiled planks. But how does one do this with the planking supplied with the kit? HELP! Current Builds - 18th Century Longboat, MS Syren Completed Builds - MS Bluenose, Panart BatteStation Cross section, Endevour J Boat Half Hull, Windego Half Hull, R/C T37 Breezing Along, R/C Victoria 32, SolCat 18 On the shelf - Panart San Felipe, Euromodel Ajax, C.Mamoli America, Its a sailor's Life for me!
druxey Posted September 2, 2013 #21 Posted September 2, 2013 Unfortunately this is the weakness of kit-supplied planking strips. If you can get a fine-grained veneer from a local source (I assume you don't have the power tools to machine your own plank sheet 'blanks'), you might consider that route. Spiling is definitely the way to go if you want the nice planking look of scratch-built models. Be sure to sign up for an epic Nelson/Trafalgar project if you would like to see it made into a TV series http://trafalgar.tv
fnkershner Posted September 2, 2013 #22 Posted September 2, 2013 Well Druxey, Before I moved I did have full sized tools. But where I live now I don't have the room and I sold them. Now I am limited to what I can cut with a full set of Jim's tools. So I am going to be shopping soon. Just for discussion purposes. If I was willing to accept less that Scratch quality, how do you do it? My problem is that the plank doesn't lay flat. It tends to get a "clinker" look to it. Current Builds - 18th Century Longboat, MS Syren Completed Builds - MS Bluenose, Panart BatteStation Cross section, Endevour J Boat Half Hull, Windego Half Hull, R/C T37 Breezing Along, R/C Victoria 32, SolCat 18 On the shelf - Panart San Felipe, Euromodel Ajax, C.Mamoli America, Its a sailor's Life for me!
ASAT Posted September 2, 2013 #23 Posted September 2, 2013 (edited) bevel the edges of the plank during the fitting process, soak em, use CA and force them as close as you can when gluing, and then sand the sh1te out of them... Edited September 2, 2013 by ASAT Lou, In Pleasant View Harvey by ASAT- AL Scale 1:50 - Kitbash Fair American by ASAT - LSS Craftsman Plus https://modelshipworld.com/topic/23121-revenge-1577-by-asat-amati-164/
capnharv2 Posted September 2, 2013 #24 Posted September 2, 2013 Floyd, If you need extra planking material, please let me know. I've got quite a bit of cherry, walnut and maple laying around-and more basswood than I'll ever need. With Jim's sander you should be in business. Also, I can run up to your house if you like. Thanks, Harvey fnkershner 1
fnkershner Posted September 2, 2013 #25 Posted September 2, 2013 Harvey - I may take you up on the offer after I return from vacation. We leave Friday night to catch the AC finals. Current Builds - 18th Century Longboat, MS Syren Completed Builds - MS Bluenose, Panart BatteStation Cross section, Endevour J Boat Half Hull, Windego Half Hull, R/C T37 Breezing Along, R/C Victoria 32, SolCat 18 On the shelf - Panart San Felipe, Euromodel Ajax, C.Mamoli America, Its a sailor's Life for me!


Recommended Posts