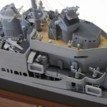
alross2 Posted May 7, 2021 Author Share #31 Posted May 7, 2021 First coat of white primer this morning. Prior to that, I had just mounted the PE torpedo tube covers and the 6 pdr hull casemates and hinges. chris watton, Nunnehi (Don), hollowneck and 8 others 11 Link to comment Share on other sites More sharing options...
alross2 Posted May 7, 2021 Author Share #32 Posted May 7, 2021 Let's be honest; not everyone reads and follows instructions. While this isn't a good idea in kits with lots of premade parts, it happens. So, one of the challenges in kit design is to tailor your illustrations for this potential situation. While thinking about the text for this process, I realized that the initial illustration (while just fine if you read the instructions) might be better if it mimicked the text more closely. Thus, the second illustration. mtaylor, coxswain, Ryland Craze and 7 others 10 Link to comment Share on other sites More sharing options...
mtaylor Posted May 7, 2021 Share #33 Posted May 7, 2021 4 hours ago, alross2 said: Let's be honest; not everyone reads and follows instructions. As a former tech writer, I can attest to this 100%. Some times, the builders ignore the blueprints also because "they know better". hollowneck, Canute, alross2 and 1 other 4 Mark "The shipwright is slow, but the wood is patient." - me Current Build: Past Builds: La Belle Poule 1765 - French Frigate from ANCRE plans - ON HOLD Triton Cross-Section NRG Hallf Hull Planking Kit HMS Sphinx 1775 - Vanguard Models - 1:64 Non-Ship Model: On hold, maybe forever: CH-53 Sikorsky - 1:48 - Revell - Completed Licorne - 1755 from Hahn Plans (Scratch) Version 2.0 (Abandoned) Link to comment Share on other sites More sharing options...
alross2 Posted May 8, 2021 Author Share #34 Posted May 8, 2021 You go, Mark! If I get a call from someone having a problem with one of the kits I developed, first thing I ask them is whether they read the instructions. If not, I tell them to back and read them, then call me. Because there is so much laser and photo-etch, there is a specific sequence to be followed that isn't necessarily intuitive. I used to develop training materials and procedures for the nuclear power industry and taught technical writing at a college. Canute, Bill Hudson, thibaultron and 3 others 5 1 Link to comment Share on other sites More sharing options...
alross2 Posted May 12, 2021 Author Share #35 Posted May 12, 2021 I'm working on the OREGON instructions today and decided the text on setting the bilge keels needed an enhanced illustration to accompany the jig illustration. The dimension from the rudder post to the aft end of the bilge keel will be filled in when I get back to the model in my shop and measure it. ccoyle, GrandpaPhil, coxswain and 7 others 10 Link to comment Share on other sites More sharing options...
alross2 Posted May 12, 2021 Author Share #36 Posted May 12, 2021 The sponsons below the overhang of the 6" casemates are a simple shape but a bugger to get right. GrandpaPhil, EricWilliamMarshall, mtaylor and 8 others 11 Link to comment Share on other sites More sharing options...
Bill Hudson Posted May 12, 2021 Share #37 Posted May 12, 2021 Thought this might be of interest: https://en.wikipedia.org/wiki/USS_Oregon_(BB-3) Ryland Craze, mtaylor, thibaultron and 1 other 4 Fall down nine times, get up ten. Link to comment Share on other sites More sharing options...
alross2 Posted May 13, 2021 Author Share #38 Posted May 13, 2021 Finish coat of white is now on the hull and superstructure and the mast is finished except for the binnacle and railing, which won't go on until the mast is in place on the model. Like Comment Share Bill Hudson, thibaultron, Ryland Craze and 7 others 10 Link to comment Share on other sites More sharing options...
alross2 Posted May 14, 2021 Author Share #39 Posted May 14, 2021 OK, bottom color on this AM. After peeling away all of the masking tape, I found some underbleed on the deck, but that's easily removed. The next activity will be adding the photo-etched coal scuttles and bases for the deck furniture. The waterline masking was a little tricky, as it is 1/16" below the top of the armor belt. I taped off the hull along the top of the armor belt with 1/4" striping tape, then used 1/16" striping tape below that. Regular painters' masking tape was applied from the 1/16" tape up. The first layer of color was from rattlecan of red primer, followed by an airbrushing of flat red. Canute, Ryland Craze, EricWilliamMarshall and 10 others 13 Link to comment Share on other sites More sharing options...
alross2 Posted May 18, 2021 Author Share #40 Posted May 18, 2021 Starting to put on the little stuff. This is the aft portion of the main deck with bitts and hatches. Ryland Craze, mtaylor, reklein and 10 others 13 Link to comment Share on other sites More sharing options...
alross2 Posted May 18, 2021 Author Share #41 Posted May 18, 2021 Test fitting one of the twelve gunner's grates to the inside of the hammock net structure. The brass section at the ladder is 3/8" tall. The white strip is .020" styrene. Ryland Craze, mtaylor, GuntherMT and 5 others 8 Link to comment Share on other sites More sharing options...
dcicero Posted May 18, 2021 Share #42 Posted May 18, 2021 On 5/14/2021 at 9:56 AM, alross2 said: OK, bottom color on this AM. After peeling away all of the masking tape, I found some underbleed on the deck, but that's easily removed. How do you remove underbleed like that? I've messed this up so many times, I find ways to avoid situation where it might happen. Dan thibaultron, Canute and mtaylor 3 Link to comment Share on other sites More sharing options...
alross2 Posted May 18, 2021 Author Share #43 Posted May 18, 2021 3 hours ago, dcicero said: How do you remove underbleed like that? I've messed this up so many times, I find ways to avoid situation where it might happen. Dan The best way to remove it is not to get it... I don't get it very often because I double or triple mask, first with pin striping tape (1/16' or 1/8"), then an overlap of 1/4" tape, then another overlap with low tack painter's tape (and paper if it's a large surface. Still, stuff happens sometimes. The underbleed I normally get is between the hull and a bright finished deck. In most cases, I use a very sharp #11 blade and cut alongside any objects against which the underbleed rests. This gives a nice sharp edge to end against when scraping. Then, depending on the size of the area around the paint, I scrape with the grain towards the sharp edge using a variety of chisel blades and a razor blade. You need a gentle touch and to keep the blade vertical. If it's paint on paint, now you have a definite problem. If it's gloss paint and the base coat is well cured, you can use a Q tip dipped in a mild thinner and lightly swab aqay the underbled color. Sometimes you can use automotive polishing compound and a soft cloth on some paints, as well. In all probability, with a paint on paint problem, you're probably going to have to remask and repaint. FAIR WARNING: I seldom brush paint any large surface. Generally, I use an airbrush and sometimes a rattle can. Consequently, I'm not sure how well this would work with a brushed surface. mtaylor, GuntherMT, thibaultron and 8 others 10 1 Link to comment Share on other sites More sharing options...
alross2 Posted May 19, 2021 Author Share #44 Posted May 19, 2021 It never fails. We have two nice chain stops in the fittings - neither one fits OREGON. So, I made up a brass master this AM from brass tube, brass channel, and solder. There will be four per kit. GuntherMT, Canute, hollowneck and 6 others 9 Link to comment Share on other sites More sharing options...
ccoyle Posted May 19, 2021 Share #45 Posted May 19, 2021 35 minutes ago, alross2 said: We have two nice chain stops in the fittings - neither one fits OREGON. So, I made up a brass master this AM from brass tube, brass channel, and solder. There will be four per kit. Which is awesome. Some manufacturers might have simply shrugged and used the off-the-shelf fittings. Canute, thibaultron, mtaylor and 2 others 5 Chris Coyle Greer, South Carolina When you have to shoot, shoot. Don't talk. - Tuco Current builds: Brigantine Phoenix, Hawker Hurricane Link to comment Share on other sites More sharing options...
alross2 Posted May 19, 2021 Author Share #46 Posted May 19, 2021 Bow section with most of the bases for the various bits and pieces. mtaylor, ccoyle, GuntherMT and 6 others 9 Link to comment Share on other sites More sharing options...
alross2 Posted May 19, 2021 Author Share #47 Posted May 19, 2021 Some of the photo-etched coal scuttles. hollowneck, coxswain, GuntherMT and 8 others 11 Link to comment Share on other sites More sharing options...
Azzoun Posted February 8, 2022 Share #48 Posted February 8, 2022 Is there an expected timing on go-to-market? thibaultron, Canute and mtaylor 3 Link to comment Share on other sites More sharing options...

Recommended Posts