


Chuck Seiler
-
Posts
1,878 -
Joined
-
Last visited
Content Type
Profiles
Forums
Gallery
Events
Everything posted by Chuck Seiler
-
 Greetings from San Diego! I am building Chuck Passaro's QUEEN ANNE BARGE and I figured I would do a build log. If you are reading this, it means I am half finished. I wanted to wait until I had significant progress before I published. My past efforts at logs usually turned out poorly. I get bogged down trying to document the build and end up getting distracted from actually building. Today is 08 July 2018. (Your calendar is different.) A grueling 7 months at work has come to an end (the grueling part, not the work) and I figured I would celebrate by getting back into building. I chose the QAB for a couple reasons. I really like Chuck's instructions. I have made or am in the process of several models which Chuck has written practica for. I also have used his "stuff" (line, blocks, windlass, etc). Top notch material. I wanted to do the MEDWAY LONGBOAT he is working on, but that will not be available for awhile. I couldn't wait that long. I decided to give QAB a try because of the quality and because many of the processes he uses for it will be found in the LONGBOAT. Another reason, although minor is a family connection I found with the Queen Anne period while doing ancestry research. I won't go into detail unless somebody is interested. I ordered the kit about 2.5 weeks ago. As usual, Chuck shipped it to me immediately and I have been studying the plans and instructions since (as well as other build logs). The build is finally underway.
 -
Dowmer: I had taken a hiatus from all building due to work related issues. I am starting up again with Chuck P's Queen Anne Barge (build log to follow soon). It is a simple project that won't bog me down. PROVIDENCE is on the back burner, but not forgotten. Ken: SOS said he got the plans from the captain of the replica. They appear to be the same as was featured in the book, since the author worked closely with the builders, except as noted above. I had attempted to get with the author and publisher to get permission to use the plans, but was unable to do so.
-
A Chuck convention this weekend.
- 421 replies
-
- 7
-

-
- medway longboat
- Syren Ship Model Company
- (and 1 more)
-
There is another downside to over-beveling your planks. The planks will meet snug on the surface, but there will be a gap as you get deeper into the plank.The resulting finish sanding could remove that vital upper layer and create a gap in your planking. Don't ask me how I know this.
- 421 replies
-
- 8
-
-
- medway longboat
- Syren Ship Model Company
- (and 1 more)
-
New to ship modelling? But what do you build first?
Chuck Seiler replied to MSW's topic in Wood ship model kits
Rum comes later in #6 "Alcohol is your friend, part 2-When all else fails" -
New to ship modelling? But what do you build first?
Chuck Seiler replied to MSW's topic in Wood ship model kits
I wonder how many people take advice like this, versus they have to touch the hot stove before they listen. (ouch, that IS hot!!!) I have spoken on this topic often, so it is close to my heart. I usually see "Yeah, I hear you, but that doesn't apply to me." Far be it from me to judge. An old friend of mine built a fully rigged, quite detailed miniature of HMS VICTORY as his second model. For some it DOESN't apply to them. Most it does. I hope that those who disregard this and get the complicated model, only to 'touch the stove' don't get discouraged. Instead, I hope they have the wisdom to set that project aside and get a simple starter kit to learn on. OTHER WORDS OF WISDOM FOR NEWBIES: 1. You can never have too many clamps. 2. Alcohol is your friend. It helps you unglue previously screwed up glued up parts so you can try again. (Including ALL the planking from one model...just saying.) 3. Magnification and light are also your friends. 4. If you get frustrated or tired, set it aside and come back to it later. 5. READ THE INSTRUCTIONS!!!!!!!!!!!!!!!!!!!!!!!!!!!!!!!!!!!!!!- 94 replies
-
- 11
-
-

-
Then you are making them wrong. A couple years ago when I was more active in my local club, I would help man the ship modeling both at the County Faire. One of my mates would demonstrate making treenails with a drawplate, making his length of 'nails' increasingly smaller. As he got down to about 1MM and showed everybody his creation (ooooo ahhhhhh) I would chuck up a inch or 2 of bamboo in the ol' Dremel and whip at an inch of 1MM treenail in under a minute with a piece of fine sand paper. Good quality bamboo is strong for is size. I use BBQ skewers, but you have to make sure you get good ones. It takes some practice and is prone to burnngfingers if not careful, but they are great. I use hem to affix small furniture items to the deck.
-
Chuck, When do you anticipate these being available for the group build? Where do I signup?
- 421 replies
-
- 4
-
-
- medway longboat
- Syren Ship Model Company
- (and 1 more)
-
Requesting feedback for future MSW Group Projects
Chuck Seiler replied to Chuck's topic in Group Projects on Model Ship World
I'm sad. -
Requesting feedback for future MSW Group Projects
Chuck Seiler replied to Chuck's topic in Group Projects on Model Ship World
I would be interested in a Pegasus Cross Section group build. Will it be available for the conference? -
dimensions of US flag on USF Constitution
Chuck Seiler replied to silverfoxes's topic in Nautical/Naval History
When I went to my first NRG conference in 1999 I met a guy who wrote a book on flags. As I recall he asserted that back in the sailing ship days the length (fly) of the battle ensign was the beam of the ship. The fly of the next size flag was the same as the hoist (height) of the size above it. I'm not sure how correct that is, but you flag would be inside those dimensions I believe. The battle ensign was meant to be large. -
Kurt, Can you go on the Thursday lunch cruise without going on the dam tour? Been there...done that.
- 19 replies
-
- 1
-
-
- nrg
- conference
- (and 2 more)
-
Greg, Well done! I love the weathering. As a tincan sailor of many years, I find the look familiar.
-
Not all that empty. Iwill be taking a gander from time to time through the porthole.

-
Advice about attachinng eyebolts
Chuck Seiler replied to Shultzy's topic in Masting, rigging and sails
You may also want to insert the eyebolt shaft at an angle so that it is not in direct line of the force of pull.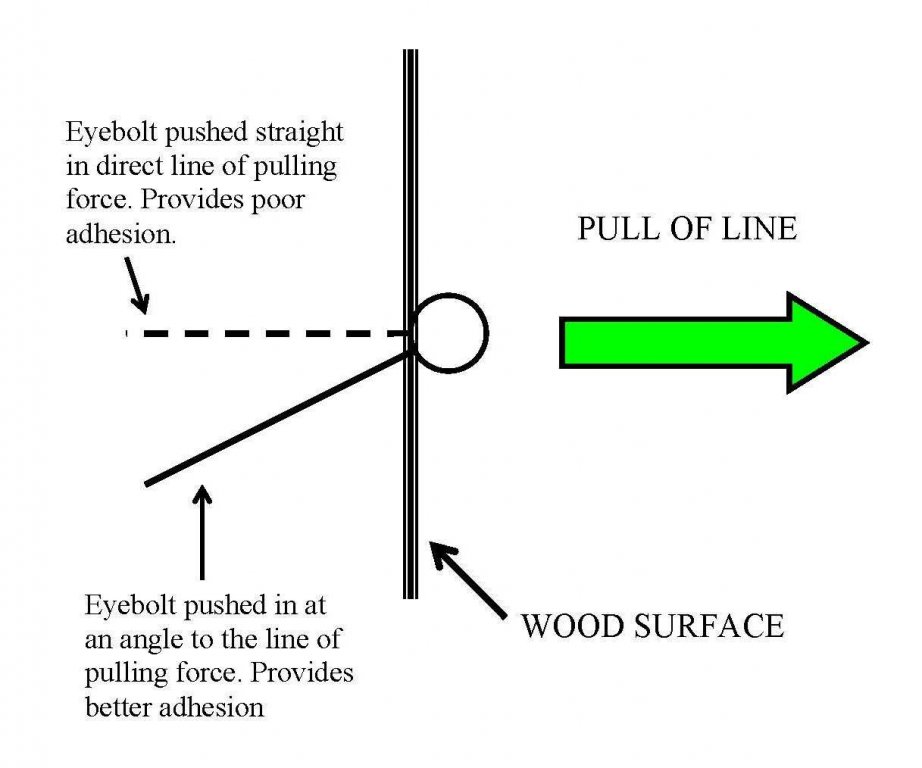
-
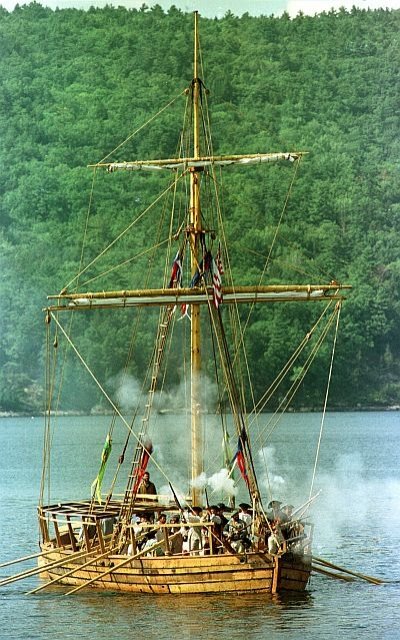
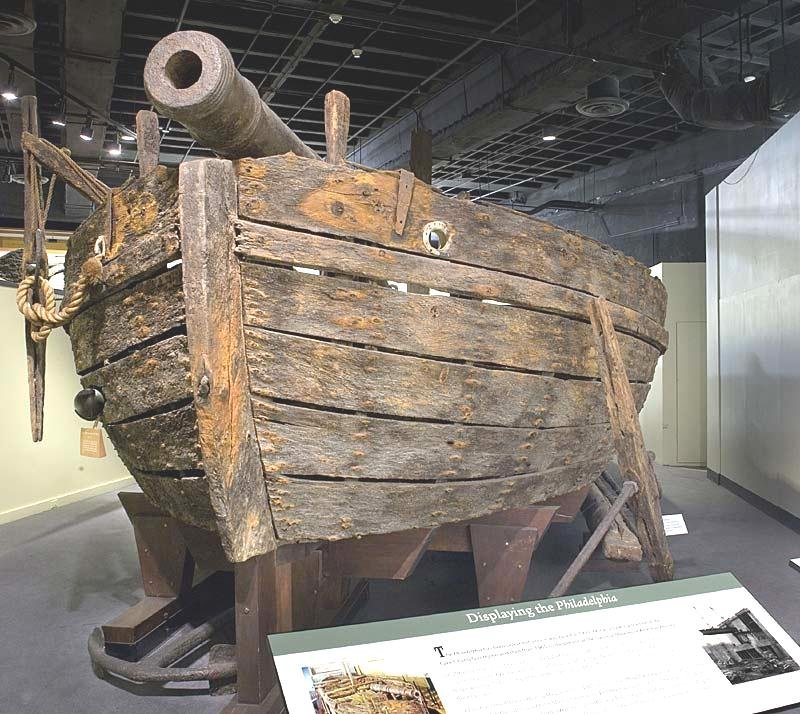
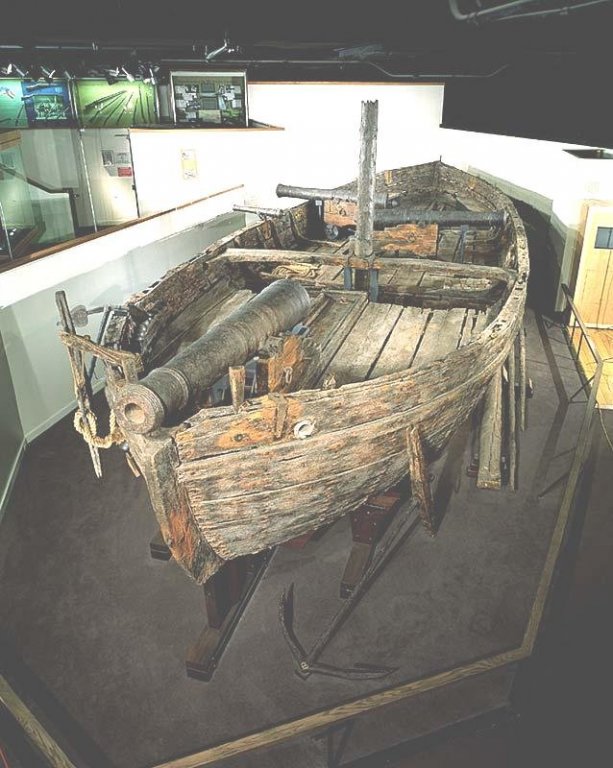
What you see is what there was. As Elijah states, it was flat bottomed with no keel. With 2 x 9 pounde guns and 1 x 12 pounder...plus all the other supplies it had an extremely low center of gravity. Even so, it only drew about 6 inches when fully loaded (if I recall correctly). Here is how Philly currently appears. Here is Philly in her heyday(as photographed from one of the British gunboats during the battle.
- 228 replies
-
- 11
-
-
- gunboat
- model shipways
- (and 1 more)
-
size of people
Chuck Seiler replied to Snow's topic in Discussion for a Ship's Deck Furniture, Guns, boats and other Fittings
Another factor is that you have to work with what is available. Unless you make your own figures you have to go what is commercially available and those may not readily allow you to choose between 5feet and 5 feet 6 inches. One technique I have used is to sand off the figures feet (and maybe portion of the leg) to get the right height. I then use a little sculpy or gesso to remake the feet. ...a shorter dumpy guy. Alternatively, cut the feet off, add a little length to the legs and re sculpy the feet. -
size of people
Chuck Seiler replied to Snow's topic in Discussion for a Ship's Deck Furniture, Guns, boats and other Fittings
There were pictures of Napoleon? -
Many thanks. Your secret is safe with me.
-
Salty Dog! Well done!!! It makes me want to dust mine off and get back into the shipyard. How do you support the two walkways leading from the quarterdeck to the ladders? I can't tell from the pictures. Is it supported by a knee or a post?
-
Chuck, Do we get a separate quarter for each frame or do we have to re-use the same one? Seriously, this looks great! I am looking forward to it progressing (in log form) and being available.
-
The round ones keep rolling off my desk.


