


SawdustDave
-
Posts
1,770 -
Joined
-
Last visited
Content Type
Profiles
Forums
Gallery
Events
Posts posted by SawdustDave
-
-
Delighted to hear from you Ken.
I'm sure you recognize my comments are intended in the most complimentary way.
Also, happy to hear you are planning to use your gifted hands to create more ships sir, and I look forward to sitting in on more of your future projects.As for my humble attempt to model the canopy frames.... I assure you that I thoroughly enjoy every moment in the ship yard. Being an old woodworker, anything on the metal craft side represents quite a challenge to me.
BTW.... Most of my MSW friends know by now, I will usually screw up a two-float parade.... then start all over if necessary, and laugh about it.
If we can't have fun with this crazy hobby we need to find something else.... RIGHT?Hope you will drop in once in a while.
Cheers Mate
-
-
You just described exactly the technique I have come around to Piet.
Much easier said than done.... believe me.
Getting the lateral spaces perfectly parallel and perpendicular and exact same height proves to be much more difficult in practice than in my mind.Jigs on top of jigs required.
As for silver soldering.... clearly not one of my skill sets, but then I don't have multiple certifications in metalworking crafts like a certain old Dutchman we all know.
This is attested by the dozens of wasted parts accumulated in my trash can....

Getting a little better.
No sir.... no canvas will be placed over the frames.
Speaking of "covering up hard work"....
I am still amazed by all the extreme detail Ken put into the gun deck of his amazing Connie, then completely covered up with spar decking.
Think about it!
This man tells us he is NOT A SHIP MODELER.... Then sets about creating a model that would be admired by the world's most experienced master shipwrights!
I don't think the man actually realizes how good he is!I just hope he will continue building ships.
Cheers
-
-
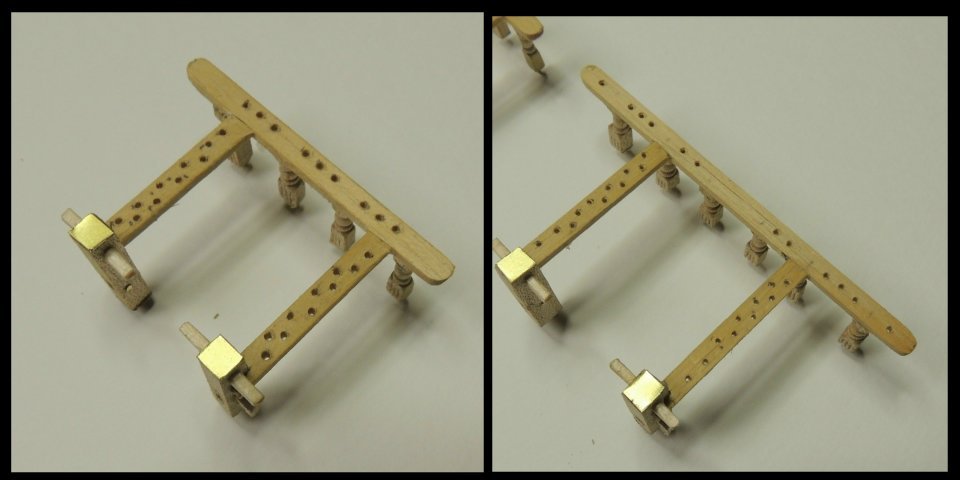
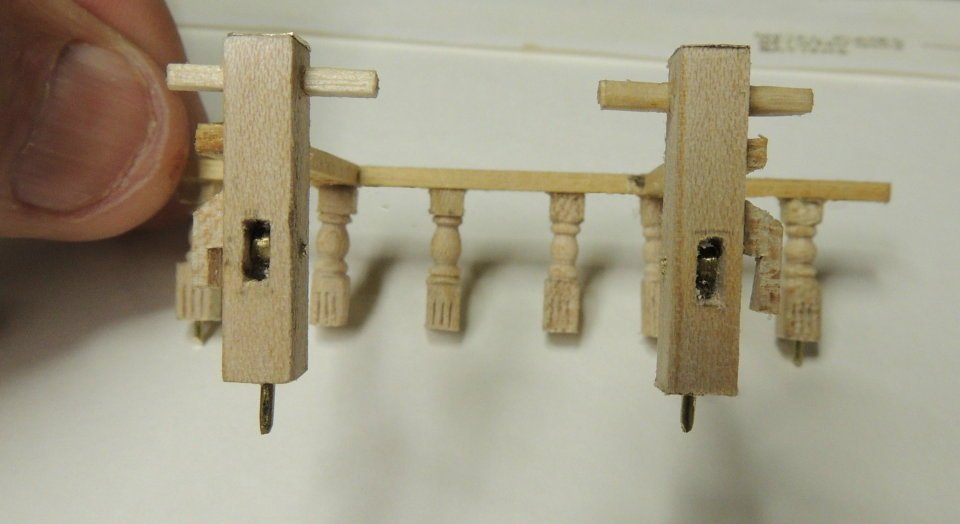
Canopy Frame....
From the ships wheel, I am moving back to the companionway canopy frames.
I must comment here, for any future builder of the Constitution.... As easy as Ken made this fixture appear in his build log, DO NOT BE FOOLED!
This has got to be the most extreme difficulty level I have personally experienced in over 10 years of scratch building ship models....
If Ken's log had not made it look "easy as pie", I would have been happy to go with no canopy frames. All your fault Ken..... yahahahaha!!!

My personal advise.... DON'T EVEN THINK ABOUT IT!Having said all that.... here is the third canopy frame just completed.
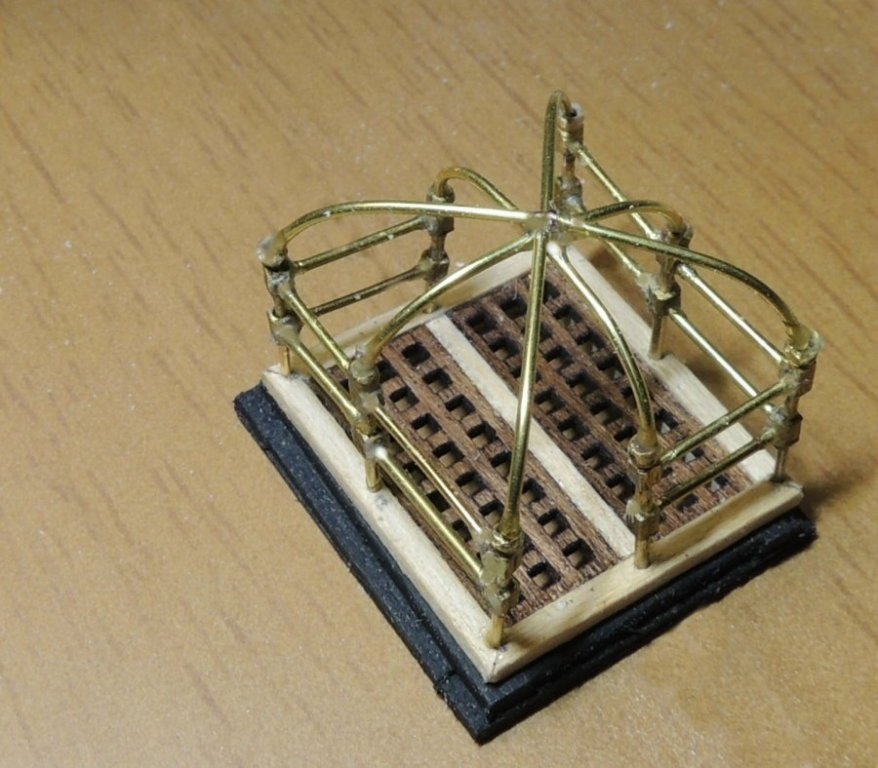
Two more to go, then the sky light fixture.- CaptainSteve, shipmodel, reklein and 14 others
-
 17
17
-
I'm the undisputed KING OF FAT FINGERING Piet.
Cheers Mate
- Omega1234, Piet, CaptainSteve and 2 others
-
5
-
-
I question the sanity of ANYONE who would sit and spend the untold thousands of hours doing what we do Mark.
As for myself, it keeps me from the temptation to go back to work.... picture me as a “Greeter” at Walmart.

- Piet, marktiedens, mtaylor and 3 others
-
6
-
-
My dear MSW friends.... After spending over 4 hours last night, catching up on Marsal's Pandora, I woke up this morning a completely humbled man. Instead of my usual morning routine, I think my morning time will be well spent to return to his log and go through it once more....very slowly.
As humbling as it is to study this man's work, it is also very inspiring to those of us hoping to improve our own skills.
If I were a younger man, I would take a large hammer to my current build and begin with a clean slate.
Cheers
- CaptainSteve, Piet, Canute and 2 others
-
5
-
Beautiful work Nils. I have enjoyed playing catch up on your log.... love it. Nice to see the cut-away, leaving a view to all those fine details below deck.
Dave
- mtaylor, Mirabell61, Omega1234 and 3 others
-
6
-
Marsal....
Been a while since my last visit to your incredible Pandora build. What can I say that has not been said by so many fellow artists.
You sir, truely stand apart from all mortals who, like myself, can only admire your skills from afar. Very thankful am I for this forum where we can enjoy such masterful work from the likes of yourself, Ed T, and so many other great masters of the art.
Thank you a thousand times over.
Now, after spending four hours catching up, please excuse me while I walk out to my shop and set my current project afire.
Dave
- aviaamator and mtaylor
-
2
-
Ships Wheel installed....
Just a couple more details added after two thin coats of wipe on poly and fitting the rope to the drum.
Seen in the right photo, the four brass bolts have been added to the frame base. Also, the brass plate and tube has been added where the wheel rope passes through the deck.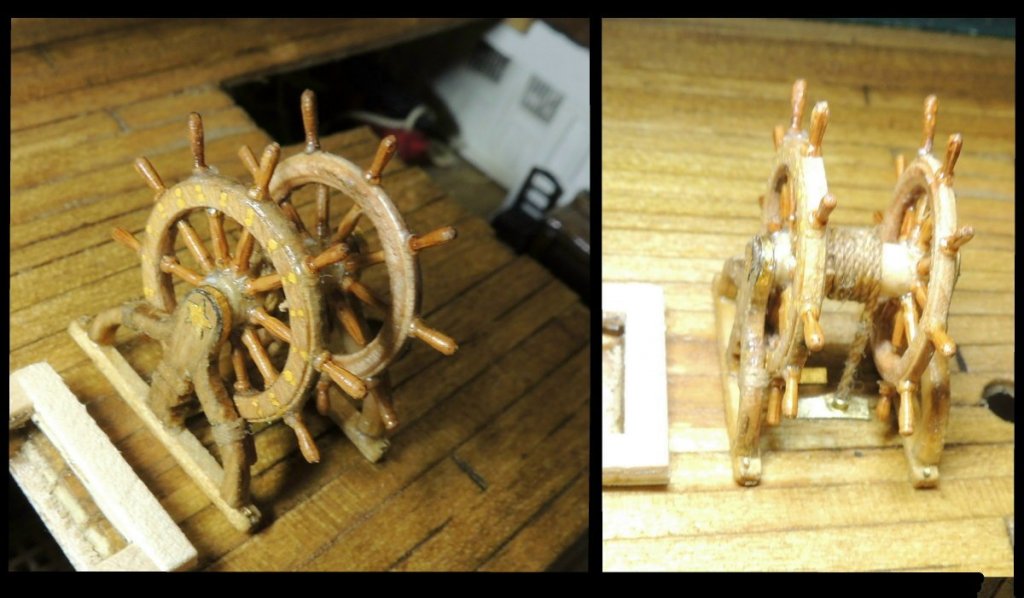
- shipcarpenter, alde, mtaylor and 7 others
-
10
-
-
David....My personal experience in taking on a couple of restorations in very similar condition, they can be a lot of fun, particularly if you know the history behind them. Don't know if you can trace the history back to the builder in this case, but it was quite interesting to know who the builder was and when it was built.
My last restoration was the "Half Moon" and the original builder lived in Italy. Seriously damaged when the family tried to ship it to a personal friend, and did a very poor job of protecting is in the way it was packaged.
Best of luck with this one.Dave
-
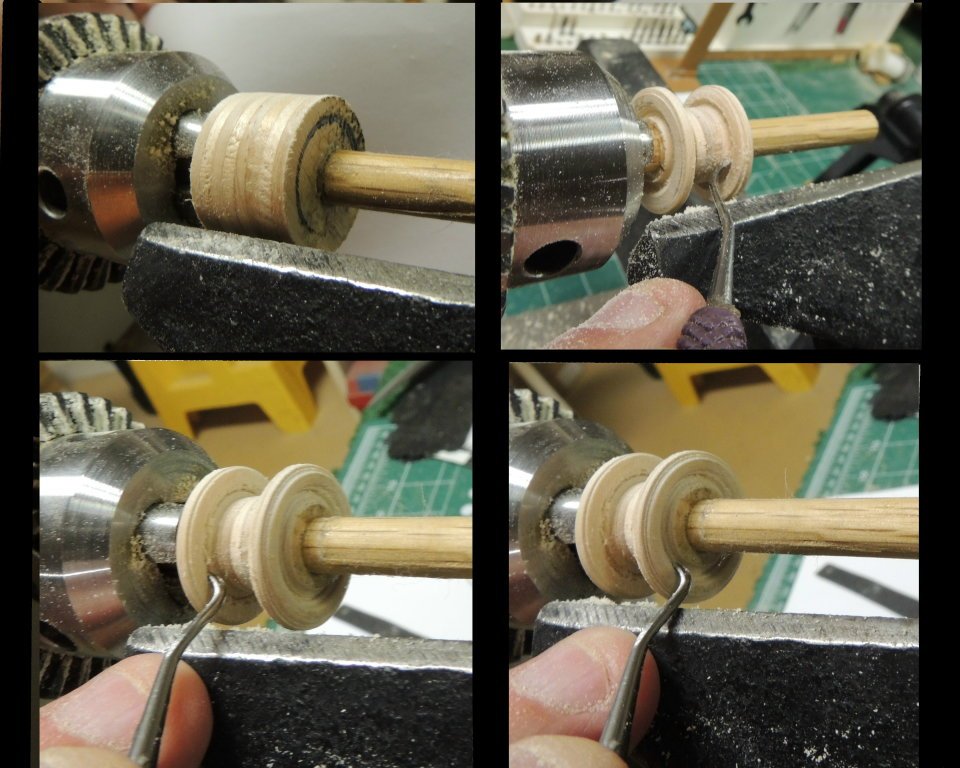
Wheel Assembly (stage 1)....
As usual, it took me two attempts to work out the technique I had in mind for adding the wheel spokes.... so what's new.
First failed attempt was exactly the same except for tapping out the 10 holes onto the drum and making a pointed tip on each of the spokes.
So here's how it went.....
First: Drilled a shallow 1/4" hole to hold the drum and the auto cad template.
Second: Used the auto cad template to carefully mark the ten spoke locations.
Third: Carefully tapped the ten location holes around the drum. Note there is an alignment groove turned into both ends of the drum.
Fourth: Turned the spokes with a pointed tip and glued them in place.
Fifth: Trimmed the spokes and glued the wheel “rim” in place.

Note that only one “handle” has been added...just wanted to get one master turning to copy.
And here's a closer view to the mounted rim showing the 40 tree nails simulated with dots of acrylic gold. (tried actual tree nails but they did not show up well enough).
-
15 minutes ago, usedtosail said:
Could you drill those holes while the assembly is still on the lathe, before you part off the wheels? This was one of the most rewarding parts to make for me. Have fun with it.
Possibly Tom, but I have a jig in mind that will insure precision.
You're right.... this is really a fun fixture. And then there's the fact that I have had my hands on that wheel makes it even more special to me personally.
BTW.... I just spent an hour studying your scratch wheel build.... WOW!
What a beautiful job!Dave
- mtaylor, usedtosail, Piet and 3 others
-
6
-
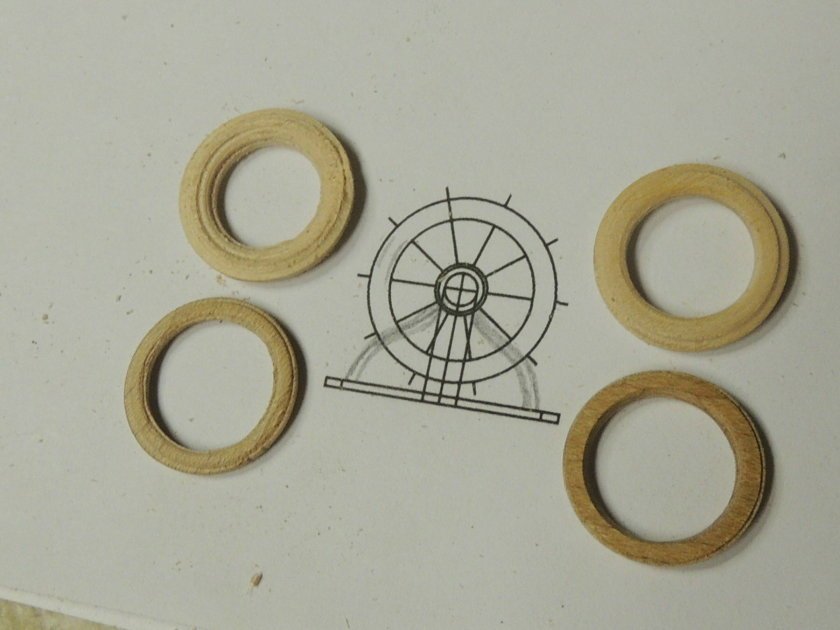
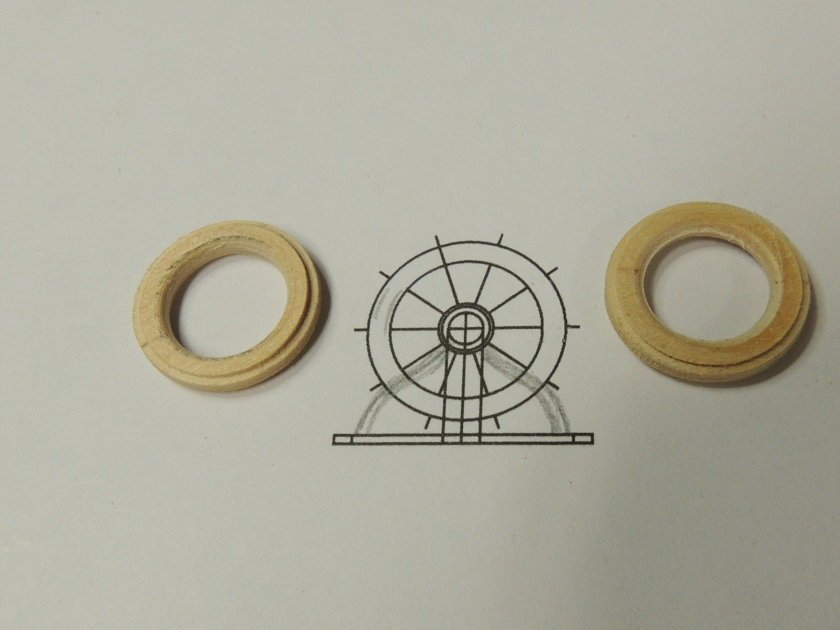
MORE BETTER....
The new wheel frames are a great improvement. Went to maple and used a different method of mounting to the lathe. The 1/4" bolt with washers and a nut gave me a perfect, more stable spin.... zero wobble.
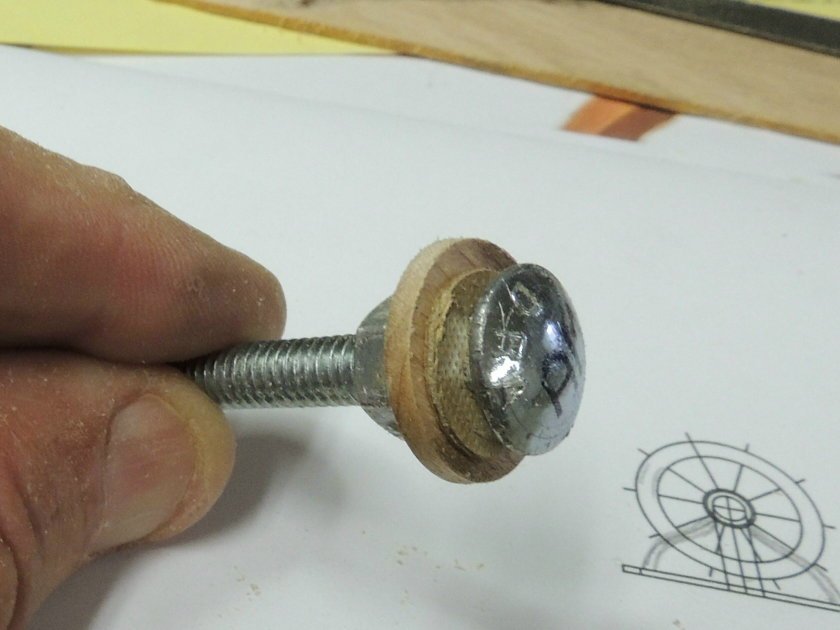
The washer and nut allowed much better access to the inner turning.
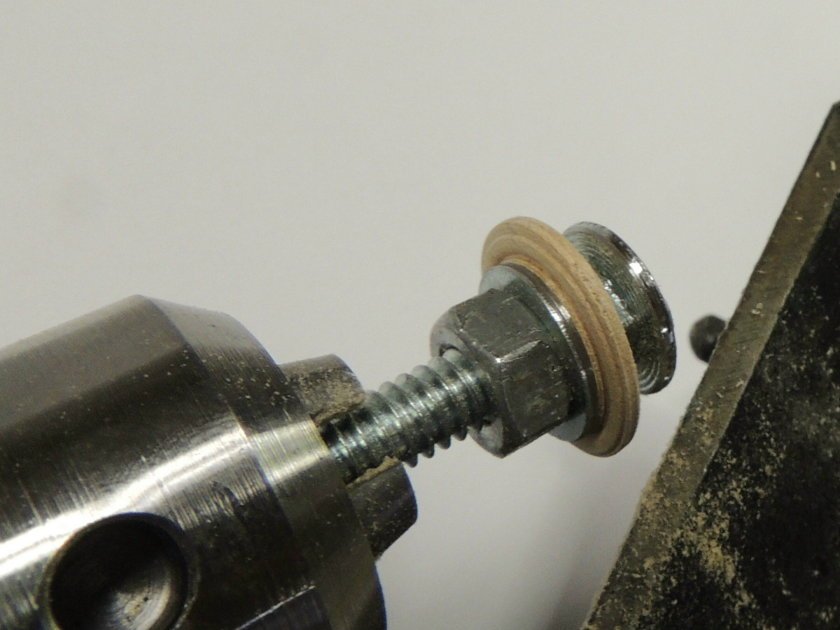
And here's a comparison to the finished parts. Note the much cleaner lines with the maple parts (bottom).
I was also able to come much closer to scale with these new turnings.
First testing the ability to tap the outer edges looks pretty good.
- Omega1234, BANYAN, CaptainSteve and 7 others
-
10
-
ANOTHER FAILED ATTEMPT....
Those who know me have come to expect my mistakes and failed attempts.Turns out, the bass wood wheels created yesterday on the lathe may look pretty good, but they simply don't stand up to the next step which is marking and tapping the ten holes needed to add the hand grip spindles to the outer circumference.
Back to the drawing board...... maple being my go-to hard wood.
Also, I think I can improve on the system used to turn them.Stay tuned mates.
Dave
-
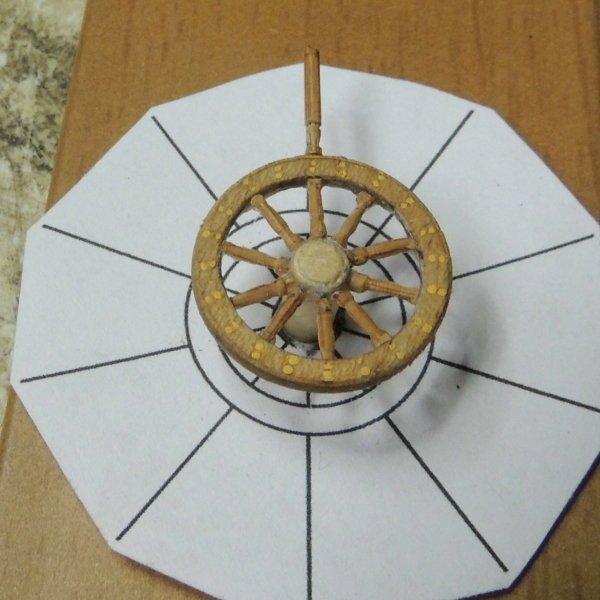
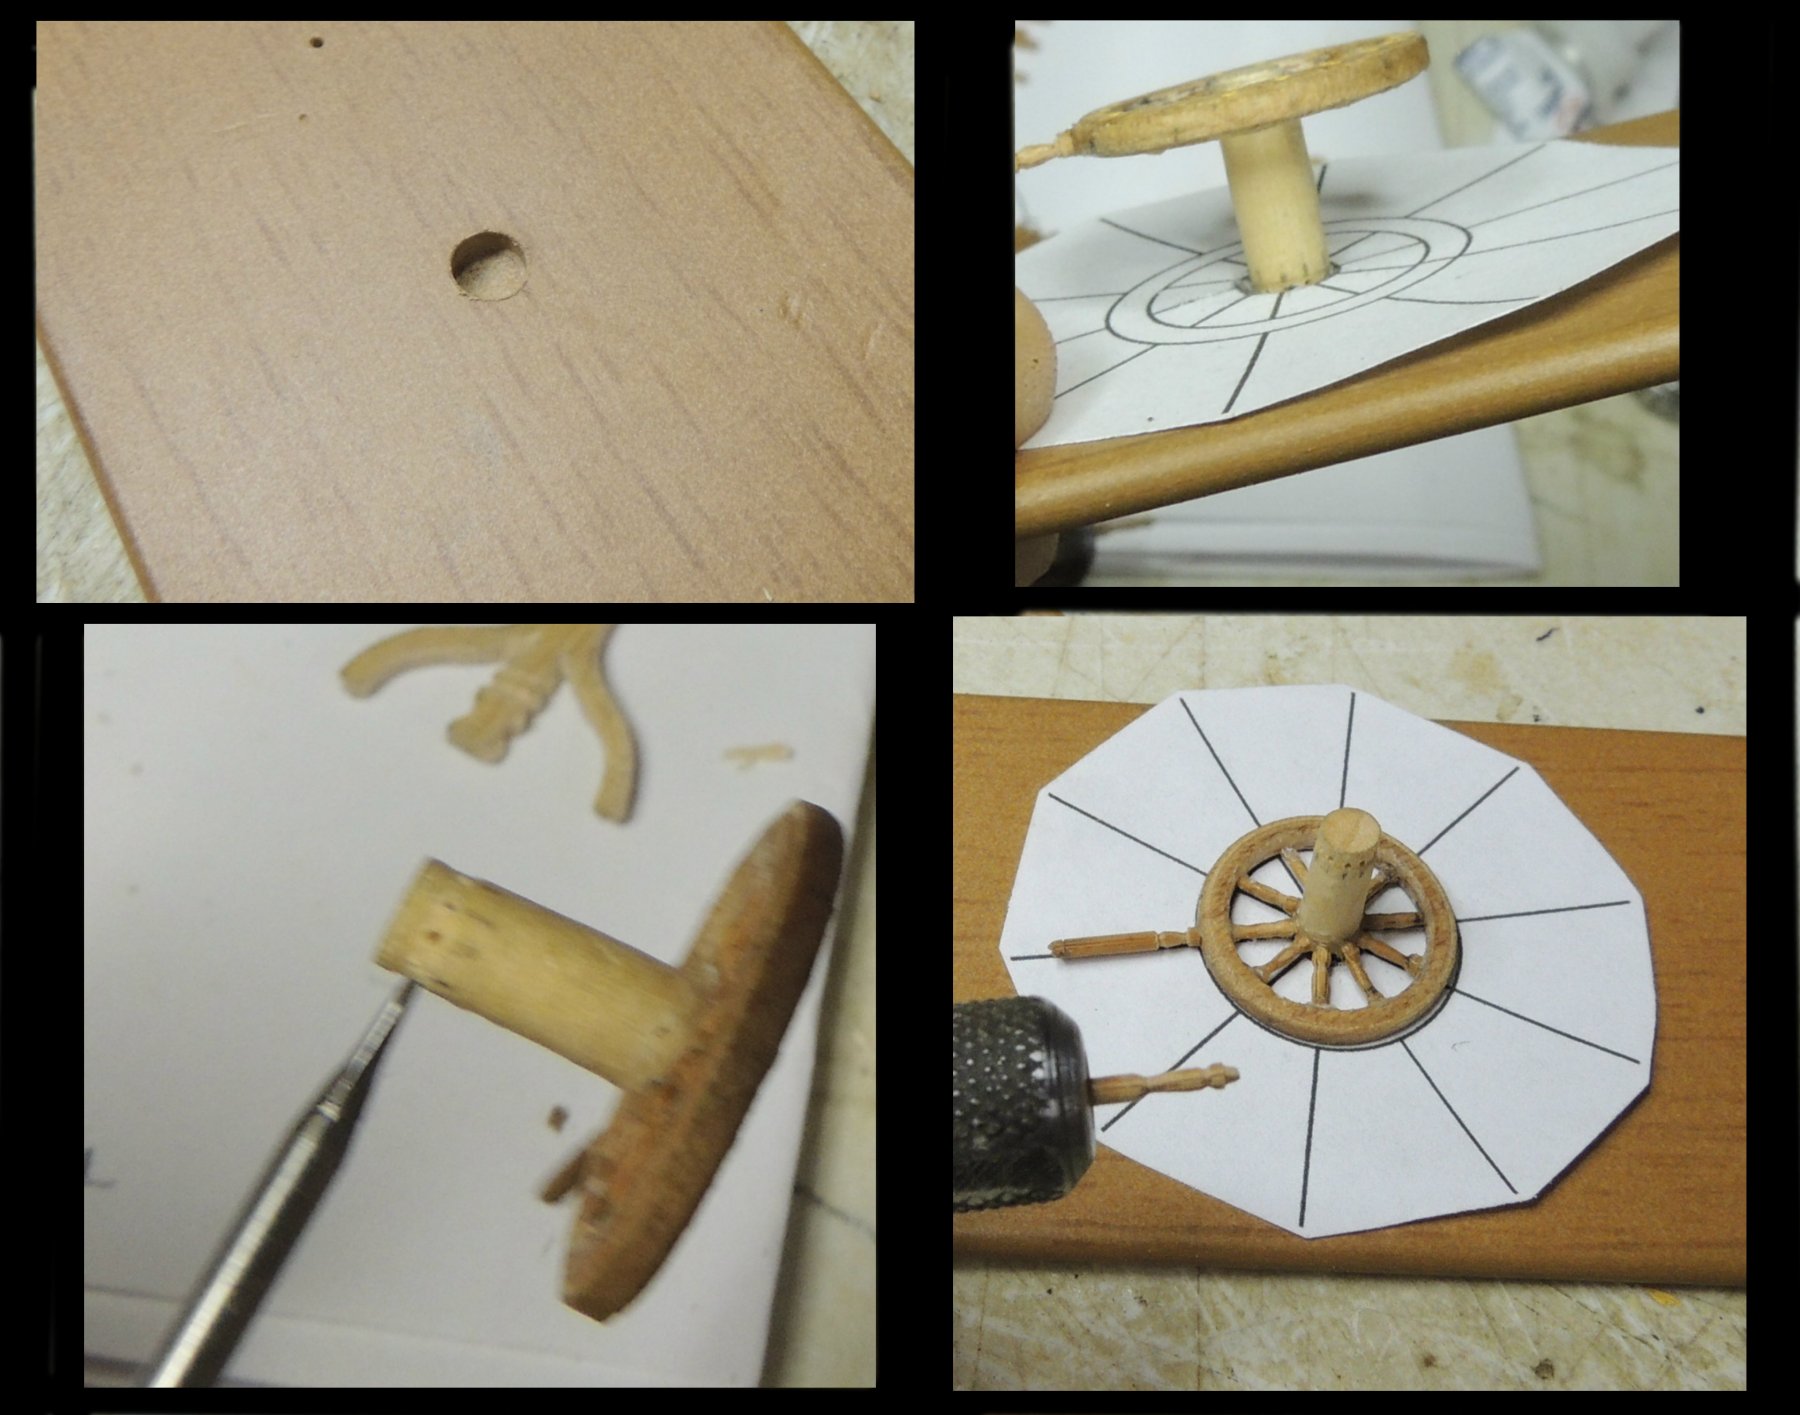
The Wheel........
Played around with a few methods to create the two wheels. Here's what I came up with....
First I glued up a stack of several squares of bass wood, alternating the grain direction. Then drilled out the center with 1/4" bit and mounted the assembly onto a 1/4" dowel.
Note the circle representing the exact size of the wheel.
(the drawing seen below was created with auto cad)
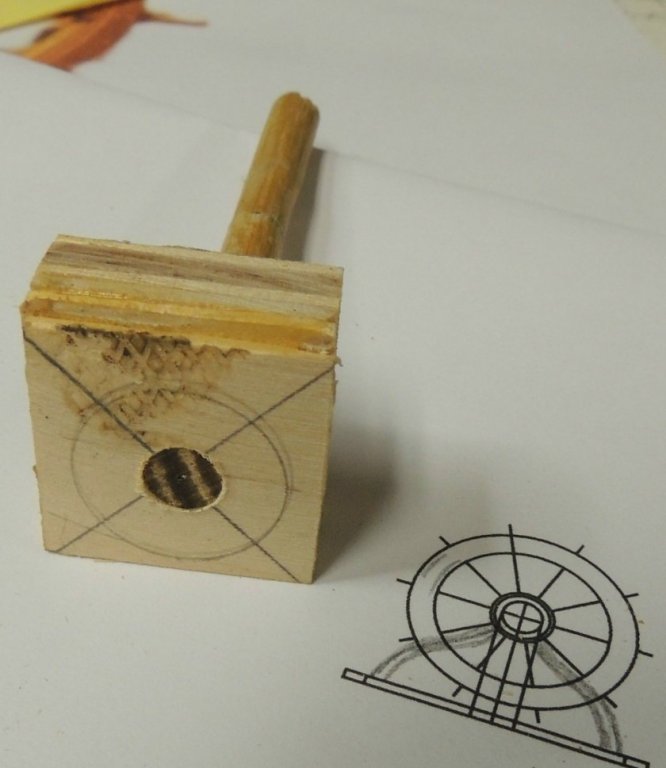
Next.... the block is mounted onto the lathe and turned down to the marked circle. Also note the smaller circle marking.
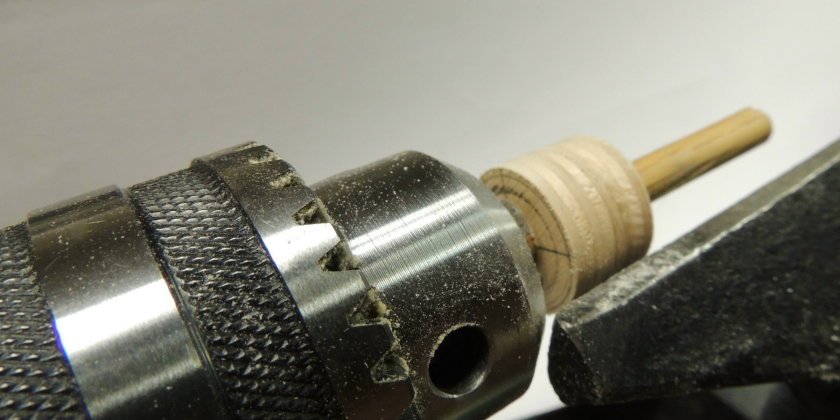
Next.... Using a sharpened hook tool, the edges are shaped inside and out.
Finally, the hook tool was used to cut through the two wheels and remove them from the lathe.
Long way to go, but off to a good start.
-
-
1 hour ago, JSGerson said:
The brass sheaves, how did you make them? It looks like there might be a rope groove on them. Also, I'm curious if you used any pins where the rails meet at right angles with each other, for structural joint strength. I can see the pins for anchoring them to the deck.
Jon
The brass sheaves.... brass tubing turned on my mini-lathe. Inserted a tooth pick inside the tubing in order to capture the tiny sheave once I cut through.... and yes there is a rope groove turned into each sheave.
As for the joining of the rails, I used a “half lap” joint. Pins would have worked just as well.
Dave
-
-
Thanks Jon.... So glad to see you dropping in.
You're right about the lids, and I gave it a lot of thought and decided to add them now, realizing I may have to re-glue a few of them that get bumped out of place while working around them. Actually,the lids are surprisingly sturdy the way I mounted them.
The cutaway sections of the spar deck.... I can't tell you how many different configurations I went through in my mind and on paper. My personal favorite, of all the ships I have build over the years, is the Confederacy, which has a similar cutaway. I always wished the Captains quarters was more visible.... that is why I have left that area more open on my Connie. Just wish I could have come up with a way to leave those bilge pumps more visible.
CheersDave
- JesseLee, mtaylor, CaptainSteve and 4 others
-
7


USS Constitution by SawdustDave - FINISHED - 1:60th Scale
in - Build logs for subjects built 1751 - 1800
Posted
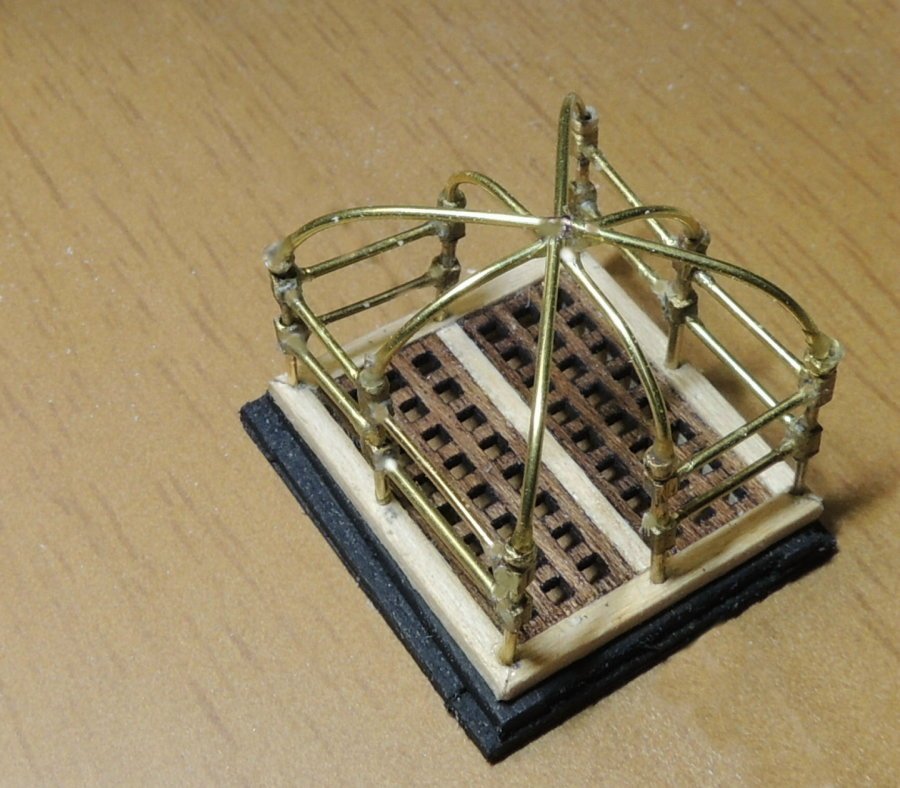
One Canopy frame to go....
Quick overhead shot of the developing spar deck. Once the last canopy frame is completed, I plan to begin developing the three masts, seen dry fitted here.