


SawdustDave
-
Posts
1,770 -
Joined
-
Last visited
Content Type
Profiles
Forums
Gallery
Events
Posts posted by SawdustDave
-
-
-
SU CARBS....
The twin side vent SU carbs were a real challenge. Efforts to create them in wood didn't work out so well, so I turned to brass tubes and silver solder.
Note, however, that the air filter is wood..
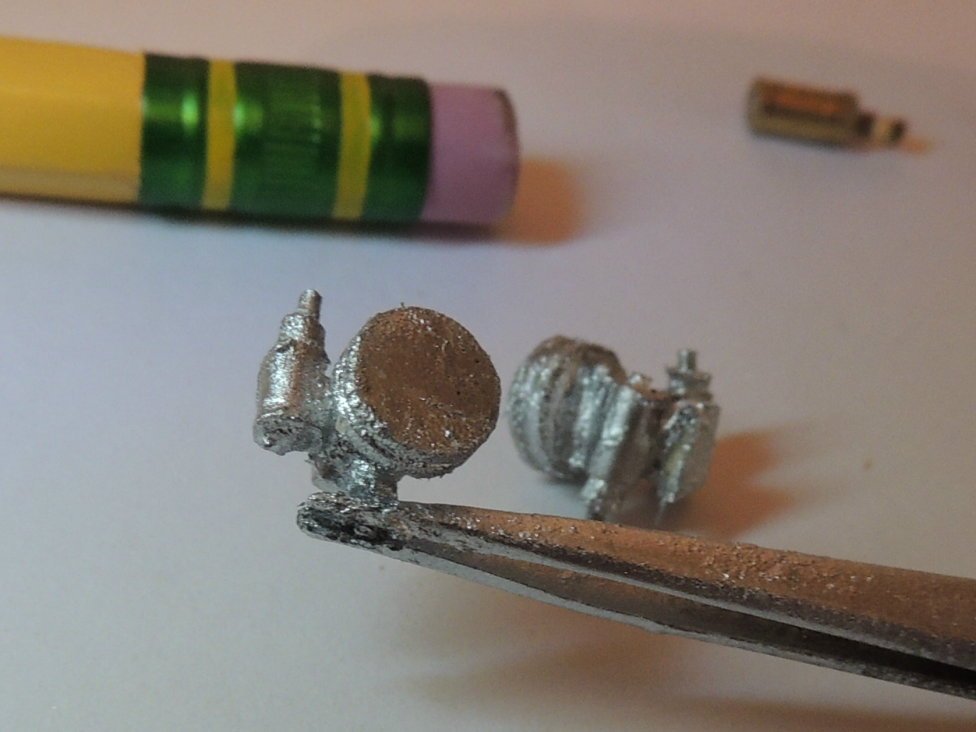
SECOND..... Exhaust manifold:After a couple of failed attempts at carving the exhaust manifold, I have experimented with a piece of 2mm fuel line from an old line trimmer.
So far the results look very promising, although the line I used was very old and brittle.
I have ordered a pack from Amazon.... 4 sizes.

- mtaylor, John Allen and lmagna
-
 3
3
-
CREATING THE ENGINE .....
Before I shoot it with a primer, here's a shot of the development of the engine....
With a high-temperature, high-strength aluminum allow cylinder head, hemispherical combustion chambers, inclined valves and twin side-draft SU carburetors, the duel overhead-cam 3.4 L straight-6 XK was highly advanced for a mass-produced unit of the time. Using 80 octane fuel a standard 8:1 compression ratio developed 160 bhp.
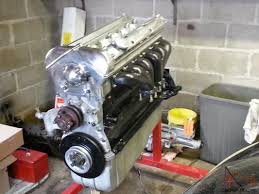 First a photo of the real thing....
The alternator seen laying beside the engine is ready to mount.
The five bladed fan was created from a piece of scrap aluminum.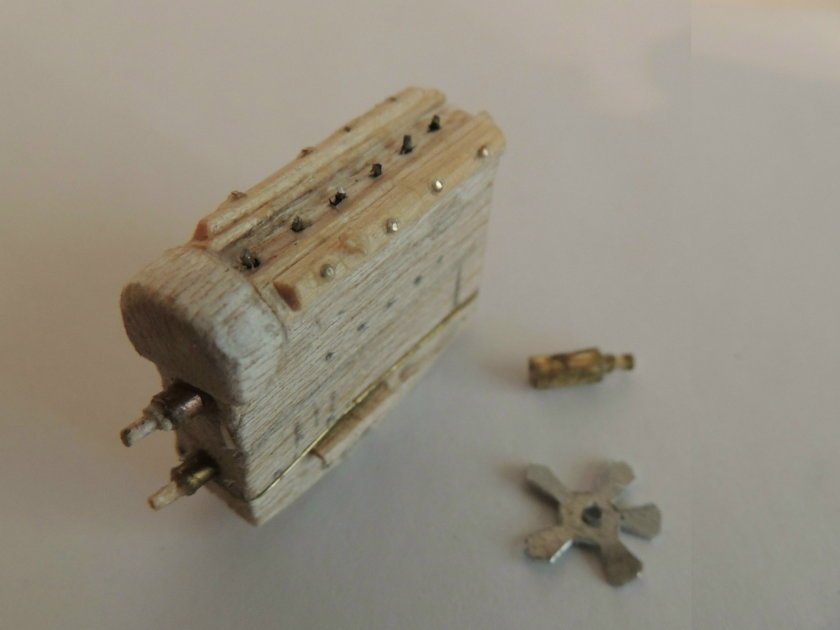
- lmagna, GrandpaPhil, mtaylor and 3 others
-
6
-
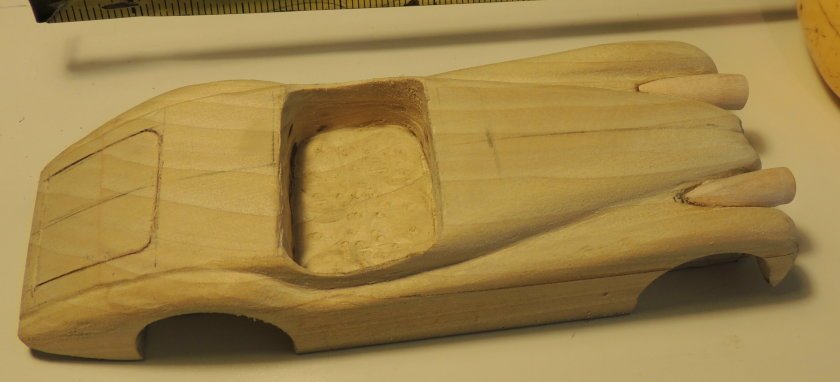
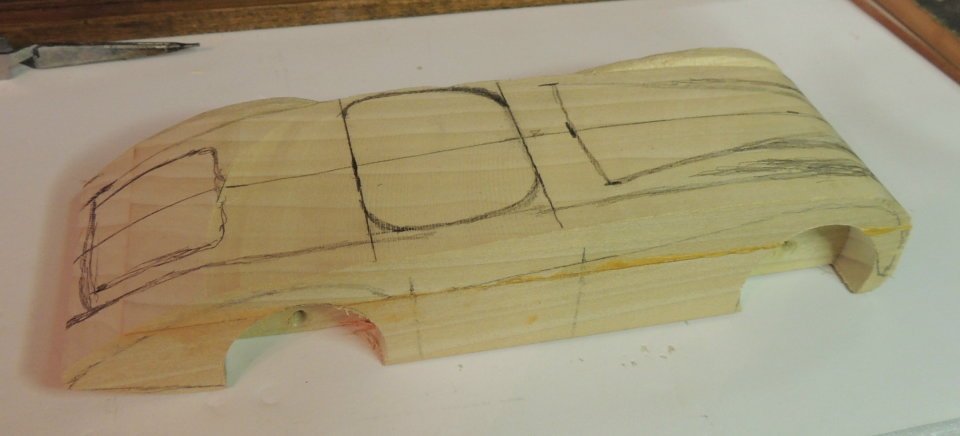
COCKPIT PROGRESS....
The powder blue base coat has been applied to the body..... now allowing several days to cure out before next coats then finished sanding with 1000 grit then shooting with clear coat.
Meanwhile.... Spent the last couple of days creating the cockpit module.
This photo taken this morning with the first dry fitting of the roughly shaped steering wheel and the dash board I created with computer graphics.
Hope to have the door panels created today.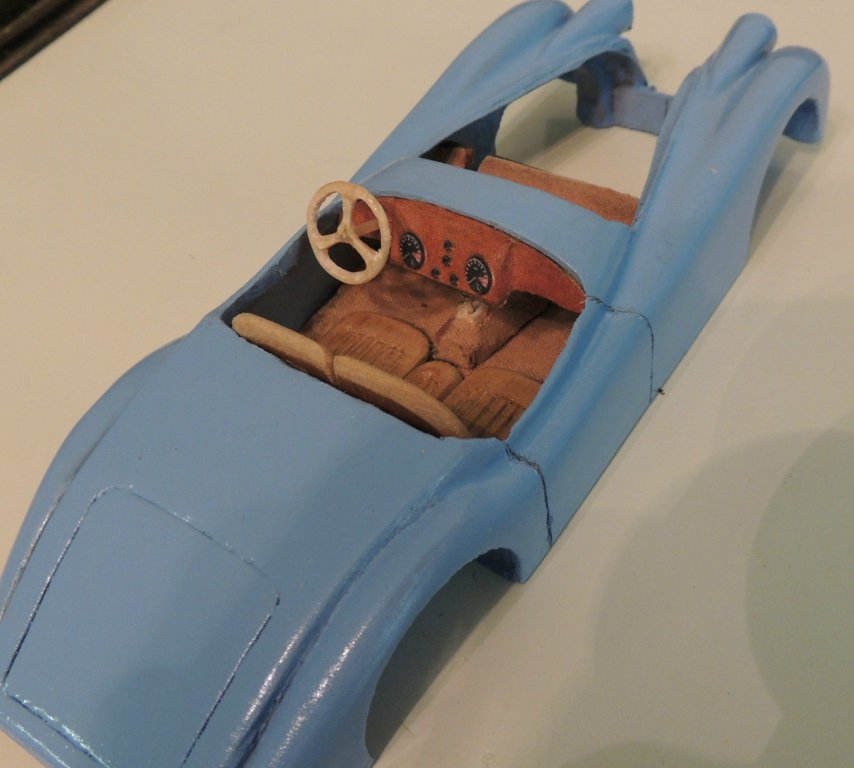
- usedtosail, amateur, Baker and 5 others
-
8
-
-
Interesting suggestion Lou. The issue I'm running into, even with the very thin silk material, is getting the individual rolls to adhere from roll to roll. Using watered down CA which tends to wick through the fabric and create a blotchy effect.
The carved seats are, in fact, vinyl strips taken from feu wood venetian blinds (been using the stuff for carvings for several years).Dave
-
Experimenting with some silk fabric Mark.... more better, but still doesn't look too promising.
As for color, the tan color seen in the cockpit photo depicts the original interior as I purchased her.
The red leather I used to refurbish.... never really cared for that much.
Working on covering floor board area and center housing before going to door panels.
However it turns out, this really is a fun project. Having a blast!Dave
- John Allen, Jack12477 and mtaylor
-
3
-
My attempt at covering was a bust Lou. The scale just will not allow. I’ll play around with using wipe on poly.
Thanks for the visit and comments.
- John Allen and mtaylor
-
2
-
The 67 Goat was a classic John. My best friend drove one exactly like this one I picked from the internet. We did some great cruising back and forth to college in those days.
Like you, he still regrets the day he sold it for pennies on the current value.
Same goes for me and my Jag.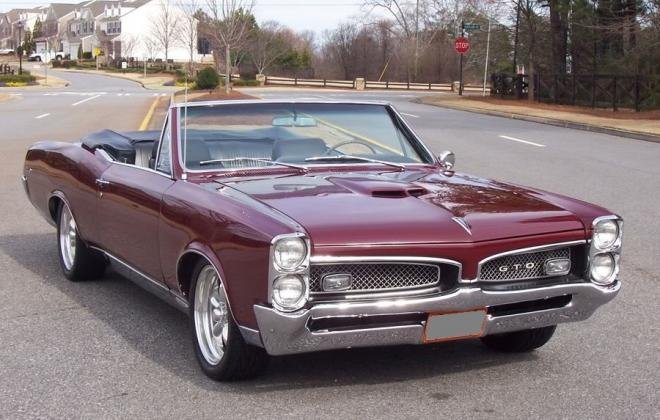
- coxswain, mtaylor, pontiachedmark and 4 others
-
7
-
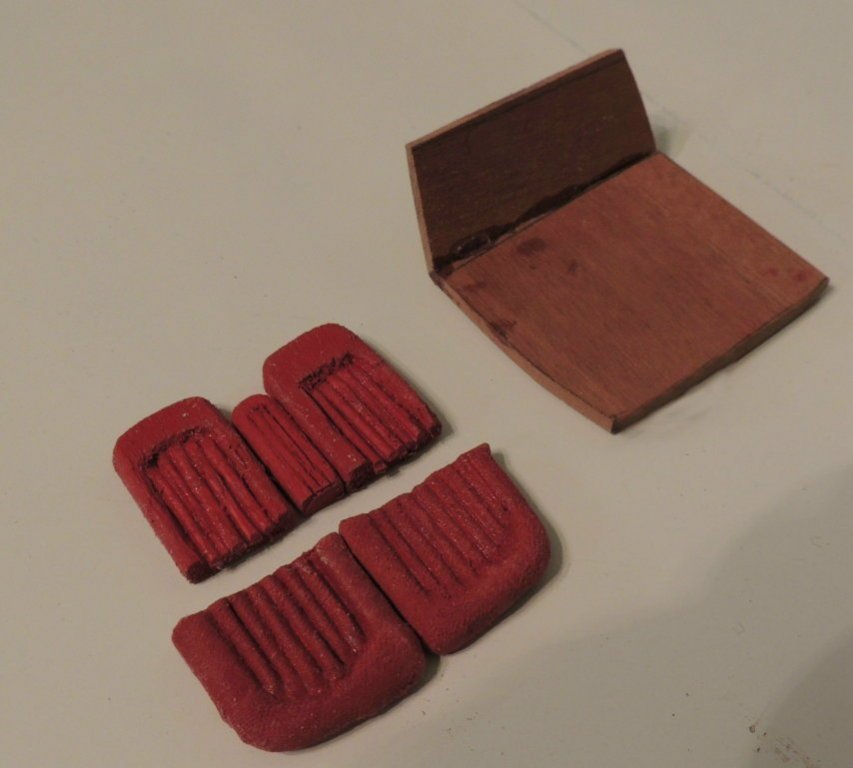
Then there's the seats.....
I rely heavily on photos to tell me what is good or not. The camera very seldom lies.... right?So I decided, after studying the photos of the upholstered seats, that I seriously did not like what I was seeing.
The painted red fabric was terrible.... the seat backs were much too thick.... and more.
Most of the last couple of days was spent on developing a set of seats I could live with.
Here's what I came up with....
I will likely use a wipe on poly to give them a slight sheen.

- yvesvidal, paulsutcliffe, hexnut and 5 others
-
8
-
PROGRESS REPORT....
A real mixed bag of good and very bad progress this morning.
First, the good along with the bad.
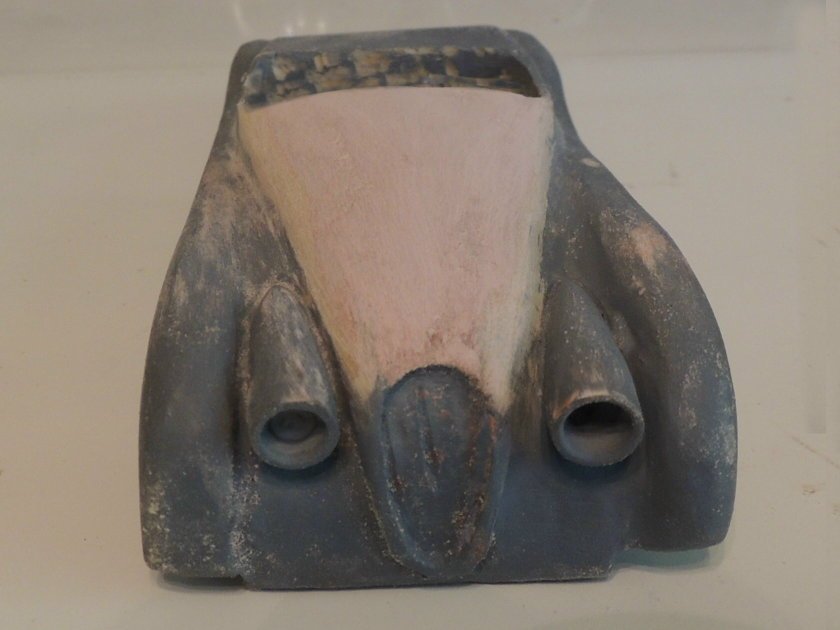
Seen here, I was able to remove the hood with minimal damage. Primarily because most of the precision removal was with the grain of the wood. the wide cut across the end and also down around the grill got a little dicey because I was cutting across the grain.
Realizing the difficulty of making the cutouts across the grain has me a little sceptical about attempting to remove the doors.
Also note in the upper pic, that I have sanded and sprayed the base coat of powder blue enamel to the body.
The lower inset pic is the disaster that occurred this morning as I attempted to apply the second coat to the drivers side. After allowing 48 hours for drying and curing, I placed the body with the drivers side facing up in order to get a nice even coat. To my horror, the entire side instantly wrinkled like a waded up piece of paper! Thankfully it only involved the drivers side.
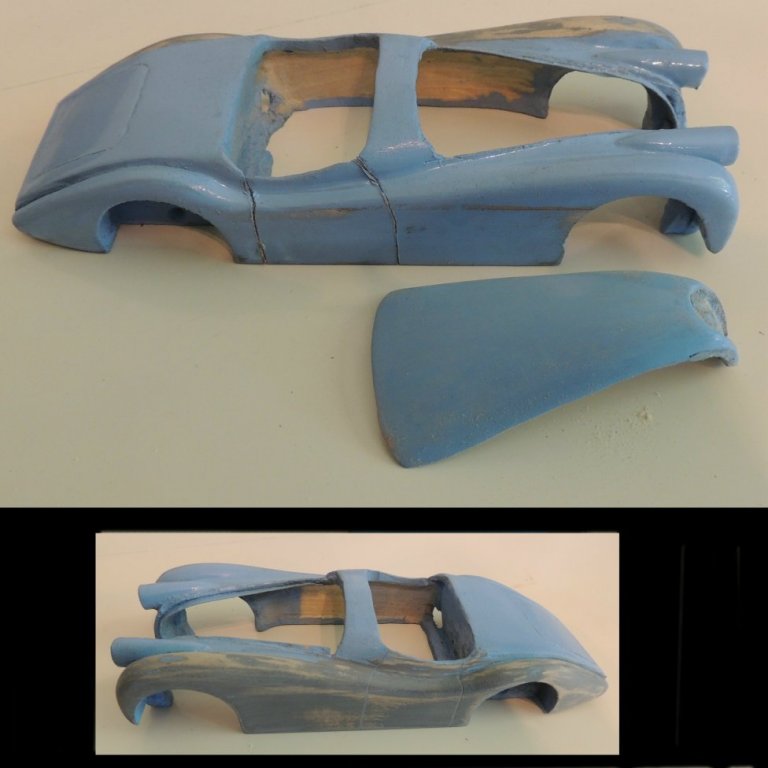
So.... after re-sanding and scraping the drivers side back to the wood, I will likely have to wait several days for complete curing before the next stage of painting the body.
I guess I could speed up the process if I had a little toaster oven, but I don't.- mtaylor, lmagna, paulsutcliffe and 4 others
-
7
-
Most of the last few days playing around with the cockpit module and removing the hood.
Here's the floorboard mount that I will be placing the seats and console onto.
The seats, painted red, are actually covered with a thin layer of felt left over from my custom poker table business.
I have a ton of experience in upholstery, but never anything anywhere near this scale.
- usedtosail, Jack12477, GrandpaPhil and 3 others
-
6
-
Thanks for sharing that experience Lou. What year was your experience? I assure you, I never took my Jag cross country.
The double clutching down shifting does bring back memories, for sure. I recall that I actually got pretty good at it.
Working on a number of areas in the early development. Mostly in the cockpit area....
Here's the photo I'm working from....
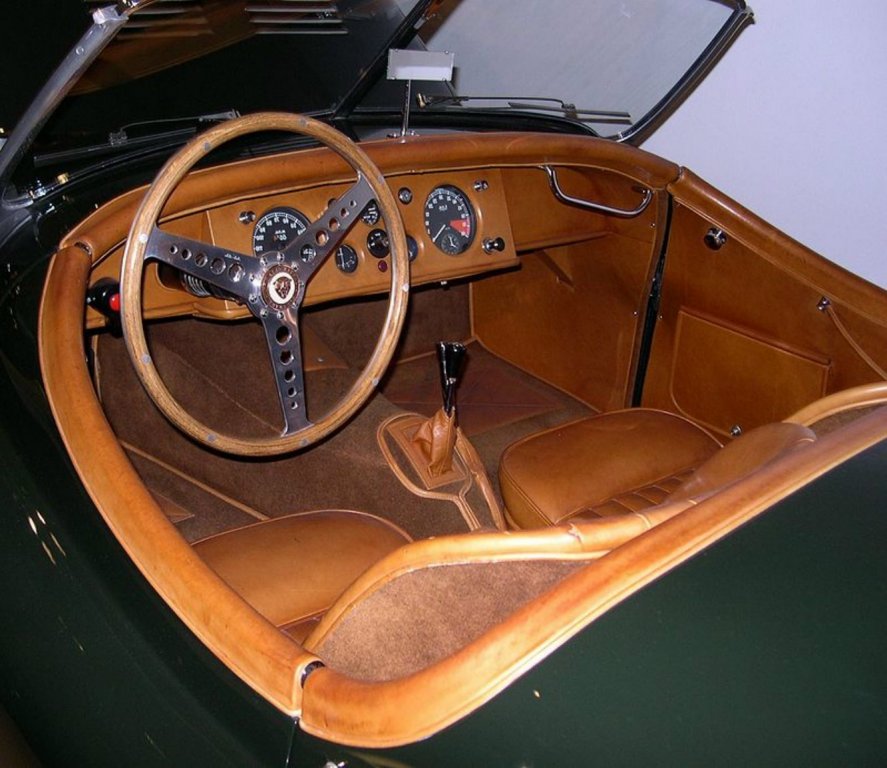
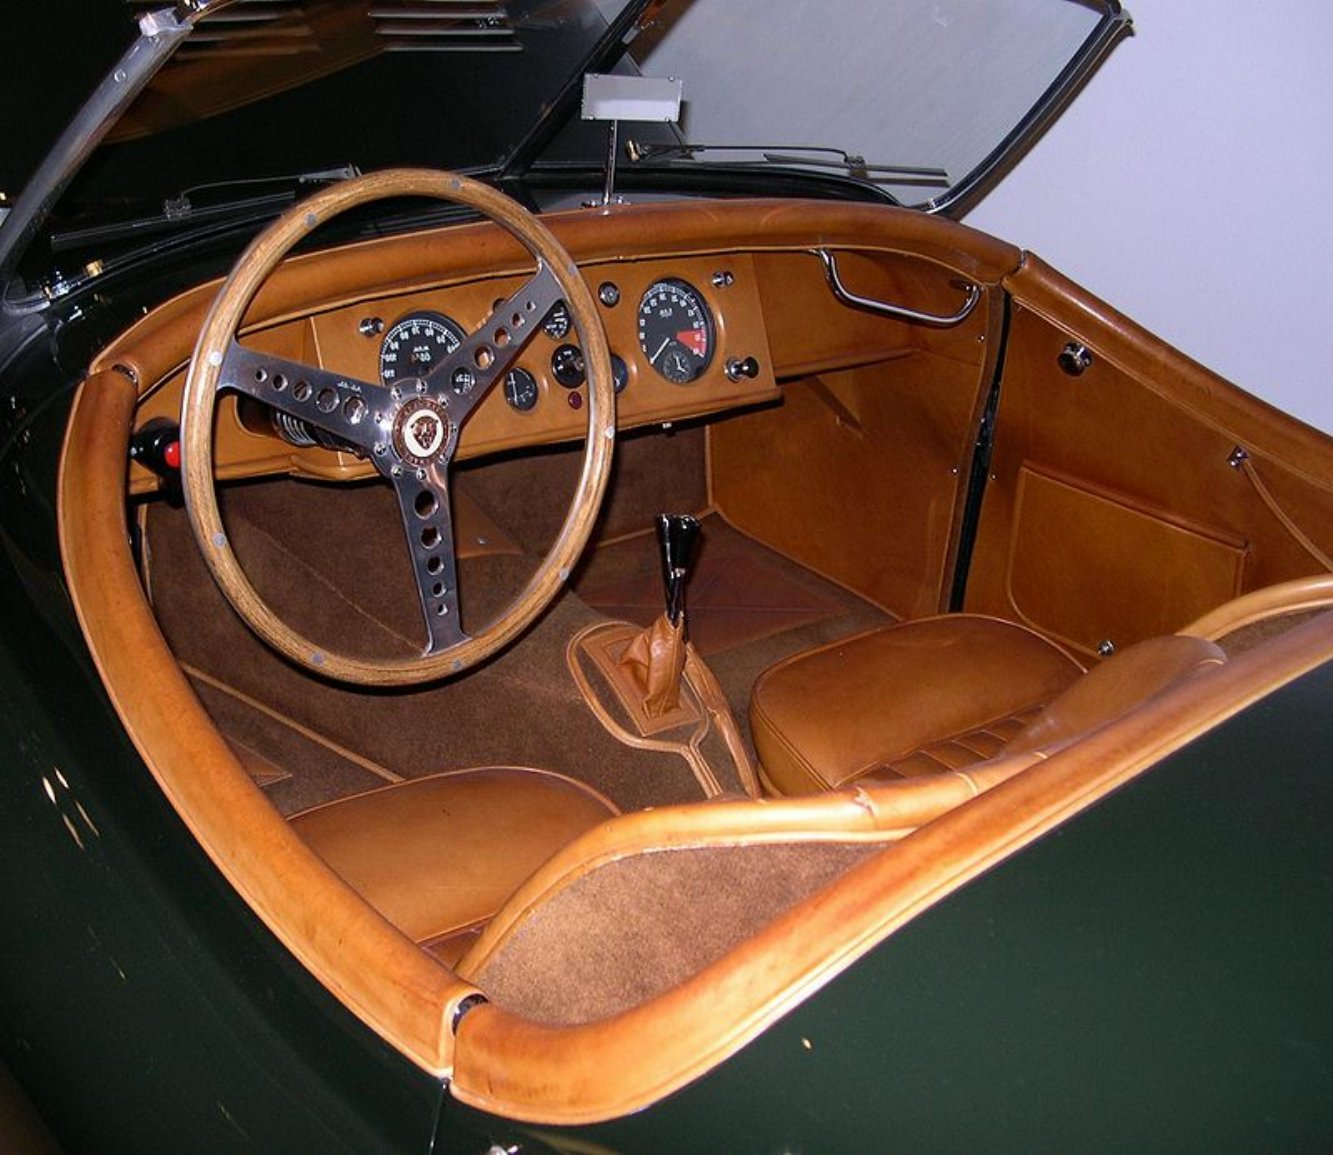
The jury still out on the colors. My interior was red and the body was painted a baby blue.
-
Superb job Tom.
This posting kinda makes me want to move mine back to the bench.
Green with envy here mate.
Cheers
-
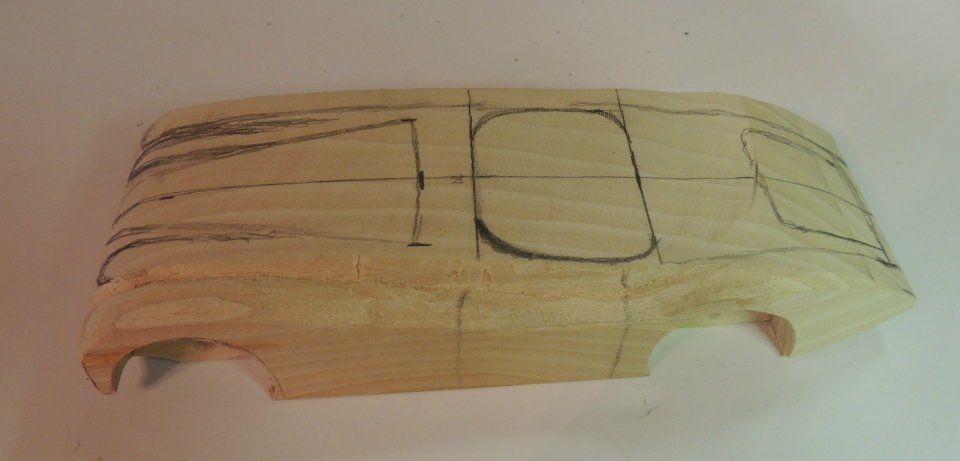
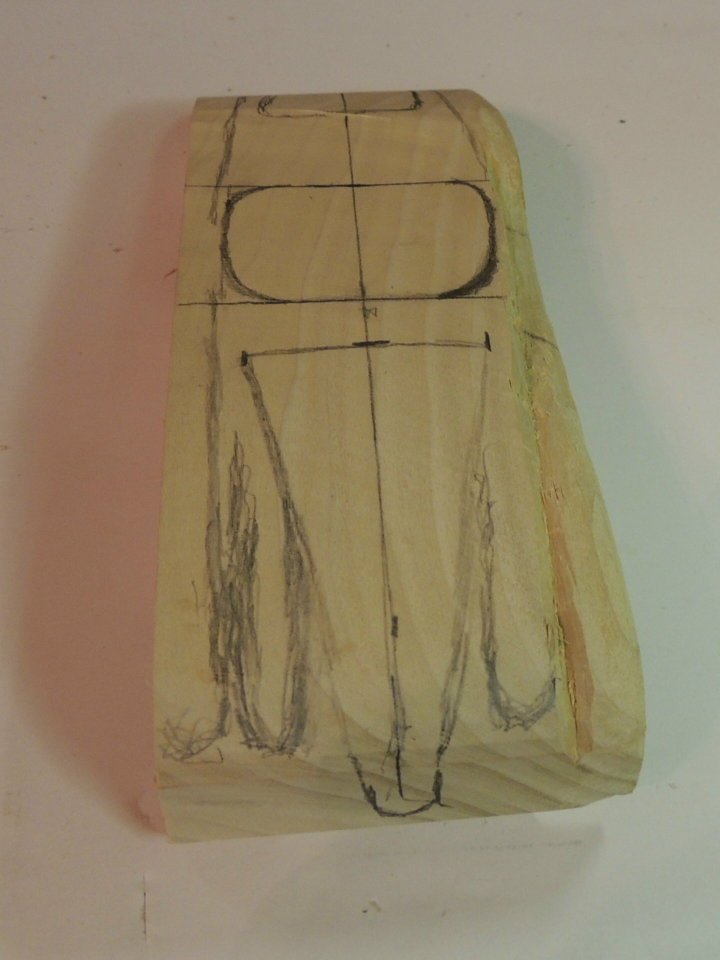
Still developing a plan to work from.....
Creating the engine compartment means removing everything that will be needed to support her motor and wheels, etc.
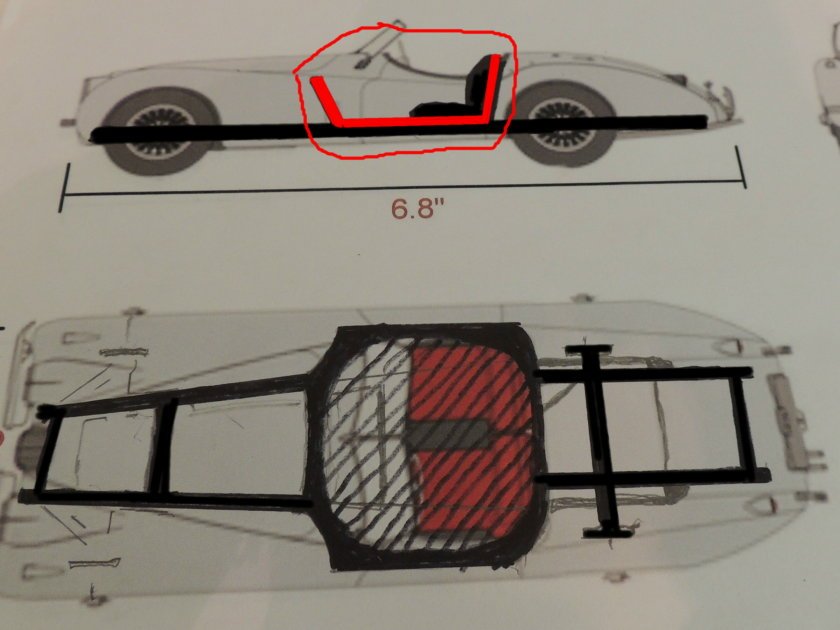
Using the scale drawing, I've sketched out the chassis and cockpit modules.
The diagonal lines in the cockpit area indicate a solid floorboard area.
Having fun playing around with the cockpit module this morning.
- usedtosail, Jim Rogers, Mirabell61 and 5 others
-
8
-
WOW!
If only I had the machine equipment and skills to go there Jim.
As we mortals well know, there are modelers in this world who live in a much different world, far beyond the limitations of normal minds. Clearly Ken Foran is in that amazing class.
I, on the other hand.....
Just an old woodworker who took up modeling with wood as a form of art..... kinda like old people who take up painting numbered pictures with water colors in their retirement.
While I have now made the decision to attempt creating this Jag model with open hood and doors, these photos are very inspiring in terms of developing a reasonable (kinda looks like) model.
Thanks for your visit and comments. -
-
Many major decisions to make.....
The more I study the dynamics of this project, the more I realize the shaping of the body may be the easiest task of all.
Depending on how far I dare attempt to take the modeling.....
Filling the cockpit area with seats, steering wheel, floor boards, center console, dash board, instrumentation, gear shift, door panels, etc. will be much more challenging than the simple shaping of the body.BIG decisions not yet resolved in my mind.....
Do I dare attempt to model the engine compartment?
I found plenty of great photos of that area, and it would be fun to go there..... but.... that means I will have to hollow out the engine compartment area from the grill back to the fire wall. AND..... remove the hood and hinge it in order to show underneath. THAT is the part that makes me GULP!
Then, there's the same question regarding the doors...... open with hinges or not.
From a practical standpoint, I'm not sure those three components can be surgically removed with precision that allows them to perfectly fit when closed. Hmmmmm
So, if I decide to take it that far, it will likely mean making the doors and hood separately.
Might have to have a few cold beverages to decide those issues.
Cheers -
Today's progress....
Several coats of primer was applied in order to examine the flaws and shapes I needed to refine.
I discovered that the shape of the hood was a little too flat.... needed to have more radius in the center.
Using automotive BONDO, I have built up the hood and sanded it back to a more accurate shape.
- John Allen, Seventynet, Jack12477 and 6 others
-
9
-
-
-
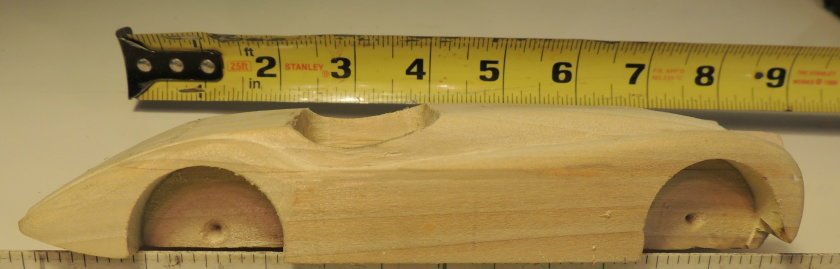
Being such a classic sports car, the internet is loaded with plenty of photos and research information to help me create the model.
I found this perfect scale drawing showing all four profiles needed to carve the shape in detail.This is an absolute gold mine....

-
-
A brief background story.....
Recently, while attending a competition in South Carolina, (entering three of my ships). For those not familiar with IPMS clubs, the members are passionate plastic kit modelers.... cars, planes, military tanks and artillery, and lots of Star Wars stuff. My ships seemed to be a real treat for them. Long story short.... I had to promise to build a car to enter in next year's event.
Since I am a pure scratch builder / wood artist.... I agreed to do a car for them without a clue as to what I would choose.
During the three hour drive home, a plan was formed. I couldn't wait to get back to my shop.
After HS graduation in 1961, taking my first full time job, I bought my first set of "wheels".... a "ragged out" 1951 Jaguar XK 120 roadster.
The car was shipped from Europe to the US by a soldier stationed at Ft. Bragg. The aluminum body was in good shape but the paint job was dull and badly faded. Upholstery was warn and sun cracked. Worst of all, most of the engine parts were in the trunk.
With help from my uncle, we worked every night and full weekends for almost a year. New paint, upholstery, and complete engine and tranny tear down. Upon completion, it was absolutely mint!
So here we go.... Flat-top hair cut, peg legged pants, turned up collar, white tee shirt with cigs rolled up in the sleeve, penny loafers with no socks.... get the picture?
Here's a photo taken from the internet..... identical to the one I restored.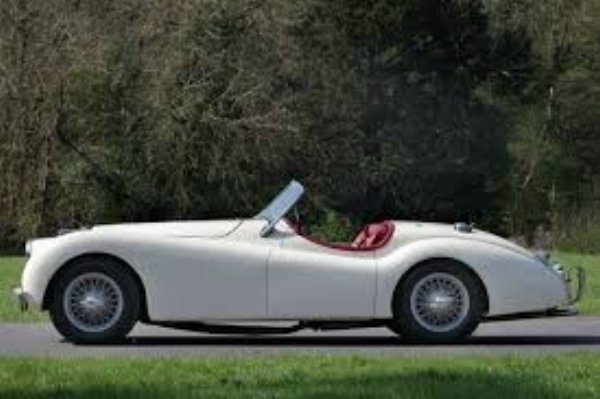
- coxswain, druxey, Ryland Craze and 4 others
-
7


Dave's 1951 XK120 Jag Roadster - FINISHED - 1/24th scale
in Non-ship/categorised builds
Posted · Edited by SawdustDave
insert photo
Exhaust Manifold Progress....
Don't we love it when a solid plan comes together and actually works?
Shopping at Lowe's for 2mm fuel line, I came across some 2.4mm trimmer line. BINGO!
Right size.... flexable.... responds to heat.... can be knife cut into precise segments.... joints can be glued with CA and seams "welded" with heat.
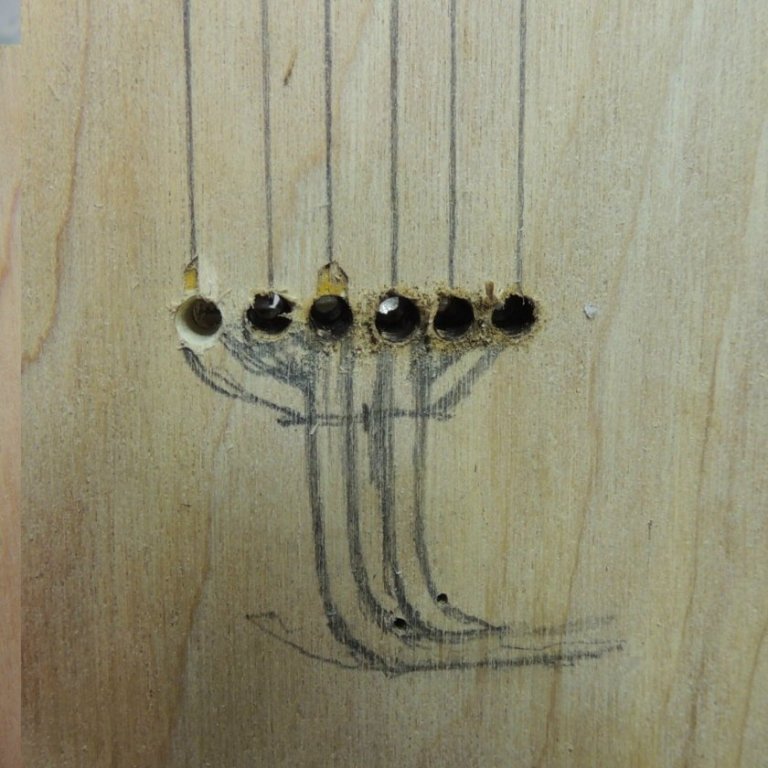
All I need is a jig.....
Jig was just too simple, and worked like a charm.
The rest was a simple matter of joining and blending.....
Pretty close to perfect....