


SawdustDave
-
Posts
1,770 -
Joined
-
Last visited
Content Type
Profiles
Forums
Gallery
Events
Posts posted by SawdustDave
-
-
Don't tempt him Piet. You know Remco might just do that.
-
Hi Piet:
I'm playing a little catching up this morning. Been swamped with writing the instructions for the lifeboat kit project....almost done.
So glad to get back and enjoy the amazing progress on your build....and to read the good news regarding your health concerns.
The dingy looks like fun. Might as well build two while you're at it, and bring one to the April show.
Keep up the beautiful work my friend.
-
-
This is the build I come to for re-newed inspiration! If modeling is an art (I consider it a very high form of art), then you, sir Ed, are a true master. I'm thinking Rembrandt here.
- clipper, Erebus and Terror, Elia and 2 others
-
 5
5
-
The draught marks are a new one for me Remco. Beautiful precision carving. I assume this was done with an Exacto blade.
Haven't visited for a while.... She's just magnificent!
Dave
-
Looks like my progress on the Mayflower is going to suffer for a while as I am having to focus every moment in the shop on the development of instruction sheets for the Life Boats For Warriors kit.
How much fun is one old man entitled to have?
-
-
-
ANNOUNCING !

I just announced the launching of an exciting spin-off project every modeler might be interested in.
Like the April show we will be hosting here in Lumberton, NC, this new spin-off project is now a registered Wounded Warrior Project event.The project name is "Lifeboats For Warriors" and you can learn all about by visiting this link....
.. http://modelshipworld.com/index.php/topic/8275-spring-msw-member-show-and-tell-meeting-discussion/page-8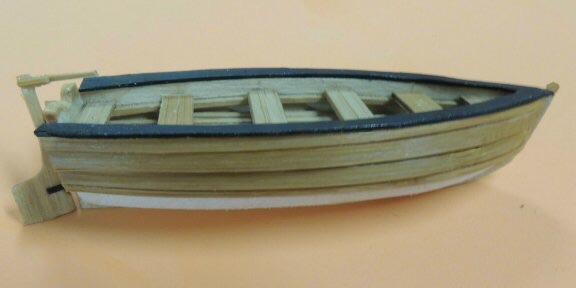
- tadheus, CaptainSteve, archjofo and 3 others
-
6
-
Great idea JesseLee....very neat work. Enjoying your very excellent build. Are you building this for the show?
-
The mast dowels are oak, and the caps and rails are maple....everything else (cleats, planks, and crosstrees) are bamboo. The mast coats are white vinyl painted black.
- yvesvidal, CaptainSteve, tadheus and 6 others
-
9
-
-
Thanks Pops / Piet....
Poker night.... Wish me luck.
ALL IN!
-
Got in some real good shop time since last update.....
Finished up the tops, including ripping out the oversized knees and replacing them with smaller scale.
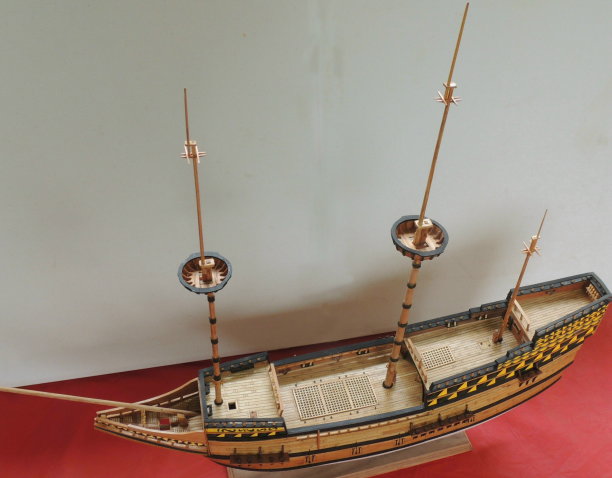
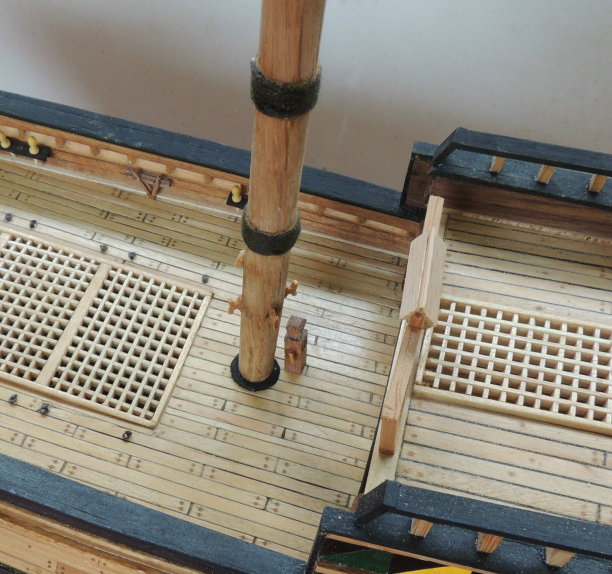
Created main and mizzen masts, fitting and staining them and stepping all three masts.....
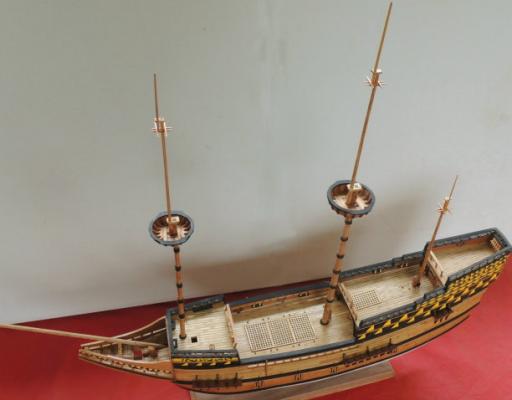
She is now tall....I do like shots from high above....
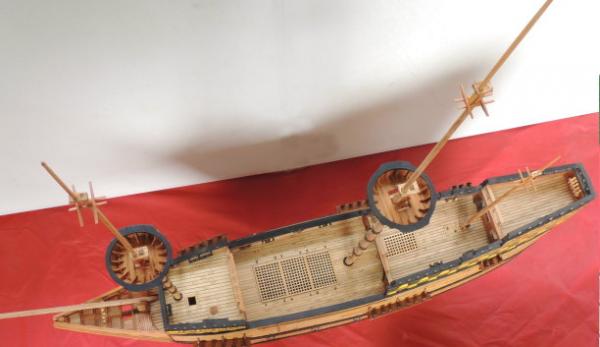
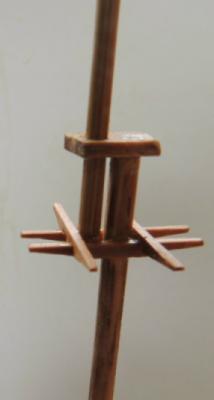
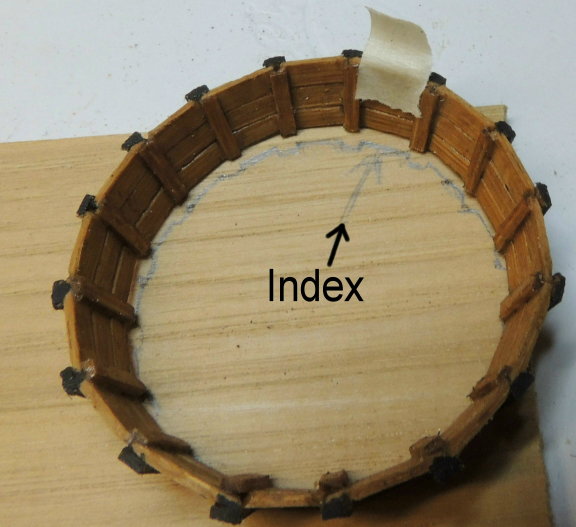
Close in on one of the completed tops....note that I widened the rails on each side where the deadeyes will be fitted (builders choice).
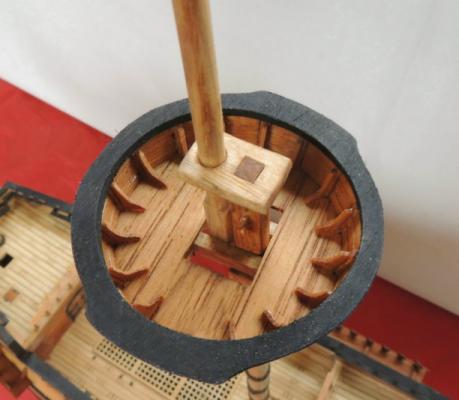
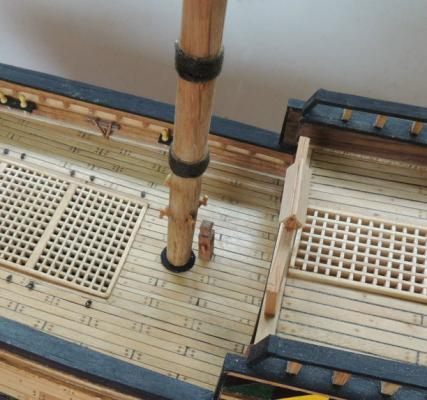
Shot of the fitted main mast....
-
-
Here's a posting I just placed on the "Discussion" thread for a spring get-together in NC.....
UPDATE....
The event is now officially registered and approved as a Wounded Warrior Project fund raising event. Tentative date is set for April 4th.
Also, I have agreed to offer my Mayflower (1:76th scale) for public auction at the event.
Raises the next question.... Do any of you have any models you would like to offer for auction?
All receipts going to WWP of course.
Here is the approval notification I just received....
"We are pleased to inform you that your event application has been approved by Wounded Warrior Project® (WWP). As an approved Proud Supporter, you will have access to a myriad of tools through the WWP Proud Supporter Community. Please click here to access our secure online network for you and other Proud Supporters! "
Comments....suggestions....
-
I am very much enjoying and learning from your techniques Tony. Beautiful work mate.
Dave
-
Very interesting idea with the switch Vivian. Nice work.
Dave
-
Hi Piet. Never have tried an airplane because I figured I would get carried away and put a lot of sweat into something only to make a hole in the ground with it. My brother did exactly that.
As for the angle cuts on the planks, I refer you to the answer given to Ed, who had the same question. The interlocking pattern is much stronger than straight joints would be.
PS....It's beginning to look a little more like you might need to plan that trip to NC next spring.
Thanks for the visit as always.
-
You will have to forgive Popeye Hank....sometimes he calls me Sue.
Glad I found your very interesting log. Great work..... Now I can go back through it more slowly.
WOW! Went back through your build and thoroughly enjoyed every update and comment from your fans.
Being an old land lubber, I get a little lost with all the naval jargon, but appreciate what it must mean to those of you who actually served on those awesome war vessels.
Pulling up a chair from here out.
Dave
-
Hi Stu....Glad to see you decided to finish this model for your daughter. It will become a family treasure one day.
As for the planking errors, don't concern yourself too much with the first layer (assuming you are going to double plank her). That first layer only serves as a shaping base for the outer skin. Use wood filler to get everything nice and smoothe and even. Again, don't concern yourself with how any of first planking looks.
Cheers
-
Ed...you are exactly right regarding the glue surface, also the pattern works like an interlocking joint once the cavities are loaded with CA. You would be surprised just how sturdy the assembly is after the core is removed.
Joe....no hot tub. It's a poker table.... And I'm putting you ALL IN mate.
Stu....welcome to the build. Please ignore Joe.
Thanks for the visit Bob and Popeye.
-
Shaping the bottom fitting requires a bit of fiddling in order to get a snug fit. Note the indexing mark and piece of tape (obvious reason). Cutting the shape staying about 1mm outside the marks, then beveling the bottom edge inward to match up to the beveled sides.
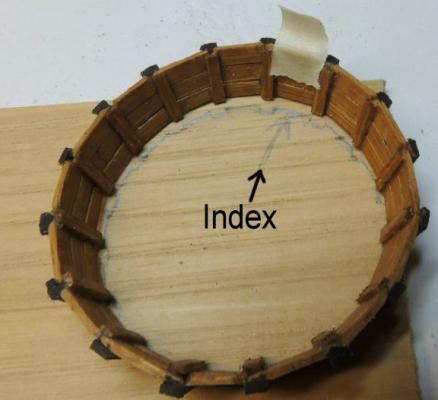
Not a bad fit here (both sides)

Finally, using the crosstree assembly, marked the opening and cut the hole.
Final note, you can see that I have greatly reduced the size of the knees compared to the foremast top.
Yea....Gonna have loads of fun trying to rip those puppies out and re-doing without tearing anything up.
My original thought was to make them fat enough to treenail them.... another foolish thought on my part.

-
Thanks Joe....Omega has a warped sense of humor this morning.


Hr. Ms. O 19 1938 by Piet - FINISHED - scale 1:50 - submarine of the Royal Navy Netherlands in service 1939 - 1945
in - Build logs for subjects built 1901 - Present Day
Posted · Edited by SawdustDave
Looks super Piet. That is one beautiful dingy. Your talents are endless sir.