


SawdustDave
-
Posts
1,770 -
Joined
-
Last visited
Content Type
Profiles
Forums
Gallery
Events
Posts posted by SawdustDave
-
-
Mark....sorry about the confusion. Two different table saws. The 7-1/4 blade is mounted on my small table top Skill table saw. I only use the MicroLux to slice off the individual pieces from the board once the slots have been cut.
Tried using other methods of filing/grinding down the kerf....the steel is so darned hard I couldn't move any material with a file.
Actually, the process was not all that intense....maybe 5 or 6 sec per tooth at the most. Not nearly as bad as tying rat lines

-
Final note on the blade....careful not to attempt taking off too much at one time. As this was done over 4 years ago in my case, I can't tell you exactly how many times I mounted and re-mounted that blade to make test cuts and check for wobble that would have come from upsetting the balance. The fact that the diameter is only 7-1/4" is a very big advantage.
Good luck with this. Glad this helped you Joe.
-
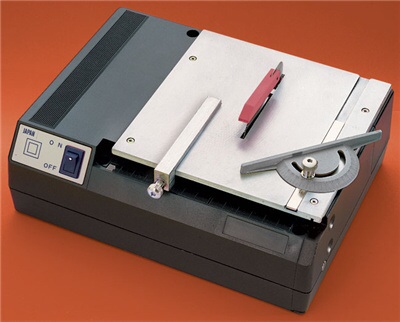
I use the term "mini table saw" referring to my MicroLux miniature table saw....
Grinding the blade.... That would be way too technical Joe.
The steel on those blades is super hardened, so you can grind away and hardly make a difference. I eyeballed most of it marking my starting point, I worked on one tooth at a time and worked my way around on one side, then flipped it over and repeated the process. Then installed the blade for a test cut (only 1/8" deep) and measured the width of the cut. I remember, I actually had to repeat this process several times before I got the perfect result.
I would say, as long as you are consistent with the method of grinding on each tooth....moving the blade across the grinding wheel with several passes with moderate pressure (as opposed to holding it still)....you will not upset the balance of the blade.
-
Joe....That blade is a 7-1/4" DeWALT....100 teeth. The original kerf was just over 1/8th". As noted, I used a high speed table mounted grinder (fine grit wheel) to grind the kerf down to 1/16th"
-
No problem Omega. Of course, there are other methods out there some members might find equally, or even more effective. I tried a number of ways....came fairly close with razor saw....even a hack-saw blade. This is the method that seemed to give me the most consistent results when it came down to having them fit together in the end.
-
-
Before I got into the treenailing and beakhead project, I figured I would knock out a scratch grating "how to" for those who asked.
I was forced into developing a method of creating gratings a few years ago because of the large scale of the pirate ship I built to honor my old high school football/basketball coach. I don't know if I've bought any gratings since. Actually, I'm not sure why anyone would care to go through what I'm going to show here, rather than buy the same product in a pack. Here goes.....
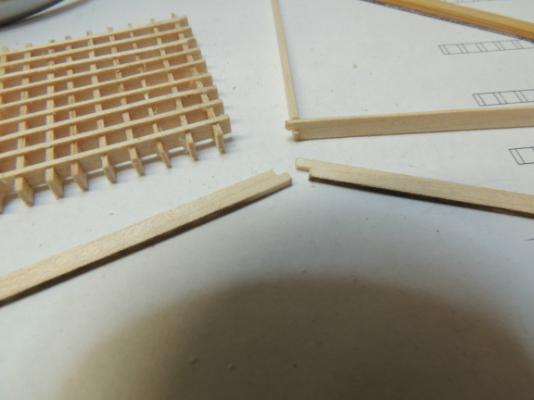
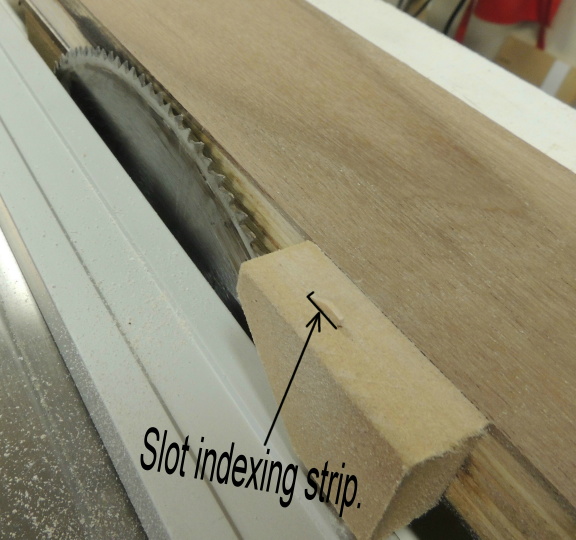
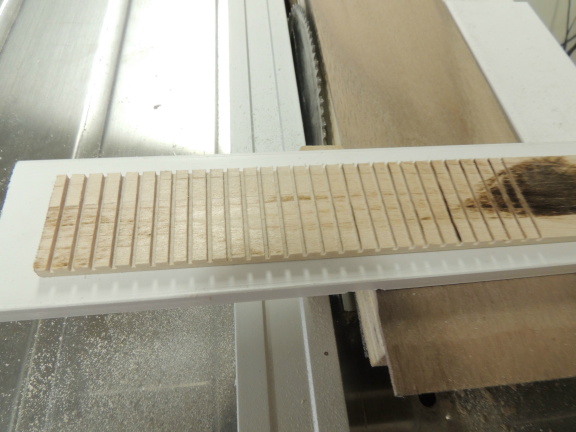
The challenge is to make a series of slots at perfect 90 degree angles to the long edge of a piece of material (maple in this case). The depth and width of each slot must be very precise and uniform....and....the spacing between each slot must be very exact (that's the real tricky part).
Beginning with my small table saw set up.....this small table saw doesn't have a height adjustment for the blade so I created flat surface on the right side of the blade shimmed to the exact height needed for the slot cutting. Note, this blade has been modified by grinding the kerf down to the exact width needed for the grating slots.
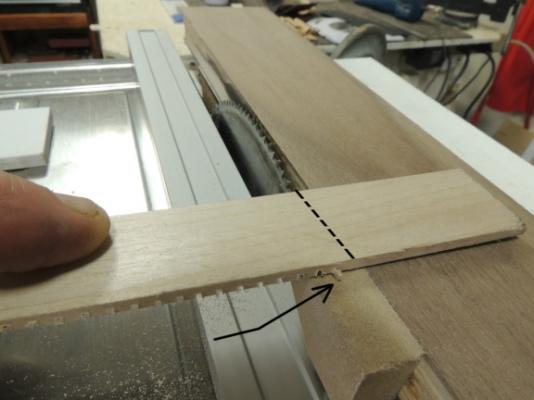
The most important feature being the tiny strip (arrow pointing to it) which I am calling the "slot indexing strip". The next photo will make it much clearer how it works.
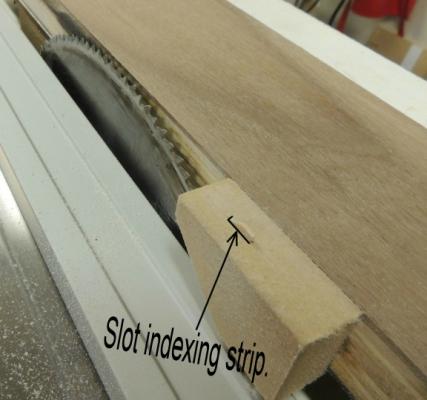
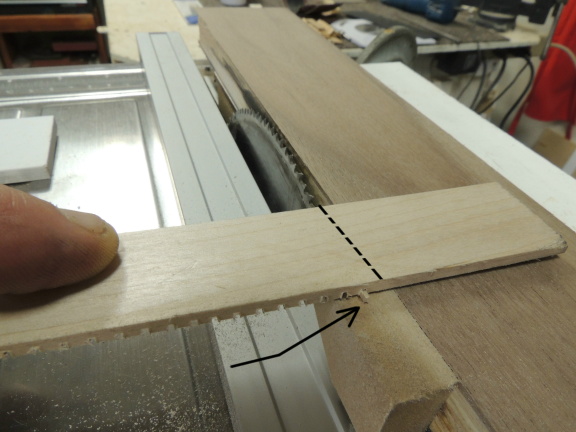
Seen here (below), after I have already made 16 slots, you can see that the indexing strip has been set into the last slot cut before beginning the next cut. This indexing gives me absolutely positive spacing between each slot. Not seen in the photo is the T-Square I use to move the board forward through the cutting area.
I should also note, I can change the size of the grating squares by simply adjusting the location of the indexing tab (strip) left (larger) or right (smaller). I can also change the depth of each slot by removing shims from the sliding platform, thus lowering the surface and exposing more blade. I cannot change the kerf of the blade.
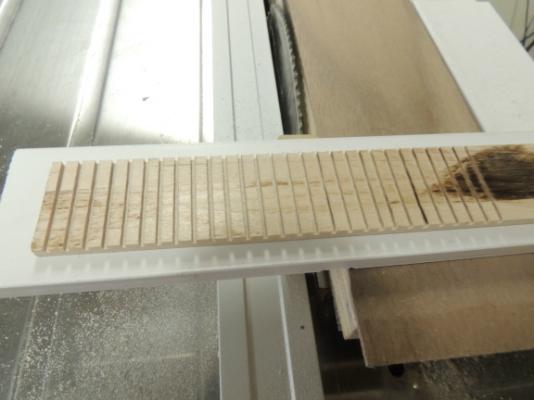
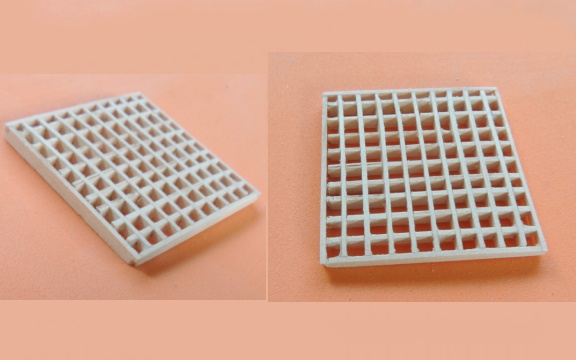
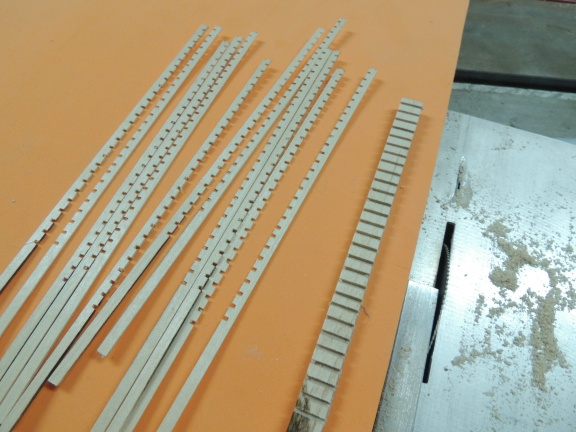
And here's the results at this point...disregard the burn marks on the back of the board as that section will not be used.
Obviously, I could have made many more slots in this board but decided this would be enough for this demo.
Now over to the Mini Table Saw.....straight forward, set the rip fence to the precise thickness needed and begin slicing the cheese.....

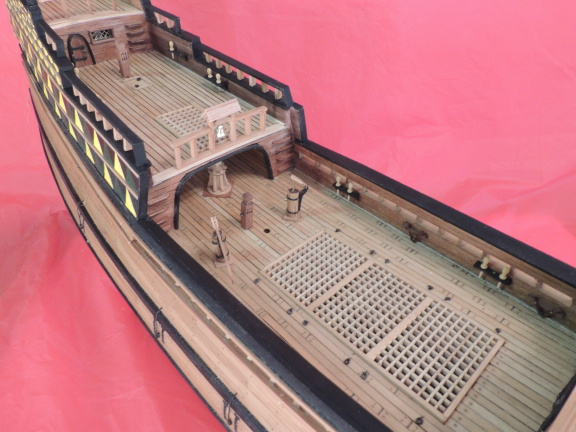
Assembled and very rough at this point....creating the half-lap joints for the corners of the frame.
And there you have it.....works for me.
Admittedly, I am not much of a "show-and-tell" expert, so this might not make the most sense to everyone. Best I could come up with.
Cheers Mates
- Timmo, Remcohe, CaptainSteve and 7 others
-
 10
10
-
Omega / Joe....gratings....I'm going to need some more gratings for the Beakhead coming up. Will take a few pics as I build those. Not as tough as you might think.
Straightened up the work bench, vacuumed a little, fed that stupid bird, put on coffee for 6:00 am delayed brew....Lights out
-
Thanks for the visit mates.
The screw bell.... if you go to page two of this log, you can see a closer view of the one I created for my smaller scale build (still in progress).
Pretty streight forward shaping by using two Dremel tools....one to slowly spin the wood screw while shaping it with the other using fine grinder and a diamond wheel. After shaping, I drilled a small hole in the top and inserted a steel wire used to mount it.
Not all that difficult.....it's just brass instead of wood.
-
I guess I was having so much fun the last several days, I neglected my posting chores. This progress report will show quite a few changes.
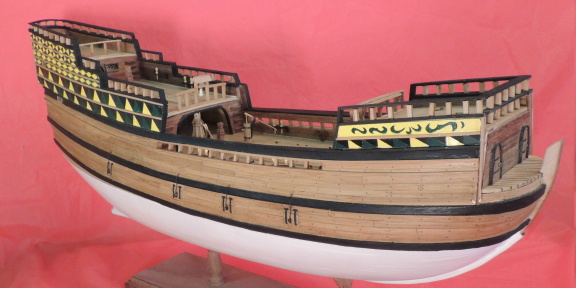
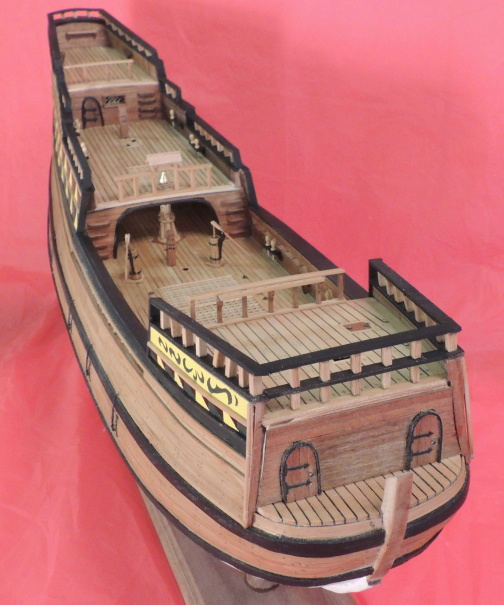
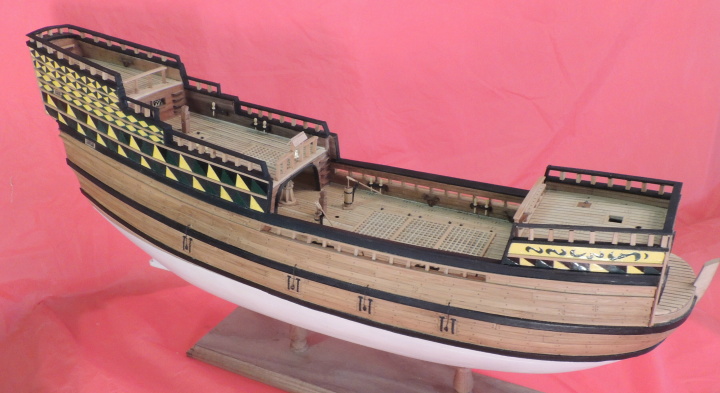
So I will begin with this shot of her starboard bow.... note the painted strips below her forecastle railing. Also, the gun port lids have all been rigged with rings and lift cables. Also, all stanchions and rails have been installed.
You can see in this next pic, I still have a lot of treenailing to do to her beakhead deck and outer bulkhead planking.
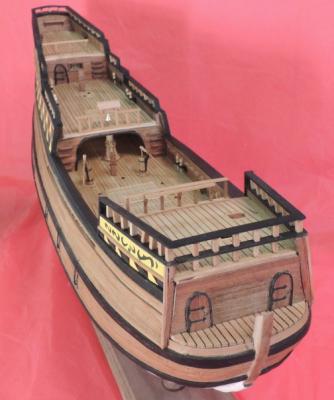
The two water pumps are not yet attached at this point as I do not intend to glue them in place until after all rigging in that area is completed. Meanwhile, they live in their secure box until I choose to install them.
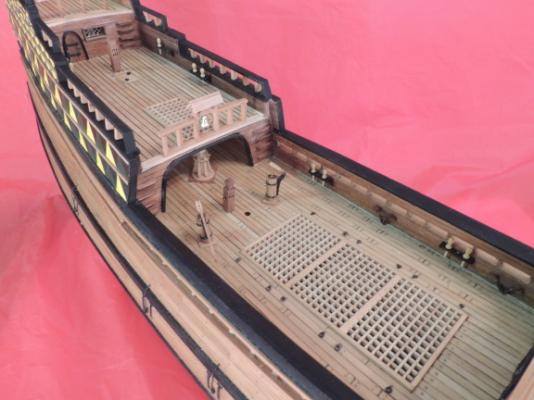
This view shows the addition of pin rails, kevels, knightheads, and interior deck railing.
Note, the ships bell, same as with my smaller Mayflower, was created from a solid brass phillips-head wood screw (allbeit a somewhat larger screw).
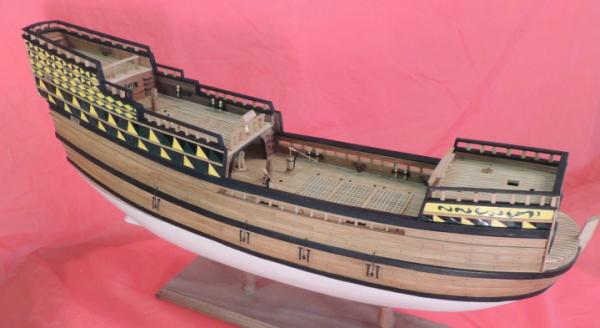
I guess this is just a slightly different starboard side view.
And now I shall return to some serious treenailing so I can then finish building out the beakhead assembly which I really do look forward to. Reminds me, I still have to drill out the hole for her bowsprit.
-
Know the feeling Chuck. I can only do tree nailing for an hour or two at a time. Many more yet to do on my build.
-
Very nicely done Ken. You're in to the really good stuff now. Have fun mate.
Dave
-
-
-
Thanks guys....great to have such nice friends. MSW is my favorite "hang-out" place because of the excellent folks you find hanging out around here. If Chuck could figure a way to provide cold beer and country western music it would be PERFECT.
Adam, I'm sorry I didn't make a few step pics of the pumps. One secret to the pumps is using very thin planking on the cylinder. Bevel the edges of each plank to get really tight fits.
Looking forward to seeing your final.
- mtaylor, CaptainSteve and Michiel
-
3
-
Still amazed at the many differences in kit designs for the Mayflower.....which I think is great since every one I have found is uniquely beautiful. Your is looking great Adam. Nice clean work.
-
-
Another day at school....thanks Ed
-
Great looking deadeyes mate. Neat idea for the lid hinges.
-
Chuck....The bolder and bigger works much nicer. Don't need to change for me, but some of the other old farts out there may have been having the same difficulty.
Carry on Mate.
-
Hi Chuck....Happy Labor Day weekend. We too, decided to stay away from the beach this weekend....just too many people.
Enjoying your build....but....your thin blue script font is tough on these old eyes. Looks nice....tough to read.
Cheers
-
No paint....please, no paint. Beautiful wood....beautiful joints.
- Mirabell61, harvey1847 and wyz
-
3
-
-

Mayflower by SawdustDave - Finished
in - Build logs for subjects built 1751 - 1800
Posted · Edited by SawdustDave
Joe....Those are just two of my table saws....not counting the industrial floor model.
Tell the Admiral you must have these essential tools in order to....Git'er done!
Tell her a fella named "Augie" put you up to it. That will work for sure.
If not, just suck it up and go for it.....then stop by the jewelry store on the way home.
I'm talking diamond necklace here.