Landlubber Mike
-
Posts
4,553 -
Joined
-
Last visited
Content Type
Profiles
Forums
Gallery
Events
Everything posted by Landlubber Mike
-
 Thanks very much everyone. It's good to be back and working on the build. After completing my Hannah, I did take some time reading books on ship models in bottles. It can be another addictive part of the hobby - I'll probably start a scratch SIB in the next couple of months. I bought half a dozen books, along with supplies and a few bottles. The best part of the hobby of course is drinking/emptying the bottle Eamonn, you didn't miss much. I pretty much posted the full build log on day after completing the Hannah SIB. I was worried that I'd mess it up getting the ship into the bottle, so decided I would wait to see if I was successful before posting the build log. Thankfully it all worked out ok, but I had a few choice words for the project along the way Frank, sorry to hear you were so sick. Hope you're feeling better my friend.
 -
Looking great Igor. The sea especially looks very nice. Good luck on the home stretch!
-
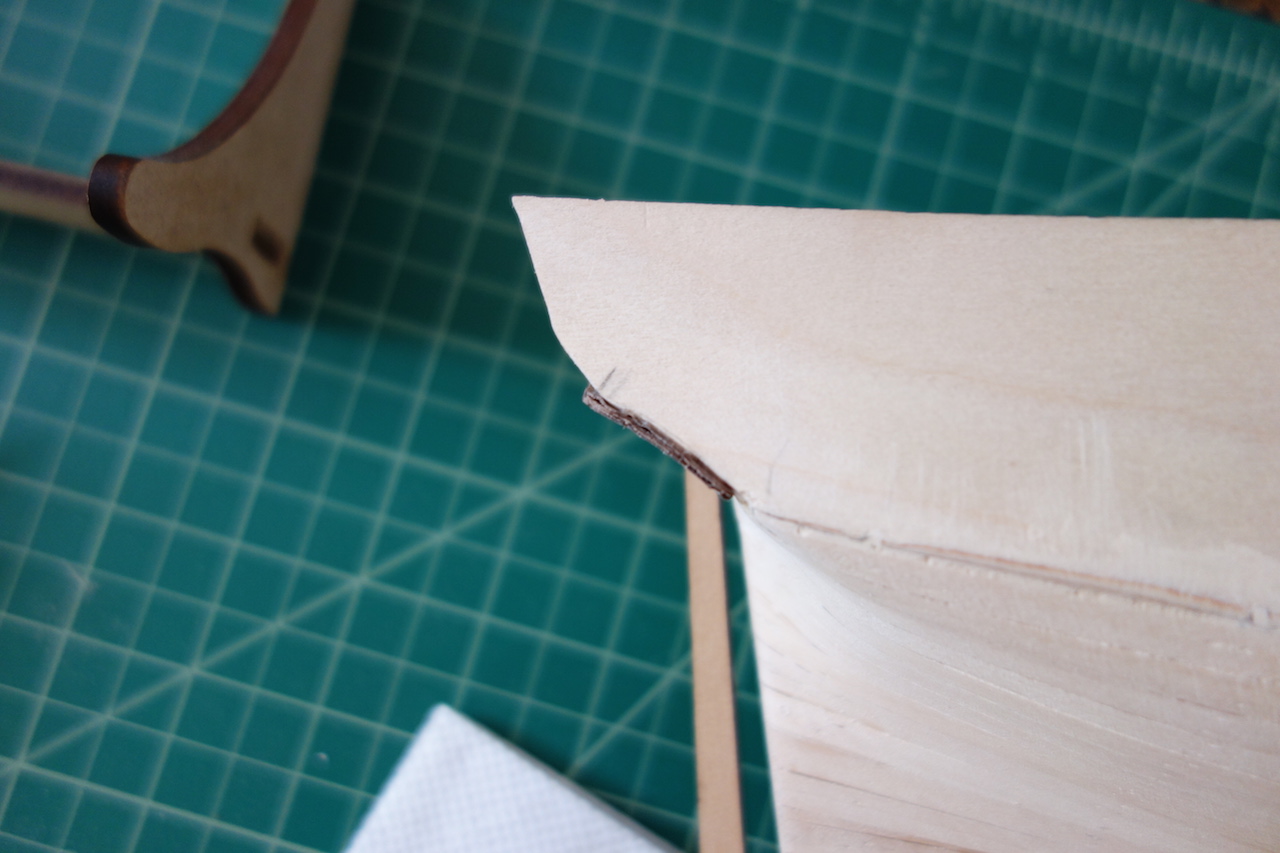
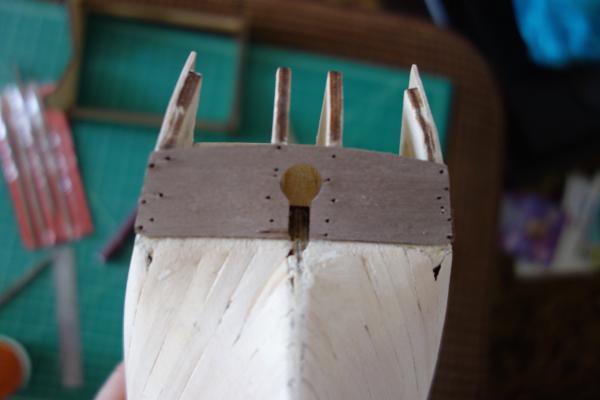
It's been a couple of months since my last update. I spent most of February finishing up my Hannah SIB build, and then have been busy with work, kids, etc. This week I did take some time to continue filling and sanding the hull, and installed the stern counter. When I looked at the NMM plans for the Pegasus, the counter seems to be a little more curved than the supports with the kit. So, I sanded back the stern extensions to add more of a curve, thinned down the stern counter a bit, soaked it and let it dry against a thermos, and then installed it yesterday. It probably could have been curved a bit more, but I think it works. The curves won't be as apparent once the decorative pieces are installed anyway. I plan on planking over the walnut ply piece with some thin pear. I'll start the second planking soon. I want to take the time to line the hull the right way, as I'm planning on using multiple colors for the upper hull planking. The base color will be pear stained a darker brown color. Then I will use pear stained blue for the frieze area, followed by redheart planking for the top area of the hull. The wales will be pear stained black, and I'm thinking of using black for the area between the wales and the coppering, which I think looks great on Realworkingsailor's build. A lot to plan out when using stains, but hopefully with a little pre-planning all should go well.

-
Love the look of this ship, and love Euromodel kits also. Looking forward to your log.
-
John, your Morgan is fantastic. Every time I come to your log I regret starting other kits on my shelf than the Morgan. Really great job!
- 2,250 replies
-
- 2
-

-
- model shipways
- Charles W Morgan
- (and 1 more)
-
Like Andy, I had no problem with the swelling either. I agree with him that I don't think there is enough moisture in the planks to transfer to the MDF and cause a problem.
-
Rick, I built the Caldercraft Badger, which used plywood for the keel and bulkheads. I am now building the Corel Unicorn (plywood) Amati Pegasus (MDF). Here are my thoughts. I think plywood is great, but only if it is perfectly straight. The Badger kit came with perfect plywood parts. The Corel Unicorn did not. When I went to source plywood elsewhere, the package of plywood I got from Micromark was all warped (to their credit, they refunded me the purchase price), and the next source had one piece out of five in the package that was not warped. I see people using various methods to un-warp their keel, but I have always wondered long term how successful that is if you don't also add in lots of filler blocks or other pieces to keep the keel straight - which, is a complete pain I would think. MDF, at least what is used in the Pegasus, is perfectly flat and the keel, bulkheads and lower deck all fit together like a glove. I don't know if you can get that kind of precision with plywood, and maybe Amati sources very high quality MDF. But, it was a joy to work with. I had to go through so much trouble with replacing the Corel Unicorn keel that it was a real relief to switch over to the Pegasus kit. MDF is interesting too in that it is a hard material to sand, but it's quite easy to chisel as the layers flake off if you chisel them the right way. If you chisel, you aren't creating much fine dust. Toxicity is, and should always be, a concern. I guess my take on it is that there is not much work that goes on in ship modeling with the keel and bulkheads, so your exposure is limited (I'm so slow at modeling that I'm only exposing myself every 5 or more years to the keel). That being said, like any other time I'm sanding wood or composites, I try to be good about taking the necessary precautions of wearing a dust mask, vacuuming up the dust quickly, sanding outside if a big job, etc. Plus, there are so many other toxic materials that are used in the hobby like woods, adhesives like CA, soldering stuff, blackening agents, etc. So, I just try to be smart about the nature and extent of my contact with those materials. Anyway, I'm still a relative beginner to this hobby, but these are just my thoughts.
-
Great pictures Ian - looks like a really fun trip. Welcome back!
-
Fantastic Igor, very nice work. It looks fantastic in the new bottle. Are you planning to add sea to the bottle?
-
Very nice work Peter, this ship has very nice lines. Clean crisp planking, great job!
- 293 replies
-
- 2
-
-
- pickle
- caldercraft
- (and 1 more)
-
Hey Carl, very nice job! Looks like you managed to get it inserted without a hitch, congratulations! So are you going to do any other SIBs? I think I'm hooked, but I'm going to go the scratch route for my next builds.
-
Hey Nathan, it's looking great. Are you planning to add sea to the bottle? If so, consider filing down the bottom of the ship. That will help you to need less "sea" material, and make it easier to fit the ship through the neck of the bottle.
-
Coming along very nicely Glenn. Wow, that Victory is huge!
-
Looks good Nathan. I finished my Hannah SIB a couple of weeks ago. It's a nice kit that really tempts you to get addicted to SIB modeling
-
Nice work Carl, good luck with the next step! Would be cool if you joined the rest of us in continuing on with SIBs. I did it as a check the box for my bucket list, but now I'm pretty addicted to it.
-
Thanks Igor. I have the website bookmarked. I might try buying a bag of old used watch parts as well to see if they would work as well.
-
I planked my Badger (both plankings) on my lap, and the first planking of my Pegasus in my lap. I might just do the Pegasus second planking in my lap, but I've been thinking of using my Amati keel clamp for the upper second planking, and my Panavise for the lower second planking (when I flip the ship upside down).
-
Igor, very nice work. Maybe you posted this once before, but for the photo-etched ship wheels, where did you source them from? I haven't seen any at such small scale before. I was thinking of going with old watch parts, but your photo-etchings look much nicer.
-
In case people coming across my log are interested in what goes into SIB models, Igor set up a nice topic here: http://modelshipworld.com/index.php/topic/10011-sib-what-is-necessary-to-start-building-the-ship-in-a-bottle/#entry297548
-
I thought so too Carl. Glad you were able to get it off - isn't it essentially a sticker that you adhere on both sides ? At least mine was. I was also worried that I wouldn't get the ends to line up correctly.
-
Your best sail cloth and technique
Landlubber Mike replied to steven sturgis's topic in Masting, rigging and sails
For what it's worth I got a big roll of model span last year from CornwallModelBoats. Steven, if you're interested in furled sails, I shared my techniques that I used on my Badger in a separate thread: http://modelshipworld.com/index.php/topic/3944-landlubber-mikes-technique-for-furled-sails/ -
Your best sail cloth and technique
Landlubber Mike replied to steven sturgis's topic in Masting, rigging and sails
Is there a difference between silk span and model span? I have a roll of model span, but haven't tried using it yet. -
Thanks Daniel and Igor, that's good to know. Igor, I'd love for there to be a discussion on bottles. Did you want to start one? I'll have to be on the lookout for bottles - or at least start drinking better liquor. I'll stay away from perfume though... Thanks Kester! The kit comes with various ensigns, but I decided not to go with them as the material was a bit bright, and I thought not conducive to adding some folds. Next time I promise
-
Hey Joe, I didn't mean to scare you off. Frankly, the only two things that stressed me out on the build were getting the sea into the bottle and having snapped the bowsprit. I'm sure you're much more careful than I am Other than that, it was a lot of fun.