Landlubber Mike
-
Posts
4,541 -
Joined
-
Last visited
Content Type
Profiles
Forums
Gallery
Events
Everything posted by Landlubber Mike
-
 Ha, I'm not sure I'll be cheering just yet Martin Martin, when you did your top and butt planks for the wales, did you cut them all to the same length? The diagram in TFFM shows them in different lengths along the hull, which makes things a little trickier.
 -
Looking great. The Le Renommee is a gorgeous ship and I look forward to your updates!
-
Hi Martin, really nice work, things are coming along nicely. Not sure what to tell you on the sills. They are inset a bit from the outside from what I understand. I forget if the bulwark planking covers them up from the inside though. On the pictures, light plays a huge effect. I bought a point and shoot camera with a much bigger light sensor, and my pictures are a lot clearer. There are some basic ways you can touch up the photos as well. I usually increase the exposure level a bit for a brighter picture, and sometimes tweak the sharpness as well to bring out the fine details.
- 467 replies
-
- 1
-

-
- fly
- victory models
- (and 1 more)
-
Thanks Chris. Frankly, going with 2mm planks wasn't all that bad. I had a couple of the pear pieces split on the stem pieces (interestingly, not on the bend itself but at the far end where the plank was straight). I soon figured out that after soaking, it was good to loosen the wood fibers but bending the planks backward and forward a few times, and then bending to the final configuration. I had no more issues after that. All in all, it was a little more work with the 2mm planks, but then I only had to run the planks once. Yeah, the staining is going to be a little tricky. I might have been better off going with walnut for the dark brown areas from the beginning, but I was scared off by the fact that it tends to be very grainy and more splintery than pear. I'm going to take my time and do the best I can. I'm hoping that the 2mm rails will hide any color runs between the brown and blue areas (and frankly, I can probably pre-color the blue planks ahead of time). The color transition between the brown and black should be fine, as hopefully the brown doesn't bleed onto the black wale (plus, the wale is 2mm, and I can always touch it up with the black again). For the red area, I'm planning to use redheart so no bleeding issues there to worry about. The General Finishes stains that I'm planning on using seem to combine stain properties of being a very thin finish with paint properties of coverage and deep color, so I think that should help me. A little ambitious, but so far my modifications are going nicely so I might as well try it out.
-
Thanks Chris. Do you mind sharing how to do that technique? I assumed you meant glue two pieces of 1mm stock together, then glue the combined 2mm piece to the hull. It obviously sounds like there is more to it than that. Do you overlap the butt joints of the lower piece and then sand the combined piece to get a nice continual curve?
-
Thanks John, really appreciate the kind words. I'm actually going to be staining the pear (I know, sacrilege!) on this model in various hues - darker brown, black and even blue. I want a darker look to the model, but plan on sticking with pure pear (and ebonized pear) and boxwood on my Lyme build. A happy and safe 4th to you and your family as well! Jeff's pear at 2mm actually bent quite nicely without any issues. I'm not sure if there was really a need to laminate it as I got it to bend around to the stem fairly easily with some soaking and time in the jig. I saw in the TFFM series something about laminating the stern. I'll have to read it again to understand why that approach is taken.
-
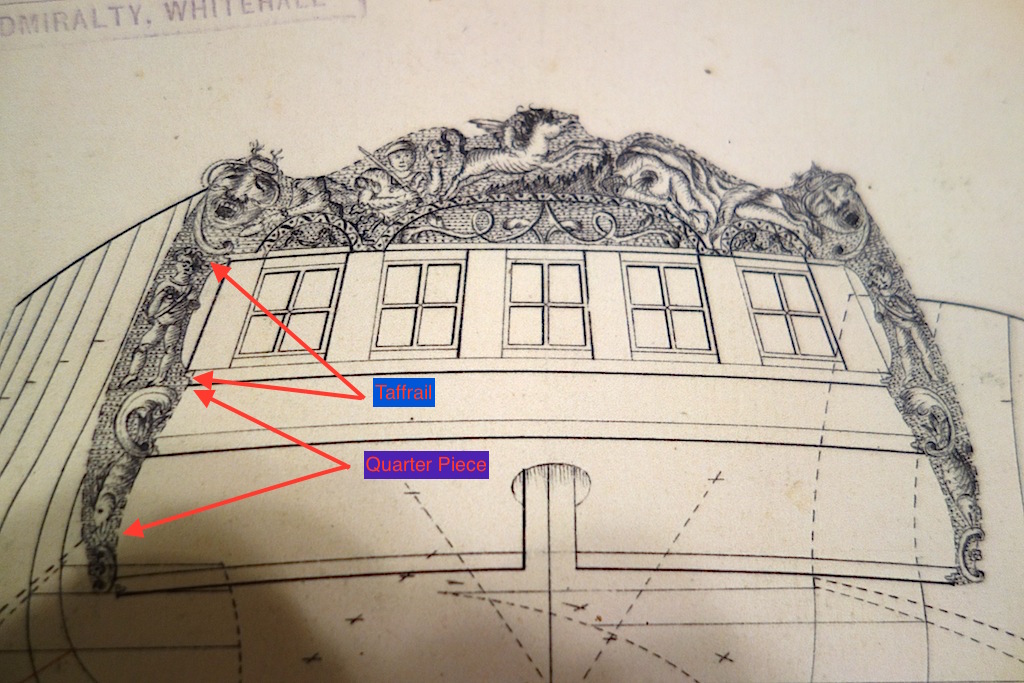
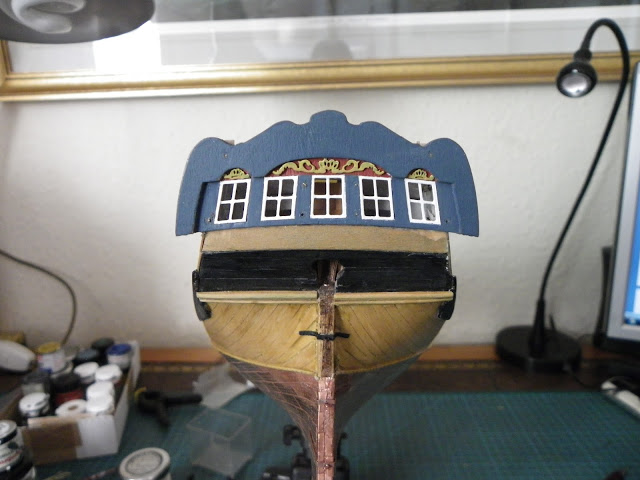
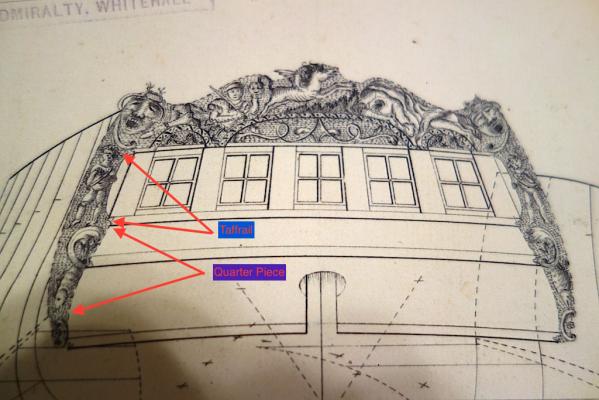
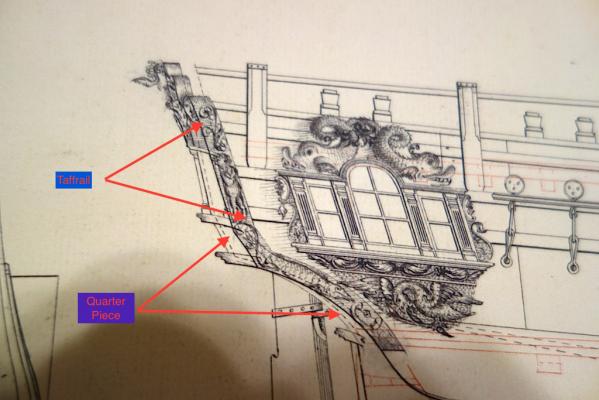
Finishing the wale is going to be tricky. The kit appears to have left off the quarter piece that extends just below the taffrail into the wale. So, what you end up with if you follow the kit is the taffrail just hanging out to the sides of the ship. The kit supplies you with a photo etch decorative piece that flows where the quarter piece would normally be, but I'm not sure how one is supposed to add it if it lays on the second planking with the bottom of it on the top of the wale (essentially, bumping up an extra mm to go onto the wale). Here is a picture, I think from BE's log, that shows what I mean about the taffrail just hanging out there: Here are some pics from the NMM plans showing what I think are quarter pieces: I think Blue Ensign spotted this on his build, and added quarter pieces to his Pegasus. I'm going to do the same. I think it would not only add accuracy to the model, but aesthetically, it would essentially round off the taffrail in a much nicer way than just having square ends like the kit. So, I'll probably take a piece of pear and try and carve it into the correct shape. BE has a detailed section on his build log on putting together the quarter piece. I've also been taking a look at the quarter badges. While they look nice, I'm thinking of making them a little more three dimensional by making a sorta bow window look to them. Realworkingsailor took that approach on his Pegasus to really nice effect, and it seems like some other modelers have taken a similar route as well.

-
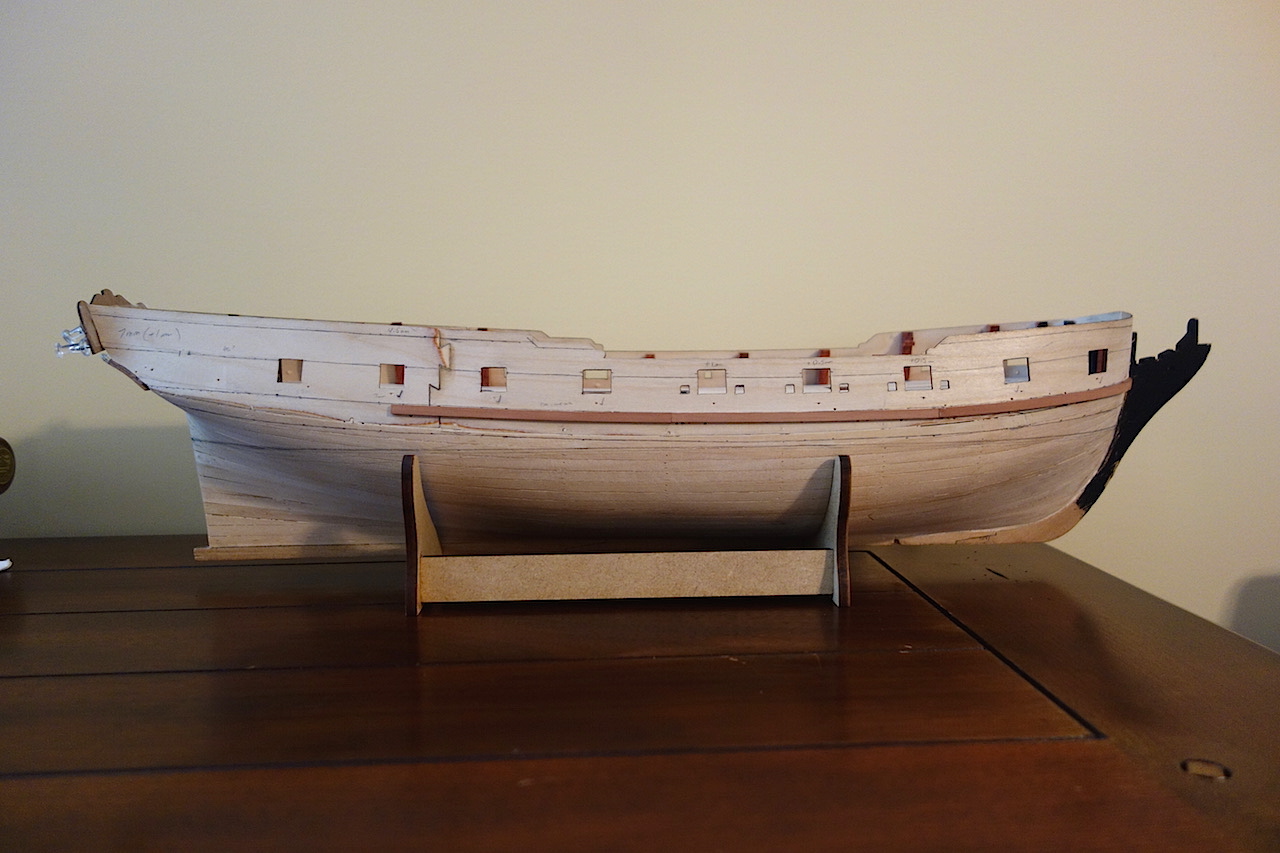
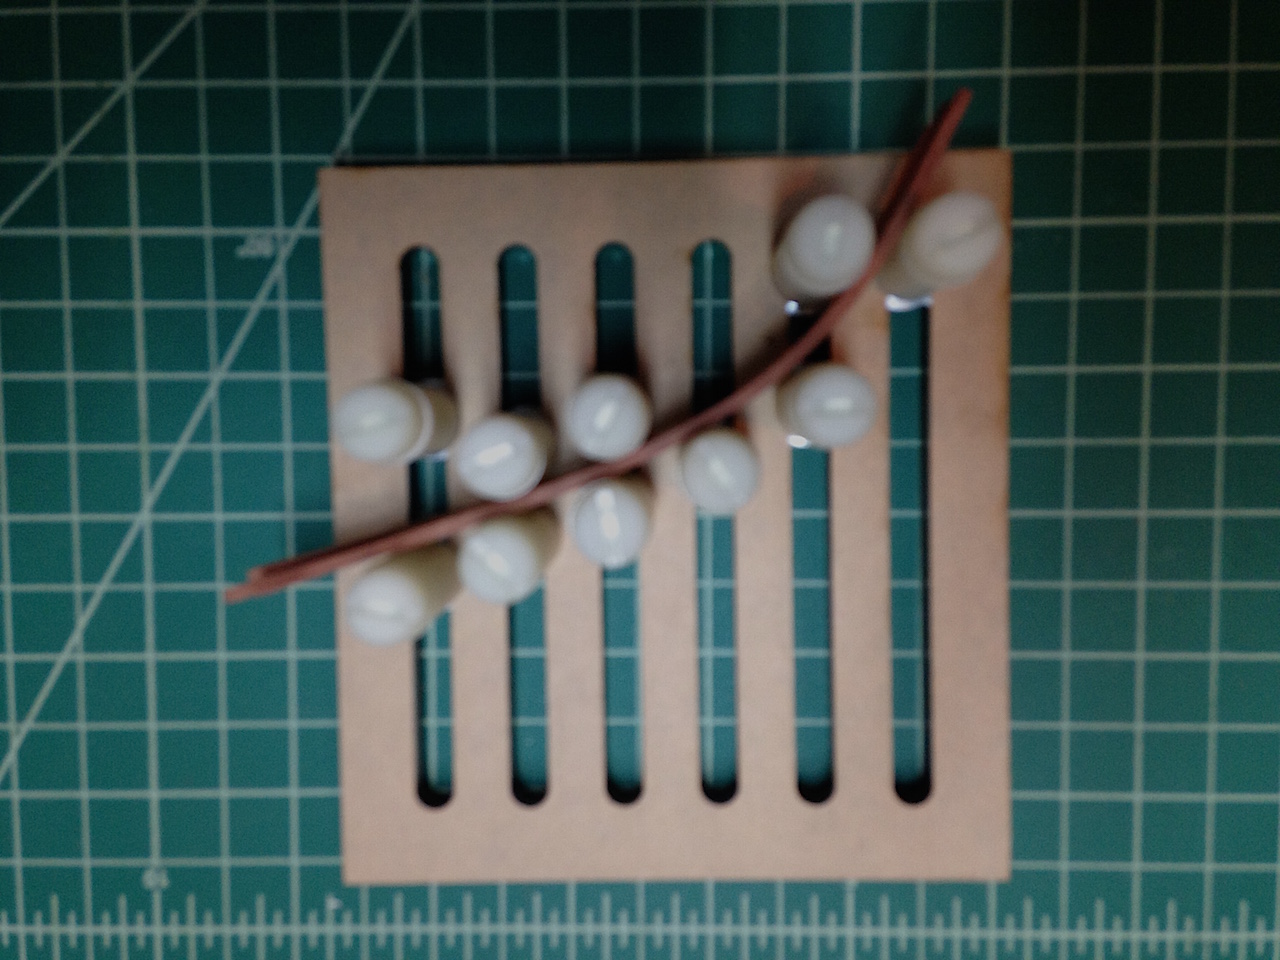
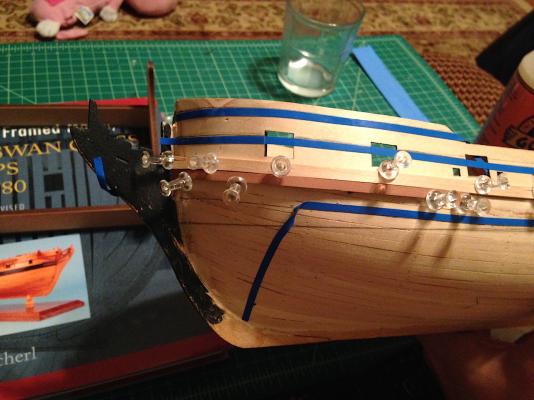
Well, I started working on the wale, and am laying down the first line of planks. I plan on planking it according to TFFM, so the upper row will be straight planks, and the next two below will be top and butt planks. I've laid the first three planks down, and have the remaining plank on either side to go. This doesn't look like much progress, but I've had hours upon hours on getting the line correct. I'm using 2mm planks for the wale, rather than two rows of 1mm planks as per the kit directions. I first plotted out the lines in pencil, then ran blue masking tape to outline the lines to give me an idea of how the planking would run. Easy enough. Then I started overthinking things. I worried that in running the planking line using four separate planks, the line wouldn't be a smooth curve but rather would be angular at the joints between two planks. So, I added a temporary batten on both sides marking the upper boundary of the planking run as in the picture below: In theory this would have worked great, but after running three planks on either side and confirming the measurements against the plans, I found that I was off a bit in a few places by as much as 1mm! Argh! While I was able to pop some of the planks off to refit in earlier rounds, this time was too much and they all started cracking. So, back to the drawing board. I spent a few hours redrawing the wale and rail lines. Interestingly, my original lines had been off for some reason even though I checked and rechecked it numerous times. I think my new lines are much more accurate. From there, I soaked and pre-fit planks as I went along, and after they dried, I glued them using pins and sometimes just my fingers to keep them on the line. Much better results this time around. Couple of things that helped when it came to the first plank at the stem. First, I widened the rabbet for the wale at the stem to 2mm using some micro gouges. The rabbet really helps to anchor that first plank at the stem. Next, I used the jig in the picture below that I got from Micro Mark a while back. First time I used it, but after eyeballing the general curve and setting the pins, it did a nice job pre-bending the wet 2mm pear planks. After the planks dried, I soaked them in hot water again and pinned them to the model in the right position. Once dry, I glued with white glue. The other planks didn't need to spend any time in that jig thankfully.


-
The tanganyika in my kit is a lot nicer than the stuff that was in my Badger kit (which was splintery and warped). When all was said and done however, it worked out nicely for my build. Your deck looks really great. I switched to maple just to change things up a bit. It's a great wood to work with, and I like the character in the grain. Others use holly, but I found it a bit too bland for the deck.
-
Nice work Per, and good choice on the TFFM series. For the deck planking, did you use the kit tanganyika? It looks pretty nice.
-
Very nice work. Great job on bending the boxwood for the taffrail - impressive!
- 293 replies
-
- 1
-
-
- pickle
- caldercraft
- (and 1 more)
-
Looks great Per. On my Badger, I tree nailed the deck using bamboo skewers and the Byrnes draw plate. I liked the end result, but it was a lot of work. The wood filler method seems to give a very similar result with a lot less hassle.
-
Per, do you have Abebooks.com or something similar? It's a website consortium of smaller used book dealers. I've gotten some really great deals on used books for my ship modeling library through that website. If I remember correctly, Abebooks had both US and UK sellers listing through it. I have all four volumes and find them incredibly helpful. I used Vol. 4 extensively for the rigging and sails on my Badger build. I haven't been using Vol. 1 very much. If you are interested in details like mast partners, etc., then there is some info there. But, on all the visible deck details, Vol. 2 is a wonderful resource. Vol. 3 is great as well as Martin says in that you can follow along as Greg builds his Pegasus.
-
If it has similar properties to cherry, it might be a great alternative. Completely different hobby for me, but I know the barbecue guys down in your area use peach a lot instead of cherry when they smoke meats because it has a similar, yet softer, flavor profile. Now I'm getting hungry
-
I ended up getting my copies of TFFM on eBay. On average, for new copies, I was paying about $35 per volume. Looks like I'll have to shell out for the new rigging supplement.
-
I ended up planking my stern counter too, and used curved planks. I ended up taking wider straight planks and sanding them back so that I ended up with curved planking (rather than bend the planks laterally against their width).
-
Really amazing work Alex. Nice job on that stove, wow!
-
Thank you Greg, that's very helpful. Appreciate you chiming in!
-
Thanks very much guys! I'll give it a go and see what happens I saw that as well SpyGlass, though the model on the box cover art doesn't show the cut out step. I also took a look at TFFM and other sources, and didn't see a similar cut out step so I'm ignoring it as well.
-
Thanks very much Martin, this is all very helpful. I literally spent hours marking off the wales and the rails. I'm fairly confident (I think ) that my wales are marked correctly. At this point, I'm thinking that I will stick with the 2mm planks as I don't want to have to go through that exercise again if I switched to two layers of 1mm planking! In terms of the sweep of the wales, there is a slight upward sweep at the stern as the wales generally follow the sweep of the gun ports. At the stem, I probably overstated that it was a downward sweep - you are correct that it's more of a flattening of the wales. I recall reading this in TFFM (and I think on some build logs), so I think a flattening is what one should see. I need to take another look at the sample planking diagram in TFFM 2, but I recall that the planks looked fairly straight above the wales. I'm going to attempt to plank above the wales according to that diagram, but I fear that I'll have to customize the black strake to be able to use straight planks. At least I'll be coppering and so only the planks above the waterline will be visible Where I'm really making things difficult on myself is in using stains and different woods, rather than paint, above the wales. I don't think that the runs of planks cleanly fit within the various color bands, so it's going to be very interesting working my way up from the wales. I think it's doable, but it's going to take a lot of planning and plotting out as you suggest. Fun times!
-
Hey guys, I started to work on the planking for the wales the past couple of nights. I'm going to start with the top row of the wales, which consists of straight planks, and then work on the top and butt planks for the next two rows. I decided to go with 2mm planks, rather than planking twice with 1mm planks, which I think would make for a cleaner presentation. It's been a bit tricky bending the first plank at the stem - my first couple of attempts, the pear planks split a little. My second attempts seem to have worked better. Soaked the planks in water, slowly bent the planks back and forth to loosen the fibers, and then I put them in a jig that approximated the curve. Since I'm planning on using smaller planks, I'm thinking about running a temporary full length planking strip to mark the upper line of the wales. This way when I run that first line of planking for the wale, it will butt against that temporary planking line and be a smooth continuous line. Question: For those that have built or are working on the Swan class, I just wanted to confirm that the wales generally have an upward sweep as you go from the stem to the stern, and actually have a slight downward sweep at the very front section near the stem. Is this the case? If you use the full length kit planks as suggested by the instructions, I think you would ultimately have to bend the planks laterally against their width. My issue: By starting with the wales and using 2mm planks, this naturally affects the remaining planking above the wales and below - i.e., those planking lines would have a similar sweep. This is probably less of a problem using smaller planks and spilling them, but it's making me think whether it would have just been easier adding the second row of planking using straight runs of planks, and then adding the wales on top with a second layer. If I ever want to get back to a straight run of planks, particularly above the wales, I'll almost have to customize the row of planking immediately above the wales to get back to a straight line. Any thoughts or advice would be greatly appreciated!
-
Bow and figurehead look much better than the kit approach. Well done!
-
John, thanks very much for that. That seems to be the safest approach. I'd like to keep all my fingers, so just wanted to make sure that I reached out to see what others with more experience are doing.
-
Thank you Greg, that's very helpful. I believe I saw similar pictures in TFFM 3? This might seem like a dumb question, but how and where did you use the push stick? Do you hold the knurled knob on the taper jig to keep the jig against the fence, and with your left hand, hold the wood strip against the taper jig? In your second picture, it seems like the push stick would have to be very thin, like on the order of a few millimeters given the small angle on the jig.