Landlubber Mike
-
Posts
4,548 -
Joined
-
Last visited
Content Type
Profiles
Forums
Gallery
Events
Everything posted by Landlubber Mike
-

Landlubber Mike's technique for furled sails
Landlubber Mike replied to Landlubber Mike's topic in Masting, rigging and sails
I added buntlines to the topsails and the fore course. Rather than knotting the end of the line and running it through the buntline blocks at the top of the mast like you would do per the kit instructions, I glued a portion of the line onto the sail and ran it through the buntline blocks before furling the sails. Unfortunately the example I showed in the beginning of the thread was for the topgallant sails, which didn't have buntlines. I skipped the bowlines and reef tackles. You're a brave man if you are going to add them I will likely add a combination of furled, partially furled and full sails to my next build, so I'll be following your techniques closely. -
Looking really great Augie. Wales and the treenails came out very nice indeed
- 2,191 replies
-
- 1
-

-
- confederacy
- Model Shipways
- (and 1 more)
-
Landlubber Mike's technique for furled sails
Landlubber Mike replied to Landlubber Mike's topic in Masting, rigging and sails
Hi again Jay, sorry I missed this response earlier. What confused me earlier was the configuration in the kit plans for how the clew lines and sheets and their related blocks were run - essentially, the clue line is fixed to the spar towards the end, travels downward to the clew block (from which the sheet is run), then back upward to the clue block on the spar near the middle of the spar, forming a triangle. The triangle is fictitious really, and is there only because the kit's plans show a typical model without sails. Actual sails had the clew block attached to the cringle of the clew of the sail, and the sheet or tack (depending on the sail) was run through the cringle. The diagrams from pages 82-82 of the Lennarth Petersson book are very helpful, but unfortunately I can't find the online version to post pictures. So, what I ended up doing with my sails is that I added the cringles to the clews of the sails, attached a clew block at the sail clew (and for the fore course a sheet block as well), then ran the sheets through the cringles, knotting them at one end so that they stayed locked at the cringle (for the fore course, I ran the tack). It took me a long while to wrap my head around all this, but I think this is how it all works. You're right that it does make for a busy section at the furled sail clew. I've seen a few models with furled sails where the sail clew was omitted, perhaps because of the "busy-ness" at that point, or perhaps because it makes things a bit more complicated. -
Thanks very much Eamonn, really appreciate the kind words. Give them a try!
- 153 replies
-
- 1
-
-
- badger
- caldercraft
- (and 1 more)
-
Landlubber Mike's technique for furled sails
Landlubber Mike replied to Landlubber Mike's topic in Masting, rigging and sails
Jay, the location of the furled sail as to the spar (below and in front vs. on top) depends on the period. I think when jackstays were introduced (I think that's they were called, but I could very well be wrong), the furled sails sat on top of the spar. The Badger dated from about 1778, which preceded the jackstay (or whatever it was called), so I put my furled sails below and in front. Mike -
Very cool, thanks very much for sharing your technique! Looks fantastic, particularly against the red painted areas.
-
Landlubber Mike's technique for furled sails
Landlubber Mike replied to Landlubber Mike's topic in Masting, rigging and sails
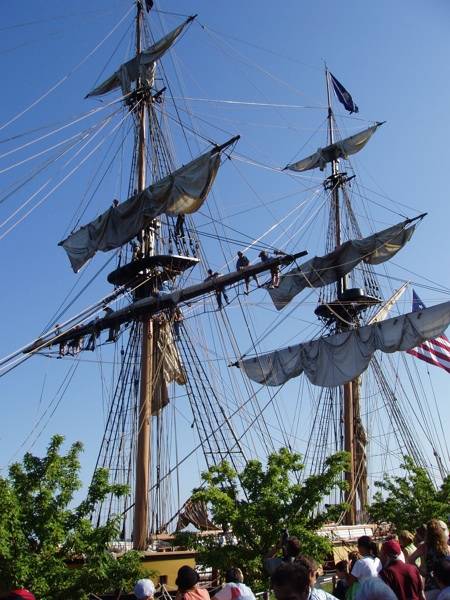
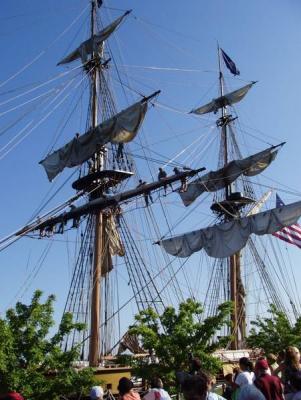
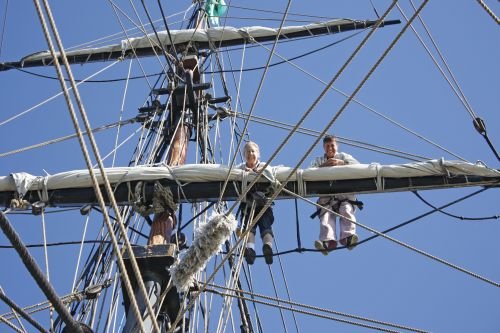
Looks great Jay! How did you do the seams? They look very good. The crew were very brave indeed to stand on the yard horses and furl the sails. Here is one picture that I found online of some folks doing that - not my cup of tea, and I don't think that I'd be all smiles like these gentlemen!
-
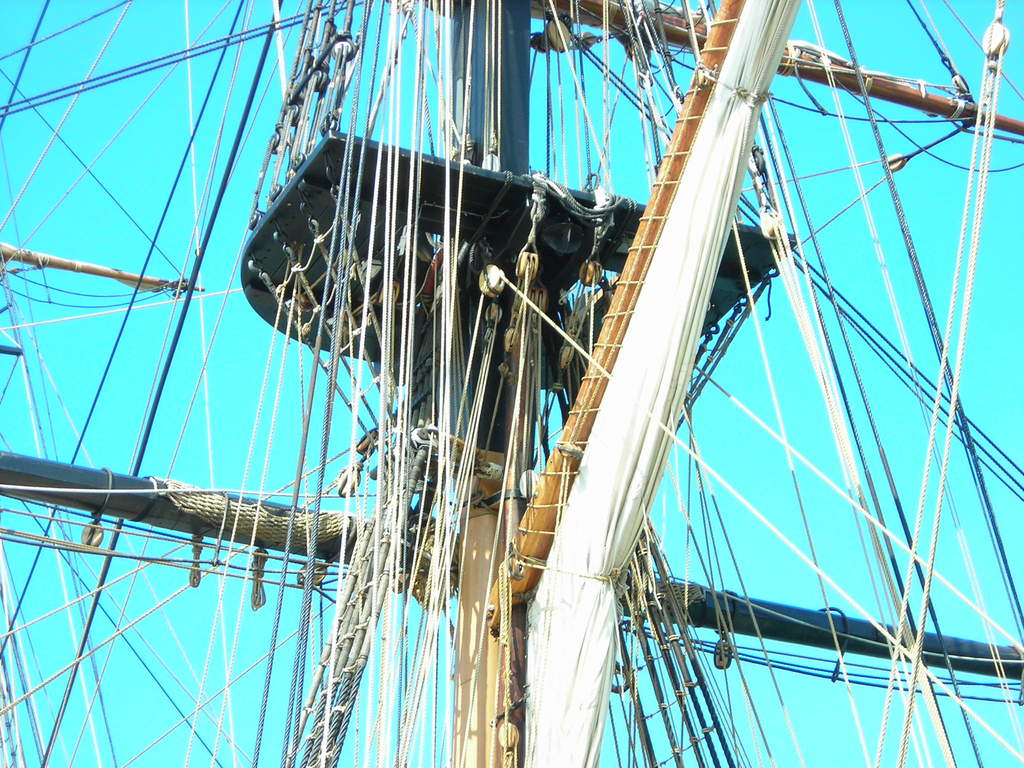
Hi Peter, thanks very much for looking in. The zu Mondfeld approach seems like great advice - I'm working fore to aft, but I think working aft to fore would have been a better approach. I'll probably try that next time. No offense taken at all on my furled sails - I appreciate all thoughts, comments and advice, as I'm always looking to improve things. One thing I would note is that the amount of sail to be reduced is very dependent on the thickness of the material that you are working with. Even though the material I am using is the thinnest weight cotton that I could find at a fabric store, it is still a bit too thick for my liking. I originally was going to go with zu Mondfeld's suggestion of reducing by 30%, but the sails would have come out too bulky. If I had used something else like silkspan or the like, then I probably could have gotten away with keeping more material. For future builds, I'll probably see if I can source thinner material, like high quality linen handkerchief type of material or maybe very fine cotton material used for bedding, or tissue-like material like silkspan. In any event, that is why I had to get a little creative with the pattern of the sails. I'll mention one other thing about the thickness of the material I was using. It might have been easier to create folds and creases using thinner material. Maybe that's less important at the scale I'm working with now (1:64), but I would have liked to have been able to get more folds and creases in the sails. Even reducing the sail by as much as I did, the furled bulk is still very tightly furled with little extra space within the bulk to help create the folds and creases. It's also amazing at how tightly sails could be furled to the yards. I've read that the furled bulk should be about the size of the yard, which is not all that big - in fact, this led me to believe that perhaps my topgallant and maybe even topsails were a tad too big. Here are some pictures I found of the Niagara and another ship. Amazing that even the driver could be furled so tightly!


- 153 replies
-
- 3
-
-
- badger
- caldercraft
- (and 1 more)
-
Euro Ship Kits - moved by moderator
Landlubber Mike replied to pirozzi's topic in Wood ship model kits
PiratePete, Are you the author of the build manuals on Euromodel's website? If so, a big thank you! I downloaded them yesterday, and was very impressed. Vince, Congratulations! If the Royal William is anything like the Friedrich Wilhelm, I'm sure you were very impressed with the materials and the plans of the kit. I have a few kits now, and almost wish that I had stuck with Euromodel kits. I'm excited to follow your build, if you decide to post a build log. Nigel, Congratulations on the Mordaunt! That looks like another fantastic kit. Hope you post a build log -
Really great work Jason. I'm a bit further along in rigging my Badger, but I think I would have had an easier time going with your approach of adding the mast sections and accompanying rigging in sections, rather than building the entire mast, stepping it, and trying to run the rigging. Things get a bit complicated with the lines doing it the latter way. The only good reason to do it the latter way in my opinion is that it is probably easier to ensure that the mast sections are all lined up correctly. I'll be interested to follow your steps and see how you liked your approach.
- 800 replies
-
- 1
-
-
- snake
- caldercraft
- (and 1 more)
-
Ulises, your work is absolutely outstanding. I love the improved rigging line and blocks. That extra bit of enhanced detail really sets a model apart from a "by the kit" model. I'll have to look into improving those components for my next builds. I really like your furled sails. Just out of curiosity, did you add clews to the sails? A number of modelers don't add them, but a few I've seen do. I ended up adding clews to my Badger sails (in large part because I was wondering how you would otherwise run the clew lines), but I was sorta guessing on how to do it.
-
Landlubber Mike's technique for furled sails
Landlubber Mike replied to Landlubber Mike's topic in Masting, rigging and sails
Thanks very much Anthony, I appreciate the kind words One thing I forgot to mention - in reality, when sails were furled they weren't rolled up as you would do with a rug. Instead, they were gathered up. They look like they were rolled up because as they are gathered, a "skin" is formed by a fold of the sail which serves to cover and protect the entire bulk. I tried this on the square sails, and had a tough time doing it. So instead I just rolled them as well as the driver sail up. Just remember to compensate for the fact that the bulk of the sail will end up along the furled side, so you need to preposition the sail a bit towards the opposite side from where you are rolling so that the bulk ends up in the right spot. I did manage to use the gathering/skin method on the jib sail, which was a little easier since it wasn't fully furled. A possible improvement to the sails would be to add seams to them. I've heard of various techniques to indicate the seams, such as by using pencil or pen to trace the lines, actually sewing in a seam or pulling a a thread line out of the cloth. My personal view is that at this scale (1:64), the pencil/pen and sewing methods are slightly overscale and add a bit much to the look of the furled sails. The pulling of the thread technique sounds very interesting, though I wonder how easy it is to do. I should also say that if anyone has any questions or suggestions on improvements, I would love to hear them. -
Landlubber Mike's technique for furled sails
Landlubber Mike replied to Landlubber Mike's topic in Masting, rigging and sails
Thanks very much Steve, but after looking at your Victory and Apostol Felipe, I think it is you that need to put together a tutorial, and me to do the reading - very nice work! I'm glad to hear that you're planning to put sails on your Constitution - that's one ship that will look fantastic with sails. Nice job by the way on the small boats on your Constitution. I'm going to start the Charles Morgan as my next build (alongside the Corel Unicorn), and the small boats are constructed in a very similar way. The Badger (and most other kits) use cast resin bodies for the small ships, which can be nice, but I like the idea of wood hulls. -
Landlubber Mike's technique for furled sails
Landlubber Mike replied to Landlubber Mike's topic in Masting, rigging and sails
Thanks very much guys. I probably would have finished my Badger four months ago had I not gone the furled sail route, but I think it's been well worth it. Jay, the boom is coming. I'm planning on adding an ensign to the end of the gaff, which will be raised by a halliard which is belayed to cleats along the bulwarks near the captain's cabin of the ship. I figure that it will be easier to belay the lines if the boom is not in the way. As for the other model you saw with no boom but a flag staff, some mizzen/gaff sails do not have a boom, but are set flying (I think these are technically called spankers). Maybe that was what the model had? As you say, if there is a flag staff, then a boom would tend to get in the way. By the way, I love your tutorials, both on here, and on youtube. You definitely set the standard for passing along great information to the rest of us. -
Landlubber Mike's technique for furled sails
Landlubber Mike replied to Landlubber Mike's topic in Masting, rigging and sails
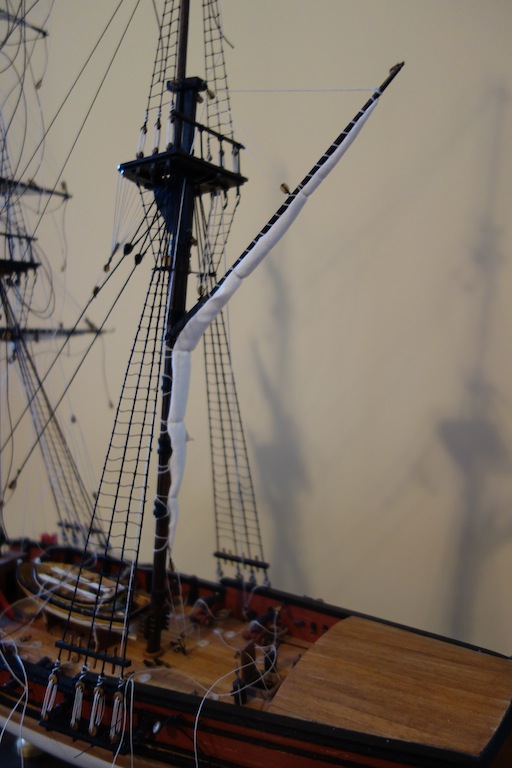
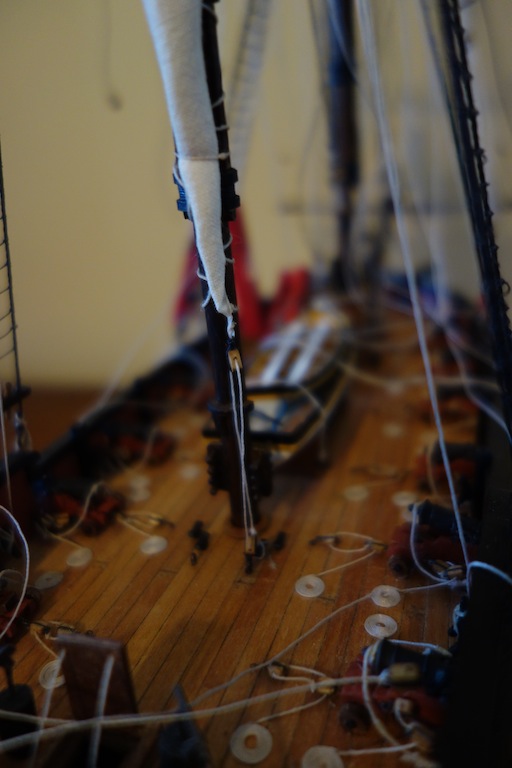
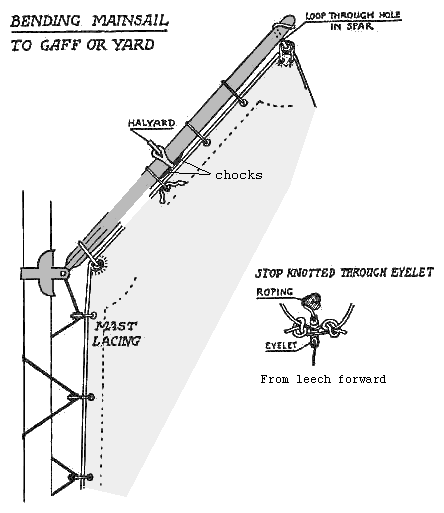
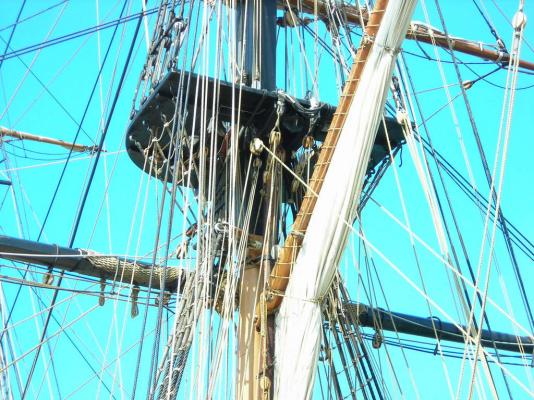
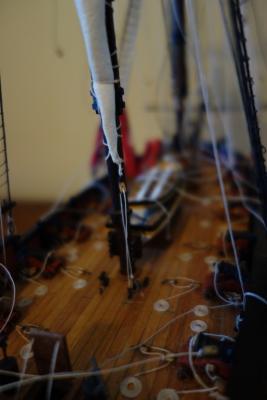
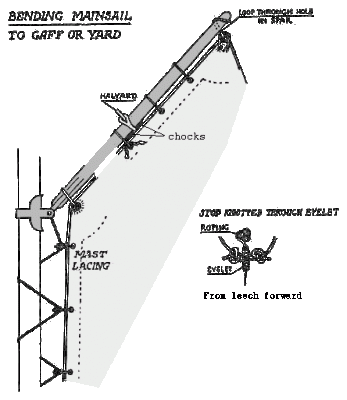
Next step was to furl the sail as much as possible off the build before attaching the gaff to the main mast: I was able to completely furl the head area along the gaff up to the throat of the gaff. You'll see I used three gasket type lines to hold the furl here, to somewhat represent the brail lines. Not sure if this would be accurate as I think the brail lines actually ran through brail blocks at the gaff, and then were belayed down to the deck. But, this would have been overly complicated at this scale, not to mention that multiple pins and cleats would have to be added. So, I went with these three gasket type lines. Ultimately, I went with two along the gaff, and moved the remaining line to the throat area of the sail (and not at the throat of the gaff itself). I was also able to get the luff edge furled pretty well at this stage as well. My plan of not angling the foot worked out pretty well, as you can see that the bulk is greatly reduced at the tack, with most of the bulk at the throat. In case you're wondering, I'm using napkins under the red clothespins because I've found that the color on these colored clothespins can rub off on the sail cloth From there, it was a matter of installing the gaff and lacing it to the mast. As noted above, the lacing for the mast is a bit different than the lacing to the gaff - I think zu Mondfeld has 10 different approaches in his book. From my research, part of the reason for the different lacing was so that the sail could slide more easily up and down the mast. I used the mast lacing pattern as in this diagram: Next I furled the rest of the sail, and added two more brail lines against the mast. I also added a block and tackle arrangement at the deck as you can see in the third picture below. I'm also planning on adding the outhauler line, which would run from the tack clew, through a sheeve at the end of the boom, and belayed at a deck cleat at the base of the main mast. The kit plans have two pairs of deck cleats to be installed at the base of the main mast, with only one pair used, so all I needed to do was add an extra pair of eyebolts to the deck. They still need some work to try and get in some folds, etc., but overall it came out somewhat ok I think. I'd also note that in addition to real drivers having brail lines and blocks, there are a number of other inhauler/outhauler lines at the peak, as well as lines at the end of the boom. For my build, I thought they would add too much complication given the kit's pin and cleat configuration, and I had already installed them per the kit plans before deciding on the furled sails. So that's how I added a furled driver. There are probably better ways of doing this, but hopefully this helps give people a jump start on how to approach them - I had searched all over the internet for methods on how to install a furled driver, but couldn't find any so hopefully this helps a bit. Thanks for reading!- 89 replies
-
- 12
-
-
Landlubber Mike's technique for furled sails
Landlubber Mike replied to Landlubber Mike's topic in Masting, rigging and sails
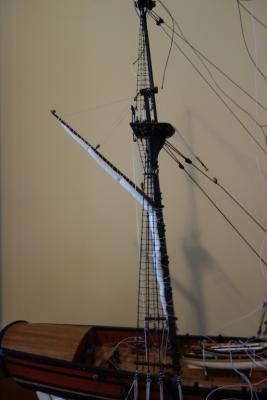
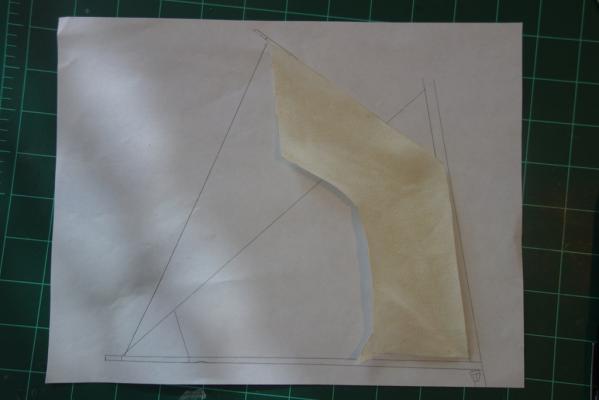
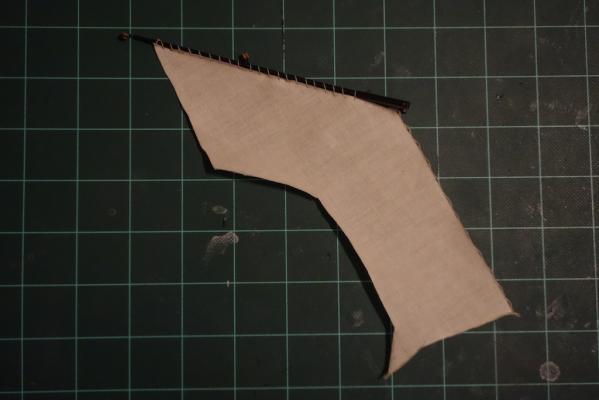
My approach Like the other sails, I started by drawing a general outline of the driver sail, tracing the plans for the gaff, main mast and boom, and then just drawing a line for the leech end of the sail. The next step was to draw the pattern for the reduced sail. Here, there were three considerations: (1) how to reduce it enough that I could get a tightly furled sail; (2) how to design the pattern so that the furled sail bulk would be thinner at the peak and tack, and thicker in the area in between; and (3) mechanically, how would I proceed with the furl given that the furl takes multiple directions along the brail lines. Here is what I came up with: The total bulk of the sail is reduced to about 40% of the full sail size. The depth along the head and along the luff is about the depth of what I used for the furled fore and main course sails. The shape is a bit odd in that at the head area, the leech end is angled inward, while at the foot, it runs parallel to the boom (on actual mizzen sails, I believe the foot of the sail was curved). This was because of the way I planned to furl the sail. First, I furled the sail up to the gaff, similarly to how I furled the square sails. So, the leech end, like the sides of the square sails, was angled inwards to reduce bulk at the peak. Second, I furled the sail at the throat area and the luff side. The foot is parallel to the boom and not angled as the head was because I realized that as I furled the gaff area, the outer edge of the foot would be pulled upwards, essentially angling the leech end near the foot upwards. So, there was no need to cut the pattern to an angle like I did with the head (otherwise, I would have almost no sail to work with at the tack). Hope that all makes sense. The other thing to note is that I added a mock clew at the edge of the sail. Given the shape of the overall driver sail, I thought the clew on the actual sail would end up midway along the luff, rather than at the throat. I also wanted to add an outhauler line that was attached to the clew. I modeled this off the MS Brig Niagara instructions, where the clew is brailed up the middle of the luff. With the pattern cut, I prepped the sail to attach it to the gaff. I added lacing holes along the head (5mm apart) to run the lacing to the gaff. I also added cringles along luff area (10mm apart) so that I could subsequently attach it to the mast. I also added clew and tack cringles at those areas. From my research, it seemed that these sails were bent to the gaff with simple lacing that ended at the throat of the gaff. I went with 5mm apart for the holes, which was what I used on the square sails. The sails are bent to the mast using a different lacing pattern (shown in the next post) using cringles, which I represented by running a line of thread along the edge using fabric glue, and pulling it up every 10mm to create the cringle. Given that the sail will be furled, these will not be visible later on. They did serve as a good guide for the mast lacing however, which I couldn't accomplish using holes drilled into the sail itself. -
Landlubber Mike's technique for furled sails
Landlubber Mike replied to Landlubber Mike's topic in Masting, rigging and sails
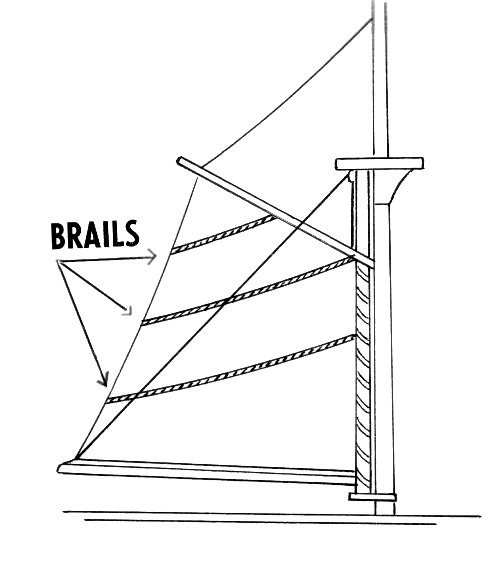
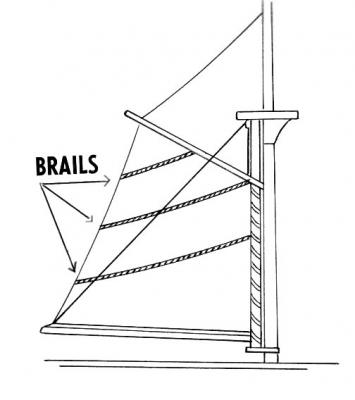
To keep all my furled sail posts together, here are my posts on how I furled the driver on my Badger build. Furled Driver Sail Here is what I did for the driver sail. I've seen these types of sails under a variety of names, including mizzen sails, gaff sails, driver sails and spanker sails. I think mizzen and gaff sails refer to the overall category of these types of sails. From what I can tell, "driver" and "spanker" are particular types of sails where the driver is associated with a boom, whereas a spanker is set free without a boom. The Badger has a boom, so this sail is a driver. Before I get too far, it might be worth attaching a diagram of a gaff sail's parts: In some ways the driver was easier than the other sails, but in others, it was more complicated. Unlike the other sails where the sail is bent to the yard on only one edge of the sail (the head for the square sails, and the luff for the fore sails), the driver is attached on both the head and the luff. So rather than furling the sails in one general direction, furling the driver takes on multiple directions. On real sails, this was accomplished using brail lines that start along the leech side, and run up to the head and luff ends. A bit hard to explain, but this picture might help. From my research, it seemed like gaff sails had around 5 brail lines, with 2-3 on the head and another 2-3 on the luff. The diagrams I've seen, however, on how/where the clew was furled differed from resource to resource. Some diagrams show a brail at the clew. Others show the bottom most clew on the leech as being about 2/3 of the way down the leech (and not at the clew). Then there is the matter of where the clew ends up. Some diagrams had the clue ending up at the throat, others, midway along the luff. So, a lot of things to consider. The next post will outline my approach. -
Next step was to furl the sail as much as possible off the build before attaching the gaff to the main mast: I was able to completely furl the head area along the gaff up to the throat of the gaff. You'll see I used three gasket type lines to hold the furl here, to somewhat represent the brail lines. Not sure if this would be accurate as I think the brail lines actually ran through brail blocks at the gaff, and then were belayed down to the deck. But, this would have been overly complicated at this scale, not to mention that multiple pins and cleats would have to be added. So, I went with these three gasket type lines. Ultimately, I went with two along the gaff, and moved the remaining line to the throat area of the sail (and not at the throat of the gaff itself). I was also able to get the luff edge furled pretty well at this stage as well. My plan of not angling the foot worked out pretty well, as you can see that the bulk is greatly reduced at the tack, with most of the bulk at the throat. In case you're wondering, I'm using napkins under the red clothespins because I've found that the color on these colored clothespins can rub off on the sail cloth From there, it was a matter of installing the gaff and lacing it to the mast. As noted above, the lacing for the mast is a bit different than the lacing to the gaff - I think zu Mondfeld has 10 different approaches in his book. From my research, part of the reason for the different lacing was so that the sail could slide more easily up and down the mast. I used the mast lacing pattern as in this diagram: Next I furled the rest of the sail, and added two more brail lines against the mast. I also added a block and tackle arrangement at the deck as you can see in the third picture below. I'm also planning on adding the outhauler line, which would run from the tack clew, through a sheeve at the end of the boom, and belayed at a deck cleat at the base of the main mast. The kit plans have two pairs of deck cleats to be installed at the base of the main mast, with only one pair used, so all I needed to do was add an extra pair of eyebolts to the deck. They still need some work to try and get in some folds, etc., but overall it came out somewhat ok I think. I'd also note that in addition to real drivers having brail lines and blocks, there are a number of other inhauler/outhauler lines at the peak, as well as lines at the end of the boom. For my build, I thought they would add too much complication given the kit's pin and cleat configuration, and I had already installed them per the kit plans before deciding on the furled sails. So that's how I added a furled driver. There are probably better ways of doing this, but hopefully this helps give people a jump start on how to approach them - I had searched all over the internet for methods on how to install a furled driver, but couldn't find any so hopefully this helps a bit. Thanks for reading!

- 153 replies
-
- 6
-
-
- badger
- caldercraft
- (and 1 more)
-
My approach Like the other sails, I started by drawing a general outline of the driver sail, tracing the plans for the gaff, main mast and boom, and then just drawing a line for the leech end of the sail. The next step was to draw the pattern for the reduced sail. Here, there were three considerations: (1) how to reduce it enough that I could get a tightly furled sail; (2) how to design the pattern so that the furled sail bulk would be thinner at the peak and tack, and thicker in the area in between; and (3) mechanically, how would I proceed with the furl given that the furl takes multiple directions along the brail lines. Here is what I came up with: The total bulk of the sail is reduced to about 40% of the full sail size. The depth along the head and along the luff is about the depth of what I used for the furled fore and main course sails. The shape is a bit odd in that at the head area, the leech end is angled inward, while at the foot, it runs parallel to the boom (on actual mizzen sails, I believe the foot of the sail was curved). This was because of the way I planned to furl the sail. First, I furled the sail up to the gaff, similarly to how I furled the square sails. So, the leech end, like the sides of the square sails, was angled inwards to reduce bulk at the peak. Second, I furled the sail at the throat area and the luff side. The foot is parallel to the boom and not angled as the head was because I realized that as I furled the gaff area, the outer edge of the foot would be pulled upwards, essentially angling the leech end near the foot upwards. So, there was no need to cut the pattern to an angle like I did with the head (otherwise, I would have almost no sail to work with at the tack). Hope that all makes sense. The other thing to note is that I added a mock clew at the edge of the sail. Given the shape of the overall driver sail, I thought the clew on the actual sail would end up midway along the luff, rather than at the throat. I also wanted to add an outhauler line that was attached to the clew. I modeled this off the MS Brig Niagara instructions, where the clew is brailed up the middle of the luff. With the pattern cut, I prepped the sail to attach it to the gaff. I added lacing holes along the head (5mm apart) to run the lacing to the gaff. I also added cringles along luff area (10mm apart) so that I could subsequently attach it to the mast. I also added clew and tack cringles at those areas. From my research, it seemed that these sails were bent to the gaff with simple lacing that ended at the throat of the gaff. I went with 5mm apart for the holes, which was what I used on the square sails. The sails are bent to the mast using a different lacing pattern (shown in the next post) using cringles, which I represented by running a line of thread along the edge using fabric glue, and pulling it up every 10mm to create the cringle. Given that the sail will be furled, these will not be visible later on. They did serve as a good guide for the mast lacing however, which I couldn't accomplish using holes drilled into the sail itself.
- 153 replies
-
- 3
-
-
- badger
- caldercraft
- (and 1 more)
-
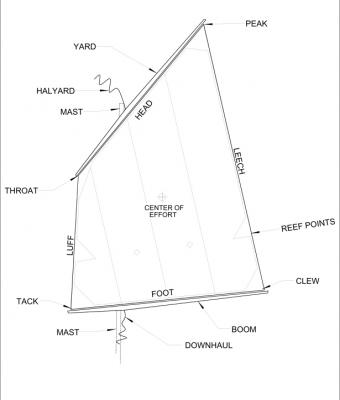
Furled Driver Sail Here is what I did for the driver sail. I've seen these types of sails under a variety of names, including mizzen sails, gaff sails, driver sails and spanker sails. I think mizzen and gaff sails refer to the overall category of these types of sails. From what I can tell, "driver" and "spanker" are particular types of sails where the driver is associated with a boom, whereas a spanker is set free without a boom. The Badger has a boom, so this sail is a driver. Before I get too far, it might be worth attaching a diagram of a gaff sail's parts: In some ways the driver was easier than the other sails, but in others, it was more complicated. Unlike the other sails where the sail is bent to the yard on only one edge of the sail (the head for the square sails, and the luff for the fore sails), the driver is attached on both the head and the luff. So rather than furling the sails in one general direction, furling the driver takes on multiple directions. On real sails, this was accomplished using brail lines that start along the leech side, and run up to the head and luff ends. A bit hard to explain, but this picture might help. From my research, it seemed like gaff sails had around 5 brail lines, with 2-3 on the head and another 2-3 on the luff. The diagrams I've seen, however, on how/where the clew was furled differed from resource to resource. Some diagrams show a brail at the clew. Others show the bottom most clew on the leech as being about 2/3 of the way down the leech (and not at the clew). Then there is the matter of where the clew ends up. Some diagrams had the clue ending up at the throat, others, midway along the luff. So, a lot of things to consider. The next post will outline my approach.
- 153 replies
-
- 2
-
-
- badger
- caldercraft
- (and 1 more)
-
Landlubber Mike's technique for furled sails
Landlubber Mike replied to Landlubber Mike's topic in Masting, rigging and sails
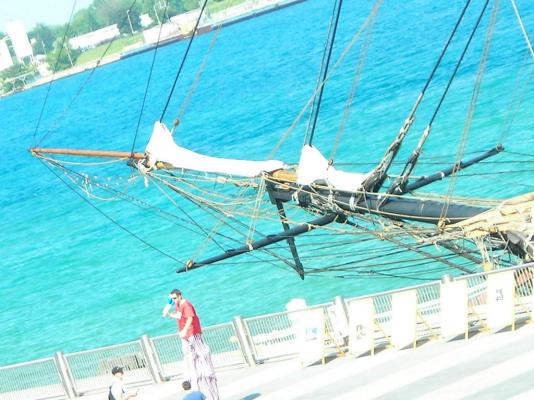
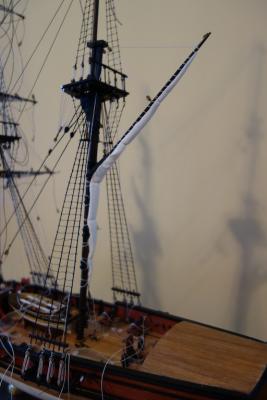
Jib sail. The jib sail was simpler in some ways (not requiring the netting/horses or figuring out what kind of stay to use), but requires a special piece of hardware called a "traveler" which is detailed below. Similarly to the staysail, I had to cut down on the size of the jib sail to ensure a tight furl. Looking at pictures of ships with furled sails, as well as the pictures in the Harland book, it's amazing how tightly these sails were furled. The jib had more running room, so I went with a larger sail than the staysail - I also wanted to run it up the jib stay a bit higher than the staysail, so I needed more cloth to work with. Construction was very similar to the square sails on the yards - using fabric glue I added bolt ropes and cringles. As mentioned above, for the hanks I used very thin beading wire which is much more flexible than using brass wire. The wire was looped around a brass rod in a spiral shape, painted, then cut as needed and shaped into a loop. Real hanks had a more complicated shape which I couldn't duplicate at this scale, so I just went with simple loops. I also painted them brown because it seems like these tended to be wood. The pictures below show the sail (with the sheets installed), as well as bent to the jib stay. The pre-furled shape of the sails is probably a bit different in the angle at the tack is the angle formed by the jibboom and the jib stay. I figured that this would make furling the sails down to the jibboom a lot easier. Setting up the jib was a lot easier than the staysail, except to the extent that I needed to built a traveler. The traveler has three main pieces: the main loop that goes around the jibboom, the shackle that runs forward to the end the jibboom on which the outhaul is attached, and then a hook to which the jib's tack cringle is attached. These were created using brass wire and a hook from the kit. A block is also attached to the traveler for the downhaul. The traveler itself (minus the shackle) was covered in leather for protection. I didn't bother to simulate it as such but just left it as blackened brass. Here is how the rigging proceeds: 1. Jib stay: The jib stay is attached to the traveler ring, through the hanks on the sail, up through the top sheeve on the cheek block on the starboard side, and down to the aft end of the starboard fore channel. Given the size of this ship, it seemed correct to tie it off directly, rather than use a block and tackle arrangement as in larger ships. 2. Outhaul: This line is tied to the shackle of the traveler, runs forward along the jibboom through a sheeve, to a timberhead on the starboard side. This functions similarly to the tack for the staysail in that it establishes a fixed position for the sail along the jibboom. 3. Downhaul: Similarly to the staysail, it attaches to the peak cringle, runs through a few hanks, down through the block attached to the traveler, and belays to a starboard timberhead. 4. Haliard: Similarly to the staysail, the haliard is run from the peak cringle but up through the lower sheeve of the starboard cheek block, and belays to a timberhead opposite by the aft end of fore shrouds, starboard side. As with the staysail, I ran these without a block and tackle for two reasons. Historically, it seemed smaller ships did not use a block and tackle. From a practical standpoint, and probably more importantly, adding a block and tackle would have been very hard to achieve given the scale and general size and busy-ness of the ship. So, I felt comfortable not using block and tackles. 5. Tack: The tack is attached to the hook on the traveler. 6. Sheets: The sheets are run just like for the staysail. Here's the end result (sorry, had the TV on in the second): Hope all this is helpful (and accurate and correct!). I found that there was a lot of information online for furling and adding square sails, but not much really on the fore and aft sails. I spent many hours trying to figure all this out from the resources mentioned above, and at least to my eye, I think they really improve the ship. So, if I can give back to others for all the help I've received on here in the past five years, I'll feel very happy.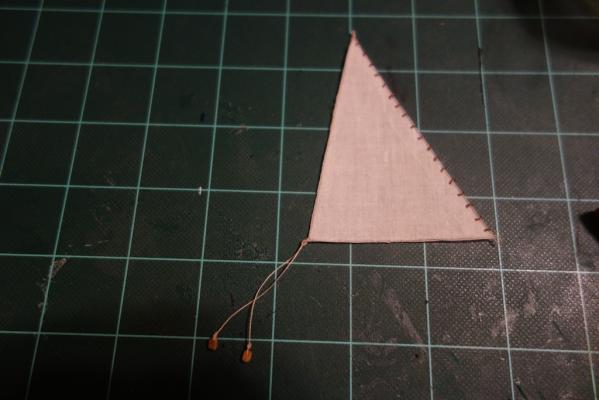
-
Landlubber Mike's technique for furled sails
Landlubber Mike replied to Landlubber Mike's topic in Masting, rigging and sails
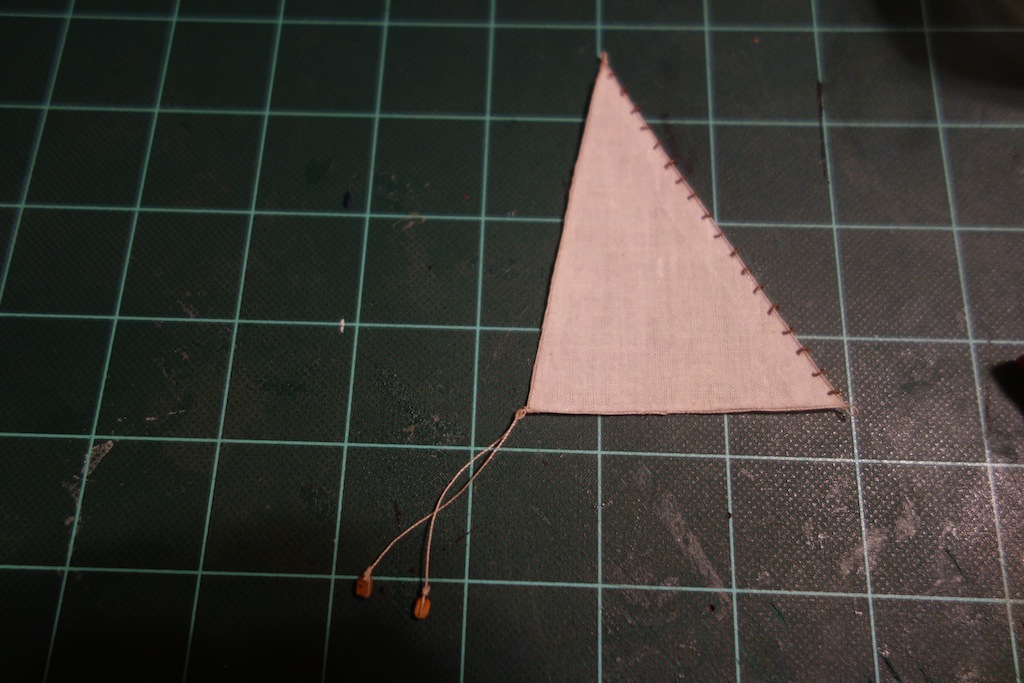
Fore topmast staysail. This sail took a ton of planning as there are a number of ways that these could be installed on a ship - bent to a fore topmast preventer stay, bent to a fore topmast staysail stay, and I think they could also be set flying (no stay at all). Then there was the question of how to run the haliards - single, double, etc. Based on Lees and TFFM, I decided to add a fore topmast preventer stay and bend the sail to it. Not sure if this was 100% historically accurate, but this route helped simplify things a bit as the preventer stay would use the existing bee sheaves in the bowspirit, and the running end would end in an eye and mouse around the mast, rather than have a running end that ended in haliards somewhere down the mast. It also added a sense of symmetry with all the rigging, which is more artistic than anything. Another reason to go with the preventer stay over a staysail stay was that there was not much room to furl the sail as it was given the proximity of the fore stay and fore preventer stay, but using the bees gave a couple of millimeters of extra space. As you can see in the picture below, the staysail is probably only 25% of what the full sized staysail would look like. This was to ensure a tightly furled sail and keep the sail in front of the fore stay and fore preventer stay. Two other things I had to add to the model for the staysail. First, I needed to add a cheek block on the port side of the fore topmast head (I also added one for the jib sail on the starboard side). Second, from Lees, Petersson, and TFFM, the staysail was not laid on top of the bowspirit, but instead was laid on top of a netting between the bowspirit horses. So, I added the horses and a simplified netting run between two staves that the horses went through. I unfortunately don't have a picture of this, but the staysail covers all of it so I didn't go all out with a very detailed netting. After all that, the rigging of the staysail is fairly simple. The staysail is triangular in shape with a peak cringle at the top, the tack at the fore bottom corner, and the clew cringle for the sheet pendant at the aft bottom corner. After threading the fore topmast preventer stay through the hanks on the sail (constructed of beading wire from a local craft store and painted brown): 1. Peak cringle: The haliard (to pull the sail up the stay) is run from the peak cringle up through the lower sheeve of the port cheek block, and belays either to the foot of the fore mast or to a timberhead opposite the after fore shrouds, port side. Also attached to the peak cringle is the downhaul (to pull the sail down the stay). The downhaul is threaded through a few of the hanks, through a block attached to the foot of the stay, and belayed at a port timberhead. 2. Tack: The tack is tied to the cringle. This is the one fixed corner of the sail. 3. Clew cringle: The sheets are attached to the clew cringle, which in turn split into pairs of whips. The sheets go to each side, ending in a block. The standing end of the whips are attached to an eyebolt, run through the block on the sheets, and the running end is belayed to a timberhead (I haven't done this step yet). That's it for the staysail. Next the jib. -
Landlubber Mike's technique for furled sails
Landlubber Mike replied to Landlubber Mike's topic in Masting, rigging and sails
Here are the posts from my Badger log on how I added a furled fore topmast staysail and a furled jib. Before I get too far, let me mention the resources that were of immense help in figuring out what to do: 1. Lennarth Petersson - Rigging Period Ship Models - pictures say a thousand words, and this book really simplifies the mysteries of rigging. Helpful to see the pictures of how the rigging for these sails works, but I would say that it shows rigging for larger ships so, for example, the haliards would be more simple than the block and tackle arrangements shown in this book. Still, very highly recommended. 2. The Fully Framed Model (TFFM) Vol. 4 - This Swan series book is an incredible resource for anyone that wants great detail into rigging period ships. Antscherl compiles a lot of research into this book, with excellent pictures, to help one go step by step. 3. Lees - The Masting and Rigging of English Ships of War - Good detailed historical account and narrative description of these sails and their rigging. 4. Harland - Seamanship in the Age of Sail - Excellent descriptions of the actual mechanics of bending, raising, furling, etc. sails. Very helpful discussion of what went into furling sails, particularly how the sails were gathered and then a "skin" was draped over the entire bundle. The remaining 2/3rds of the book goes into fantastic details on how the sails operated in various conditions, etc. Here are the pictures of where I am now, and I'll set up the next couple of posts to talk about the construction of both sails. Needless to say, for what ultimately looks like rolled up wet tissues, these things took a while to figure out how to construct and to install. But, I very much like the end result, which to me anyway looks better than a ship bare of sails. The staysail needs a bit more positioning, which I will do once the sheet whips are installed.- 89 replies
-
- 14
-