


Landlubber Mike
-
Posts
4,104 -
Joined
-
Last visited
Content Type
Profiles
Forums
Gallery
Events
Posts posted by Landlubber Mike
-
-
Great job! I'm not as into "modern" fighters, but the A-10 has always been one of my favorites. Has that mean, ready to work look. At some point I'm hoping to build a 1/32 version of it.
Congratulations!
-
For us working stiffs in the US, hope everyone is having a nice Labor Day!
Thought I was at the point where I could update the log. Slow and steady progress here. Got the hull and deck items primed and painted. I used Mr. Surfacer 1500 (black) from a rattle can as primer, and then sprayed a coat of Tamiya XF-87 IJN Grey - Maizuru arsenal. I have to say, while when first starting out I enjoyed the simplicity of using Vallejo paints, I'm now just about converted over to Tamiya and Mr. Color. The finish just seems to be nicer, and the spray is more uniform. Plus, Vallejo tends to gum up my airbrush which is annoying, so small price to pay in using thinners to clean out Tamiya from the airbrush which leaves it fresh.
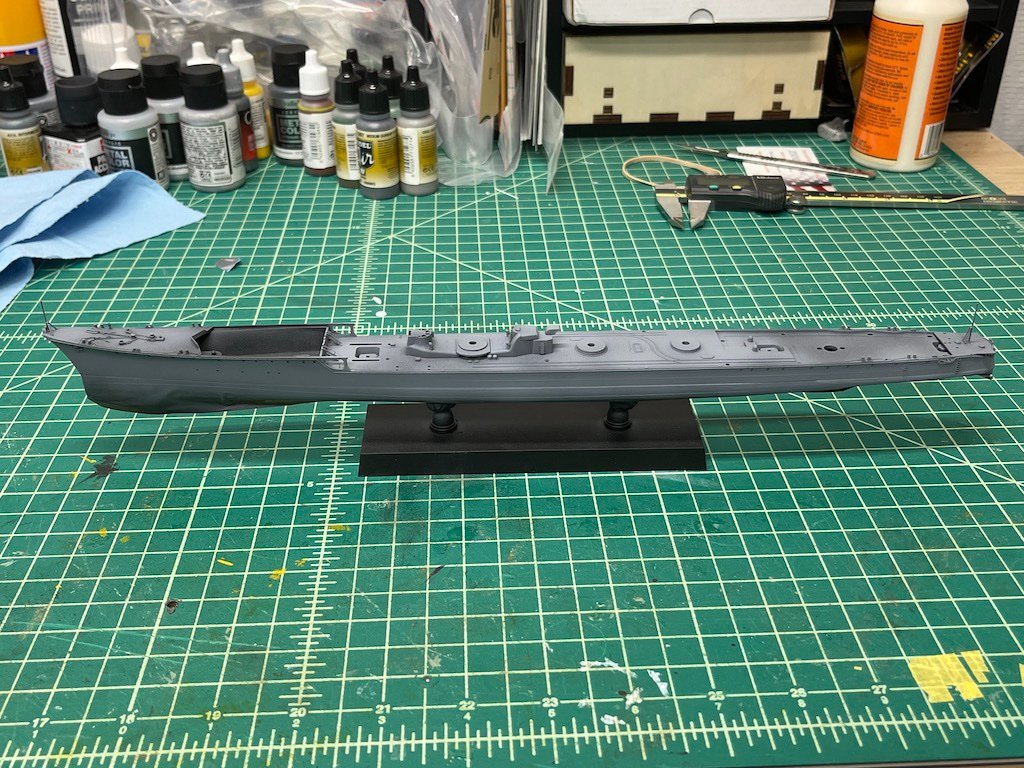

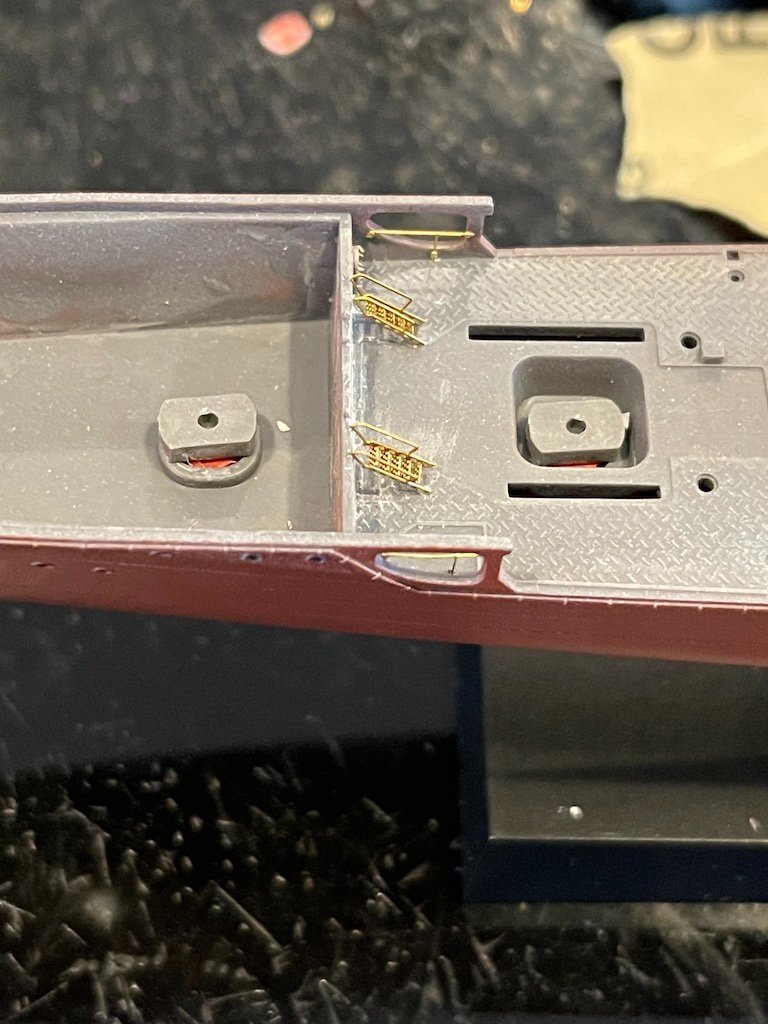
Not a great picture, but here you can see where I replaced the kit molded-in vent on the starboard side with a better looking one from Black Cat:

I'm still trying to decide whether to attempt oil canning effects. It looks really cool, but I'm wondering how much of that effect will be noticeable if in a diorama setting. I may just try it to get experience with it. Looks like a lot of tape to paint the vertical and horizontal lines, but I'm not exactly clear on the technique.
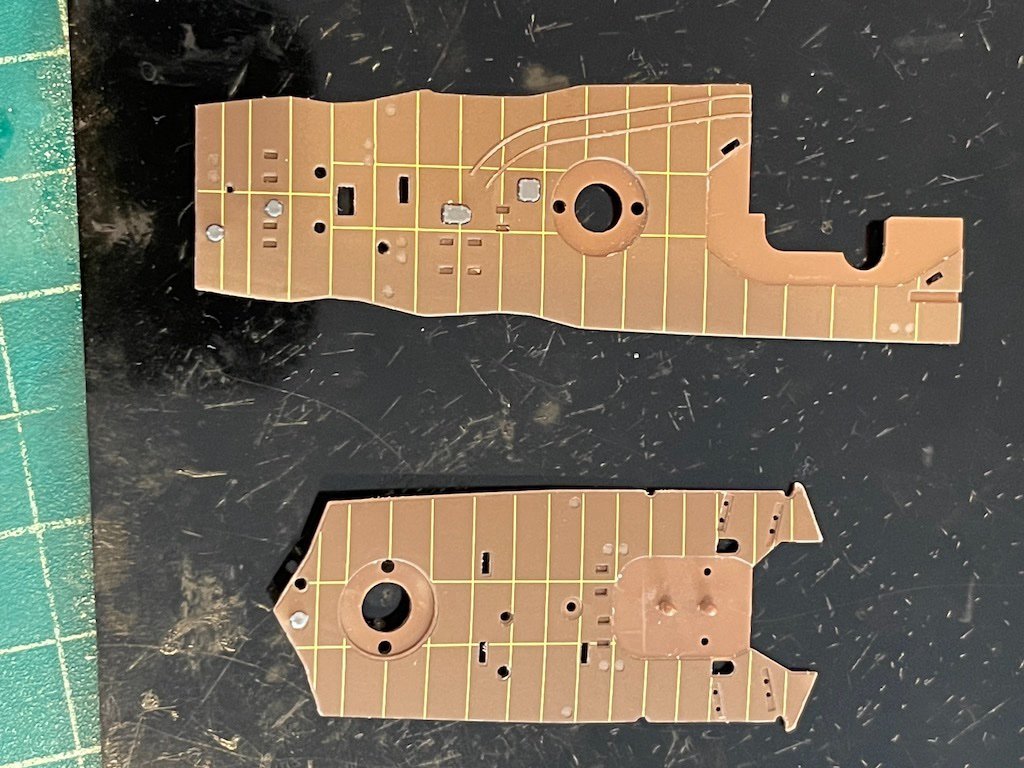
The linoleum deck pieces come in molded brown plastic. The Infini upgrade set has you scrape off the molded brass bars, and replace them with actual brass bars. For this kit, Hasegawa sells a linoleum deck sticker that you attach onto the kit parts after scraping off the molded bars. Since I had the sticker upgrade, I went ahead and used it. It's very crisp looking, and fit like a charm. My guess is that I can add a clear coat to it, and then weather it.
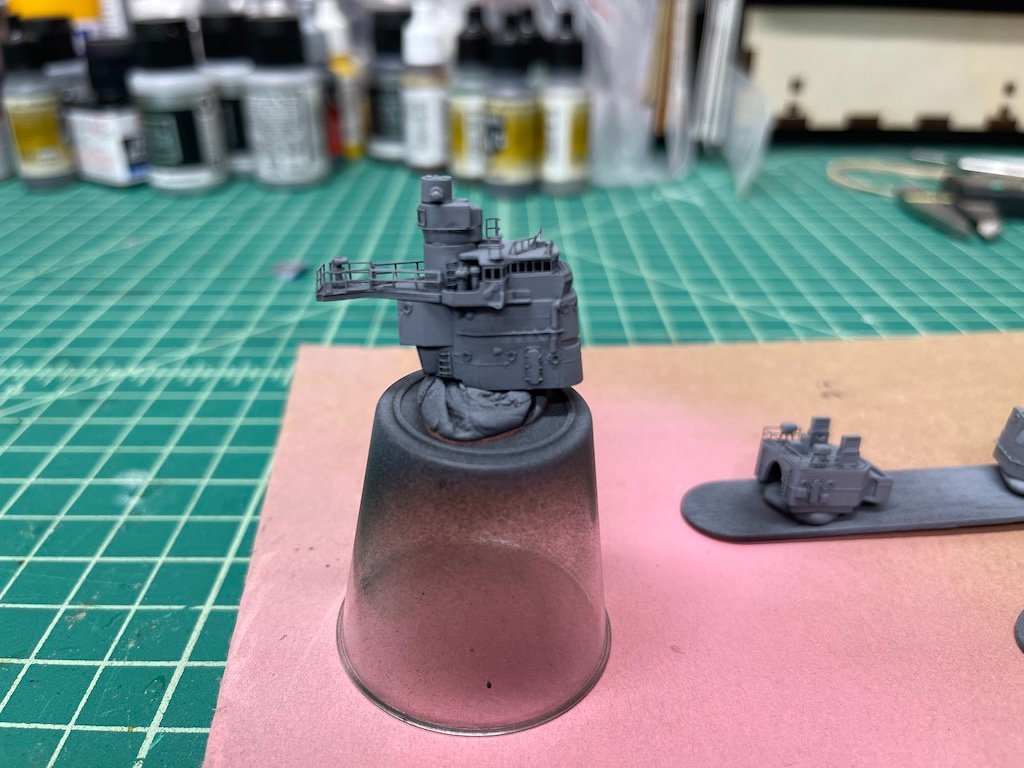
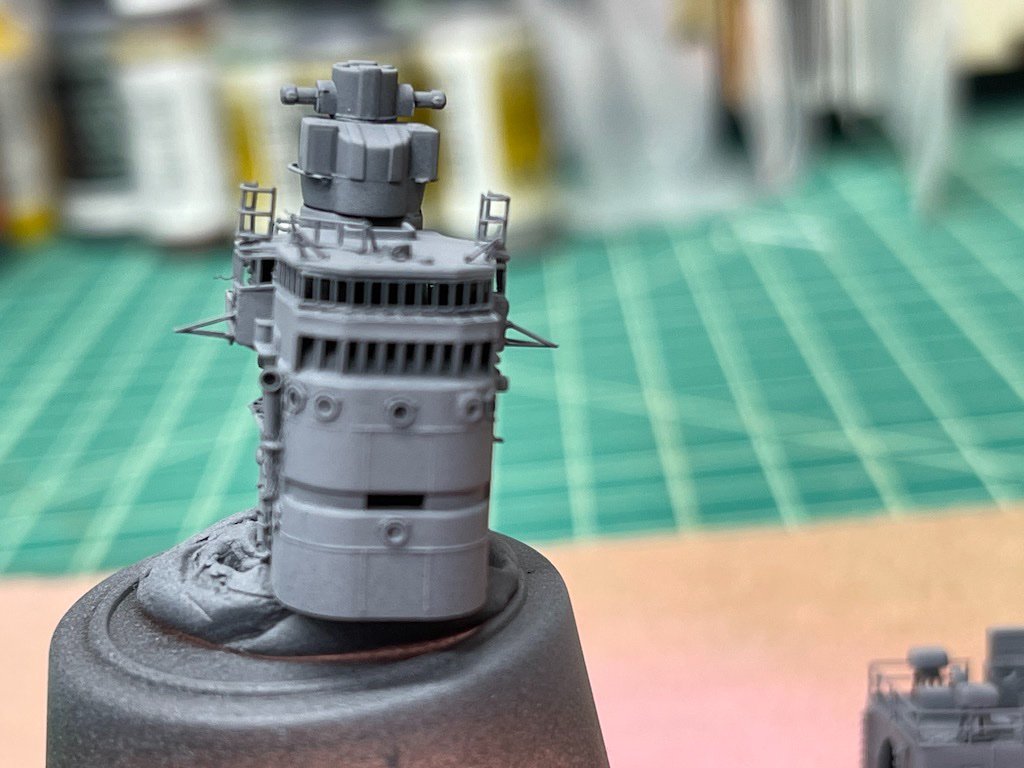
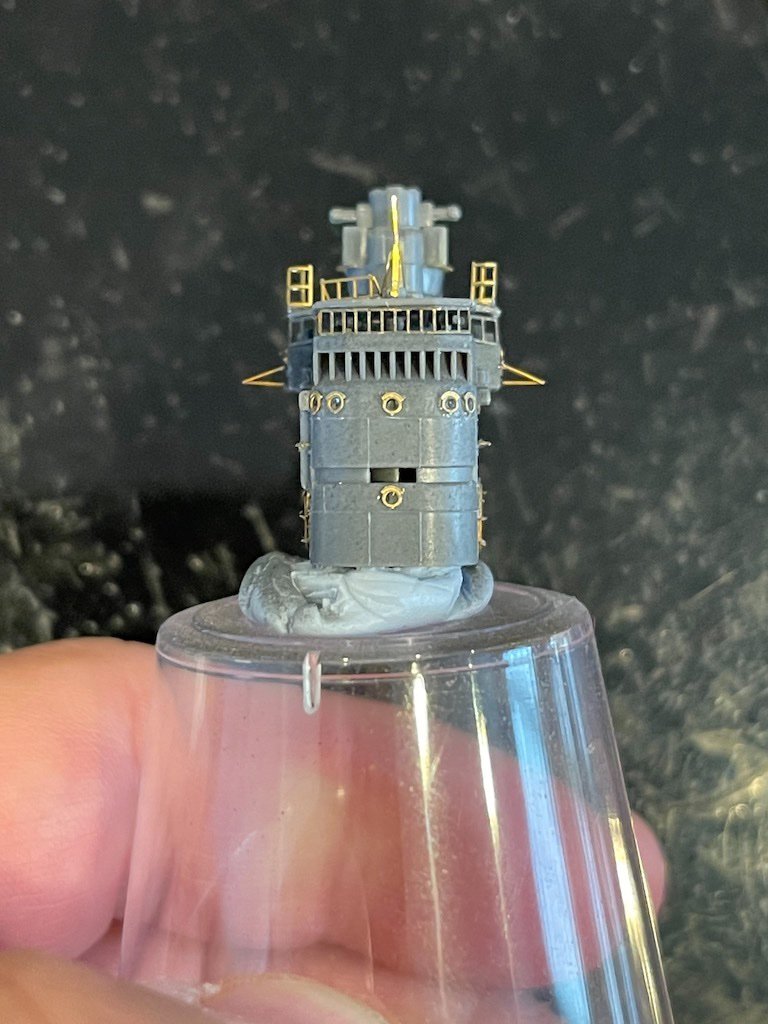
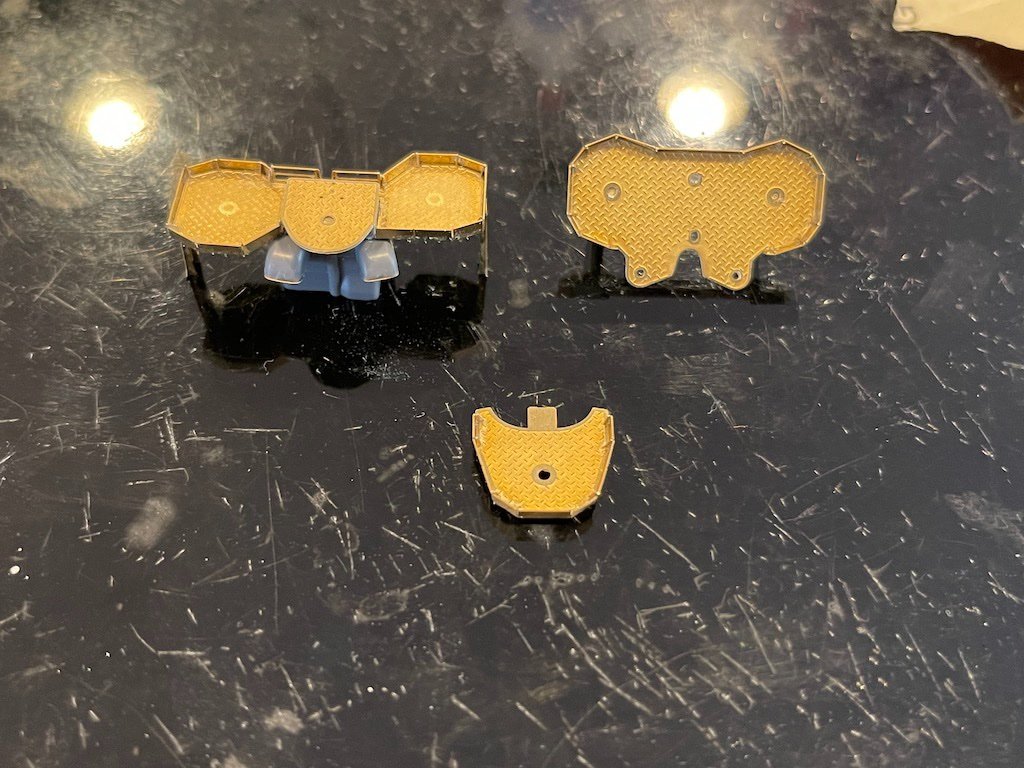
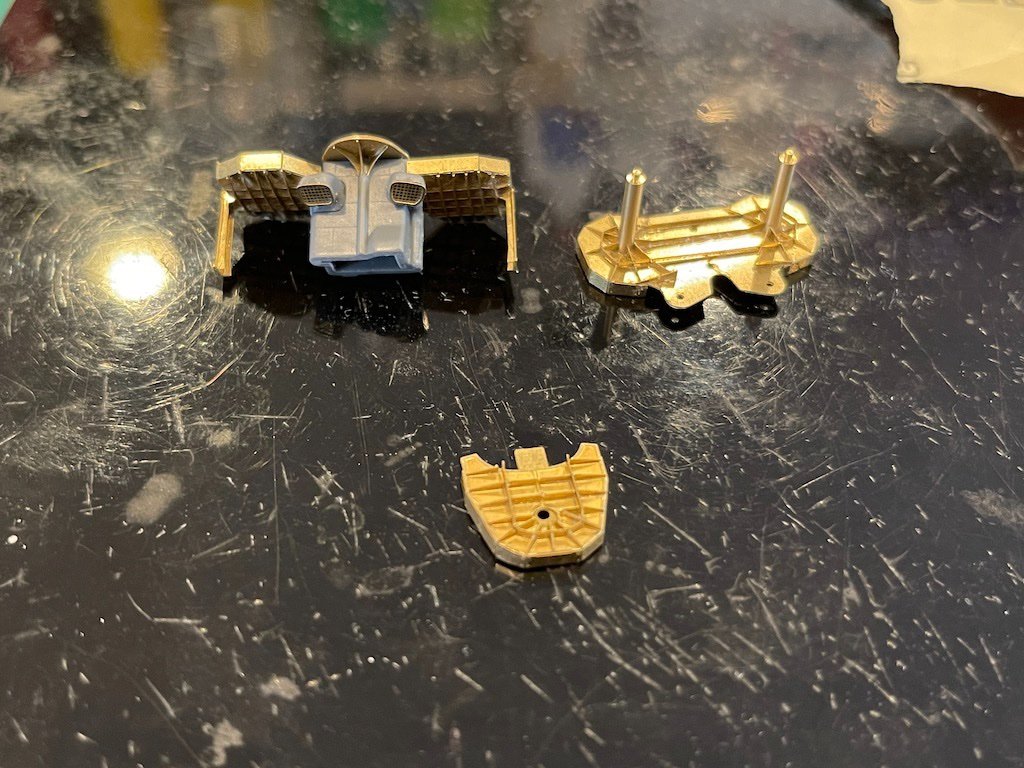
I've also done some work on the funnels. Infini gives you quite a a lot to dress them up, from the rings around the funnels to the ladders leading up them. I'm planning to paint them with the white stripes, which is requiring a lot of planning and steps to get it right. They are halfway done so hopefully I'll have a decent result to show soon. In the meantime, here is a picture of the funnel tops dressed up in the Infini PE. I've said it before, but Infini did a really nice job with this set.
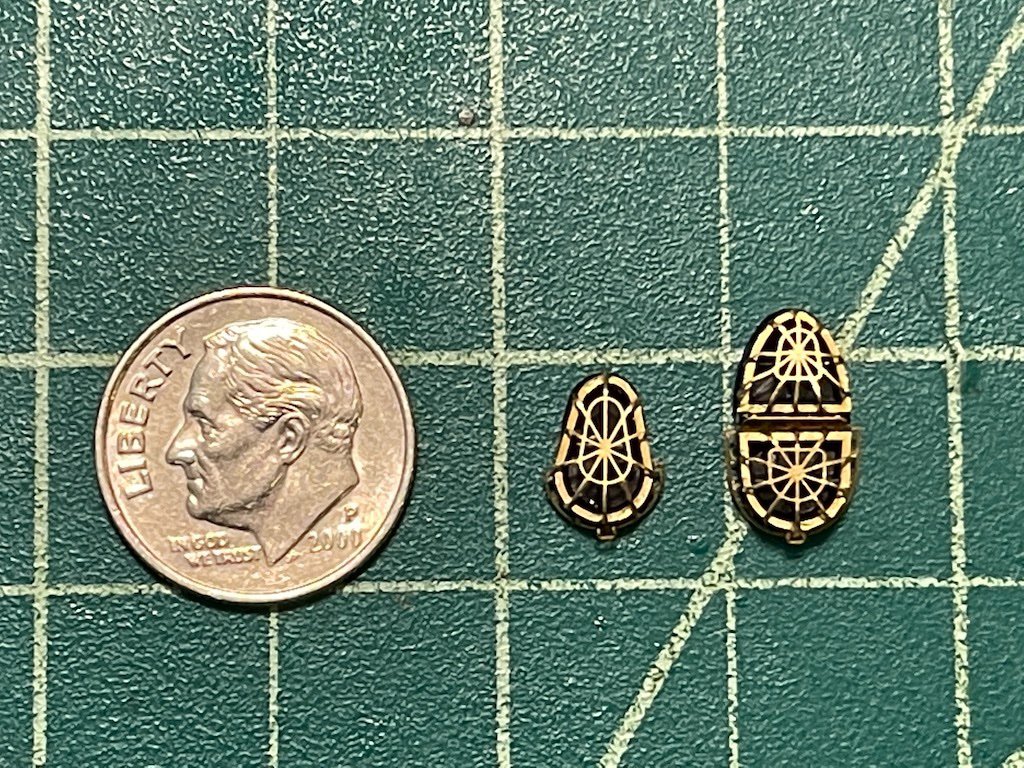
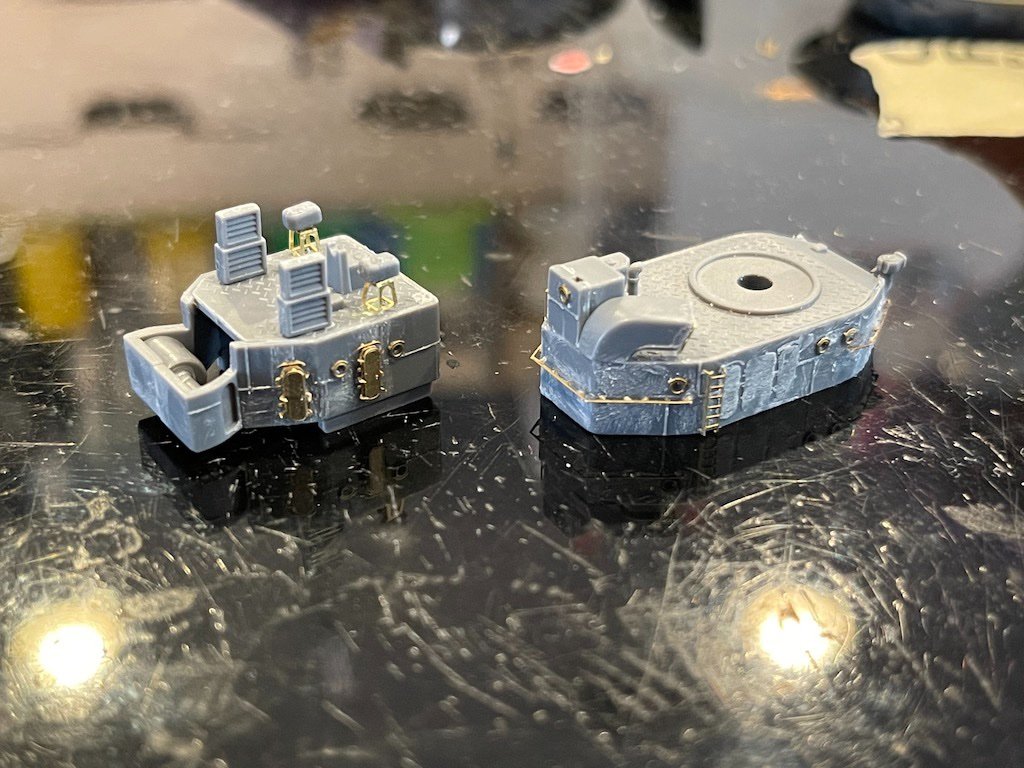
Finally, here are two of the 12.7cm main gun turrets dressed up with the Infini upgrades, shown against the kit part. Quite a lot of extra detail for sure! Next to stairways, which I think I've figured out. railings like this are my nemesis as you have super tiny glue anchor points. The trickiest part for me was to figure out how to glue the top rail, which comes in one piece and extends around the full top, coming down to the front and curving around. Lots of movement had to be worked in, and it's hard dealing with a long PE strip like that. For me, it was easiest to start by gluing the middle of the strip to the back side of the turret, then slowly working each side around. Once the PE is anchored, it was easier to glue the sides down. Even then, gluing the top rail probably involved close to an hour of work on each. In total, there were 13 PE parts per turret, and took me the better part of the weekend to complete. I also made the mistake on the first of sanding off two ridges on the sides, which I thought were the kit's attempts at railings, but turned out they weren't. 🤬 All wasn't lost as I ended up gluing some 0.2mm wire to replace what I sanded off, and they looks like the original thing. All in all, a lot of work and I'm pretty happy how these came out.
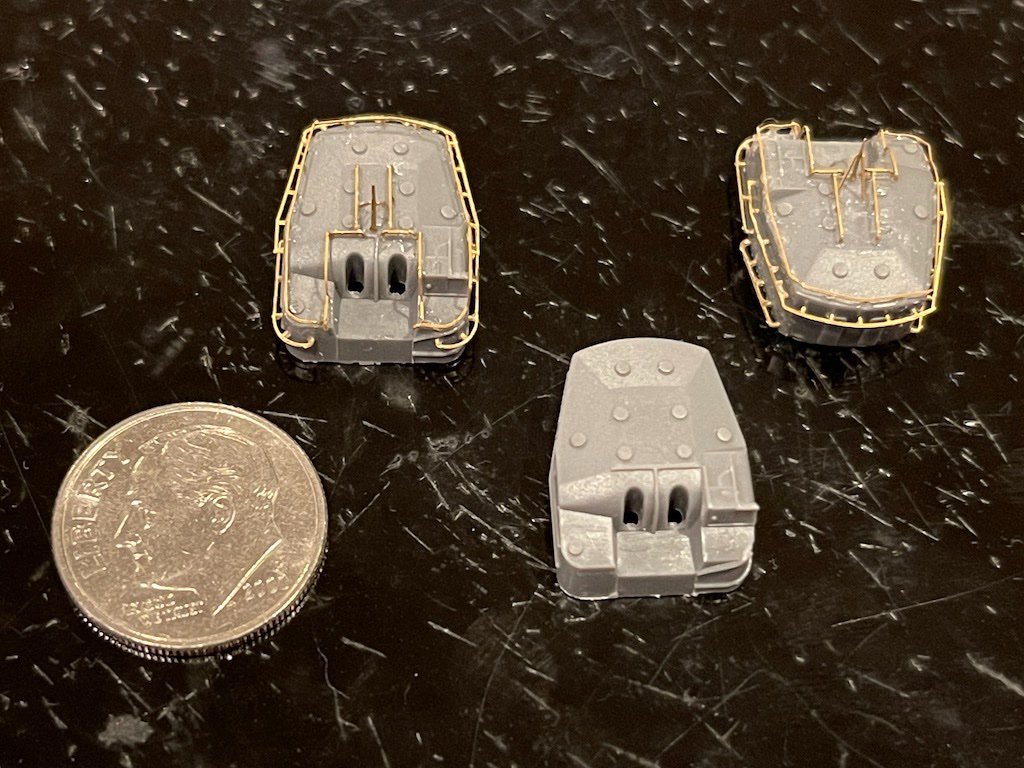
I still have to do the actual guns part. Infini has you remove the guns from the kit part and replace them with nice brass guns. Haven't decided whether to completely assemble the guns, paint gray, and later come through and paint the blast bags white, or paint the turrets and the guns separately, then assemble. I find it can be tricky painting white over very dark surfaces, which makes me lean towards painting them separately then assemble them.
Thanks for looking in!
-
On 8/5/2021 at 9:39 PM, Egilman said:
Cool! I'm glad he did change his mind, He makes a good product I would definitely second the motion to get masks from Kenny.... They ARE worth it....
Interesting - I reached out to him earlier this year for masks for my Gambier Bay and he said he was out of that business. May have to try him again.
-
Nicely done! Looks really great! Good tip on using a practice bottle. Very smart!
Looks like you just fit in the main mast. Mine was a touch tight but yours looks great.
-
Wow, good luck! Did you build those?
- thibaultron, lmagna, Canute and 2 others
-
 5
5
-
Sorry about the paint issues

If you have Netflix, there is a show called Car Masters - Rust to Riches which is a sort of reality show following Gotham Garage. They did a replica of the Futura in the first season I believe.
- thibaultron, lmagna, Canute and 5 others
-
8
-
-
-
-
1 hour ago, CDW said:
Great find - I have one to build!
Do you have the Hasegawa kit or one of the others (Fujimi might make one). Infini makes very detailed sets for all of them.
If you have the Hasegawa set, did you get the lineoleum deck stickers add-on? I haven't decided whether to go with them or not. They have the brass floor bars already painted on. Infini has you sand off the kit bars, and attach PE bars. Seems like a ton of work, and tricky to get right when it comes to gluing them on (before painting? after painting?). I thought the brass bars might be raised a bit too high and out of scale, but the bars are actually fairly prominent:
- Egilman, popeye the sailor, lmagna and 3 others
-
6
-
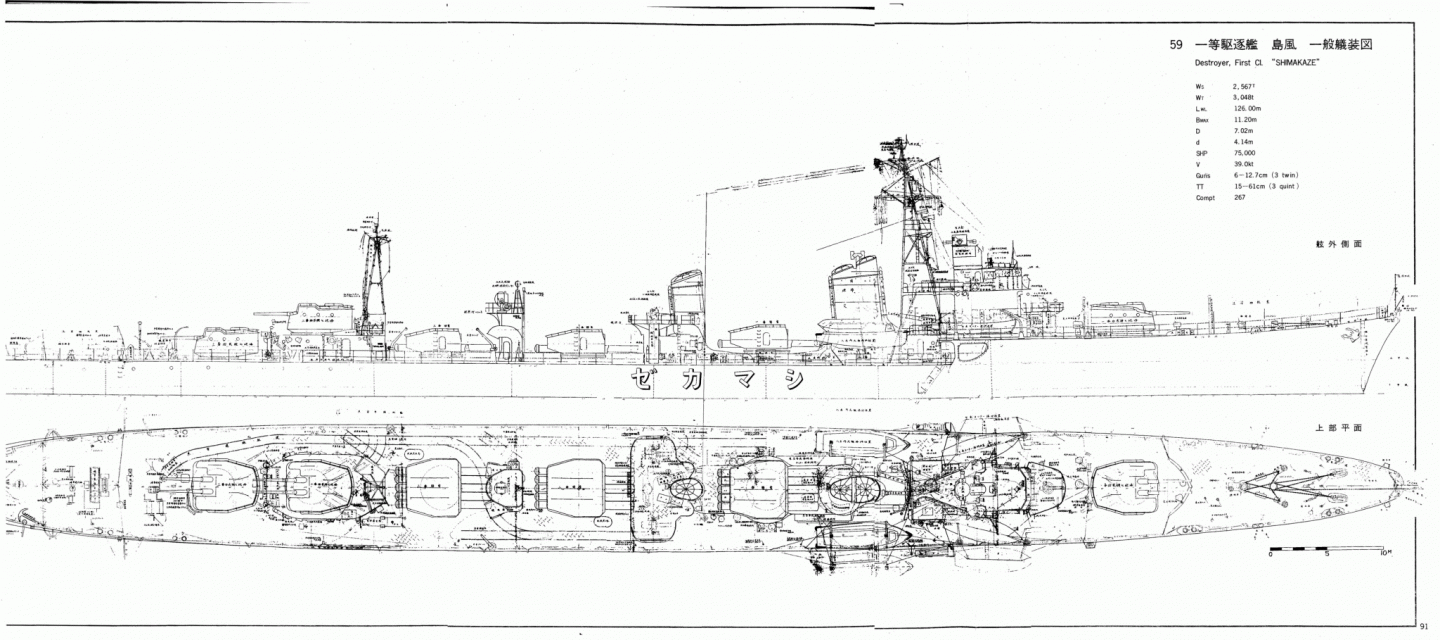
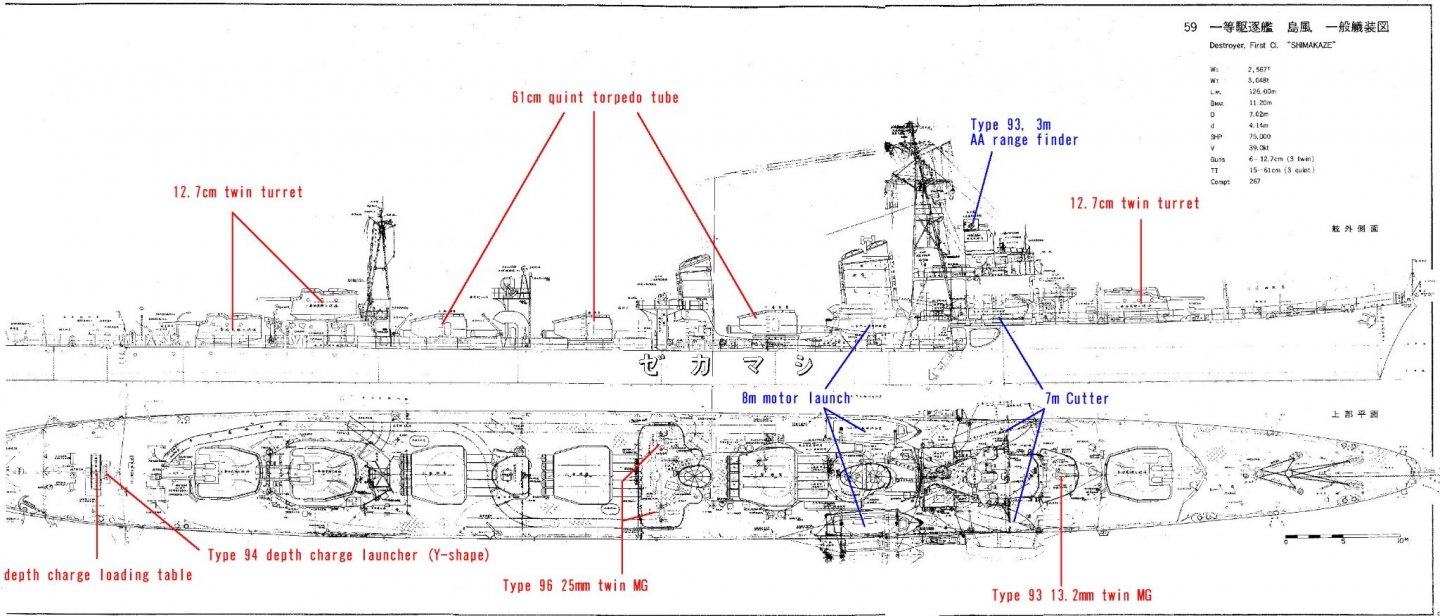
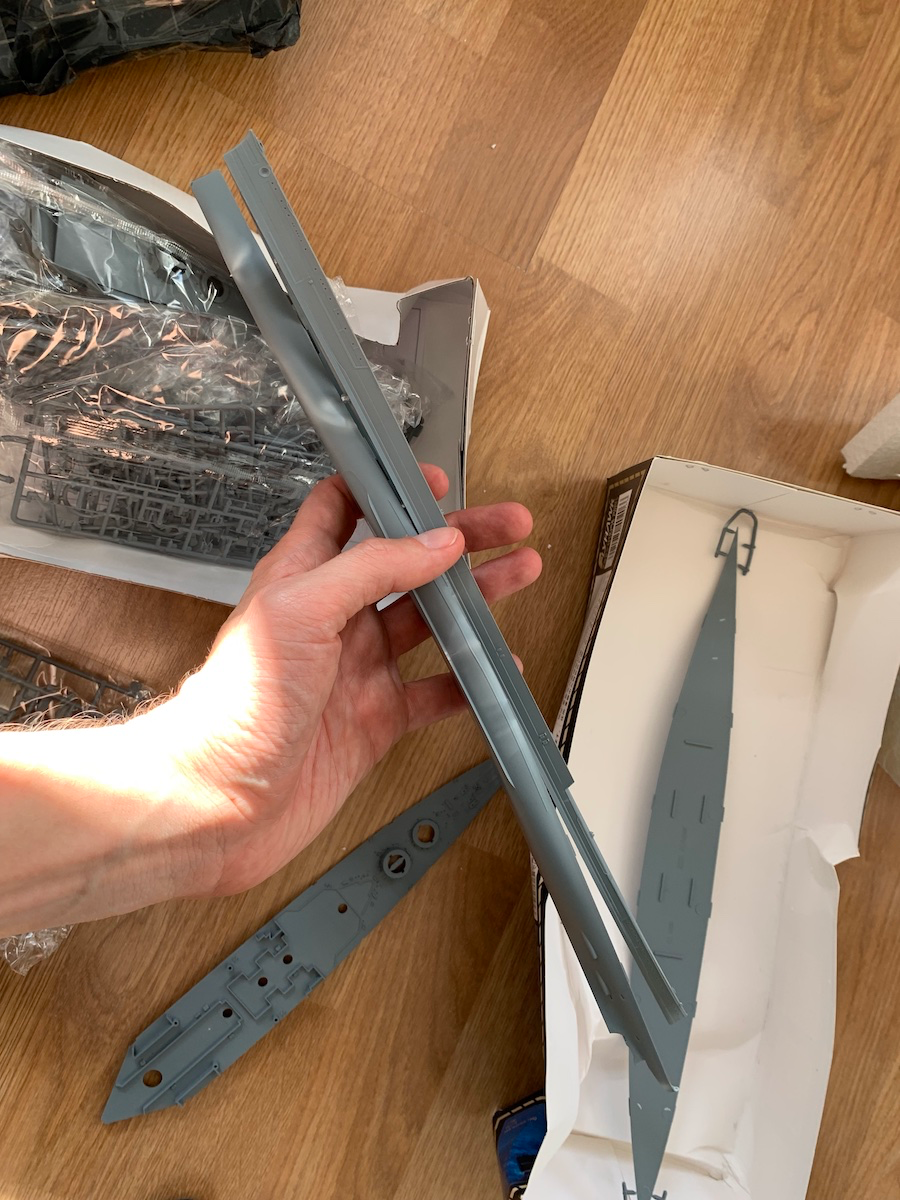
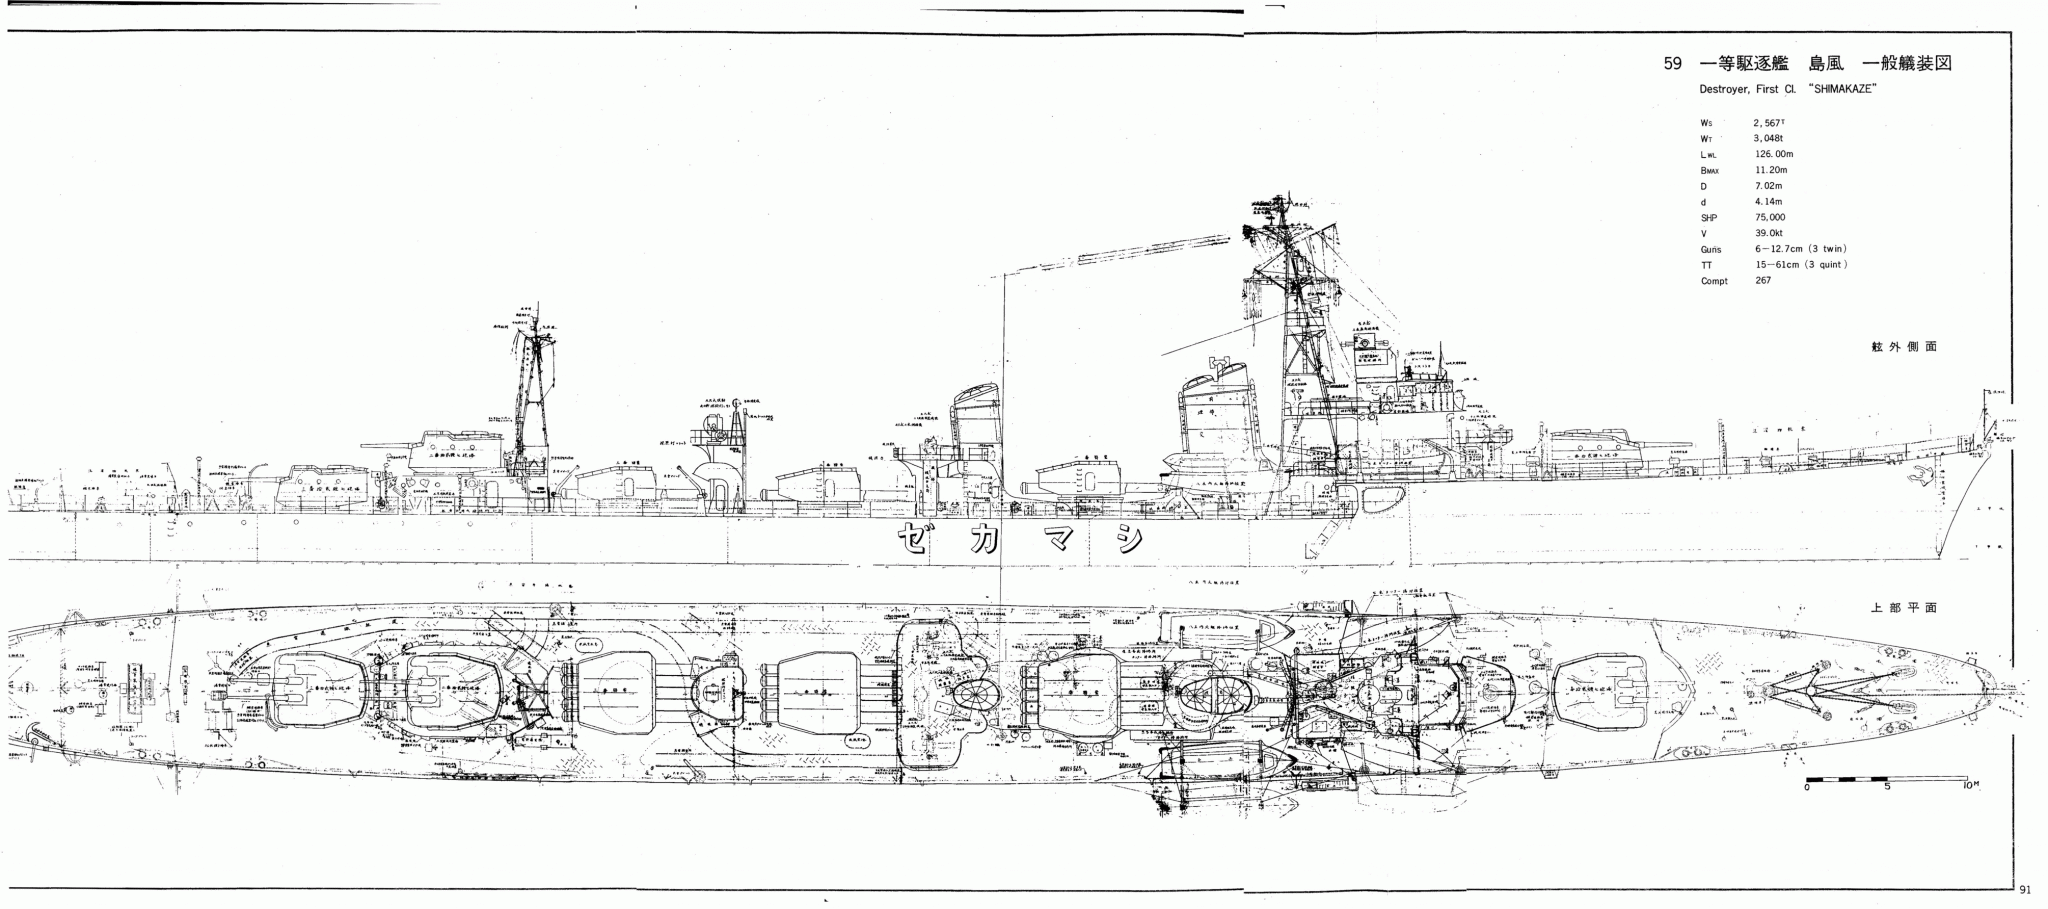
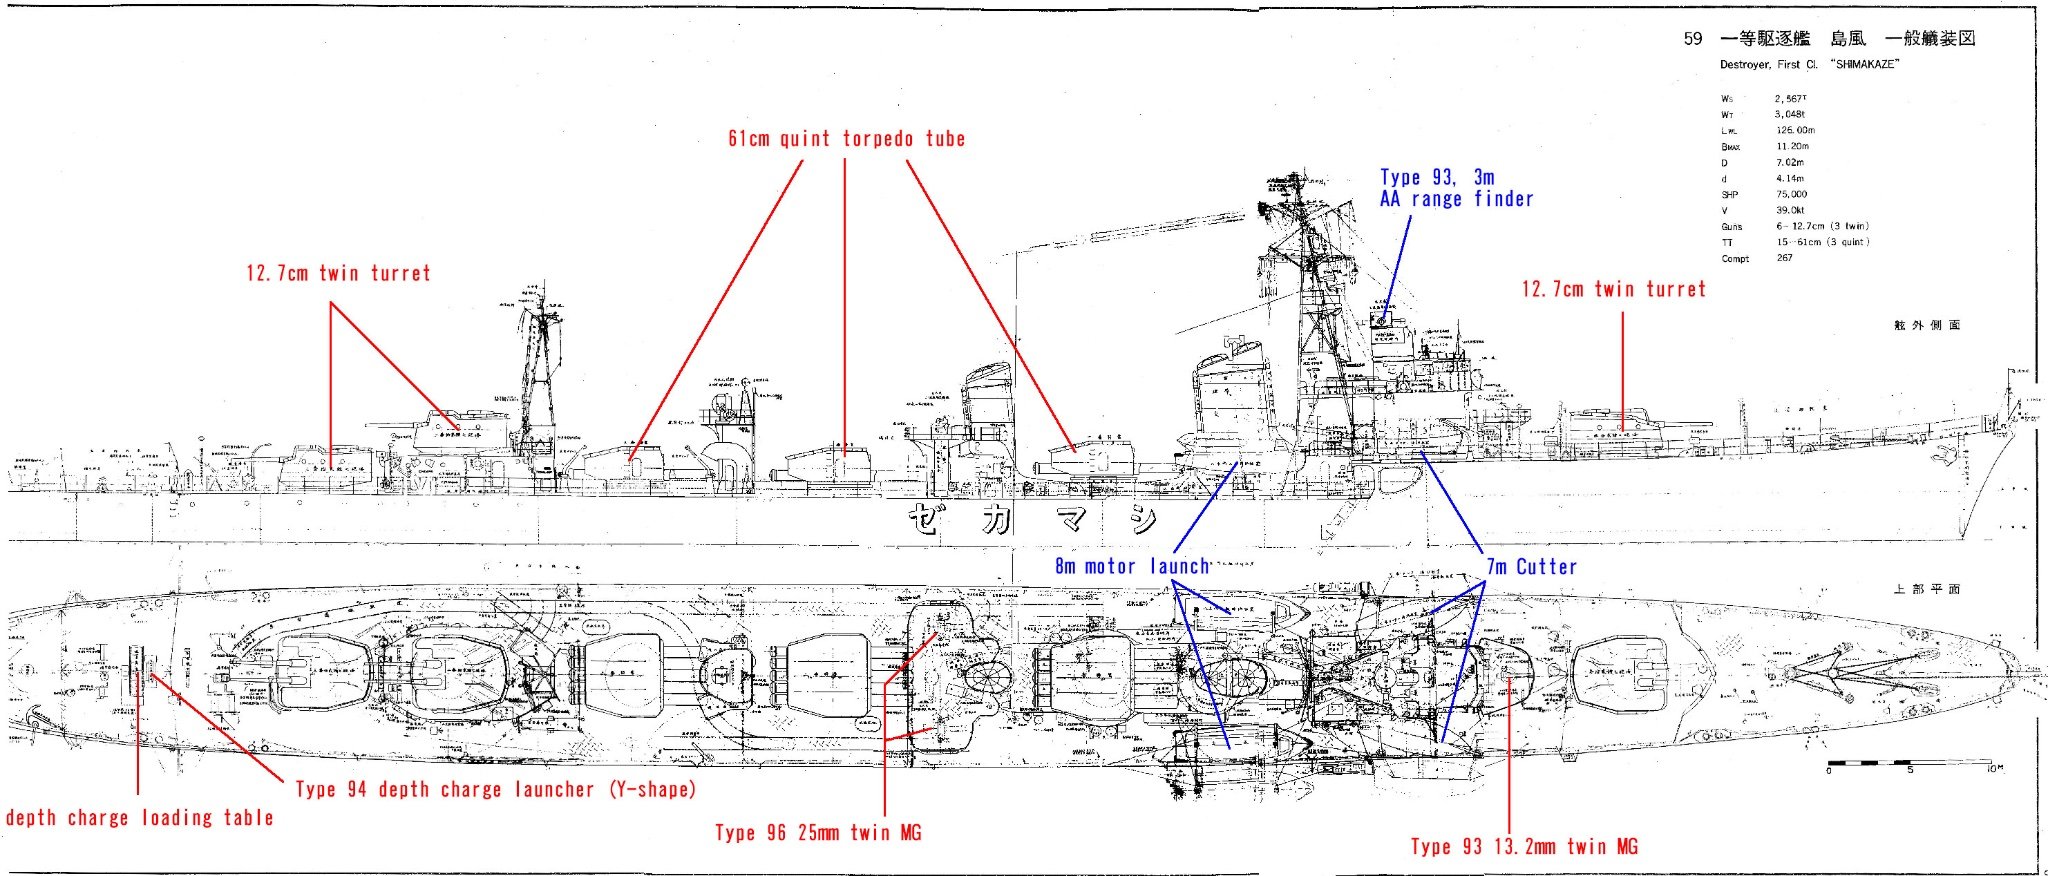
In case anyone is going to build the Shimakaze, I found some blueprints for the ship online:
- Hsae, lmagna, popeye the sailor and 7 others
-
10
-
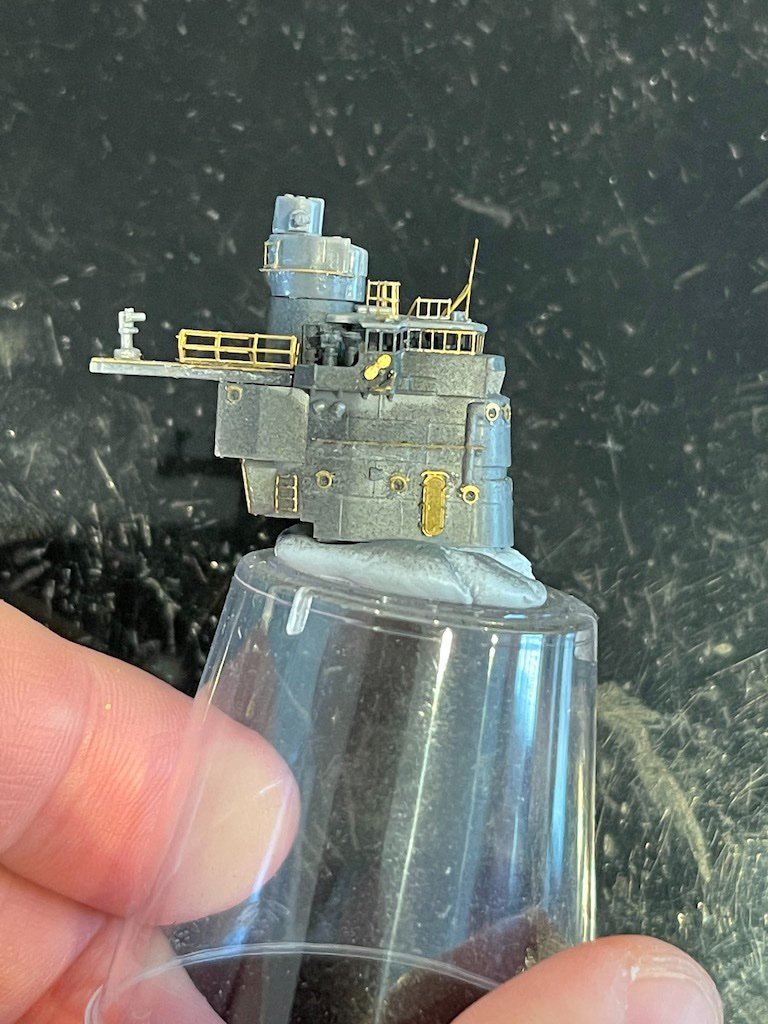
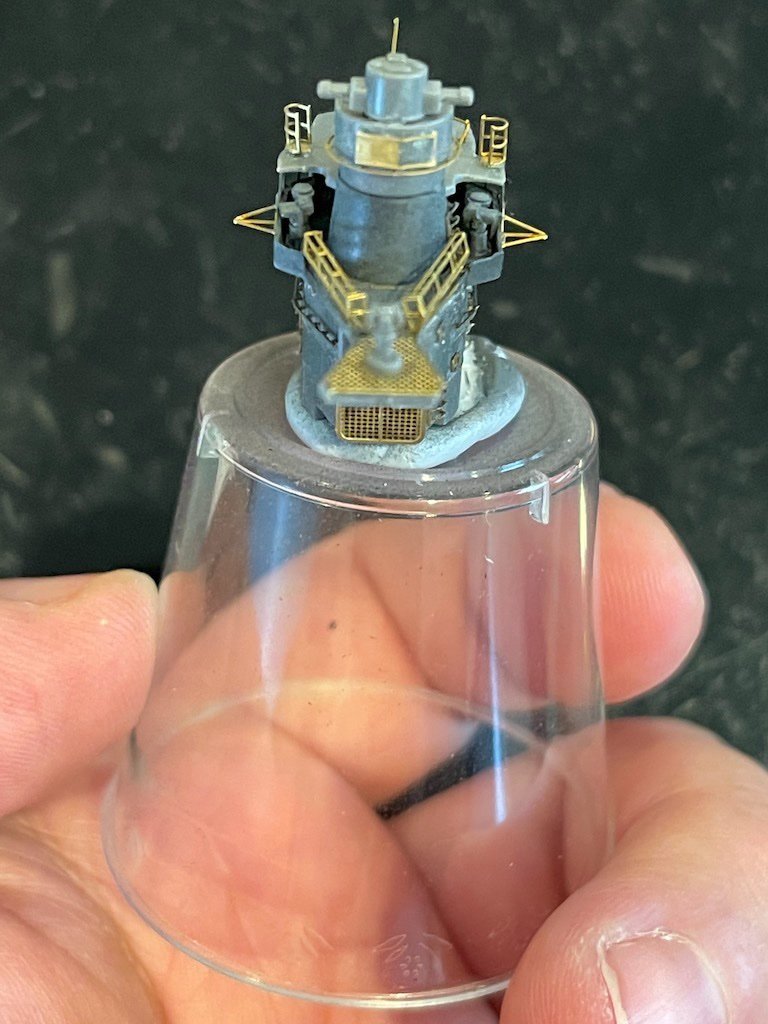
It's been a while, but thought I should update the build log. I've made slow and steady progress, and am just about at the point where I will paint the hull. I'm mostly using the Infini upgrade set, but in some cases, the Hasegawa PE set offers details not in the Infini set or that seem a little better. Took a while to sort out things out as to what I'm going to use, and the timing of when to use it (Hasegawa's instructions have you build things a bit differently, but maybe they aren't expecting one to paint, weather, etc.).
I made a few modifications to the hull, adding aftermarket brass bollards, capstans, etc. The kit ones weren't too bad, but I thought the brass items offered a little more definition and crispness. I also noticed in the two build books that there was a small vent on the starboard side of the bow. I managed to find an aftermarket set of extra vents from Black Cat that I added as well.
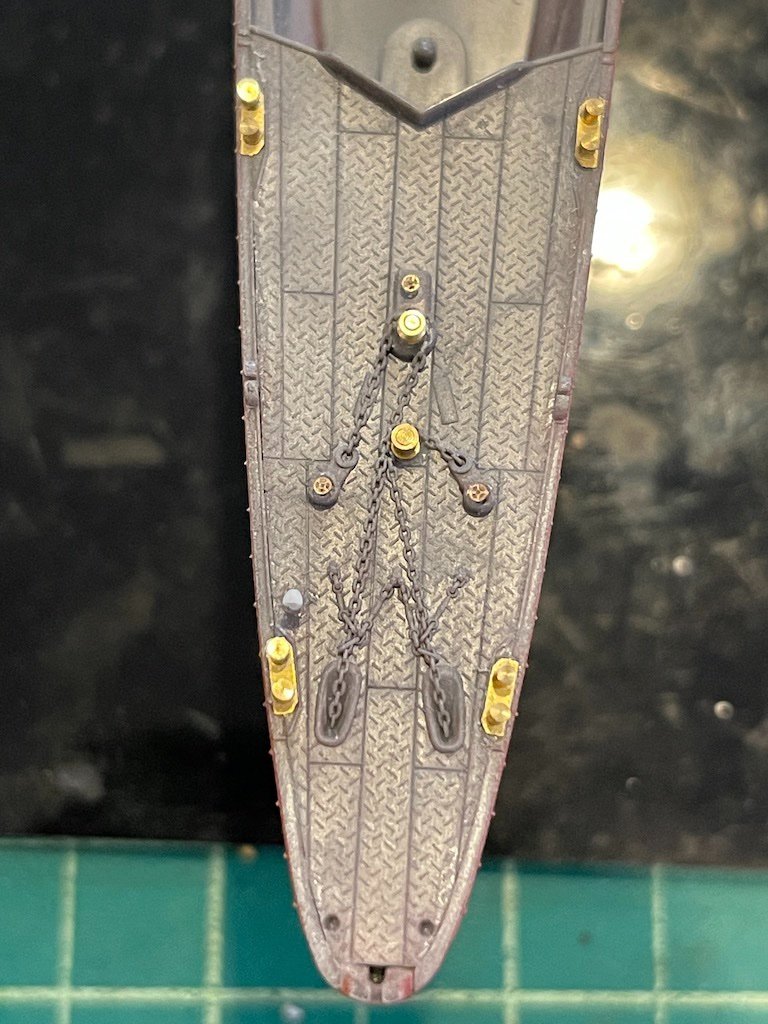
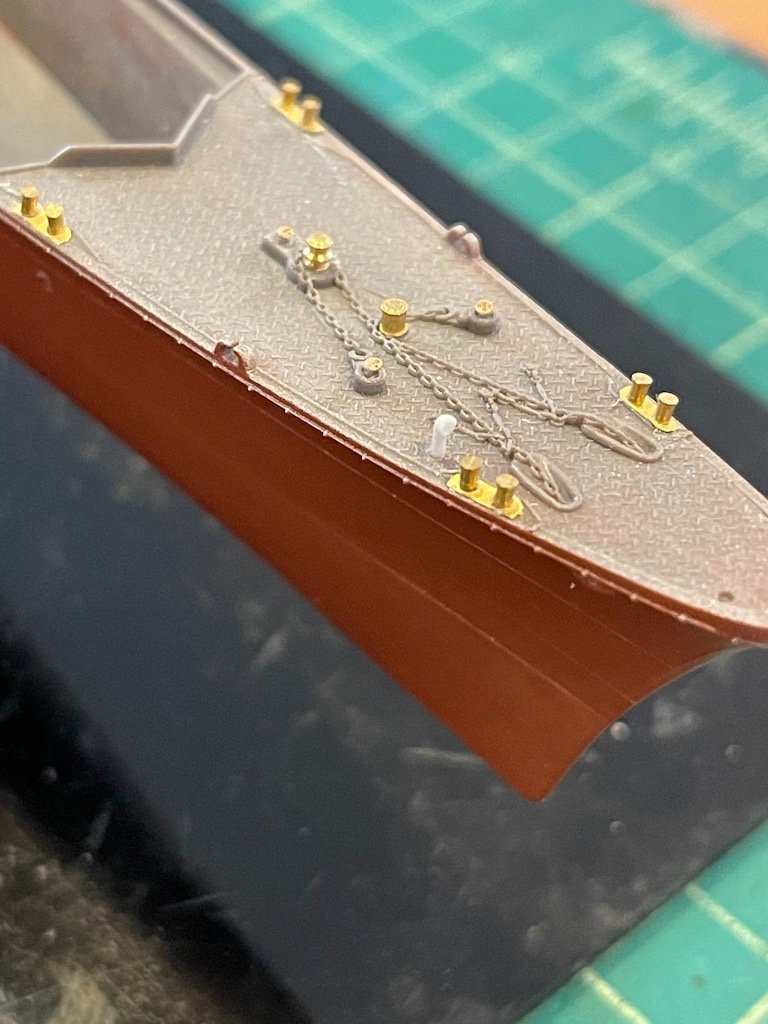
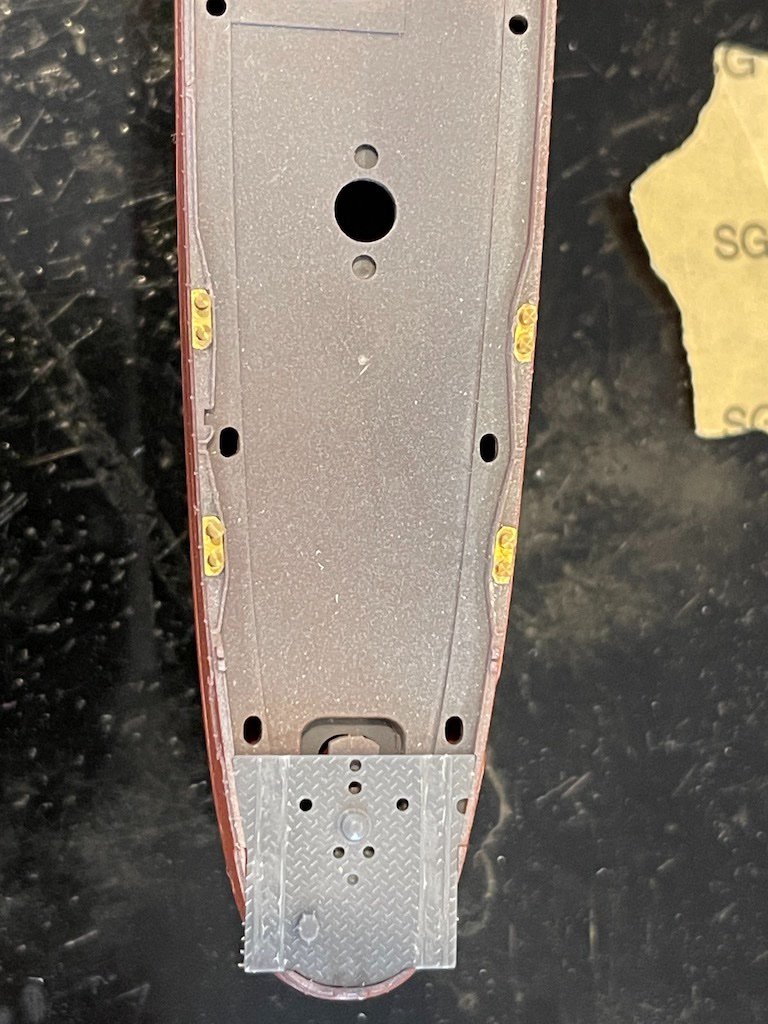
Also added some other PE details here and there that I aded to the hull. I messed up the first set of Infini ladders, but found another Infini ladder set that gave me the replacements I needed.
I also added PE to a number of the deck structures. I have a few other details to add to the bridge it looks like from the Hasegawa set. I'll probably also replace the side vent on the bridge, which seem awfully squished, with the Black Cat vents.
I have a few ladders and other add-ons to put on the hull, and then will paint. I want to get as much done on the hull as possible to avoid having to glue on things later and address excess glue. Of course that means I need to be a little more careful handling the hull, but I picked up a hull cradle that might give a little extra protection.
Thanks for looking in!
-
Looks really great Glen. Love the details you added. Good luck on the next part of the build!
-
Another beauty Craig, fantastic job!
- Ryland Craze, Canute, mtaylor and 2 others
-
5
-
Those masts are really nice. In a lot of the upgrade sets from places like Five Star, etc., the sets are very detailed but usually don’t include brass mast replacements so you’re stuck with the out of scale plastic. Infini and others do sell brass masts, but good to see that they were included in your set.
- lmagna, Old Collingwood, Canute and 2 others
-
5
-
On 8/8/2021 at 8:15 AM, Hsae said:
The best glue at this time is “thin” and “rubberized” super glue. You can clean it up with a brush and Cyanoacrylate remover.
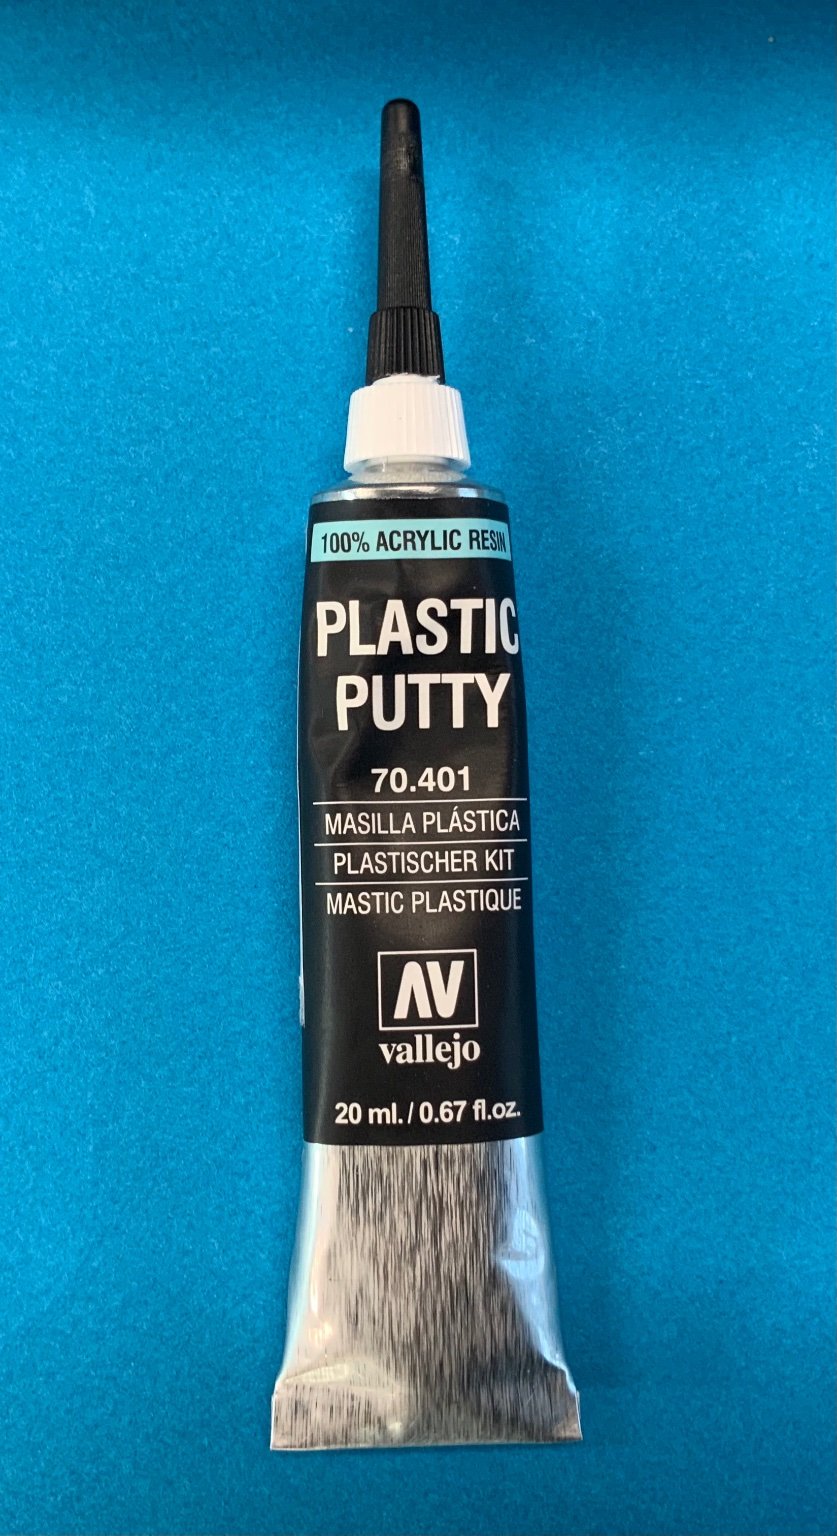
Also I discovered a nice putty, Vallejo Plastic Putty. The excess can be easily removed with a brush and water. Excellent for filling small gabs.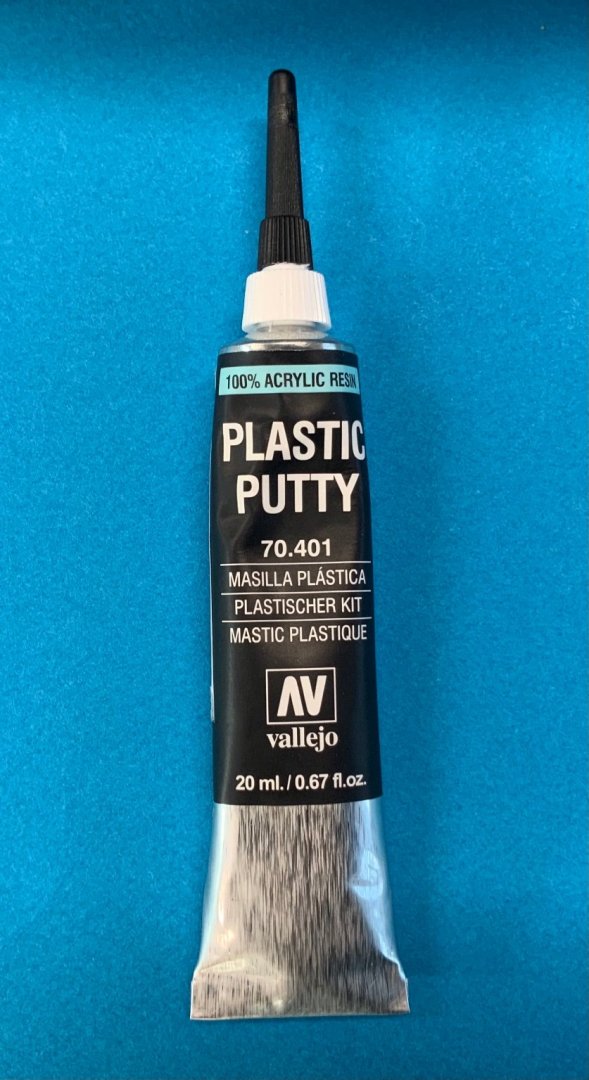
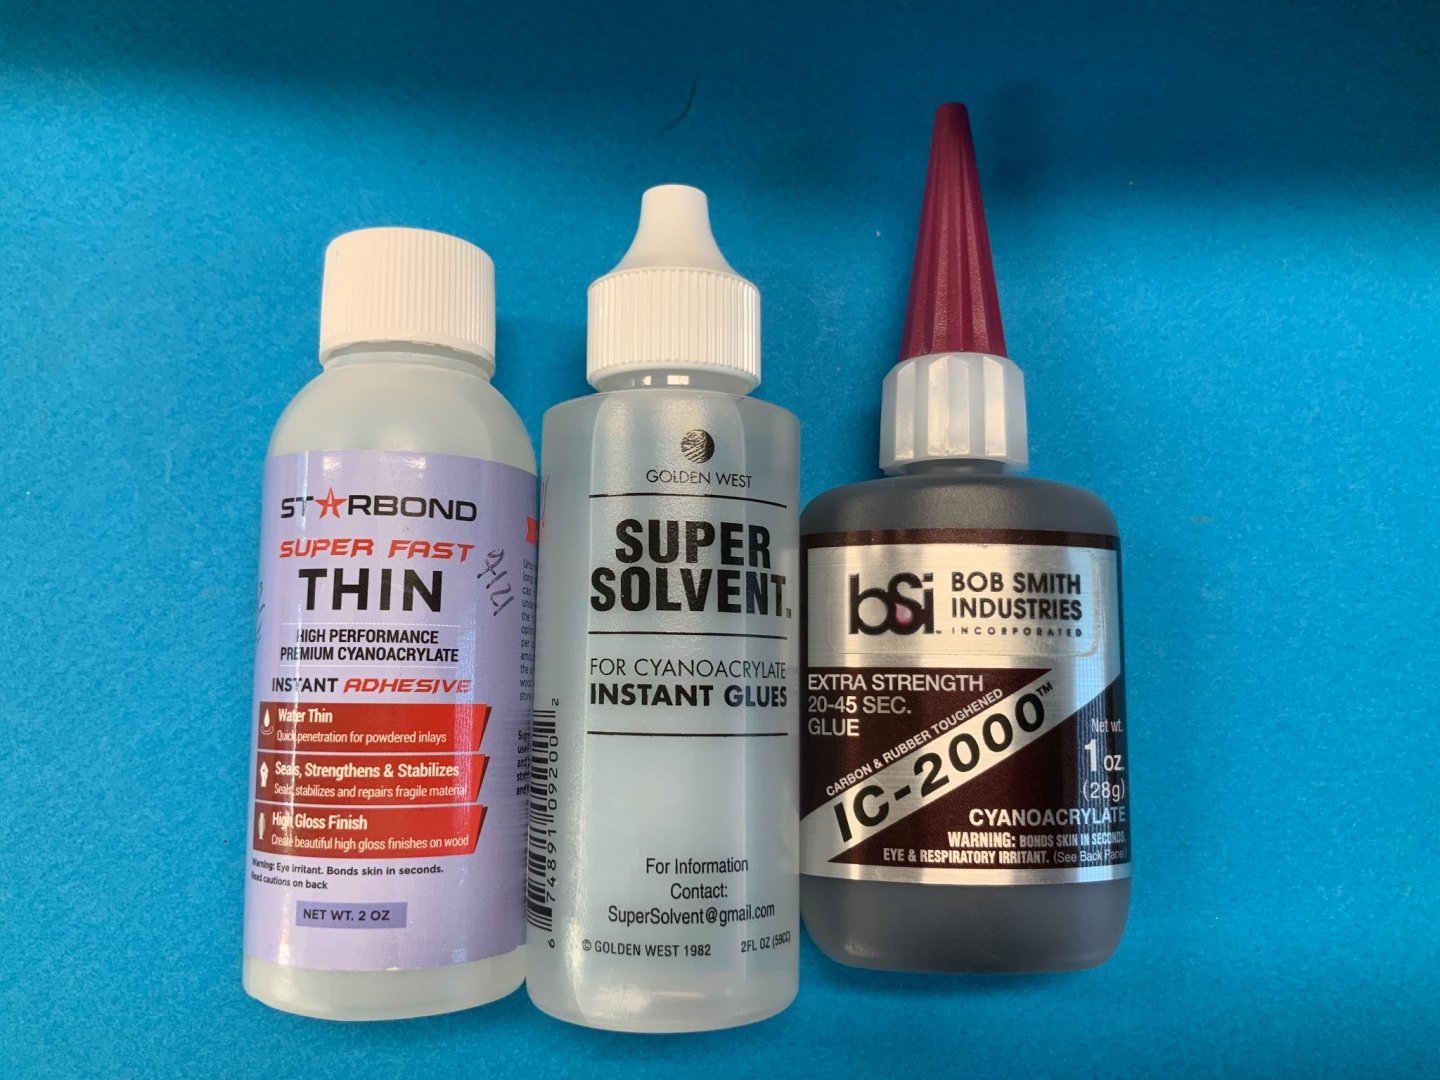
Does that solvent impact the styrene at all? I’ve always been a little nervous about using something like that to remove excess CA. Usually I just scrape it off.
-
On 8/4/2021 at 9:18 PM, Old Collingwood said:
Watch out for the fraying - I painted mine over with PVA first, before trimming.
OC.
When I did sails on my Badger, I used this anti-fray product from Aleene. It’s probably a diluted white glue that dries clear. Paint it on the edges, then you can cut them out with scissors, etc. Worked really well.

- king derelict, Canute, lmagna and 1 other
-
4
-
I thought I’d get a lot of modeling done this summer but I’ve actually gotten little done. Summer can be busy!
Your Mikasa looks fantastic and your PE work is really impressive. I have one of the 1/700 kits with Infini detail set. Seeing all the details on your build, I have a sense of what I’m in for.
I think I said this earlier, but I think the Mikasa is a really beautiful ship. Your model is looking spectacular.
- popeye the sailor, Canute, mtaylor and 1 other
-
4
-
-
Looks great Alan. So much detail in the superstructure which is probably only 1.5” high at the most? Great work!
- popeye the sailor, CDW, lmagna and 2 others
-
5
-
Amazing work Chris! I can’t believe they are paper models, fantastic!
-
Another masterpiece Bob, well done!
-
-
Nice job! Even more amazing that it's scratch built.
- GeorgeKapas and mtaylor
-
2


HMS Sphinx by myxyzptlyk - Vanguard Models
in - Kit build logs for subjects built from 1751 - 1800
Posted
Fantastic job! I have that bending tool from Micromark as well, and it's quite good. Sometimes the Micromark stuff can be crap, but this one is well built and I found it to be very helpful.
Love your alias as well 👍