HOLIDAY DONATION DRIVE - SUPPORT MSW - DO YOUR PART TO KEEP THIS GREAT FORUM GOING! (Only 13 donations so far - C'mon guys!)
×


Piet
-
Posts
3,568 -
Joined
-
Last visited
Content Type
Profiles
Forums
Gallery
Events
Everything posted by Piet
-
 Holy chiwawa Kevin, that's one big and beautiful ship you gat there, even with a wonky main mast Great progress mate. Cheers,
- 1,319 replies
-
- 1
-

-
- caldercraft
- Victory
- (and 1 more)
-
Gorgeous, awesome, beautiful, wonderbaarlijk. Congrets with the finished product! Cheers,
-
Outstanding work Omega, just a beautiful jewel! Cheers,
- 120 replies
-
- 1
-
-
- mystic
- motor yacht
- (and 2 more)
-
She's beginning to look ship-shape Popeye. Nicely done. Cheers,
- 956 replies
-
- 1
-
-
- andrea gail
- trawler
- (and 1 more)
-
Ah yes, Kevin is back working on the great ship Victory! Mast is looking mighty fine, Kevin. Cheers,
- 1,319 replies
-
- 2
-
-
- caldercraft
- Victory
- (and 1 more)
-
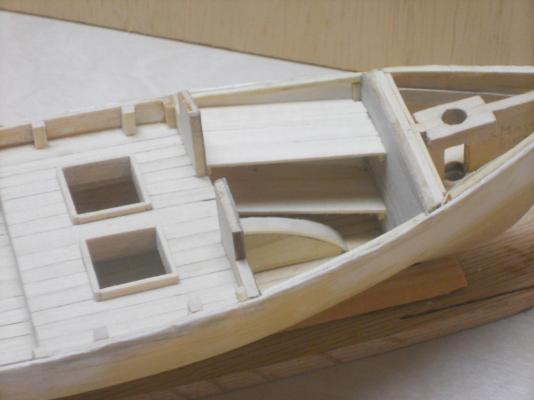
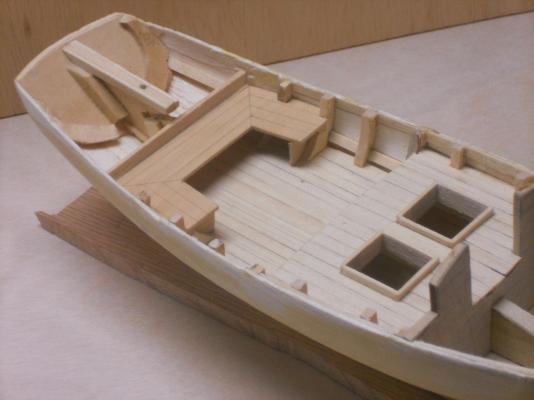
Hello everyone, I trust all y'all had a great holiday. I finally finished the dinghy for my O19 submarine model and can spend more time on this little boat. In between jobs I managed to finish the cockpit seat and installed it. I'm now moving forward and started on making the bunks for the little cabin. The lower bunk is all glued in but the top bunk still needs to be finished. I'm holding off with that one till I have scrounged up "stuff" for the mattress and bedding materials before I can glue the top bunk in for excess to the lower bunk. I still need to stain the bulkhead planking before I can finalize the bunks. I don't know yet about other furniture beside a table. A stove would be nice but I need to think about that one. It would pose a real fire hazzard and we need to put some asbestos heat shields in OSHA and the EPA will not be happy with that idea I also made the gudgeons and pintles for the rudder today but need to wait with installing the rudder till the cabin interior is finished. That'll be the last thing to do before I can put the deck on. Here are a few picks of the work so far. I made lockers under the benches to stow "stuff" in. Perhaps not standard equipment, having two bunks but I figured - why not. I plan to add 2 mm to the cabin roof to give the top bunk a little more headroom Cheers,


- 176 replies
-
- 11
-
-
- muscongus bay lobster smack
- Midwest Products
- (and 1 more)
-
WOW, I'm overwhelmed by the many likes, thank you all! Thank you George, Wacko Joe, Kevin, Jan and Omega for your very kind words. Cheers,
-
Fantastic job Omega, she looks just splendiferous! Cheers,
- 120 replies
-
- 1
-
-
- mystic
- motor yacht
- (and 2 more)
-
Thank you Popeye and Gwen and I also wish you and all yours a very meaningful holiday and a healthy, prosperous 2015. Cheers,
- 176 replies
-
- 2
-
-
- muscongus bay lobster smack
- Midwest Products
- (and 1 more)
-
Fantastic looking ship! You did good on her and make it even better after you fix that little hiccup on the railing. You and Anja have a very happy holiday and a prosperous and healthy 2015. Cheers,
- 1,616 replies
-
- 1
-
-
- caldercraft
- agamemnon
- (and 1 more)
-
Outrageous! That entire ship is not much larger then my O19 dinghy! Talking about dinghy, you little dinghy looks very nice up there. Fantastic work Omega. Cheers,
- 120 replies
-
- 1
-
-
- mystic
- motor yacht
- (and 2 more)
-
Marvelous work Nils! I like the added detail like the grapnel anchor. I may just have to make one for my O19 dinghy Happy Holidays. Cheers,
-
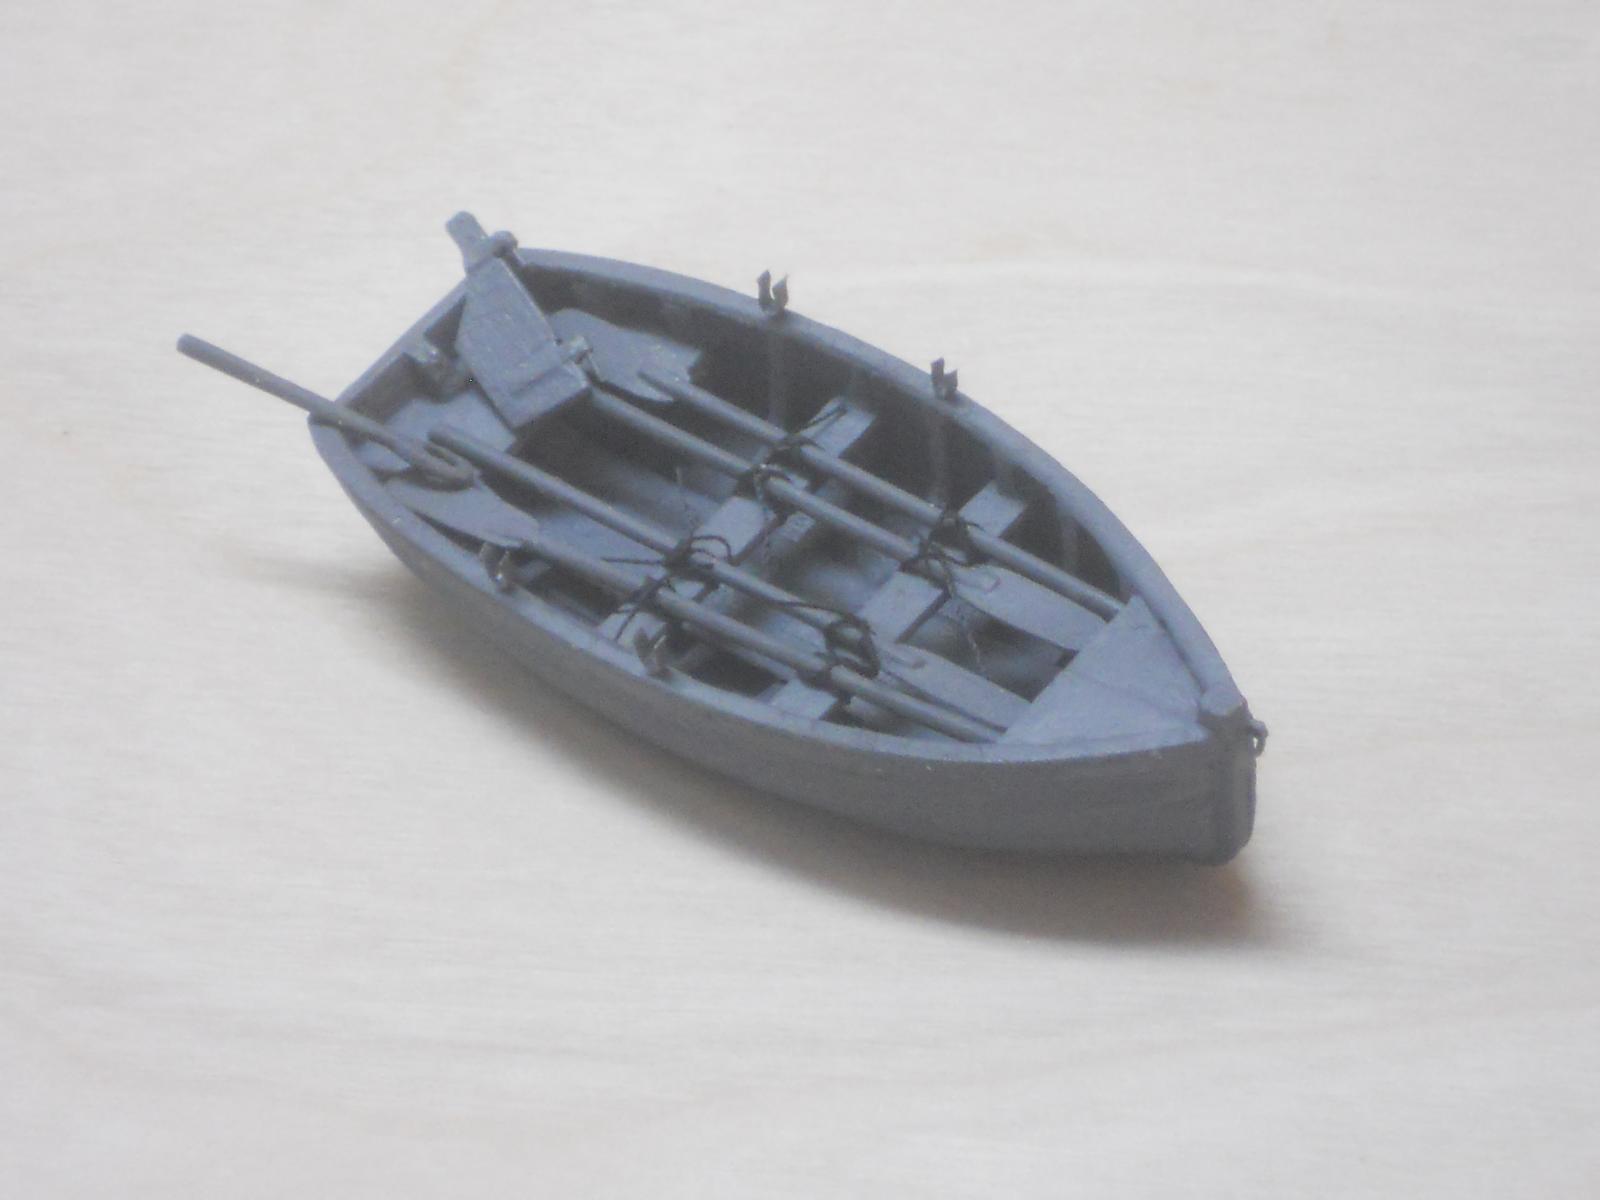
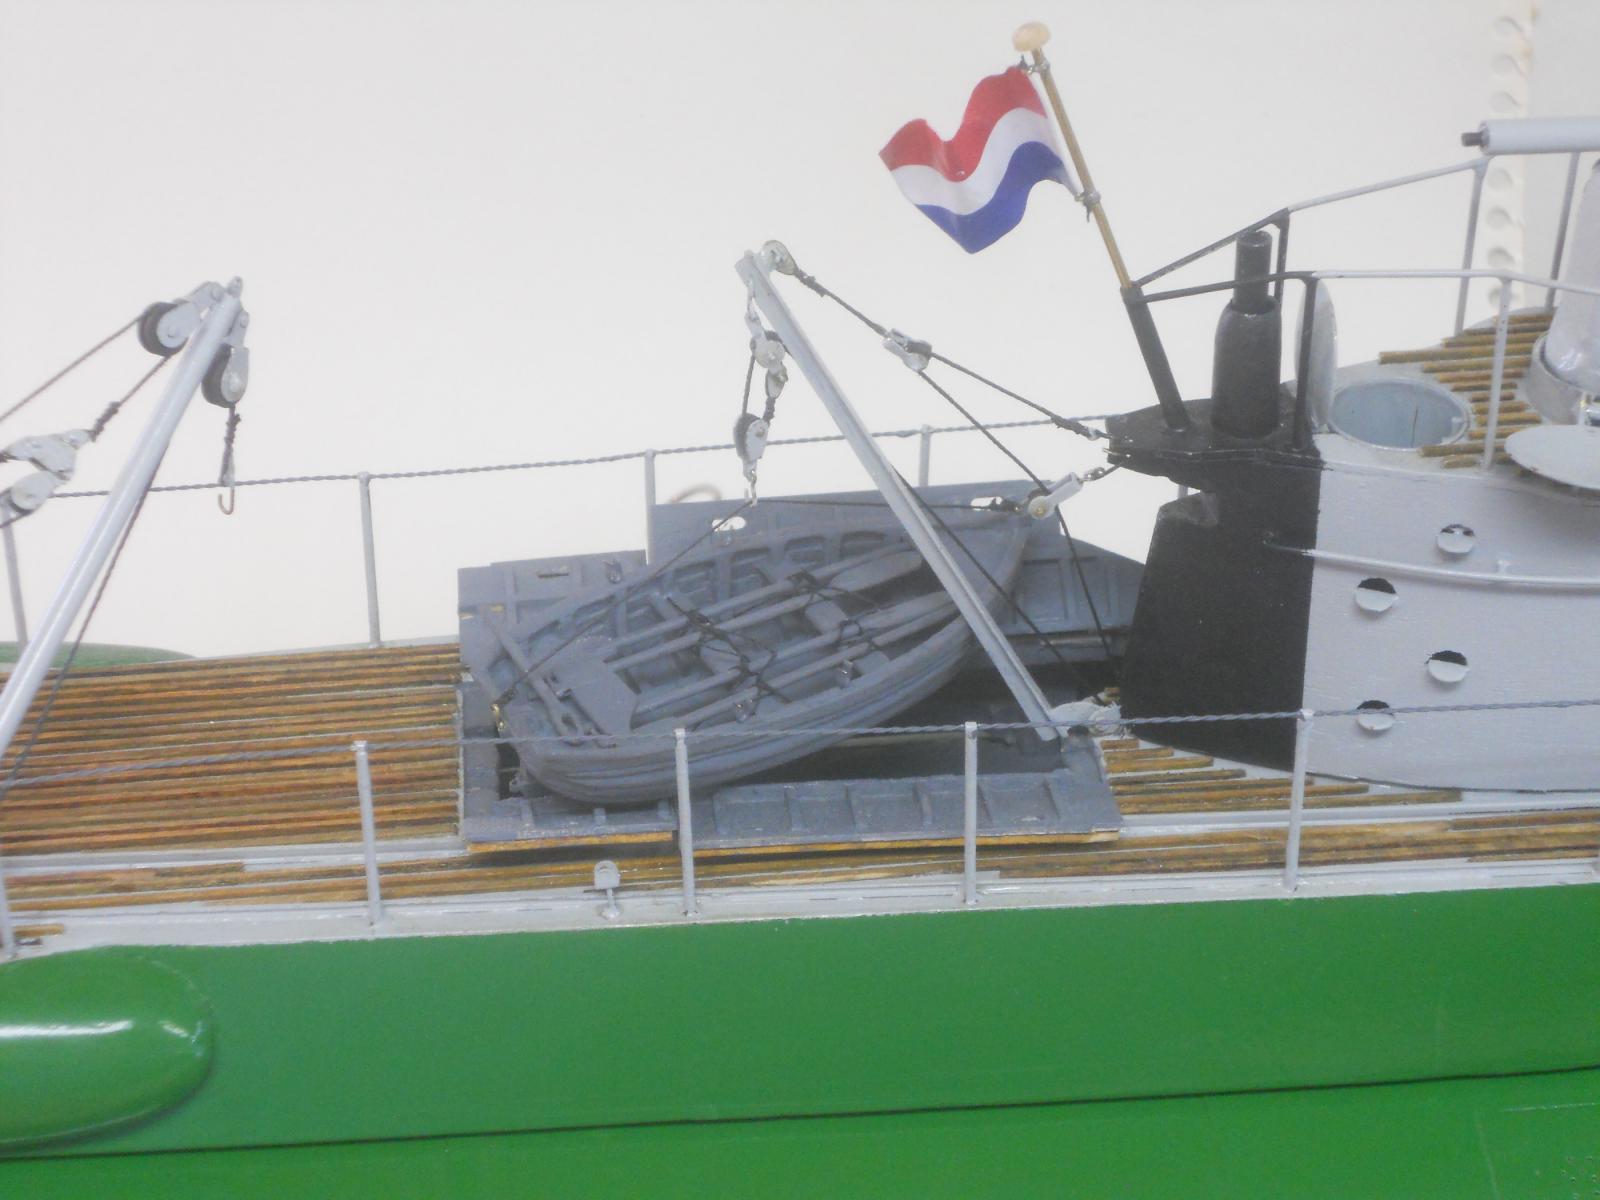
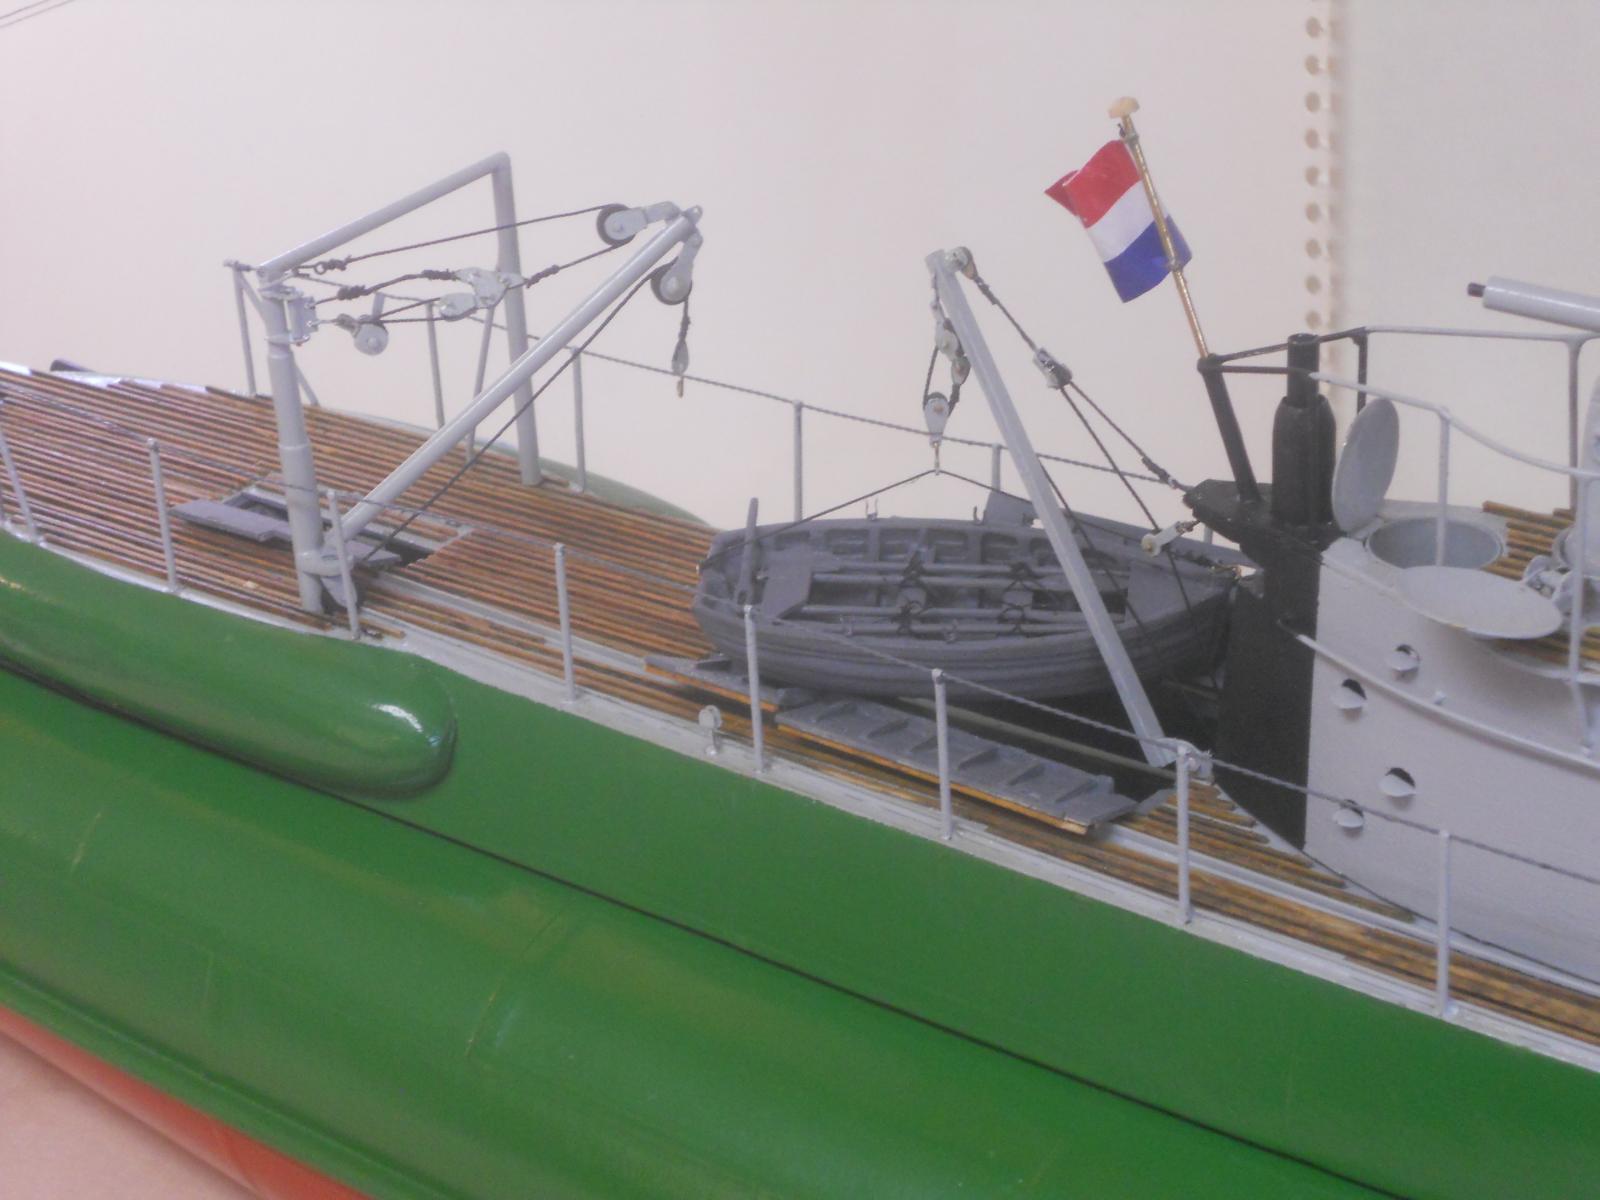
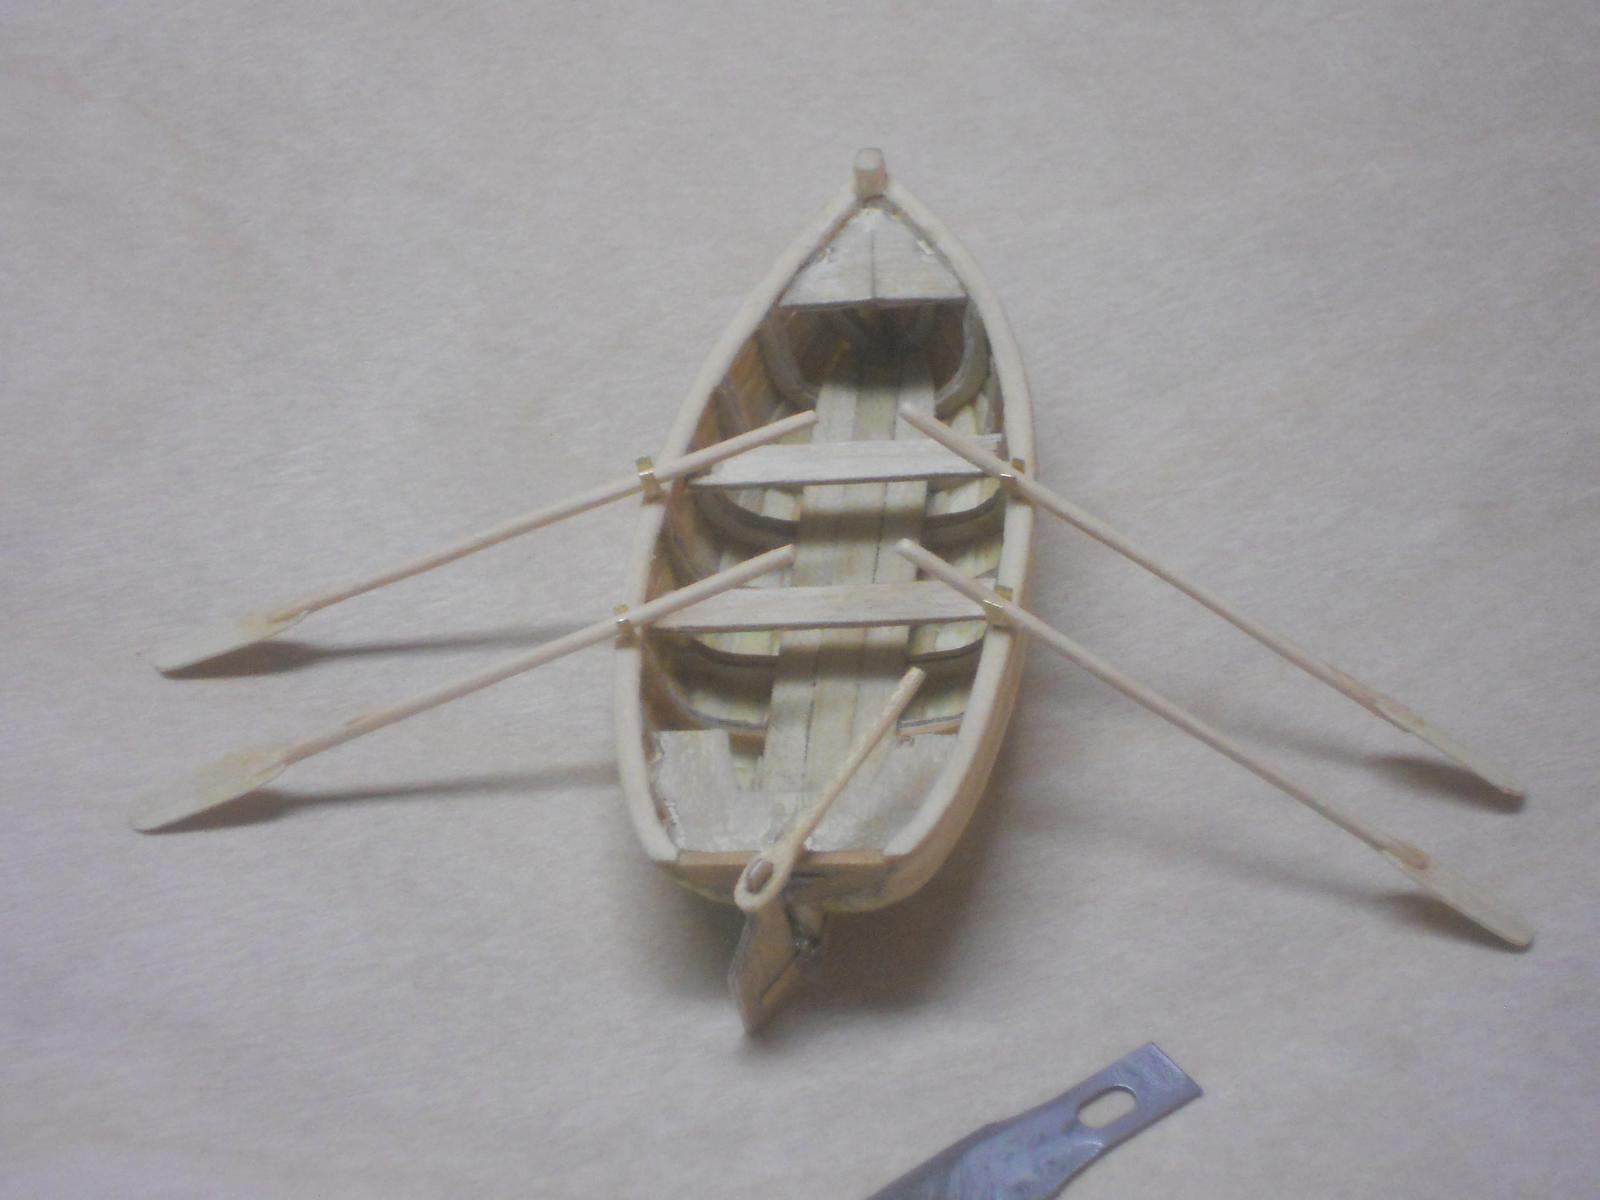
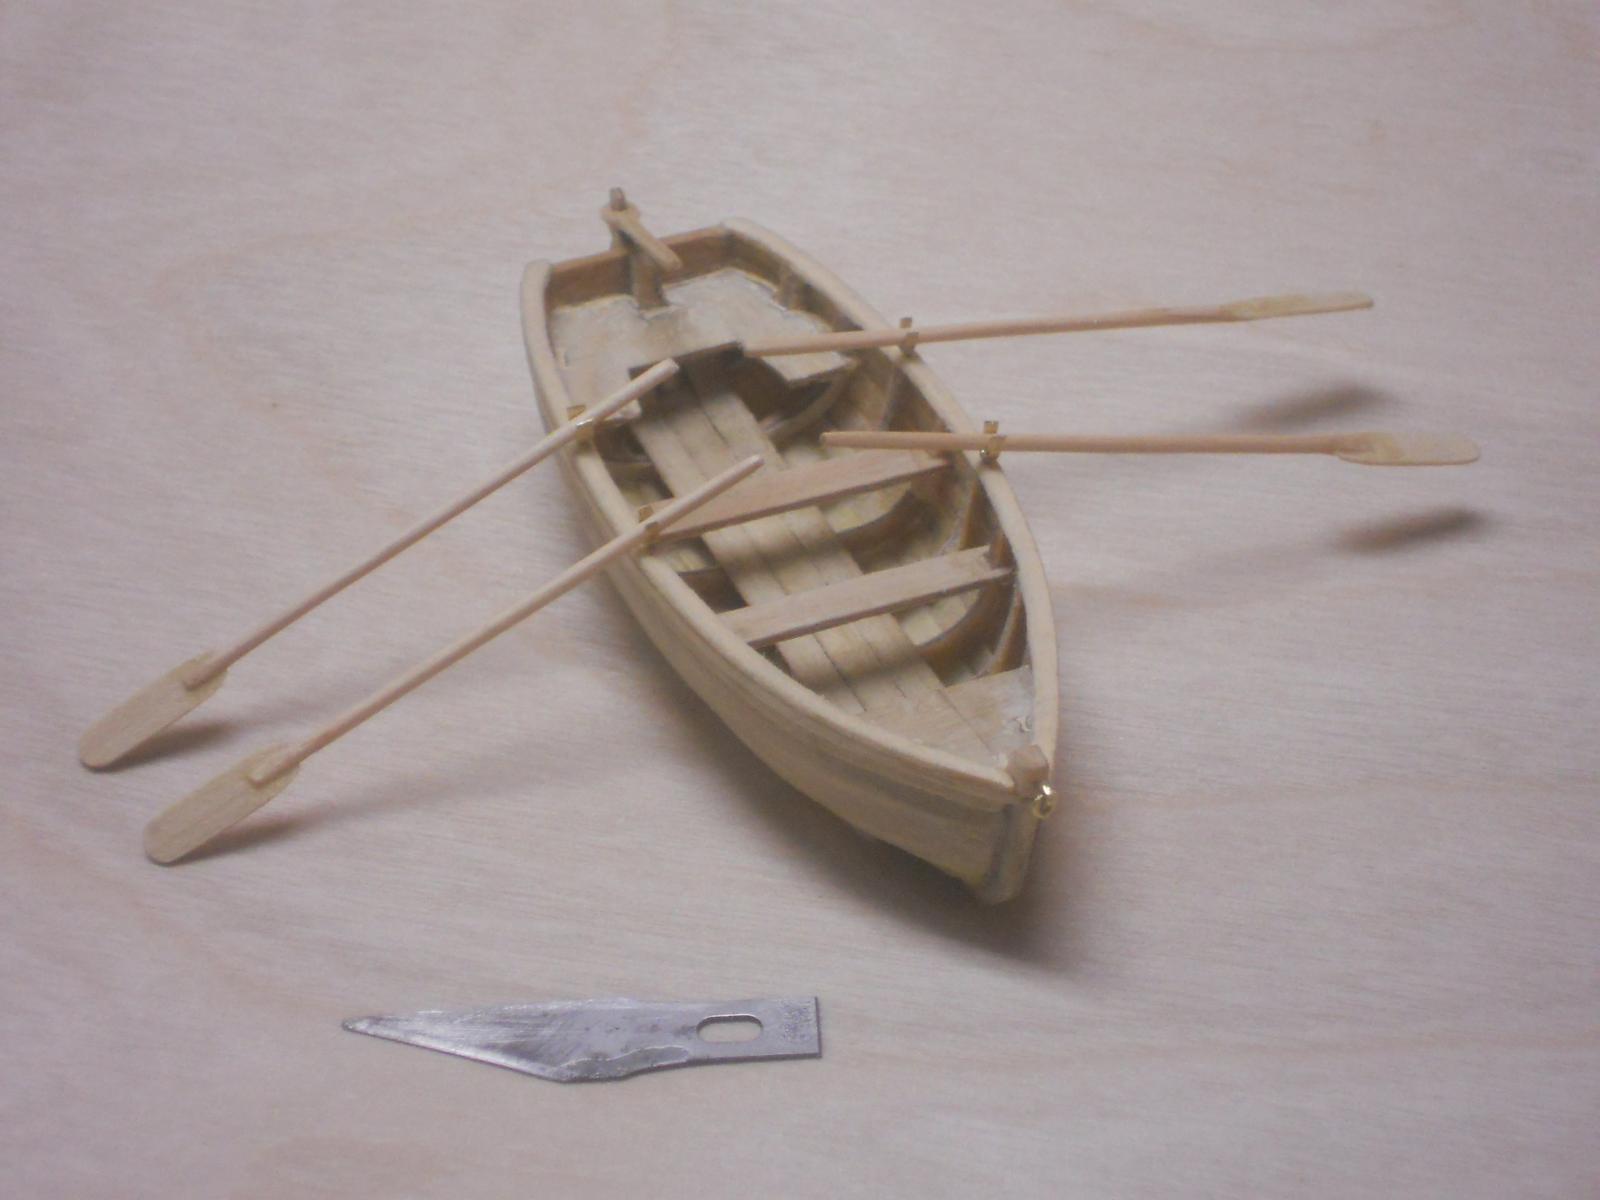
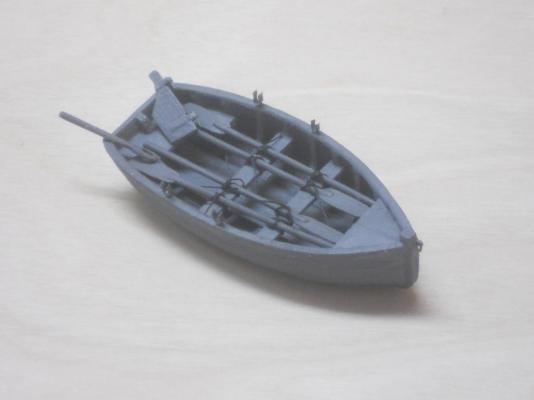
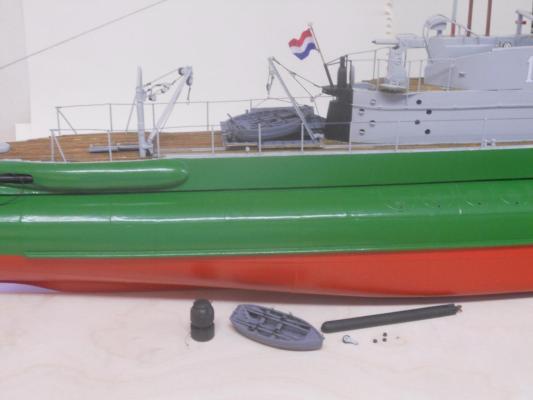
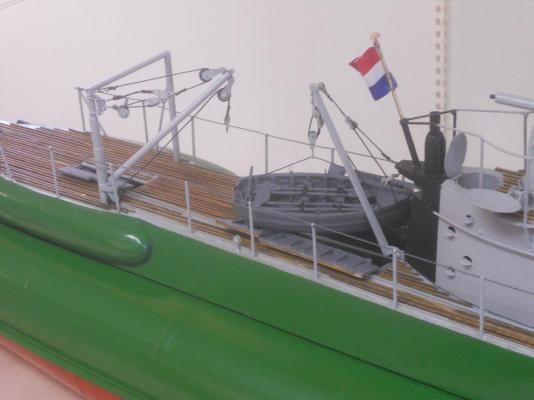
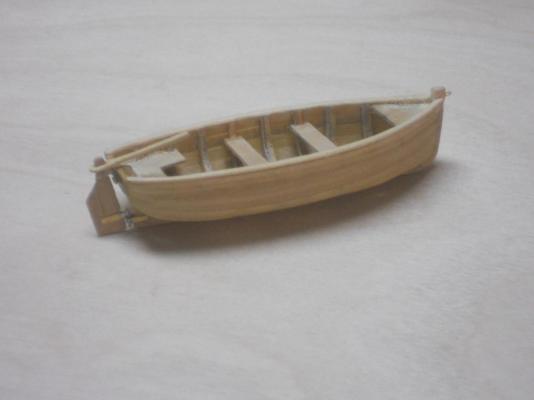
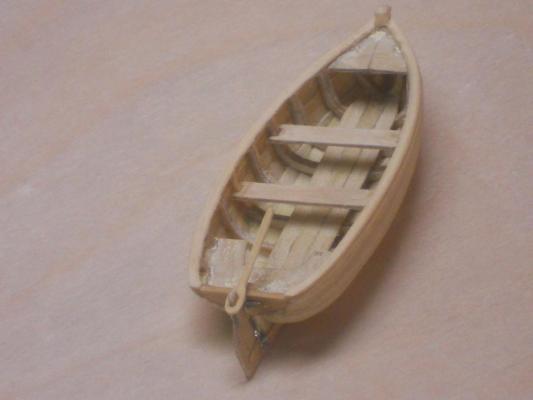
Hello again all y'all. I checked the painted dinghy this morning for anything that needed touching up but found every this hunky dory. So I proceeded with lashing the oars to the seats to prep it for stowing. I real life they stored the oars, rudder, helm and oarlocks inside the con. I could have done the same but figured that this shows the oars and the rudder. I can always change it at a much later date. So, the dinghy is done and hanging from a sling on the loading boom. All I need now are a few crew members wrestling her back inside Some day I'll be making a few crew members but that'll be for next year. Oh my, tha's next week already, hmmm, how time flies when you're having fun. Yea, a few crew, some spare torpedoes, mines, an anchor and ammo and a cases of Heineken beer Then there is the display board with the cover. Okay, here are a few pics of the completed dinghy. Here you see the dinghy v.2.0 in the sling hanging in the loading boom ready to be lowered inside her 'hangar" below deck. I have also placed dinghy v.1.0 on the dock with a spare mine, torpedo, an extra pulley that has Remco inscribed on it, a few smaller pulleys and a hook. Cheers,


-
First of all, Gwen and I wish everyone on MSW a very meaningful holiday and a healthy, prosperous 2015. Secondly, I thank all who visited and clicked the like button and of course your very kind comments. @ George: Than you my friend and the dinghy is now hanging in the loading boom a'board the O19. @ Nils: Thank you for your compliment and you too, have a great holiday. @ Carl: Yup, a lot of my tools are made on the fly and made do, but they work. Thank you for your compliments, and Gwen and I wish you and yours also a meaningful holiday and a healthy, prosperous 2015. @ Sjors: You need only four of these??? At this small scale they could be dinghies for your sloops Thank you too for your compliments and Gwen and I wish you and Anja also a meaningful kerst and een zeer voorspoedig 2015. @ Dave: Thank you my friend, much appreciated. Happy holidays to you too. @ Nenad: Thank you Nenad, yup, she's little alright but no magic, just a lot of hard and patient work. You have to make a few boats for the CS too you know. You can show us all your magic You and your family enjoy the year end festivities and a healthy and prosperous 2015 (hope the strike will be over soon.) @ Row: Thank you for the compliments. No - no break for me, I am now spending all my time on the lobster smack kit for the Wounded Warrior program. I still need to do a few things to the O19, perhaps in between. Best wishes to you and yours as well and a healthy, prosperous 2015. Cheers,
-
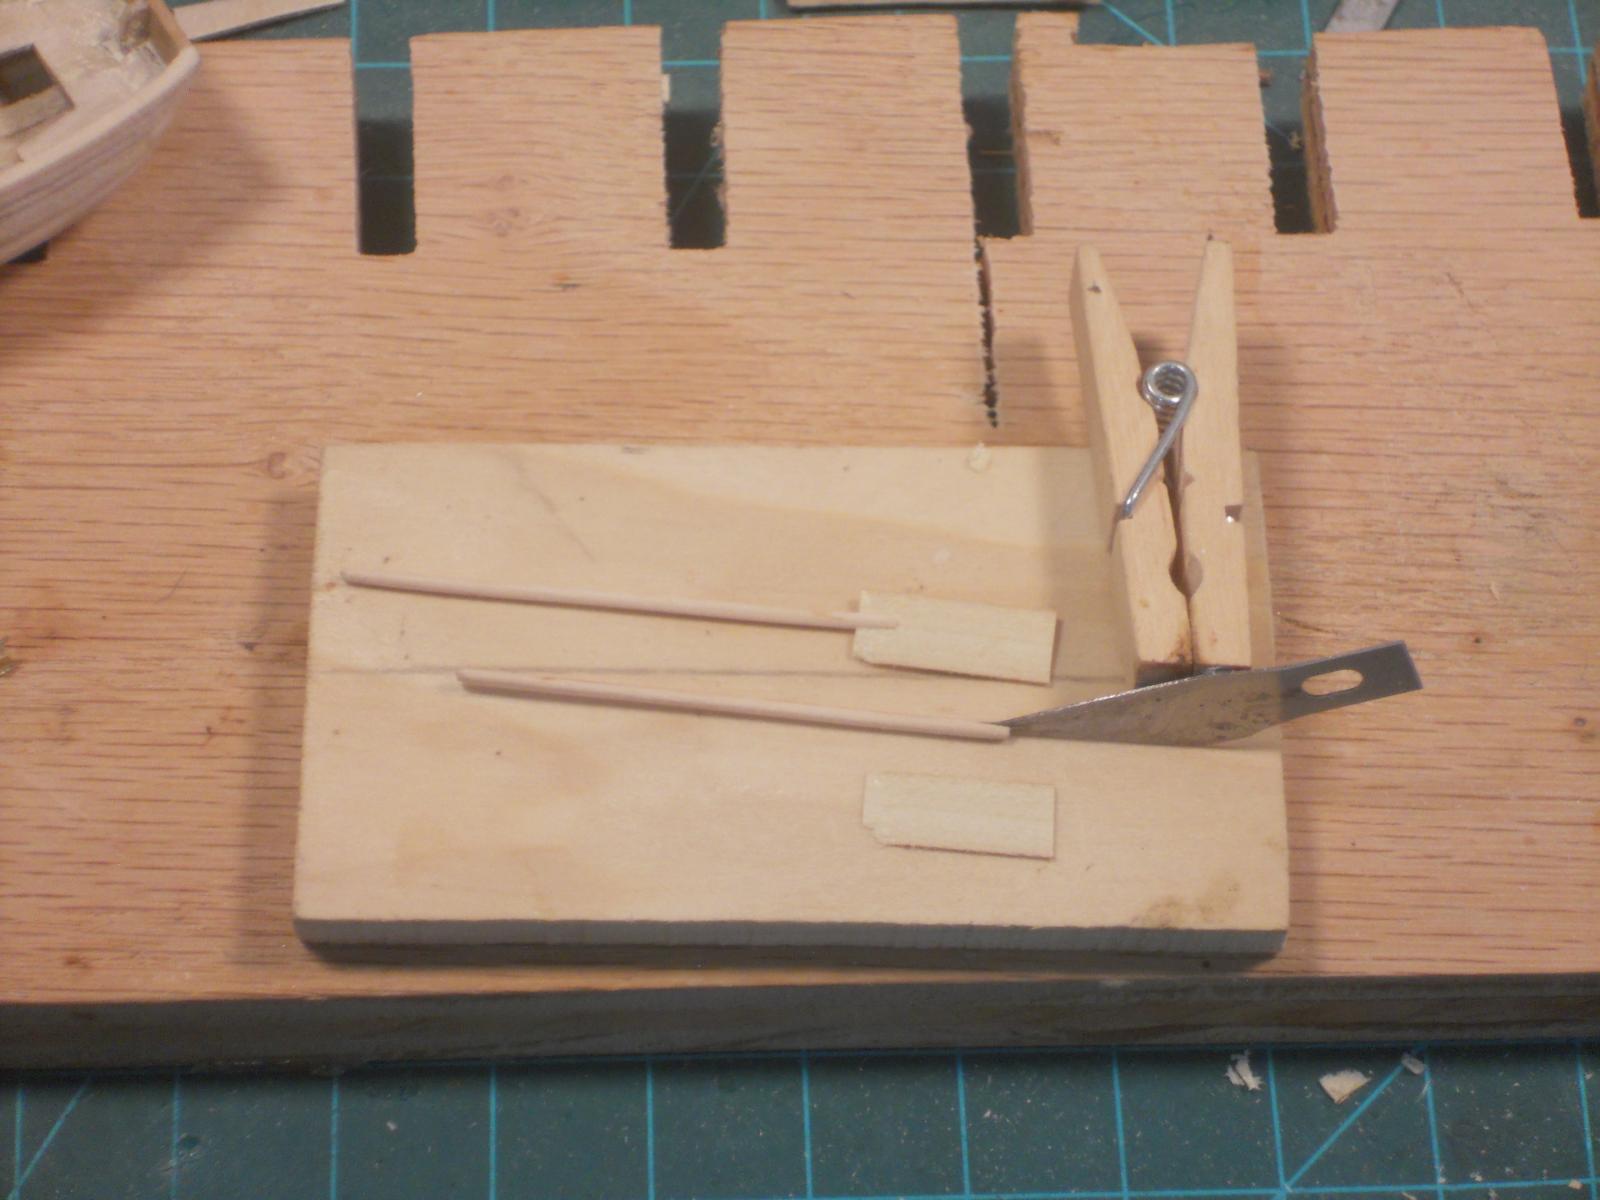
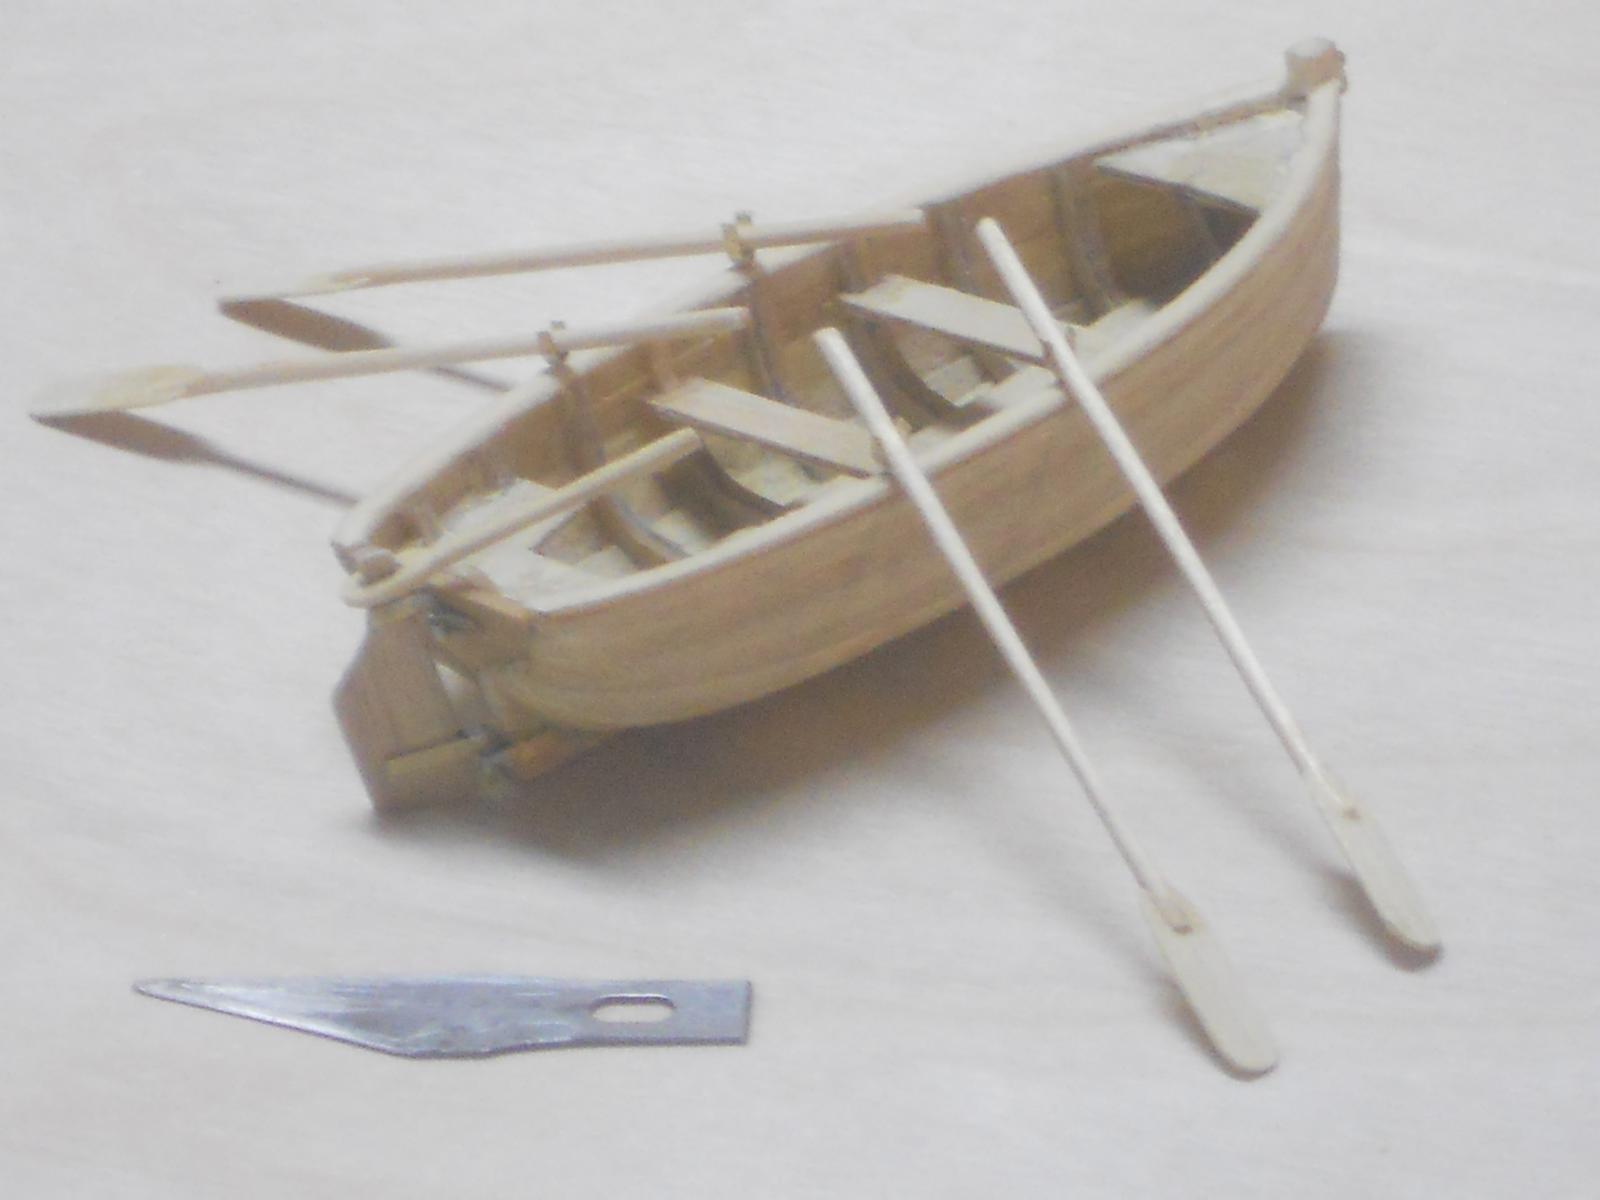
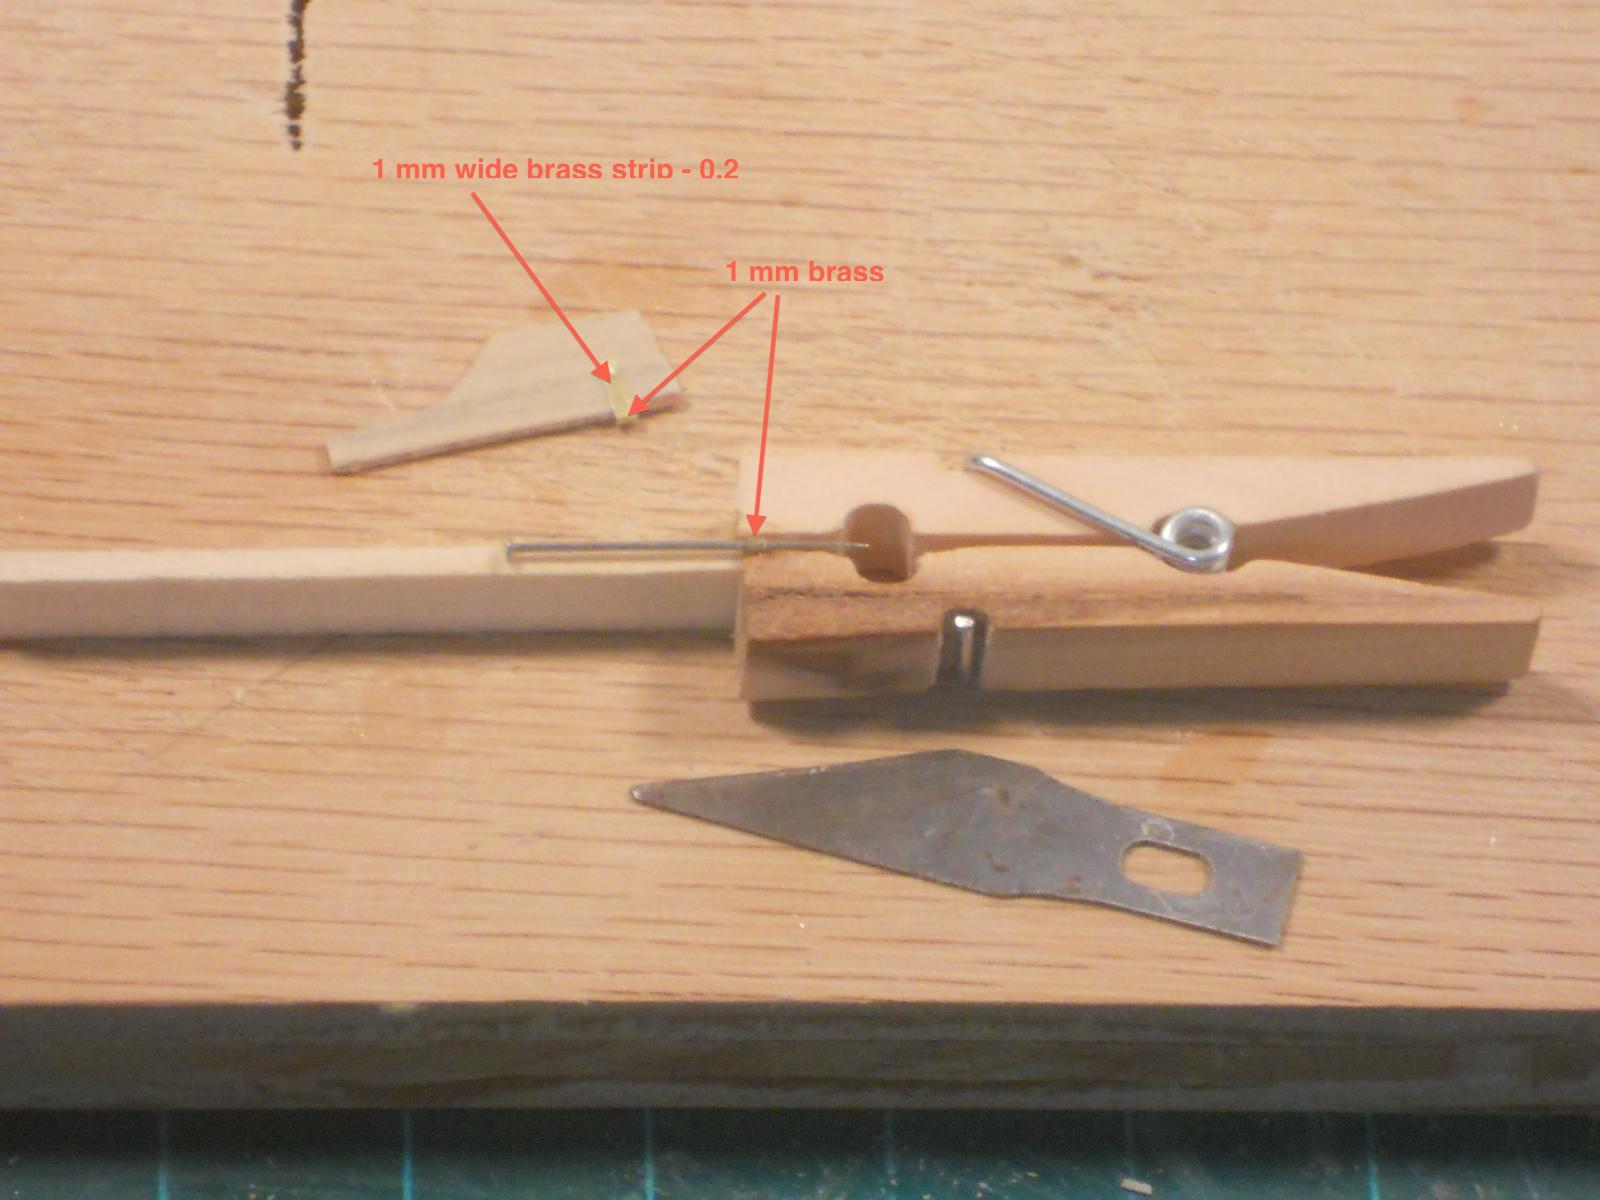
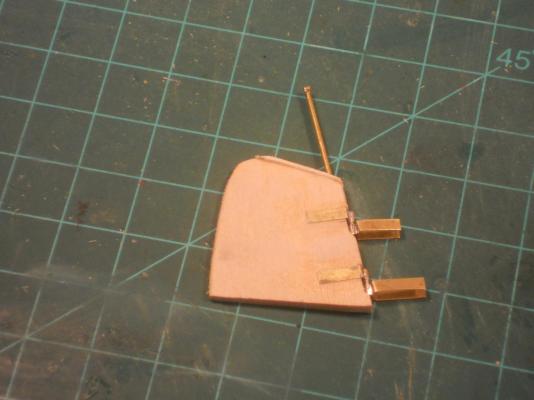
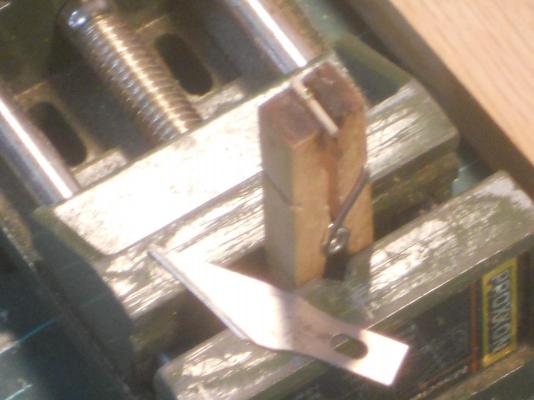
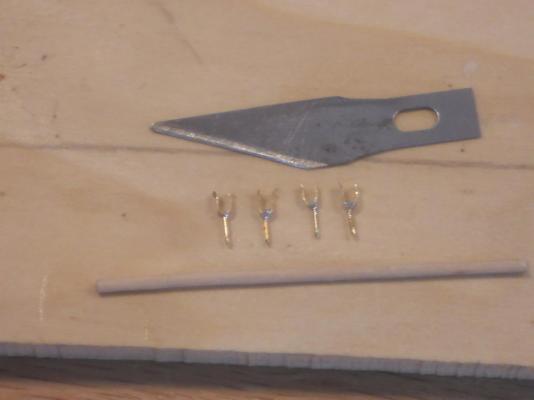
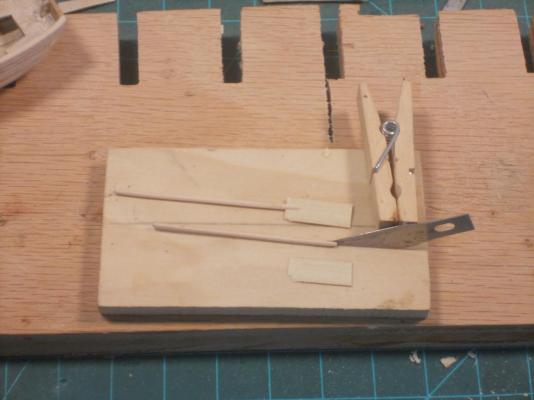
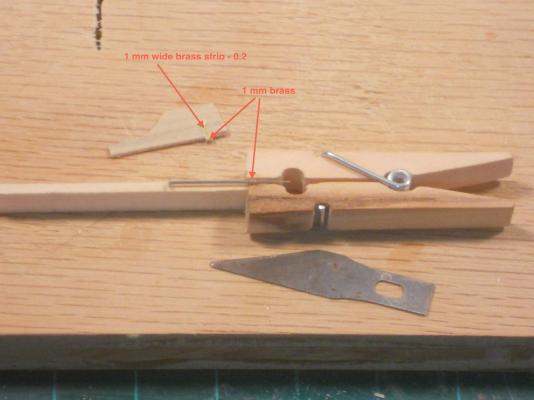
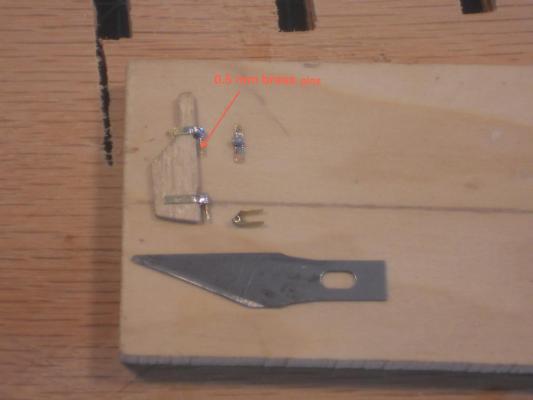
Hello again all y'all. I went to bed last night a little frustrated about them dumb oarlocks. But as I was laying there waiting for Mr. Sandman to come, I was thinking about how to tackle them then - - - click - the light came on I suddenly remembered how I did it with version 1.0. When I told Gwen about it she asked my if I made notes of everything I do - - - - - - good question, ummm - - - no dear. Her response? "that's not smart, isn't it"? No dear, but I figured it was going to be a one shot deal so no need for them stink'n notes She didn't buy it, "it's still not a smart thing to do." Okay, with all that straightened out I proceeded to make the oars first so so I can use them as part of the oarlock making procedure. I again made them from wooden toothpicks and whittled them down to about 1 mm diameter, using first a sharp mini chisel and then through a draw plate with a final sanding. Next I cut them to the same length as the v. 1.0 oars and cut a slit in one end for the blades. I made the oarlocks from 0.2 mm brass shim strips cut to 1 mm wide, cut them to estimated lengths and drilled 0.5 mm holes in the center for the pins. They'l be trimmed later and final shaped I used a small discarded piece of oar lock shaft as a mandril and bend these little strips around it into a U. Then put the U shaped pieces on the mandril, clamped it in a mini cloth pin, which is then clamped in a mini vice and put a small piece of 0.5 mm brass rod in the hole. Next it was just a case of soldering the pins to the oarlocks. Everything worked so well that there was almost no extra cleaning up to do except for trimming them all to the proper length and make a slight bend to the ends. For the oar blades I used some poplar and shaved a piece of waste planking down to 0.5 mm thick. One end I tapered to a wedge and shoved it into the slit I made preciously in one end of the shaft. I used CA to cement it together and stared to shape it into an oar blade. I think they came out okay. The oar shafts may have to be cut shorter but I'll sleep on that first. Okay, we are now on third base and batter is up! I couldn't resist painting everything dark grey before closing the shipyard for today. Tomorrow I'll do the final inspection and some more sanding and whatever is needed. It may need a final coat of paint before I'm satisfied. Then I'll tie the oars to the seats and hang her in the loading boom on the O19! Here are the pics of today's activities. This is my crude soldering jig. The quality is not very good, at this magnification the pixels make it fuzzy. Perhaps you can still see the brass oarlock with a pin inserted into the hole. Hey, it worked! Here are the completed oarlocks. It looks like a lot of solder on it but in actuality there was not really that much and only a little filing took care of it. You can also see the slight bends I made to the tips of the oarlocks? This is just an example pic of how I made the oars. It was difficult to see the slits I made in the shafts so I stuck a #11 blade in it. the one above t has the 0.5 mm "oar blade" already shoved into the slit. Cheers,


-
Hello again all y'all. I went to bed last night a little frustrated about them dumb oarlocks. But as I was thinking about how to tackle them then - - - click - the light came on I suddenly remembered how I did it with version 1.0. Gwen asked my if I made notes of everything I do - - - - - - good question, ummm - - - no dear. Her response? "that's not smart, isn't it"? No dear, but I figured it was going to be a one shot deal. She didn't buy it, it's still not a smart thing to do. Okay, with all that straightened out I proceeded to make the oars first so so I can use them as part of the oarlock making procedure. I again made them from wooden toothpicks and whittled them down to about 1 mm diameter, using first a sharp mini chisel and then through a draw plate with a final sanding. Next I cut them to the same length as the v. 1.0 oars and cut a slit in one end for the blades. I made the oarlocks from 0.2 mm brass shim strips cut to 1 mm wide, cut them to estimated lengths and drilled 0.5 mm holes in the center for the pins. They'l be trimmed later and final shaped I used a small discarded piece as a mandril and bend these little strips around it. Then put the U shaped pieces on the mandril, clamped it in a mini cloth pin, which is then clamped in a mini vice and put a small piece of 0.5 mm brass rod in the hole. Next it was just a case of soldering the pins to the oarlocks. Everything worked so well that there was almost no extra cleaning up to do except for trimming them all to the proper length and make a slight bend to the ends. For the oars I used some poplar and shaved a piece of waste planking down to 0.5 mm thick. One end I tapered to a wedge and shoved it into the slit I made preciously in one end of the shaft. I used CA to cement it together and stared to shape it into an oar blade. I think they came out okay. The oar shafts may have to be cut shorter but I'll sleep on that first. Okay, we are now on third base and batter is up! I couldn't resist painting everything dark grey before closing the shipyard for today. Tomorrow I'll do the final inspection and some more sanding and whatever is needed. It may need a final coat of paint before i'm satisfied. Then I'll tie the oars to the seats and har her on the loading boom on the O19! Here are the pics of today's activities. Cheers,
-
Hello everyone and thanks for dropping in and clicking the like button! @ Omega: Thank you very much for your compliments. It was a lot of fun but testing my patience Gwen and I wish you and yours the best holiday season as well. @ George: Thank you too for your kind words. Yup, Gwen is critical but fair and I appreciate her input. @ Nils: Thank you very much for your kind words. Hmmm, two oars??? I made this thing with two rower seats and she'll have four oars! I guess just in case they have to tow the sub @ Carl: Yup, Gwen is always right, just ask her Yeah, it seems that many people are overweight or even obese nowadays. I try to keep my bod in fighting trim, 140 US pounds at 5 ft 8 inches , not too bad and Gwen is also loosing weight, she dropped 20 pounds already. Cheers to all,
-
Wow, great progress Jesse! She's really looking VERY nice and so do the extra's. Cheers,
- 33 replies
-
- 1
-
-
- finished
- midwest products
- (and 1 more)
-
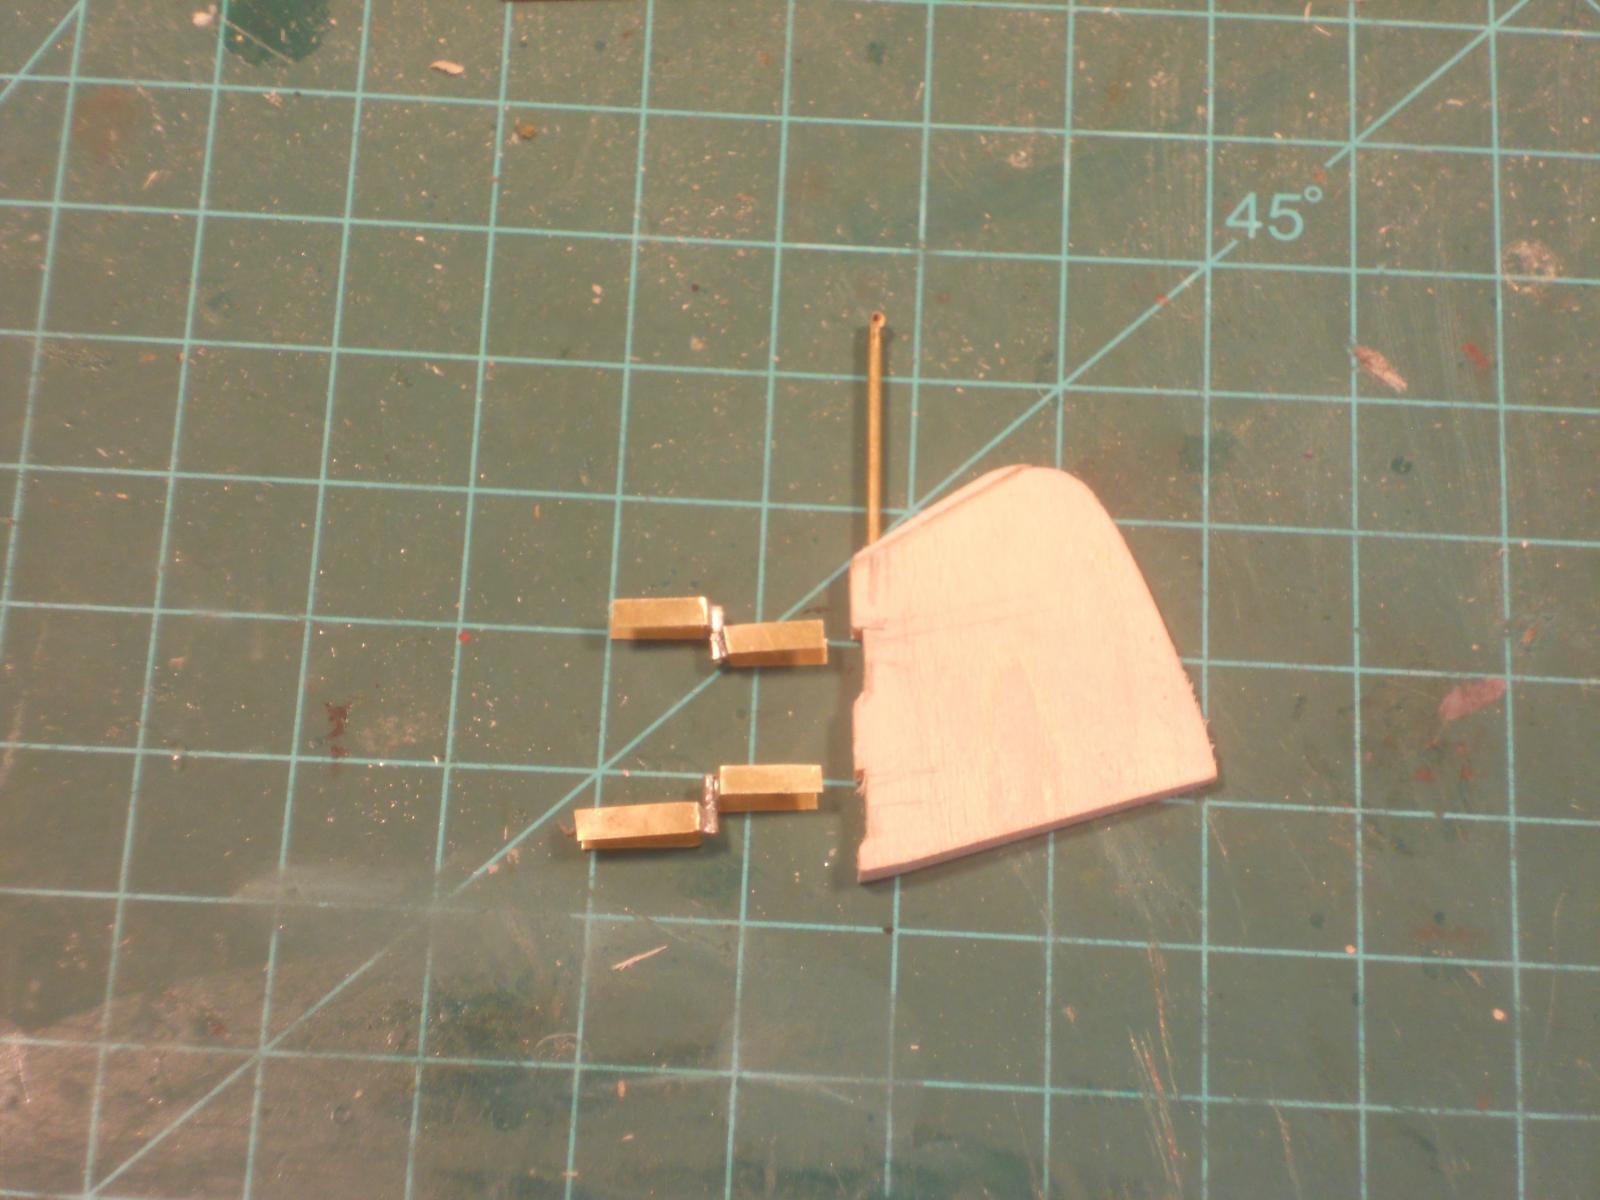
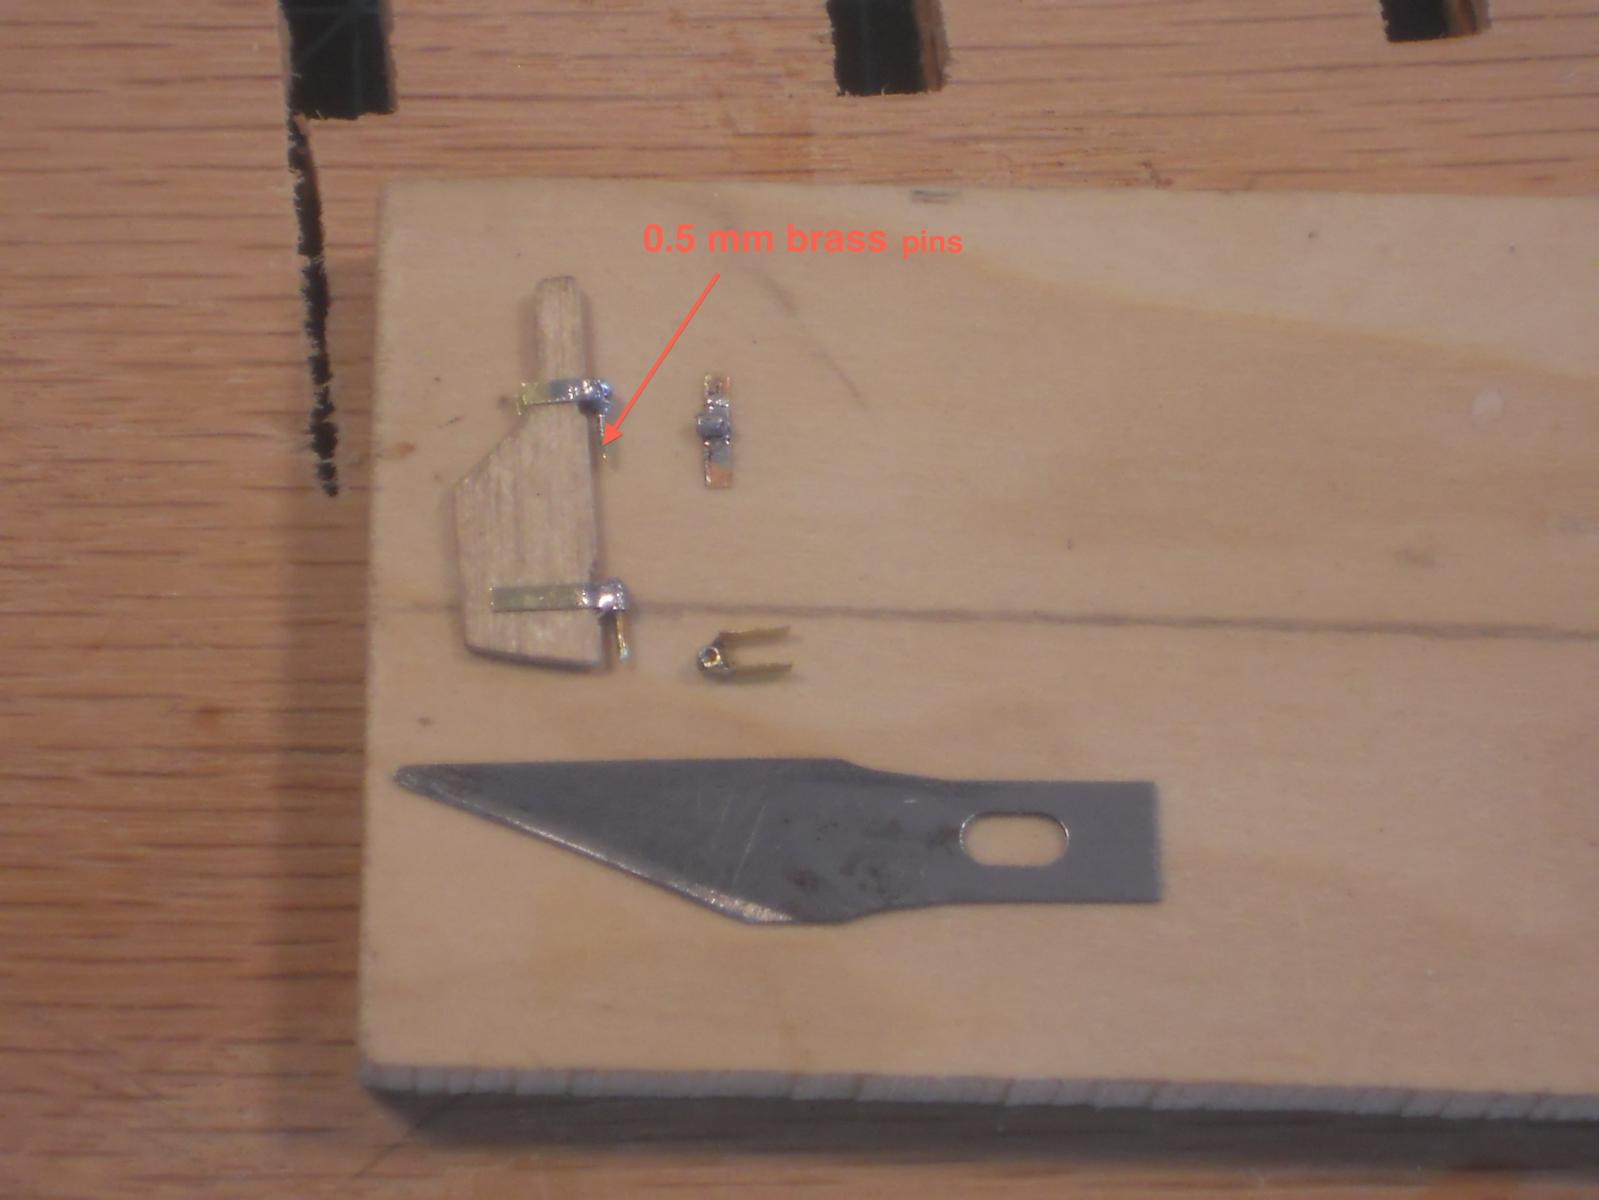
Hello friends and thank you all for visiting and your likes!!!! I spend all day in the shipyard (garage) to work on the dinghy. I fabricated the gudgeons and pintles for the rudder. Believe it or not but that took me three and a half hours to do. One wouldn't believe that something that simple can take so much time. I used 0.2 mm brass shim stock and 1 mm brass tubes with 0.5 mm brass pins for them. No reason to draw a picture, all of you know how they look like. The brass shim was cut to 1 mm wide and so were the brass tubes. I bend the brass strips into a U shape to fit the keel and rudder. The toughest part was soldering these small pieces of tube to the bend up strips. I placed a picture of my soldering jig below. I used a steel sewing pin to hold the tube to the gudgeon with my left hand while soldering with the right. Oh yeah, I used a rosin core silver solder, feeding that with my third hand Actually, I pretinned the parts. For the pintles I used the same method except that I first soldered the brass rod in the tubes and then holding that to the bend-up strips I soldered i all together. This doesn't sound like 3 1/2 hours worth of work but that includes a few remakes, naturally The pictures below were taken before I cleaned everything up by CAREFULLY filing extra solder away. The nowy look presentable and I am happy. Gwen also liked them, she said it looks rather spiffy. I cemented the gudgeons and pintles to their assigned locations with CA. Next I shaved some wood away from the oarsmen seats but I think that the forward one can still use to loose some more wood.. I also made an eye bold for the bow frame where the mooring ting will be. This I glued into the top of the bow frame with CA. After lunch I started on making the oar locks. Hmmmm - - - not having much success with them. Spend almost 3 hours on them and managed to make only one, which I will have to reject. They are supposed to be 0.5 mm wide from some 0.2 mm brass ship and then drilling a 0.5 mm hole in it for a bras pin. They'l be bend into a U shape to fit the 0.8 mm oar shaft. They'll be slightly smaller the on version 1.0 but it seems to give me more trouble tat way. Soooooh, I'm back at square one with them. Well, tomorrow is another day and I can start out fresh. That's it for today and here are a few pics of today's efforts. I put the gudgeon over a piece of scrap wood with the same thickness as the keel. You can see the sowing straight pin in the 1 mm tube and yes, it does get hot Here are all the pieces completed but still in the rough state. After I cleaned them up and filed the excess solder away they do look presentable. I also filed the ship pieces even to 1 mm wide, Cheers,
-
Hello Russ, Thanks for dropping in and your very kind words. Let truth be told about the miters - - - I cut the entire seat out of one piece and temporarily pencilled in the planking lines Yeah I know, I cheated a little but I am already going way overboard with the bashing thing and really did not want to spend the time to make a build-up seat assembly. I did cut the seats back a few mm this afternoon but spend most of the day on my O19 dinghy rudder hinges. Cheers,
- 176 replies
-
- 1
-
-
- muscongus bay lobster smack
- Midwest Products
- (and 1 more)
-
You'r welcome George, I aim to please Yeah, a lot of times I just forget in the heat of the battle. I also forget to make eough photos of some of the things I do in progressive stages. I do like to have enough pics for my own build archive so I can look at them years from now and see how I did all of this. Hey Carl, good seeing you again! No, really, Dutch sailors are "lean, mean fighting machines" No big buttocks on them The seats have been shaved down some as we speak but also remember the scale and they do need something to sit on. It looks a bit better, I think. Cheers,
-
WOW, that's looking mighty fine Mark! Congrets with this milestone and now planking. Am looking forward seeing you progress with that fun job. I love planking! Cheers,
-
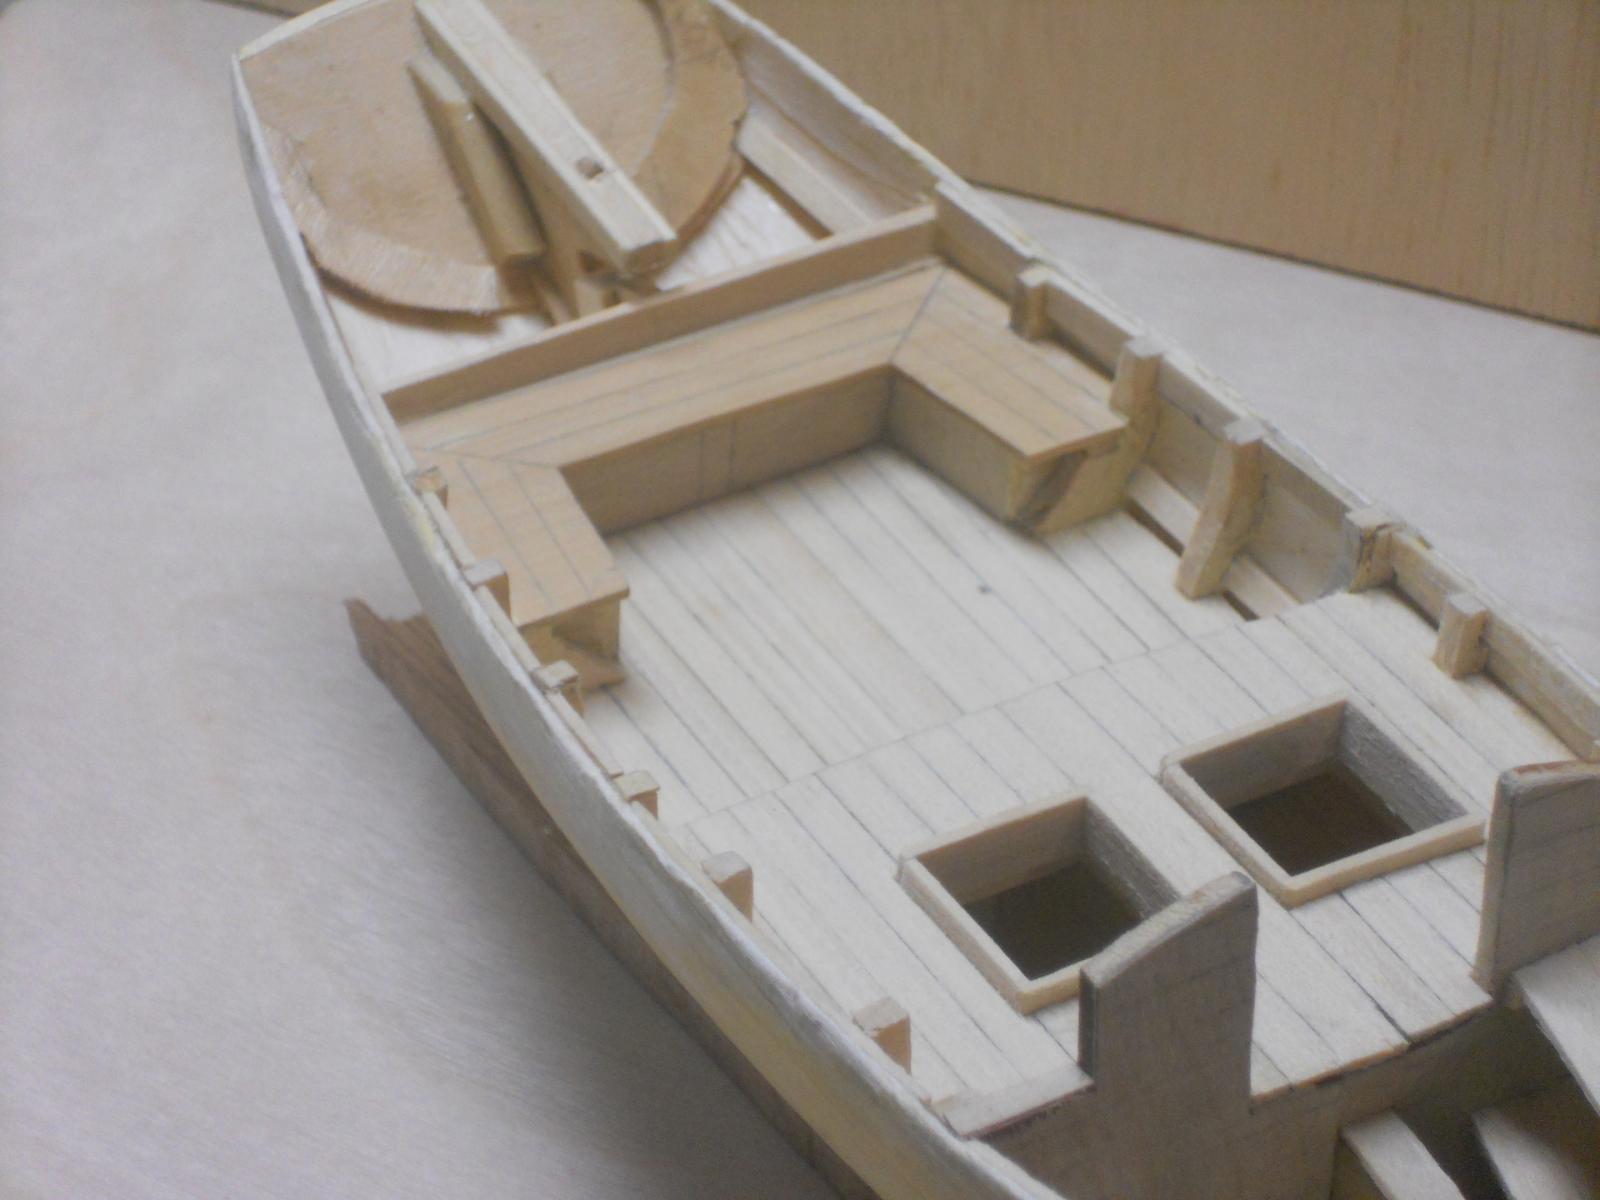
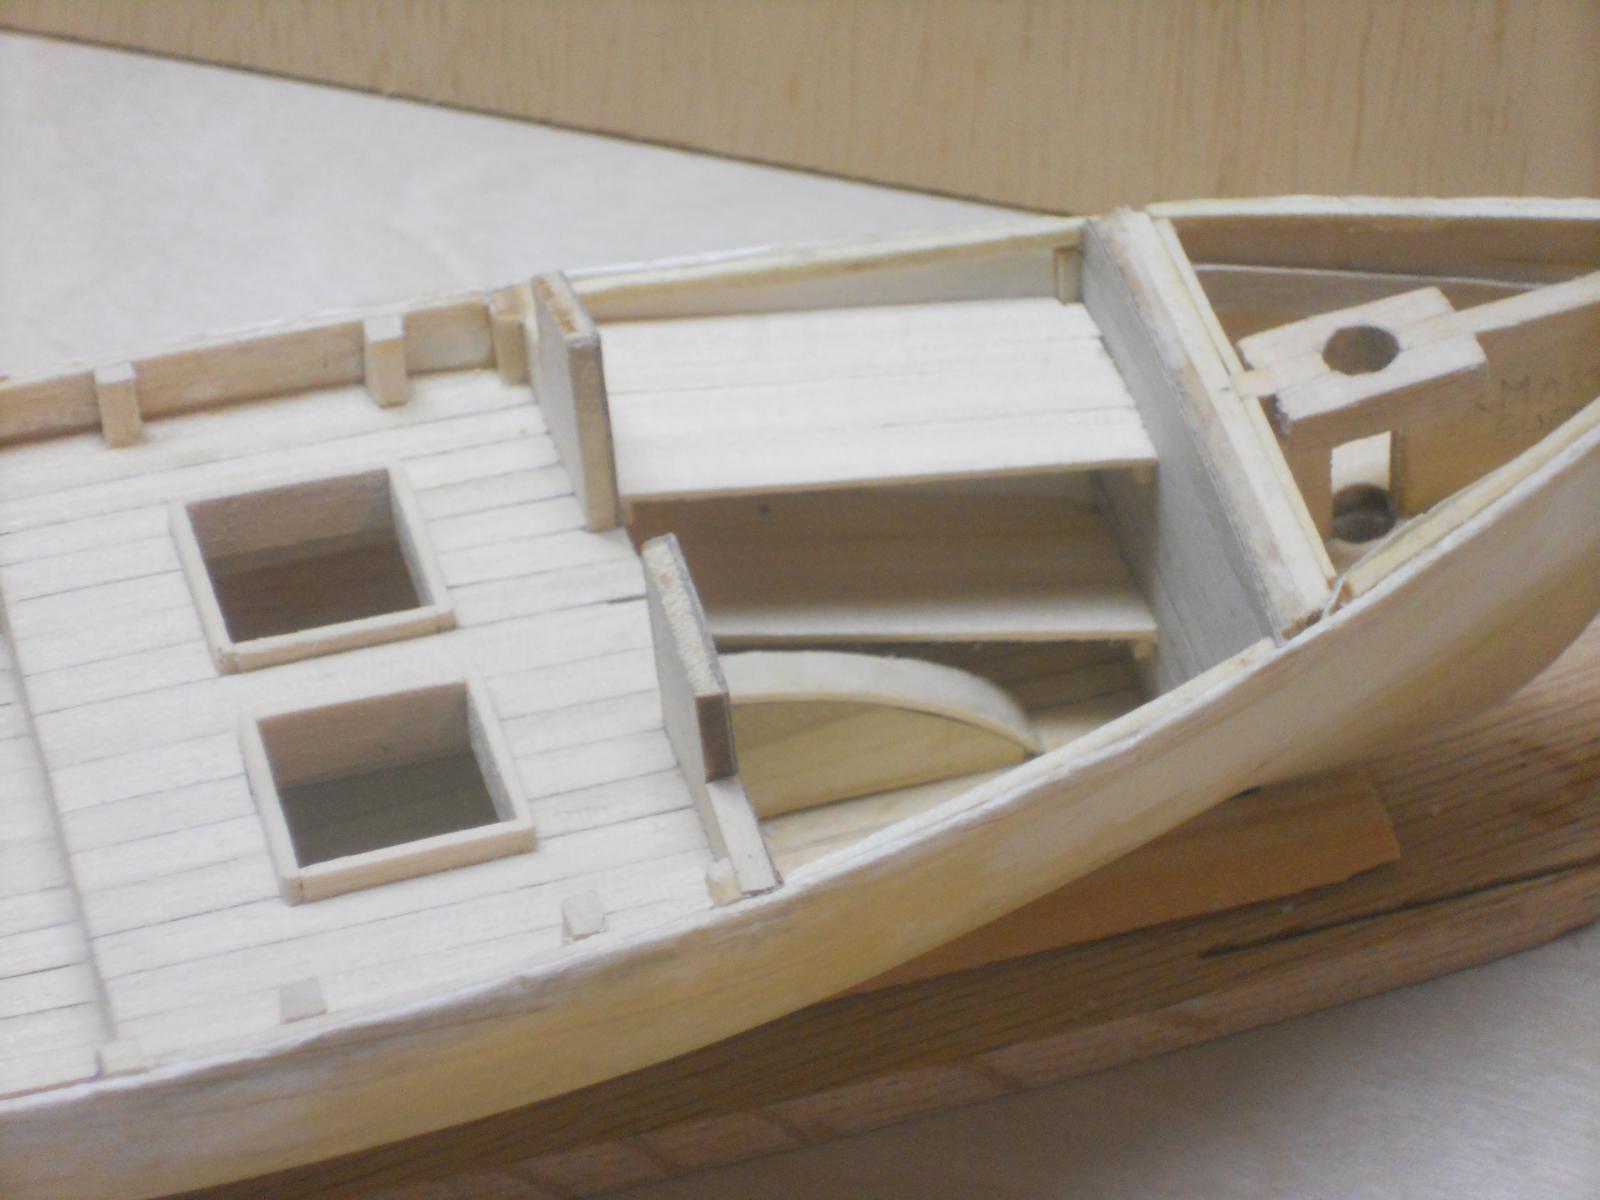
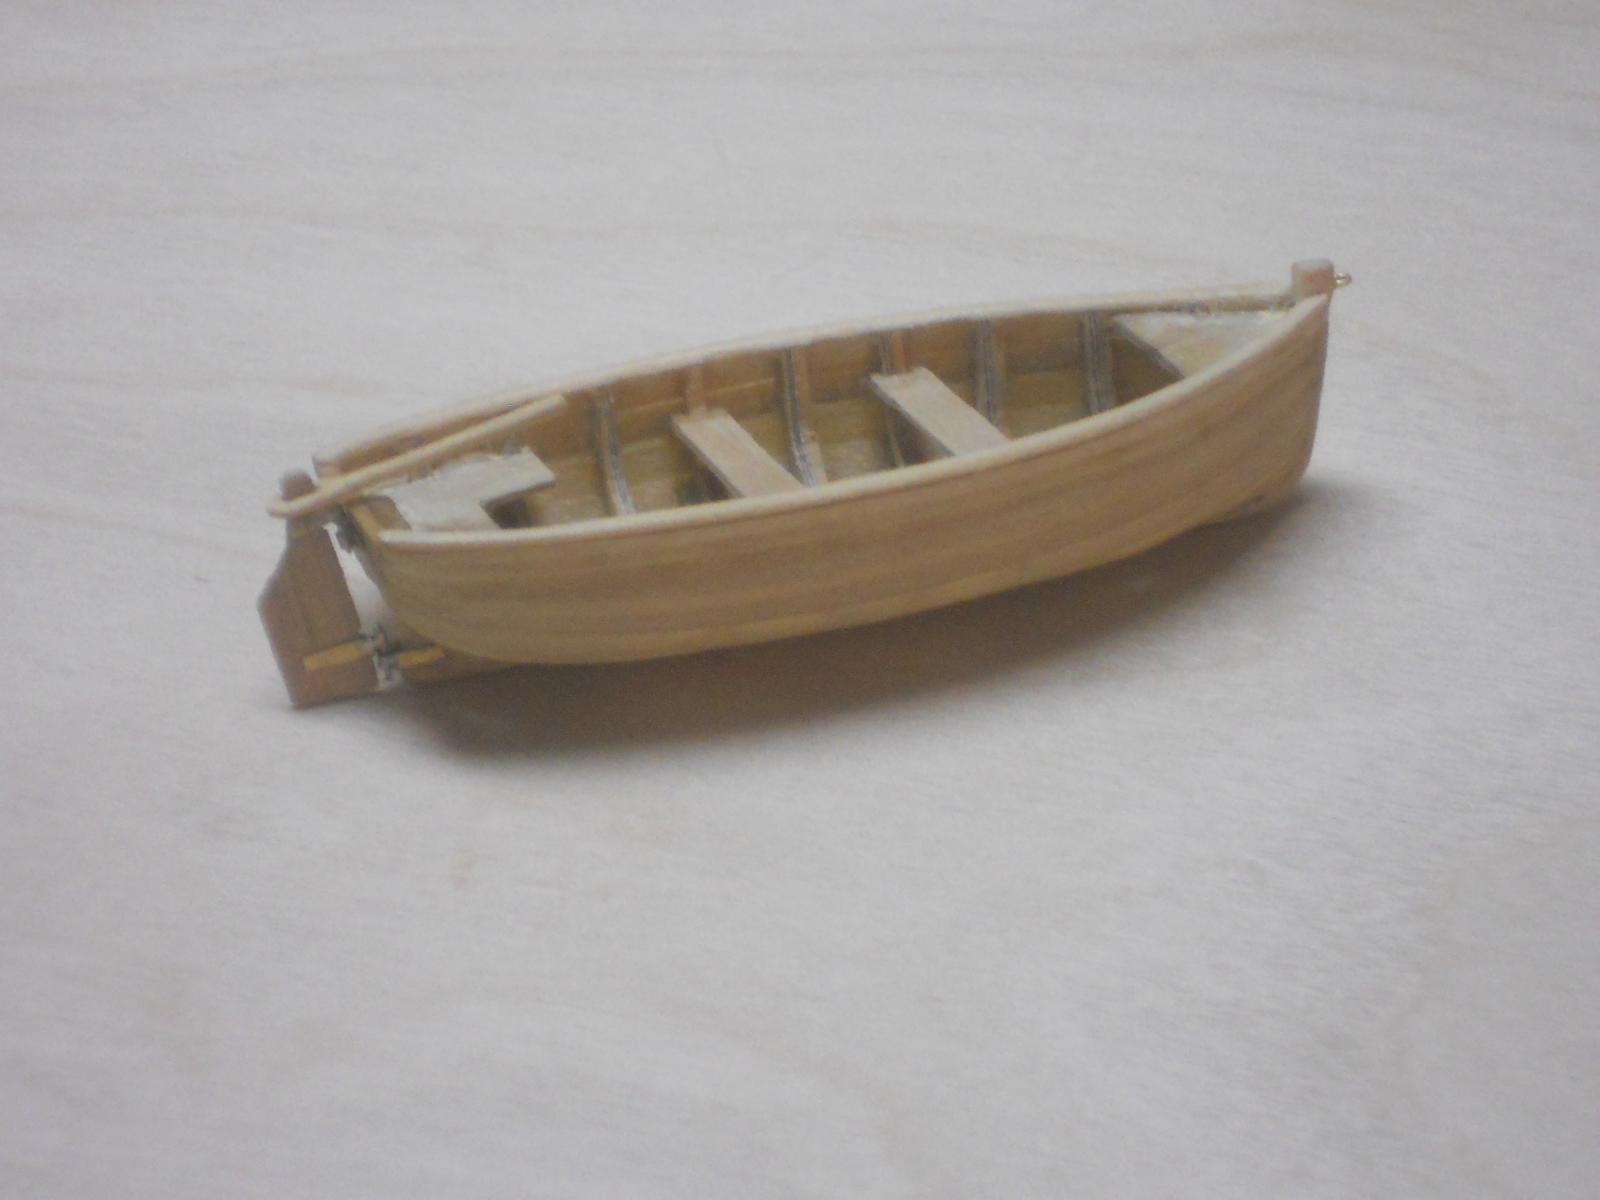
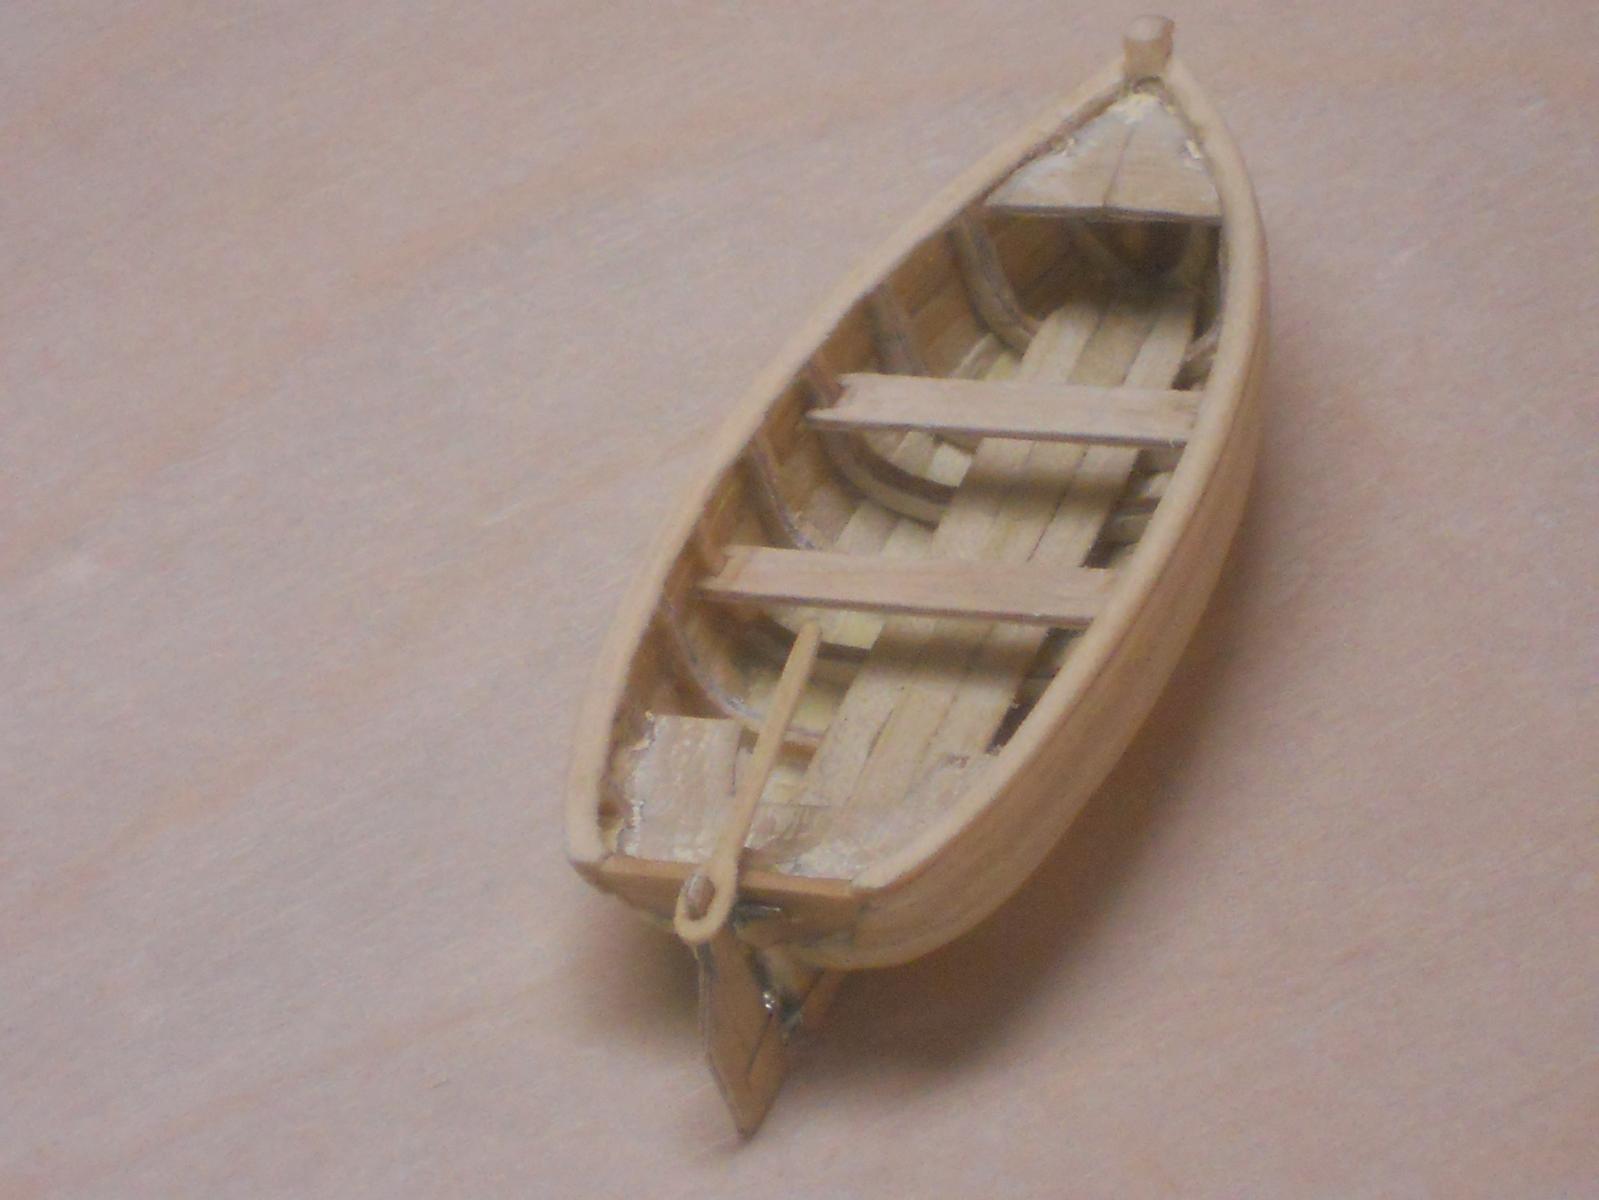
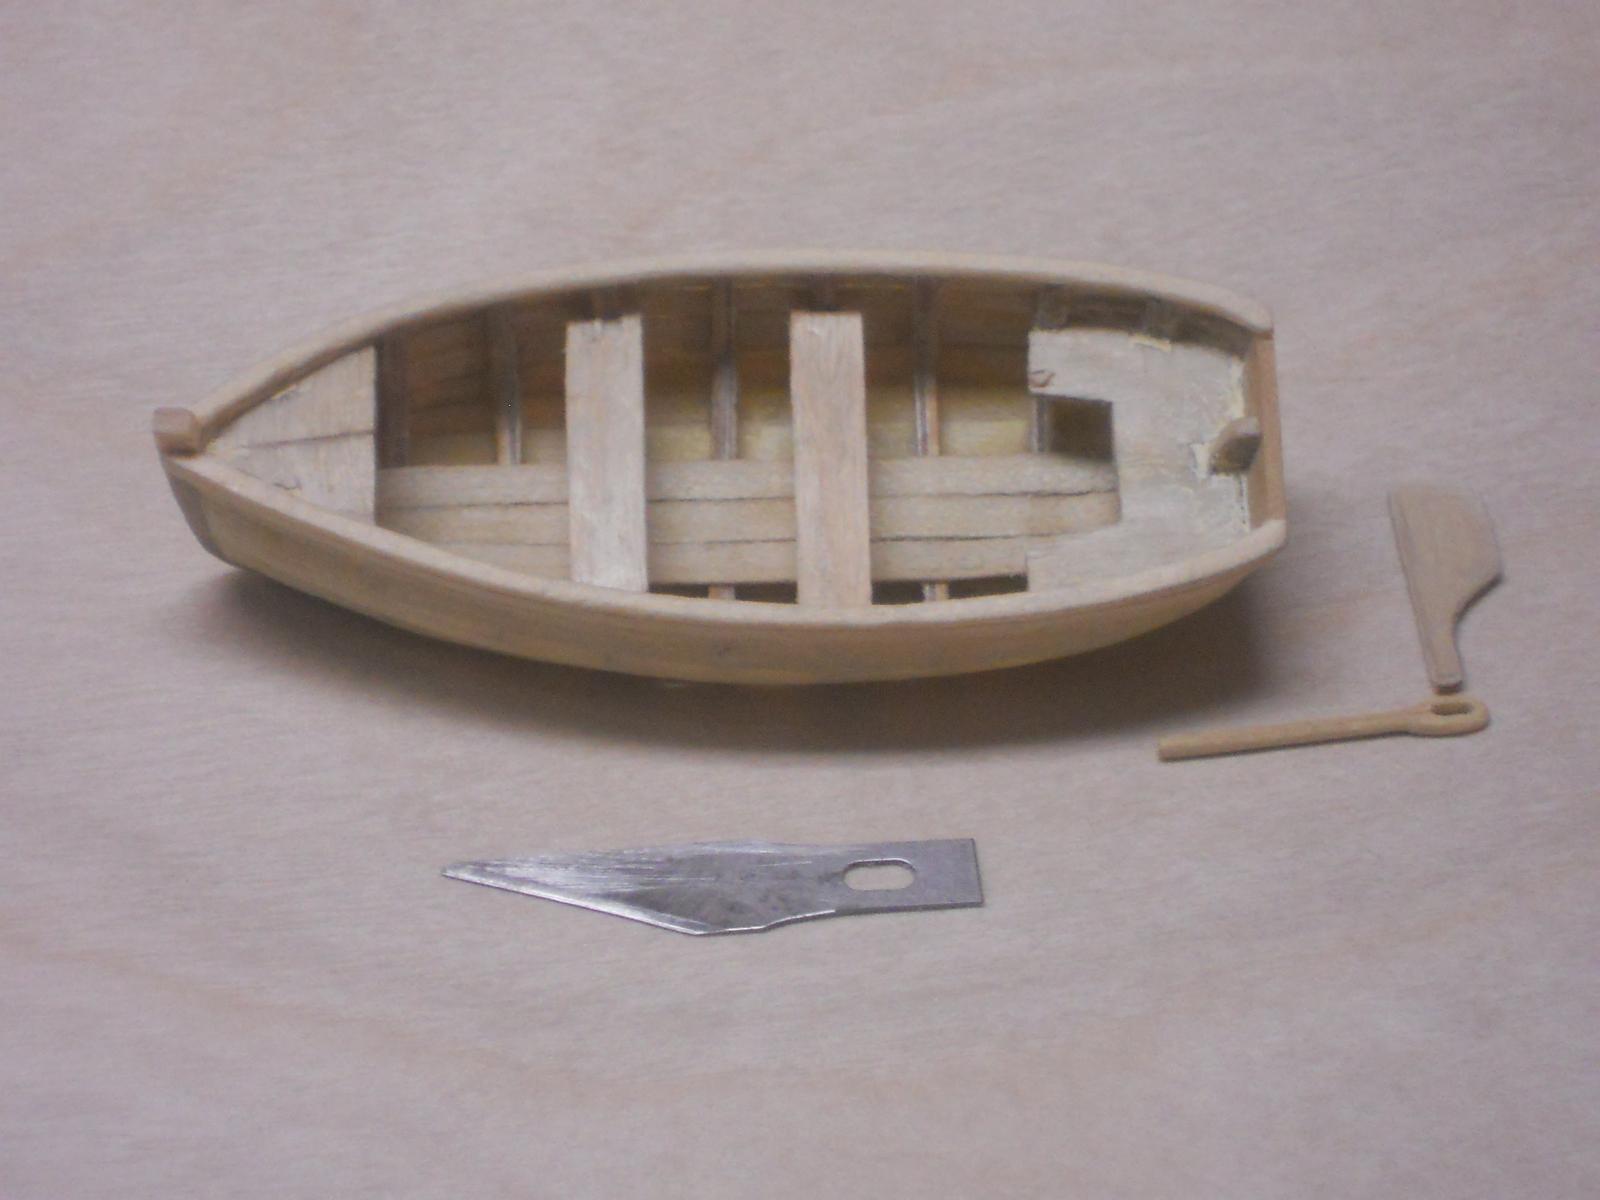
I didn't do much with this little project but managed to remove the rower's benches and put new ones in one frame forward. I think it balances out much better this way. Looking at the photo I think that I'll have make the benches a little narrower. I also made the rudder ad helm stick. Now it's just a matter of making the gudgeons and pintels, the oar locks and mooring / lifting ring - and painting. I begin to think that I'm stretching this build out some, like I don't want it to end. But I really need to finish it up so I can start make the display board and dust cover. Okay, here is a picture and with a #11 blade to indicate scale (for George ) Cheers,

-
Thank you George for your kind words and thanks to all for visiting and clicking the like button. Did some work on this little sloop. I made the bench seat for the cockpit out of a piece of 1.5 mm boxwood that I cut out of a previously made plank. I made that plank for another project out of a larger timber on my 10 inch bench saw and smoothed it down with a belt sander. Looking at the photo I think I'll have to make it a little narrower and also narrower planks. I kinda followed the kit drawing but it just looks a little to big. There'll be (fake) storage lockers under the seats therefore the seat planking will have to be close together to keep most of the water out of the lockers There is some more cleaning and tweeking to be done with other things as well but I'm progressing. Cheers,

- 176 replies
-
- 9
-
-
- muscongus bay lobster smack
- Midwest Products
- (and 1 more)
-
Hello George and thanks again for your very kind accolades. Yeah, it's small alright but a giant compared to the dinghy Omega managed to build. As noted before my dinghy is 70 mm long and when you look at the pic on page 121 you'll see the ding on my hand. This may not tell much but when you consider de overall length of my hand is 7.25 inches, from the wrist to the fingertip. Next picture I'll lay a #11 blade next to it Hoi Carl, good seeing you again and thanks for kind remarks. There'll be more detail coming - - - soon. I did rip the oarsmen seats out and made new ones and installed them. Sorry, no pics - they'll come next time. I'm getting close to being finished! Cheers to all,