Louie da fly
-
Posts
7,990 -
Joined
-
Last visited
Content Type
Profiles
Forums
Gallery
Events
Everything posted by Louie da fly
-
 Yes, not too bad, Pat. I've been chasing down those white marks (which are only obvious in a photograph - almost invisible to the naked eye). Thanks everybody for the likes, by the way. Steven
- 740 replies
-
- 3
-

-
- Tudor
- restoration
- (and 4 more)
-
Blast! Oh well, on to YK-12 Version II. At 1:16 or larger that will involve a whole new set of interesting problems to overcome. How big will it be at that scale? I have to say I really look forward to seeing this one progressing - lots of interesting issues in reconstructing a Byzantine ship as originally built. A break to work on Gros Ventre while you collect your thoughts and get a new look on things would probably be good, as well. Steven
-
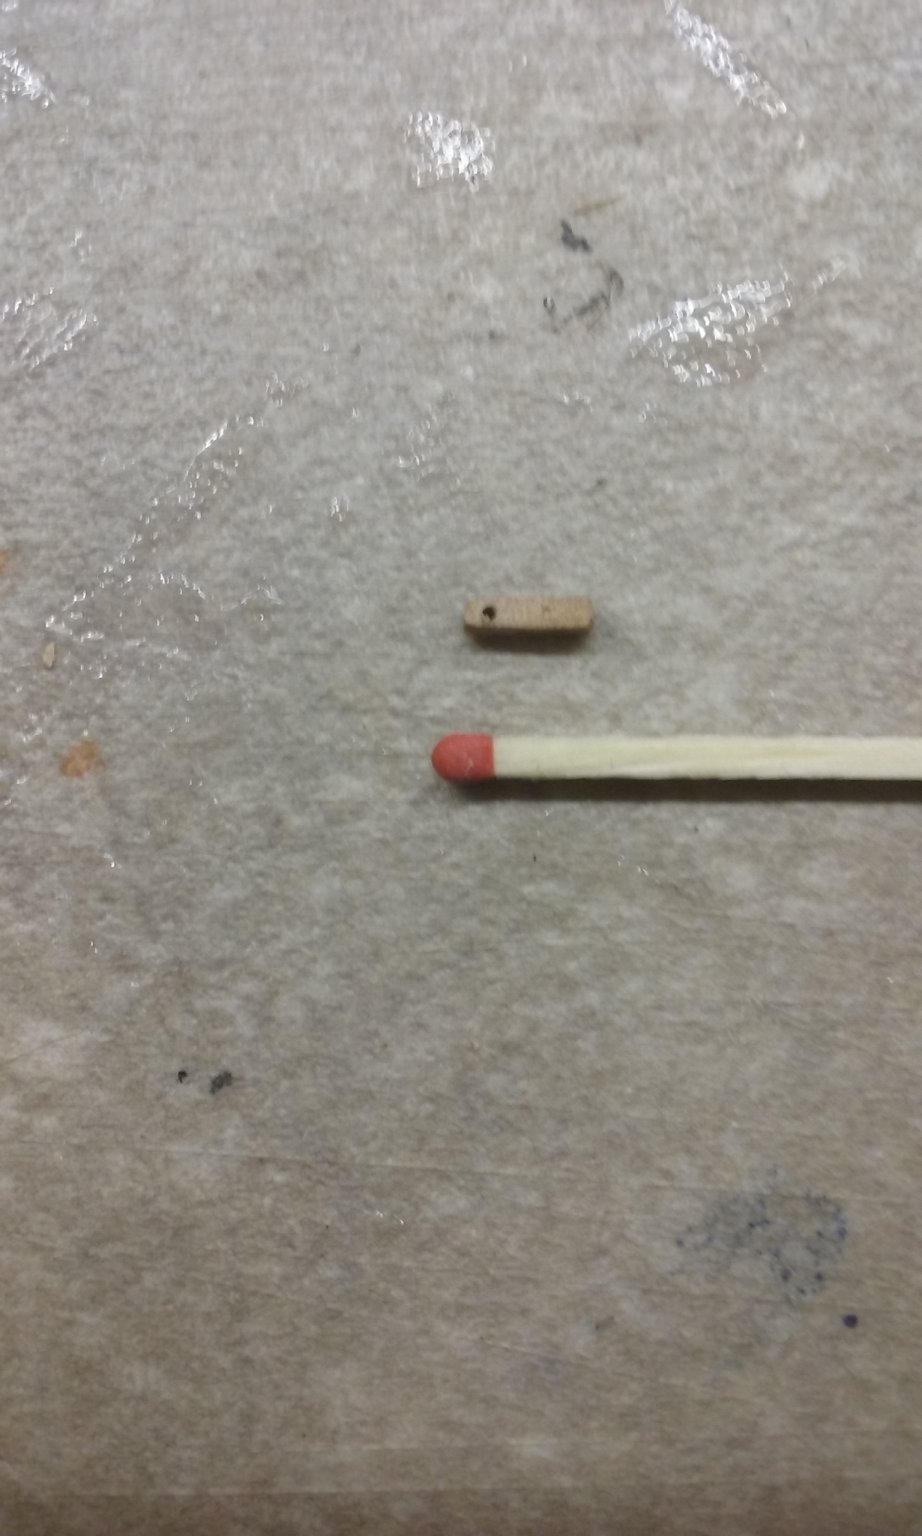
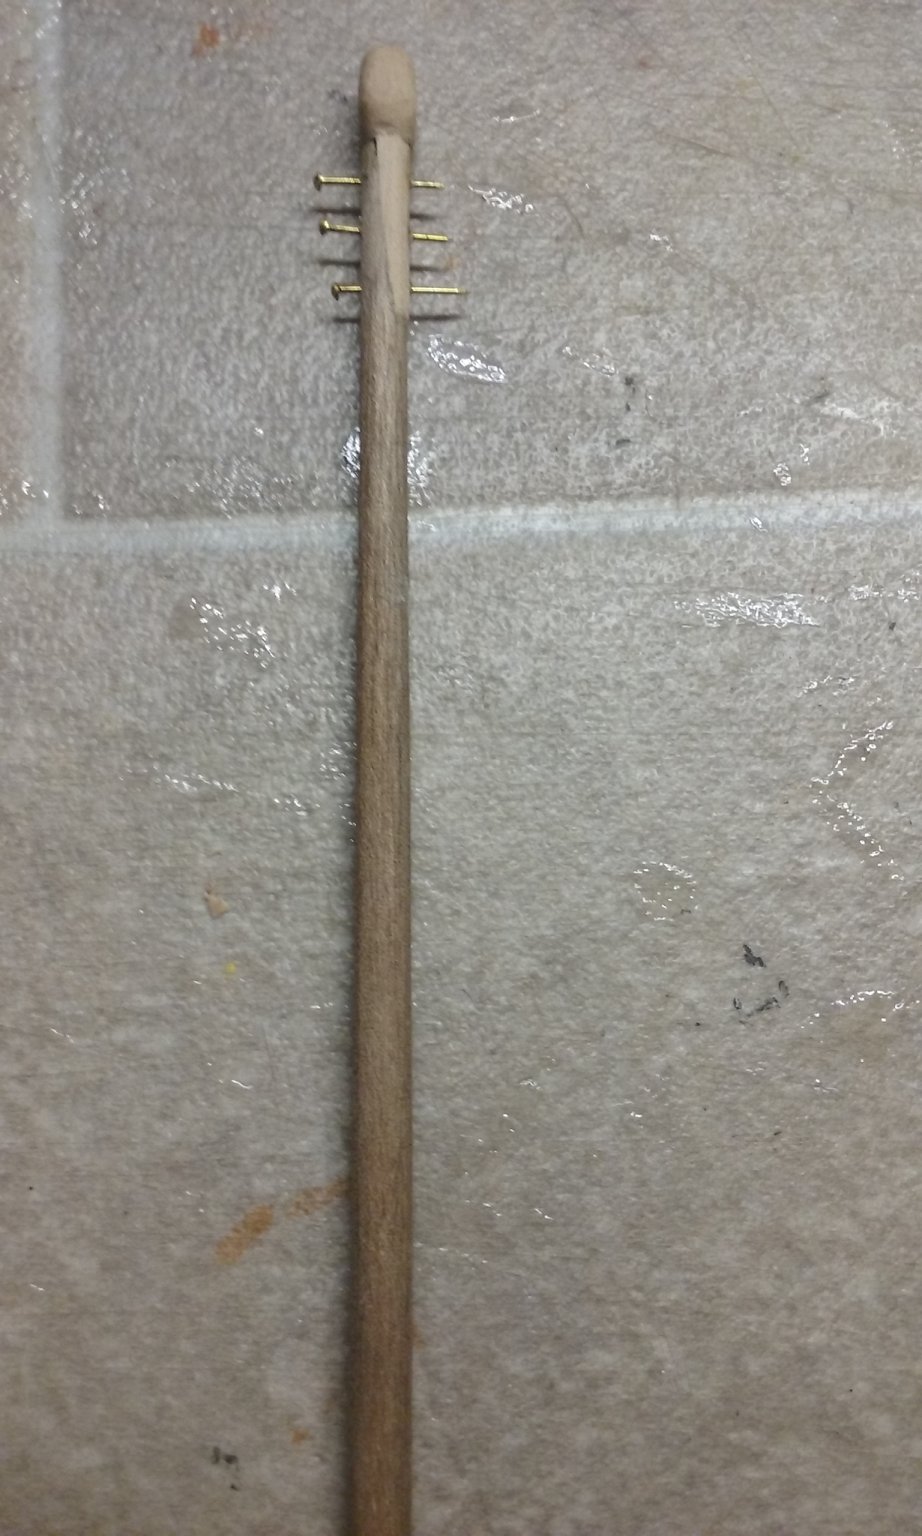
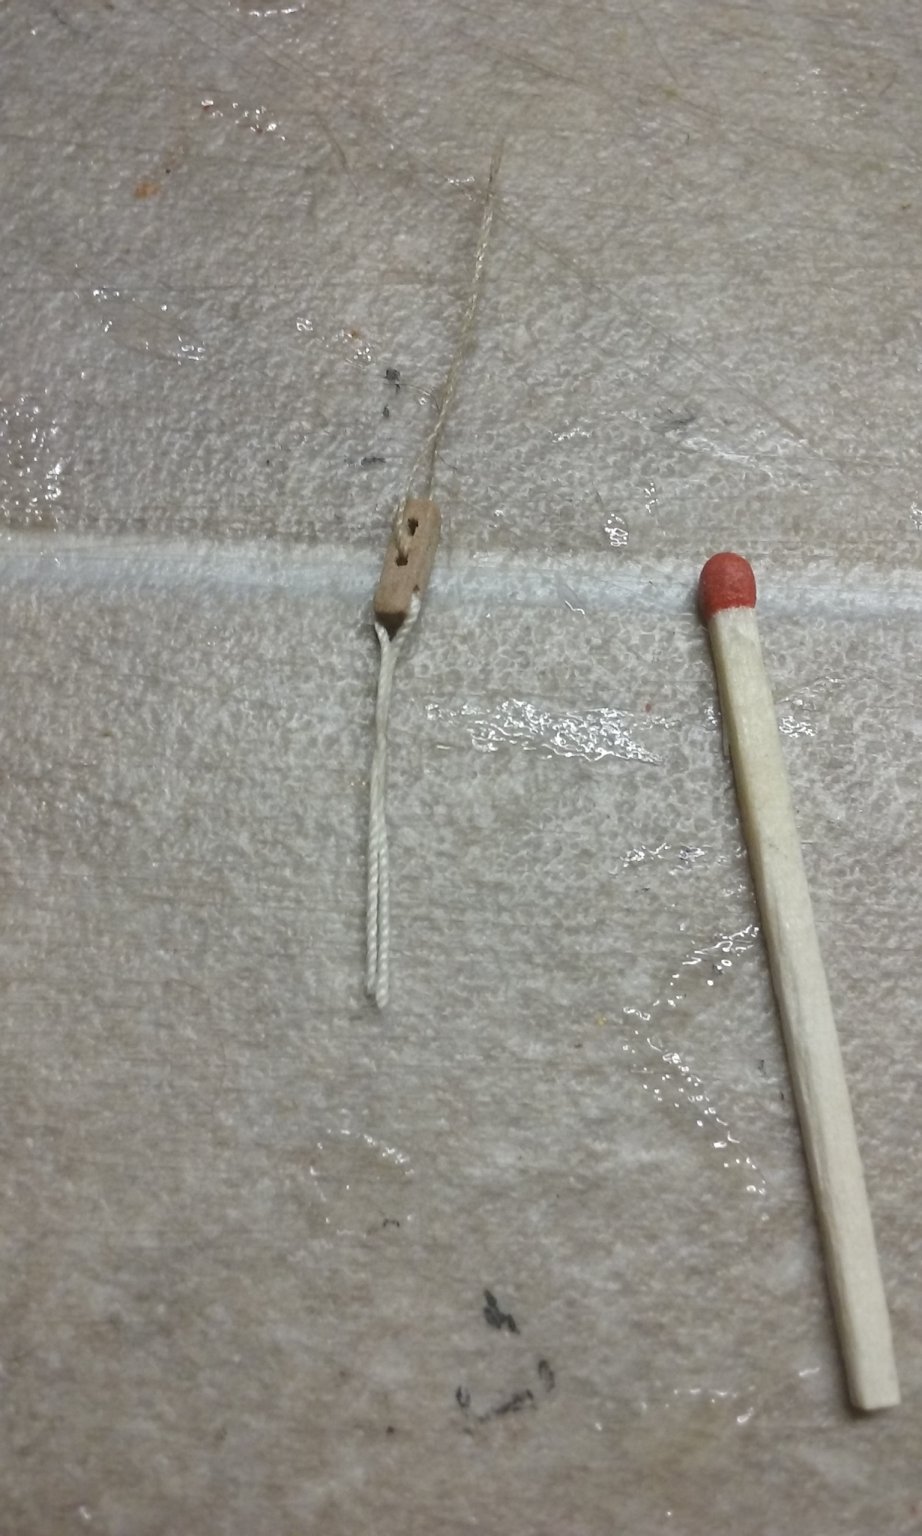
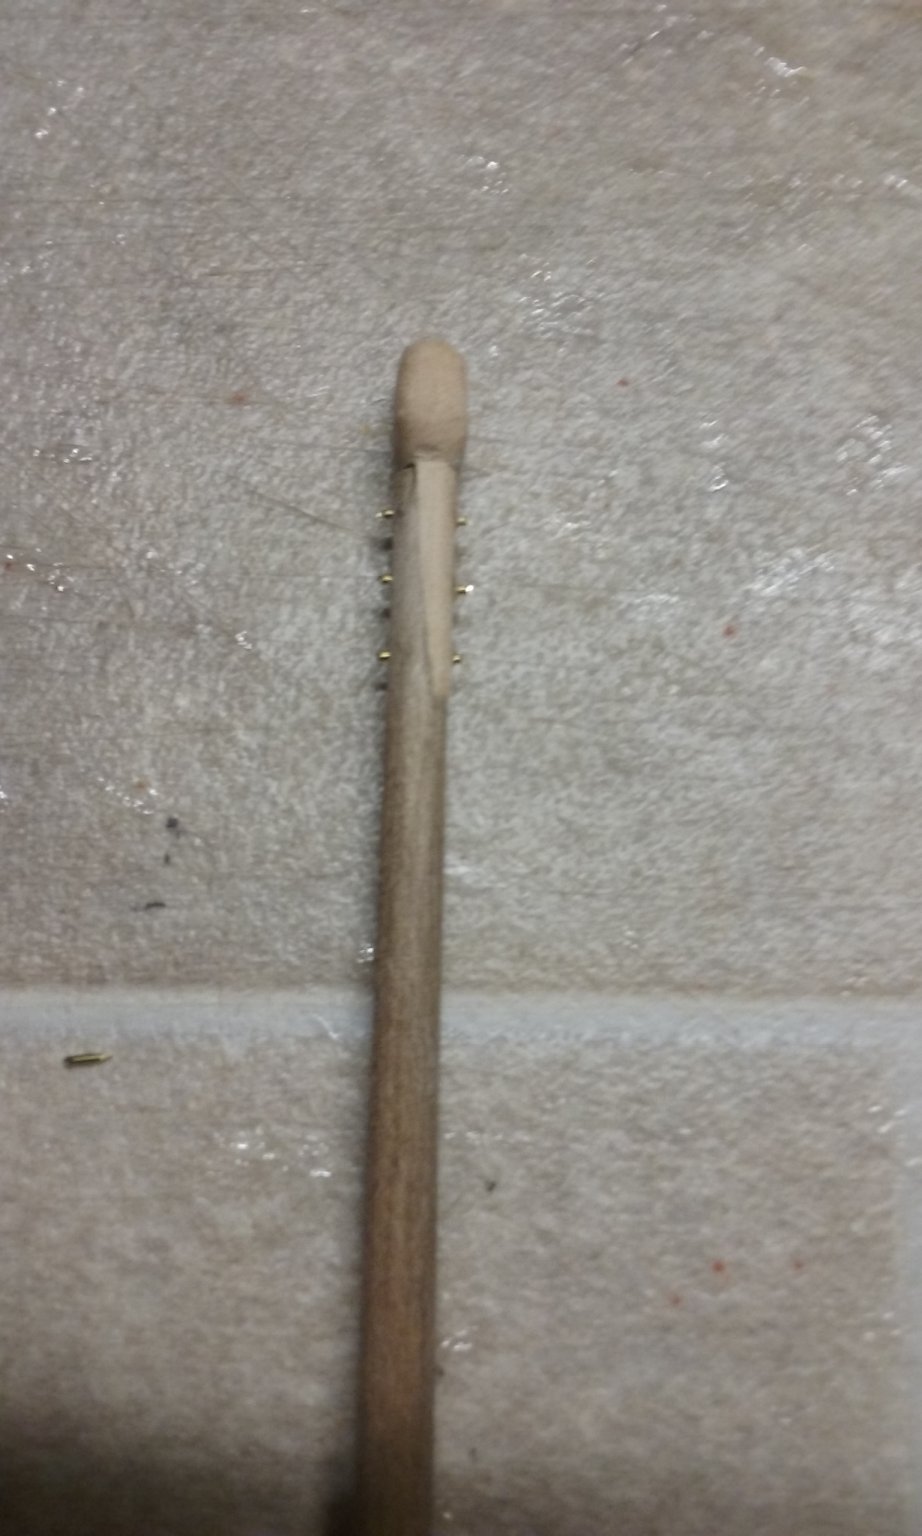
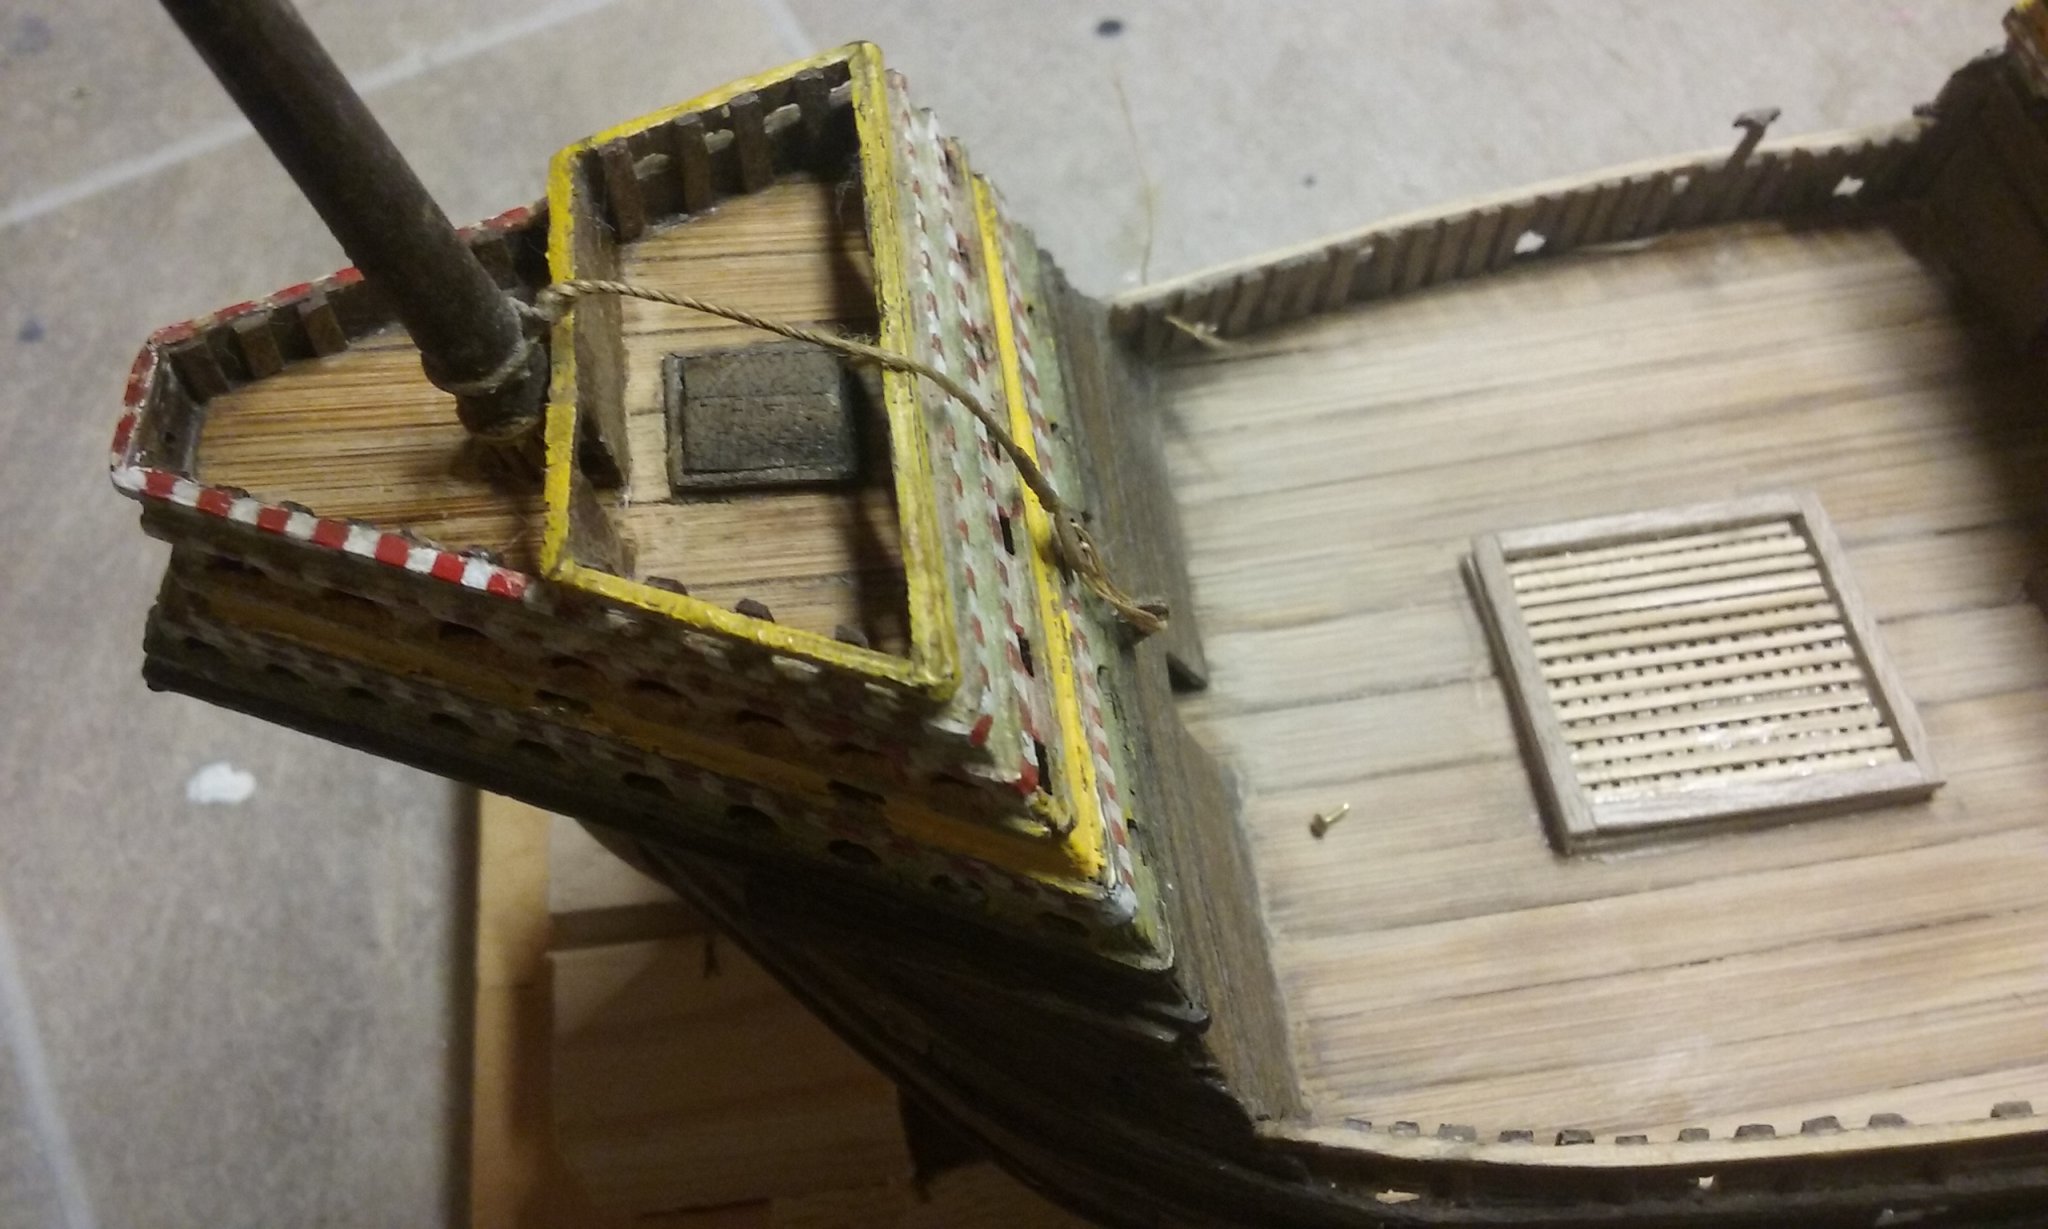
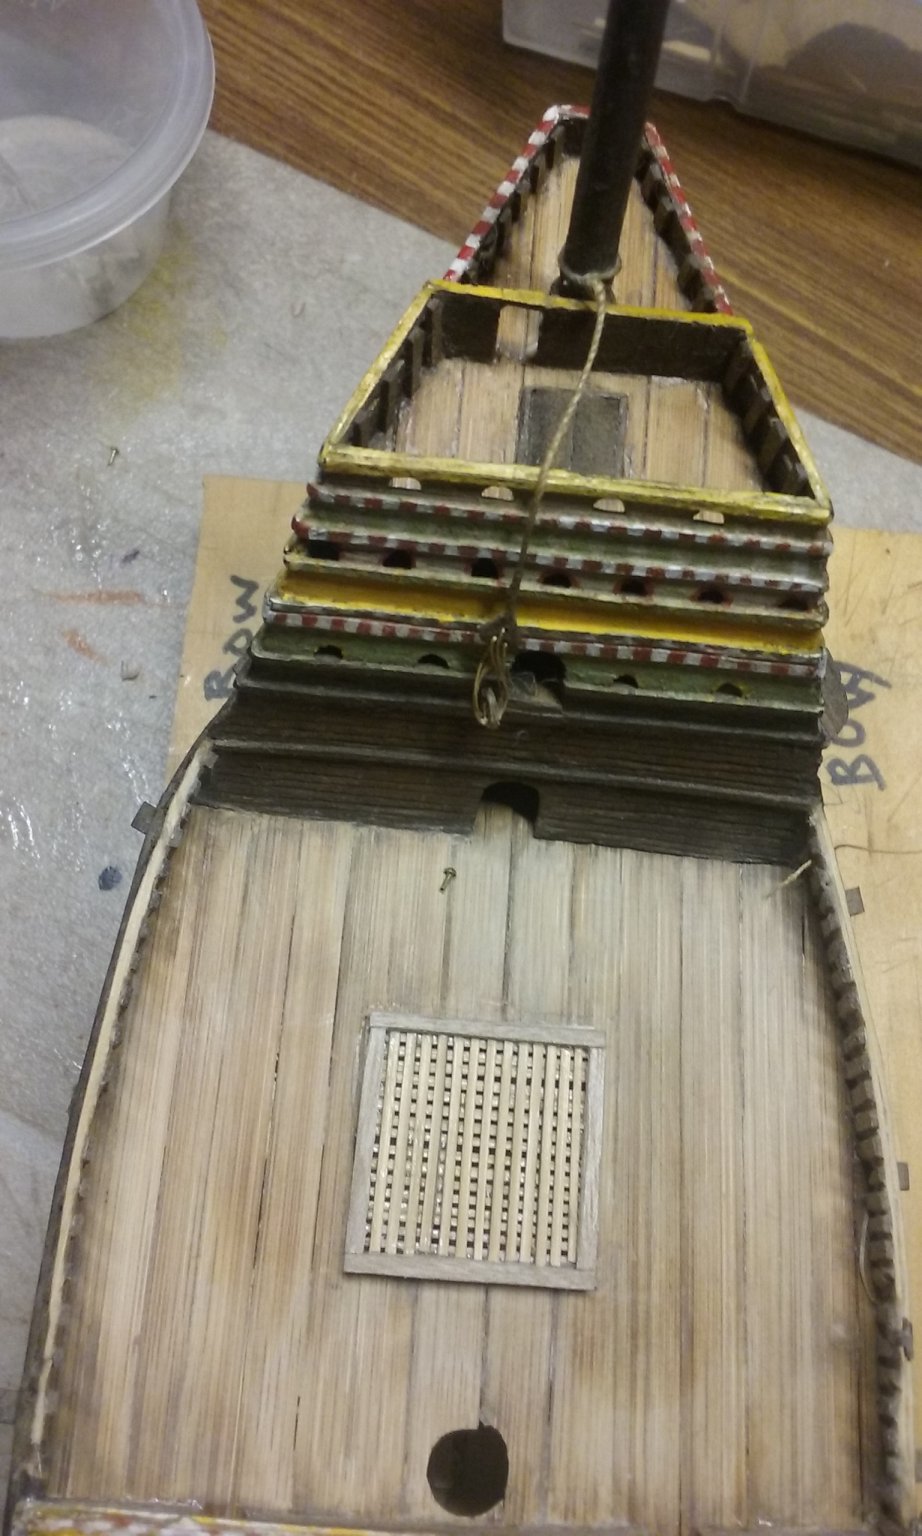
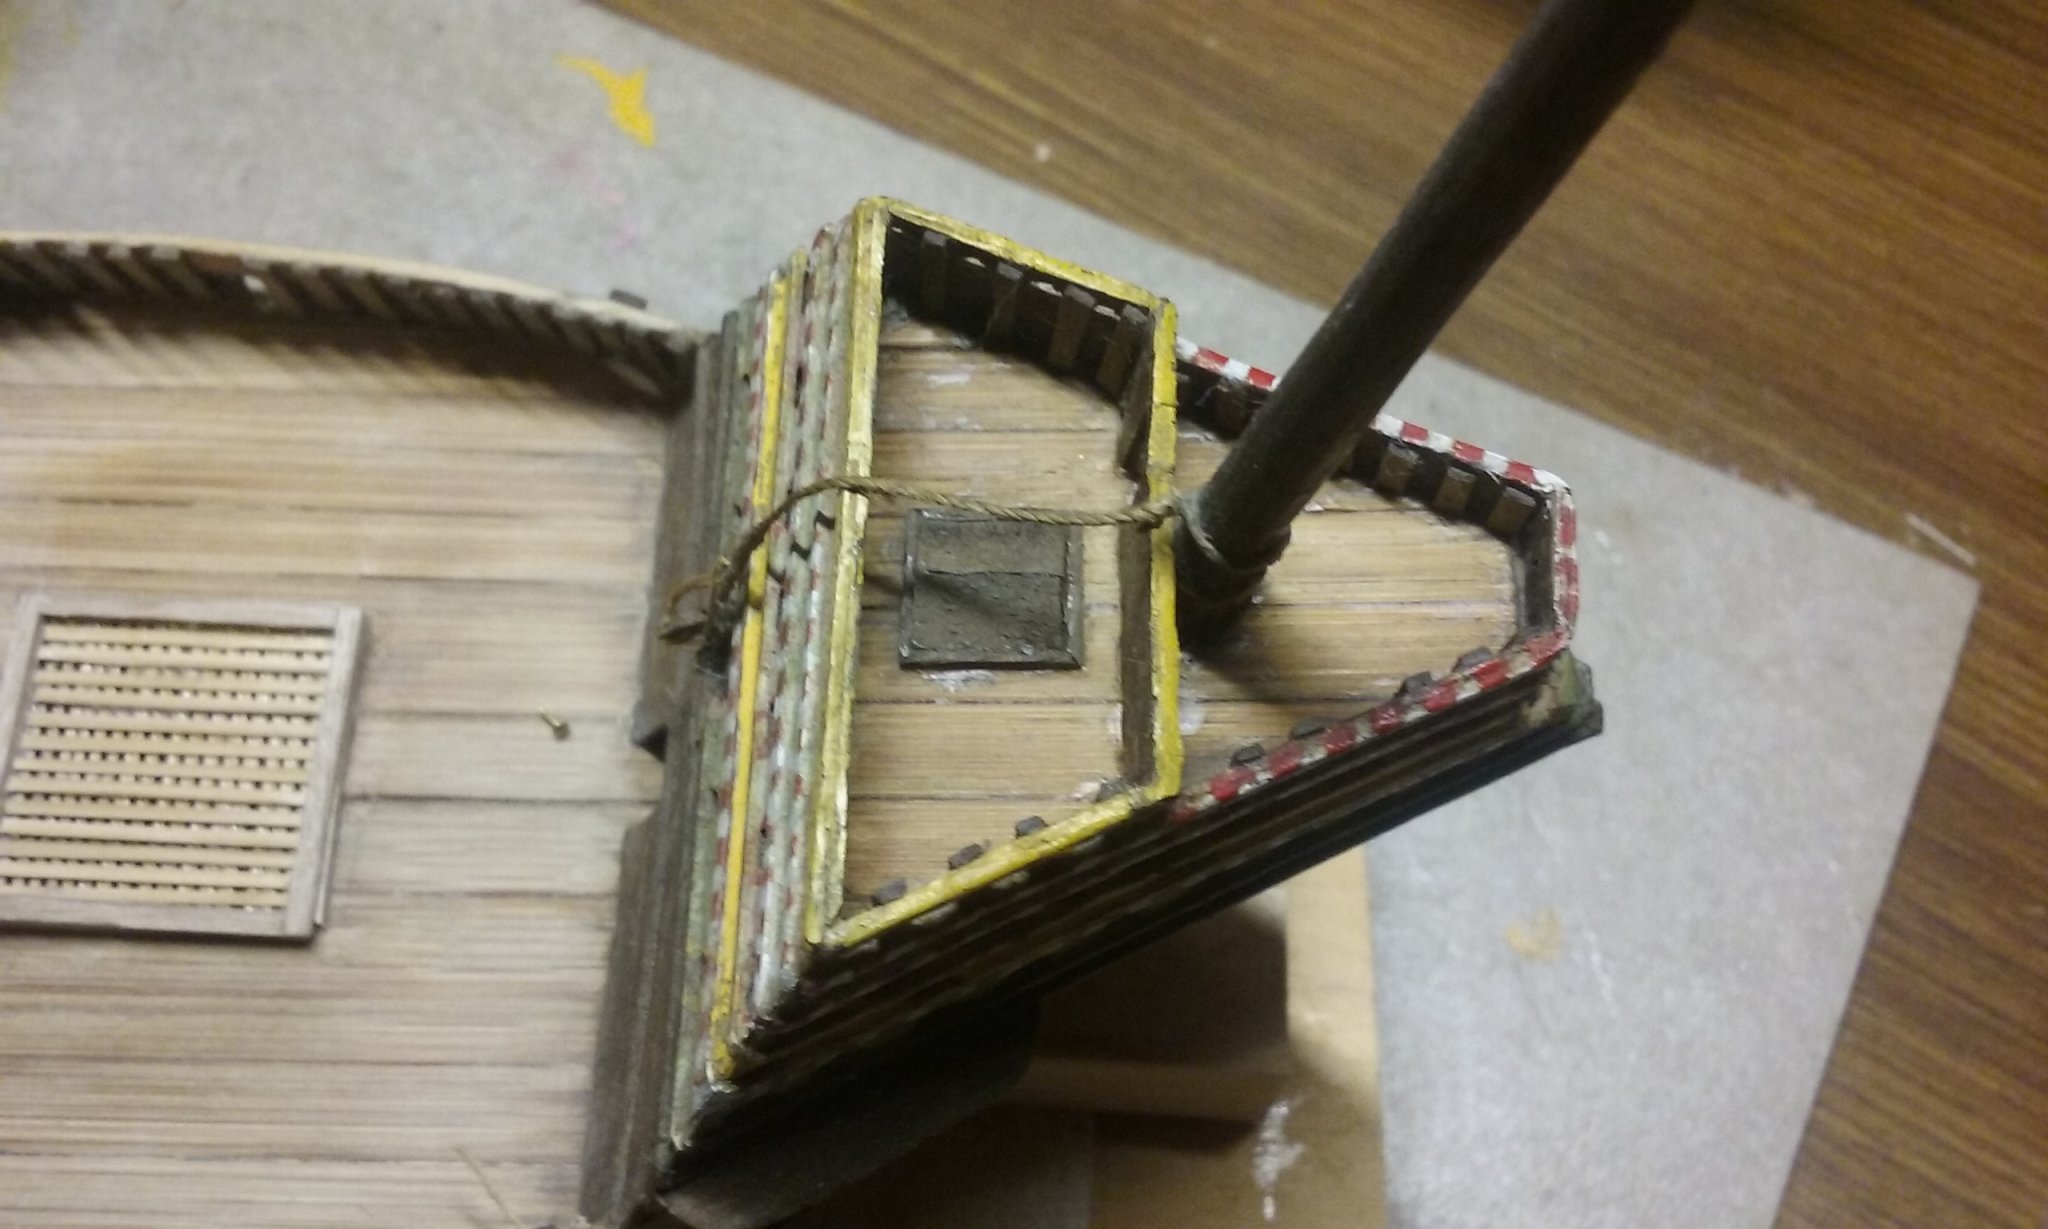
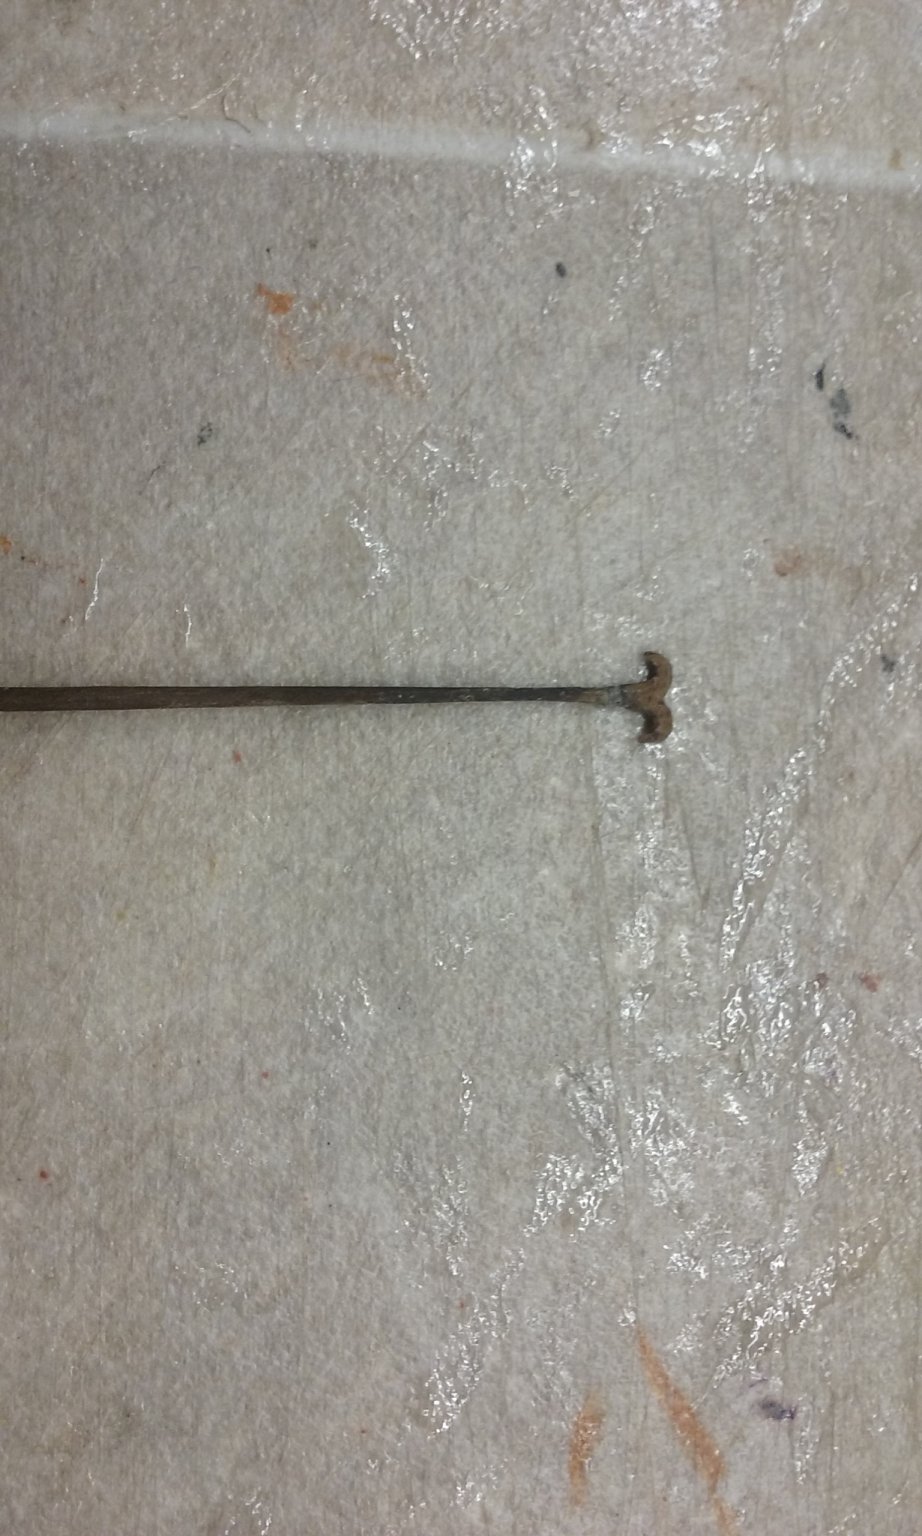
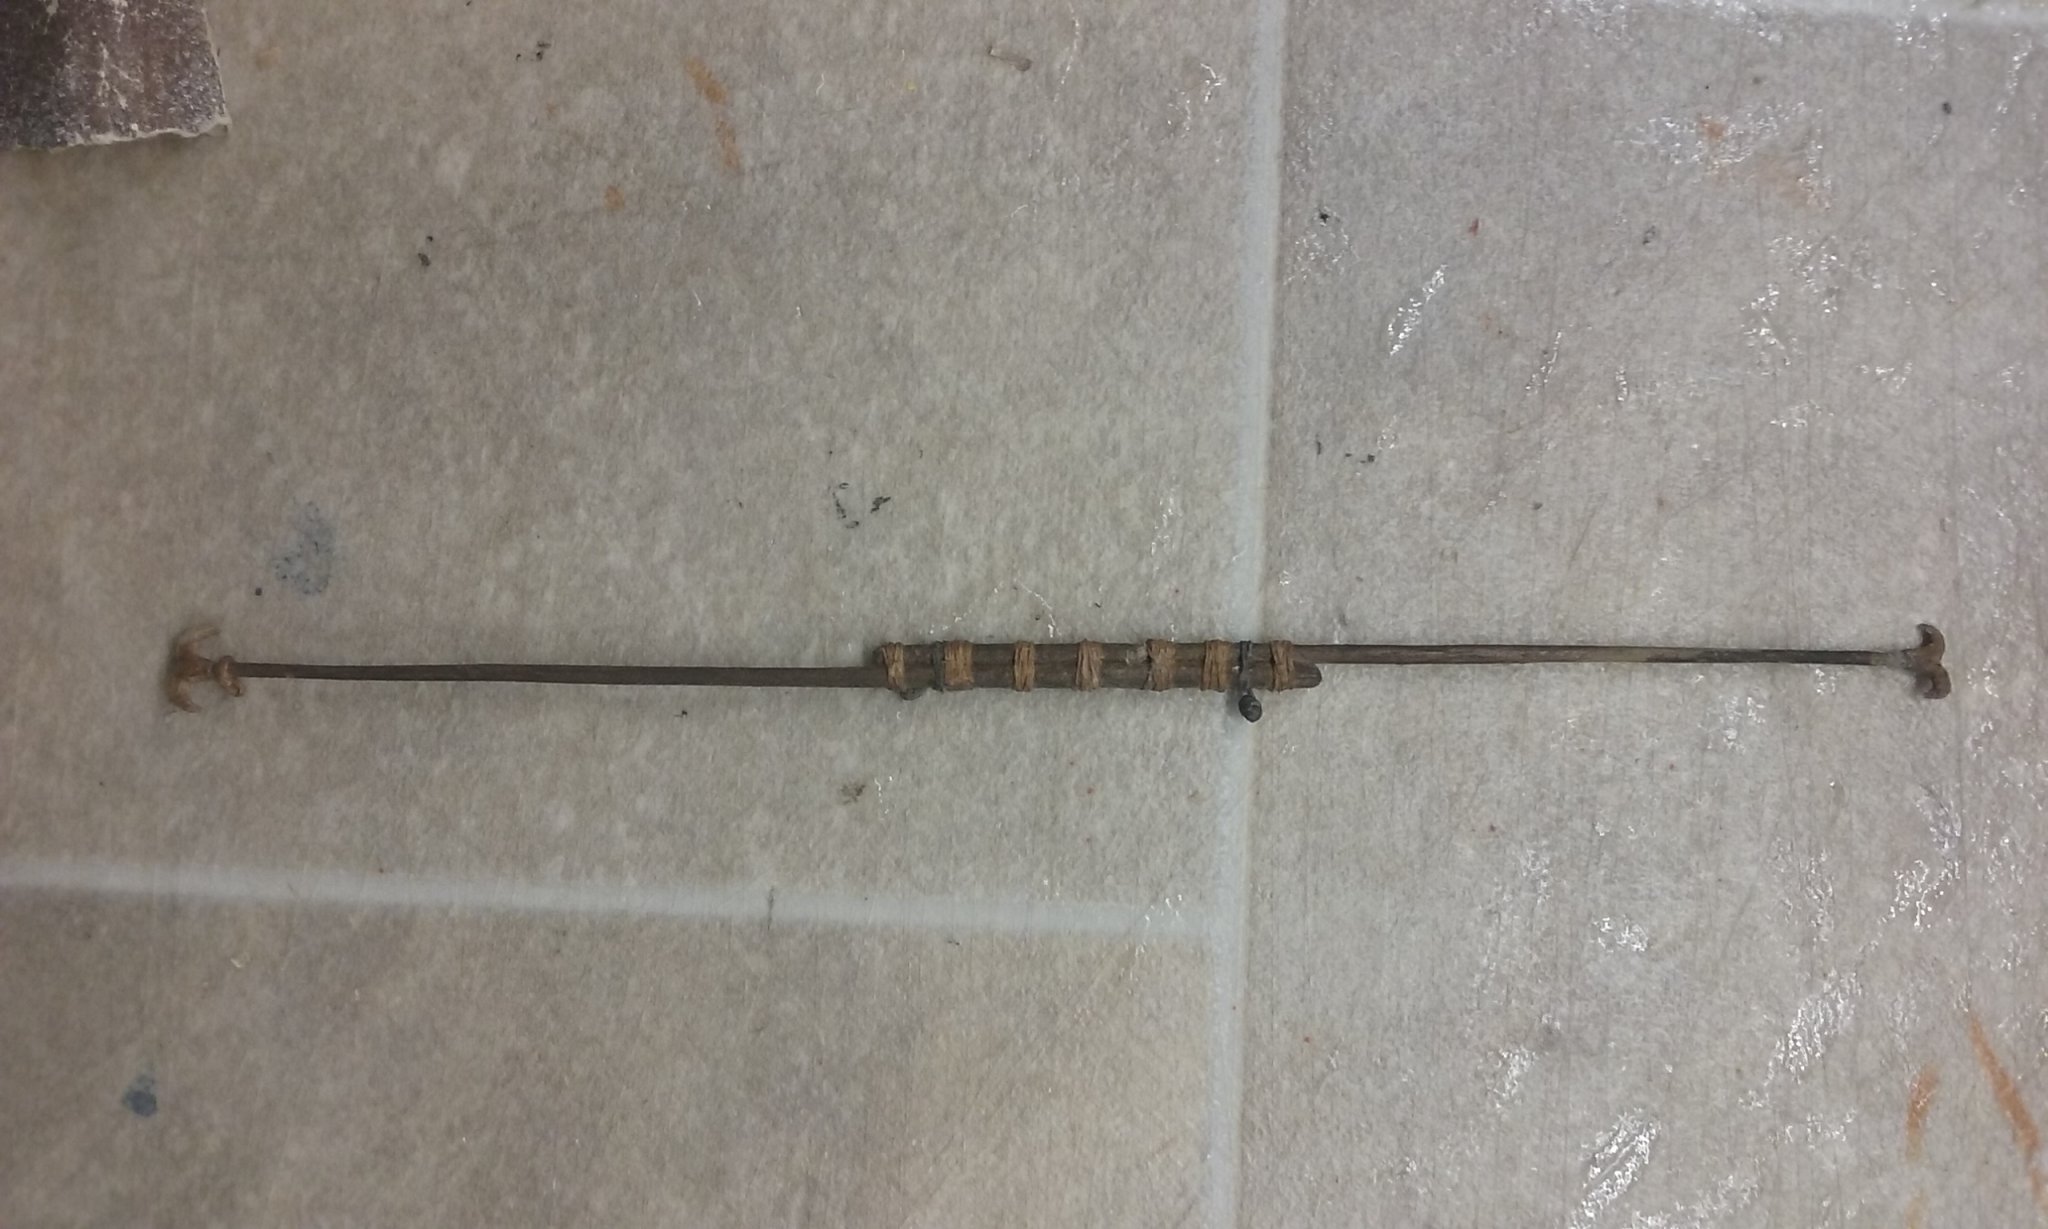
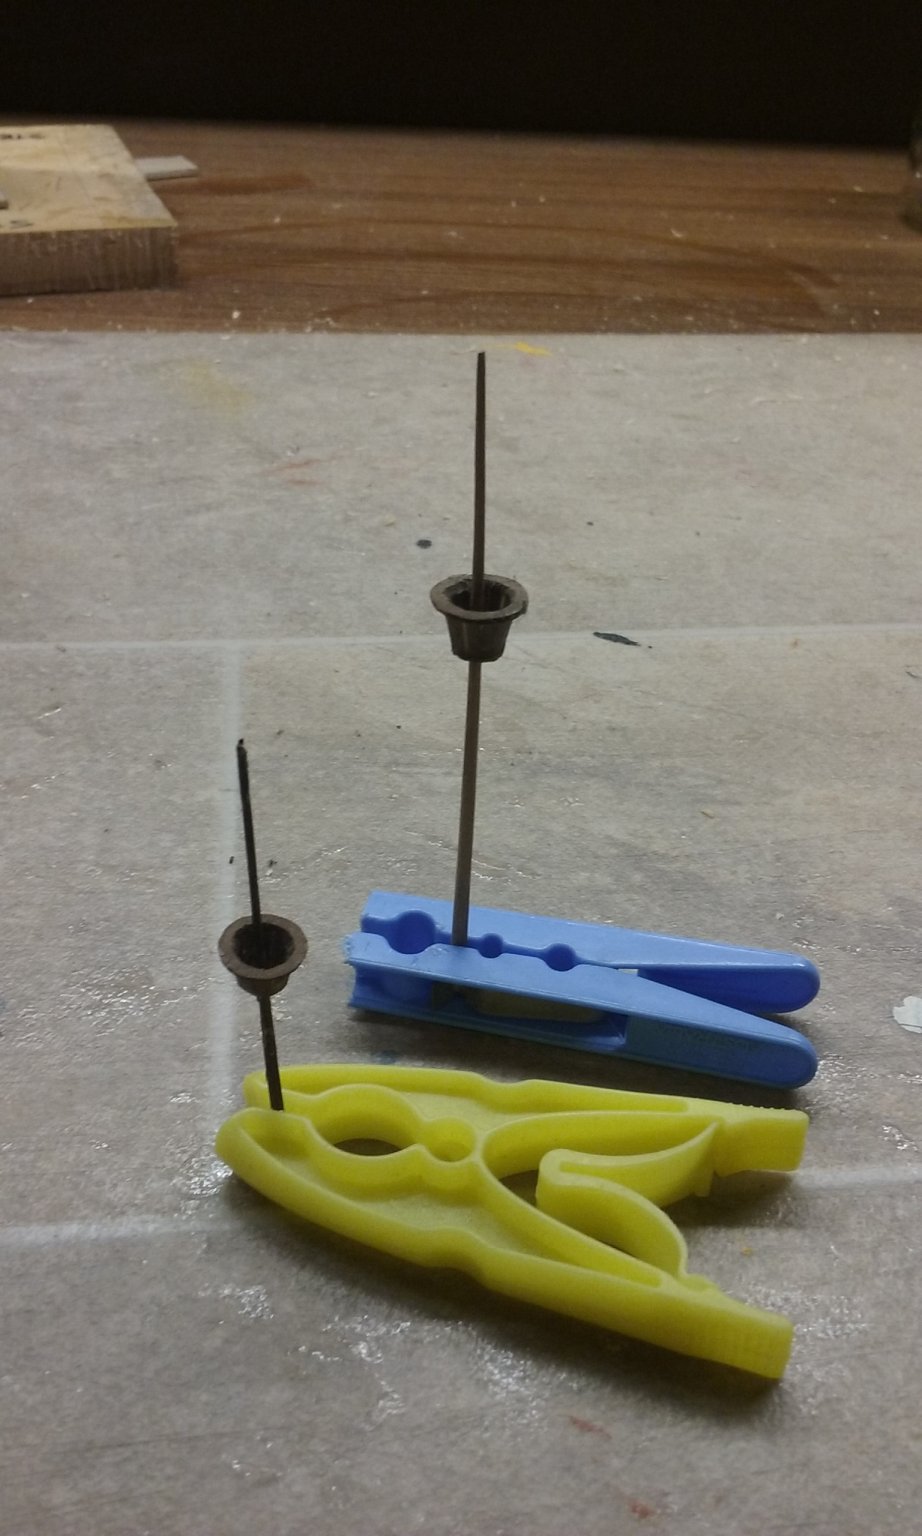
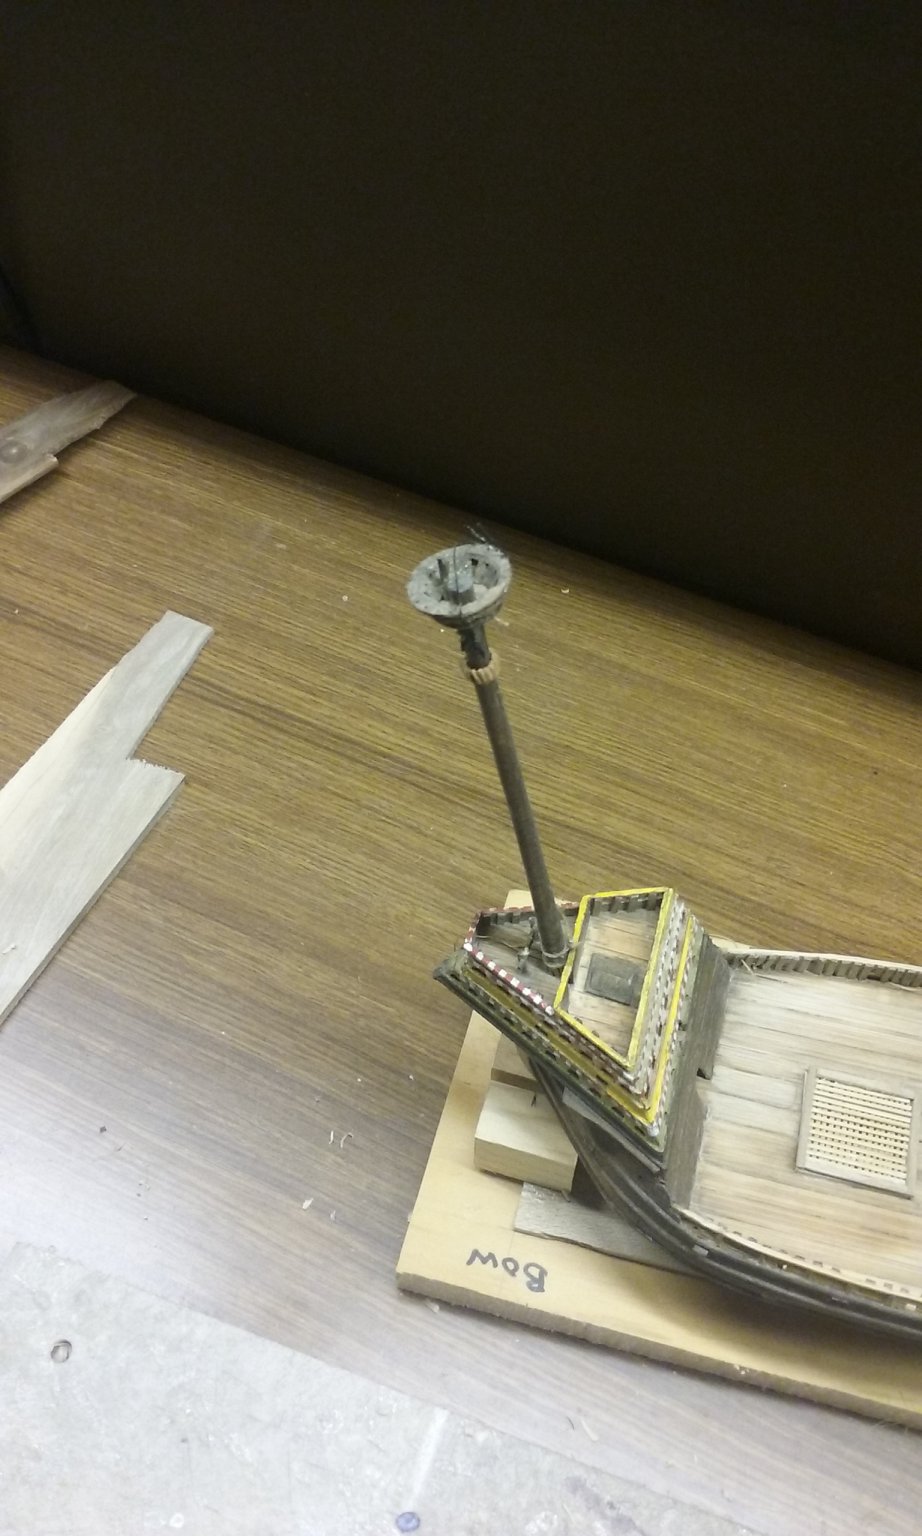
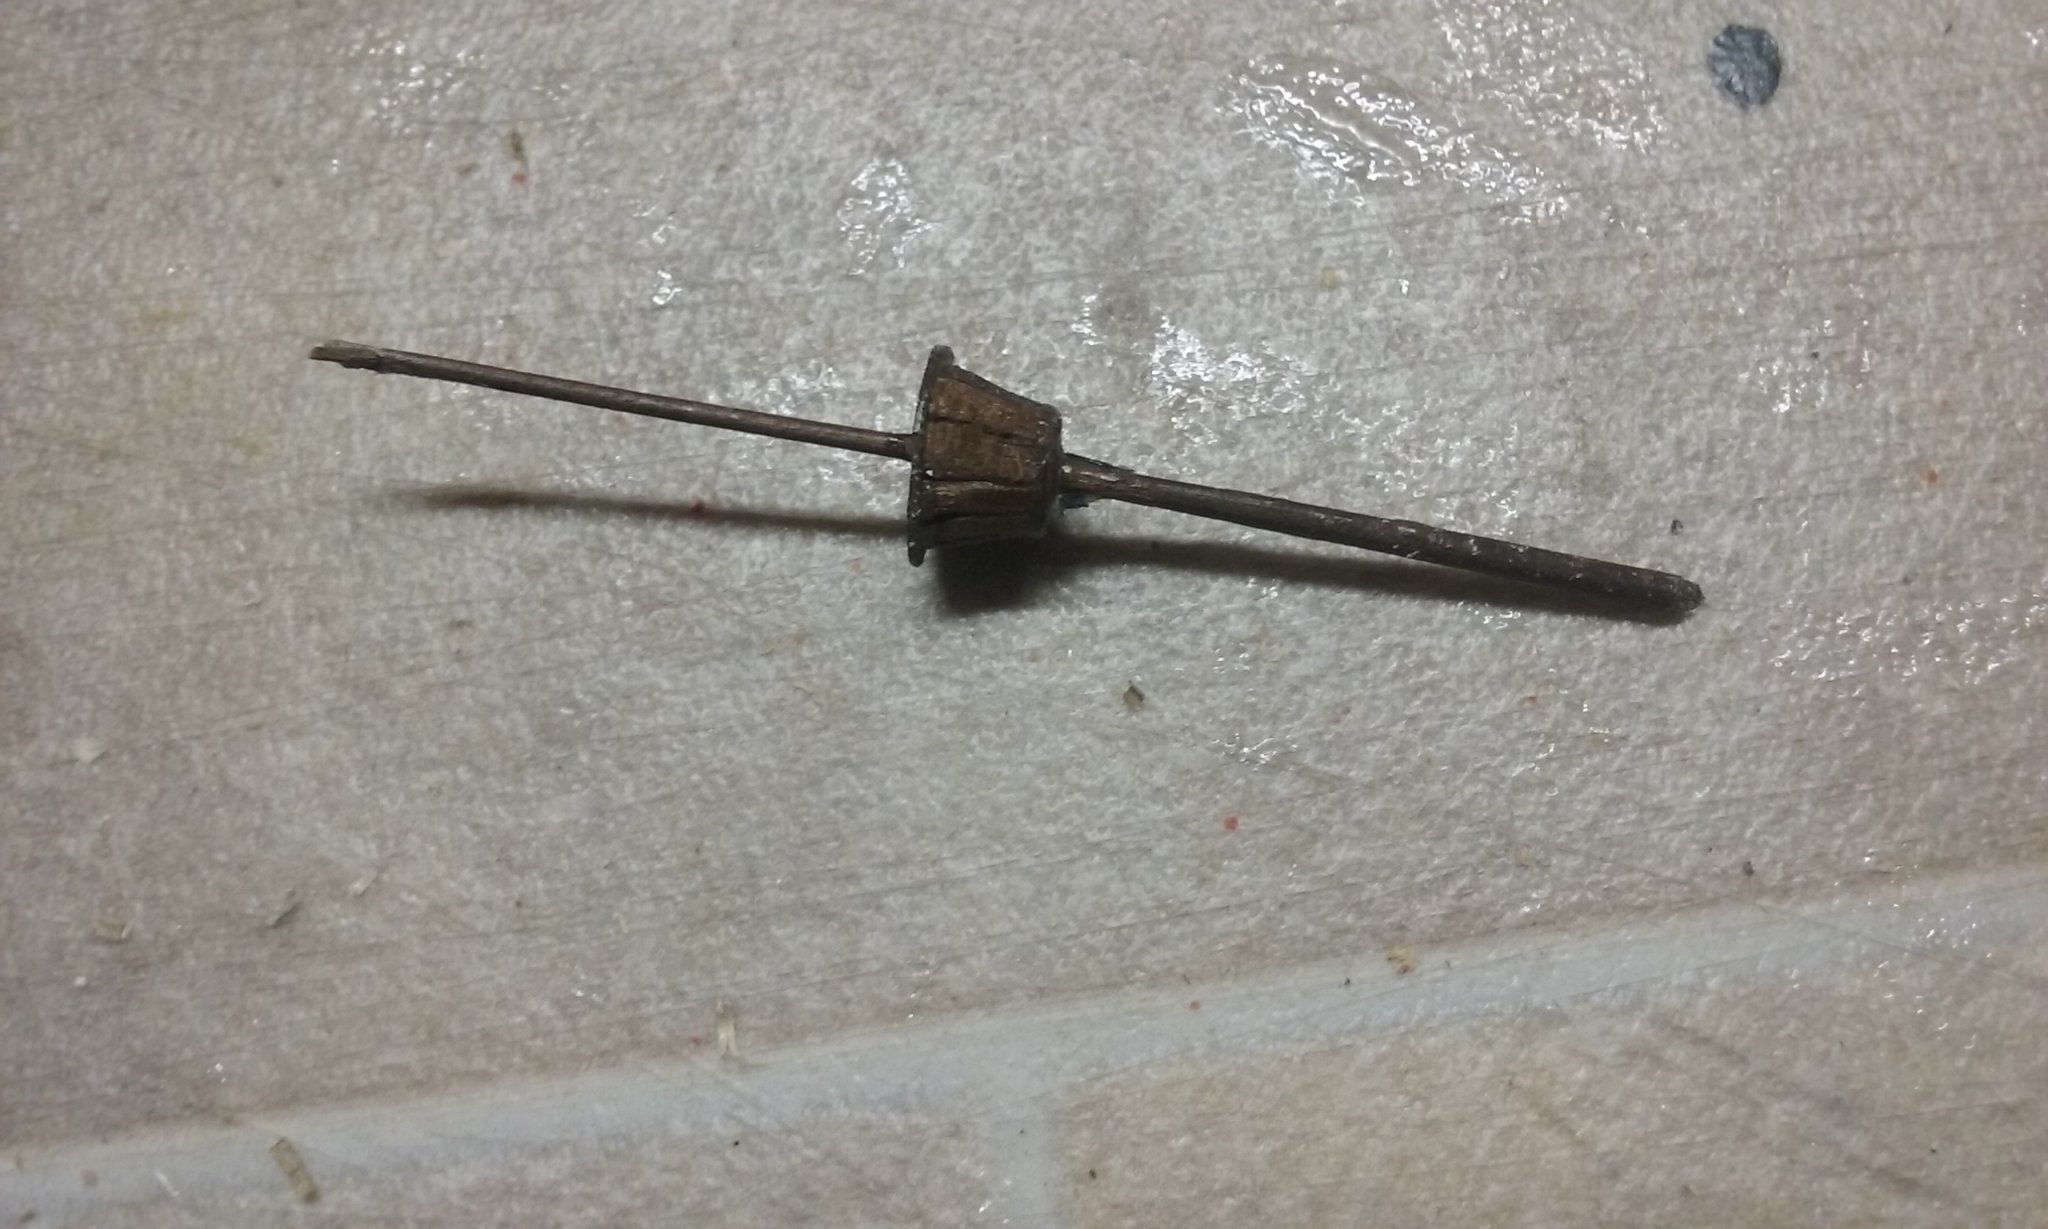
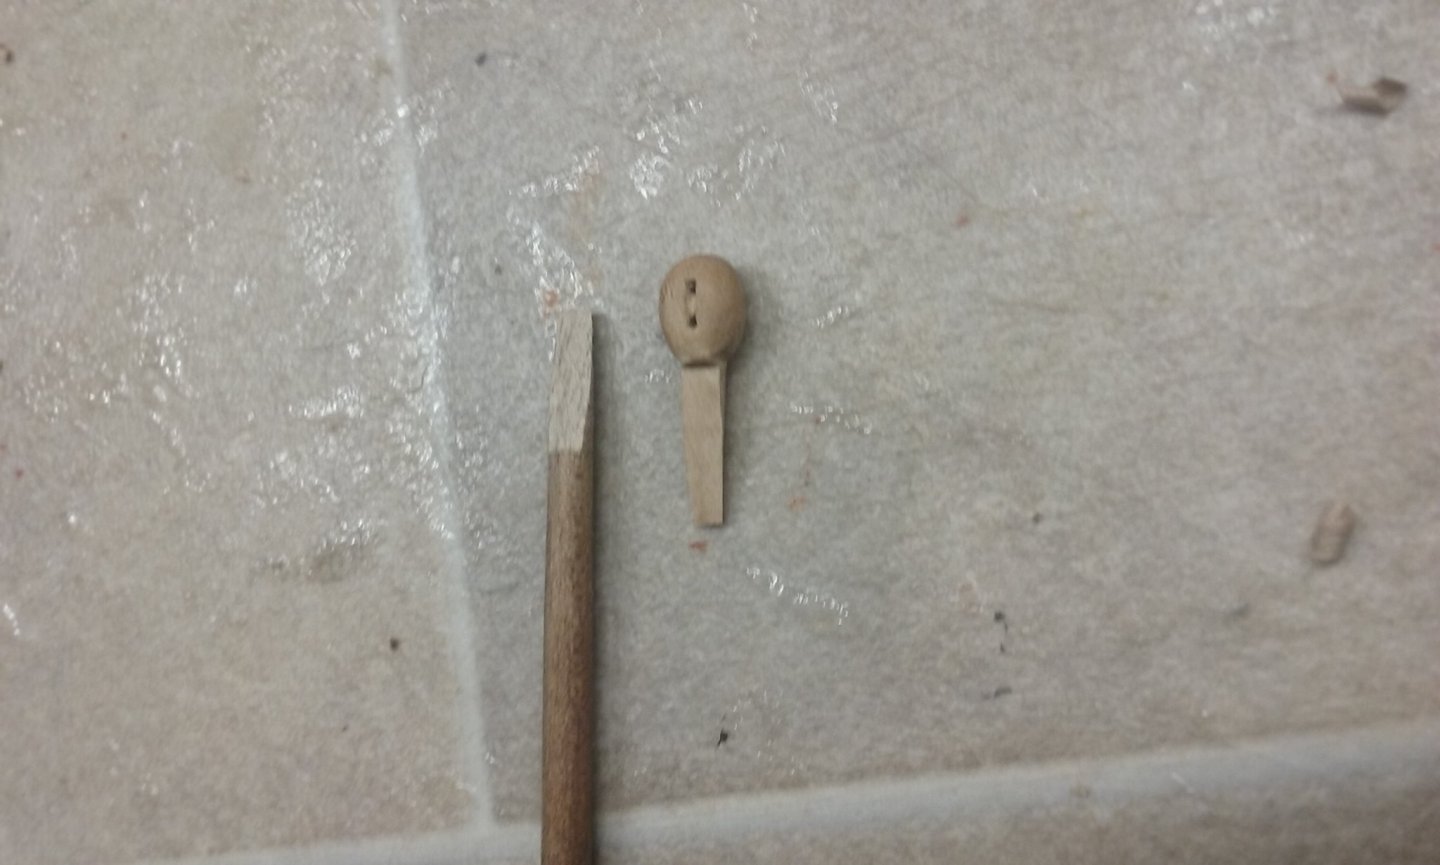
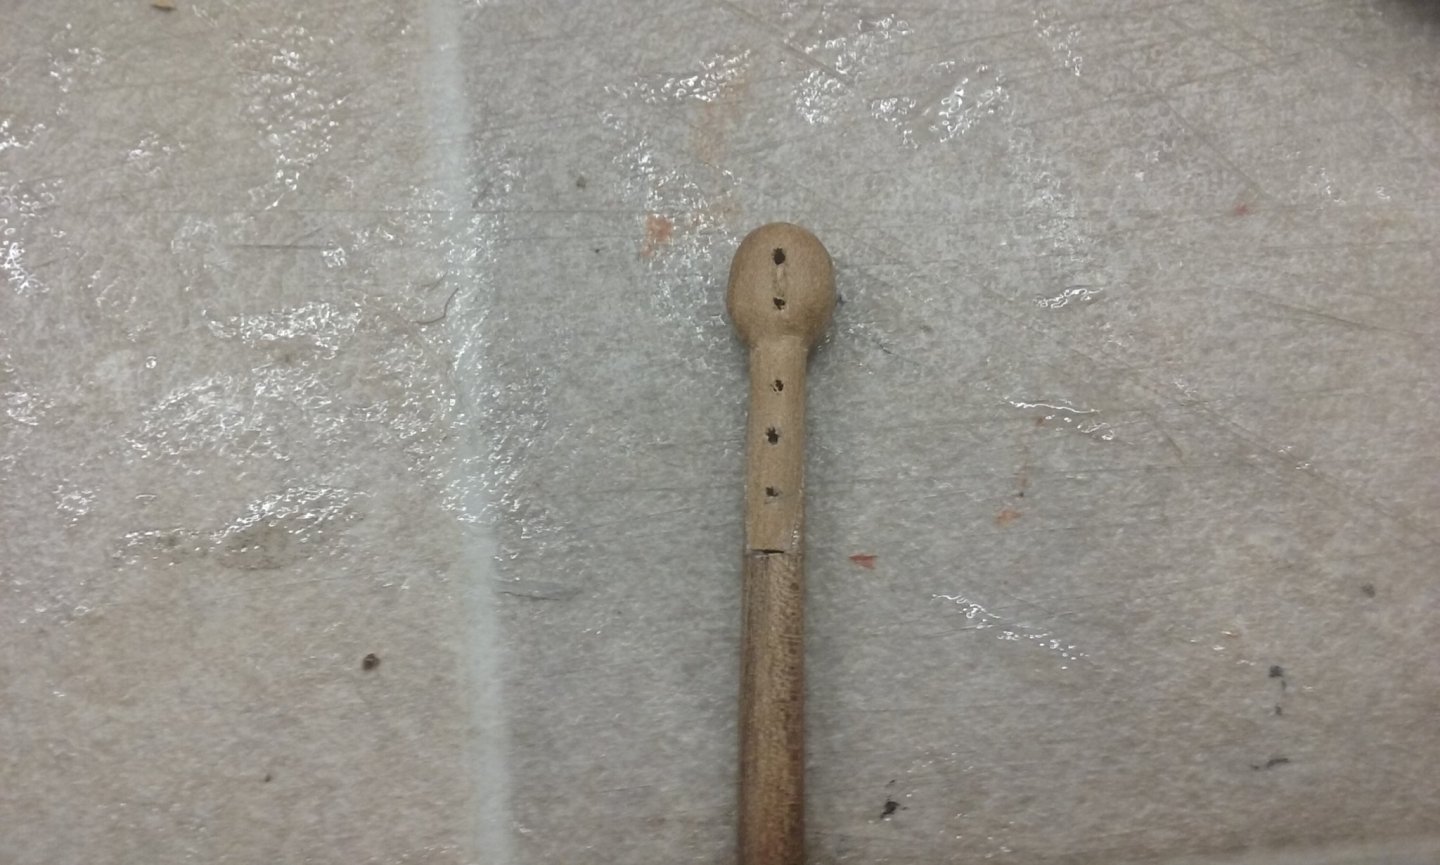
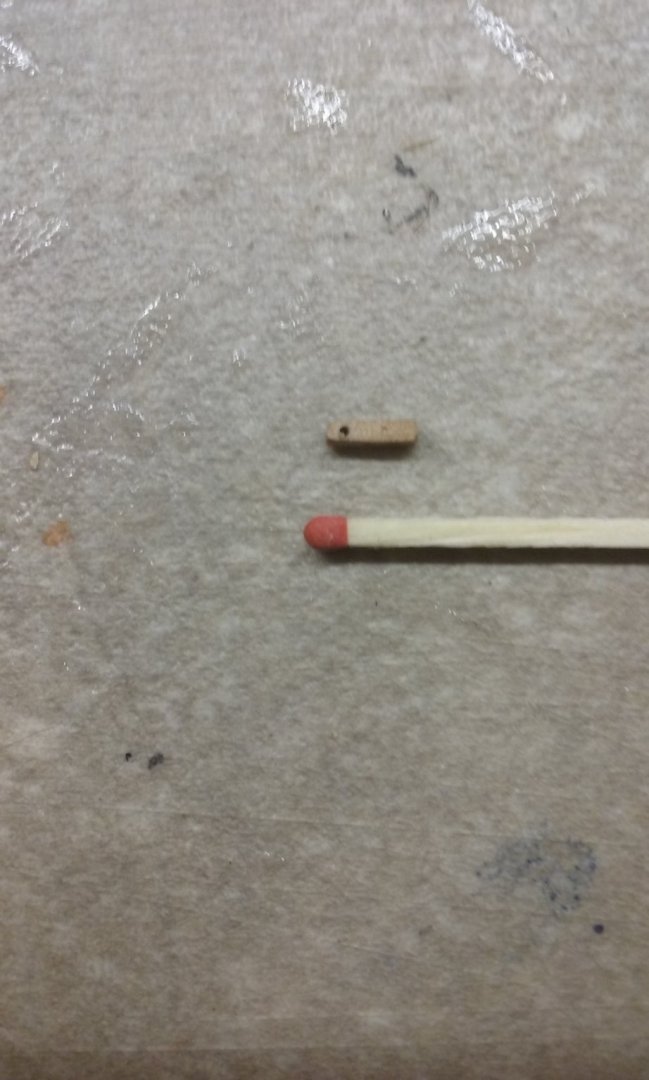
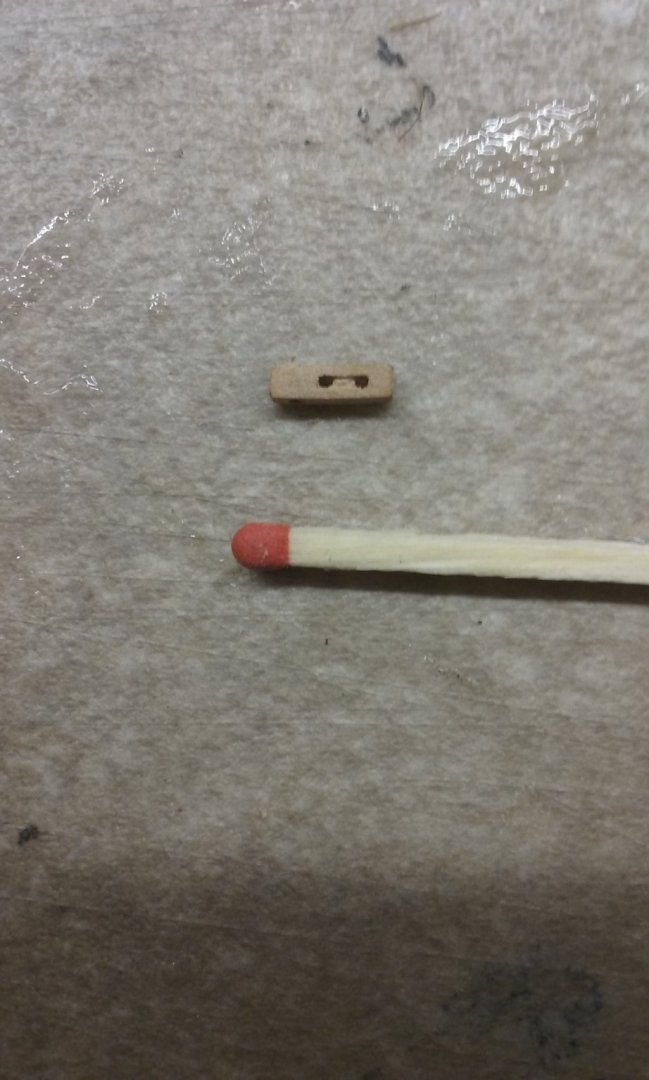
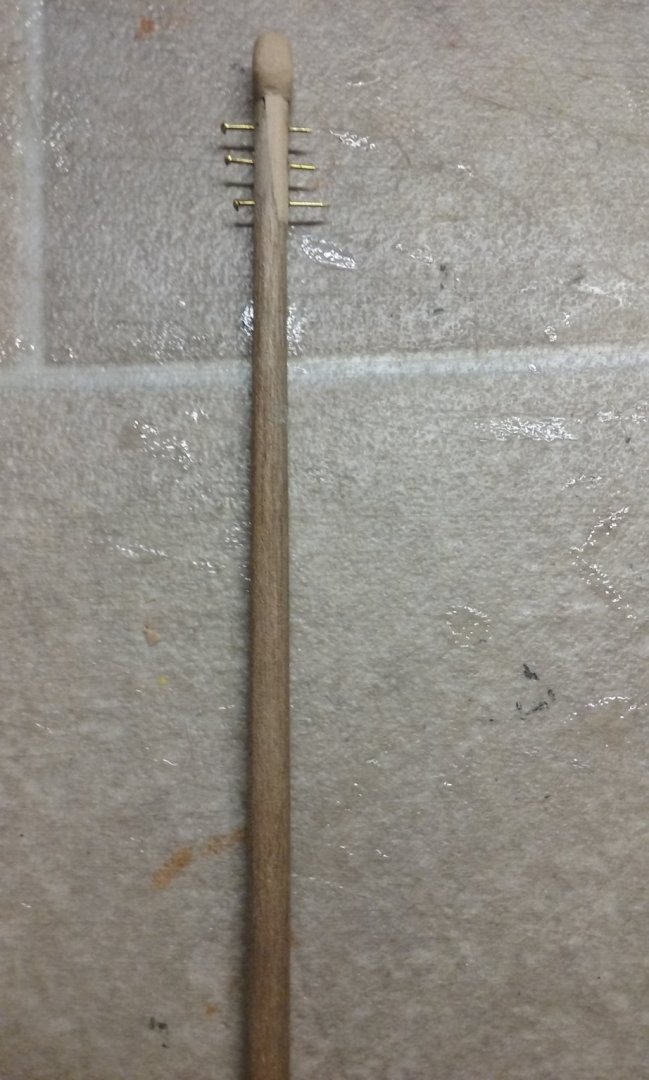
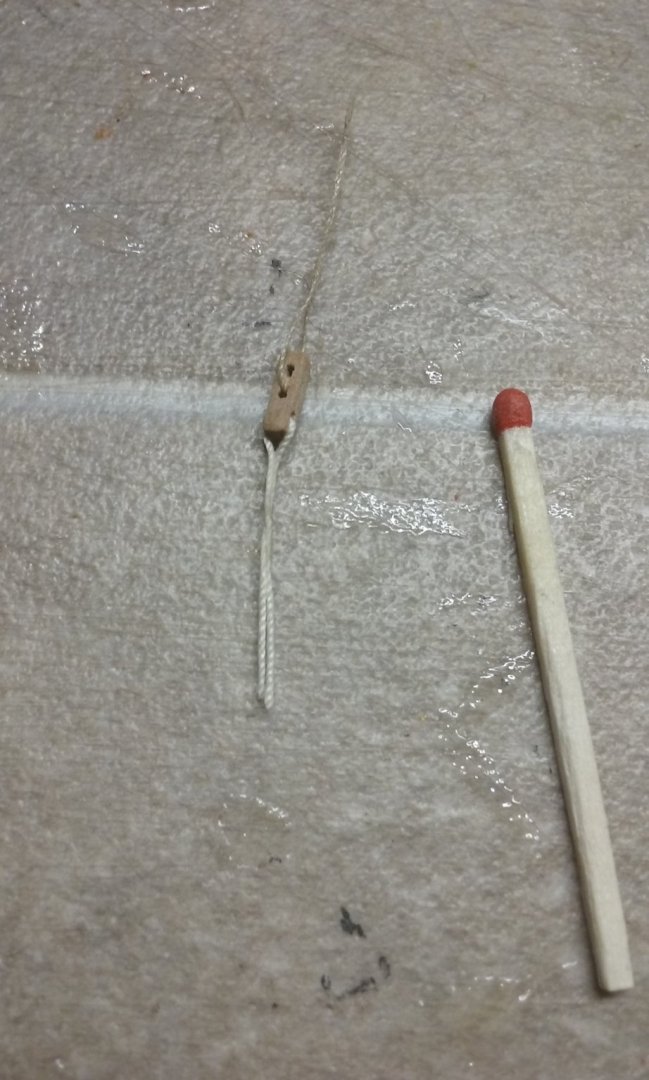
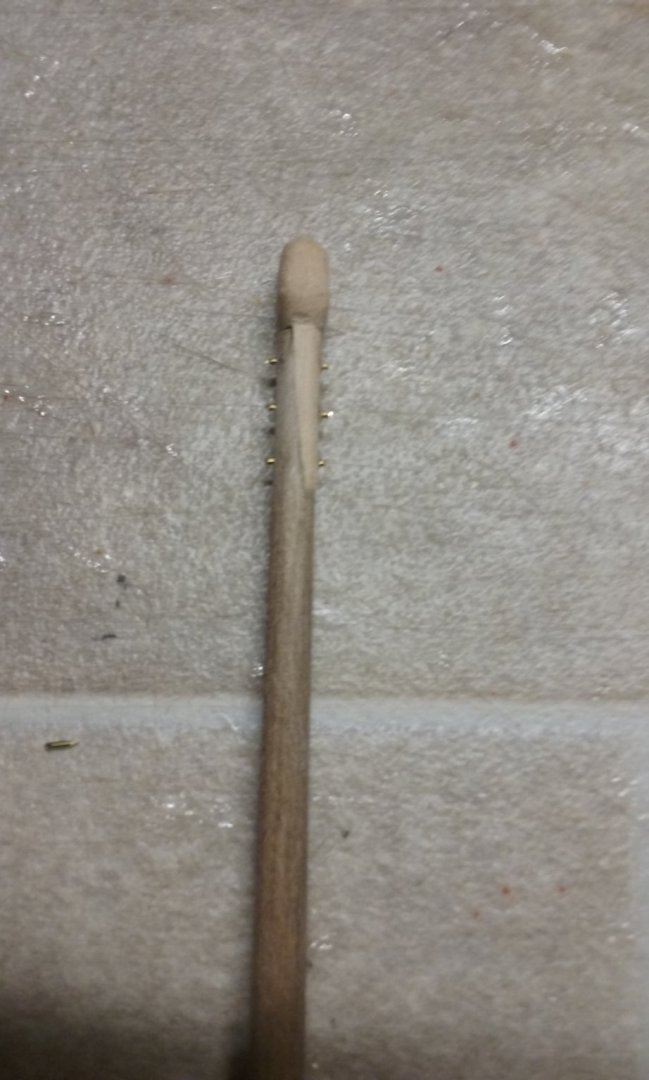
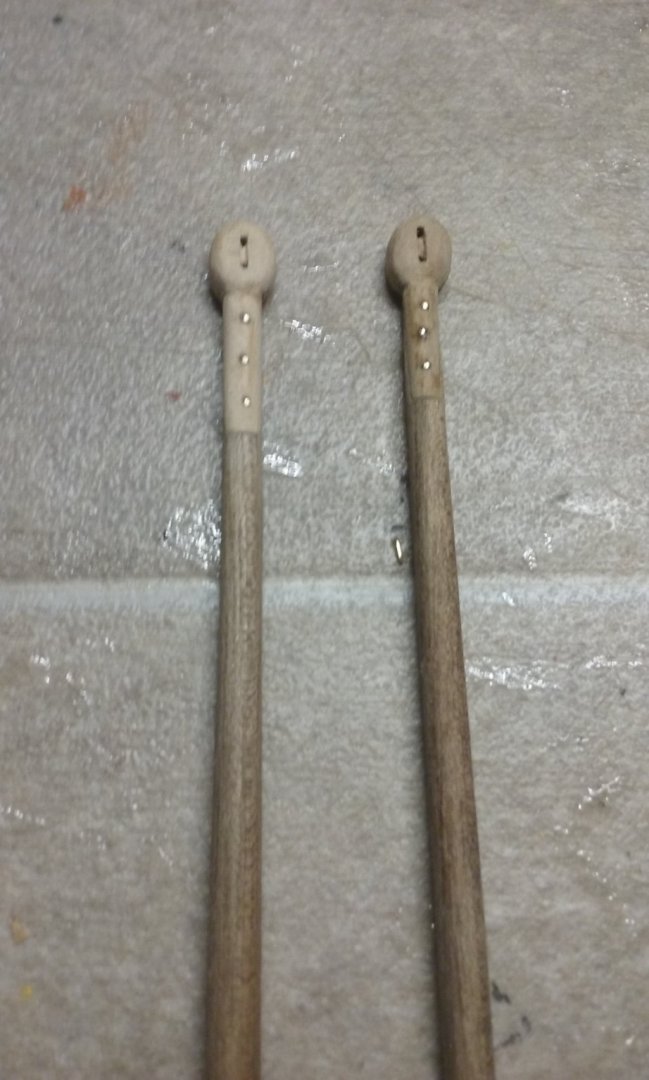
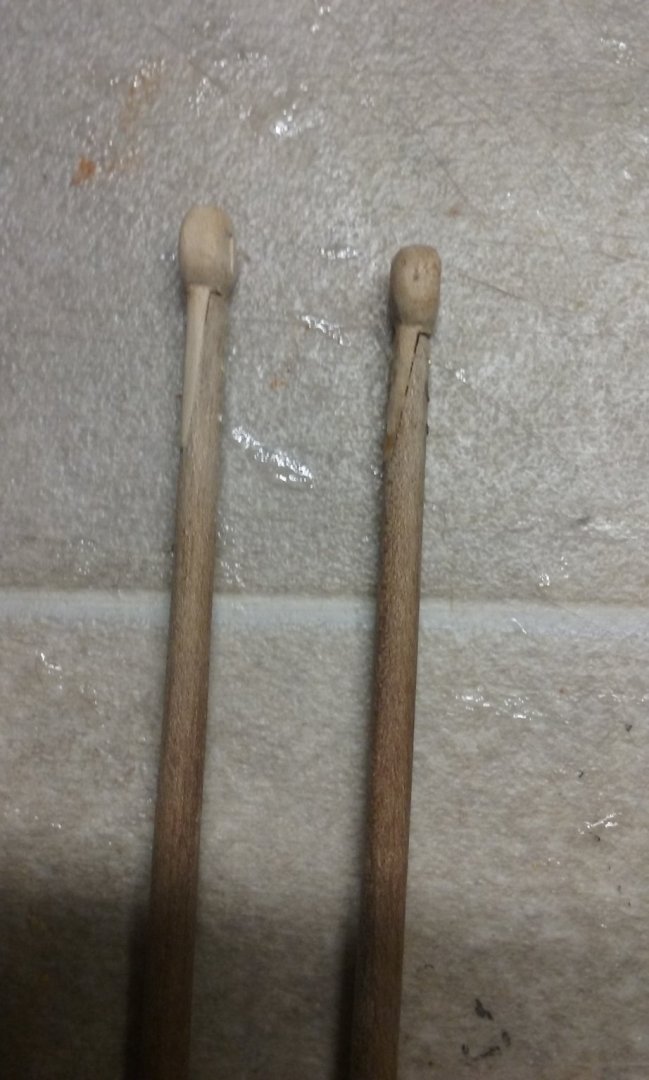
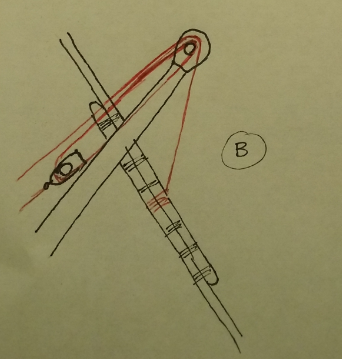
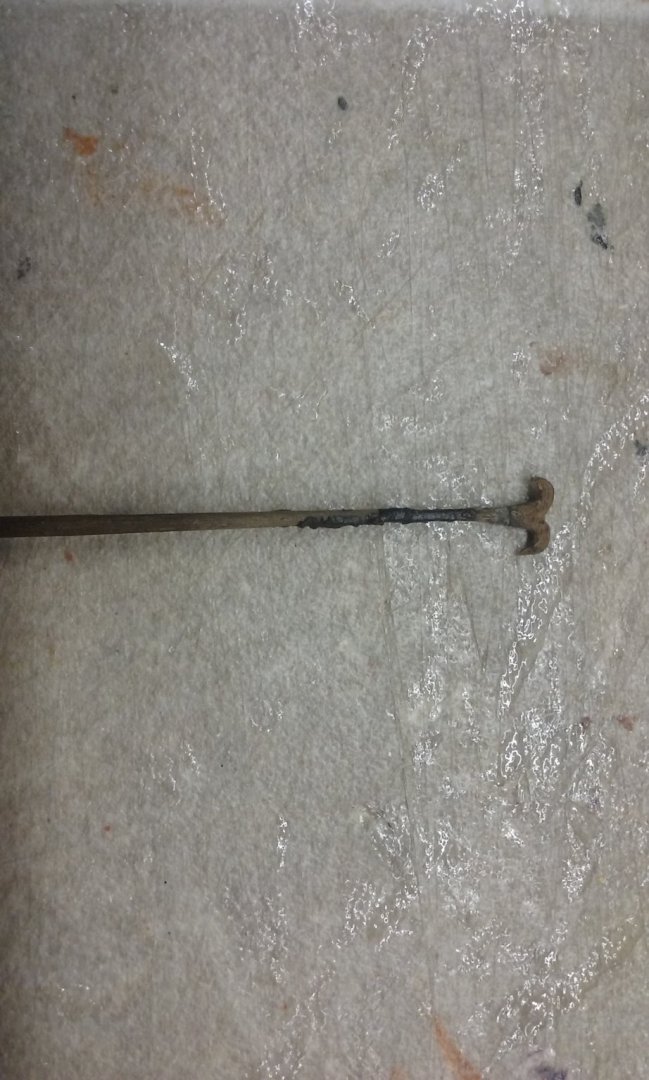
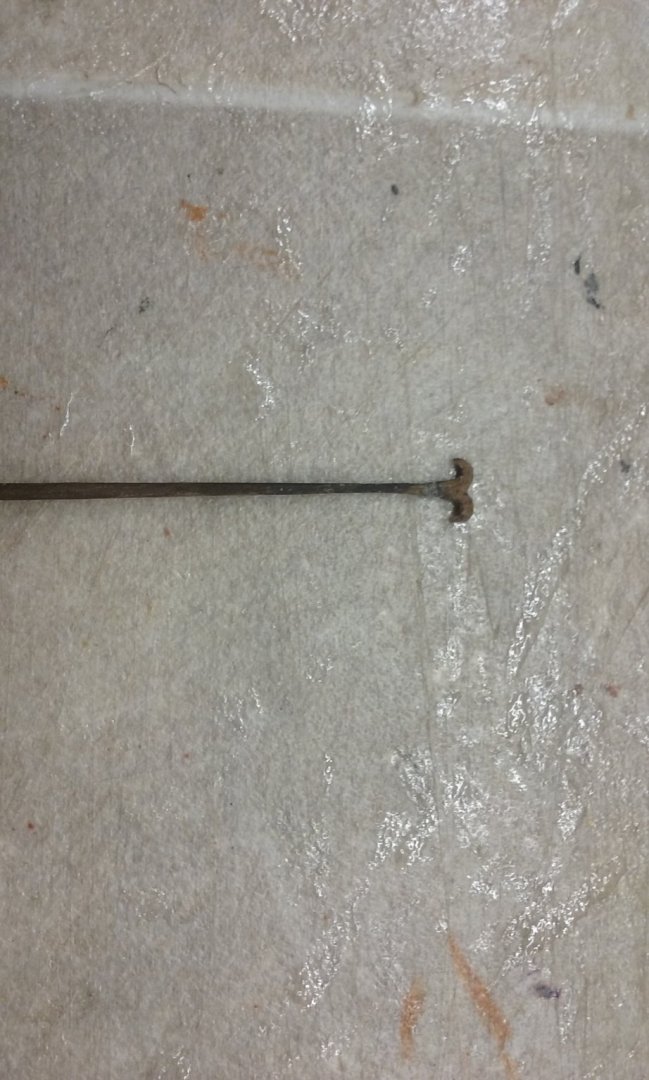
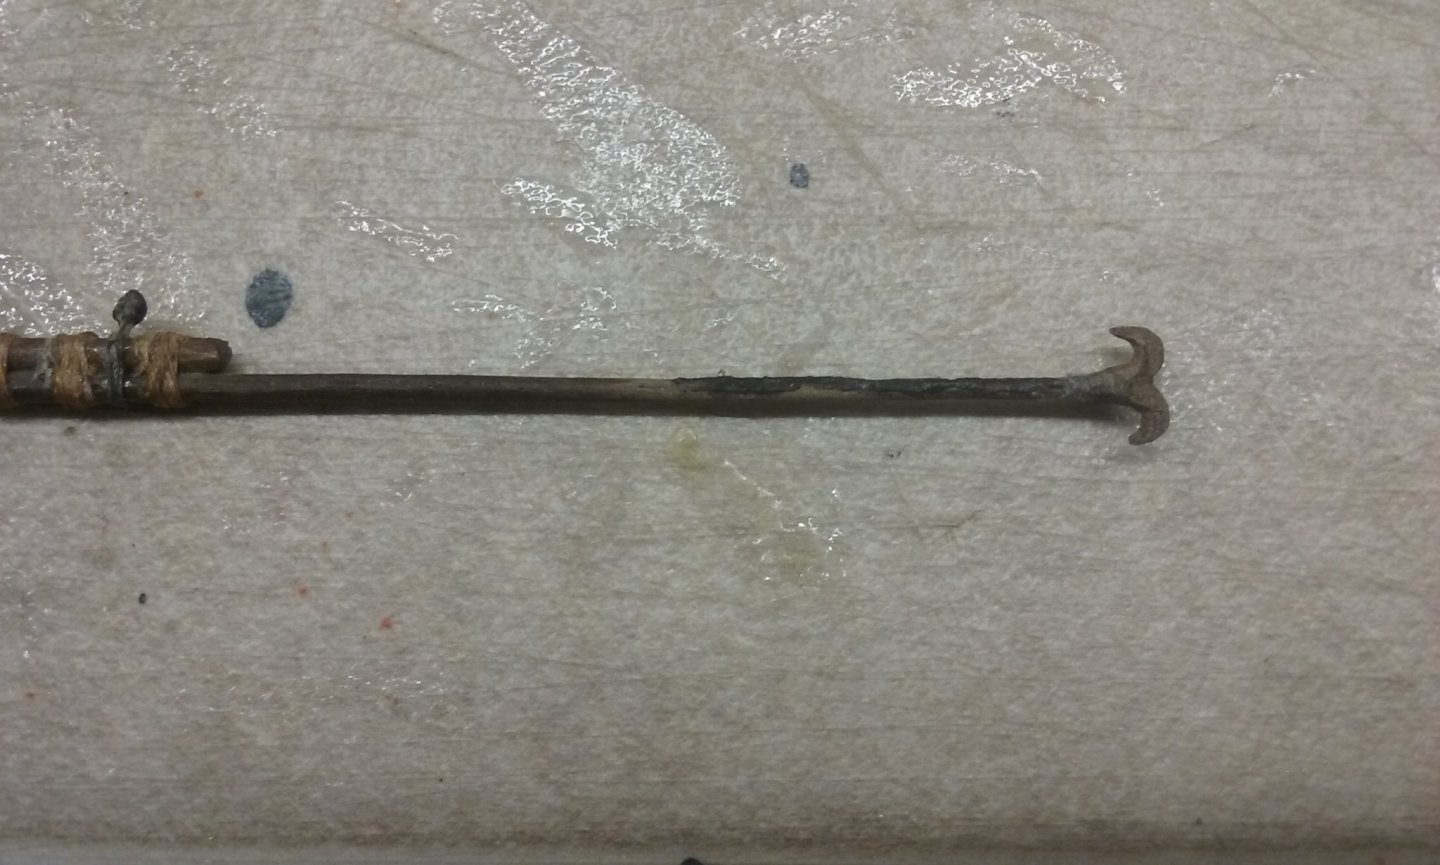
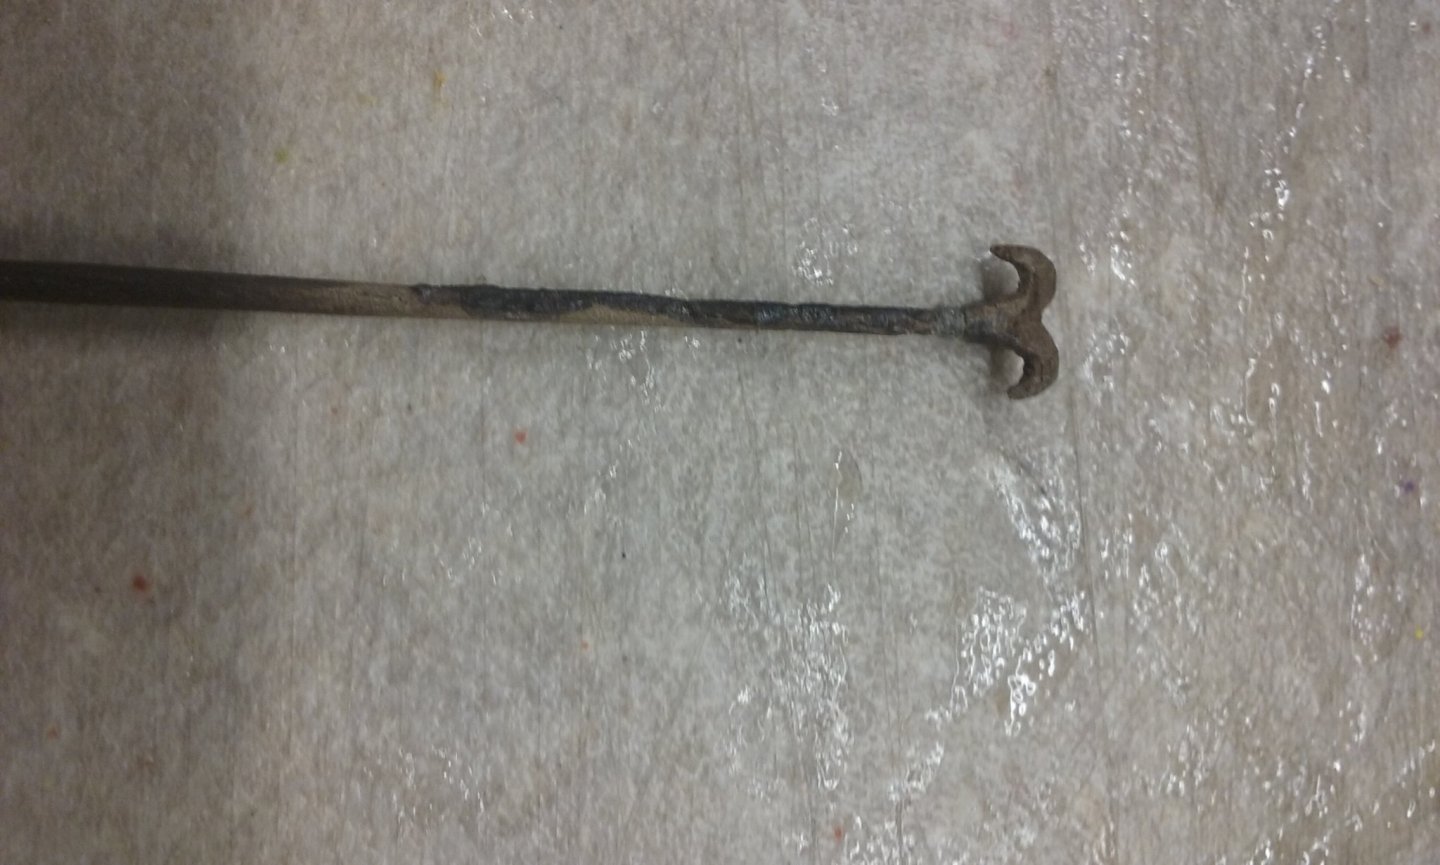
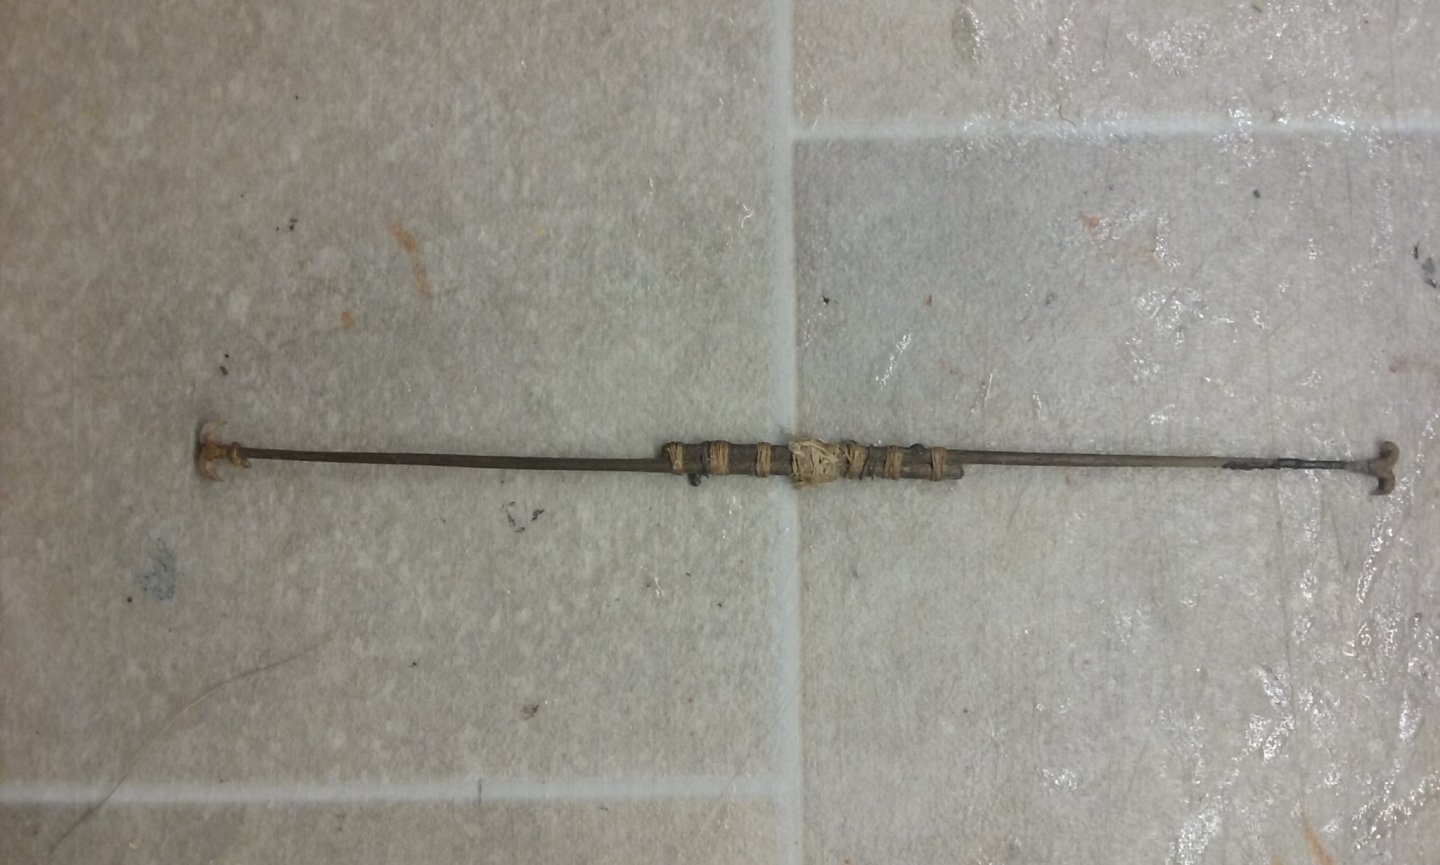
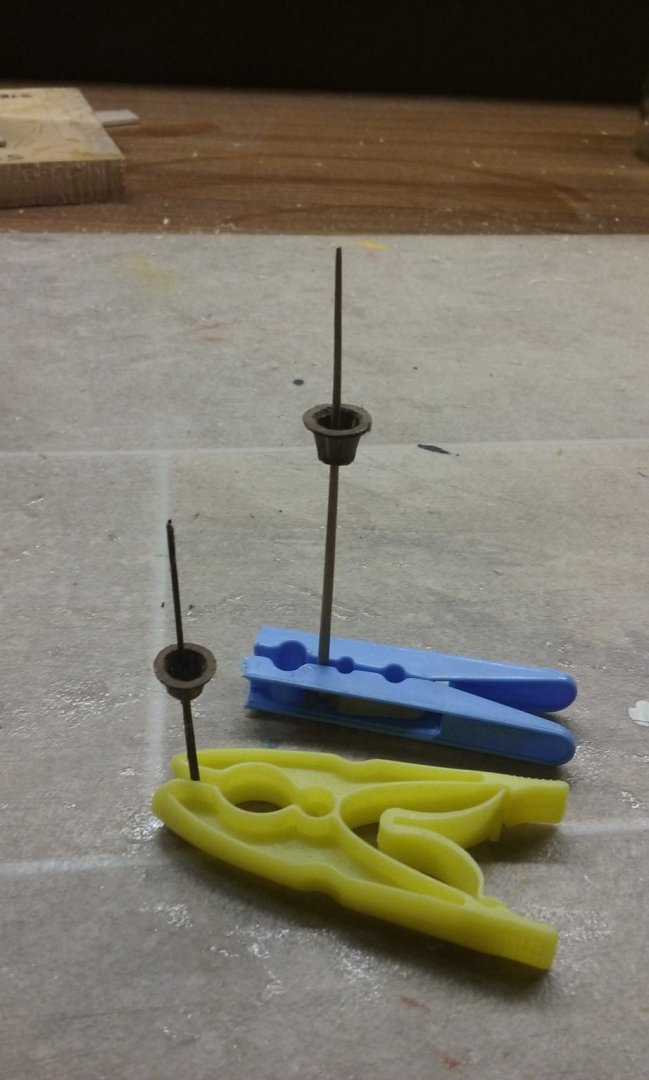
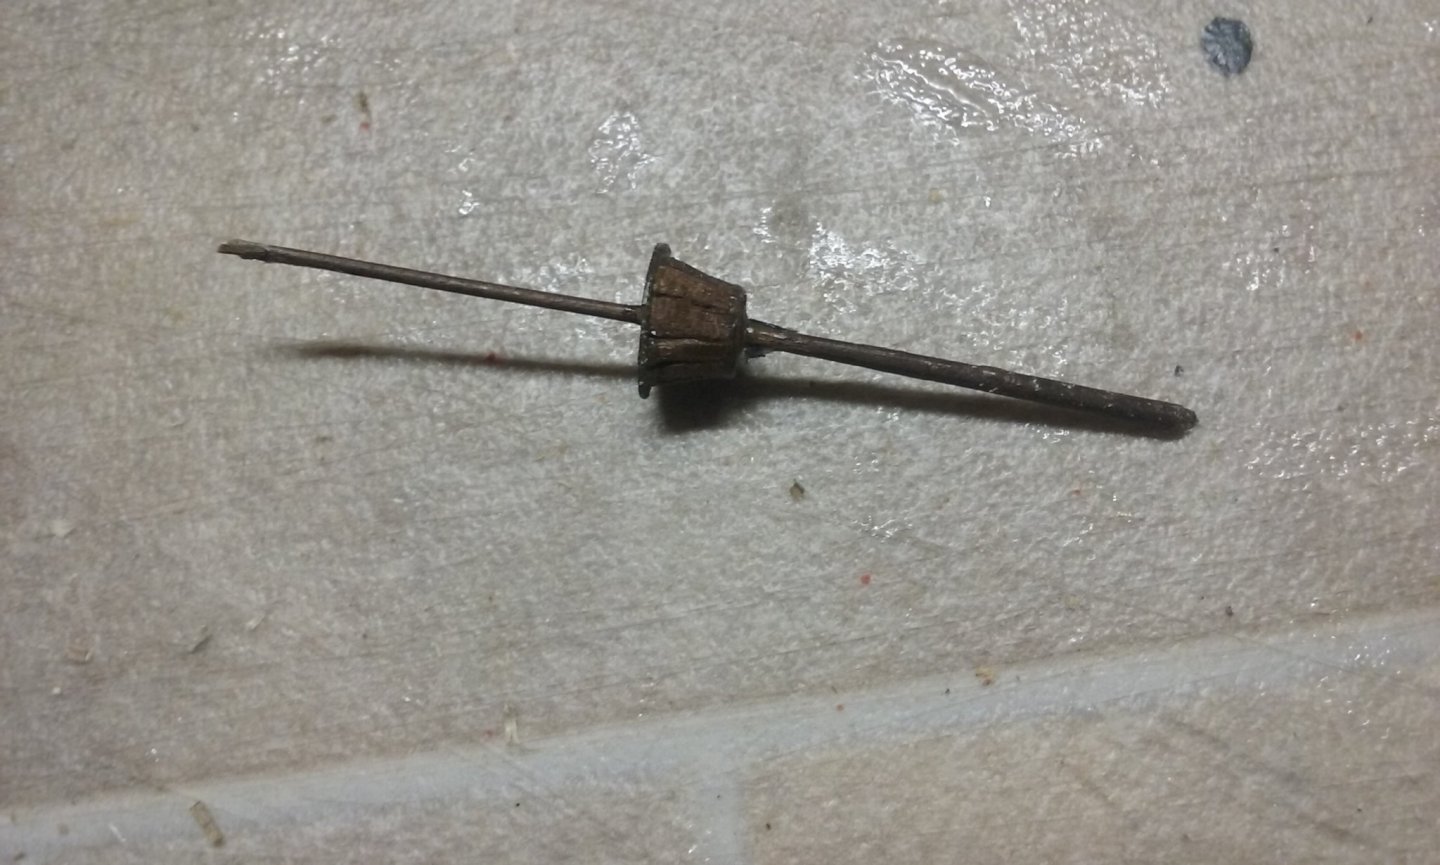
I've been agonising over the calcets at the top of the masts, which take the halyard. I'd followed a diagram which showed the calcet as having two sheaves, but try as I might, I couldn't get it to work properly. Any arrangement I was able to come up with was always awkward and overcomplicated. I thought this violates Occam's Razor - the principle that the simplest solution to a problem is usually the best. After looking at many contemporary pictures and also modern photos of lateeners (many of them dhows) I discovered that almost without exception (where it was shown) they certainly had blocks with multiple sheaves, but at the lower end of the halyard. My thanks to Woodrat for his help and advice, which confirmed me in my decision to change the calcets to single-sheaves (which of course meant I had to make new ones!) Also, based on archaeological finds (admittedly from several hundred years later), I changed the connection between the calcet and the mast, from a socket and tenon to a long scarph (known in French as a sifflet or whistle joint - probably because it resembles the angled cut at the top of a tin whistle). I've attached the calcets to the masts with brass pins cut short and filed down. In due course I'll paint them black to resemble iron. And I discovered two more Byzantine single-sheaved blocks! I already had one single-sheaved block from archaeology, but these ones were in considerably better condition and were about double the length. From a 7th-8th century wreck, but so similar to later ones that I'll be using this design in the dromon. The two blocks are identical in design, with a slight difference in length. Here's my reproduction at 1:50 scale of the larger one - yet another opportunity to use my gigantic oversized matchstick. It seems to be a standard feature of Byzantine (and mediaeval Mediterranean) blocks that they didn't have strops around the block to connect them to the rigging, but a hole through the block. Steven

-
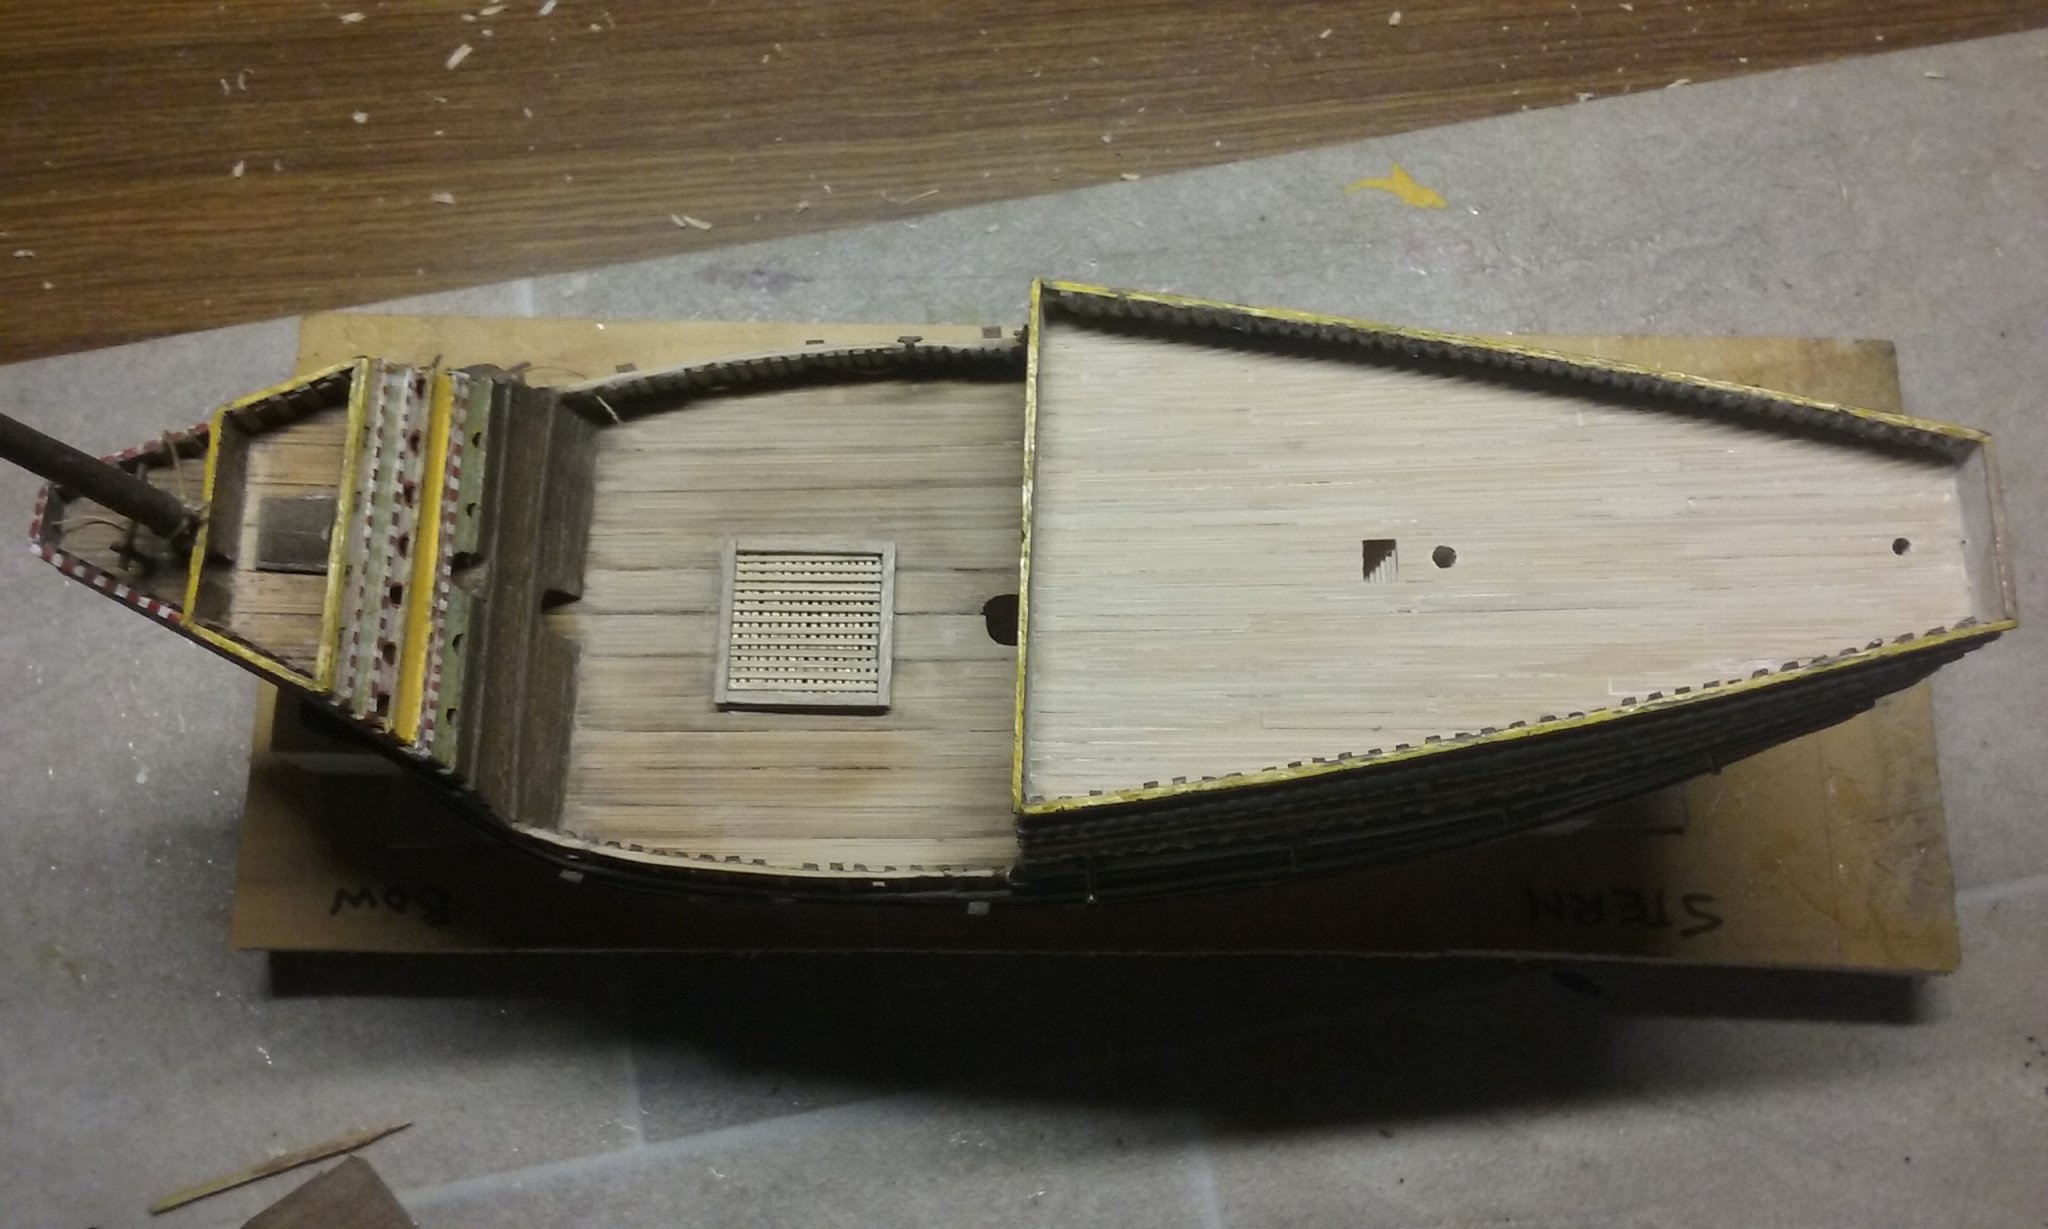
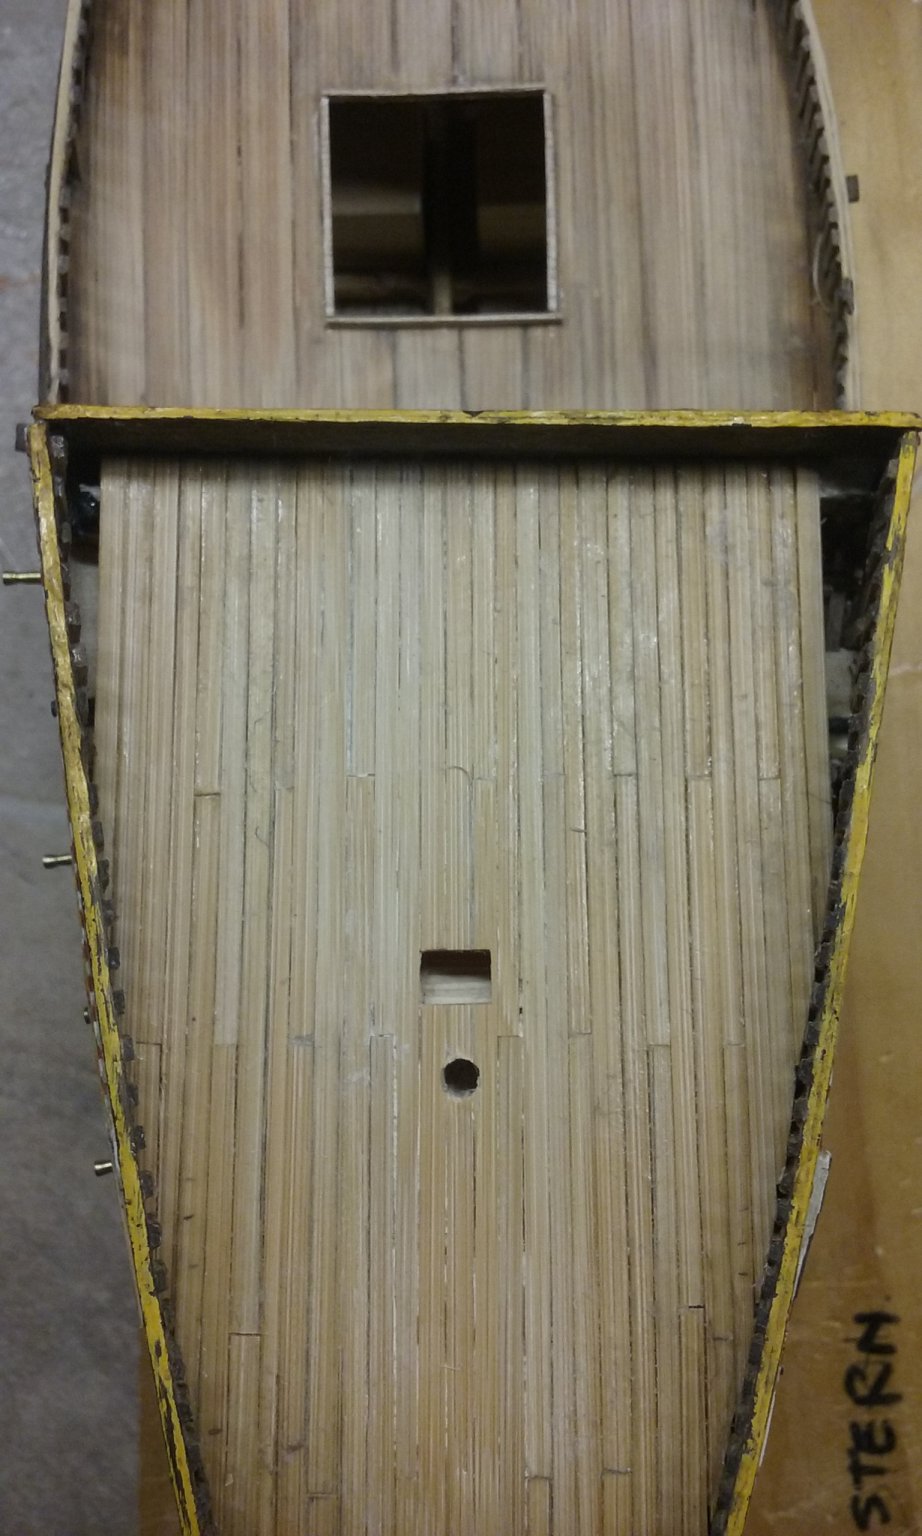
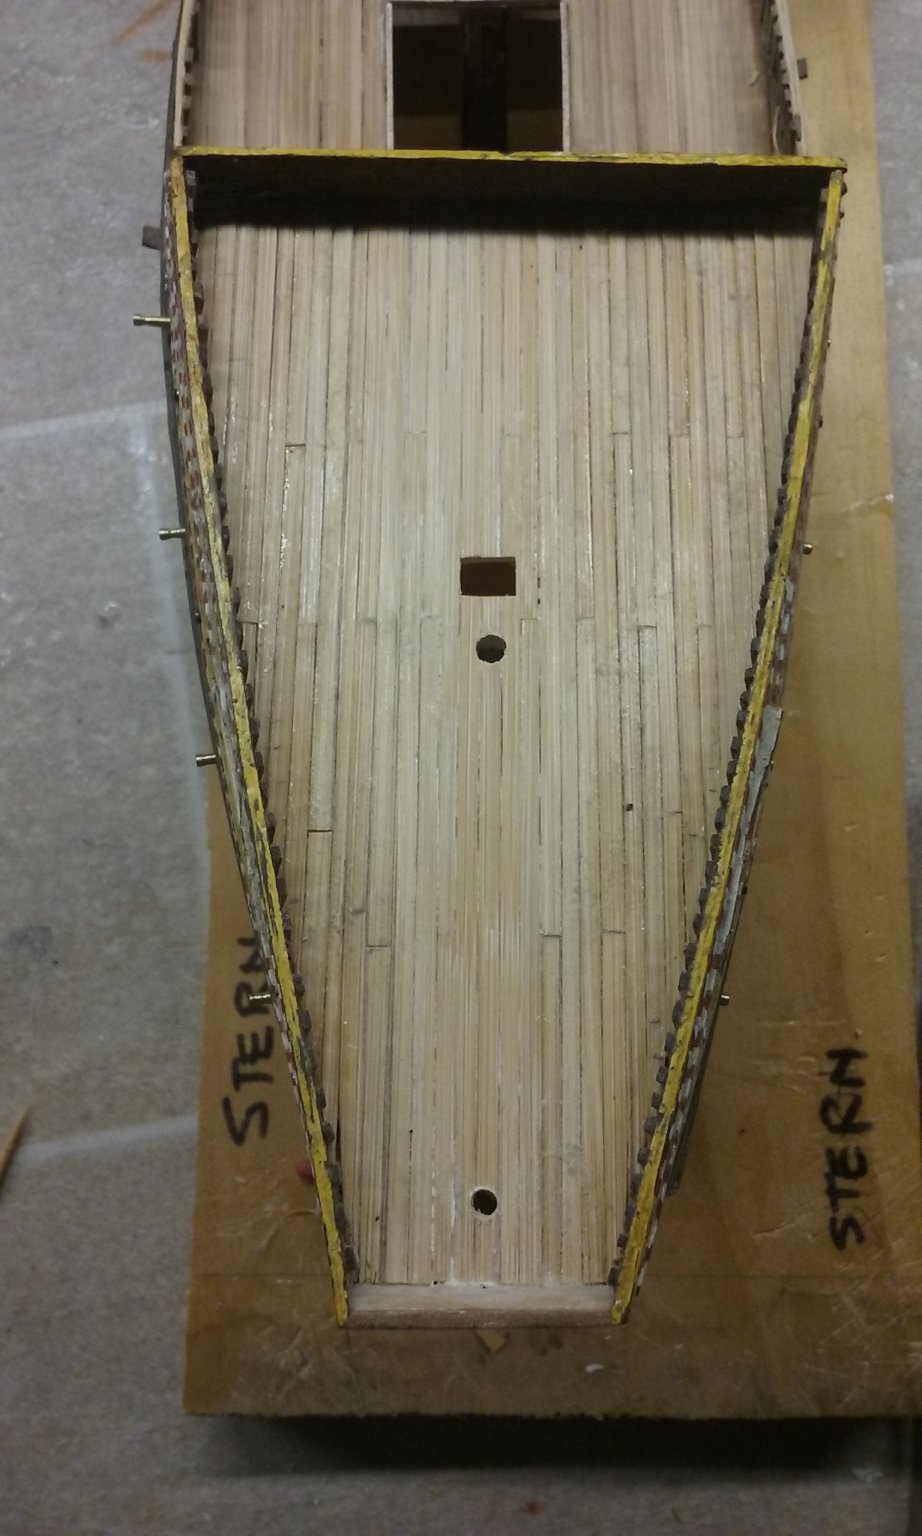
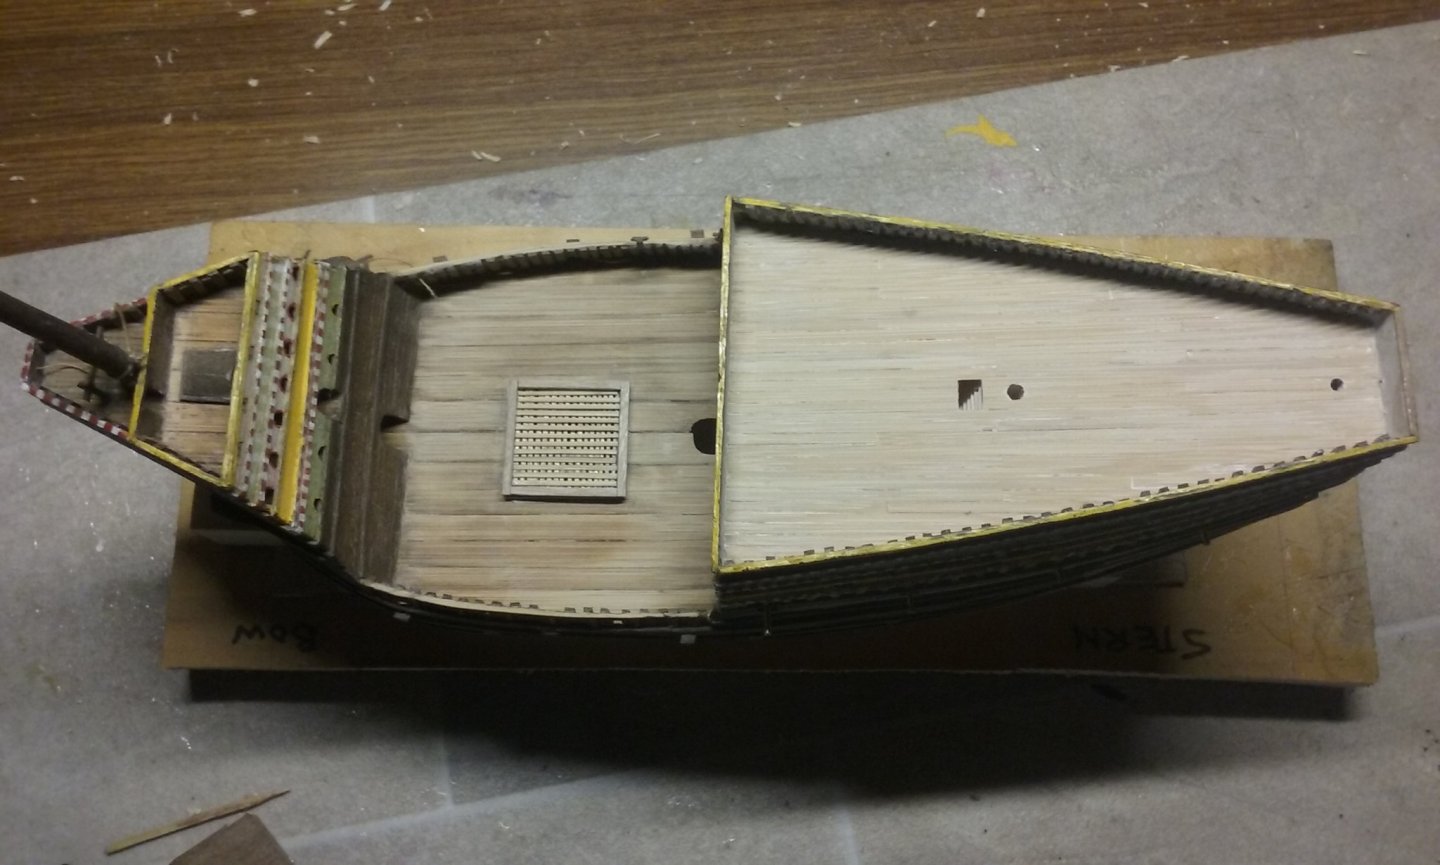
And cleaned the forecastle: I used isopropanol and cotton buds (Q tips), and occasionally a scalpel to remove built-up glue when it was too thick. The deck isn't perfectly clean, but it's a lot better than it was. I had to remove the bitts, but it's just as well - it was smothered in old glue. I'll put it back later. Steven


- 740 replies
-
- 8
-
-
- Tudor
- restoration
- (and 4 more)
-
I almost missed this! Another really interesting build. I'll pull up a chair if I may. Steven
-
Mark, I can probably insert wooden pins in the bottoms of the uprights and make holes in the deck to key them into. I'm getting pretty good at that. I've been tidying up the mainyard. It was covered with old bits of cotton from previous incarnation. Also it had been broken and though I was able to put the pieces together the yard was missing a small part so it was thinner at the join than it should have been. I took a leaf out my dromon build and sanded down a remnant of the old timber and mixed it with white glue to make filler. With it I was able to make up the thickness of the mainyard. I had to do two lots of filler to get it up to full thickness. Here it is sanded to shape. And here it is in full, with the surplus cotton removed. Steven

- 740 replies
-
- 8
-
-
- Tudor
- restoration
- (and 4 more)
-
Those are some nice tips on tying blocks, mate. I've bookmarked this page for future reference. A good set of techniques for a very fiddly job. Steven
- 181 replies
-
- 1
-
-
- santa maria
- mamoli
- (and 1 more)
-
No worries. That's just down the road to an Australian . . . Welcome to MSW. As Mark said, start a build log so we can all enjoy your build - and help answer questions, solve problems etc. You're among friends. Steven
-
Welcome, David. Sounds like you've built up a good store of experience which will stand you in good stead. The 1:80 model won't have as much detail (which should be a plus) but will help you find your way around the Endeavour, so when the Big One come along you'll be on fairly familiar ground (albeit rather more comprehensive). Start your build log, and also do a search on other logs for the Endeavour - it's a very popular ship to model, so you ought to be able to pick up a lot of tips from them. Oh, and do read the tutorials on planking; they'll make your job a lot easier. Endeavour has a very bluff bow, and it's apparently a bit of a job to get the planking right. Steven
-
Welcome, Ernie! Copper's all very well, but if you go to the early 16th century Dark Side, you can use lead sheathing! As far as rigging goes, you will pick it up as you go. And if you can't figure something out, just ask one of the friendly Forum members - someone's bound to know. (Oh and deadeyes are so-called because they vaguely resemble a skull - the French call them sheep heads). Have a good look at previous Speedy build logs - you'll probably find many of your questions/problems in your own build have already been encountered and solved by one of our members. Steven
-
Where are you based, Gordon? As you can see I'm in Ballarat, but here are a lot of Aussie members - you might even have one near you! Your idea for the Golden Hind is interesting, to say the least . . . . But nobody's going to rain on your parade and hey, maybe we'll learn something from your experimentation. Steven
-
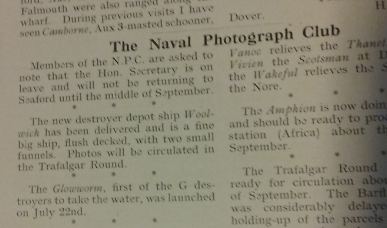
I hope I'm not intruding on this thread, but I found a couple of articles in "Ships and Ship Models" magazine from September 1935 which in hindsight are very interesting: A mention of the launching of the destroyer HMS Glowworm, which later covered itself in glory against the heavy cruiser Hipper. And another which I found very interesting - I wonder what happened to all those bells, and where they are now? Steven
-
Curtiss P-40B Warhawk by Asat- Airfix- 1/48
Louie da fly replied to ASAT's topic in Non-ship/categorised builds
Unless you're flying a Hawker Harrier. In which case they "viffed" and caused the opposing pilot to overshoot, with predictable results. Speaking of getting hooked on books (not to derail the thread TOO much) I just finished "My Mystery Ships" about the Q-ships of WWI (see https://en.wikipedia.org/wiki/Q-ship) by the most successful of the British Q-ship captains, written about 10 years after the war. Fascinating stuff about a lesser known aspect of the naval service. Steven -
Thanks everyone for the likes. A little more progress. I've recycled the old fighting tops from the fore and main topmasts. Even though I'd made a new fore topmast I was pleased to find that I could salvage the old one - though it was broken into three pieces, they were all intact so I could glue them together again. I'd far prefer to keep as much of the original build as possible rather than replace it with new. I'd also made a new main topmast, but in that case the old one was past saving. So here are the old tops in their new homes. And here's the old fore topmast rebuilt, and the broken off stump still attached to the lower mast. It might be a bit of a problem to hold the two pieces in alignment while I glue it together again, but I'll cross that bridge when I come to it. I won't be doing that until the hull planking is complete, possibly later. The main sanding of the upper deck is done. Only a little tidying up to go. The foredeck is proving a bit of a devil to clean. When I was a kid I slathered white glue everywhere, including on this deck, and the dirt is ingrained in the glue. So I have to carefully remove the glue within a pretty confined space. I've tried slicing it off with a blade, scraping it off, and removing it with isopropanol. None of those techniques is perfect - I'm just having to wing it. I'll probably have to remove the foremast bitts to get at the front of the deck, but there's a great glob of glue at the base of each upright anyway, so it's probably just as well. Steven

- 740 replies
-
- 6
-
-
- Tudor
- restoration
- (and 4 more)
-
Airfix Revenge & Revell Golden Hind Accuracy
Louie da fly replied to Robert Taylor's topic in Nautical/Naval History
Of course, if the Pelican had any sort of decoration to go with her name, it would be a pelican "in her piety" - see http://www.thewestologist.com/symbols/the-symbol-of-self-sacrifice . These representations often looked completely unlike a real pelican - the artists had probably never seen one. According to that great authority Wikipedia: "The legends of self-wounding and the provision of blood may have arisen because of the impression a pelican sometimes gives that it is stabbing itself with its bill. In reality, it often presses this onto its chest to fully empty the pouch. Another possible derivation is the tendency of the bird to rest with its bill on its breast; the Dalmatian pelican has a blood-red pouch in the early breeding season and this may have contributed to the myth." As Michael Caine famously said (assumes cockney accent) "Not many people know vat" Steven -
Thanks for the likes. Druxey, I think it would end up more as a helmet than a hairdo - or like the women's hairstyles of the 60's with all that hairspray; if you flick your finger against them, you'd get a "clunking" sound . . . (not that I ever tried that . . .) Steven
-
Airfix Revenge & Revell Golden Hind Accuracy
Louie da fly replied to Robert Taylor's topic in Nautical/Naval History
Thank you, Thunder. That's something I'd never known before. Chris, that's a beautiful model and very believable (though I love Patrick's as well). Steven -
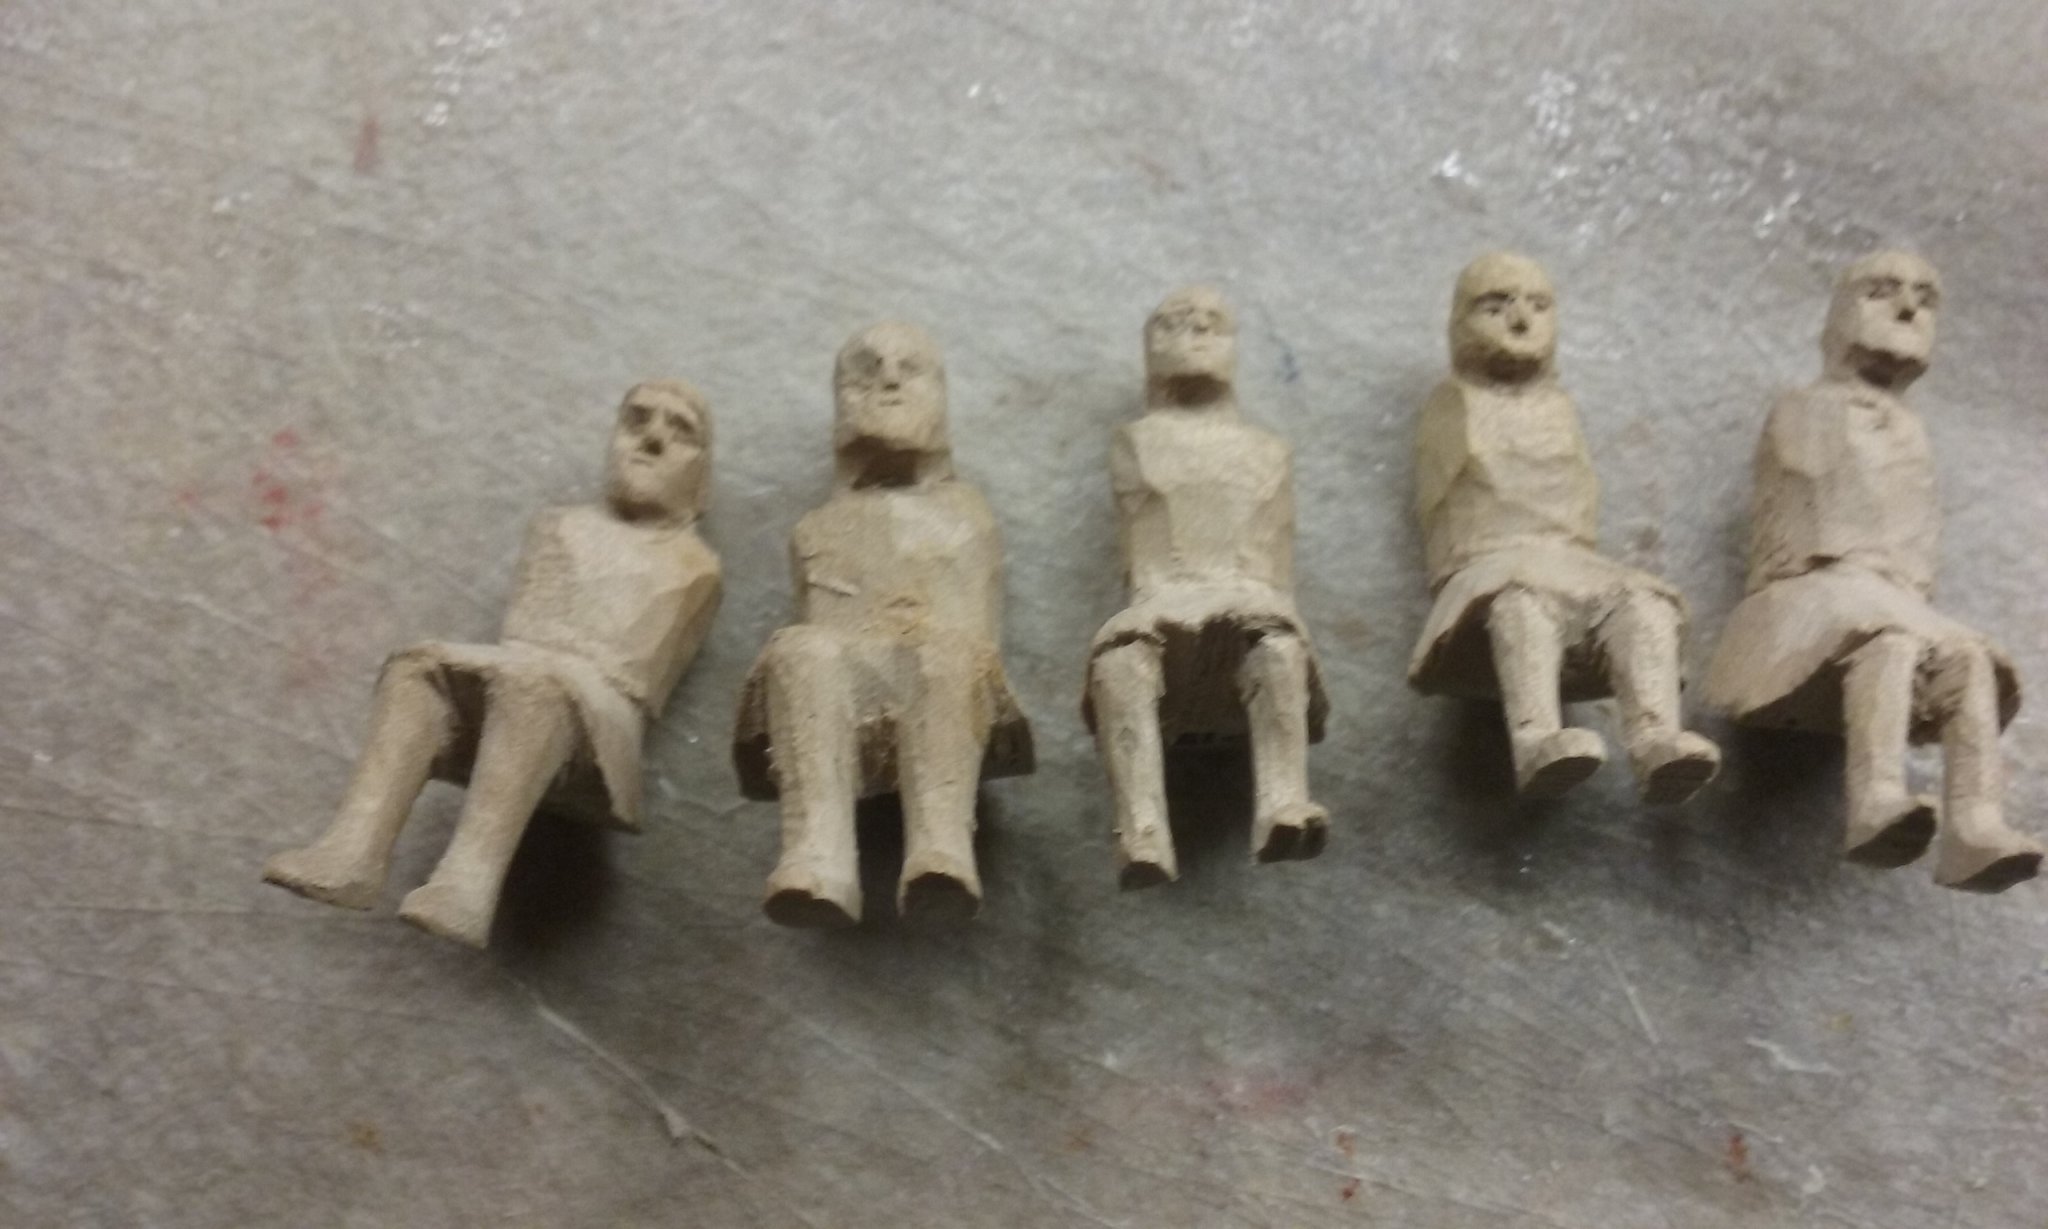
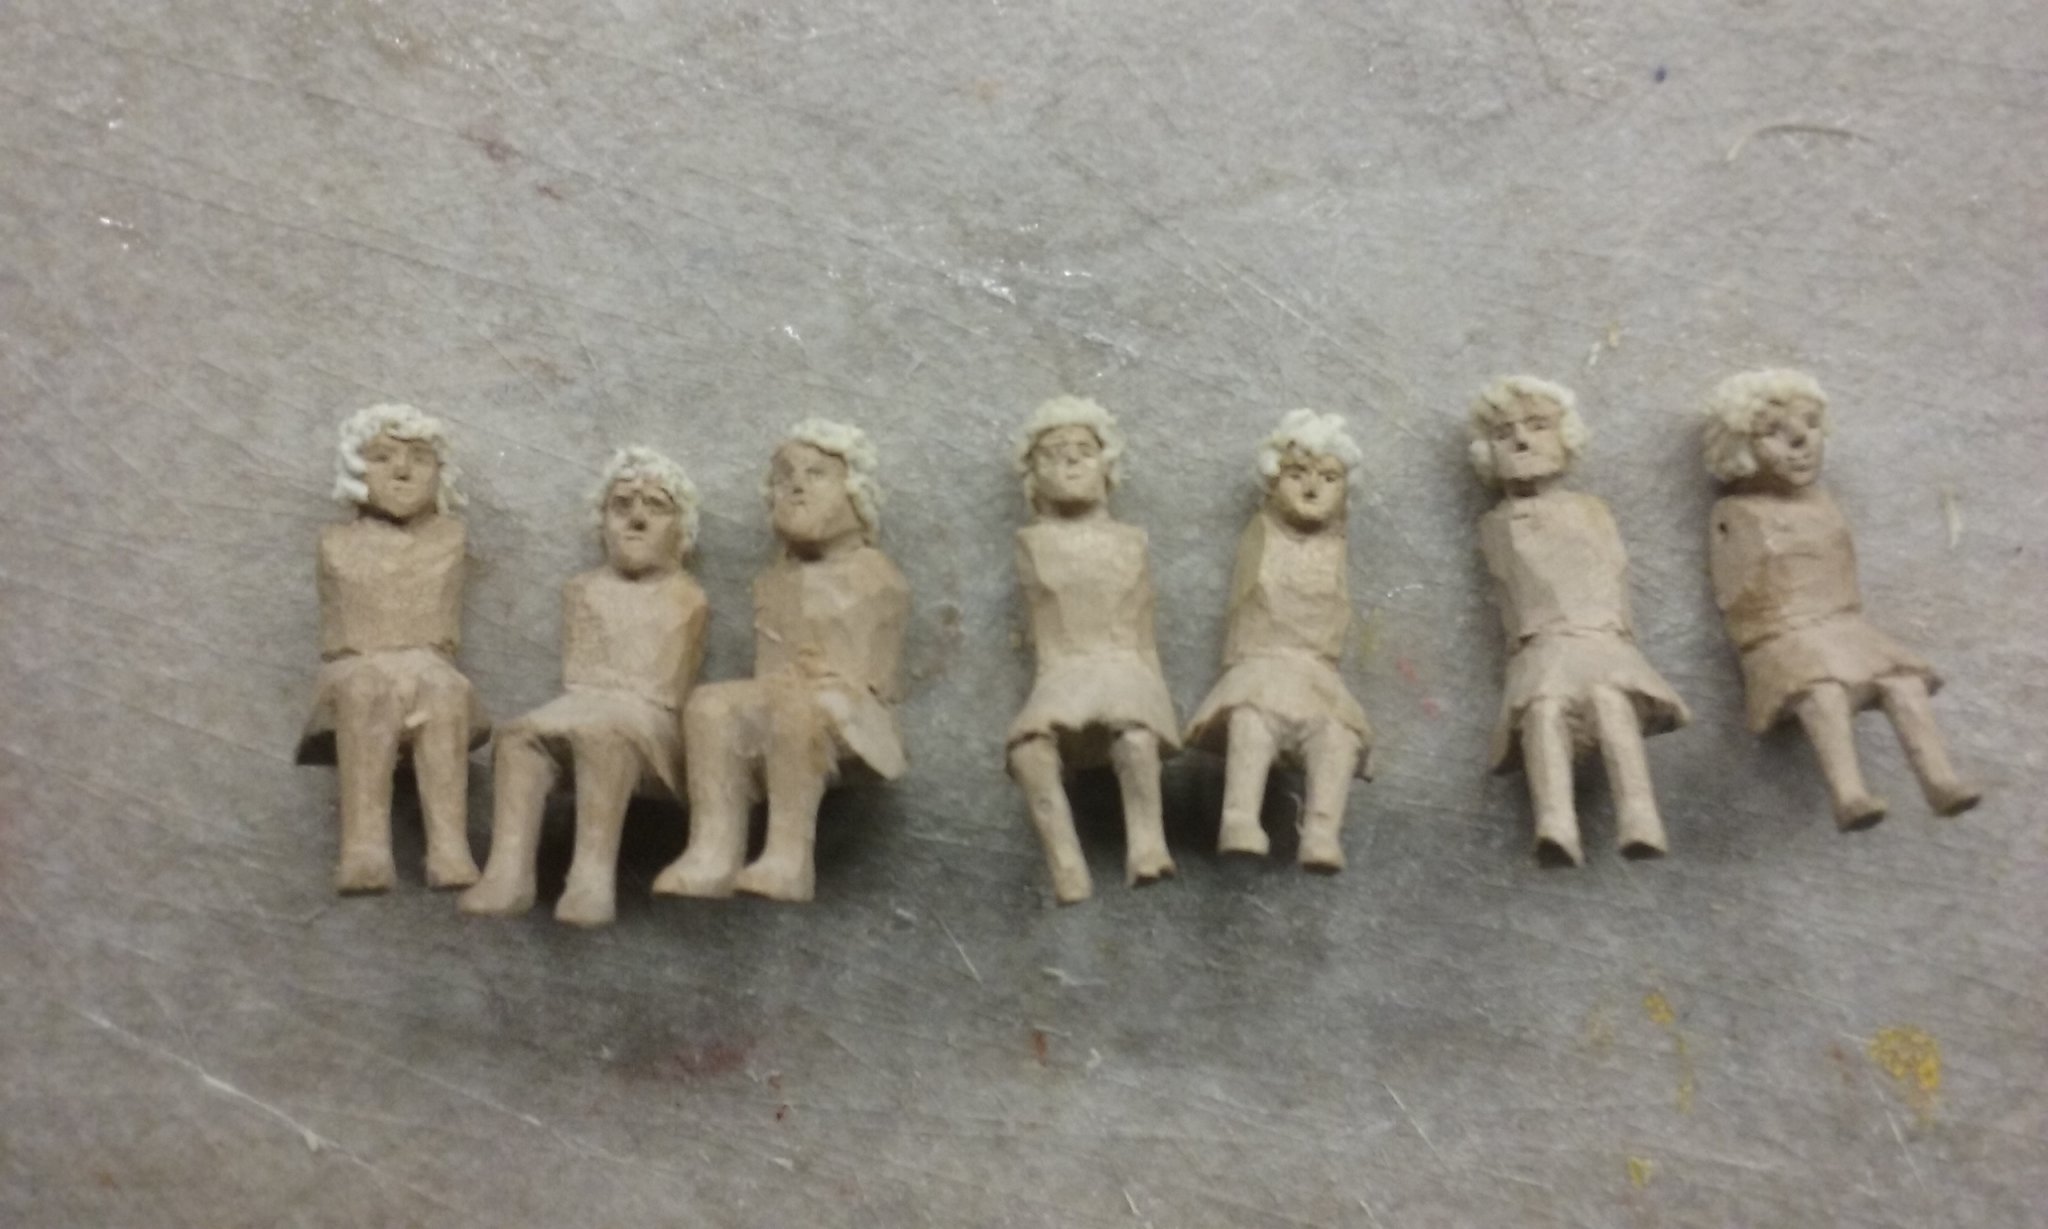
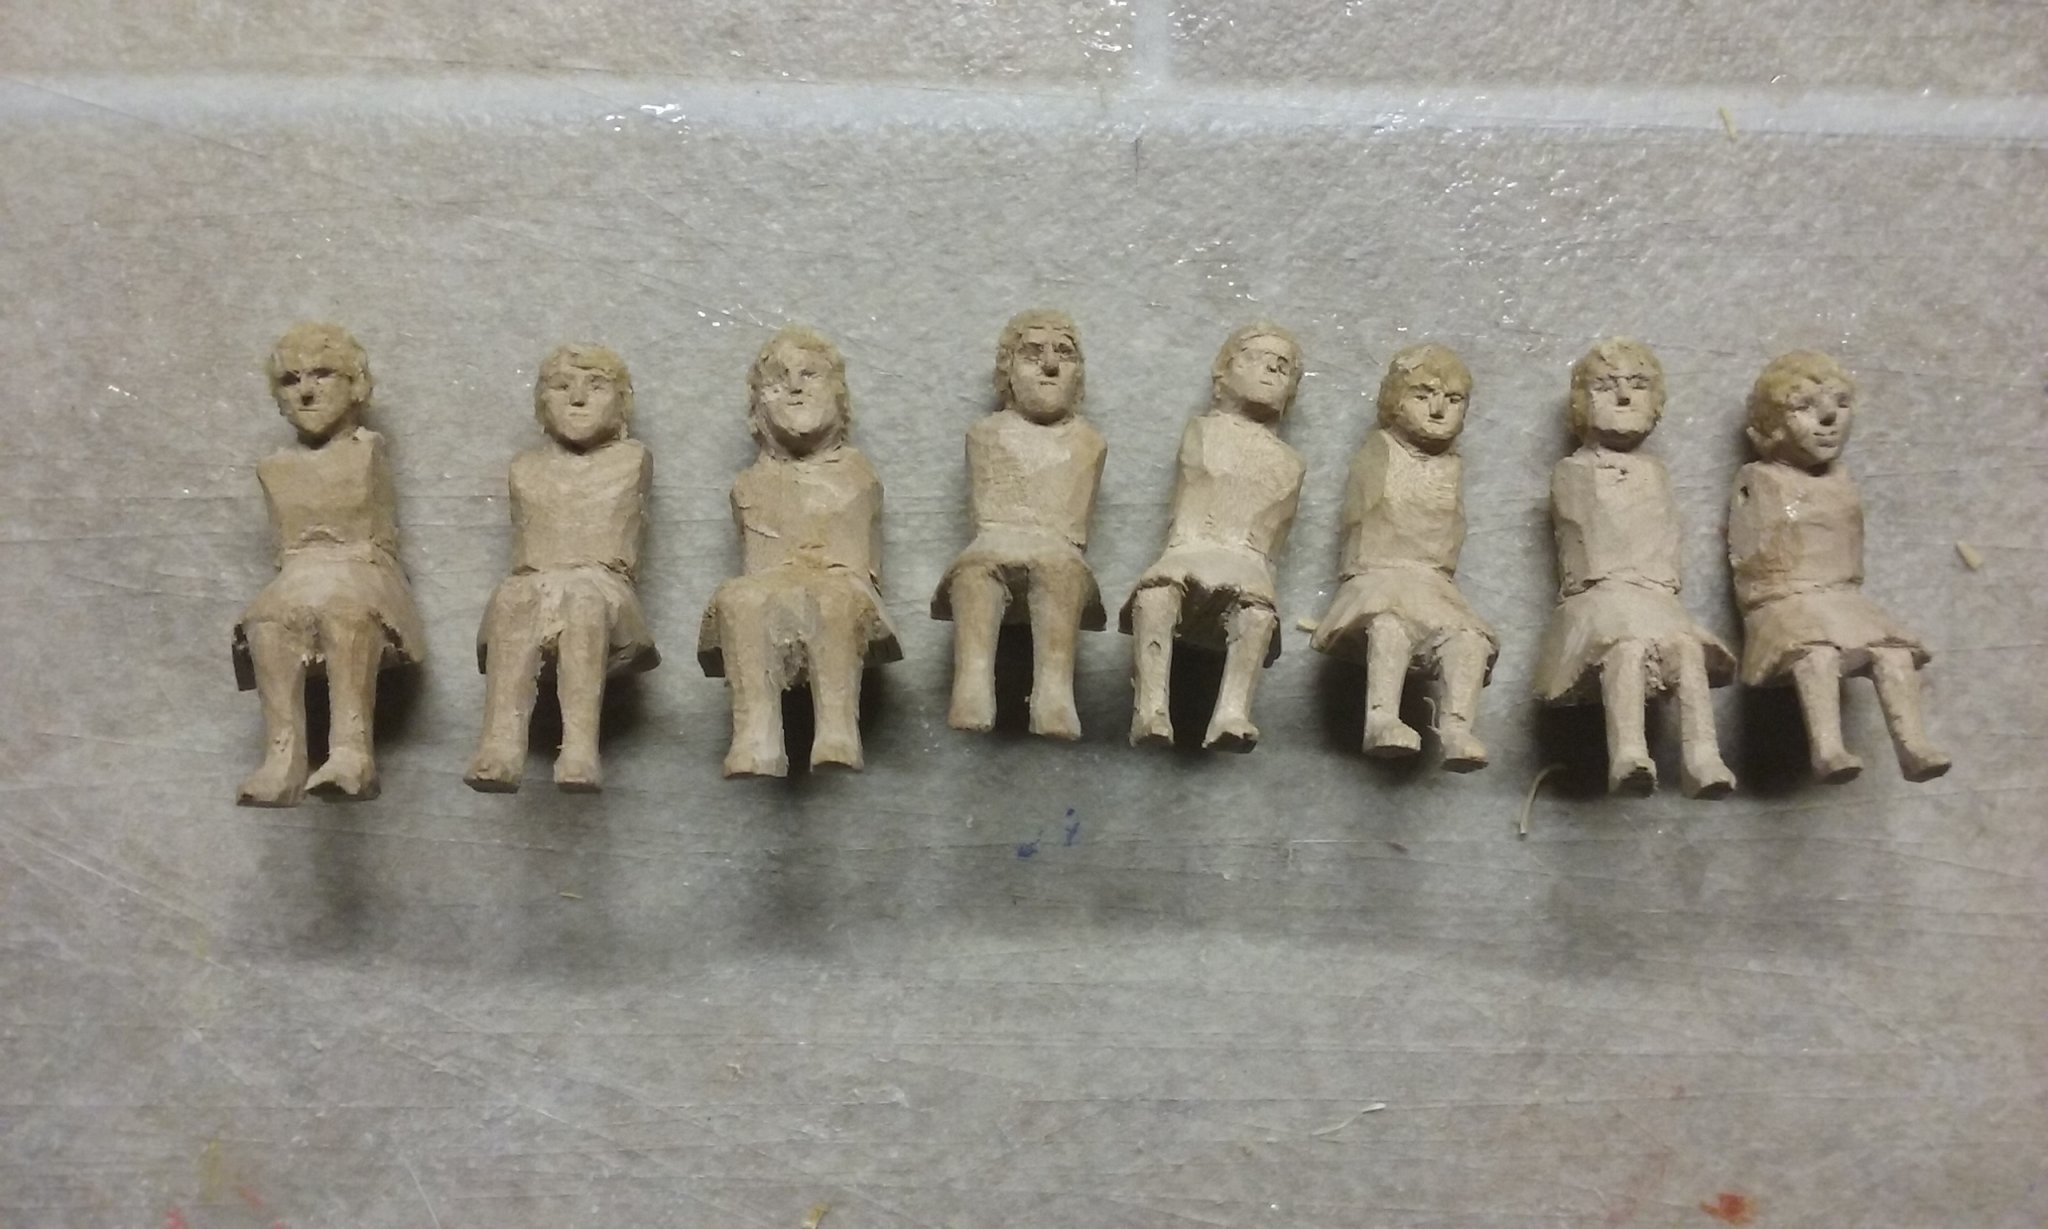
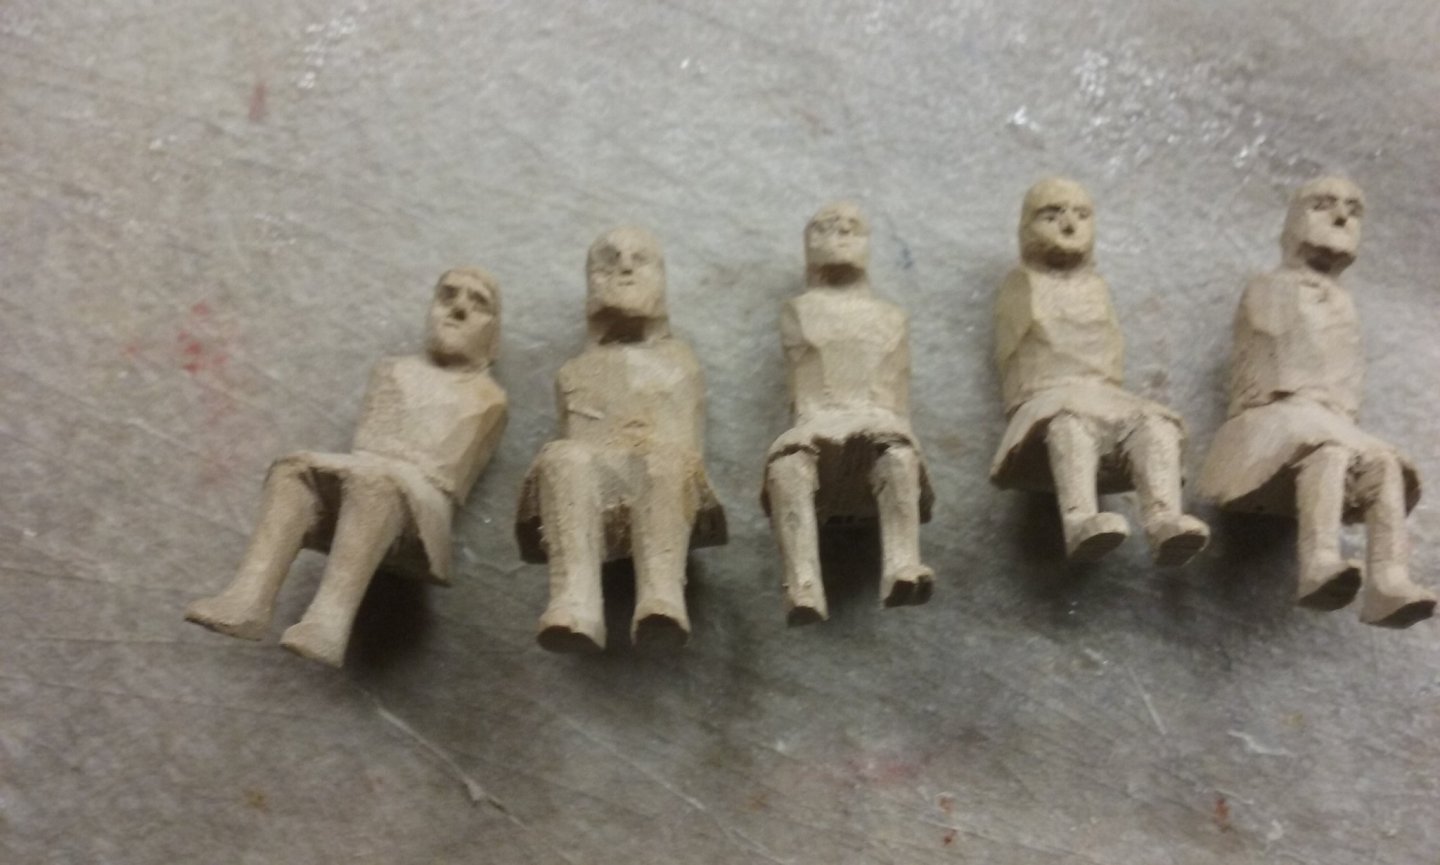
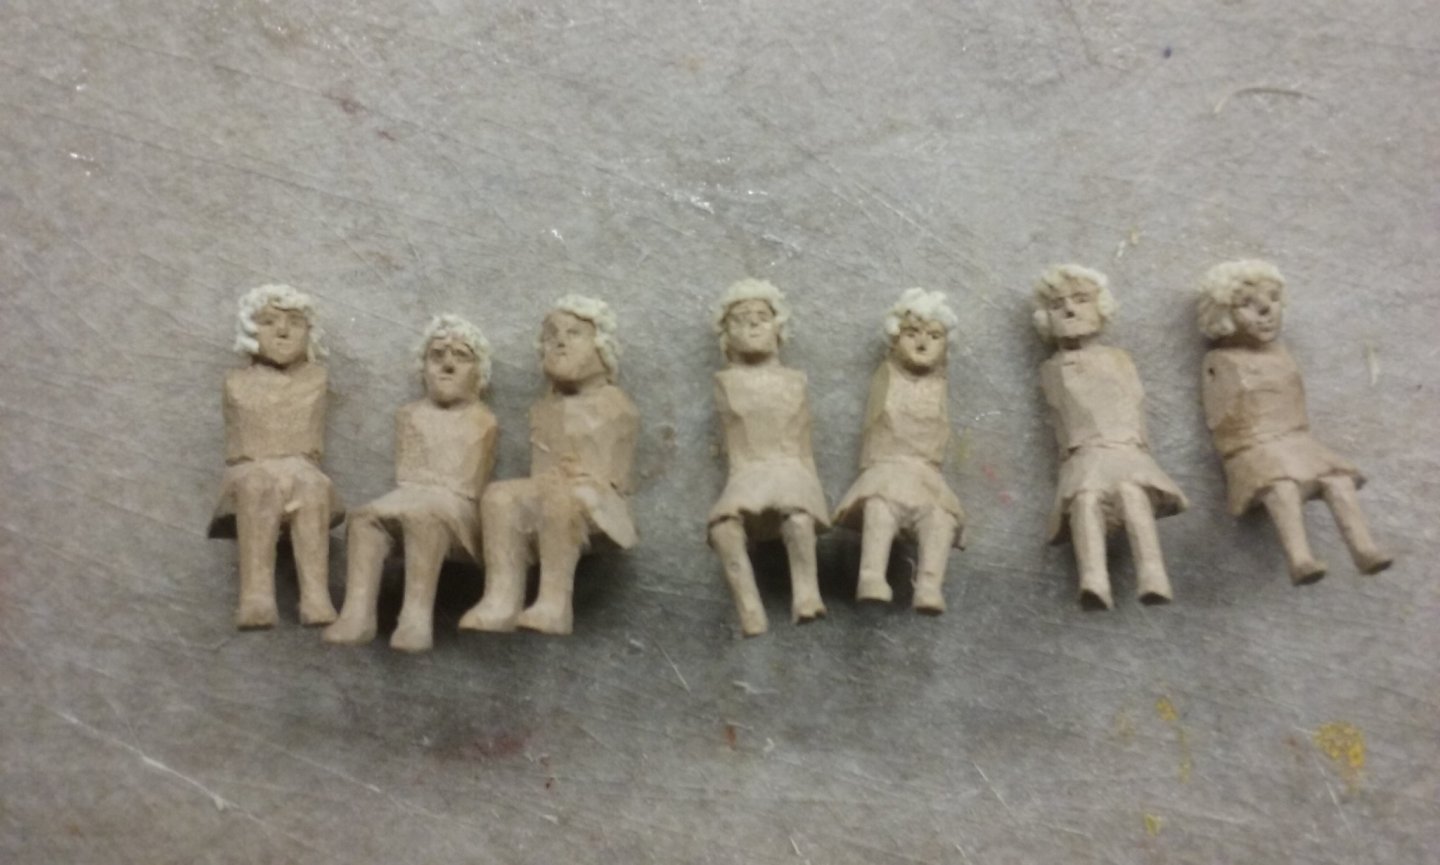
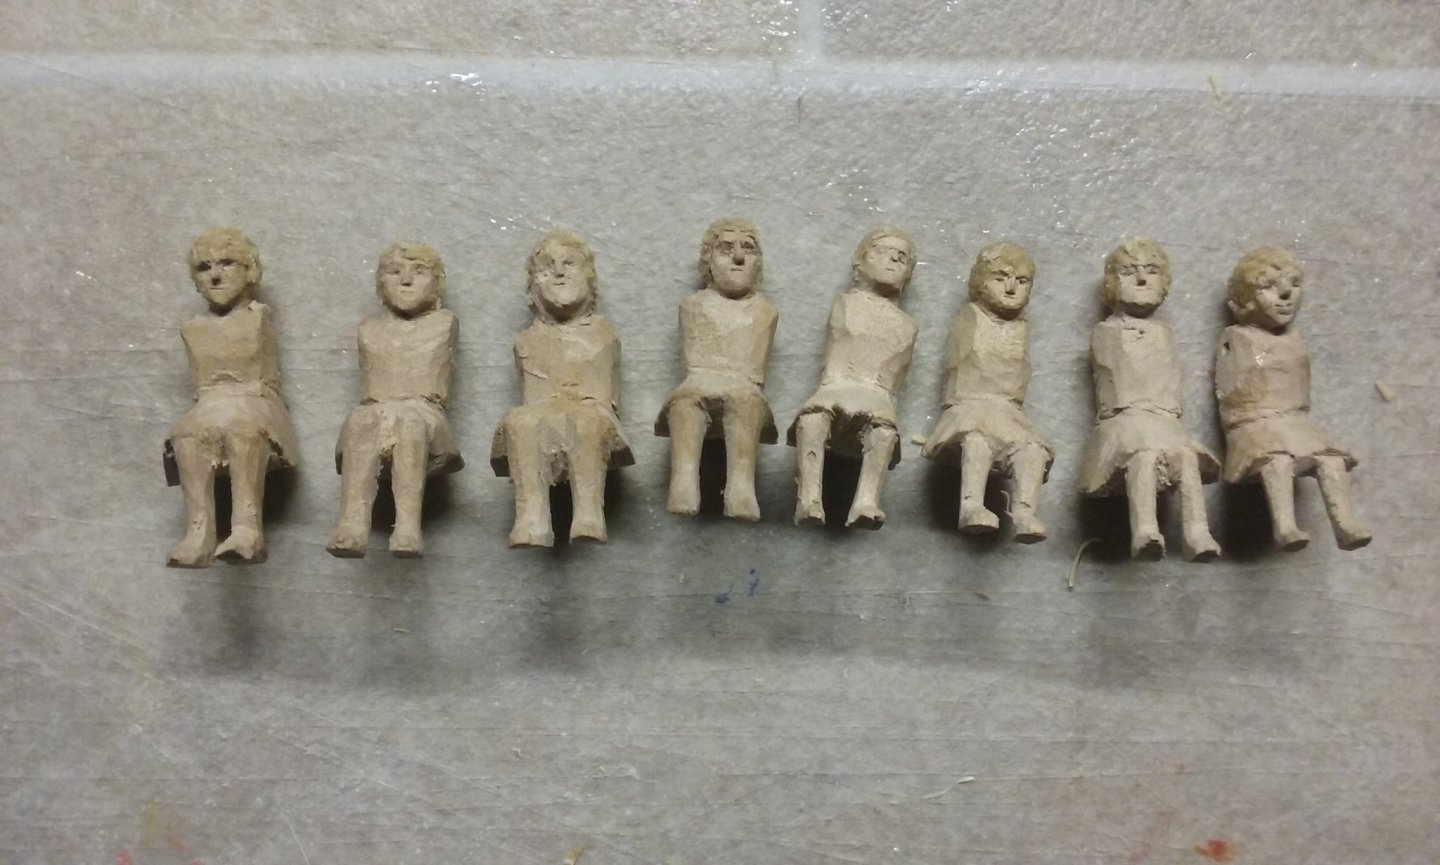
I've been unable to cut out any more oarsmen for the time being - I broke the only blade I had for my coping saw, and I have to wait till we can schedule a visit to the hardware shop - not going to make a special visit just for that! In the meantime I've been tidying up the existing ones - I wasn't happy with some of them; I'd cut the heads too narrow so I couldn't give them the full head of hair that was normal in Byzantine times - several of them had short back and sides and a few were bald! I'd resigned myself to not being able to fix that, then I thought maybe filler would help. I stored the residue from sanding the bamboo of the Great Harry's decks and mixed it with white glue. Turned out to work very well - much finer than the usual sawdust, though I had to remove random bamboo fibres that had got into the mix. The first iteration had them looking like 1950's starlets: But after the glue started to dry and I manoeuvred the filler around a bit with a toothpick, they looked surprisingly good. Note Harpo Marx at the far right, Harrison Ford far left . . . Steven
-
Finished the planking on the upper deck. A little difficult at the end because the frames were so far apart there was no support for the "pointy" end of the last couple of planks. I got a bright idea - glue two planks together for each side. That seemed to make it possible to cover the gap - that plus friction against the adjoining planks held them in place well enough to glue them in. So that's done. It has to be sanded down and then that will be complete. I'm pretty happy with it - it's in keeping with the existing decking but can be seen to be different. My next major job will be planking below the water line. Wish me luck! Steven


- 740 replies
-
- 11
-
-
- Tudor
- restoration
- (and 4 more)
-
Curtiss P-40B Warhawk by Asat- Airfix- 1/48
Louie da fly replied to ASAT's topic in Non-ship/categorised builds
Lou, the cheapest one (reportedly in good condition) is on ebay though there are several out there at similar prices. Just google Book Storm Over Kokoda Steven -
Curtiss P-40B Warhawk by Asat- Airfix- 1/48
Louie da fly replied to ASAT's topic in Non-ship/categorised builds
I came late to this build - it's looking fantastic! The detail is far and away better than the old Airfix 1:72 models I made when I was a kid. I've always loved the P-40; it just seems such a beautiful aircraft. I made a 1:72 Airfix model of it back in the day. I read a book a while ago- unfortunately I can't remember its name and the library I borrowed it from has closed for the duration - can't even access the catalogue online - about the Australian pilots in the New Guinea campaign, who were fitted with P-40s. They independently evolved the tactic of attacking in a dive and built up a respectable score against the zeros. Then along comes one of the high brass straight from his comfortable office in Melbourne, several thousand miles from the front, who accused them of cowardice for not dogfighting with the zeros. So the CO went up to dogfight with them and was shot down and killed. Good one. They fought under terrible conditions, always short of equipment and replacements, and under continual pressure under attacks that never seemed to let up, they performed magnificently. The book is well worth a read, if I can figure out what it was called. Steven [edit: The book is called "Storm Over Kokoda" and is by Peter Ewer. The book review says "Most of us have heard of the battered and muddy troops who 'saved' Australia on the Kokoda Track during the darkest hours of the Pacific war. Far fewer know of the Australian pilots and aircrew of 75 Squadron who first checked the Japanese advance into the South West Pacific, in desperate air fighting that swirled over the jungles of New Guinea and the base at Port Moresby, fully six months before the land campaign began. Storm Over Kokoda tells how Australian crews, in a handful of Hudson bombers and Catalina flying boats, took the fight to the Japanese. Peter Ewer draws on eyewitness accounts and combat reports to shed new and exciting light on a neglected episode in Australian military history. This is not merely an 'aviation' story, but a compelling tale of men at war - on both sides - in a harsh physical environment. This was a time when every flight proved an epic, and every man a hero."] Strange that it doesn't mention the P-40s, which was what 75 squadron was equipped with. -
It's been a while since I've checked on this project. Beautiful work. I particularly like your machicolations, but everything is really well done and amazingly lifelike! Steven
-
New Member in New Zealand/Australia
Louie da fly replied to StuC's topic in New member Introductions
Well, just down the road from Hedland (in terms of North-west distances). I can think of few things better designed to take a person's mind off work and lockdown than ship modelling. The Lady Nelson is a very attractive ship, well worth the effort. Looks like you've already got a good start on her. Steven -
Sorry you haven't been able to the instructions so far - I see masa might be able to provide them. You might also care to look at which though it's of the earlier version of Bluenose II might be of help to you building the later version. Steven