HOLIDAY DONATION DRIVE - SUPPORT MSW - DO YOUR PART TO KEEP THIS GREAT FORUM GOING! (Only 20 donations so far - C'mon guys!)
×


GuntherMT
-
Posts
2,213 -
Joined
-
Last visited
Content Type
Profiles
Forums
Gallery
Events
Everything posted by GuntherMT
-
Dave - the waterline should be on one of the plans. If it's not.. well, I have no idea then, but I would expect it to be on the plan sheet that was used for the initial construction of the hull, not the rigging or sail plan sheet which is what it appears you are showing.
-
Thanks. I used to love listening to Paul's stories.
-
For reference, here is a post showing the rigged cannons on deck: http://modelshipworld.com/index.php/topic/8085-armed-virginia-sloop-by-gunthermt-finished-model-shipways-scale-148/?p=328885 And here is the Syren stuff I used - Syren 5/32" Pearwood single & double blocks, Syren 3mm hooks, some generic tan thread I found that is very thin for seizing, .008" Syren brown rope for the stropping, and .012" Syren tan rope for the tackle line.
- 843 replies
-
- 3
-

-
- niagara
- model shipways
- (and 2 more)
-
I know this is from way back Mike (I've been way behind on build logs lately), but I would not let the rope dictate the size of the block, rather go with what looks right, and drill out the blocks as needed. If you look at my rigged cannon, every single block in that had to be drilled to allow the rope to fit. For that matter, every single block in my rigging was also drilled out. By the nature of how these little scale blocks are created, the provided holes are simply not large enough if you wish to keep the blocks in scale, and use rope larger than 'very small'. I don't know for sure, but my guess is that this is intentional to keep the blocks stronger and allow people to enlarge them if needed without making the unused parts of the blocks look goofy with overly large holes.
- 843 replies
-
- 3
-
-
- niagara
- model shipways
- (and 2 more)
-
Jean-Philippe, You can see my fashion pieces before they were painted in this post - http://modelshipworld.com/index.php/topic/8085-armed-virginia-sloop-by-gunthermt-finished-model-shipways-scale-148/?p=248130 They are just cut to shape out of a piece of walnut, there is no bending involved at all.
- 194 replies
-
- 3
-
-
- armed virginia sloop
- model shipways
- (and 1 more)
-
Double blocks at the bulwarks match the tackle for the AVS, and both the AVS and Niagara plans were drawn by the same gentleman.
- 648 replies
-
- 3
-
-
- niagara
- model shipways
- (and 1 more)
-
Which piece are you asking about bending? The cap rail on the stern or the curved fashion piece on the side? If it's the fashion piece, you don't bend it at all, you cut the shape out of a wider piece of walnut. If it's the cap rail, it should be basswood and bend just fine with heat and/or water.
- 194 replies
-
- 3
-
-
- armed virginia sloop
- model shipways
- (and 1 more)
-
Glad I had an idea that was useful, although I imagine you would have found a way (possibly the same one) to get around the sequence issue at some point. I'm happy that I got to get a good look at this in person, it's a wonderful work of art. The knees are looking great!
- 649 replies
-
- 6
-
-
- dunbrody
- famine ship
- (and 2 more)
-
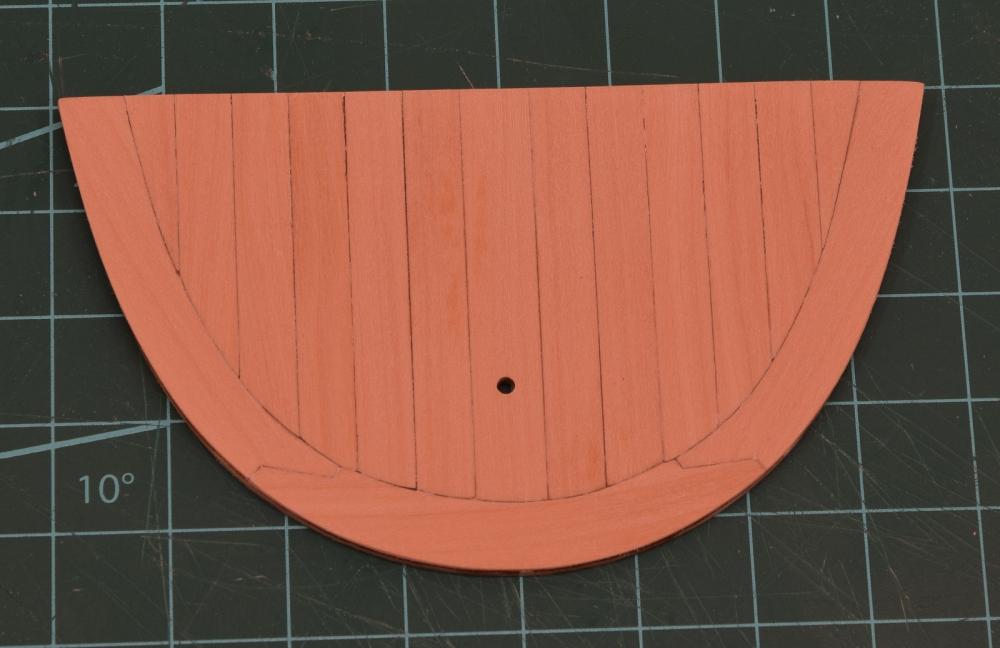
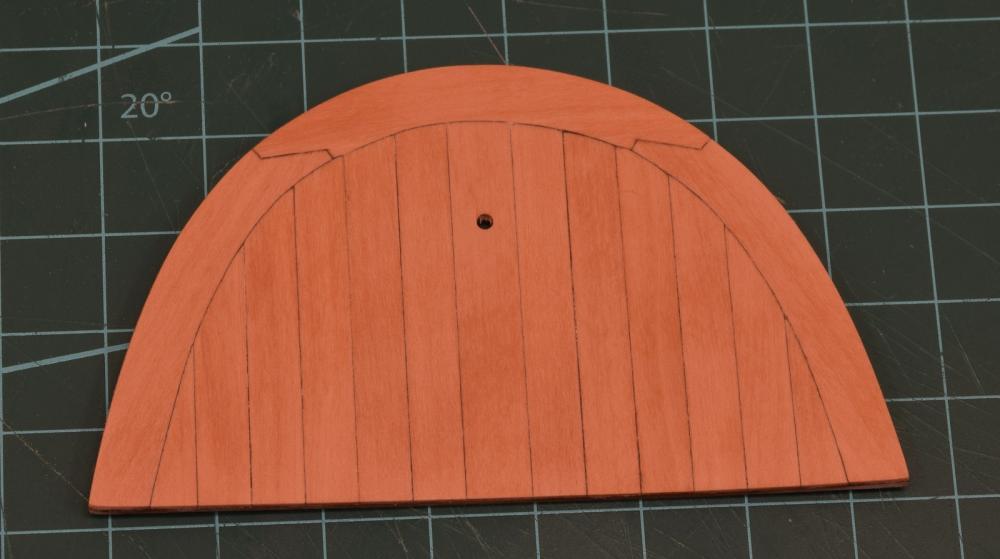
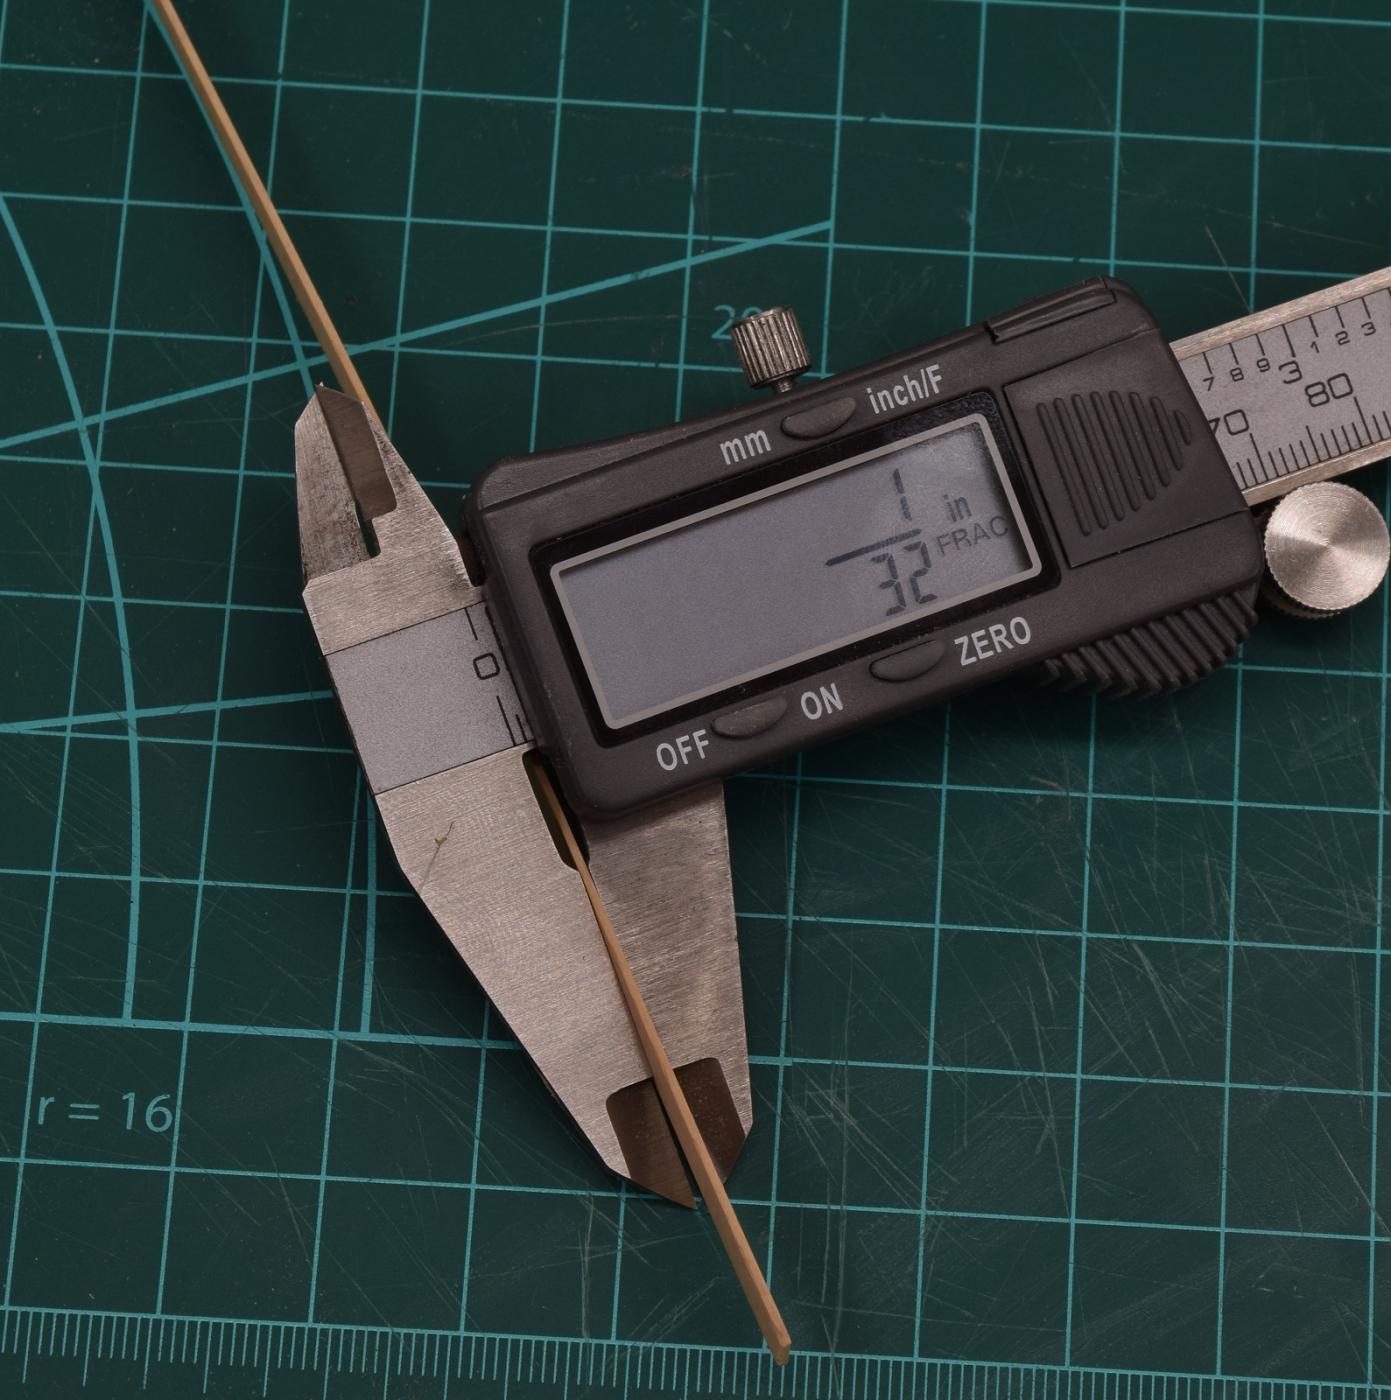
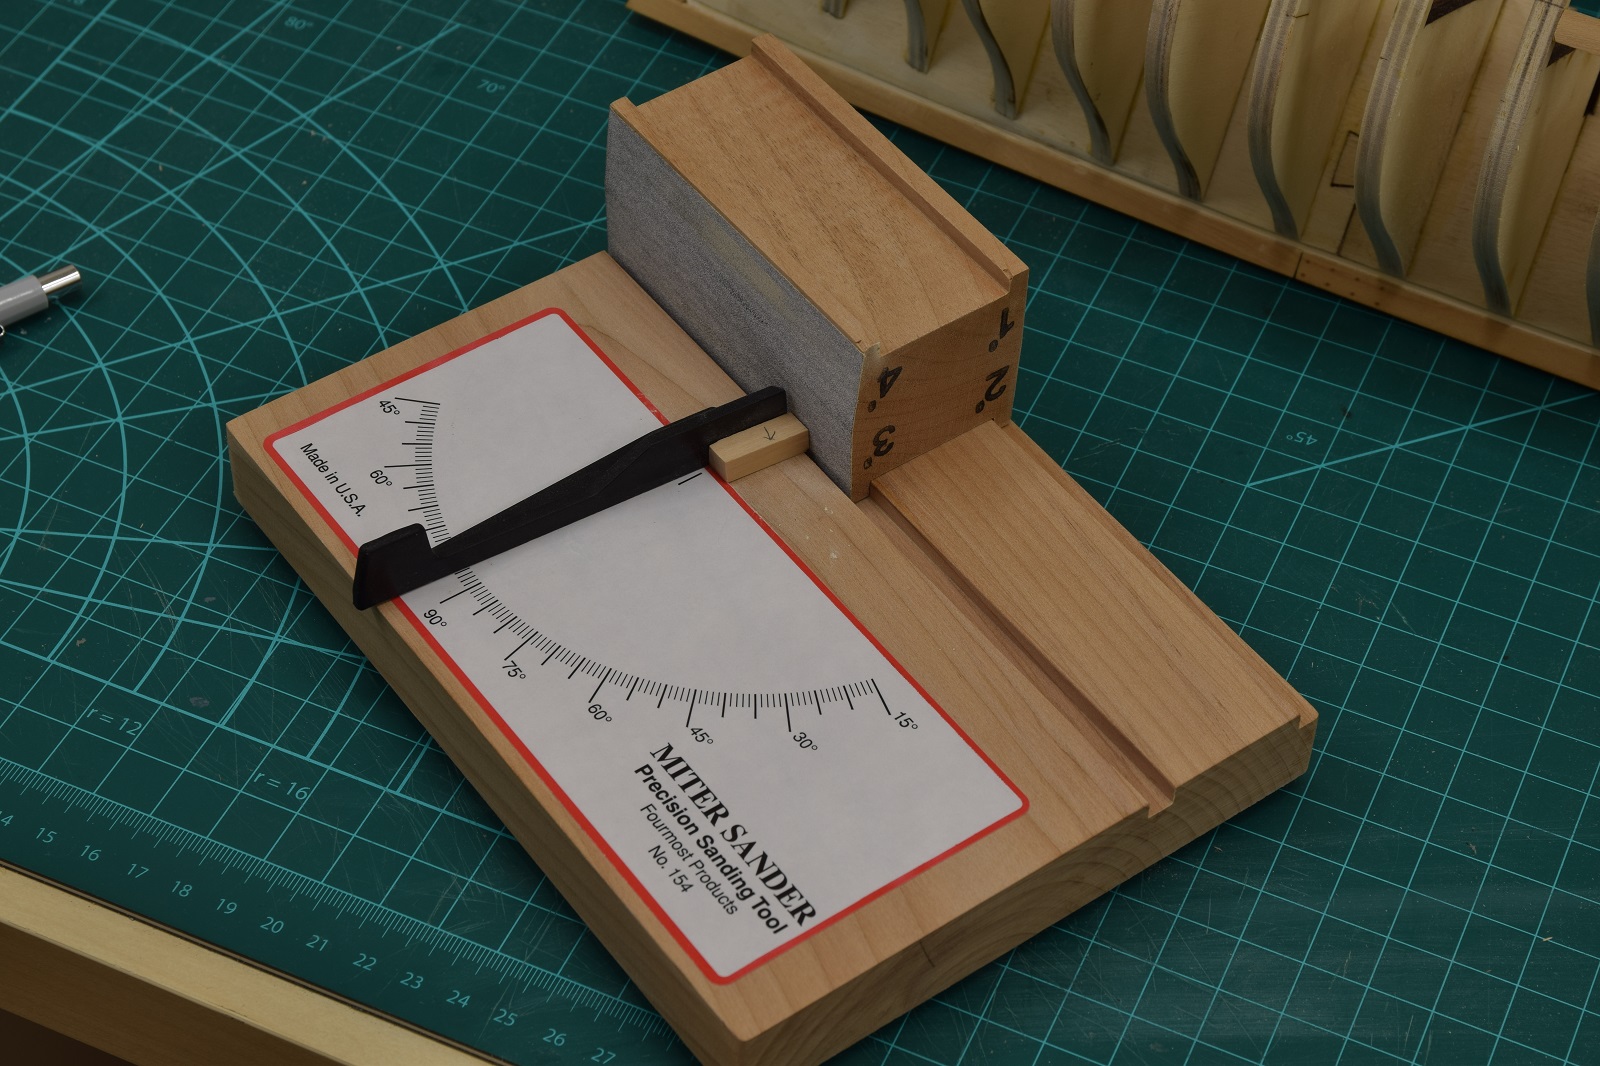
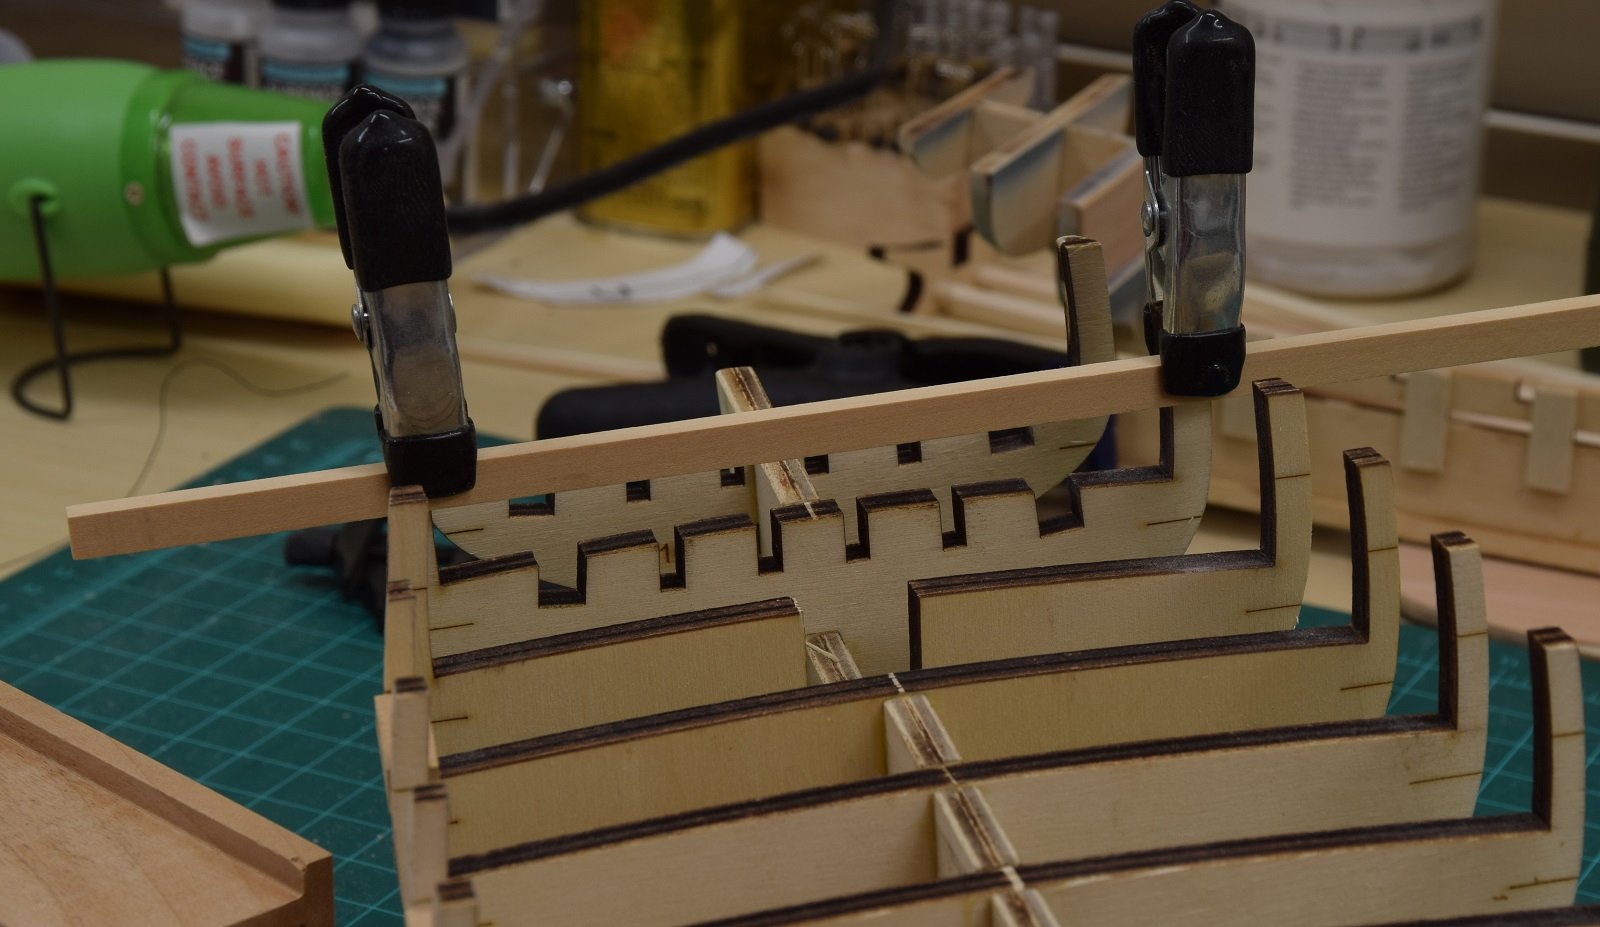
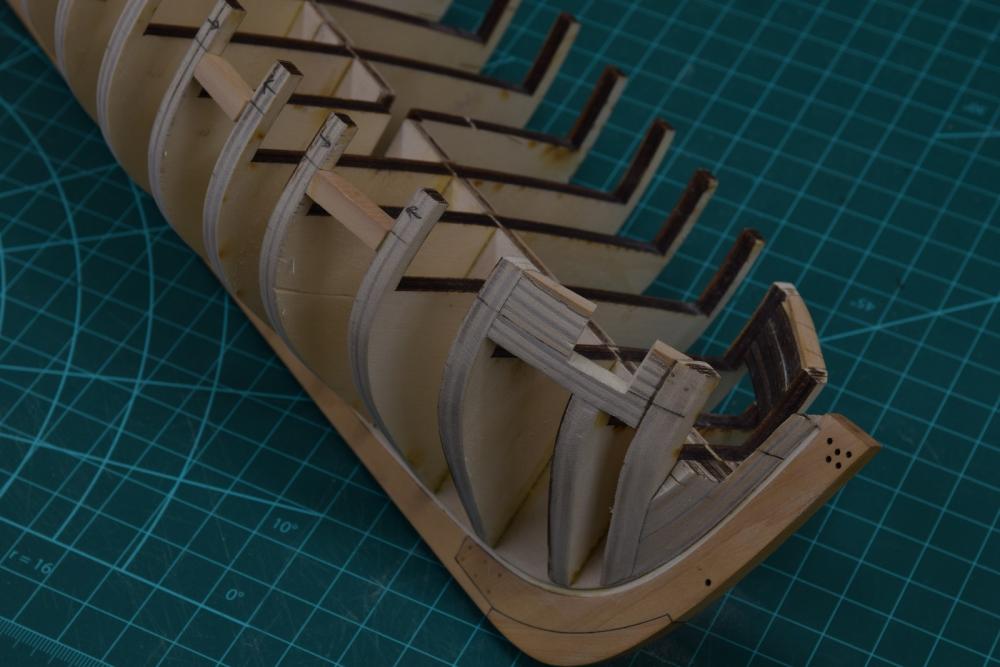
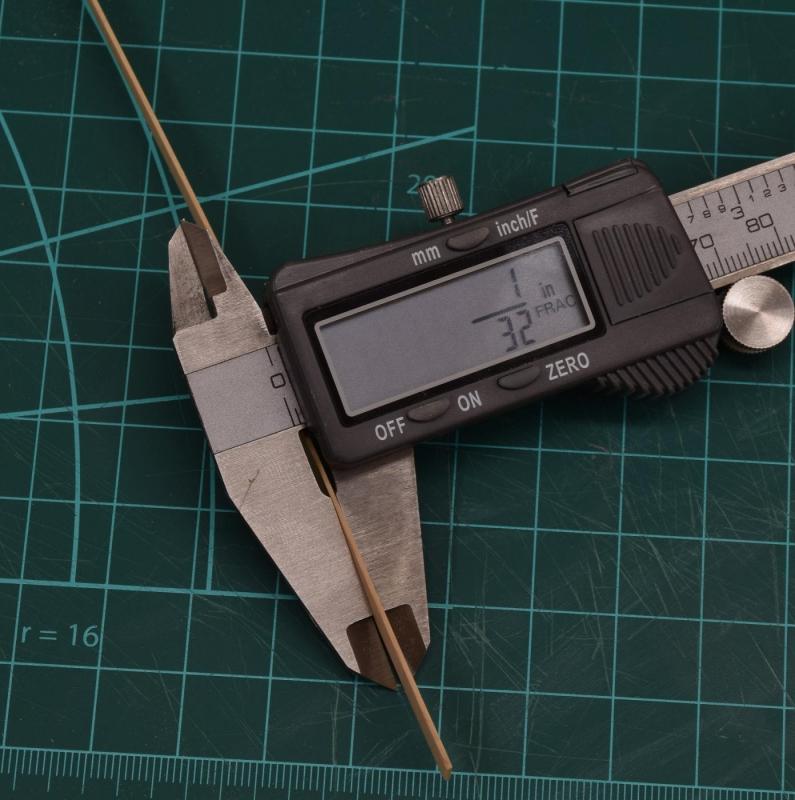
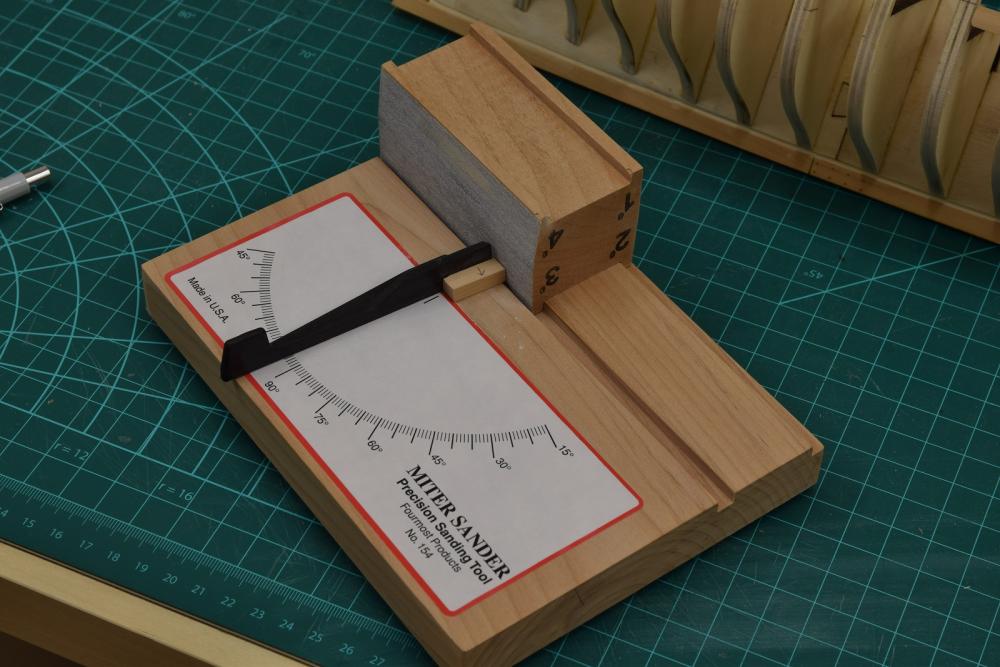
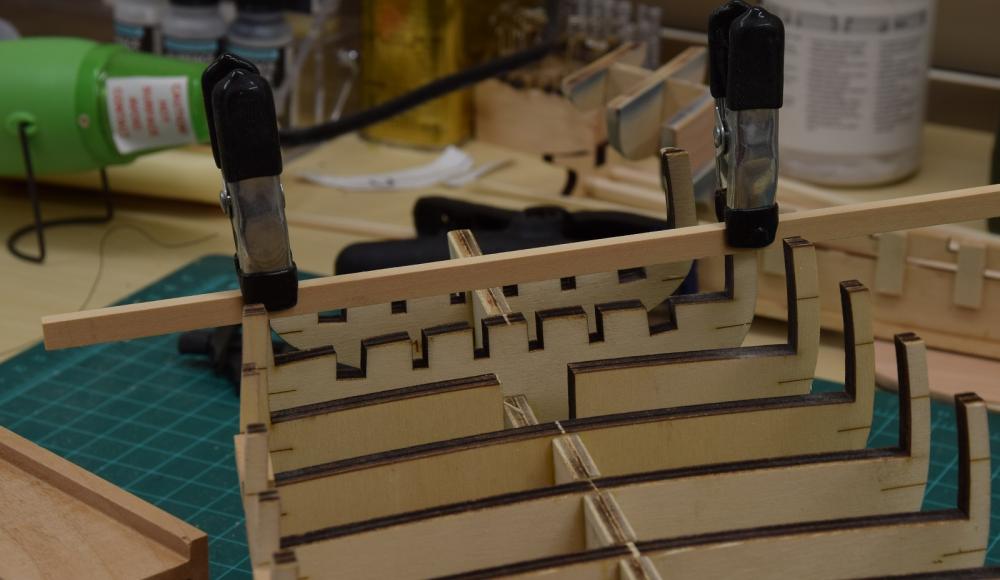
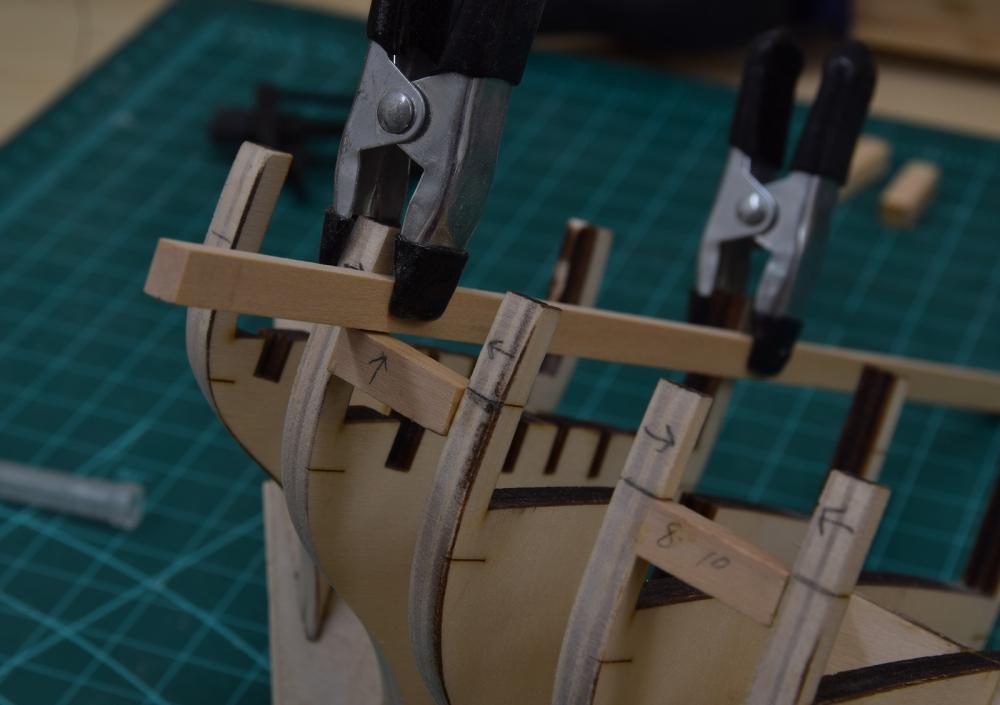
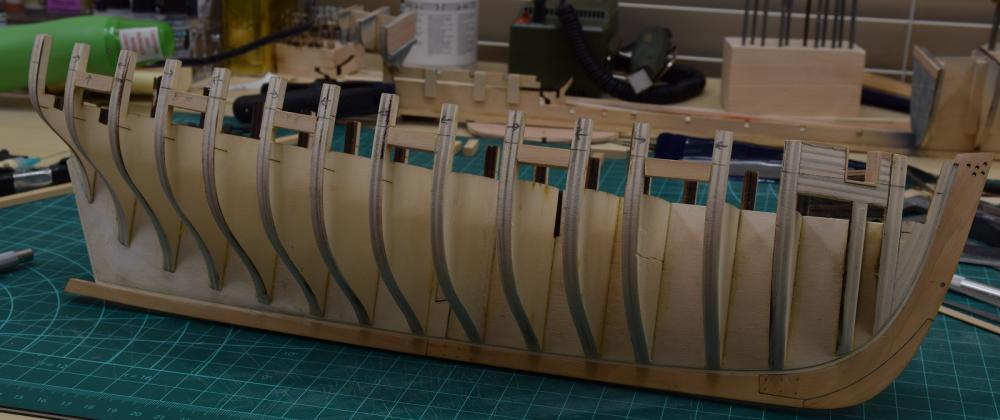
What's up Cheerful boat? We haven't seen you in a while. So not much to report, but I've completed the gun port sills on one side, so figured I'd go ahead and post it. The first thing to do was to cut out the forward gun ports from the plywood filler piece in the bow. This went fairly well, but I managed to get it slightly wider at the top than at the bottom, which was unfortunate and left me with a bit of a pickle, so I decided to make them oversized, and frame them with boxwood. Here it's cut oversize, 1/32 on all three sides, or so I thought (I failed, and it was still wider at the top, by 1/32). Also pictured is the first two gun port sills between the bulkheads have already been placed. First thing I needed to frame the forward port was the 1/32" strip of boxwood, which I didn't have. Luckily, I just happen to have an awesome little table saw now, so I took a 1/4" thick piece of boxwood and ripped a 1/32" strip from it. This saw is amazing. Here is the calipers measuring my strip. In the fraction mode, the calipers are accurate to 1/128". It measured exactly 1/32" for the entire 15" of the strip without exception. Happy dance. I cut this strip to lengths to frame the gun port with, and glued them in place. Unfortunately, as I mentioned above, when it was done I discovered that it was still 1/32 wider at the top than the bottom, so I glued another 1/32" strip in place on the forward end, and then sanded it down so that it was almost gone at the bottom of the port, but still full-thickness at the top of the port. Came out pretty good. After this I finished the rest of the 6 sills between the bulkheads on this side. My method was fairly simple, I would cut a piece of 1/4" x 1/4" boxwood slightly long on the saw, and then I used this awesome sander thingy to bevel the ends to fit. What is cool about this sander is that it will do 2 angles at once thanks to the blocks for it. As shown in the photo it is set up to sand a 5 degree bevel using the mitre, and a 3 degree bevel using the block. This allowed me to bevel the ends of the sills to fit very snugly between the bulkheads while following the line that was established using the strip of wood in an earlier update. To keep the top of the sills level relative to the keel, I clamped a board across the bulkheads using the same established line (can be seen as laser etch marks on the forward edge of the bulkheads in the first photo here). I then glued the sill in place beneath this board, after which I just un-clamped and removed the board, leaving the sill in place. And the end result as it looks right now. Up next I have to repeat all of this on the other side. Thus ends today's wooden boat update.

-
You can clean up the windows when you go to do the final installation by simply using small slices of walnut to fill the gaps and wedges. Sand it down smooth and once you hit it with wipe on poly (or paint it) nobody will ever know.
- 194 replies
-
- 4
-
-
- armed virginia sloop
- model shipways
- (and 1 more)
-
Great detail work Greg. Out of curiosity, do you know the functional purpose of the grill-work over the funnels?
- 342 replies
-
- 3
-
-
- dreadnought
- zvezda
- (and 2 more)
-
Long term, I don't think you'll regret the decision to replace something that you don't think looks right, and as you've already found, it's hard to beat the rope and blocks from Syren for appearance. As far as getting the glued eye-bolts out, I had to do that and by grabbing them with pliers right up against the hull and using very small twisting motions, I was able to break the glue (CA has very little strength against 'shear' motion) and remove the eye-bolts without much difficulty.
- 648 replies
-
- 3
-
-
- niagara
- model shipways
- (and 1 more)
-
My log probably isn't the best one to use for scuppers. I did find a nice way to shape the internal scuppers using a file that was exactly the right width, and then shaping with round file prior to installing that piece, but I also completely forgot to cut them into the black strake and had to drill them later and then shape with a file. They came out ok, but if I'd screwed it up there would have been a great deal of deconstruction involved to replace the black strake.
- 194 replies
-
- 4
-
-
- armed virginia sloop
- model shipways
- (and 1 more)
-
Very nice crisp waterline, well done.
-
Nice work so far. That's a tiny little fife rail, looks like it came out just fine.
-
Good idea Chris, I had my completed builds marked "Complete", but I've now changed them to "Finished". Having a standard word to use for this is an excellent plan. Now if only everyone would follow the standard!
-
Awesome. If you are going to be home on Monday, maybe I'll swing by after work.
- 649 replies
-
- 6
-
-
- dunbrody
- famine ship
- (and 2 more)
-
So why are you building two? Will one (or both) of them be sold? I understand that the 2nd one is much cheaper in the sense that the research and development was already done. Amazing model so far, really big!
-
Ship lettering
GuntherMT replied to piperck's topic in Building, Framing, Planking and plating a ships hull and deck
I found some dry-transfer letters at my local hobby store. They are for model railroading, and they worked great for the lettering. Of course your fonts will be limited to whatever they produce, so it depends on what you are looking for whether you will find something that works. -
I just glued my guns down with regular white glue. I used white glue so that any excess would be very difficult to see. The guns don't need to deal with any stress (unless you bang into them with something), so they don't need a lot of holding power. I sanded the bottom of the wheels lightly to remove the paint, then lightly scraped the points on the deck where the wheels would go, then just placed a small spot of glue on the bottom of each wheel with a toothpick and set them in place. I've only had one come loose, when I knocked it with something or other, and the rigging held just fine, so was a simple matter to re-glue with a toothpick and a bit more glue.
- 648 replies
-
- 2
-
-
- niagara
- model shipways
- (and 1 more)
-
Looking great Frank. Not much else to say! On the stub mast, have you considered at all doing the full lower mast so that you could include the shrouds and other lower rigging details, or do you want to just leave this completely rigging free?
- 649 replies
-
- 5
-
-
- dunbrody
- famine ship
- (and 2 more)
-
Took a while, but finally caught up on this log. Your rigging is looking fantastic!
-
Darrell, Not sure if the method I used would be easier or even worse for you, but here is a link to my post on how I stropped the blocks for my guns - http://modelshipworld.com/index.php/topic/8085-armed-virginia-sloop-by-gunthermt-model-shipways-scale-148-complete/?p=328294 Edit - I never did get the pre-made seizing to work to my liking, so my method uses hand seizing, but you could adapt the method to use pre-made seizing by threading the rope through the pre-made seizing instead of hand seizing it but otherwise using the same methods, I think.
- 648 replies
-
- 3
-
-
- niagara
- model shipways
- (and 1 more)
-
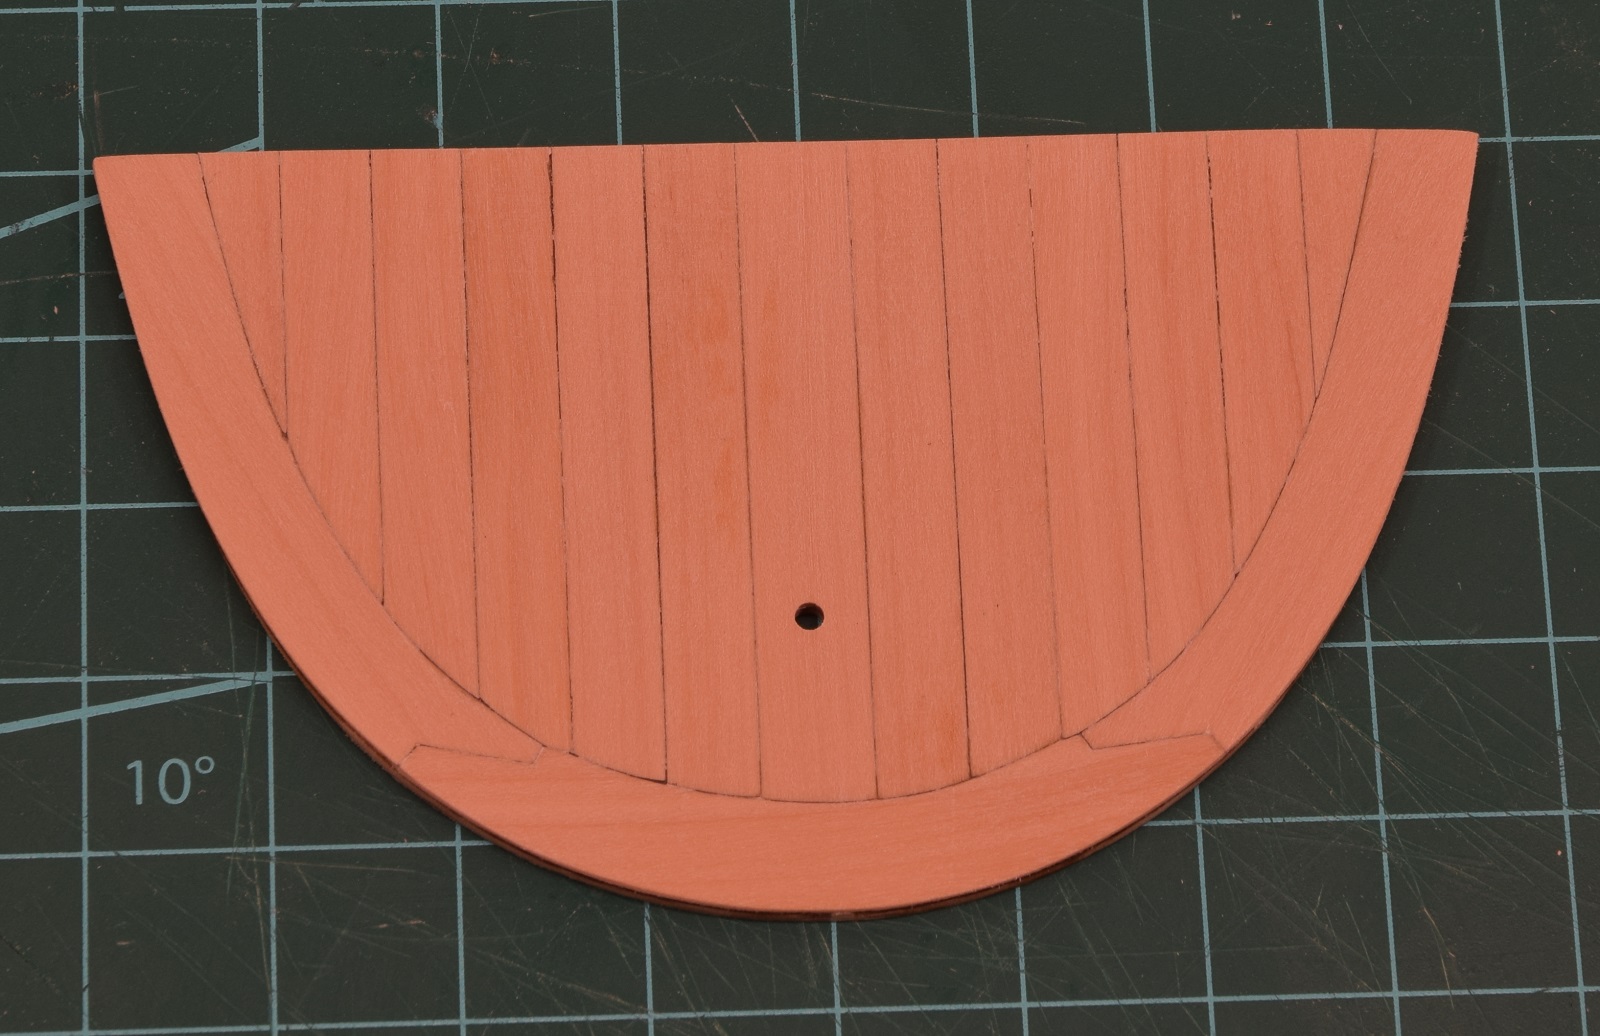
Finished the stern deck planking. Sanded and cleaned up: Added coat of wipe on poly: Pretty happy with how the decking is coming out. Have a couple of benches and the bulkheads left to do before I can finally start assembling stuff.