


Ryland Craze
-
Posts
1,569 -
Joined
-
Last visited
Content Type
Profiles
Forums
Gallery
Events
Everything posted by Ryland Craze
-
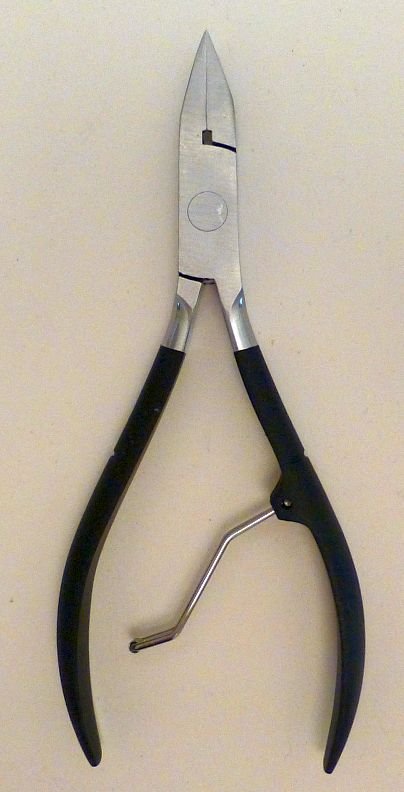
 It has been a while since posted, but thought that I would share a useful tool that I use for rigging. It is a toenail nipper that I purchased from Walmart. It is manufactured by Japonesque. It has a flat bottom to it and it is a flush cutter. It also has a sharp point that you can get really close to the line that is to be cut. Side View - Notice the sharp point. Here is the link to the one that I purchased: https://www.walmart.com/ip/Japonesque-Velvet-Touch-Pedicure-Essential-Duo/994640842?wmlspartner=wlpa&selectedSellerId=0&&adid=22222222227276419523&wl0=&wl1=g&wl2=c&wl3=332285858061&wl4=pla-636753874486&wl5=9008419&wl6=&wl7=&wl8=&wl9=pla&wl10=8175035&wl11=online&wl12=994640842&veh=sem&gclid=Cj0KCQjwvYSEBhDjARIsAJMn0li5sJXPBooROIN4T83y-d0T8uMp-ZL5P39GuFWCNafxp1fJ0GQOGgAaAm_sEALw_wcB&gclsrc=aw.ds Here is a link to the manufacture's website: https://japonesque.com/products/implements/hand-foot-care/velvet-touch-pedicure-essential-duo/ I was able to purchase it in the store. It was well worth the $13 I paid for it.
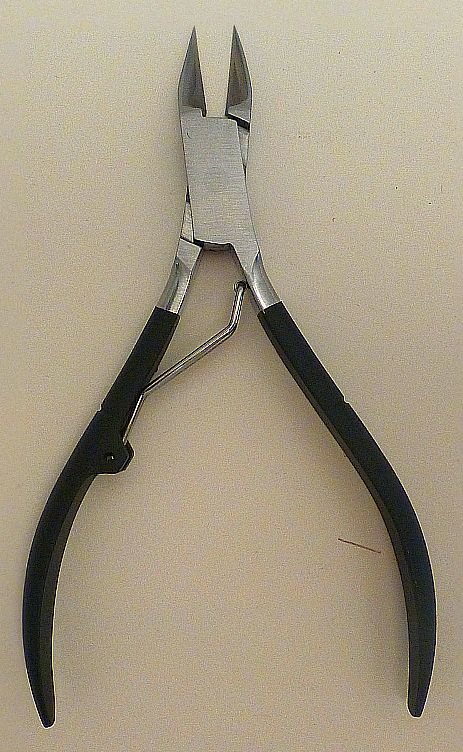

- 263 replies
-
- 15
-

-

-
- Medway Longboat
- Syren Ship Model Company
- (and 1 more)
-
Welcome to Model Ship World Pete. I am glad you have found this forum. You have done a good job on your Cutty Sark. I hope you start a build log on your model as it is never too late to start one.
-
Welcome to Model Ship World. I am amazed at the model aircraft builds that are on the internet. Some of them are so detailed and realistic that it is hard to tell the difference between the actual plane. With your modeling skills, you will do just fine building ship models. I look forward to seeing some of your work.
-
Finally got the time to start model building
Ryland Craze replied to Johan Reynaert's topic in New member Introductions
Welcome to Model Ship World Johan. The Lowell Grand Banks Dory is an excellent choice for your first wooden ship model. There are several build logs of this kit on MSW that you can refer to. Building this model will give you the skills to build more complicated ship models. I hope you will start a build log of this model. -
Welcome to Model Ship World Ken. It must be an honor to have your drawing on the cover of a book that features works from top artists. I am looking forward to seeing your work on your Syren. With your artistic talent and Chuck's artistic talent, your Syren should turn out to be an exceptional model.
-
Your stem could be slightly crooked. When a part is laser cut, the laser beam is wider at the top of the part and gets narrower as it cuts into the wood. If the laser beam is out of focus, then the angle can get more severe. I always use a miniature square to make sure that the part is 90 degrees to the base. If it is not, I will have to true up the joint being glued. You said "I still can’t really understand how to use “water & brush” to remove excess glue, but my toothpick seemed to work for me!" I use a damp brush to pick up the excess glue. Just drag the damp brush through the excess glue and then rinse the brush. Keep repeating this process until all the excess glue has been removed. Your progress looks good and your detailed build log will help future builders of this model.
- 85 replies
-
- 3
-
-
- Lowell Grand Banks Dory
- First Build
- (and 2 more)
-
This is a good kit for the beginner ship modeler. You will learn a lot of skills that will help you in future builds. You can click on the tag that is below the title of your build log and it will bring up all of the build logs for the Lowell Grand Banks Dory that you can use as a reference for your build.
- 85 replies
-
- 4
-
-
- Lowell Grand Banks Dory
- First Build
- (and 2 more)
-
Congratulations Joseph on finishing your first wooden ship model. You overcame the planking problem and your dory turned into a really nice model. This looked to be a great kit for the first time builder. I look forward to seeing your next build.
- 11 replies
-
- 1
-
-
- Lowell Grand Banks Dory
- Model Shipways
- (and 2 more)
-
Welcome to Model Ship World. Your Victory is looking great. You are on your way to completing a very nice model.
-
New to the community and wooden models
Ryland Craze replied to Harland Wolff's topic in New member Introductions
Welcome to Model Ship World Harland. You should do just fine with the Polaris. Be sure to start a build log of your model. It will definitely help you on your build. -
Beautiful engine. I envy those that build miniature working engines. And welcome to Model Ship World. I will be looking forward to seeing your build and I hope it has a scale working engine in it.
-
Beautiful work Bob.
-
I am glad you found a solution to your problem. The pictures in the original post did not show the twisted transom, but I can see it in the first picture in the above post. You have done an excellent job on building this model. For 12a, I believe you are correct in the beveling of the inside frames. The bevel should be pretty much parallel to the plank attached to it, This is why frame #3 does not require much of a bevel as the frame sits at the midpoint of the model. For step #13, my interpretation of the instructions is to put a small, possibly a 1/8" strip to cover all of the joints where the planking is glued to the stem. Looking straight on, the stem will look solid. Soften the edges of this strip after installation and it will look very nice. Good luck on your build as you are on your way to building a very good looking model.
-
Welcome to Model Ship World Bill. Many of the kit build logs are tagged "First Build". The tags are located under the title of the build log and if you click on the tag, it will list all of the first builds by members. You can check them out and see what other first time ship modeler are building. This may help you find a model that you like and is suitable to your skills.
-
Welcome to Model Ship World Matey. The San Francisco Cross Section looks like a nice kit. I hope you start a build log on this model so we can follow your progress.
-
You are off to a good start on your Dory. This is an excellent kit to get started in building wooden ship models. There are also some excellent build logs by beginner ship modelers for this model.
- 11 replies
-
- 2
-
-
- Lowell Grand Banks Dory
- Model Shipways
- (and 2 more)
-
Nice work Jean-Paul. You are making good progress.
-
Welcome to Model Ship World. The dory is an excellent kit for a first wooden ship model. I look forward to seeing your build log.
-
Congratulations!. Beautiful model and the driftwood base really adds to the model. You did a great job on building this model and it definitely looks at home on your mantle.
- 82 replies
-
- 1
-
-
- skipjack
- wye river models
- (and 2 more)
-
Hi Ben and welcome to Model Ship World. I look forward to seeing your build log of the Le Marteagou when you start this kit.
-
New Modeler, eager for advice!
Ryland Craze replied to Joseph F.'s topic in New member Introductions
Hi Joseph and welcome to Model Ship World. It is nice to see another Virginian on this site. The Hampton Roads Ship Model Society is close to you. Check out their website by clicking on this link: HRSMS Website -
You are making good progress. Your Longboat looks really nice.
-
New to the site and starting out my hobby here
Ryland Craze replied to Robp1025's topic in New member Introductions
Hi Rob and welcome to Model Ship World. You have picked an excellent kit to start with. -
Hi, from an absolute rookie from Barcelona
Ryland Craze replied to BCN-Modeller's topic in New member Introductions
Hi Pascual and welcome to Model Ship World. The Palma Nova looks like a good kit for your first wooden ship model. Before you know it, you will be building the Vanguard kits that you mentioned.