


BobG
-
Posts
3,109 -
Joined
-
Last visited
Content Type
Profiles
Forums
Gallery
Events
Posts posted by BobG
-
-
-
20 hours ago, mtaylor said:
Just noticed, this thing needs a good dusting.
I swear, these models are dust magnets!
She'll look great if you decided to go admiralty style, Mark. Glad you're back in your shipyard plugging away.
- mtaylor, Jack12477, Keith Black and 2 others
-
 5
5
-
-
Looks gorgeous, Glenn!
- glbarlow and FrankWouts
-
2
-
-
Well done, Ras! You've made your model look like a true working vessel with all the interesting, additional details. The crew member is looking very pale though. The seas must have been really rough! 🤢
-
19 hours ago, Jeff5115 said:
As a relative newcomer to this hobby I learn so much from reading other members build logs.
Welcome, Jeff, and thanks for following along.
Most of what I know about ship modeling I learned from others on this forum and, like so many things, the more you learn about something, the more you realize just how much you have yet to learn!
-
20 hours ago, smotyka said:
I'll get a log going in hopefully 6 weeks due to your encouragement - have an upcoming medical situation to tend too in the meantime.
Sorry to hear that you have some medical issues that need attention, Steve, and I hope that all goes well for you. I look forward to following your build once you are back working on your model. Take good care.
-
4 hours ago, smotyka said:
Bob, appreciate the detail that your digging into on this model.
Thanks, Steve. It's my hope that providing a good amount of detail as I go along will be helpful to others.
I want to highlight the steps that were particularly challenging for me as well as my mistakes since my guess is that others may have difficulty in a lot of the same areas that I did. I think it will be most helpful also to actually see how I finally managed to get through these problem areas and to see what I did to try and fix my mistakes. Unfortunately, I think we learn a lot through our mistakes so my build will not be pretty at times but I'm okay with that as long learn something and perhaps do it better the next time.
Do you have a build log for your Flirt? If not, it's never too late to start one. I was hesitant to start a log when I was building the Medway Longboat but I finally started one when other builders encouraged me to do so. I got lots of great advice along the way and it helped me stay motivated to finish the build.
Thanks for stopping by and good luck with your Flirt build.
-
Of the color combinations you have tried, I prefer the blue and black in the bottom photo the best. You might try the darkest blue with the black also.
-
2 hours ago, Chuck said:
Those bands as lined off are incorrect. You have way too much upward sweep at the bow on those belts. Something more akin to this would make life a lot easier.
Thank you so much, Chuck, for looking in and commenting on how the bands I laid out are incorrect. The lines that you have superimposed on the photo is extremely helpful to see! I hope you will continue to stop by every now and then and add some words of advice as I try out this planking method.
Glenn suggested that 2 bands instead of 3 might make things easier on a small hull like the Flirt. How do you generally determine how many bands to have when lining off the hull?
-
First off, thanks to everyone who has taken the time to comment on what I have done so far in my rather haphazard attempt at lining off the hull for the first time. This is exactly the kind of feedback is so helpful to me and, hopefully, to others who are trying to learn this planking method.
3 hours ago, glbarlow said:You just look for a smooth flow and sweep of the lines consistent with the sheer.
Thanks, Glenn. I really didn't know this basic concept and it's really helpful. 👍
-
One of my goals building this model was to try and learn how to plank the hull using Chuck's method of lining off the hull and edge bending the planks and, although this is a double planked model, I thought it would be wise to practice on the first planking. It would be easier and much faster to simply plank the hull by tapering the planks where they overlap the previous plank as suggested in the instructions. Certainly, James H did a fine job of planking the prototype this way.
However, some of the planking I've seen on the Cheerful and the Winnie are stunning and Chuck really encourages builders to learn this method. I also love the look of the boxwood planks and I'm seriously thinking of leaving the hull natural without painting it so I'd like for the second planking to be quite good. Of course, if I make a mess of it, I'll be filling and sanding and painting like crazy!
I will say this though. I've watched Chuck's planking videos, read some Cheerful and Winnie logs and I've read the planking tutorials in the MSW data base and I'm still not sure I understand it completely. At any rate, it's time to give it a try. I'll be tiptoeing along so this is going to be slow.
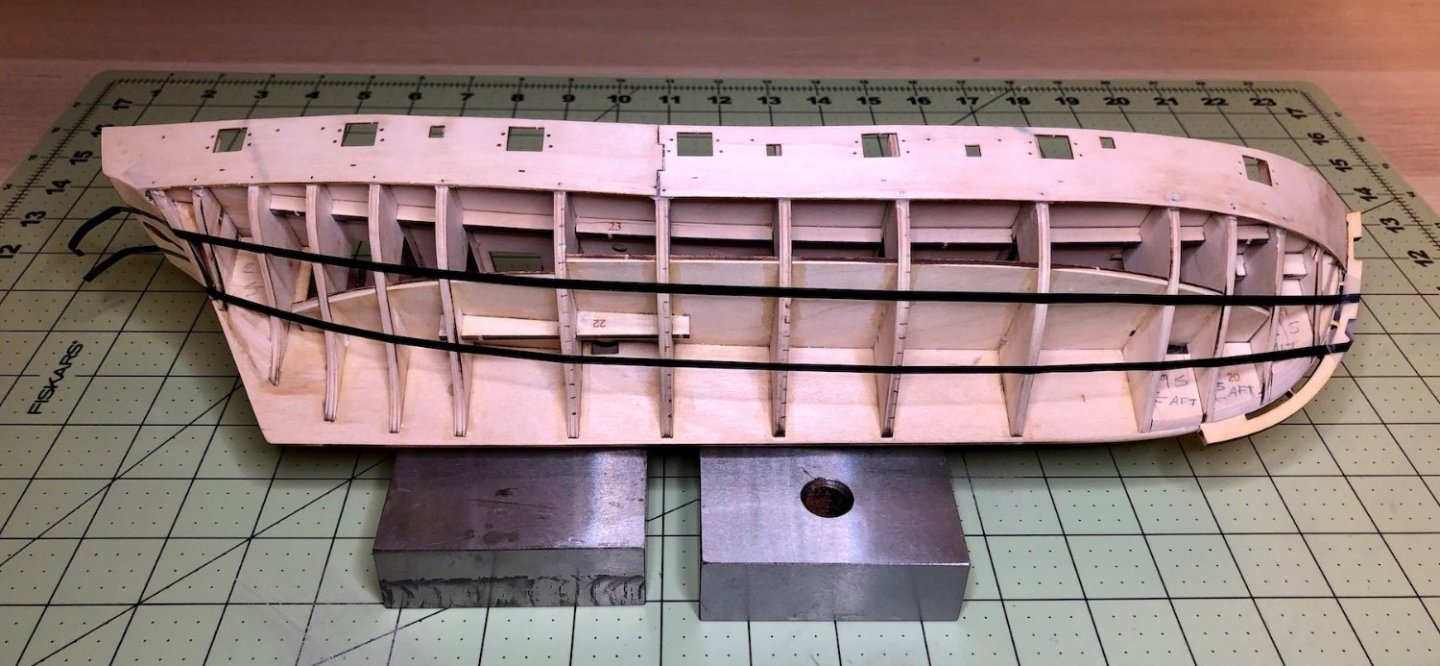
The widest, middle bulkheads are 78 mm long from the bottom of the gunport patterns to the false keel. The boxwood planks are 5 mm wide so I will need 14 planks at 5 mm and a garboard plank at 8 mm wide. I used a tick strip to mark these measurements on bulkheads 7 to 10 since they are all 78 mm.
I decided to divide the hull into 3 belts of 5 planks each. I thought having just 2 belts: one with 7 planks and one with 8 but I went with 3. I'm not really sure how you decide how many belts you should have though. I also saw that Chuck has a drop plank at the bow of the Cheerful and the Winnie but I'm not sure how you know whether you need a drop plank either. My guess is that it may be necessary so the planks don't get too narrow at the bow.
I took some 1/8" chart tape to divide the hull into 3 belts. It doesn't stick very well to the wood so I Scotch taped the ends once I thought I had a fair run of the tape.
Again, I'm not really sure how you determine when you have the tape placed correctly. I just started it in the middle with the upper edge of the tape touching the tick marks 5 planks down from the gunport patterns on the 4 middle bulkheads and I tried to lay it down in a fair run to the bow and stern. I also tried to not make the first strake so narrow at the bow that the planks would be tapered too thin there. I looked at it from different angles and made adjustments to the tape until it looked like it was running fair.
Am I going about it correctly? I really don't know. I'm in unknown waters here... 🤔
Tomorrow I will use a planking fan and a tick strip to mark the remaining frames and then line off the port side.

Thanks for looking in everyone and thanks for the comments and likes. Cheers!
- VTHokiEE, hollowneck, WalrusGuy and 8 others
-
11
-
1 hour ago, chris watton said:
a 36 Foot Admirals Barge
That's a cool little boat all by itself!
1 hour ago, chris watton said:I have had terrible toothache, culminating in tooth removal yesterday
We're in the same boat, Chris. I had a tooth yanked 2 days ago! My oral surgeon was great...no pain during the extraction and the bone graft. I will be getting an implant to replace the missing tooth. It's a long process and very expensive but worth it to me. Hope you're feeling better.
- thibaultron, chris watton, mtaylor and 1 other
-
4
-
-
6 hours ago, glbarlow said:
For the record I did say lightly on those tabs, the good news is they’ll break off easily when you want them to now.
My "lightly" was a bit too energetic! 🥴
I hope they do break off nicely. I tried to use as little glue as possible to hold the patterns to the tabs. Some needed more glue than others to hold them in place without any gaps and they might be a little stubborn to get off cleanly. I'll use some heat and a scalpel to loosen the PVA glue in the joint if necessary.
-
That's a fantastic model you built, Bruce!
- Canute, thibaultron and mtaylor
-
3
-
-
-
1 hour ago, Theodosius said:
Cobalt-blue, this is better, but I'm still not fully convinced:
I like this shade of blue better also.
I'm sure that many ship modelers try to be as historically accurate as possible when they choose the colors they paint their models. I prefer to find shades of the correct colors that please my eyes or, on some occasions, I even choose a completely different color that I like. After all, I'm the one that's going to be looking at it the most in the future! 😂
-
Lots of progress and she looks great!
-
-
Thanks very much Ron and Grant for your kind comments and encouragement.
I'm reading up on Chuck's method of planking the hull at the moment. I want to give it a try but I need to understand the steps better before I jump in with both feet...
-
Thank you so much, Peter, for taking the time to write and illustrate how you do these wonderful carvings. I've never done any carving at all but I would like to take a try at it someday.
How do you securely hold such a small and fragile piece of wood without breaking while you are carving?


HMS Flirt by Dfell - FINISHED - Vanguard Models - 1:64
in - Kit build logs for subjects built from 1751 - 1800
Posted
The planking looks very good, Doug.
I'll be doing the first planking soon and I am currently studying up on lining off the hull and then using Chuck's method of planking.
I can't quite tell from your photo but it looks like you used a planking butt shift pattern on the second planking...? Assuming you did, what pattern of shift did you use? Also, did you need to use any drop planks or stealers on the final planking?