


BobG
-
Posts
3,109 -
Joined
-
Last visited
Content Type
Profiles
Forums
Gallery
Events
Posts posted by BobG
-
-
I'm in the market for a new shop vac to replace my very old Sears Craftsman which I am sure has helped my hearing decline over the years. The available choices and sizes amongst Fein, Festool and Rigid makes my head spin though so I hope this discussion will help clarify things for me.
-
3 hours ago, Blue Ensign said:
I like to insert tiny hidden scrolls deep into the hull of models.
That's a very cool idea, BE. What a wonderful surprise that will be for someone someday.
I placed "time capsule" in the wall of our kitchen when we remodeled it 15 years ago. I included a photo of our family, several pages from a newspaper with news of the world and a handwritten note about us and the history of the house for whomever might find it many years in the future.
- Ryland Craze, Blue Ensign, Rustyj and 2 others
-
 4
4
-
 1
1
-
-
-
1 hour ago, Justin P. said:
Going forward, I think Triton might be the project I would suggest to anyone starting out in scratch work. Much of it is "just right" as an introduction to many different aspects.
Good to know. My wife got me the Byrnes sander for Christmas and I recently bit the bullet and bought the table saw and the thickness sander as well so I'm really interested in an "easier" scratch build. It's a bit intimidating to me since I've only completed a couple of kit models and I am working on a two others currently. Knowing me though, I'll probably jump in with two feet before I'm ready...
- VTHokiEE, Edwardkenway and Justin P.
-
3
-
-
-
-
I'm onboard for the build of this historic ship, Mike!
I actually got to go aboard the Calypso and talk with Jacque Cousteau and his crew when I was stationed at the US Coast Guard Captain-of-the-Port Los Angeles/Long Beach Station way back in 1969. The Calypso was in port and I was sent to try and get them to be a part of LORAN safety program and they were more than happy to sign on. Ships all over the world could be alerted through this program when they were in the area of another vessel experiencing an emergency and then go to their aid. They gave me a tour of the ship and their state of the art diving equipment also.
I'll never forget meeting Cousteau and his crew. He was a hero of mine because he was spending his life trying to save our oceans and sea life and educating the world about why it was important. He'd be appalled to see what has happened since then to the world's oceans today with all the pollution and garbage and the massive loss of corals and sea life.
Looking forward to your build, Mike. Good luck!
- xristos, mtaylor and mtdoramike
-
3
-
What a special recognition of your talent, Ryan!
-
-
14 hours ago, Duanelaker said:
Made some progress about a month ago. it seems i made the rail to thin and the straps that hold the deadeyes are to far inboard to work...this has frustrated me and i have put this ship away for now.
I know about getting frustrated with a build, David, and I think that stepping away from a build at times is not such a bad thing.
I stepped away from my Pen Duick build for a long time because I got to frustrated with the poor instructions and didn't do any building for something like a year. I just followed others' builds here on the forum until I started to feel the urge to start building again. The Pen Duick is still going very slowly but I am determined to finish it. However, I found that I needed to build a ship that had good instructions and materials. So now I building the Flirt by Vanguard and I'm enjoying it very much while I continue to work slowly on the Pen Duick as well.
I hope we'll see you back building something soon that you enjoy also.
-
7 hours ago, juhu said:
But now I would like to dedicate all the likes and thoughts to the brave people and brave country. Just a symbol, I know, but thanks to all who join.
Thanks for expressing what so many of us in the world are feeling as we continue to watch the heroism and the terrible suffering of people of Ukraine.
-
On 8/14/2021 at 4:55 AM, DelF said:
Where necessary I used clamps as well as pins, with occasional edge bending:
I really like the mini c-clamps you used when you did the planking as shown in your post #20. Do you have a link for them?
-
-
-
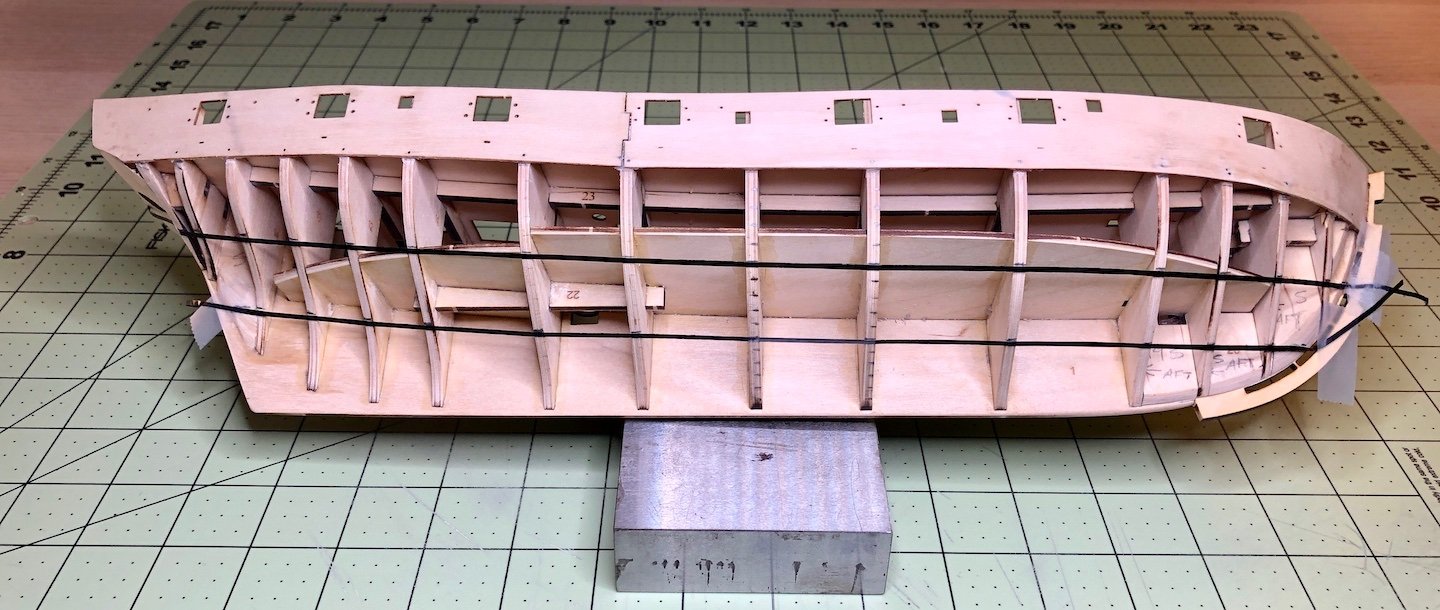
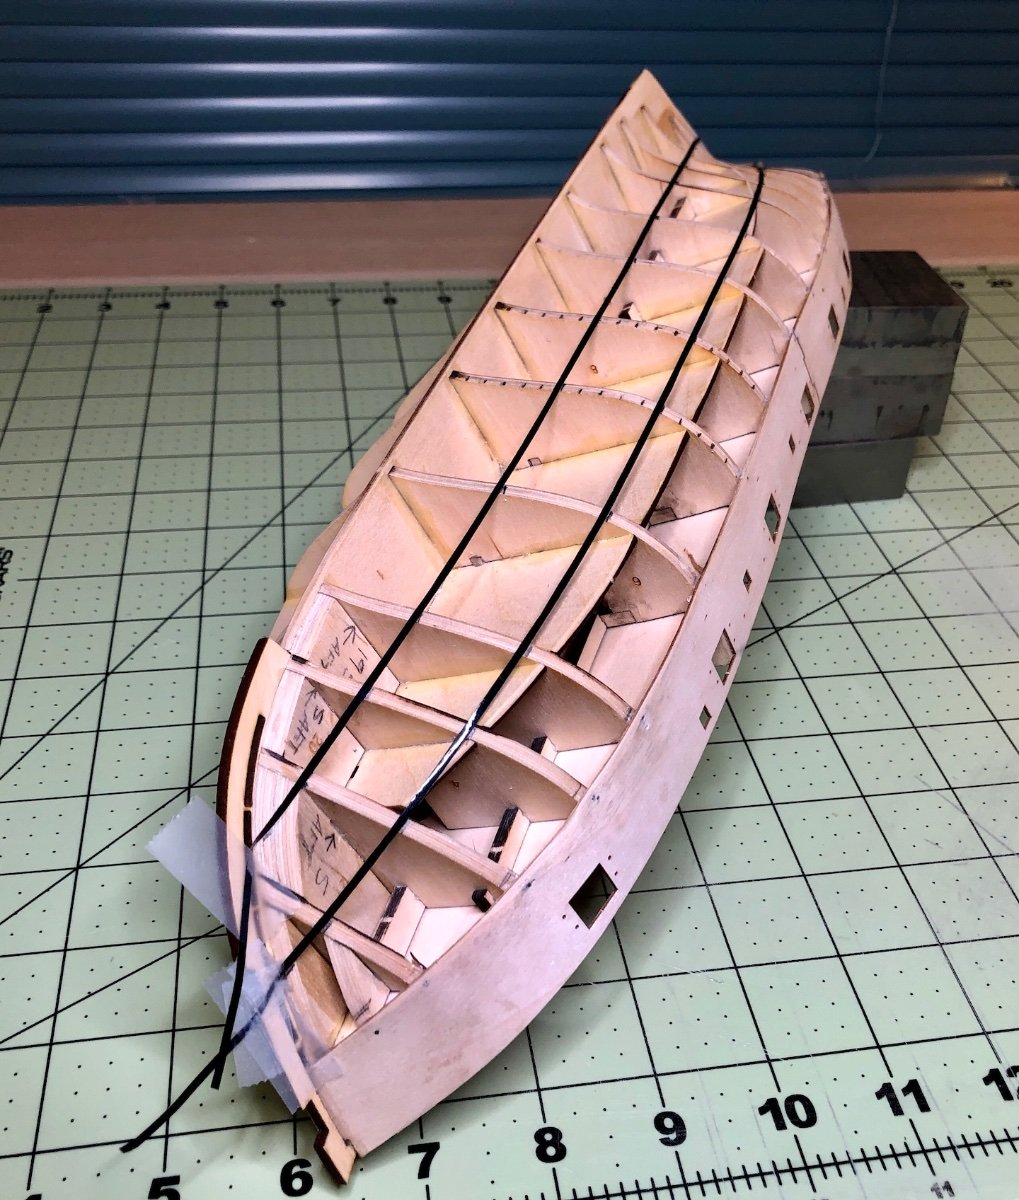
I spent quite a bit of time redoing the planking belts taking into consideration the advice from the posts by Chuck and Glenn in responses to my original attempt at lining the hull. Chuck had noted that my original layout was incorrect and so I paid particular attention to the red lines he superimposed onto the photo of my original layout of the belts. I tried 2 belts also as Glenn had suggested to see what that would be like and I preferred 3 belts. Three belts helped me visualize the flow of the belts better but I think that's simply a personal preference and some would prefer 2 belts.
I erased my previous tick marks and started over by marking the widest bulkheads, #7 and #8. The planks are 5 mm wide and the those 2 bulkheads are 78 mm wide so, starting at the bottom of the gunport patterns, there will be 15 planks total (14 planks at 5 mm wide plus a garboard plank that is 8 mm wide) and I marked those 2 bulkheads accordingly.
I used 1/16" black chart tape to divide the hull into 3 belts. The chart tape is frustrating to use because it doesn't stick well to the bulkheads and it kept popping loose requiring me to readjust often. I ended up putting Scotch tape on the ends of the tape at the bow and stern to help hold the lines in place. I need to find some narrow tape that sticks better...maybe there is some very narrow making tape...?
I started placing the tape at 5 tics down from the bottom of the gunport patterns on bulkheads 7 and 8 with the upper edge of the tape at the 5th tick mark and laid out that belt. Once the first belt was in place, I dropped down another 5 tics and did the same. Now I had 3 belts. I tried to approximate the lines Chuck had recommended to make the 3 belts and then I viewed them from different angles and made more adjustments. I also used the sheer as a reference as Glenn had suggested. Finally, I marked the top edges of the tape on all of the other bulkheads.
Next up, I'll need to use tic strips to measure the width of each section on each bulkhead. Then I'll lay each tic strip on a planking fan to determine the width of each plank in that section and transfer those marks to the appropriate bulkhead. I'll do this for all the bulkheads in each of the 3 belts. Once done, the tic marks will define the width of each plank at every bulkhead.
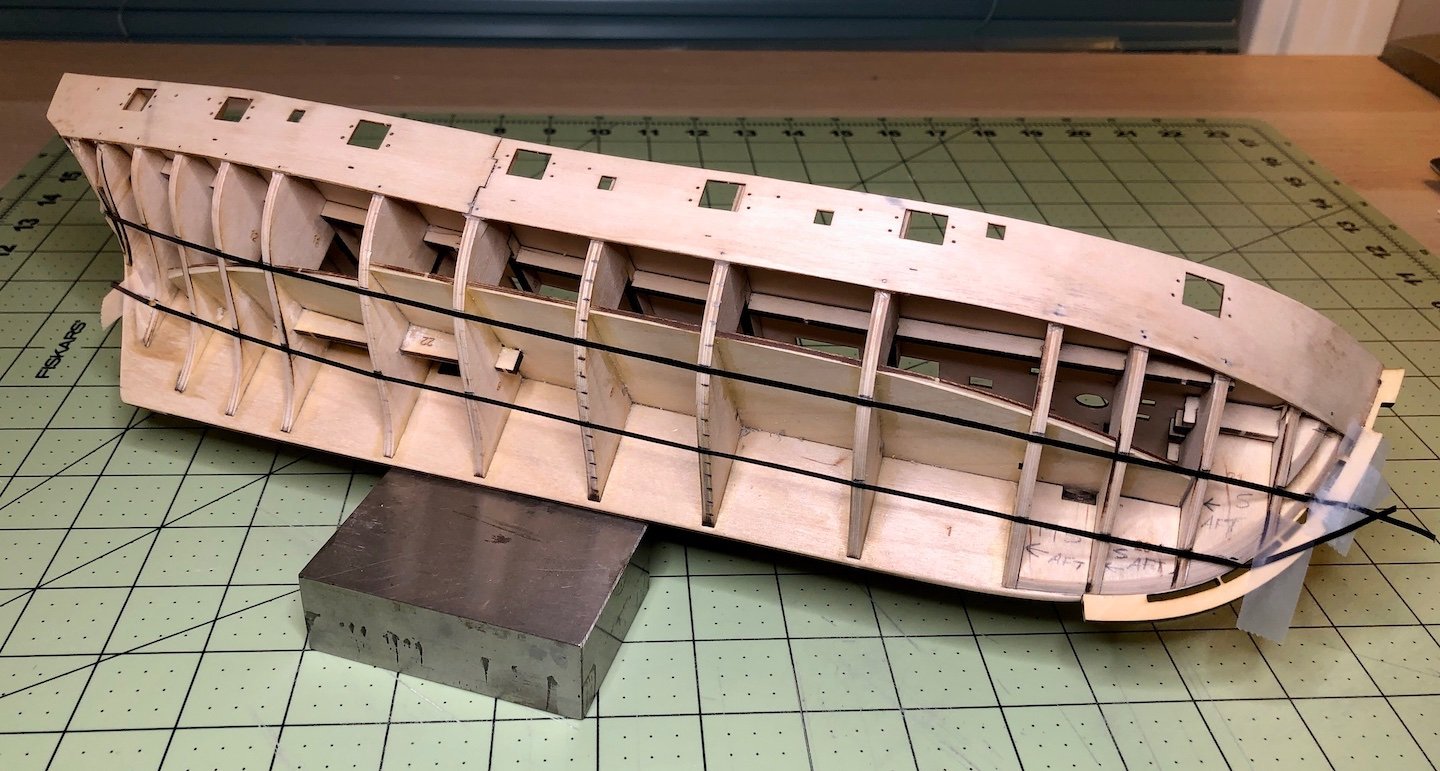
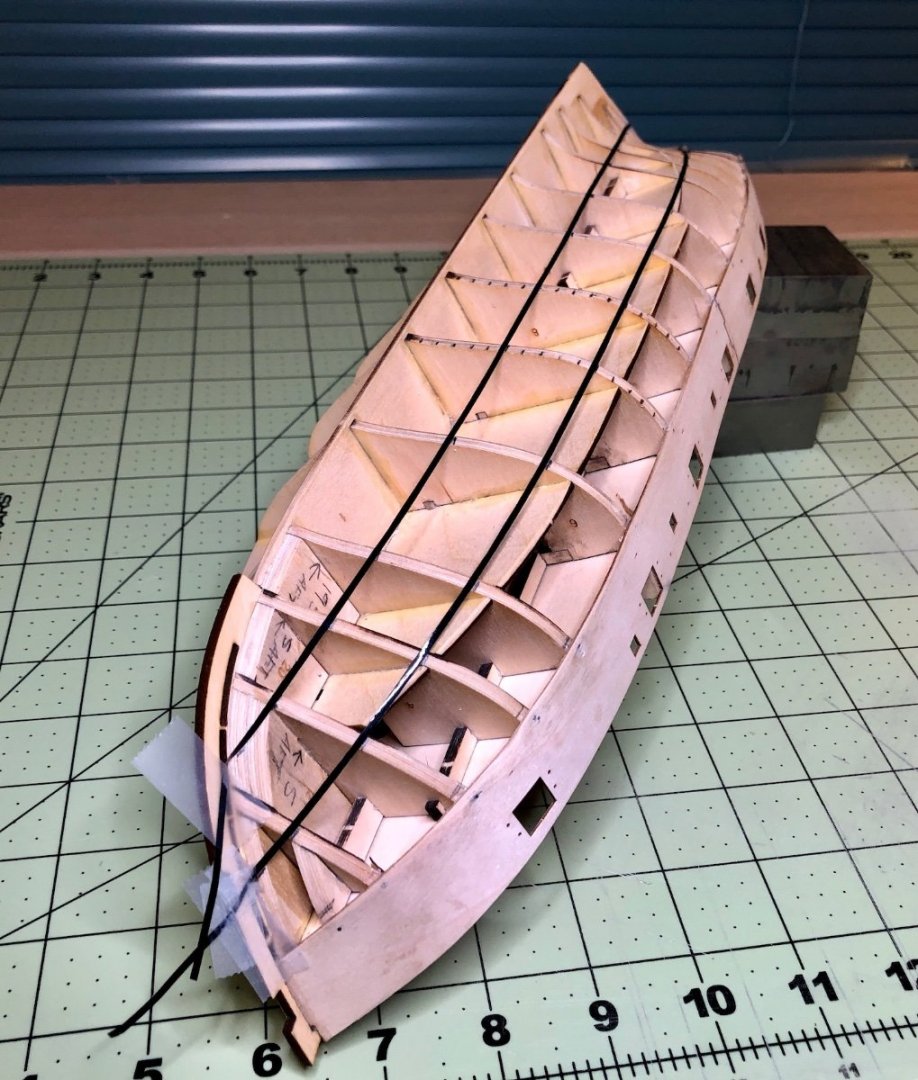
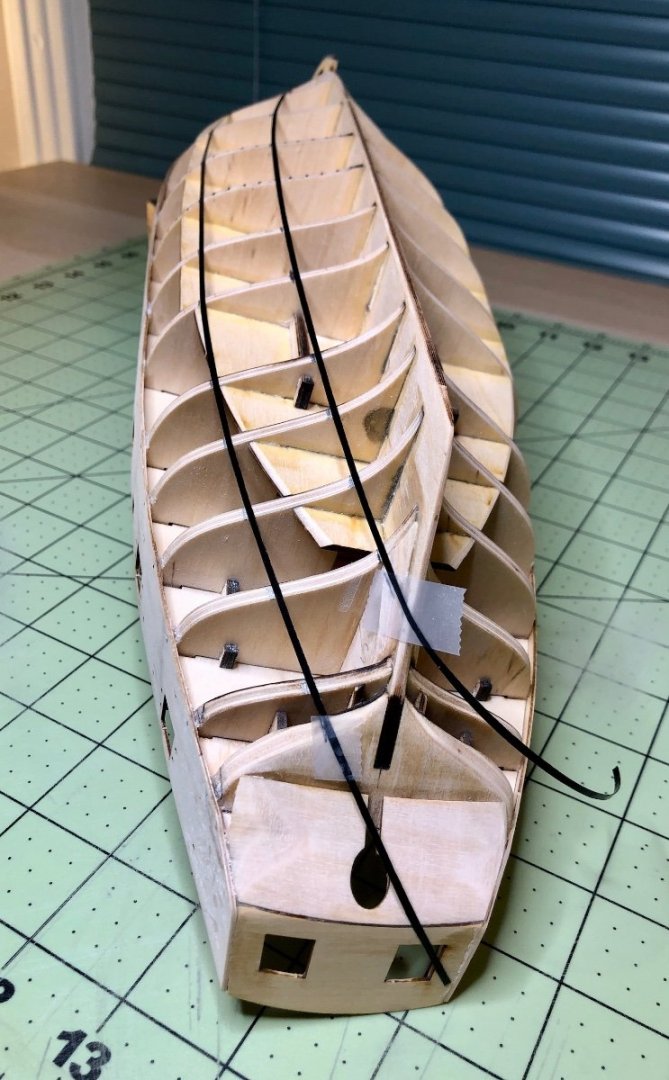
Here's several views of what the belts look like from different angles. I think they are better but... 🤞
I do have a question about the planking process itself. Is it preferable to plank the first belt on one side and then plank the first belt on the other or is it okay to plank and entire side and then plank the other side?
I'm trying to go slow and understand what I'm doing so I hope my snail's pace isn't boring everyone out of their minds!
Cheers!
- Ryland Craze, smotyka, vaddoc and 11 others
-
14
-
-
-
Maybe it will be like this for us someday, Mike!

-
11 hours ago, Dfell said:
used 3 butt shift
I've tried searching MSW for a diagram of butt shift patterns but can't seem to find an explanation or a diagram. Do you have a reference link that would show these but shifts?
-
This is going to be a magnificent model when you are finished...such fine details! Great job!
- Canute, aydingocer, thibaultron and 4 others
-
7
-
I'm sure he's smiling at the wonderful job you done to finish this model in fine fashion, Mike, and there will be a place at the ship modeling table for you along with the rest of us when the time comes. Until then, keep up the good work!
- mtaylor, Keith Black, popeye the sailor and 1 other
-
3
-
 1
1
-
Very nice work, Mike!
- mtdoramike, mtaylor, popeye the sailor and 1 other
-
3
-
1

I have adopted another orphaned kit
in RC Kits & Scratch building
Posted
Build for own pleasure and your loved ones, Mike, or perhaps for your friends or your neighbors and skip the shipping. I think it would also be fair for the buyer to be responsible for all the shipping charges if you need to ship. Whatever you decide, I hope you won't give up what you love to do and do it so well.