wyz
-
Posts
411 -
Joined
-
Last visited
Content Type
Profiles
Forums
Gallery
Events
Everything posted by wyz
-
 Merry Christmas John. Only the best to you for 2016.
- 745 replies
-
- 3
-

-
- francis pritt
- mission ship
- (and 1 more)
-
Christian Drawings look great and you're all set to start. Wonderful! I was very impressed with all the pre-build stuff you did; so well thought out. Like so many others I too will be following this build. Let the sawdust fly! ..... into a dust filter of course. Lastly, I would like to wish you and all you love the best Christmas, and may the new year be all you want it to be. Merry Christmas, Tom
-
Cutter Cheerful 1806 by rafine - FINISHED
wyz replied to rafine's topic in - Build logs for subjects built 1801 - 1850
Bob, a beautiful little build you have going. Watching this model progress has been fun. Tom- 525 replies
-
- 3
-
-
- cheerful
- Syren Ship Model Company
- (and 1 more)
-
ancre Le Fleuron 1729 by rekon54 - 1:24
wyz replied to rekon54's topic in - Build logs for subjects built 1501 - 1750
Giorgio, the detail in this model is off-the-scale nice. You know you've succeeded as a model builder when photos of your work make people think they're actually standing in a real ship. You are the consummate artist. Tom -
Welcome to MSW Gary. That's quite a building board you have for the project. Something tells me this will be a fun build to follow, so let me pull up a chair. Be prepared for a full house; a lot of onlookers. Mark has the popcorn. Should I bring the beer? Chilli? Chips & dip? Dancing girls? ...... Tom
-
Sweet looking Mark! The pear wood may have given you some problems but the wipe-on poly sure looks nice. Getting the hull planked, sanded, and finished is a really nice present to yourself this Christmas. This should psych you up big time for what you want to do this coming year. I want to wish you and your family a very Merry Christmas, and I hope 2016 is all you hope it will be.
-
Matti, you mean to say you've only been model ship building one month? Well, this is a pretty darn good start to this hobby. It was a VERY SMART move buying all those beautiful tools before retirement. While most jobs you will encounter can be done with hand tools having those power tools (precission miniature table saw, lathe, milling machine, small band saw, bench sander and drill press) will allow you to take on more and more intricate and involved tasks, and do them quickly. Yes, they will be a HUGE time saver! Another big time saver, and I can't emphasize this enough, is to follow the build logs here in the MSW site. Here you will learn building techniques from some of the best model ship builders on this planet (unfortunately not me). Have a good holiday Matti, only the best to you and your family.
-
Well done Nils! Thanks for all that you've shared with us. Best wishes to you and your family this holiday season. Tom
-
Popcorn, beer and a seat to watch Matti work on Clara May. Wonderful! That's quite a shop you have there. Tom
-
There aren't enough words for superlative in my thesaurus to adequately describe your workmanship. Tom
-
Your metal work is really something to behold .... quality to the nth degree! I'm really enjoying this build. Thanks for sharing. Tom
-
Defy the admiral? Whoa, that's bold! If it was my hull I would probably not use steel wool because of the fine metal particulate it leaves behind, but rather go for the 3M Scotch-Brite hand pads. The maroon colored #7447 is a silicon carbide general purpose pad that has the grit equivalence of 360-400. This is the steel wool equivalent to #00-#000. If you can find it you can follow that up with the light gray colored #7448 ultra fine pad with a grit of 800-1000. It also is a silicon carbide abrassive, the equivalance to #0000 steel wool. Tom
-
ancre La Salamandre by tadheus - 1:24
wyz replied to tadheus's topic in - Build logs for subjects built 1751 - 1800
Paul You hadn't posted in about a month and I was wondering if all is ok. It's good to see you back. Tom -
Mark, with all the trials and tribulations you've had with Licorne it must feel great to get that hull planked. It really is a big milestone. Well done my friend! Tom
-
Continental Frigate Hancock by wyz
wyz replied to wyz's topic in - Build logs for subjects built 1751 - 1800
@ uss frolick Yes it's true we have a number of apple orchards in the state, in fact there is a large one in the next town over. However, the big apple producing states in the US are 1. Washington, 2. New York, 3. Michigan (state tree), 4. Pennsylvania, and 5. Virginia. Connecticut ranks 21. There are 7,500 species of apple worldwide of which 2,500 are grown in the United States.The apple wood that I've acquired over the years from local trees taken down hasn't been all that good, and was VERY DIFFICULT to air dry without extreme distortion, especially the sap wood. I wasn't fond of that stuff for ship modeling purposes at all. I remember I threw out most of it. The best apple wood I ever had were a few pieces of heart wood I purchased that were kiln dried. They were small pieces but were absolutely beautiful; having a nice uniform reddish brown color with a straight tight grain and inconspicuous figure. There was no streaking either. It's too bad I have so little of it left now. Tom -
Continental Frigate Hancock by wyz
wyz replied to wyz's topic in - Build logs for subjects built 1751 - 1800
@ Kruginmi The admiral? I'm not sure I understand. Is that your wife? Tom -
Continental Frigate Hancock by wyz
wyz replied to wyz's topic in - Build logs for subjects built 1751 - 1800
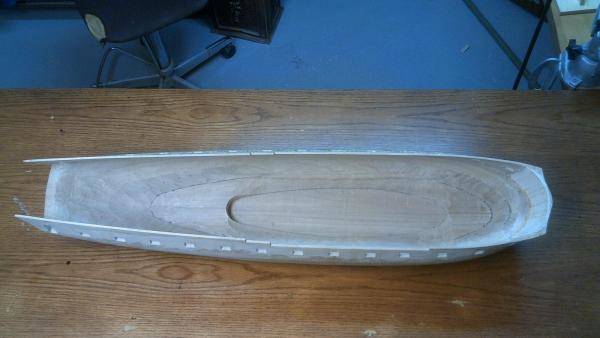
The Model I've always had a place in my heart for the Continental frigate Hancock. Even after all the years that have passed I never lost the desire to build a model of it. The ship has a delightfully charming alure that beckons me to it like Jason to the Sirens. As the subject for a modeling project there is an awful lot to like about it, and it's easy to see how I could be so enticed. The Hancock has nice lines, a beautiful sheer. a tall and interesting rig, an attractively carved figurehead and stern, and three decks chock-full of internal fittings, deck gear, armament, and ship's boats. They make for a visually exciting model. Hancock is built to 1:48 scale, where 1/4"=1'. If you rig the model, as I wish to do, it's 3' 6" from the bottom of the false keel to the top of the main-truck, and 4' 10" from the fore end of the jib boom to the aft end of the outrigger. That's a large model, and when you put it in a case is borderline enormous. It won't be easy to find a place for it where I'm living now. I know, I have the perfect spot .... in the basement sandwiched between the hot water heater and the washer/dryer. LOL This model is a solid hull bread and butter construction that was formed when 1" thick lifts of yellow poplar (Liriodendron tulipifera) were glued together and then sanded to shape using 18 station line templates made from 3/32" thick aircraft grade plywood. In Georgian style the hull will be planked. As I don't really want to paint the model, at least not very much, I will show color and contrast using different types of wood. Some will be stained and dyed. Most of the hull will be planked over with Castello boxwood (Calycophyllum multiflorum). That wood will also be used for the construction of the keel, stem, sternpost, rudder, timber that makes up the knee of the head, ship's gratings, the channels, and many of the pieces used in building up the bow and stern. With planked areas that are black in color, such as the main wales and the exterior quarterdeck bulwarks, I will probably use Swiss pear wood (Pyrus communis) dyed black. In the past I've achieved good results using Behlen's Solar-Lux jet black dye based stain on some beautiful pear wood stock. Anything that would have been painted red on the actual ship, like interior bulwarks, deck gear and gun carriages, will be done using Swiss pear wood that's lightly stained to enhance its reddish color. I'm unsure at this time what the decks will be made from, although I'm leaning towards either holly (Ilex spp.) or hornbeam (Carpinas betulus). The fine carvings on the stern and the figurehead will be done with European boxwood (Buxus sempervirens). As for the masts, yards and rigging material, well, that's just too far away for me to make a decision on at this time. On other models I've built I supplemented the woods I've already mentioned with a number of others that were sparsely used to highlight and contrast. They would include cherry (Prunis spp.), apple (Malus spp.), red gum (liquidambar styraciflua), dogwood (Cornus florida), black walnut (Juglans nigra), maple (Acer spp.), European lime (Tilia vulgaris), Ceylon satinwood (Chloroxylon swietenia), rosewood (Dalbergia spp.) and degame (Calycophyllum candidisimum). If I make the case I generally do it from Honduras mahogany (Swietenia macrophylla) or cherry. I'm still debating if I will build the model and leave off some deck planking on the quarterdeck and forecastle to expose work done on the gun deck. I will build a small false deck amidships so that the ladder going from the gundeck down to the berthdeck has something to rest on. Tom -
Johann, this is the first time I've looked at your build log and to say I'm impressed is a gross understatement. Your model is gorgeous! I too will be following this build. Well done! Tom
-
Continental Frigate Hancock by wyz
wyz replied to wyz's topic in - Build logs for subjects built 1751 - 1800
@ Burroak Thanks Greg, while the hull is mounted securely in its stand I do the disposition of frames drawing on it with a "perfectly squared" 4" x 4" x 12" piece maple and a long sharp pencil. Later I'll show how I do it. While there's a little technique required it's really pretty easy. @ mtaylor Thanks Mark, the hull is slowly coming along. I really wish I could have shown you what it looked like before I started the resurrection. @ Jim Lad Rebirth? LOL It feels like 20 years of false labor. Tom -
Nils, I stopped in to catch up on your log. When you started KWdG I wondered how you would do with it. You NEVER disappointed me! Wonderful, a joy to follow. Tom
- 2,625 replies
-
- 4
-
-
- kaiser wilhelm der grosse
- passenger steamer
- (and 1 more)
-
Continental Frigate Hancock by wyz
wyz replied to wyz's topic in - Build logs for subjects built 1751 - 1800
@ mtaylor Mind if you tag along? Of course not! How could I deny the mayor of MSW a spot at the table? ;-) @kruglnml Thanks Mark, it should be an interesting build to do. Strangely, right now it feels like I'm working on someone else's model. @ UpstateNY Welcome aboard Nigel. @ uss frollck Yes it's solid hull, a bread and butter costruction hull made of 1" thick lifts made of yellow poplar. The hull would eventually be planked over with Castelo boxwood and Swiss pearwood. The scale is 1:48 or 1/4"=1'. Actually I draw the complete disposition of frames on the model. You only see the bottom frames drawn because the plastic wood I used covered the drawn frames near the gun ports. Those areas will be redrawn at a later time. Tom -
Continental Frigate Hancock by wyz
wyz replied to wyz's topic in - Build logs for subjects built 1751 - 1800
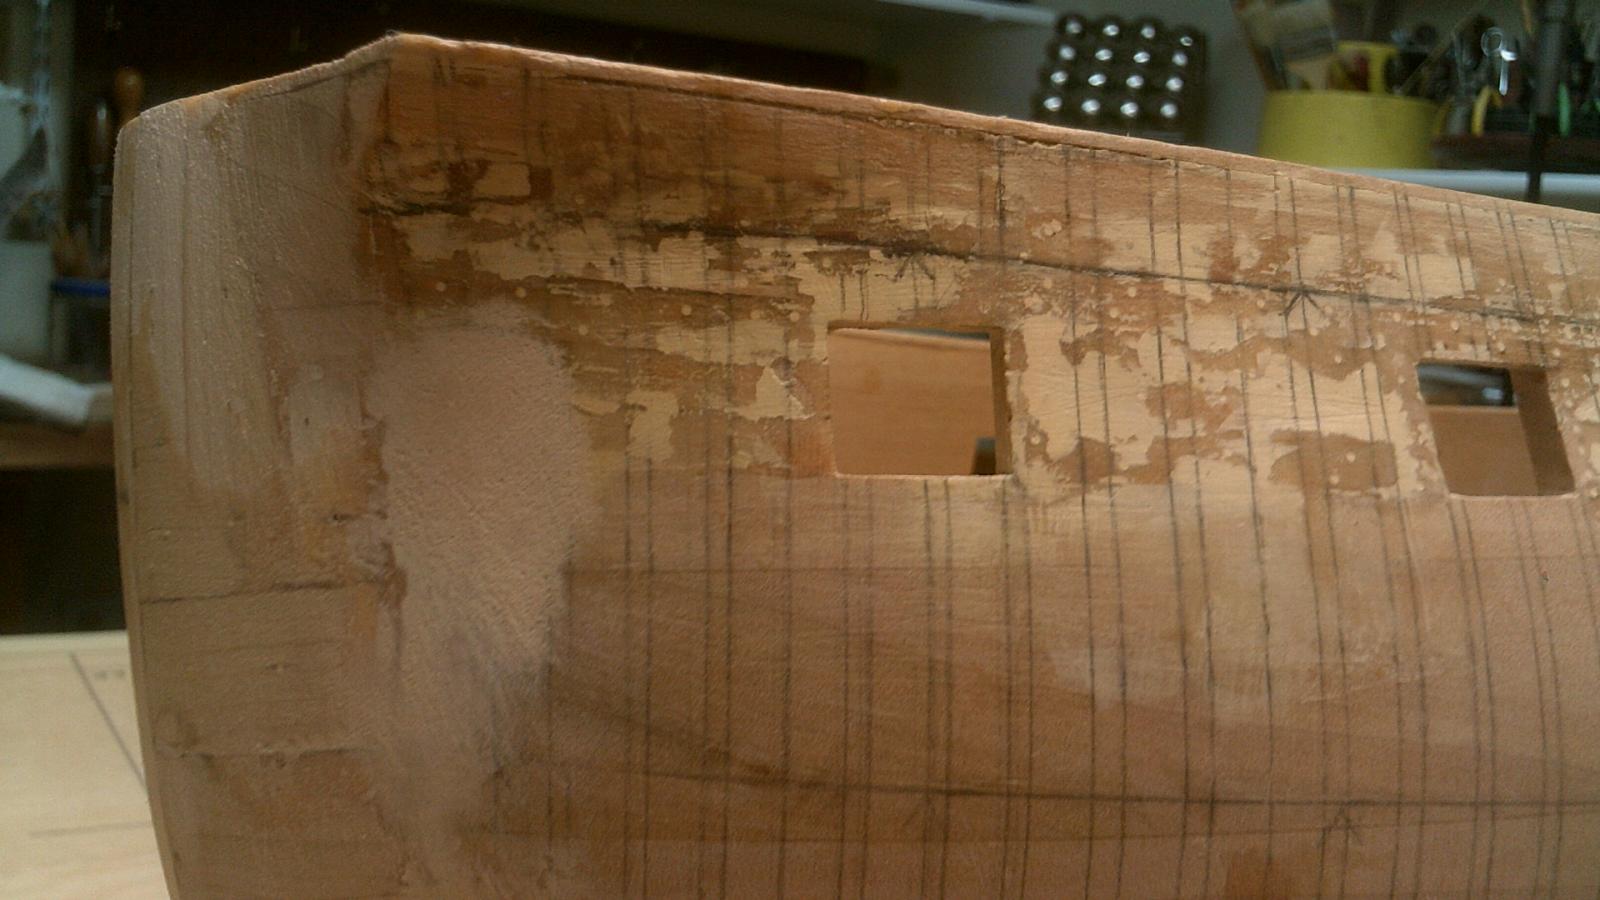
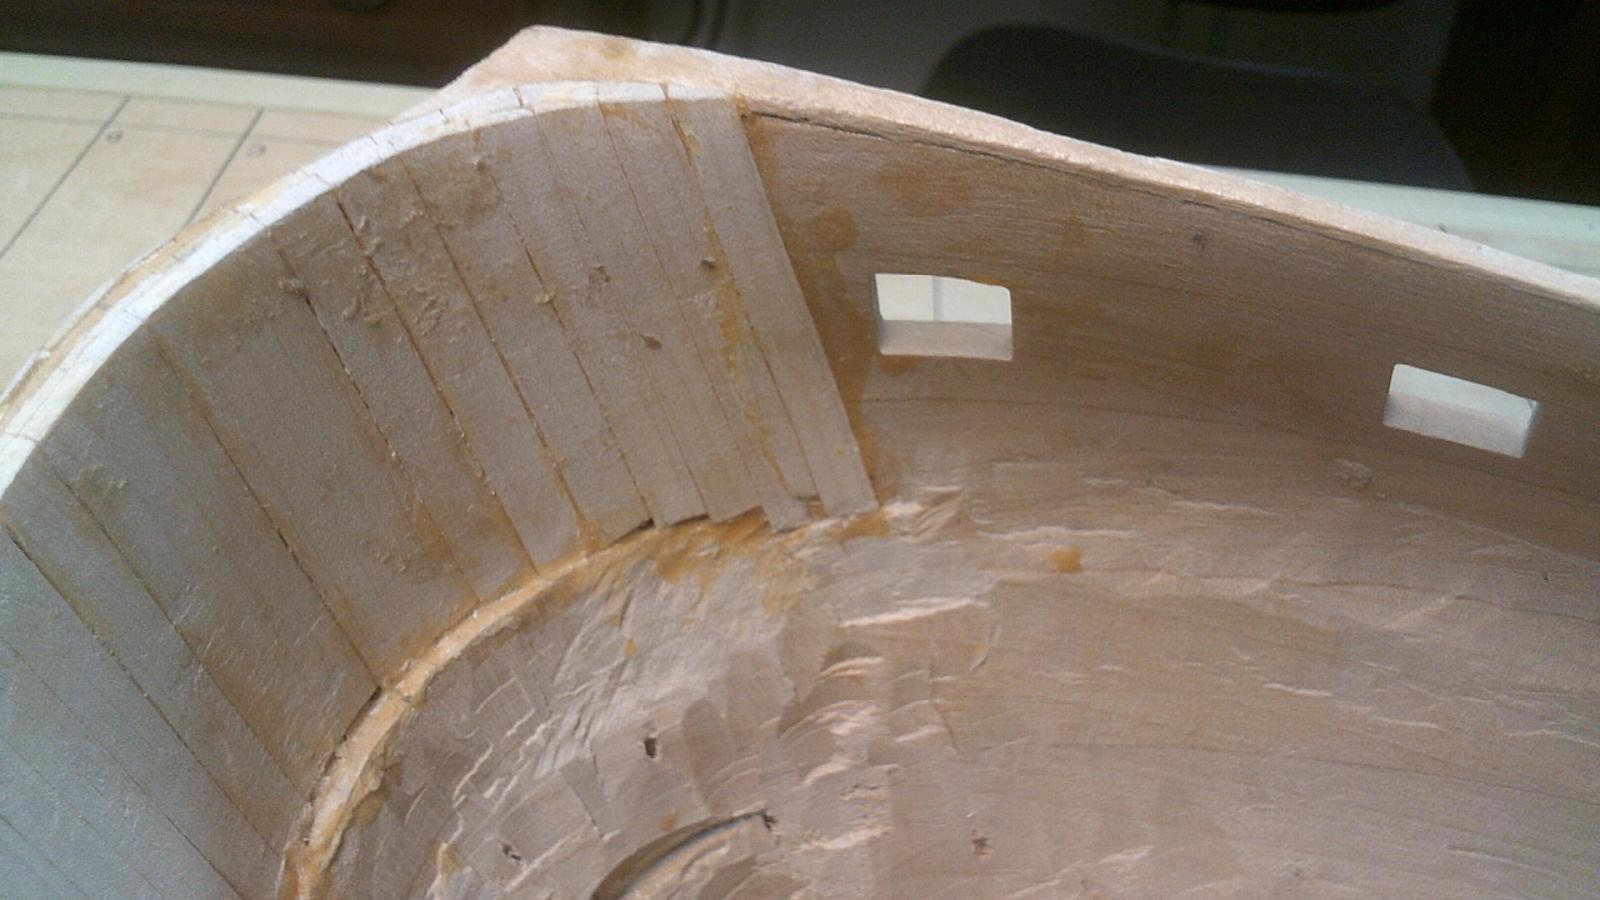
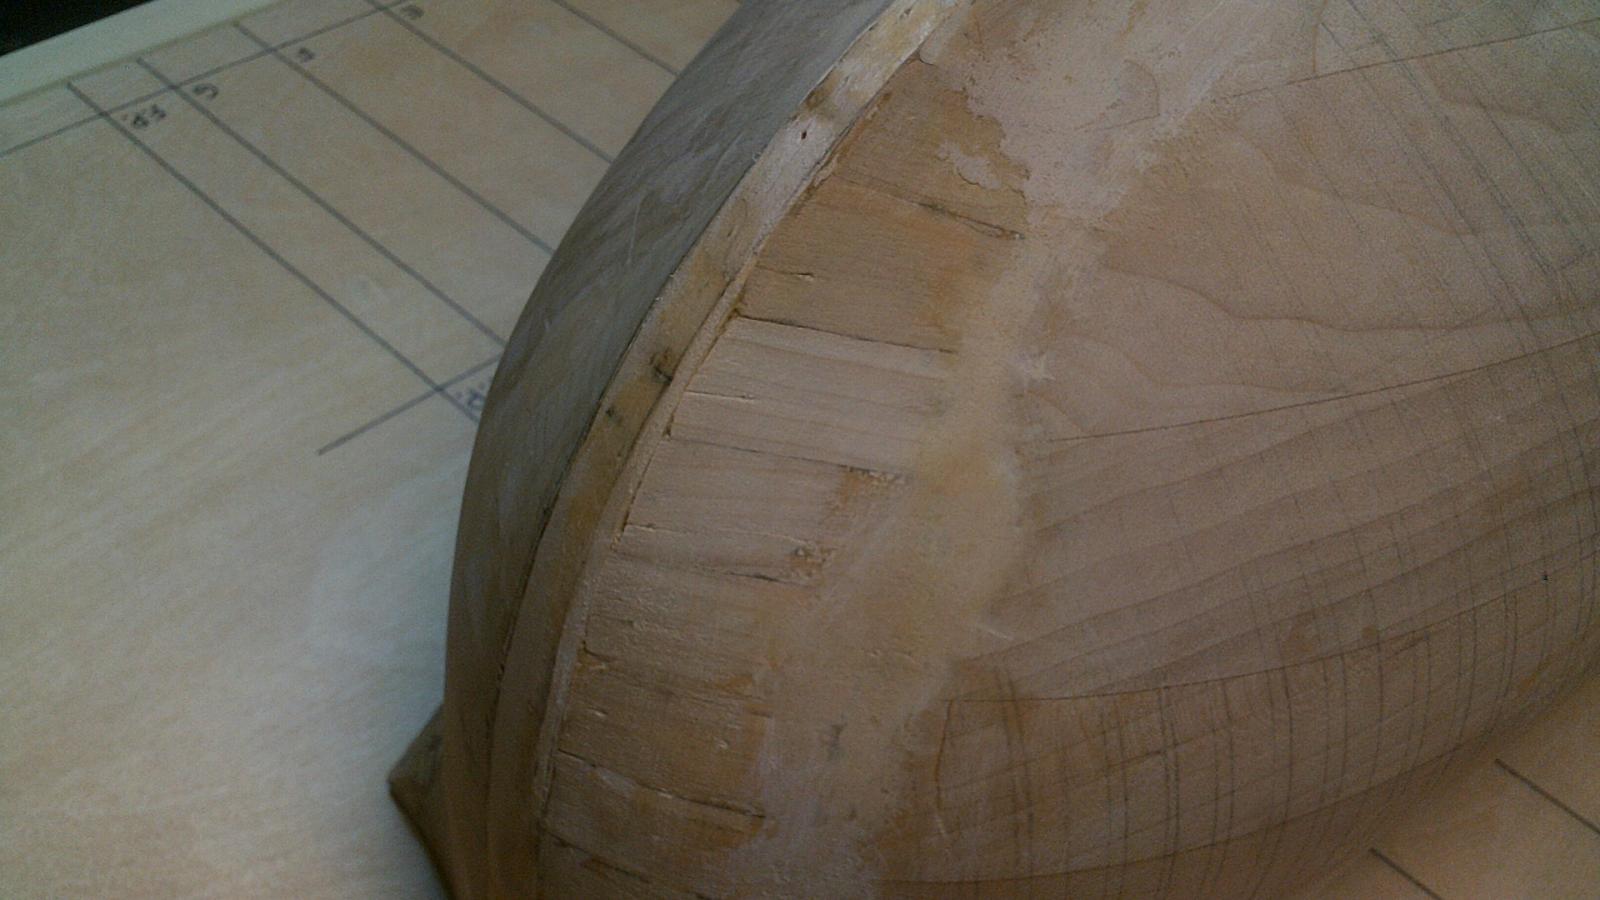
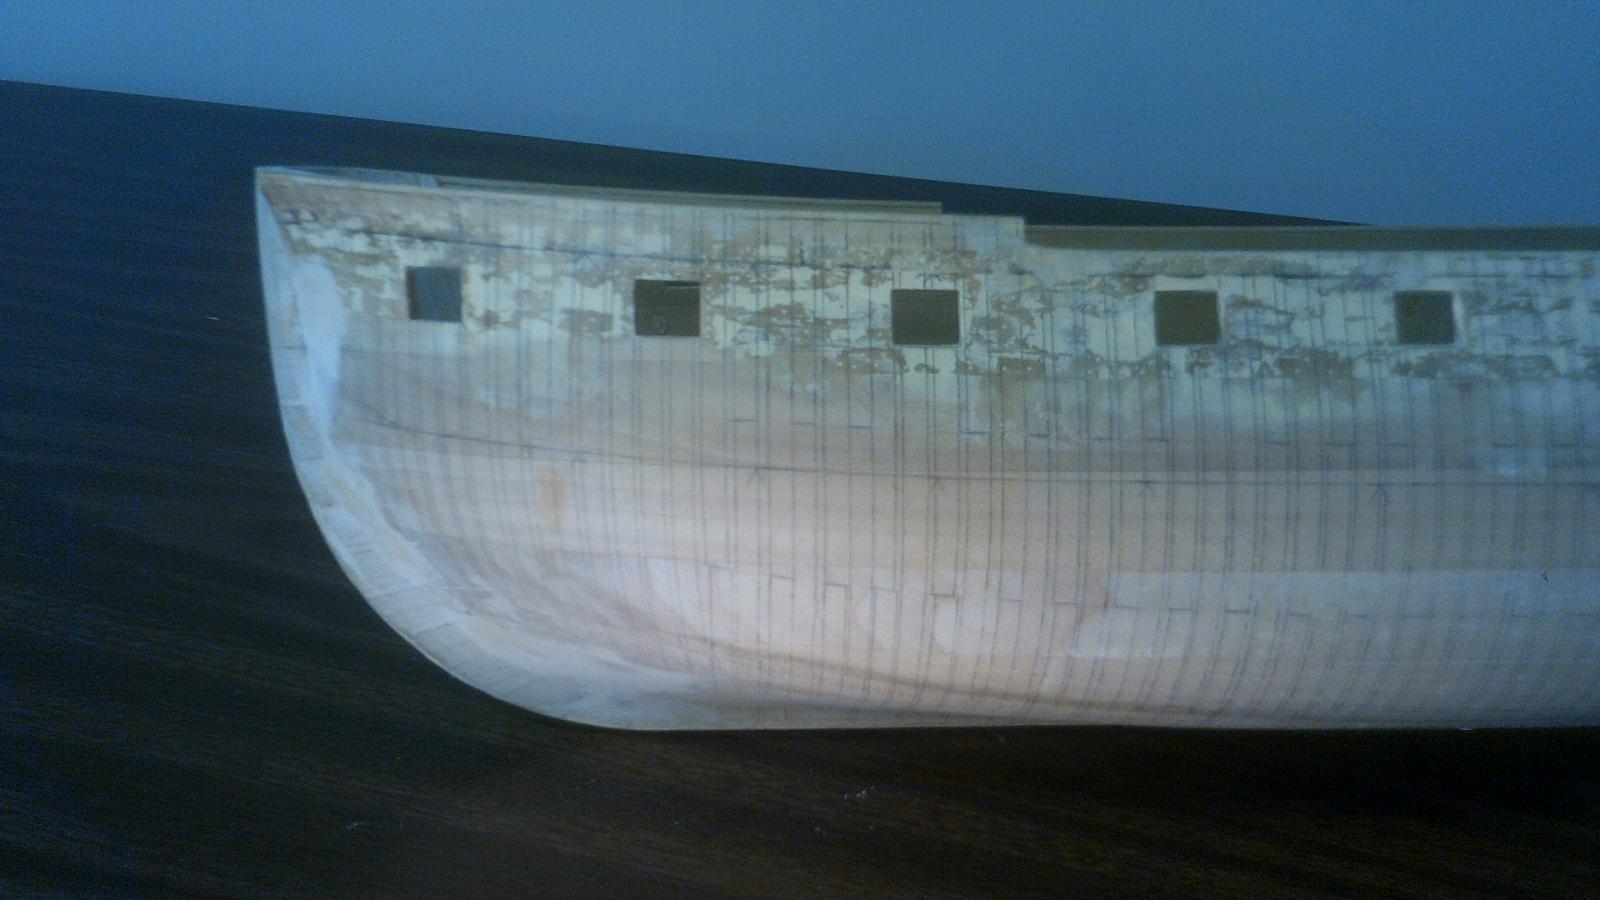
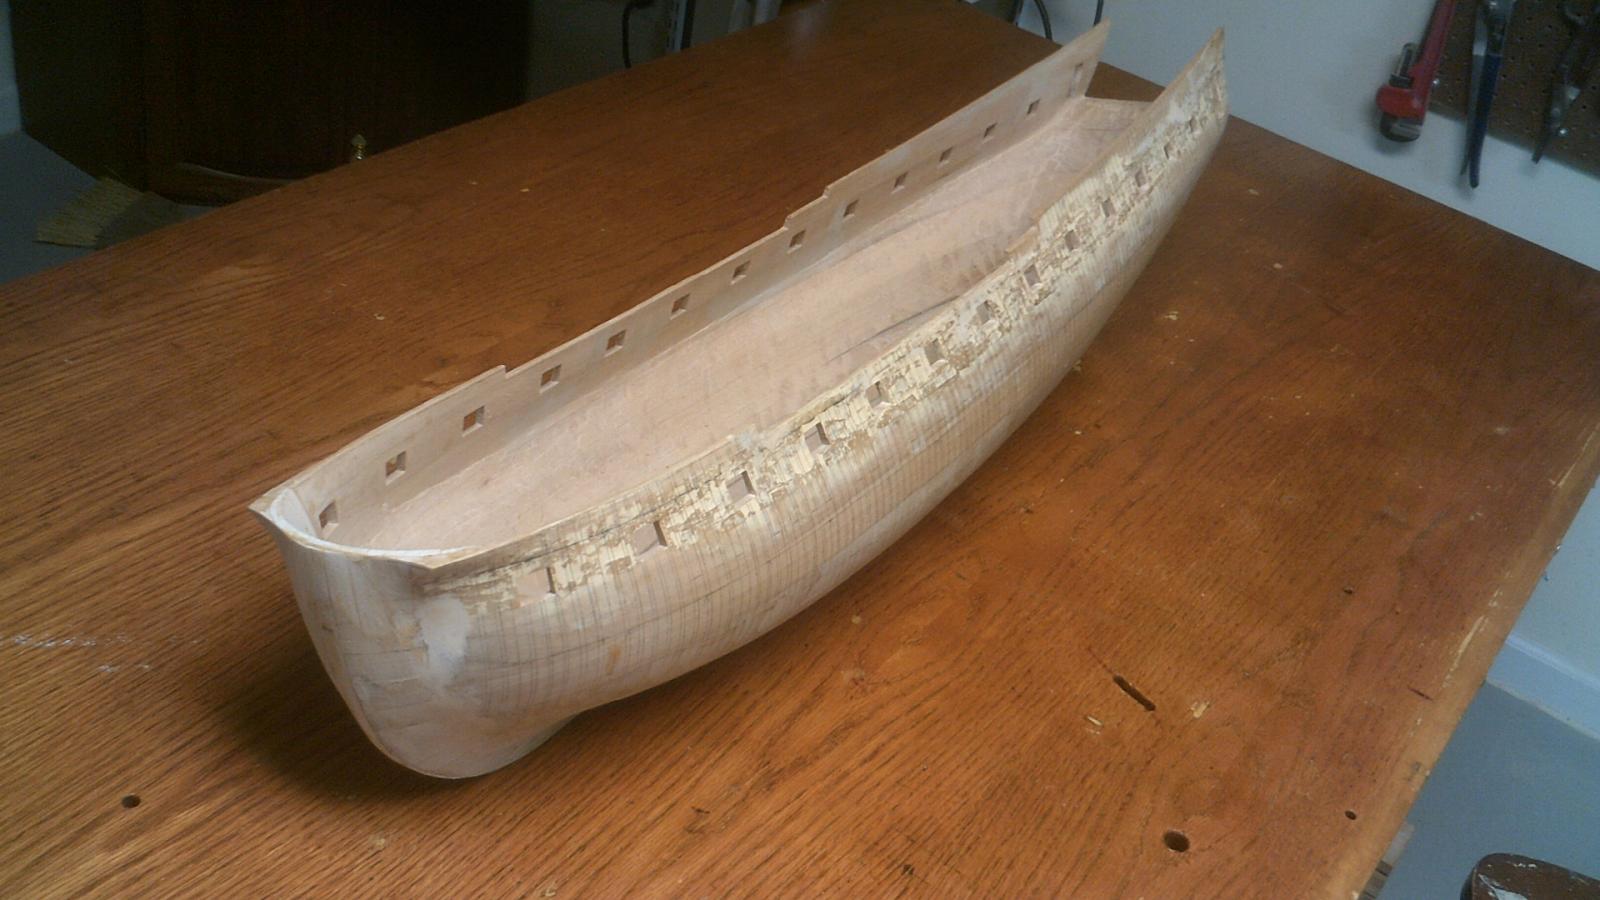
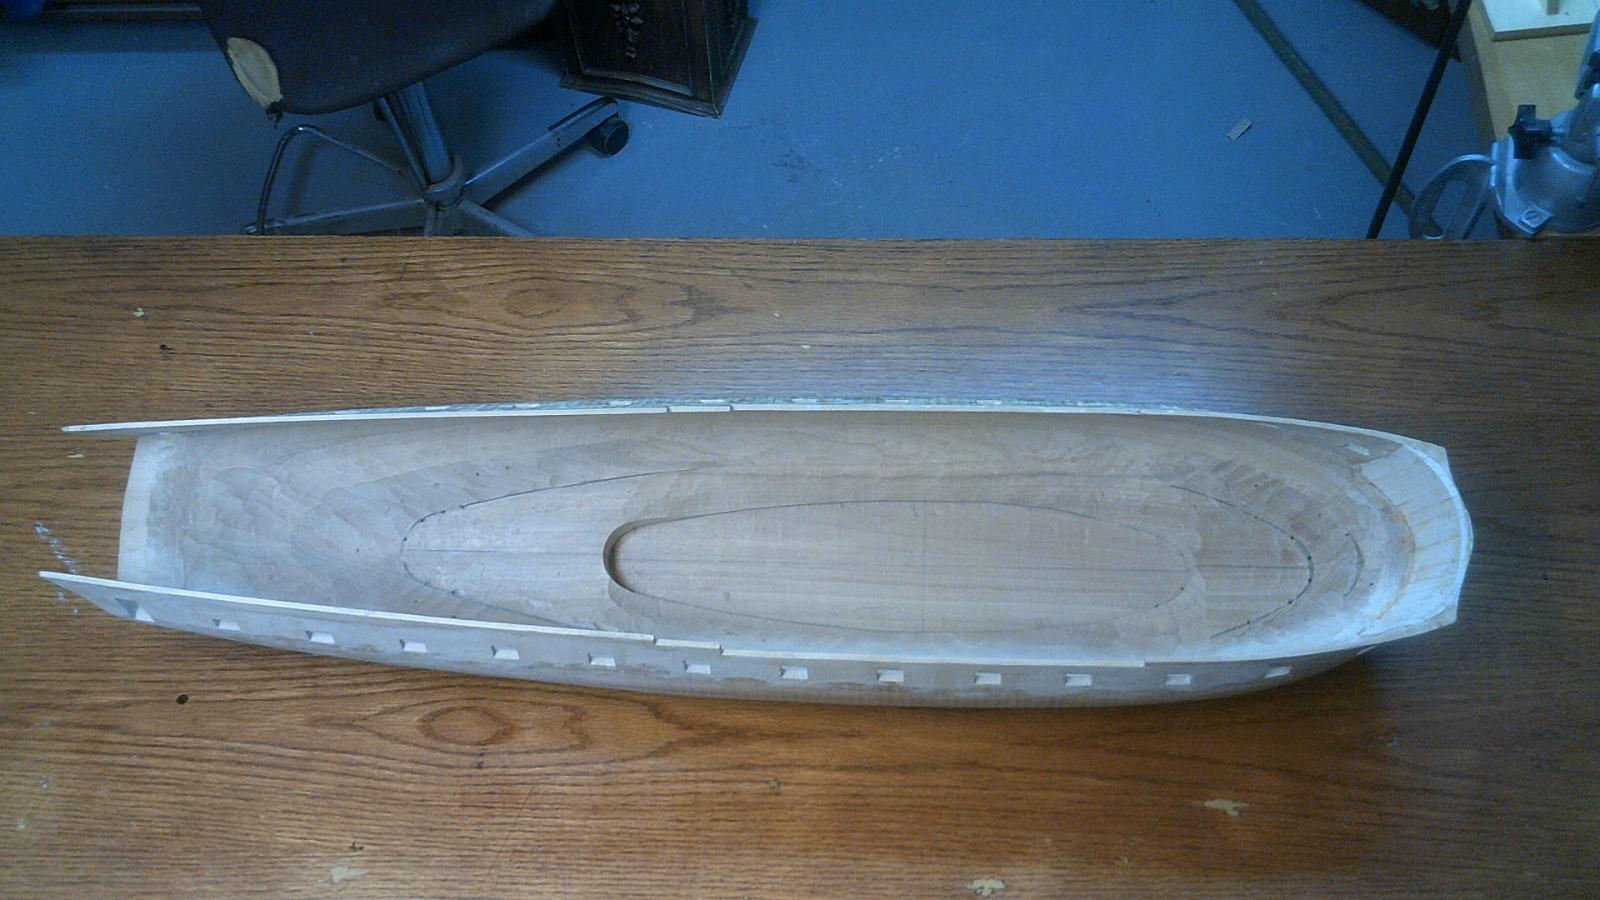
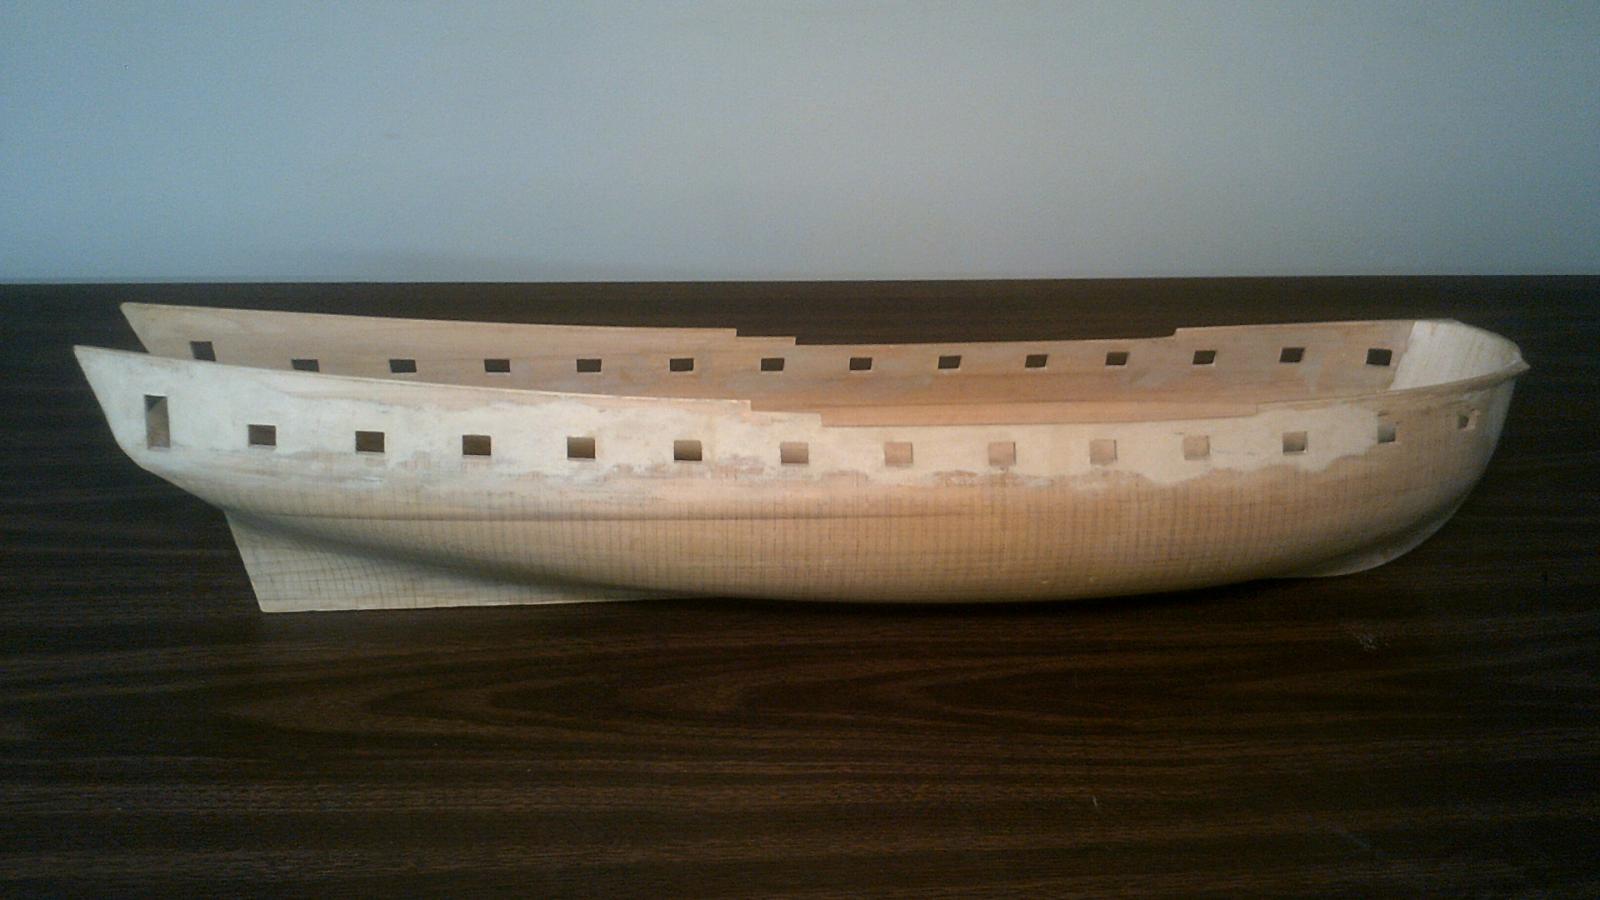
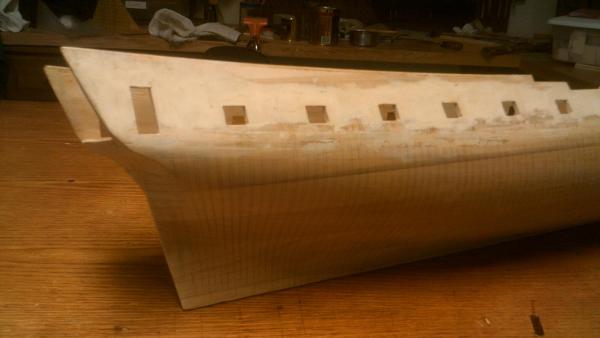
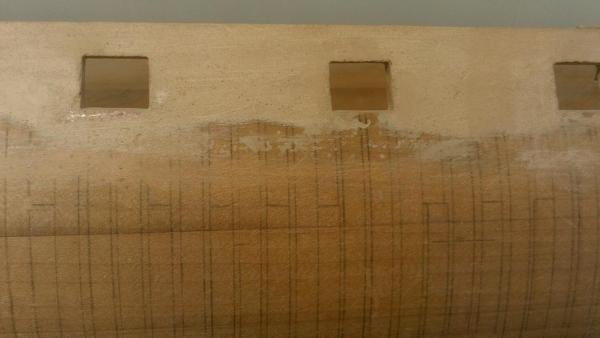
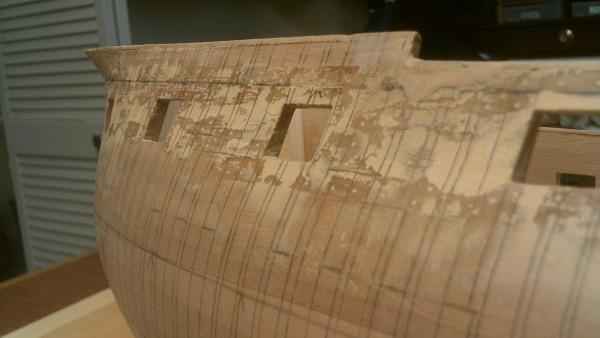
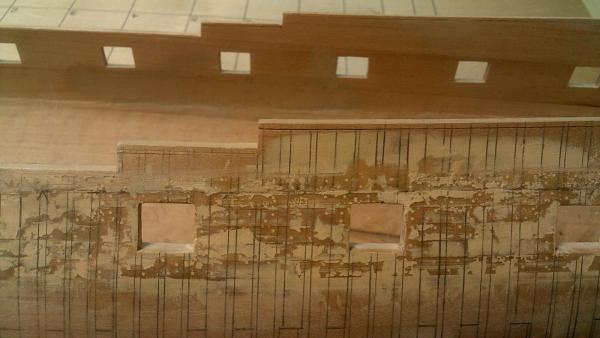
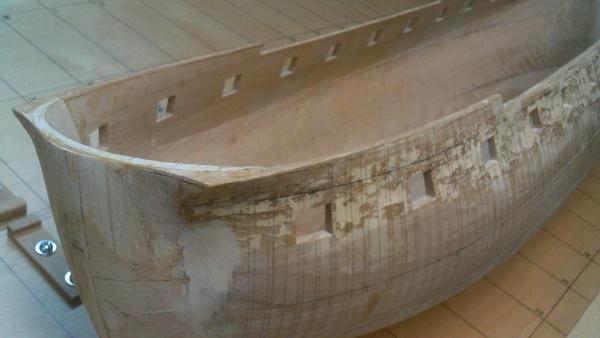
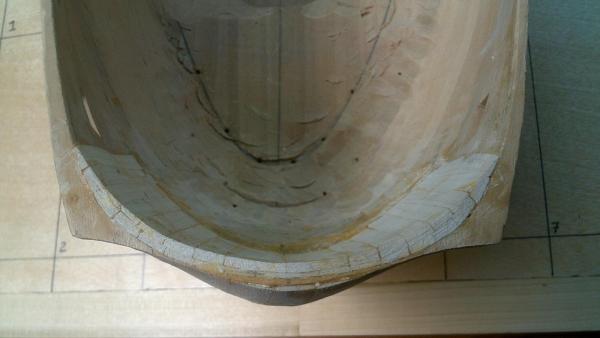
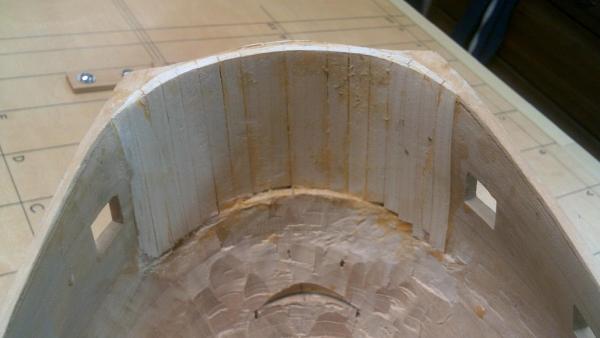
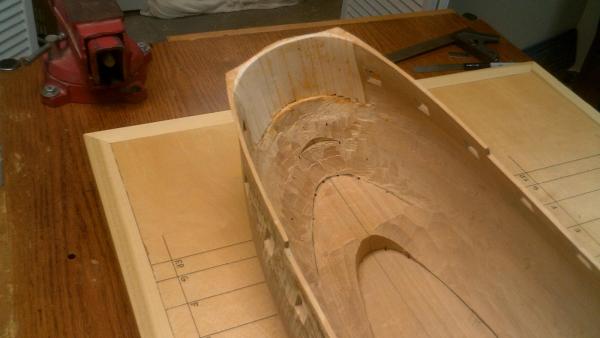
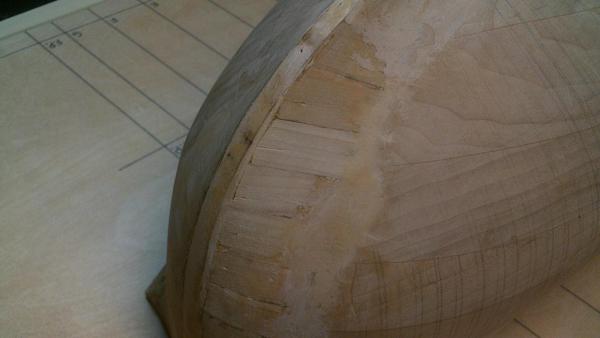
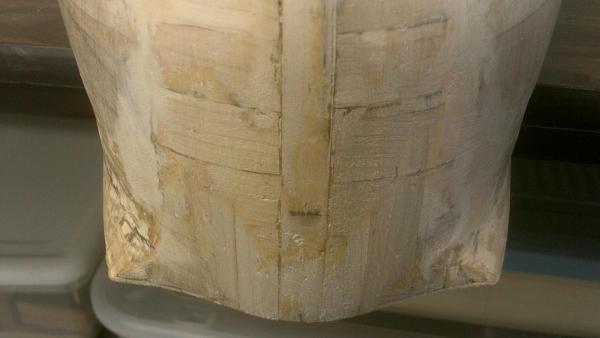
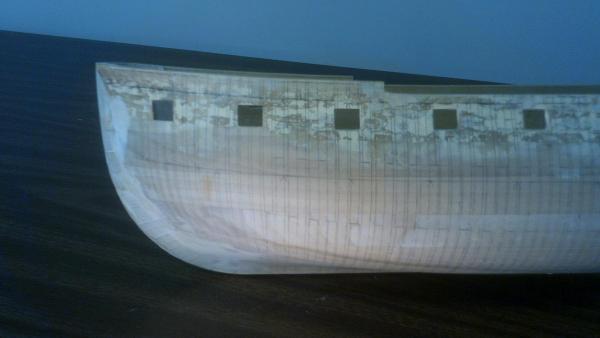
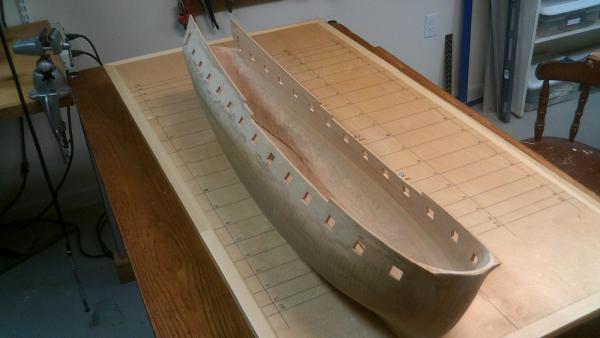
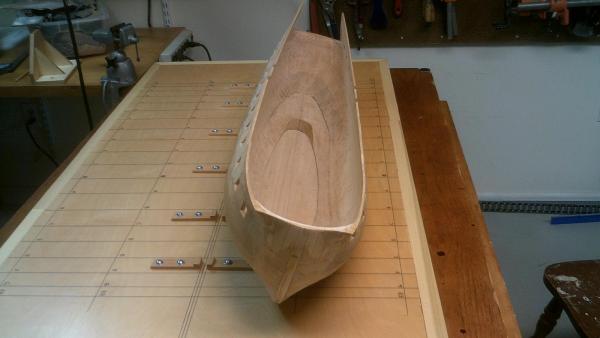
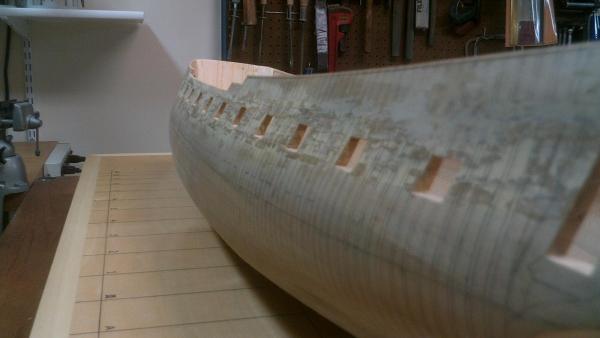
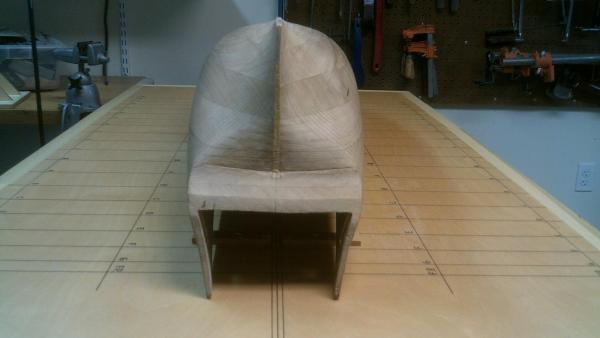
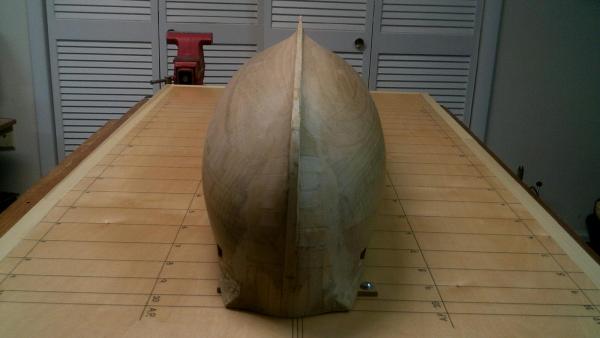
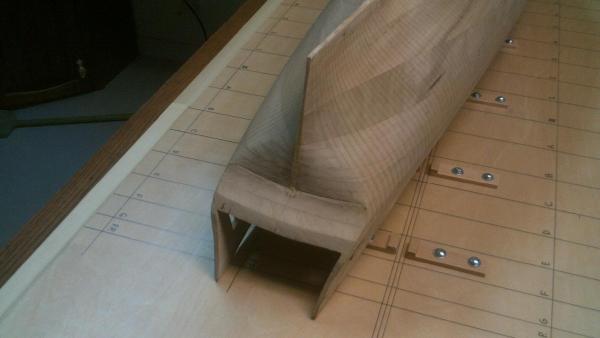
On Inspection When I initially examined the hull there were several problems that immediately jumped out at me. The first I noticed, but the least serious, was how bad the sides of the ship looked near the gunports. These were areas I had once planked, but the oversize diameter of the treenails I used didn't sit well with me and I decided to rip them out. I did so hurriedly and without care for the hull beneath. My impetuosity cost me as pieces of the yellow poplar hull ripped away with the planking. Fortunately none were deep and caused no structural weakness in the hull. There were however quite a number of them, spread all across the ship's side. A few applications of plastic wood filler, some fine sanding, and all is well, at least on the starbord side. The port side has a different filler that was applied long ago, and needs to be reworked. Views of the starbord side This is not a very good photo but it does show how liberal I had to be with the plastic wood to make the needed repairs. Views of the port side In this photo you can see hollow areas on the hull next to the middle and far right gunports. Years ago these areas were sanded out too much, no doubt after I remove the planking. These need to be built up again. There are a number of areas on the port side that need more plastic wood. The second glaring error was where the keel joined the stem and sternpost. At both the fore and aft joints the wood cracked and separated. Twenty years ago I didn't fully understand the importance of joining wood securely; and doing it correctly using scarfs, mortices, tenons, treenails, bolts, butterfly plates (fish plates), and horseshoe plates along with glue. This was no small oversight because I now had to remove the stem, sternpost, keel, false keel and knee of the head. The bottom of the hull was leveled and, for the most part, sanded smooth. However there are still a few spots on the hull that need work, especially where the keel pieces narrow at the bow and stern. Next on the list of problems to be dealt with was the shape of the bow, specifically the shape of the hybrid bulkhead. I say hybrid because it wasn't totally rounded nor was it a beakhead bulkhead. When I first shaped the hull I used Howard I Chapelle and Harold Hahn's drawings for its contour, but as it turns out these were slightly different from the ones done by the British after Hancock was captured. After spending time in Halifax, Nova Scotia the Hancock was sailed back to England, first to Portsmouth and then to Plymouth. At the dockyard there, in the spring of 1779, the ship was measured and had the lines taken off. A draught of the ship was made that fall. I have to assume this drawing shows the correct shape of the bulkhead. That established I now had to reshape the bow, but because I initially formed the hull inside and out I now had very little hull to work with. It was clear I needed to build it up in places. To assist me in this reconstruction I decided to make a template of the profile of the bow. When I used it to check out the shape of the profileI I wasn't surprised to find an error. I knew about that 20 years ago. ;-) Over the next couple of months I started to reshape the hull. Using small strips of wood glued side by side I carefully built up certain areas. After sanding the end pieces to smoothly transition into the hull I would then start another layer. This process went on, inside and out and top to bottom until the hull's bow had the proper contour to the bulkhead and the correct profile. It's not completed as there is still some more sanding to be done. In this picture you can see all the layers of wood I used to build up the interior of the bow. I needed to give it enough thickness to safely be able to shape the contour of the bulkhead. Now that I have formed it to the proper shape I have to sand down the interior so that the bow has the correct thickness to a little below the gundeck. Here you can see where wooden filler strips were glued to the hull both horizonally and vertically. This is yet another bad quality photo, but it does nicely show the corrected bow profile. Here are a number of other photos I took, from various angles, to show the overall condition of the model. In this photo you can see the newly shaped contour of the bulkhead. Tom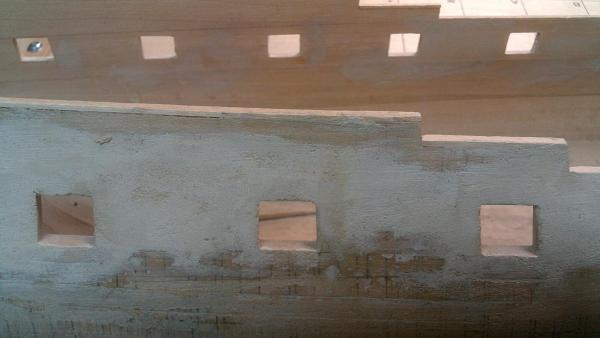


-
Continental Frigate Hancock by wyz
wyz posted a topic in - Build logs for subjects built 1751 - 1800
Blowing Off the Dust I dare say there are more than a few experienced ship model builders here in the MSW forum who have at one time started a model and, for whatever reason, stopped construction on it. No doubt some of those models were terminated due to a mistake that was beyond repair, some cannibalized for yet another try, and others shelved with the hope of being revisited sometime in the future. My Hancock is one such shelved model. When I was cleaning and reorganizing my shop several months ago I found, high on top a bookcase tucked behind a bunch of junk, an old model of the Continental frigate Hancock that I had started twenty years earlier. It was tightly wrapped up in a heavy gauge plastic bag, taped securely and covered in dust, lots of dust. Its age made me curious as to its condition so I decided to untape it and have a look. Seeing the hull of the Hancock again took me back to a much earlier time when my model building skills were far less developed. This was one of the first large scale bread and butter construction hulls I worked on. As I looked over the model I was reminded why it ended up in a plastic bag. There were so many problems with it. Some were blatantly obvious with others discernible on closer inspection. With a wry smile I shook my head, part in disgust and part in amusement, that I had made so many mistakes on the model. I was about to put the hull back into the plastic bag when a little voice in my head said "No Tom, don't do it. It's true this model has a number of problems, some serious, but none are irreparable errors. See if you can fix them and bring the Hancock back to life." That afternoon I carefully went over every inch of the hull and cast a critical eye if it was worth the effort. Even though there were a lot of issues to be dealt with the project I started twenty years earlier still had an enormous upside. There was great potential to produce an attractive Revolutionary War frigate model so I decided then to give it a go. I would resurrect Hancock. It's too bad I didn't take pictures of the hull when I first removed it from the plastic bag. I never envisioned, even after starting repairs on the hull, that I should make a build log for this model. That was a mistake. I wish I had because describing a problem is one thing, but showing before and after photos of them is quite another. I'm glad I eventually decided to do one. It's not often you will see a build log that starts off with a repair of a twenty year old model. 😉 Yes, the hull had a number of problems, but what was the mistake that had me bring construction to a halt and shelf the model? Well, after installing the keel, false keel, stem, sternpost, and knee of the head I discovered I made a serious error when I shaped the model's profile in the bow. It was off enough it had to be addressed. How could I make a profile error like this when I was so fastidiously meticulous in shaping the hull with station line templates? How did it happen? Even back twenty years ago I shouldn't have made that mistake. All that work had to be ripped out, the profile corrected, and all new pieces put in. I don't know if it was a problem with a draught distortion, expanding a drawing from one scale to another, transferring the shape of the profile from the drawing to the template, carelessness in making the template, being sloppy in aligning the template on the hull, over-aggressive sanding of the bow, falling asleep while working, ..... There probably were a number of errors made, but whatever the reason(s) the profile was off. While there were other errors made on this model, as you will see, that one completely freaked me out. I was angry, frustrated and puzzled over what happened; and I certainly wasn't ready to rebuild the parts I removed. At that time the only thing I could do was bag and shelf the model and come back to it another time. Who would have guessed that would be twenty years later? Tom
-
Anyone who has followed your Kingfisher build knows you have a knack for doing some of the most outrageously stunning, eye-popping, jaw-dropping work. This steering wheel simply reaffirms what we already know, that you are one hell of a fine shipmodel builder. Tom
- 1,215 replies
-
- 3
-
-
- sloop
- kingfisher
- (and 1 more)