
MORE HANDBOOKS ARE ON THEIR WAY! We will let you know when they get here.
×


ccoyle
-
Posts
10,212 -
Joined
-
Last visited
Content Type
Profiles
Forums
Gallery
Events
Everything posted by ccoyle
-
 Man, I'm pretty sure I built the Gosling, too!
 -
Very, very nice, Andrew -- congratulations!
-
I think I actually built the Airfix Swordfish back in the day.
-
Welcome! The two ships, Stephen Taber and Smuggler, do have very similar lines, so it should not be terribly difficult to pass a model of the latter off as the former. Cheers!
-
BTW, for our members who are not up to speed on all things card modeling, WAK is a Polish publisher with an e-commerce site that sells their own line of kits along with many others. Click here to see WAK's current stable of 1/200 scale ship models.
- 54 replies
-
- 1
-

-
- allege darles
- wak
- (and 1 more)
-
Welcome aboard, Charles! We have a few finished Heller Victories around here, and to see one being super-detailed, check out this log by dafi. Enjoy!
-
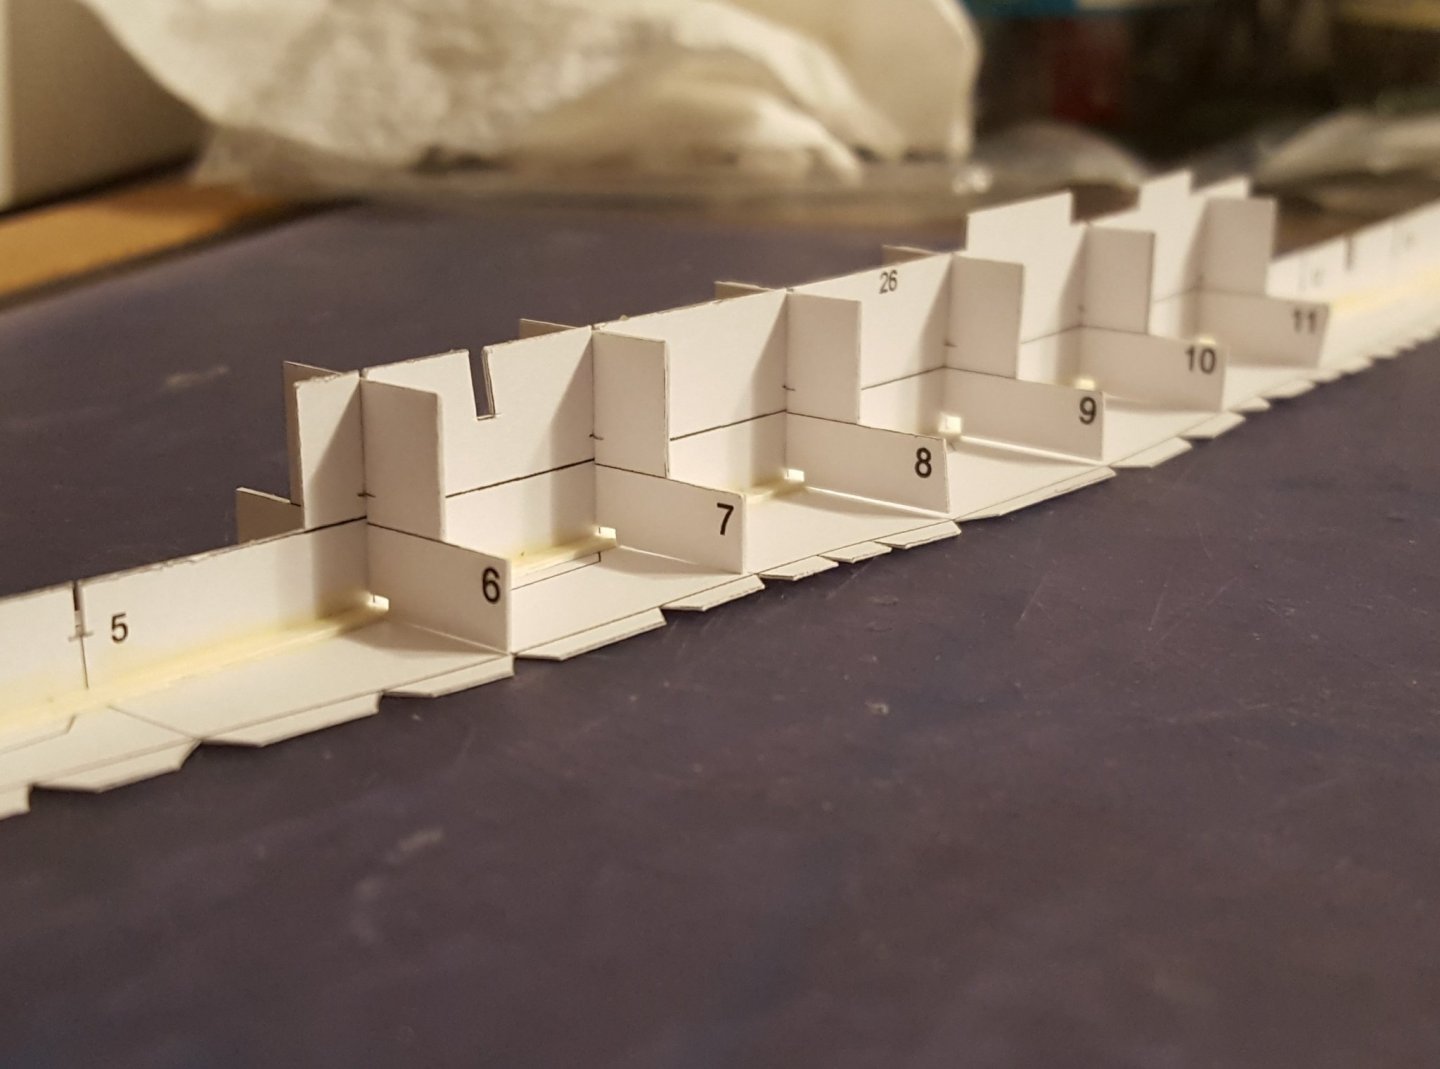
Slow progress. Was held up a few days by the need to get some more spray adhesive. I wasn't paying attention and got the wrong kind too, 3M 90 instead of 77 (90 is the heavy-duty spray and is not dispensed in anything like the fine pattern from a can of 77). Whoops! Made do with it anyway. As I hinted earlier, I'm still trying for that elusive "perfect hull." These kits have a longitudinal profile former spine that glues down to the base by means of a series of folded tabs. I don't care much for that method, since the folded paper fibers store some elastic energy, resulting in the tabs tending to push upward on the spine. What I did instead was remove the tabs and add two card strips on either side of the spine, creating a slot for the spine to fit into. Next up are the transverse formers. As you can see in the accompanying photo, the horizontal lines on the formers do not match up correctly with the corresponding line along the spine; if all is glued in place like this, the deck will not have a perfectly flat surface to lie on. The transverse formers will need to be shimmed to fix the alignment, and the amount of shim needed is slightly different at each station (due simply to the tiny variations in the cutting out of each part), so that will be the next task. EDIT: Forgot to mention that I also laminated the formers onto a second sheet of card, which substantially stiffens them. This simulates the practice found in most Eastern European kit designs, but is not standard practice for Paper Shipwright or HMV designs. Cheers!
- 10 replies
-
- 10
-
-
- paper shipwright
- canada
- (and 1 more)
-
Welcome aboard from a former teacher, now turned textbook writer. Well beyond thirty, though. 😋
-
You did, thank you! Have fun with this -- cutters are good models for neophyte builders. Check out the other logs if you get stuck, and remember that this kit's designer is a regular member here (Chris Watton), so he'll probably check in from time to time. Cheers!
- 50 replies
-
- 2
-
-
- lady nelson
- victory models
- (and 2 more)
-
Great presentation!
-
Looking for pre-made sails for Mamoli Britannia
ccoyle replied to Bob Lowther's topic in Wood ship model kits
Hey, Bob. Mamoli kits are now produced and sold by Dusek Ship Kits. They have an ad banner link on our home page. Cheers! -
You're not working from a kit, so it should go in the scratch-build section. Add something like "rebuilding antique store find" at the end of the title. Cheers!
-
Intro to Card Models Part VIII: Building V108 - Miscellaneous Bits
ccoyle replied to ccoyle's topic in Card and Paper Models
Congratulations! Completion is in itself a commendable achievement; looks are secondary, and they get better with practice. Cheers! -
What size single block is needed for 1:250 scale ship?
ccoyle replied to bogeygolpher's topic in Masting, rigging and sails
Henry beat me to the math. A 2mm block is simply way out of scale for most uses at 1/250. I think that many modelers at that scale use a tiny dollop of glue on the line and painted an appropriate color. -
I can run 10 km too, only it takes me a couple of months. 😉
- 108 replies
-
- 2
-
-
- armed virginia sloop
- model shipways
- (and 1 more)
-
Good to see you back! The Bermuda sloop is a lovely subject, and your planking looks good. Cheers!
-
Both Model Shipways and Master Korabel offer boat kits, and Model Expo carries both lines. Check them out at https://modelexpo-online.com/.
-
Any Build Logs for Wappen Von Hamberg by Corel?
ccoyle replied to MikeE's topic in Wood ship model kits
Hey, Mike. You can click here for a list of all the WvH build logs we have on site. I didn't check to see if they were active or not, just looked them up. Cheers!- 1 reply
-
- 1
-
-
Welcome aboard, Al, and good luck on your new project!
-
Welcome aboard! As an avid football fan, I have actually read the name of your city a few times, i.e. CFR Cluj, in the European continental competitions. I hope you enjoy your attempt at our hobby and wish you every success. Cheers!
