


ccoyle
-
Posts
10,540 -
Joined
-
Last visited
Content Type
Profiles
Forums
Gallery
Events
Everything posted by ccoyle
-
Welcome, Dean! (That's my middle name, BTW.) I never did RC planes, but I did build a few balsa-and-tissue examples once upon a time. The early ones all came to some sad end, e.g. crashing into a mail box. Eventually I started building them sans rubber band motors to eliminate the temptation to take them outside and wreck them, er, I mean fly them. Cheers!
-
Welcome! That should be a good kit to start with -- looking forward to seeing your progress on it. Cheers!
-
 Please -- that's what my students used to call me. Here, I'm just Chris. 😉
- 146 replies
-
- 1
-

-
- artesania latina
- bluenose ii
- (and 1 more)
-
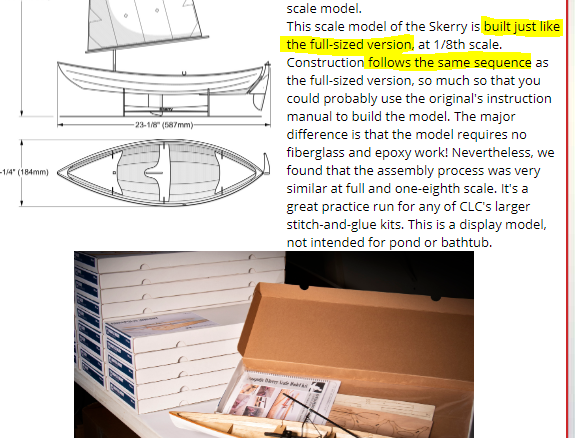
Actually, going back over the OP, it is probably more advisable that Scott find a set of full-size plans for an actual boat that he likes (e.g. one from the Wooden Boat store) and scale those down to the size of model he wishes to build. Those plans aren't cheap, though. Going back to Scott's expressed desire to scale up a model kit, I'll repeat that the only kits of small craft that I know of that faithfully replicate the construction of their full-sized counterparts are those from Chesapeake Light Craft (see image). But ... before making any hard and fast recommendation, we should probably wait to hear more details from Scott on what kind of full-size boat he wishes to build. "Schooner type" and "gaff ketch rig" describes a lot of boats and says nothing regarding construction methods, size, intended use, skill level of builder, cost, time frame, etc.
-
I don't know if anyone has yet advised you about Frank Mastini's book Ship Modeling Simplified, but I believe that this is the very kit he used throughout the book to illustrate his methods. It's a great book for beginners.
- 146 replies
-
- 1
-
-
- artesania latina
- bluenose ii
- (and 1 more)
-
Oooh -- in my experience, that's a bad idea, 'cuz it just makes you want to build real boats instead of model ones! 😄 (BTW, I have long wanted to build a real boat, and since I will soon be moving to within spitting distance of not one but two lakes, I plan to make that dream a reality in the not-too-distant future. And BTW #2, Wooden Boat Forum -- along with their magazine, store, and other resources -- is an excellent site.)
-
First of all, hi and welcome to our forum. The bringing of your search to a successful conclusion depends in large measure on what kind of boat you wish to build and, probably more specifically, what construction method you intend to use. The term "schooner type boat" is kind of vague in this regard, since it could mean anything from a traditional schooner built plank-on-frame, down to a more contemporary vessel built from plywood using a stitch-and-glue method. Regardless of which method you intend to use, model kits tend to be exercises in compromise between actual practice and what satisfies the needs of model builders. One exception to this general tendency are the kits produced by Chesapeake Light Craft (click the sponsor banner on our home page). They produce several kit versions of their full-size boats that are built in exactly the same manner as the real thing. Kind regards,
-
Welcome, Tom! I am so very pleased that you and Mr. Berti have been able to resolve this issue to everyone's satisfaction. I hope that your experience with Ancre may serve as a template for other Chinese designers and that we may soon see additional white-listings. Kind regards,
-
Looks a treat, Paul.
-
Welcome! We have a Vampire and Vendetta in the build logs somewhere. Try searching for them. Cheers!
-
I thought the author's name sounded familiar. I reviewed one of his books here. I had the same reaction to the use of fictional characters for providing historical context -- rather off-putting, in spite of some otherwise valuable content.
-
Catching up on your build, Danny. I see you have mastered the dreaded "petal fold" -- the bane of card modelers everywhere. Excellent work so far!
-
Never heard of it, but it looks promising. I like that it comes in three diameters.
-
I'd say that turned out rather well.
-
Belay Pins
ccoyle replied to shipman's topic in Discussion for a Ship's Deck Furniture, Guns, boats and other Fittings
Surprised no one has mentioned it yet, but the fat pins that come in kits can be turned down quickly by chucking them into a rotary tool and giving them a pass or two with some sandpaper or a file. Neatness isn't a particular concern, since most of the pin will be obscured by rigging line. -
Welcome aboard! With the finished pinnace under your belt, you should be well-positioned to finish your new project. Cheers!
-
Hi, Eugene. Though this type of model does not appeal to me personally, I do appreciate that MK is willing to do something a little novel and different. I look forward to seeing what you guys come up with next! Cheers,
- 216 replies
-
- 3
-
-
- masterkorabel
- ships
- (and 3 more)
-
Sorry to hear about that. I had a garage broken into once as well -- thieves took all the tools I had inherited from my grandfather. I filed a police report, but of course nothing was ever recovered.
- 86 replies
-
- 1
-
-
- billing boats
- wasa
- (and 1 more)
-
From personal experience, I can tell you that it takes a lot of perseverance to post regularly on multiple forums, especially if one of them is not in your native language.
- 1,035 replies
-
- 6
-
-
- royal katherine
- ship of the line
- (and 1 more)
-
Welcome aboard, Mr. Foss! I used to dabble in trains in my youth and still have my N-gauge stuff boxed away somewhere. Perhaps you saw the recent post on Rod Stewart's layout? Turns out he is quite the accomplished modeler. Warm regards,
-
Don't prove me wrong here! I'm not an expert on endemic Chesapeake Bay designs, but I believe that there is some overlap between the terms flattie and sharpie. Googling the latter term will bring up some images of very much flattie-like boats.
- 72 replies
-
- 2
-
-
- Chesapeake Bay Flattie
- Midwest Products
- (and 1 more)