


KeithAug
-
Posts
3,867 -
Joined
-
Last visited
Content Type
Profiles
Forums
Gallery
Events
Posts posted by KeithAug
-
-
5 minutes ago, Paul Le Wol said:
separate log?
Thank you Paul, and no I don't want to prolong the distraction.
- Keith Black, Paul Le Wol, TBlack and 2 others
-
 4
4
-
 1
1
-
Lovely project Steve and great work on the cranse. She has hell of a keel so I assume she carried a lot of sail. Given the apparent height of the mast I agree she was probably sloop rigged. I wonder whether she was converted at some time earlier in her career. Presumably we will never know - perhaps carbon dating would help🙂.
- Keith Black and Bedford
-
2
-
Andy, Rick, Phil. Thank you all for continuing to follow my lamentable progress. I haven't had time to post much or to look at how everyone is getting on with their builds. I must try harder to catch up.
The culprit (photo below) breezed into the workshop about a month ago and drew the dolls house she wanted for Christmas. So the boat was parked and the house build took over.

I am putting varnish on the hull between long periods of house construction.

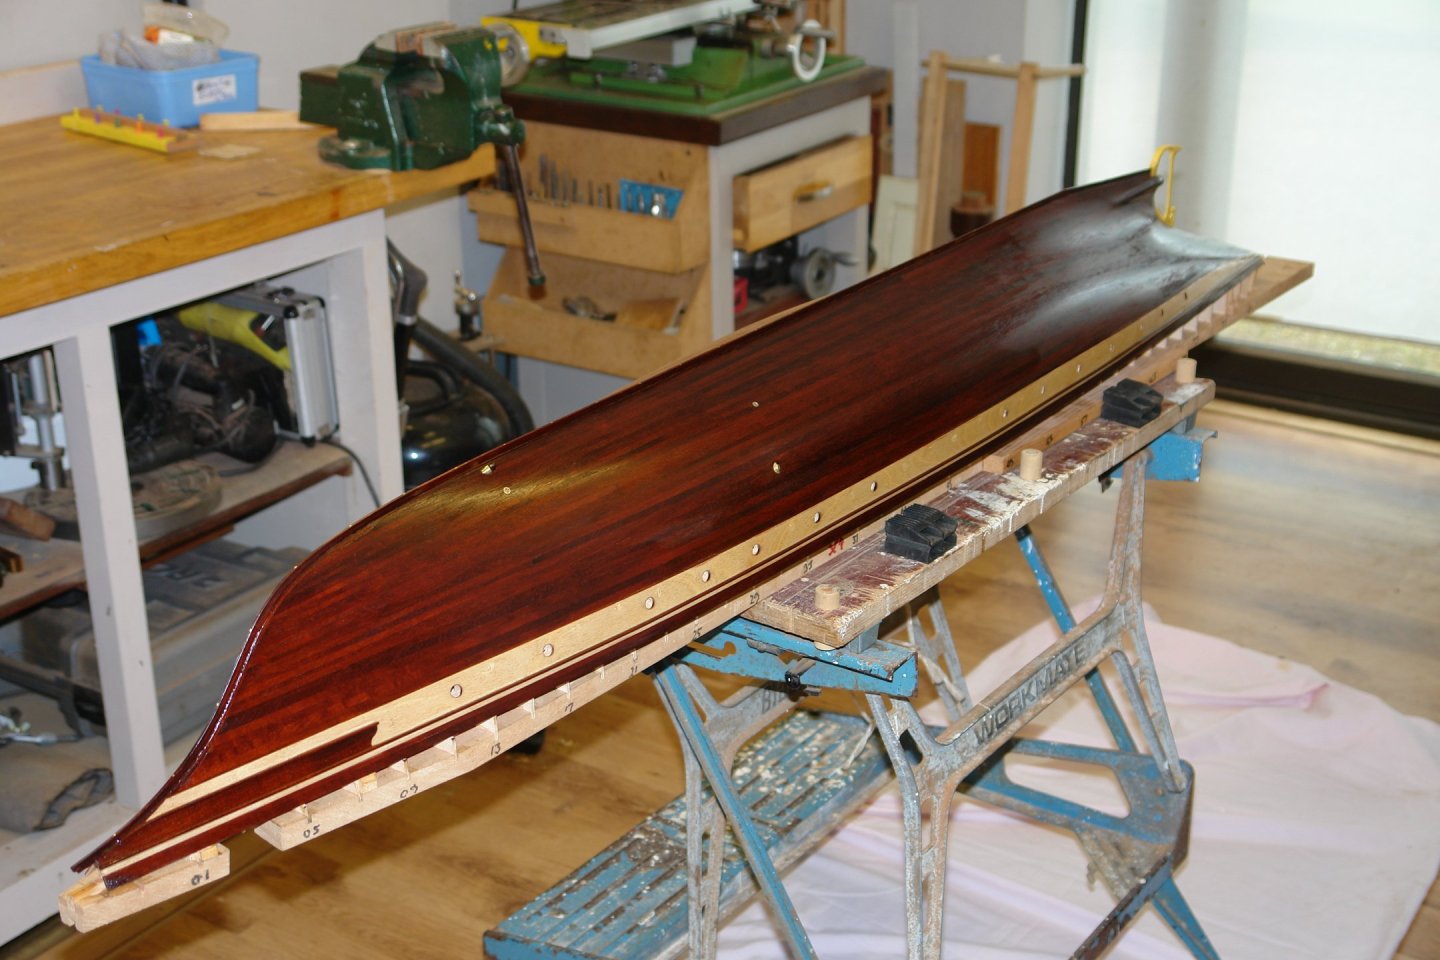

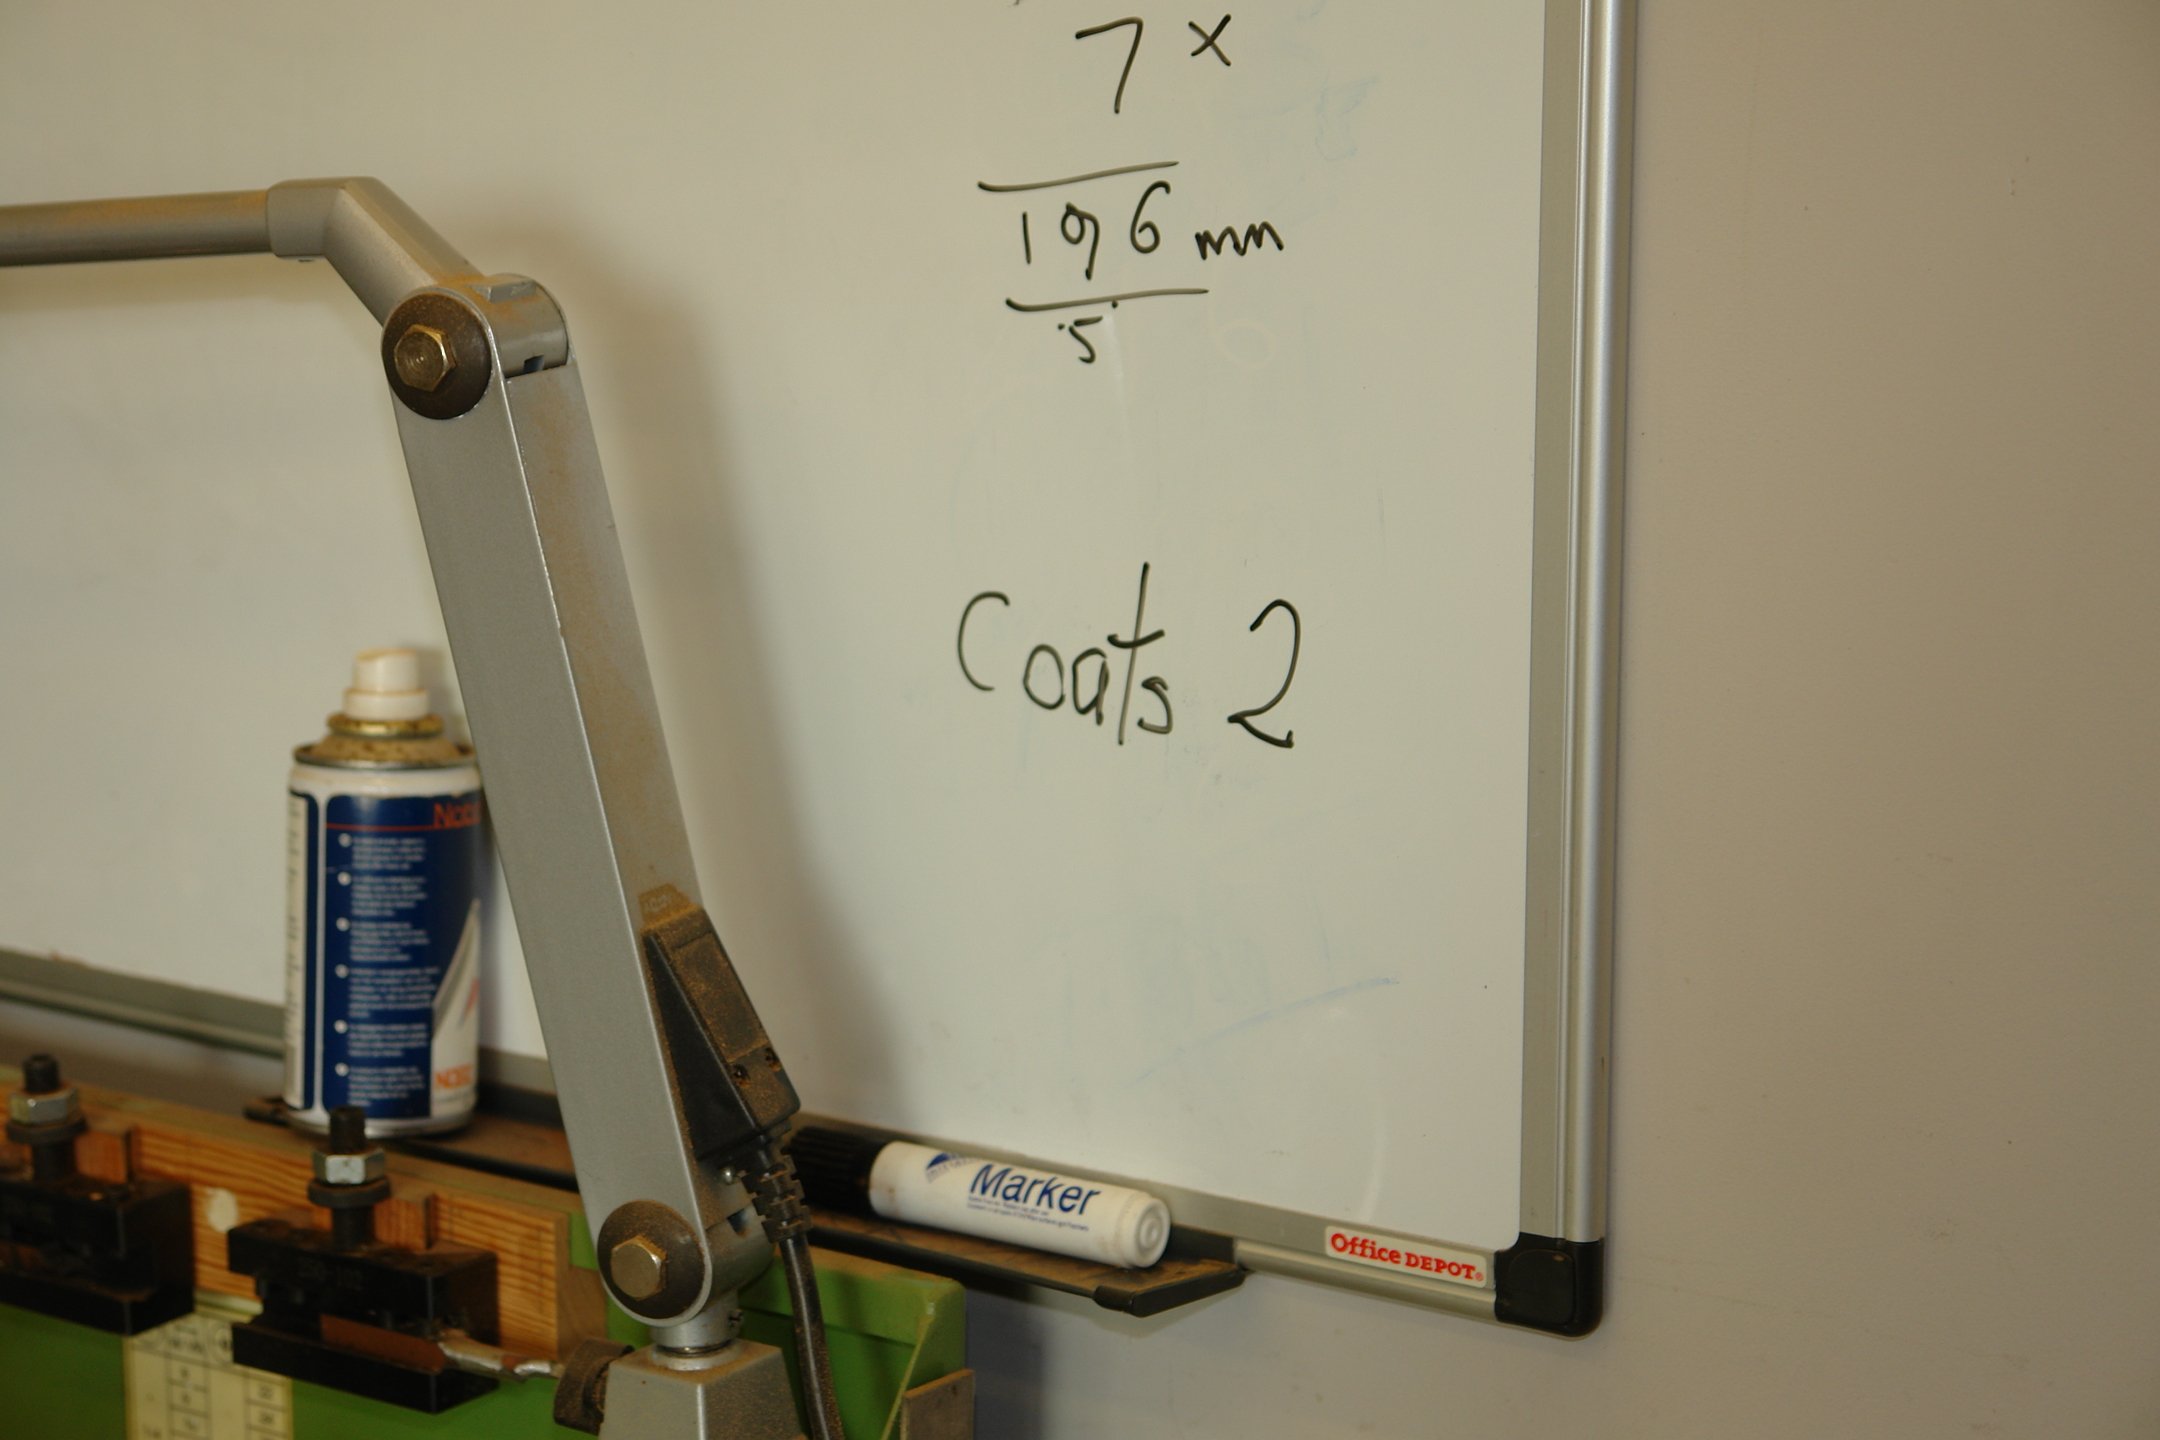
Wire wool toned down the sheen after the first coat. I still have a few blemishes to fix.


On to the second coat.


I am keeping a log of the number of coats. I am aiming for one a day.

-
On 10/31/2024 at 3:13 AM, gak1965 said:
However, before we get there, a couple of photos from our time with our daughter in the Dakotas.
Thank you for the reminder.
My family and I spent 10 years up to 2002 doing all the USA national parks with the exception of Big Bend, Shenandoah and Great Smokey Mountains. Devil's Tower was a must see for Trecky fans. Fortunately we caught Wind Cave open. Quite refreshing on a hot day.
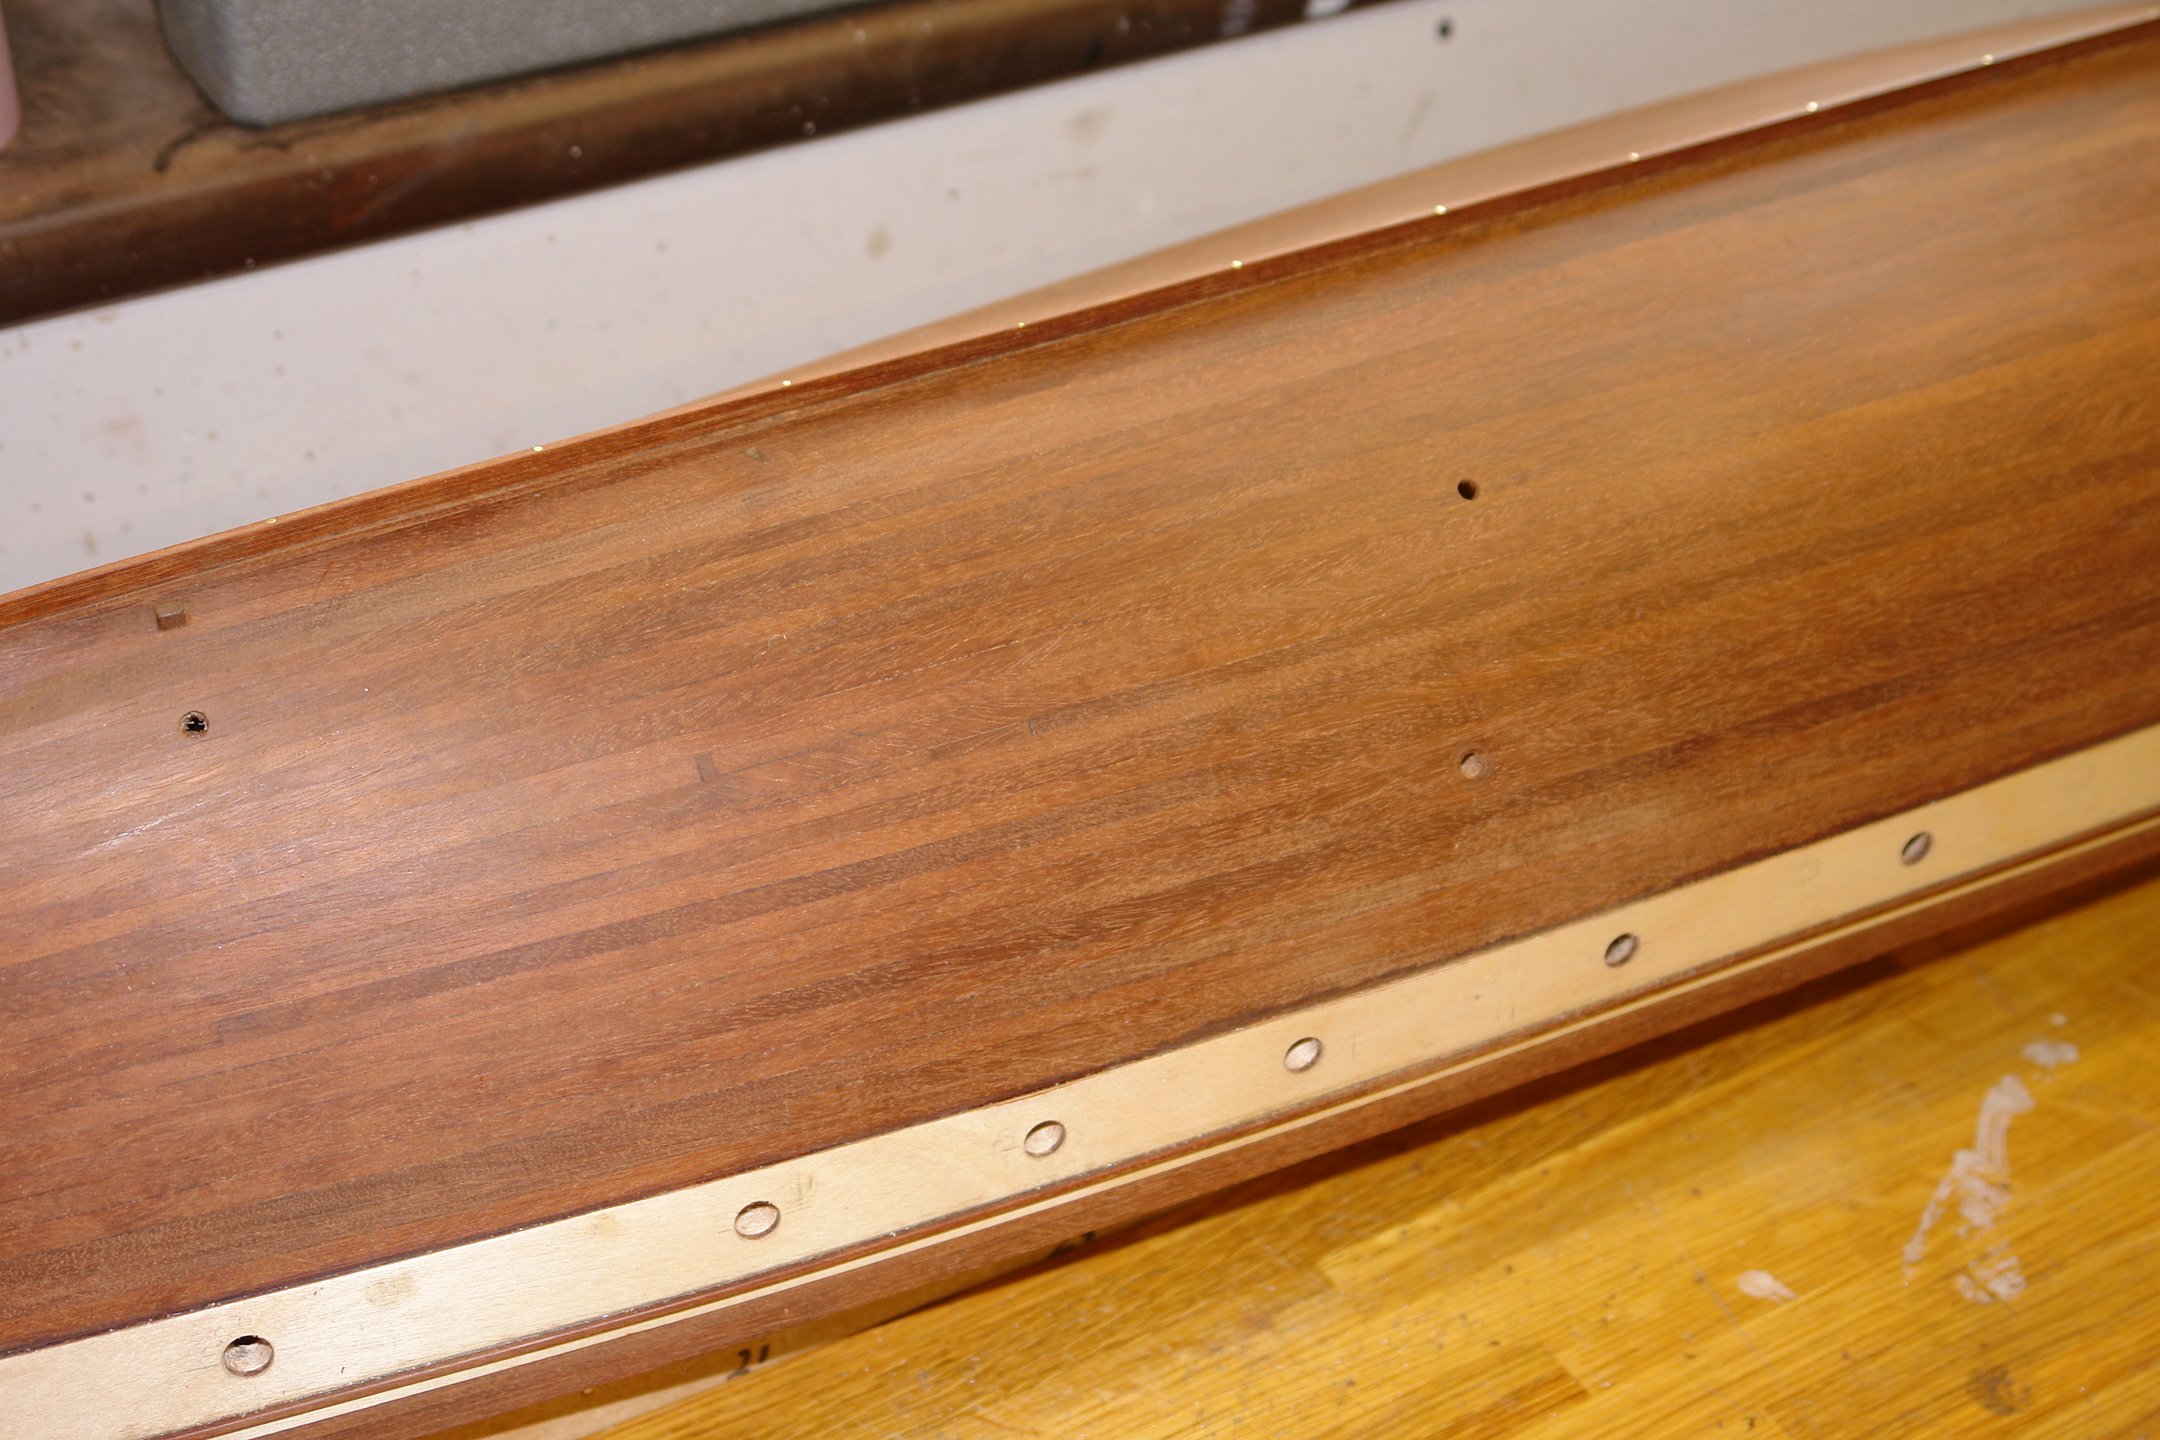
Nice metalwork detail on the hull.
- gak1965, mtaylor, FriedClams and 2 others
-
5
-
-
On 9/7/2024 at 8:56 PM, FlyingFish said:
probably never be seen, but just in case.
A man after my own heart.
- mtaylor and Keith Black
-
2
-
-
-
Good looking frames Rob. It is aways a welcome sight to see the hulls form, even when it is a skeleton.
- FriedClams and ClipperFan
-
2
-
11 hours ago, Dr PR said:
If you photo etch brass you can then add solder to build it up to a rounded shape.
Phil - Yes I had picked up that technique from another build. I think my set up time for photo etch might be almost as long as sawing it out. I think I will try building up the thickness with thick oil based paint rather than solder.
- Keith Black, FriedClams and mtaylor
-
3
-
2 hours ago, Ian_Grant said:
Suggestion: 3D print.
2 hours ago, druxey said:Photoetch might be a better solution.
1 hour ago, wefalck said:I would actually give it to my laser-cutter to chew
Ian, Druxey, Eberhard - All much better ideas than cutting out with a jewellers saw. I sometimes like doing things the hard way! Photo etch is my option 2. I don't have access to a 3d printer or a laser cutter. Perhaps Santa will oblige.
- Keith Black, FriedClams, mtaylor and 1 other
-
4
-
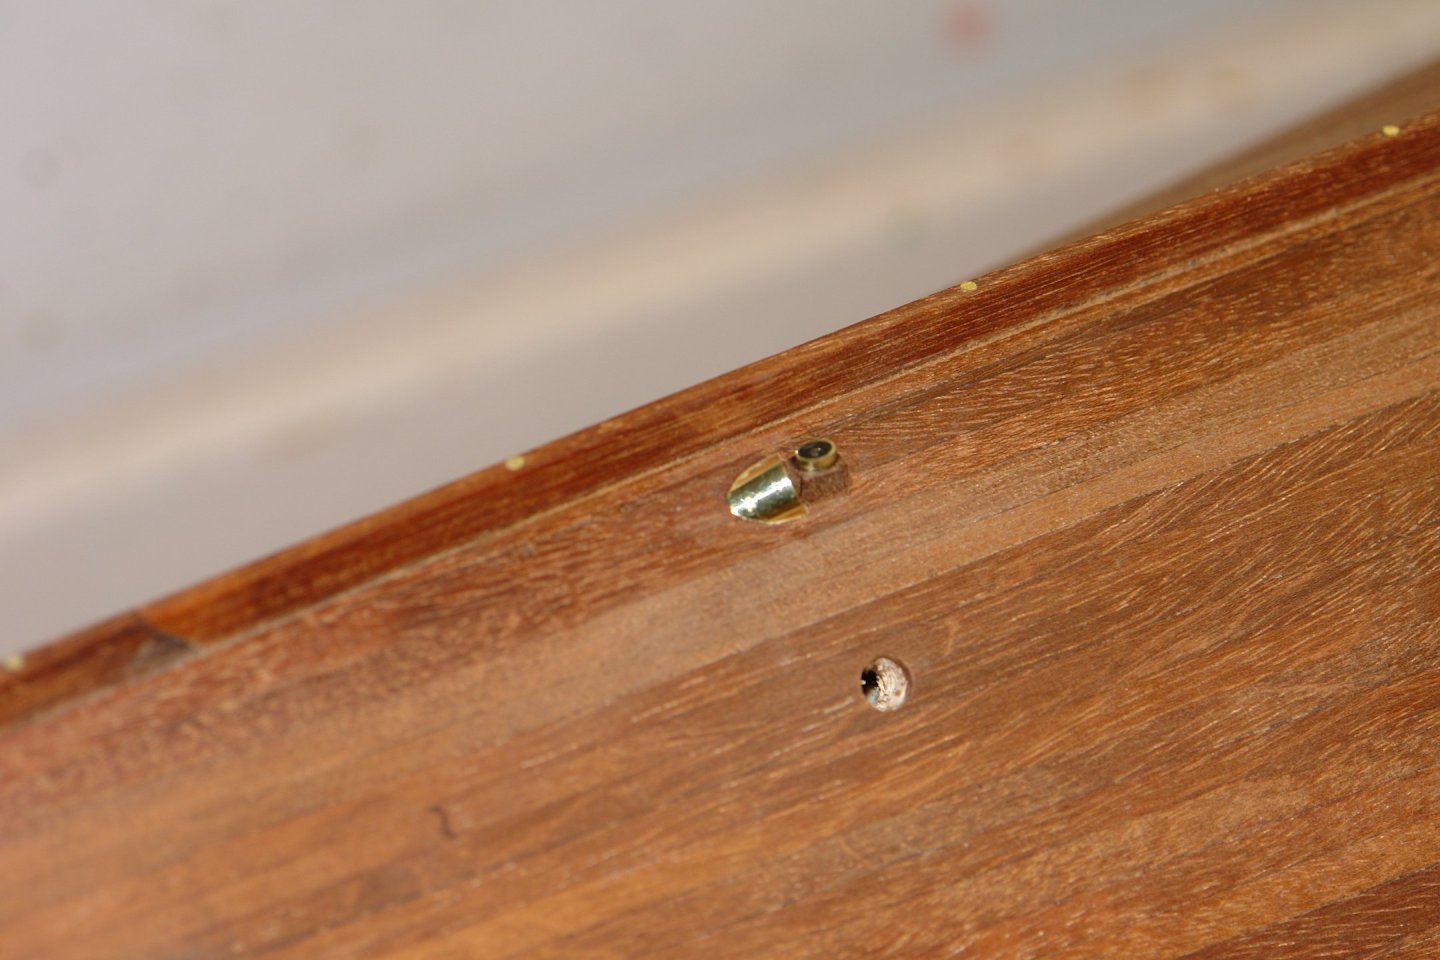
Time in the workshop continues to be hard come by. However I have made a little progress.
I increased my stress levels by boring various holes in the hull.
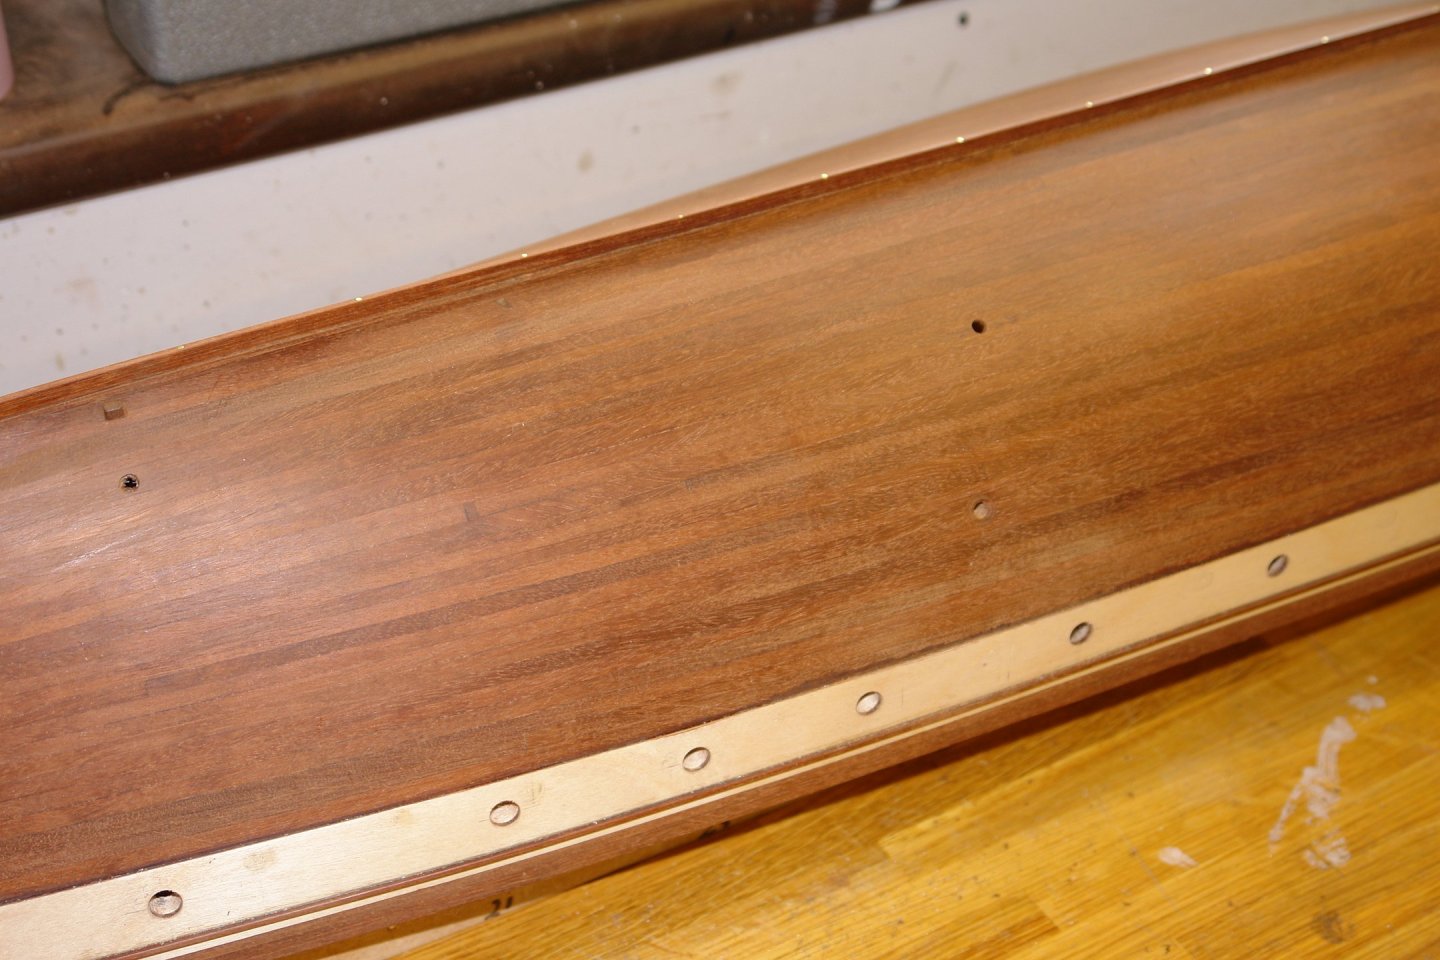
One of the holes has a concave dished shape around it so I made a dome shaped sander.

I shouldn't have bothered as the dish was almost imperceptible at model scale.
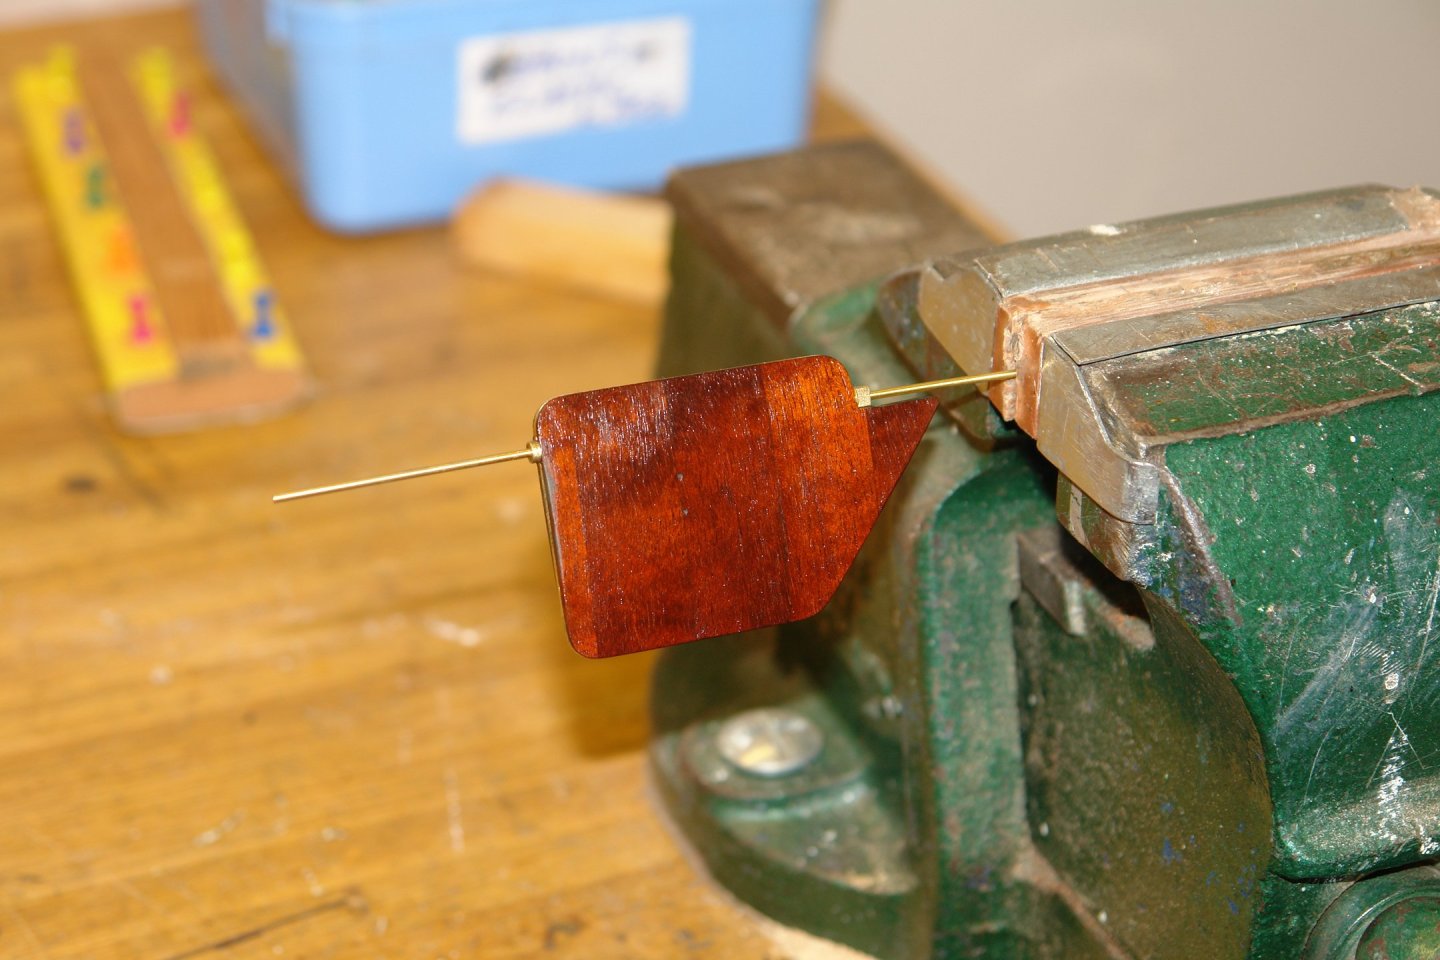
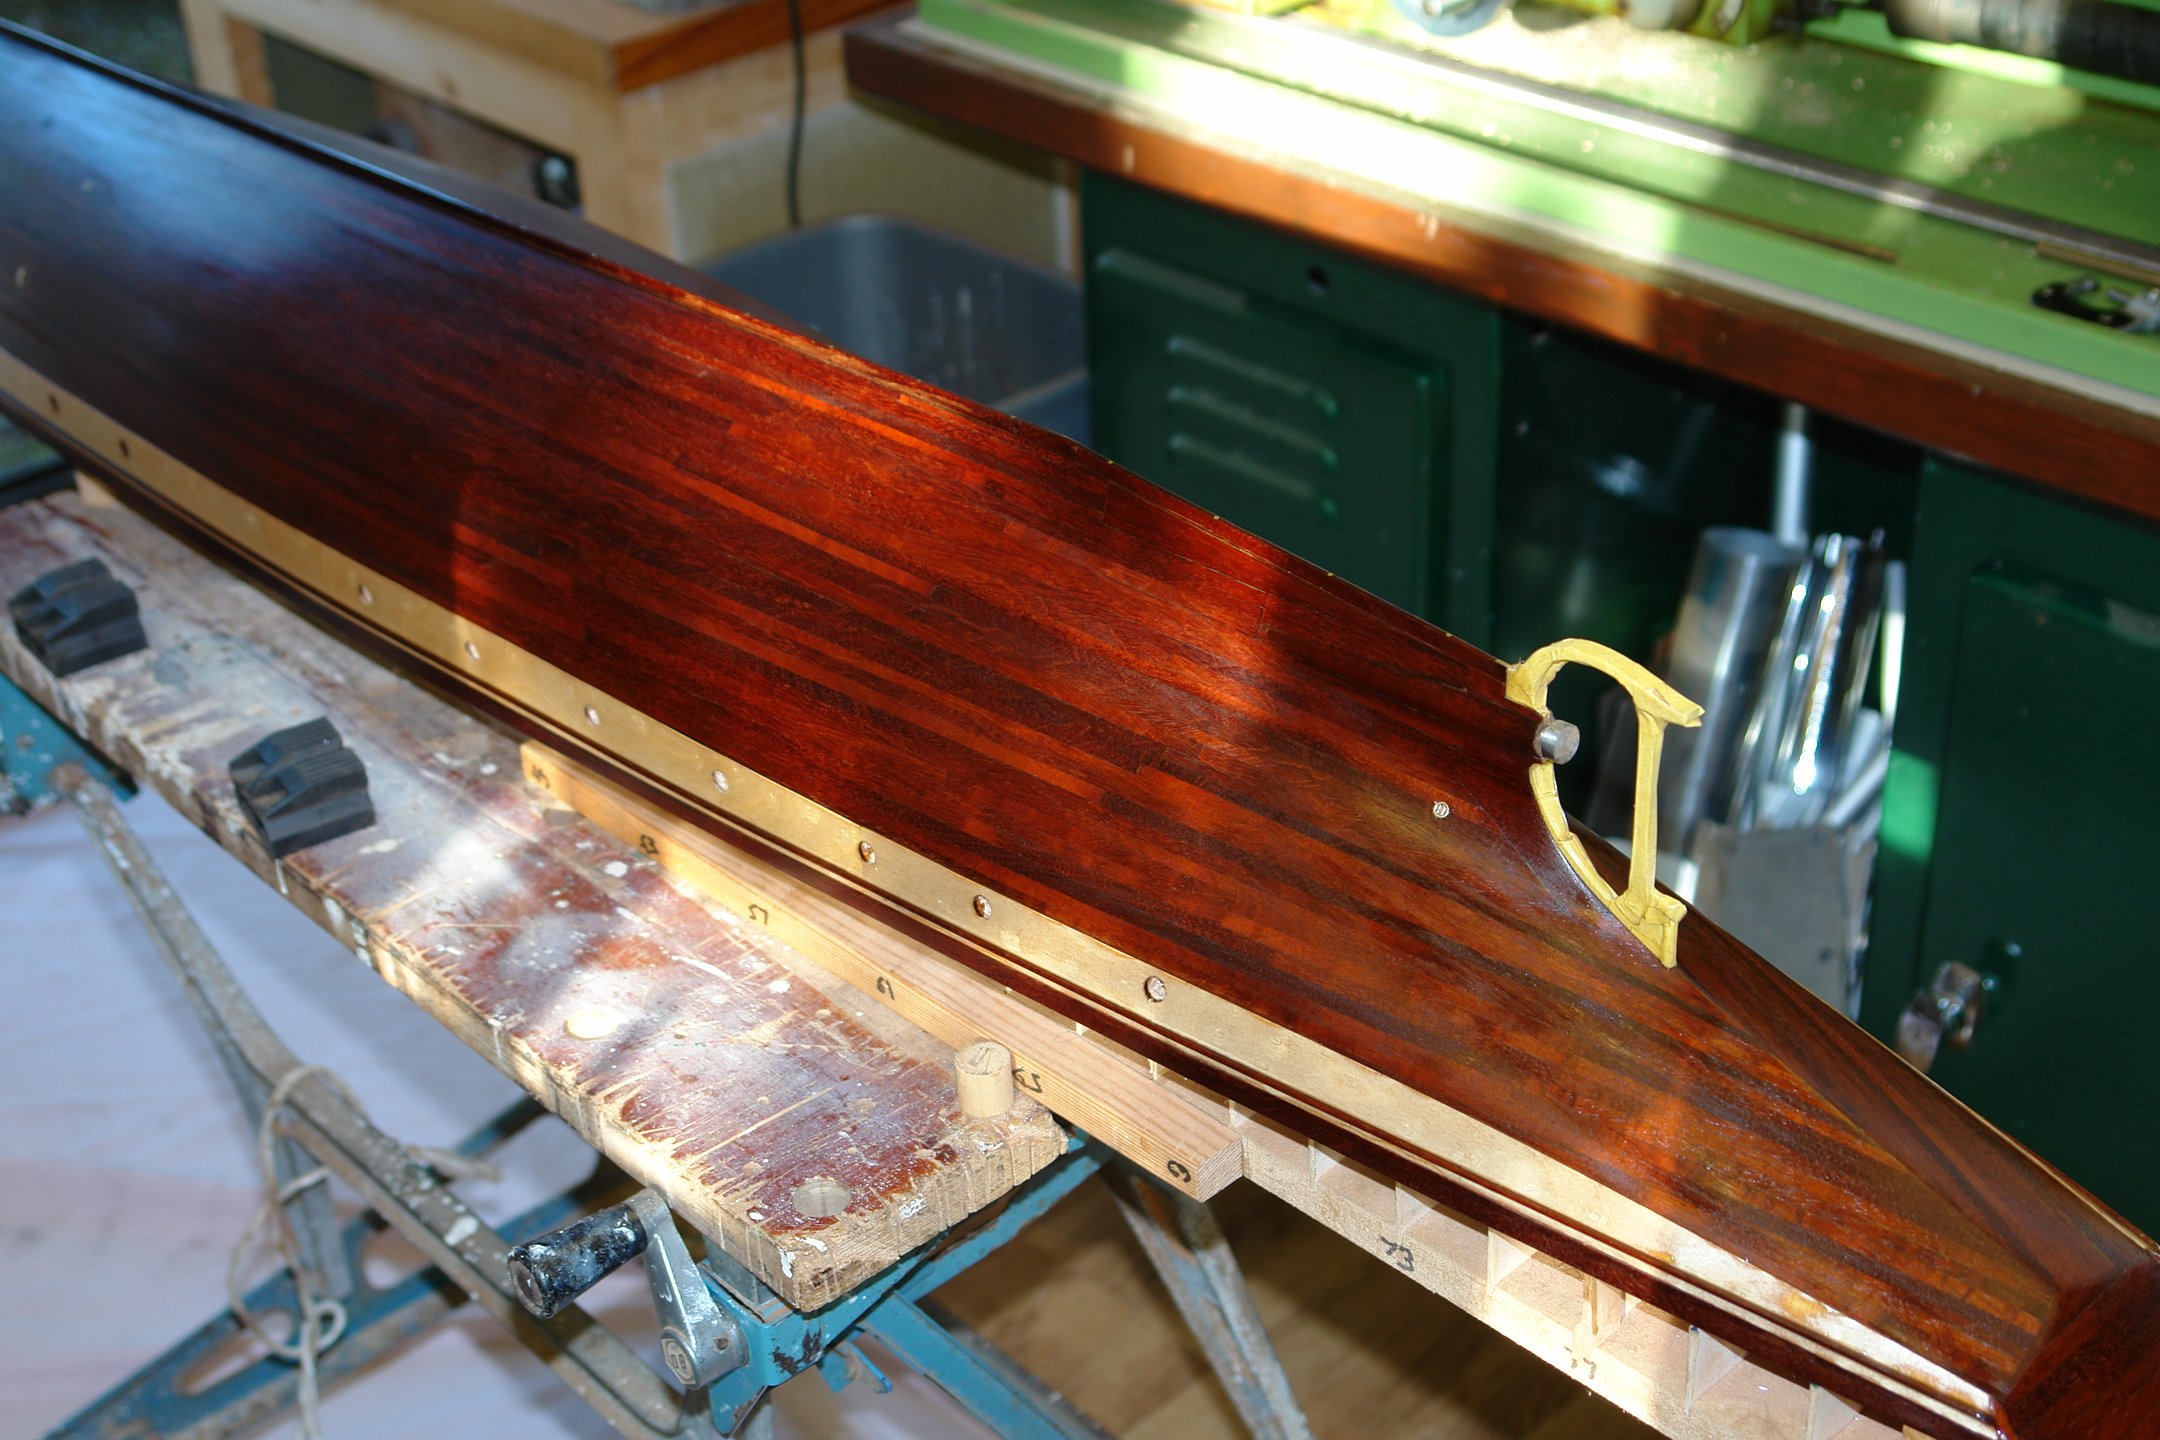
I also made the half cover from brass. I turned a very thin brass washer with sharp edges and then used a ball bearing to press the dish.

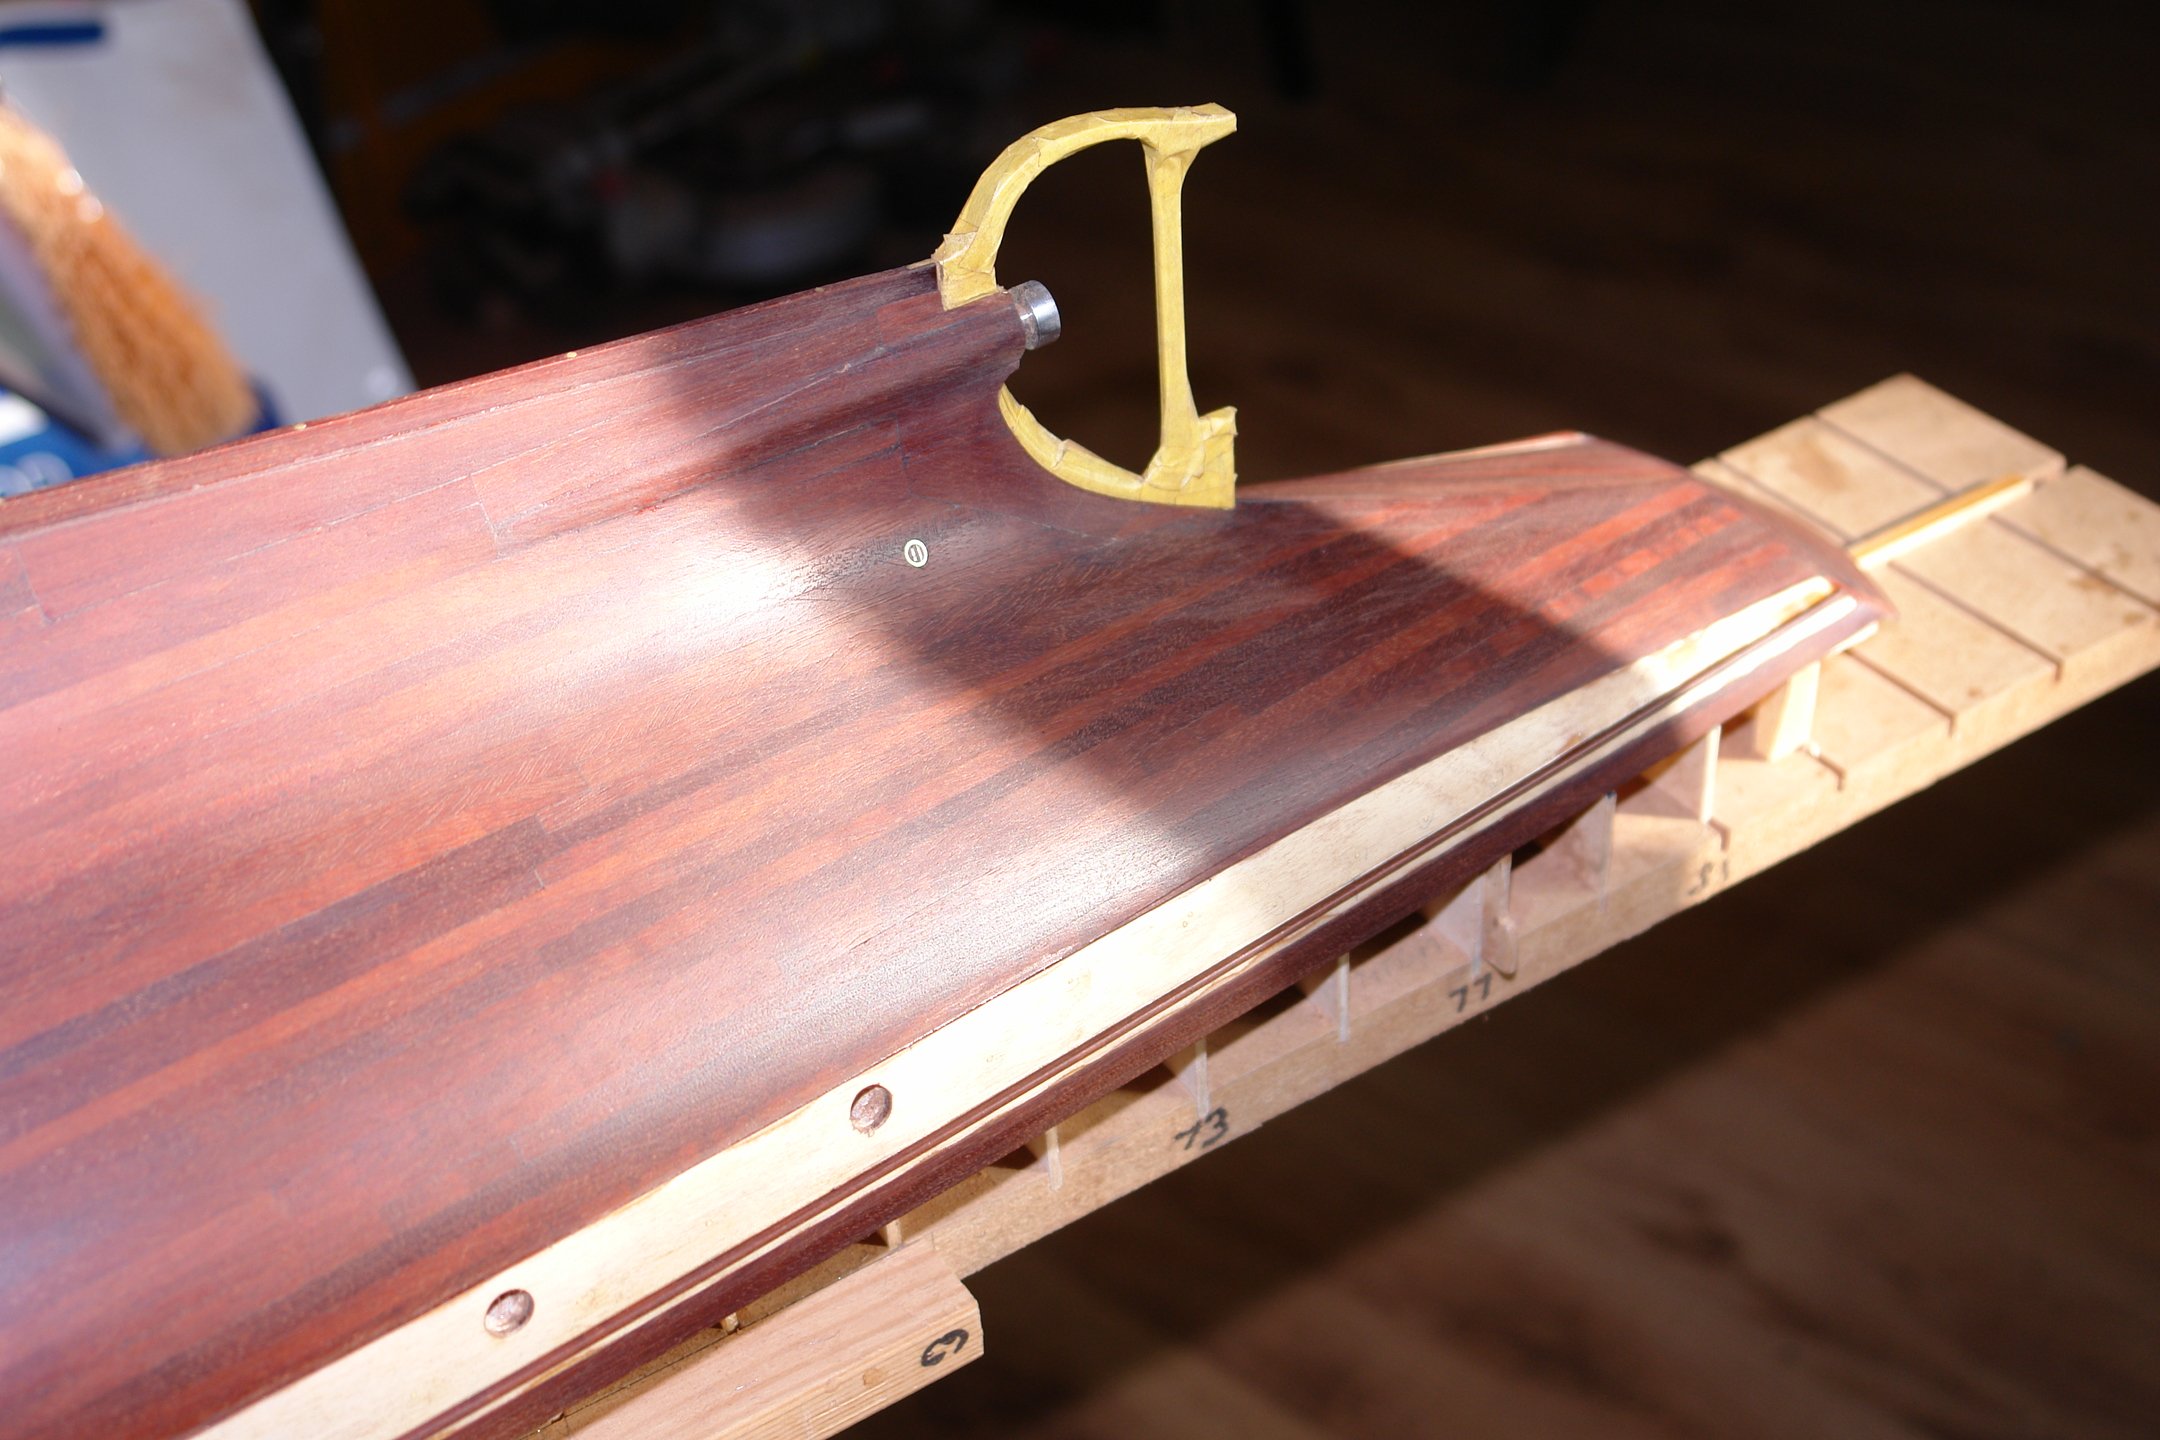
I also made the "depth sounder" feature and the fairing which protects it.
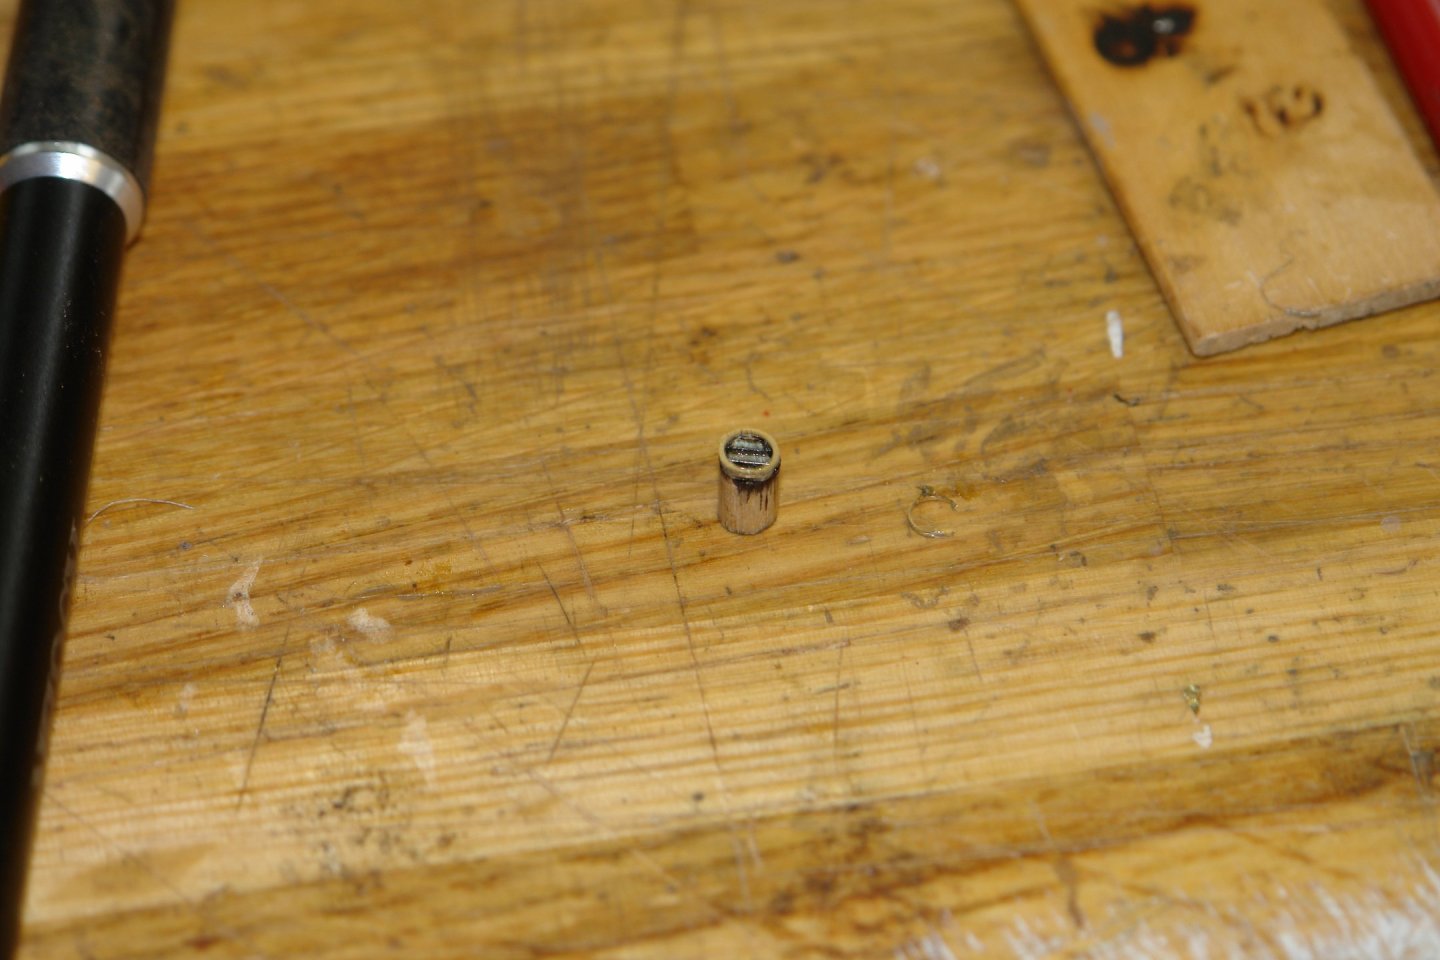
I made the grilles for the various hull penetrations from sheet brass - cut on the mill with a slitting saw.


The fingers were soldered to rings cut from brass tube. The edges were then filed flush.
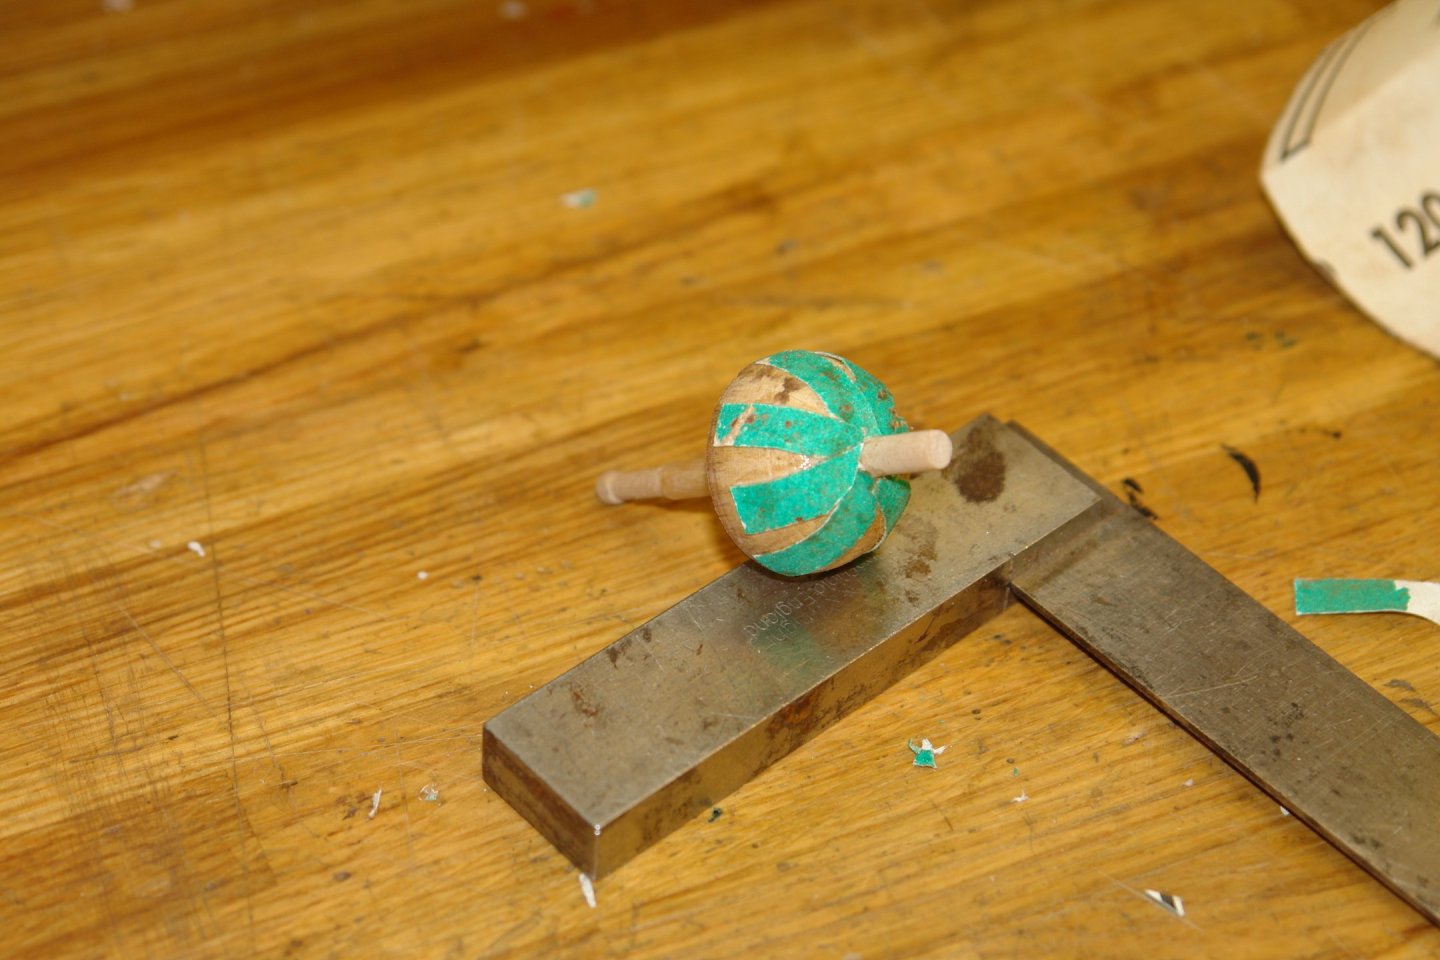
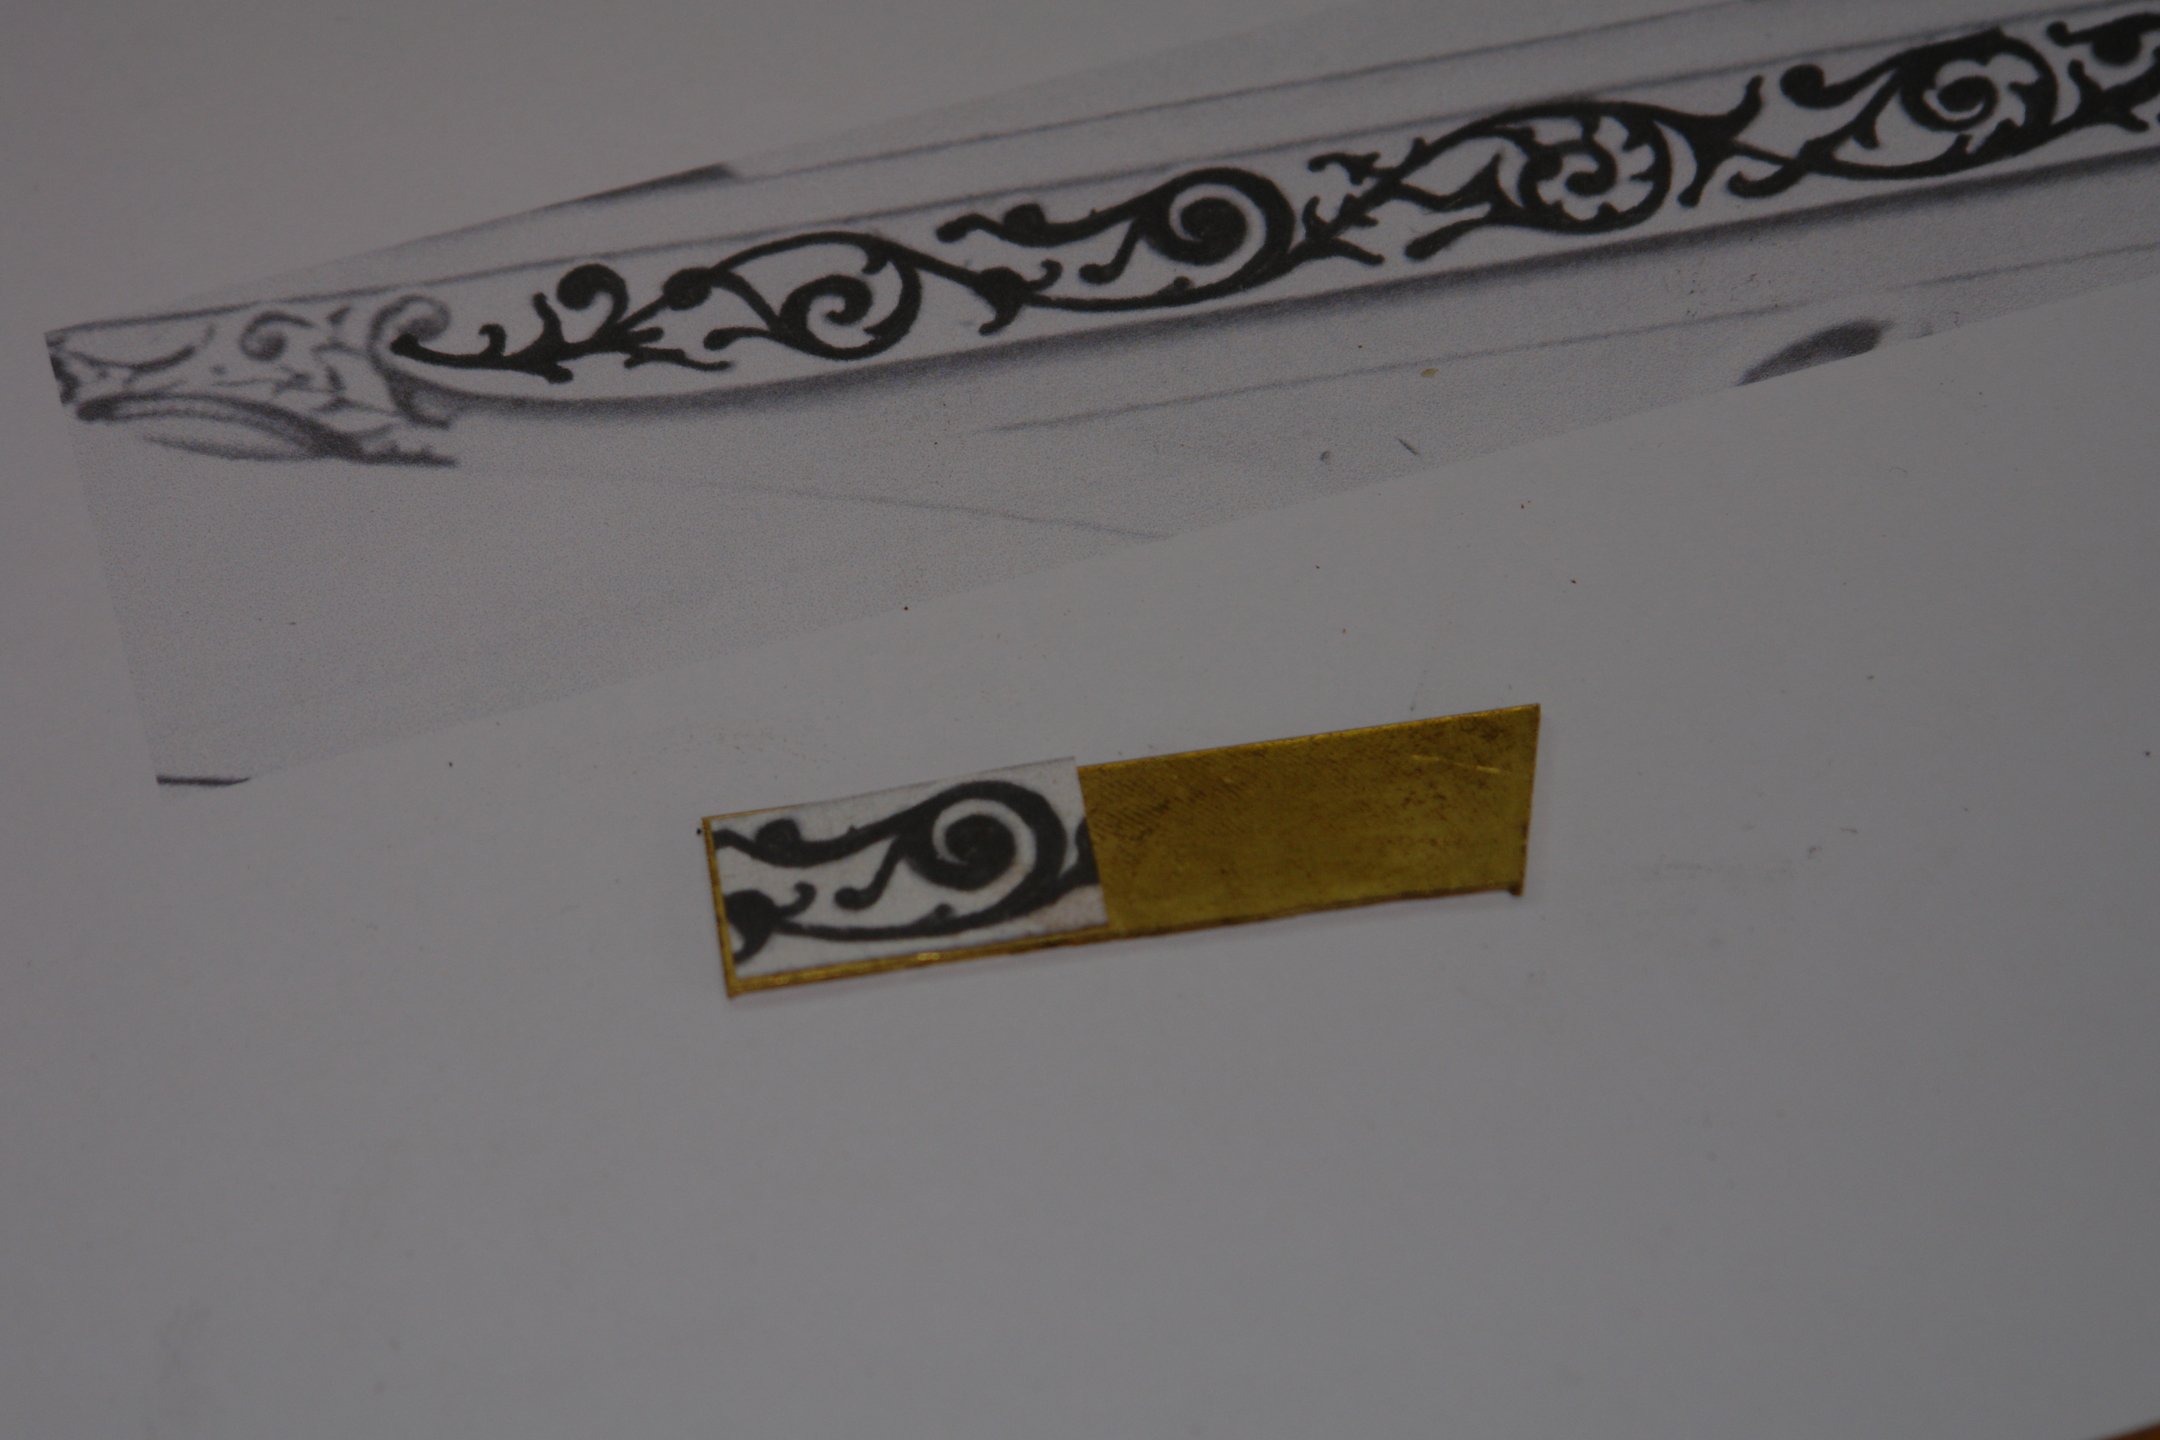
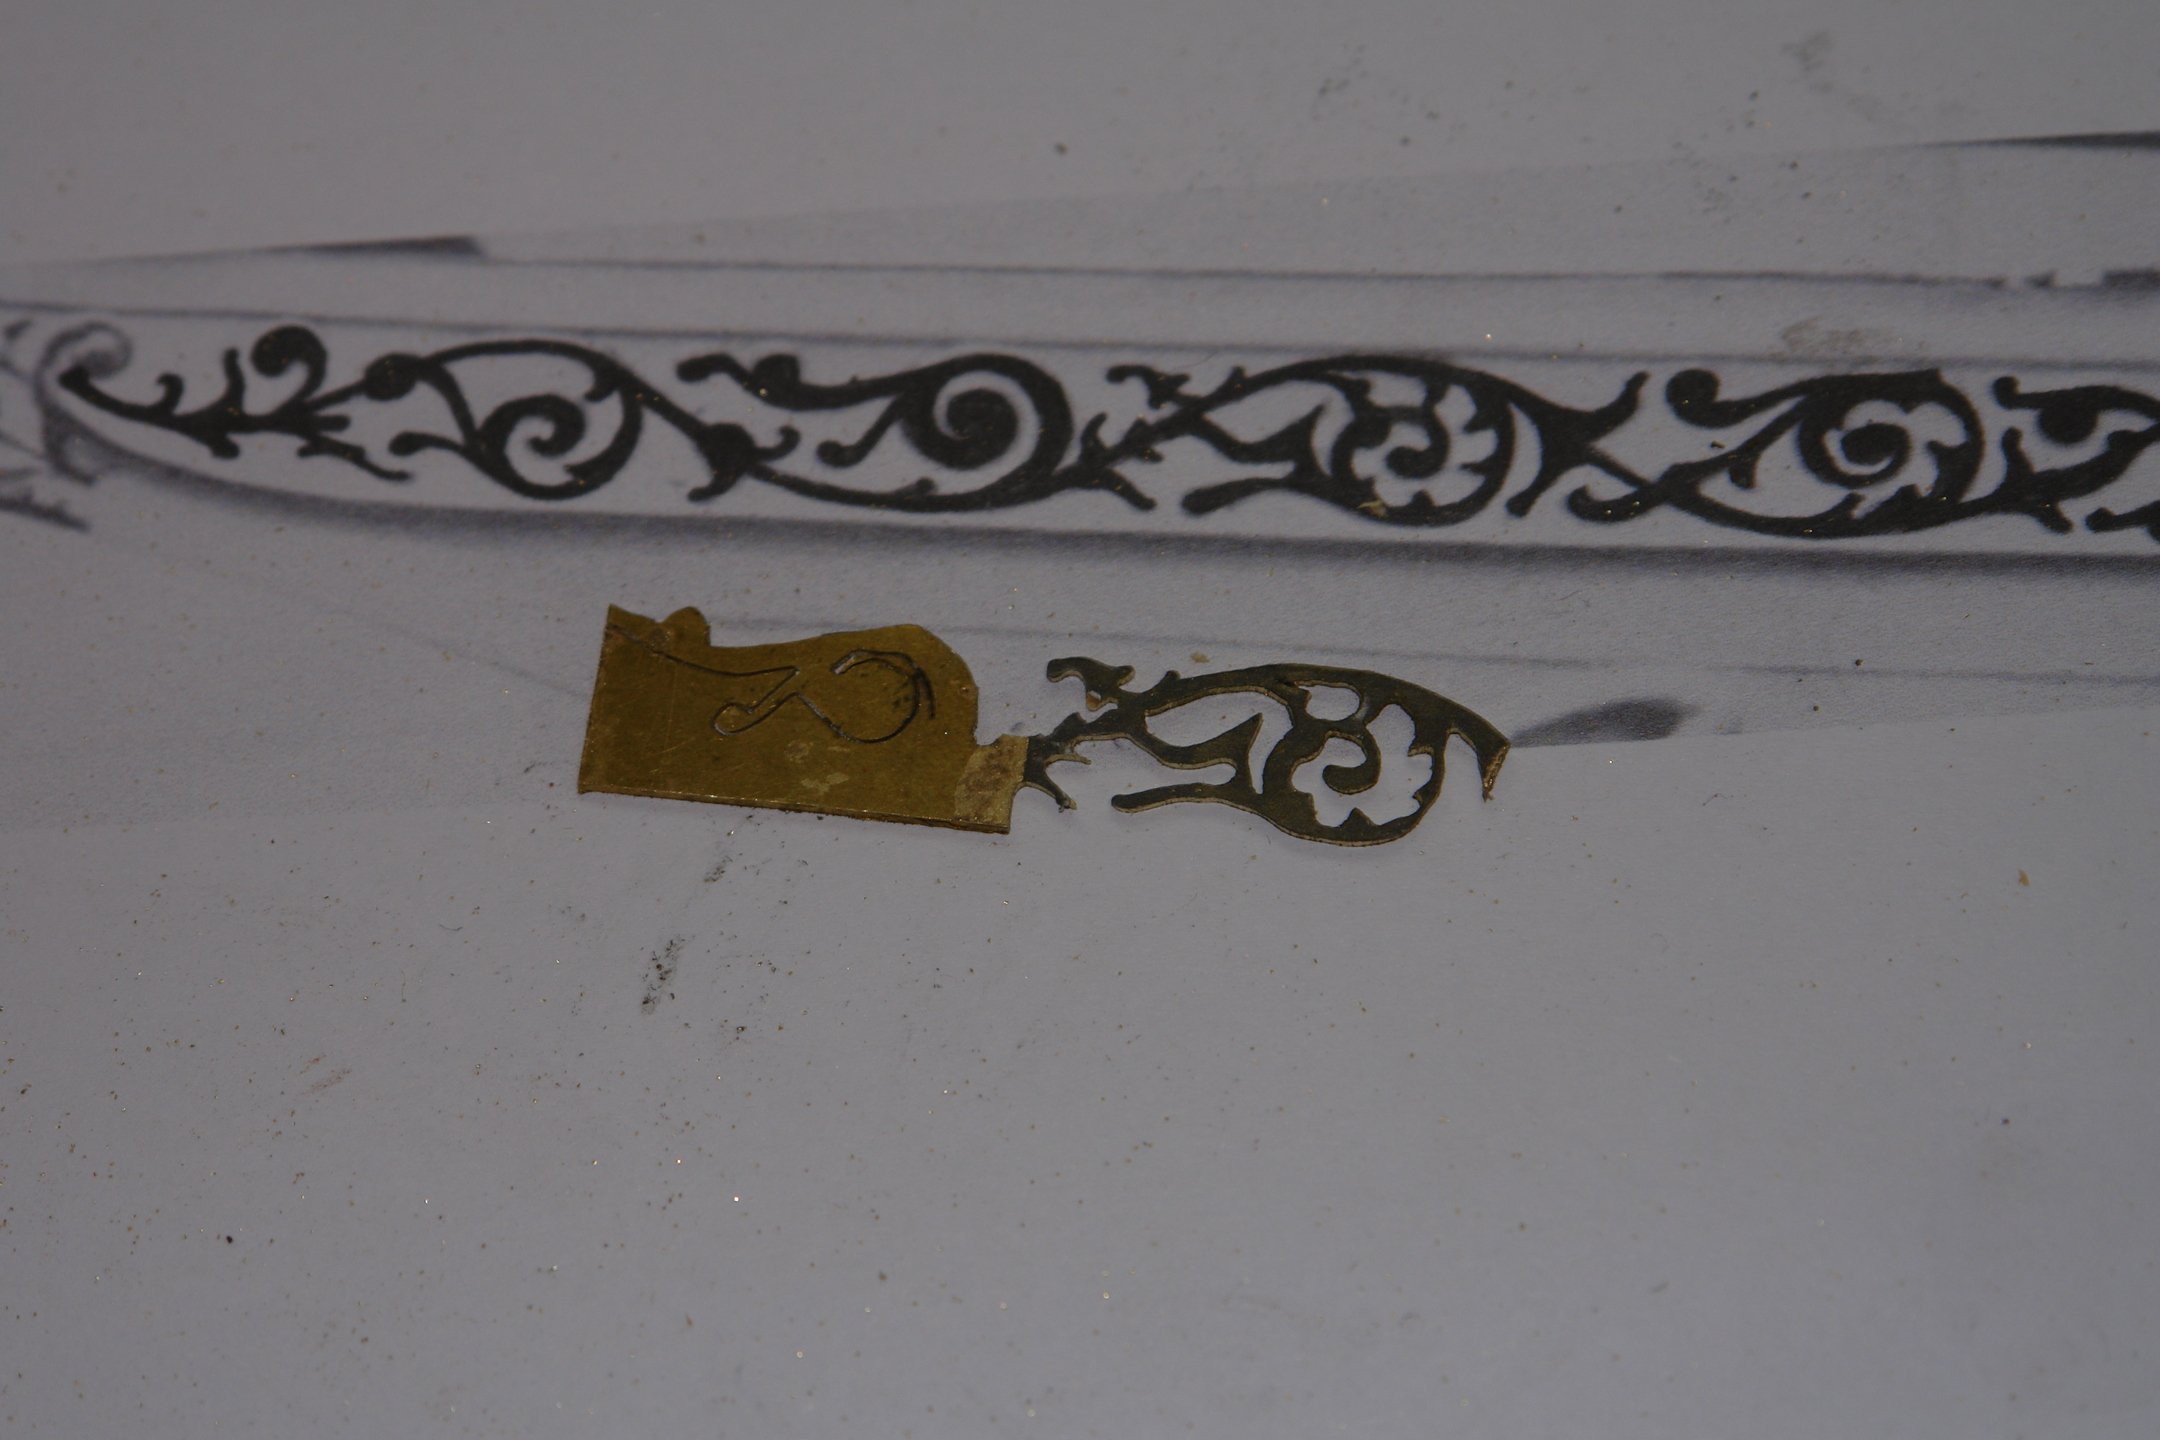
I then started pondering the gingerbread again. I sized template on the printer and laid it in place.
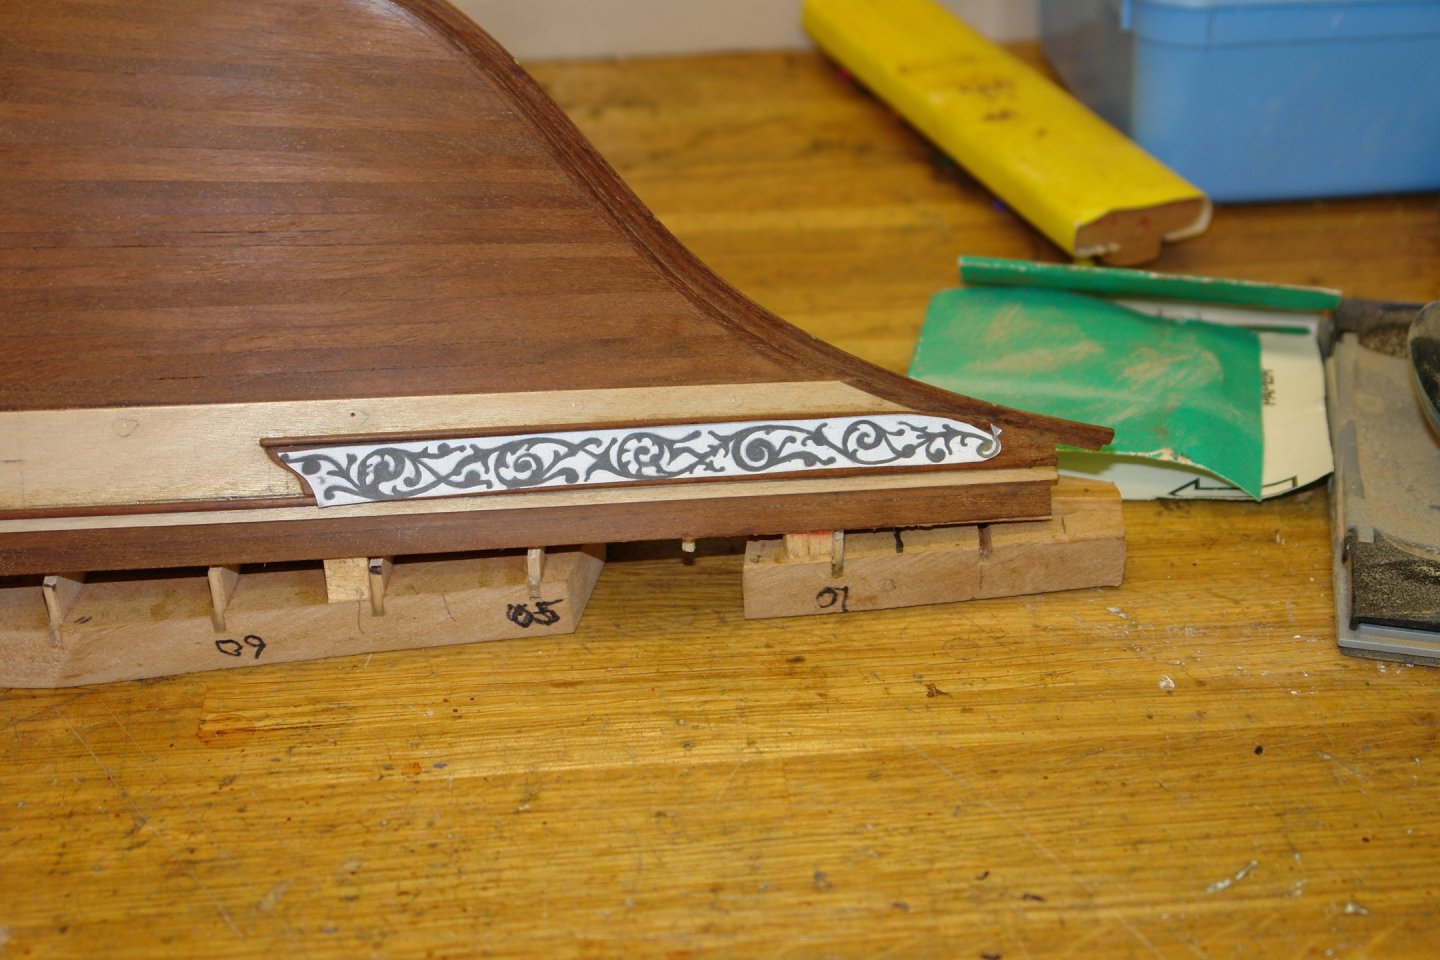
My pondering led to plan 1 - i.e. cutting the gingerbread from brass sheet and then building up the thickness with something to give it bulk / texture. Plans 2, 3 or 4 may still be necessary.
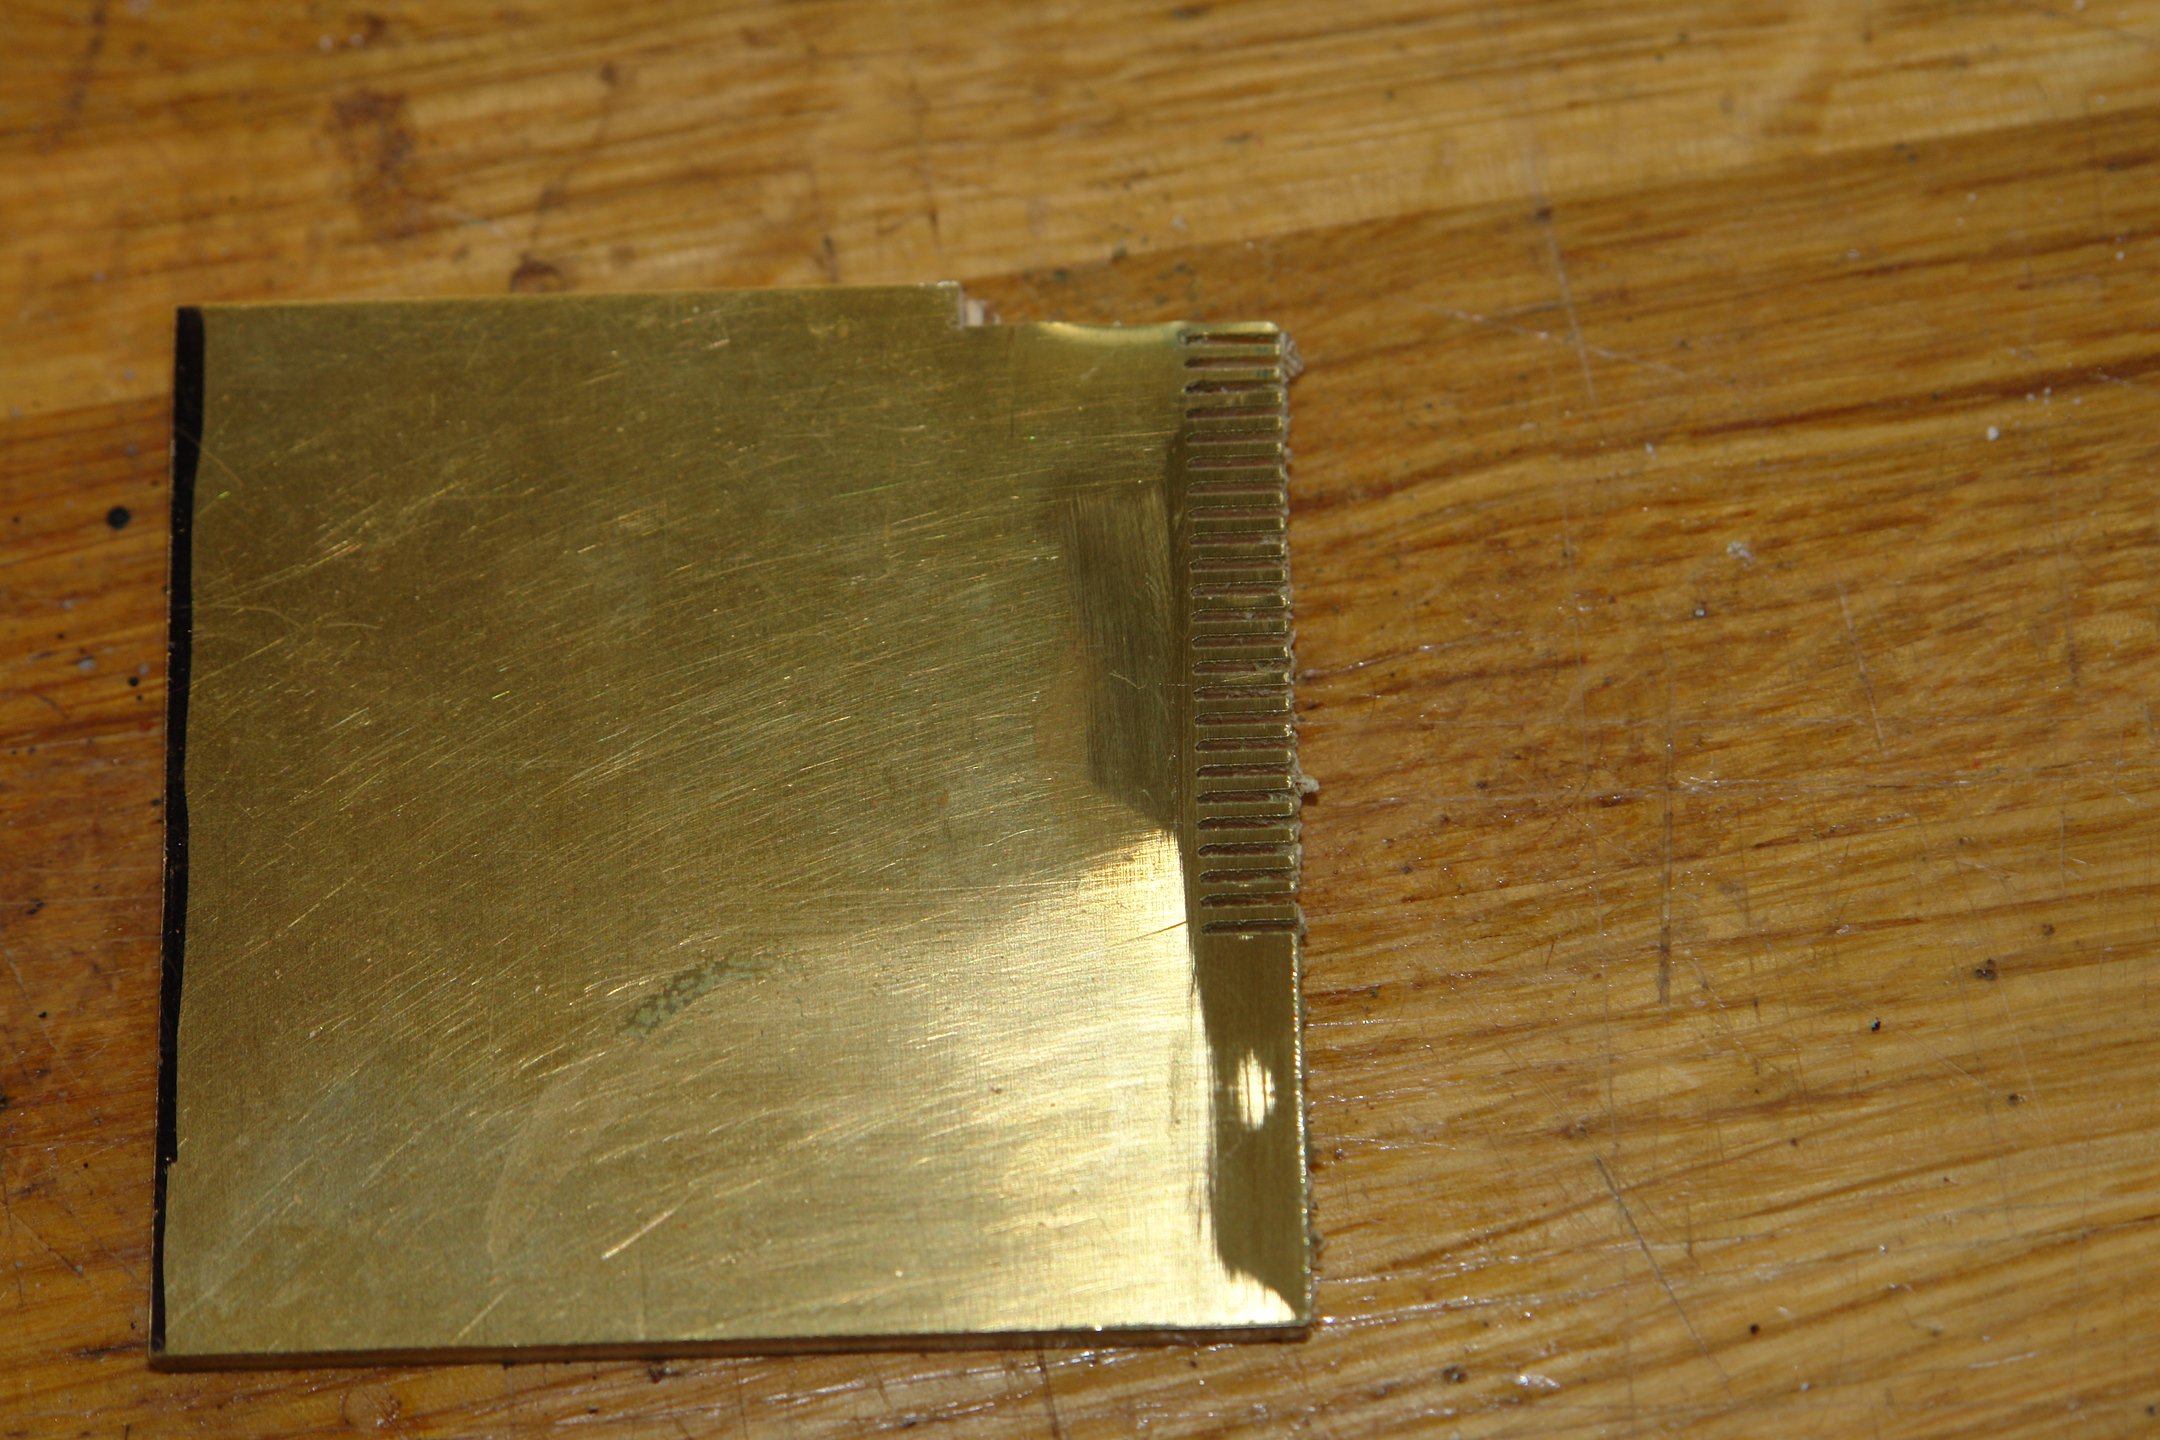
I started with a little jewellery saw practice. The first efforts weren't really up to scratch. It may take some time but with a little more care I think I can make a reasonable job of cutting the brass sheet.
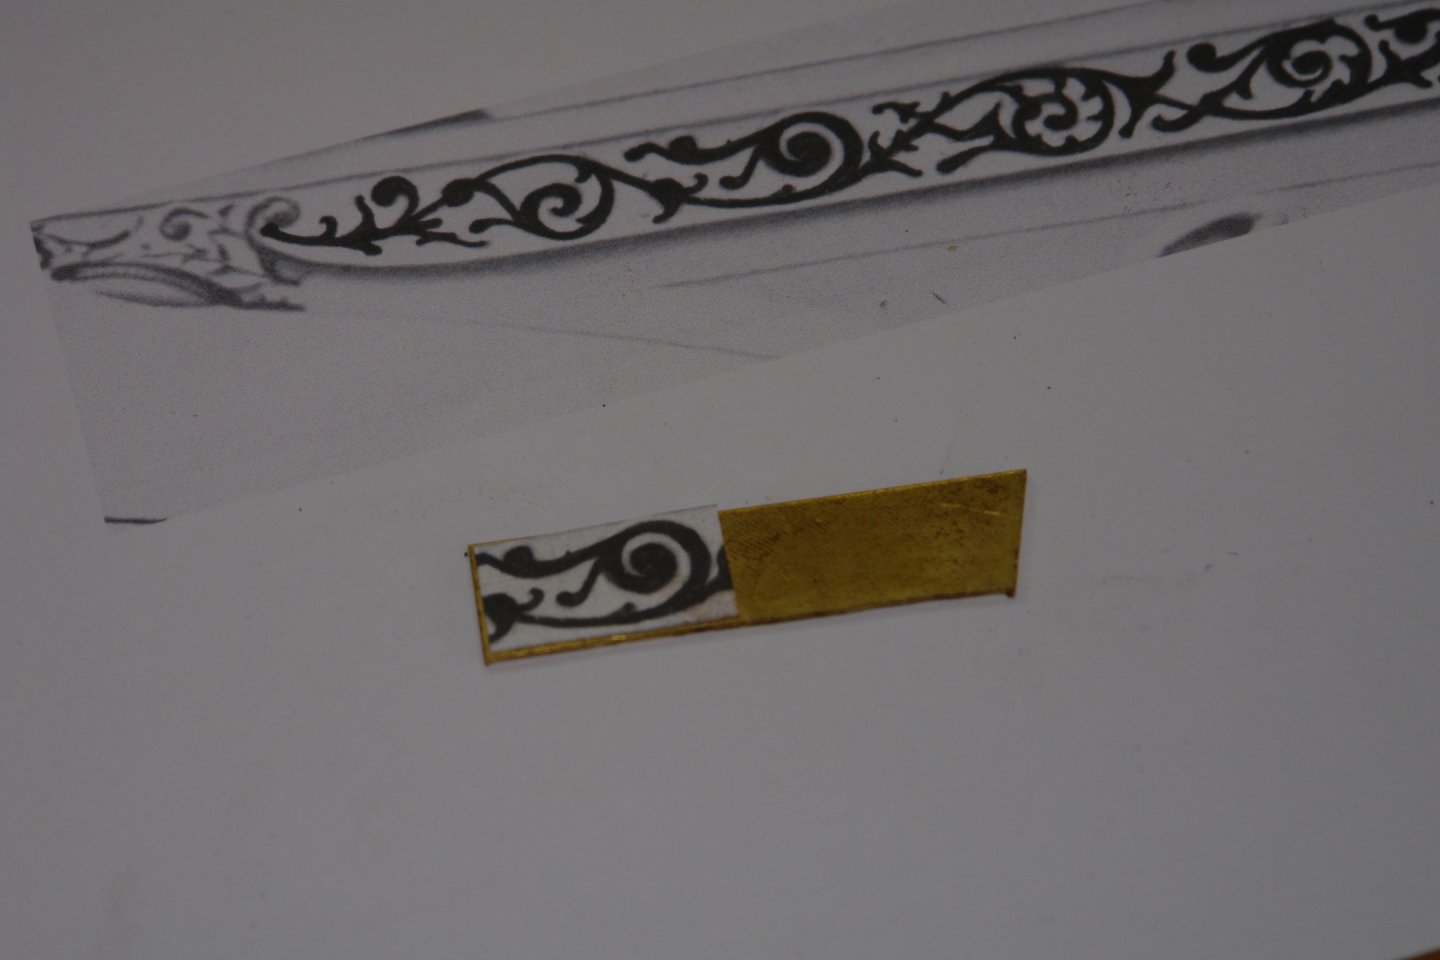
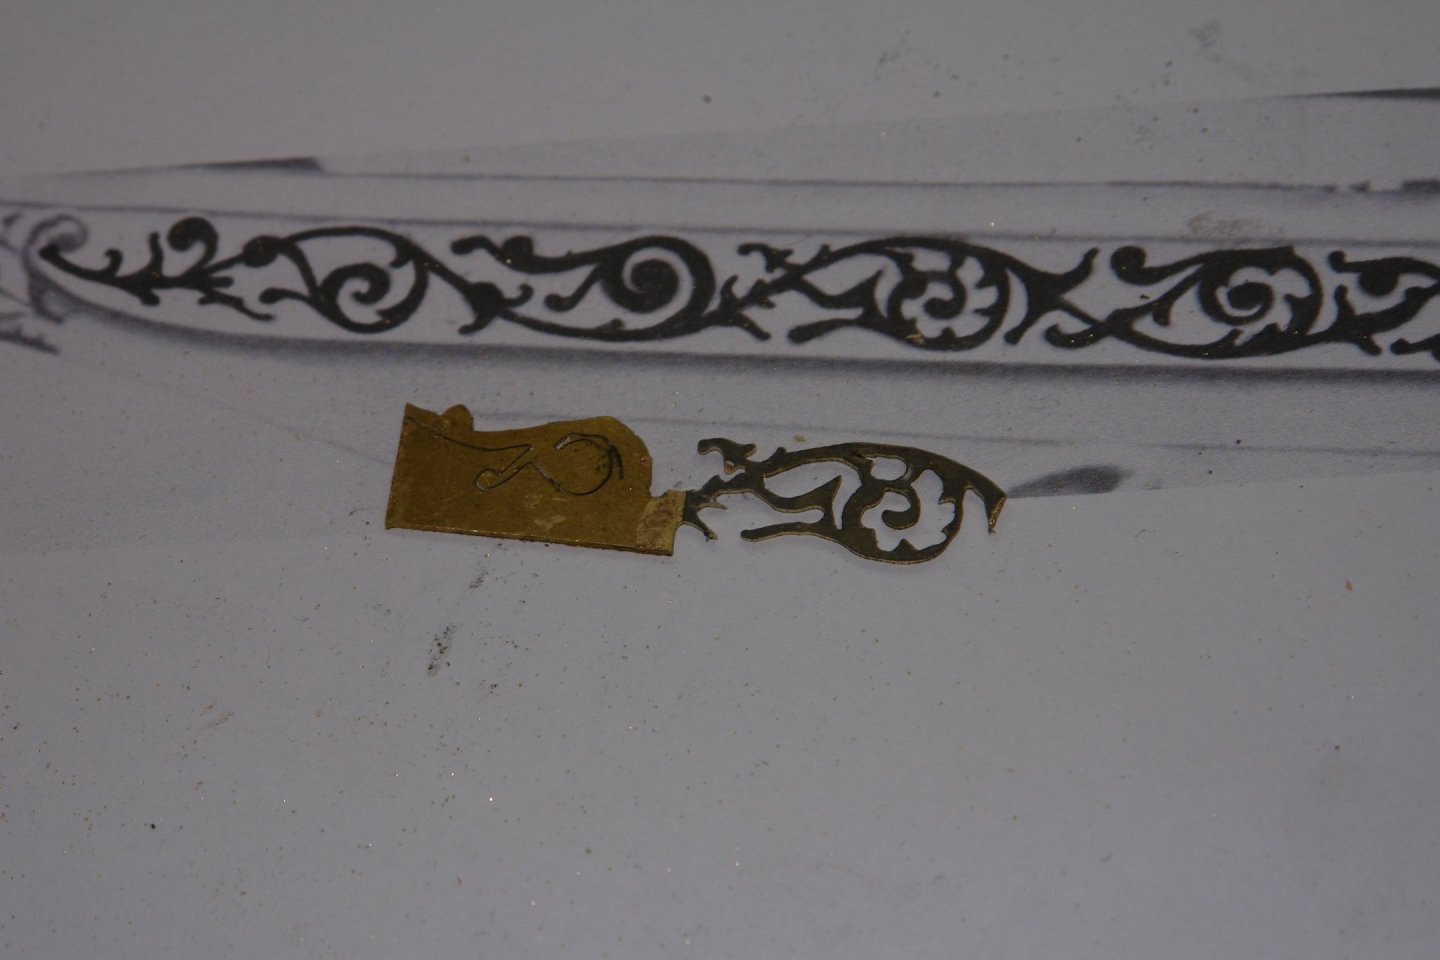
I think its going to take quite a few hours of sawing.
- gjdale, FriedClams, Paul Le Wol and 11 others
-
9
-
 5
5
-
On 10/19/2024 at 10:17 PM, Ian_Grant said:
Tore off the foredeck (while saving all the brass bollards, cleats, etc) to reveal things that I had forgotten......
I hadn't realised I was also signing up for an archaeology thread.
- Glen McGuire, mtaylor, Canute and 1 other
-
 4
4
-
On 10/19/2024 at 7:37 PM, wefalck said:
I have not so nice mermories of having to clean out the blocked sewage system on a sailboat.
Eberhard - Yes we have all probably had that pleasure. I always marvelled at how many poorly designed WC systems were installed on otherwise well designed boats e.g. :-
The toilet pump changeover switch was always positioned where misdirected urine was bound to land.
The pump was invariably plastic and held on by 4 small screws on a fairly narrow mounting base. It flexed alarmingly and felt like it was going to come off in your hand.
The pump seal always leaked and invariably squirted brown water over the handle.
The seat was invariably loose and the fastenings were invariable corroded and inaccessible.
- FriedClams, mtaylor, Retired guy and 3 others
-
 6
6
-
13 hours ago, Javelin said:
open a pipe to the sea below the waterline.
Yes Roel - that's why I would have the strainer inboard oh the seacock. I have pulled many a log from below the waterline to clear the impeller of weed. They all come with a bung tied to the housing so it is handy to plug the flow.
-
14 hours ago, Dr PR said:
too large for the hose on my portable vacuum cleaner.
I found a bit of corrugated pipe off an old vacuum cleaner that was the right external diameter to go inside the port and had an internal diameter that matched my shed vacuum cleaner. I find it works reasonably well at extracting the dust.
I should add the "spring ' handles that clamp the disc sander table broke soon after purchase. I replaced them with a couple of Allen bolts which I find are actually easier to use.
I find 5" discs are hard to get so I buy 6" which being more common are usually cheaper.
-
On 10/18/2024 at 7:12 AM, Dr PR said:
I looked around and found the Harbor Freight #69033 sander.
I also have one but I'm not quite as happy as you are Phil. The guard around the disc mounts on the pressed metal base and the work table mounts off the guard. As a consequence I find the table flexes quite easily. My belt sander made hell of a racket out of the box because the drive and idler wheels were eccentric. I had to take them out and re-machine them. I also found it beneficial to machine out the slot on the disc sander work table to accept the mitre gauge off the Byrnes table saw, the supplied gauge was pretty poor. I find the stick on sand paper discs are awful to get unglued. I usually revert to removing the disc and soaking it in a bowl of white spirit for 20 minutes. This however involves a fairly time consuming strip down. I think it is ok for infrequent use but I would like to find something better.
- Ryland Craze, Canute, mtaylor and 1 other
-
4
-
-
-
3 hours ago, Javelin said:
Then I float the hull, 12kg (=26 lbs), followed by installation of trays with lead ballast and the battery. Lastly I mount the hatch and accommodation (in that order).
Roel - How much does she weigh fully rigged? I have seen a number of launching frames constructed from plumbing materials, old bicycles, baby carriages etc etc.
- mtaylor, Keith Black, FriedClams and 1 other
-
4
-
18 hours ago, Louie da fly said:
s. Fortunately, a member of my local modelling club put me onto a paint that actually does the trick - not just like yer usual 'silver paint' look, but actual chrome.
Are you going to let us in to the magic paint secret Steven? Good to see more progress.
-
20 hours ago, wefalck said:
These grilles are probably cooling water intakes
10 hours ago, Dr PR said:They also prevent critters from crawling in and setting up house while the vessel is in port.
Eberhard / Phil - thank you. I figured they were inlets but nevertheless I thought they might be prone to blocking with debris such as plastic bags. If it were me I think I would do without the grille and compensate by including a strainer inboard of the sea cock. Much easier to clear blockages when dry and warm.
Thank you Gary.
- Keith Black, FriedClams, Mark Pearse and 1 other
-
4
-
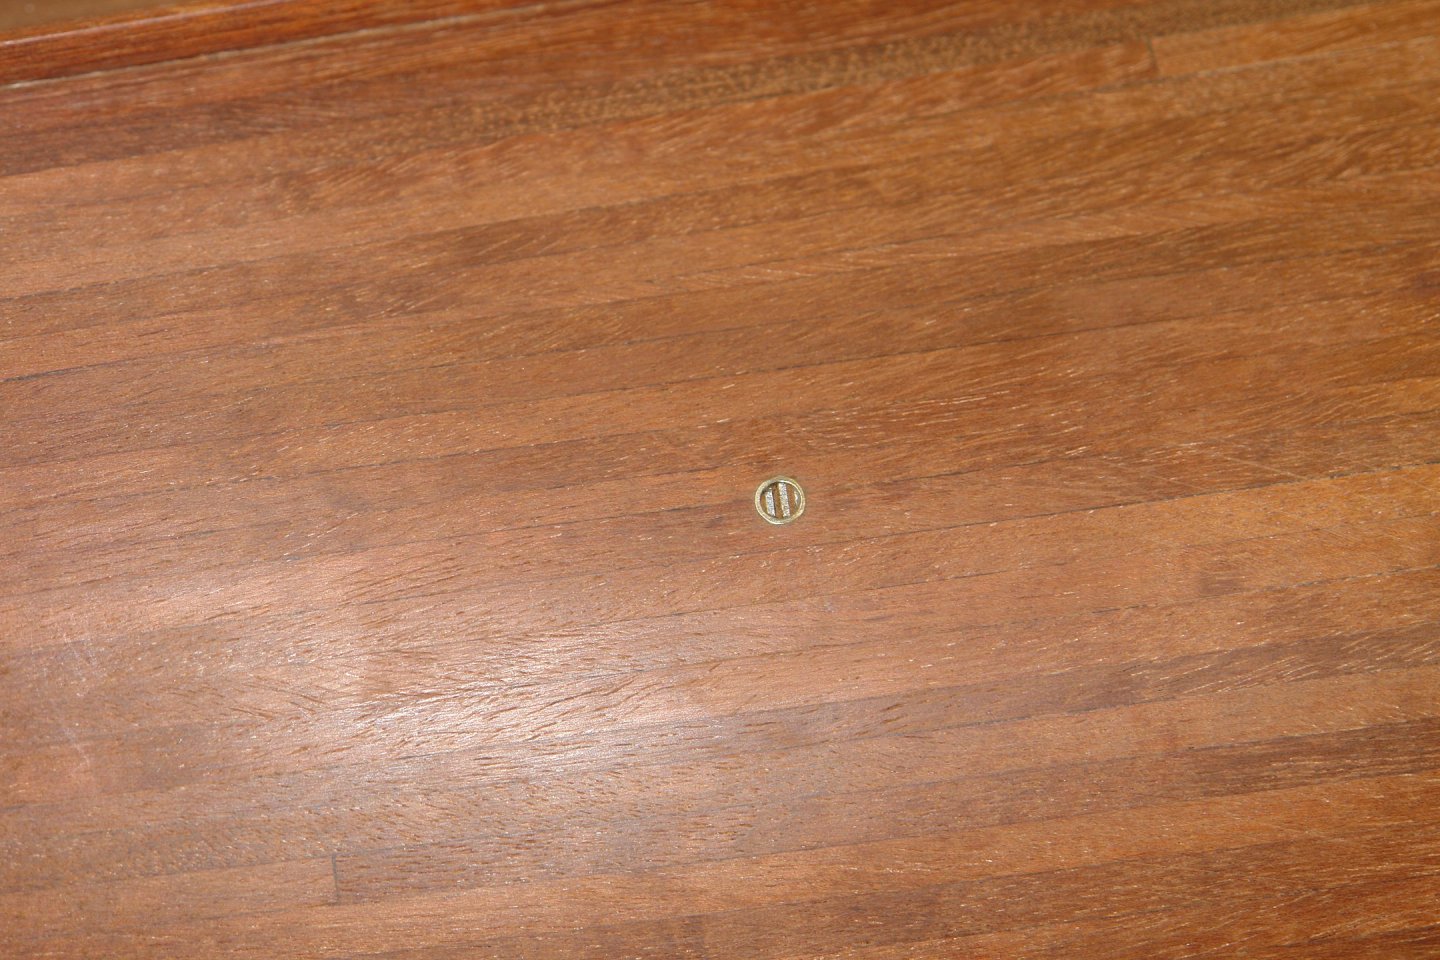
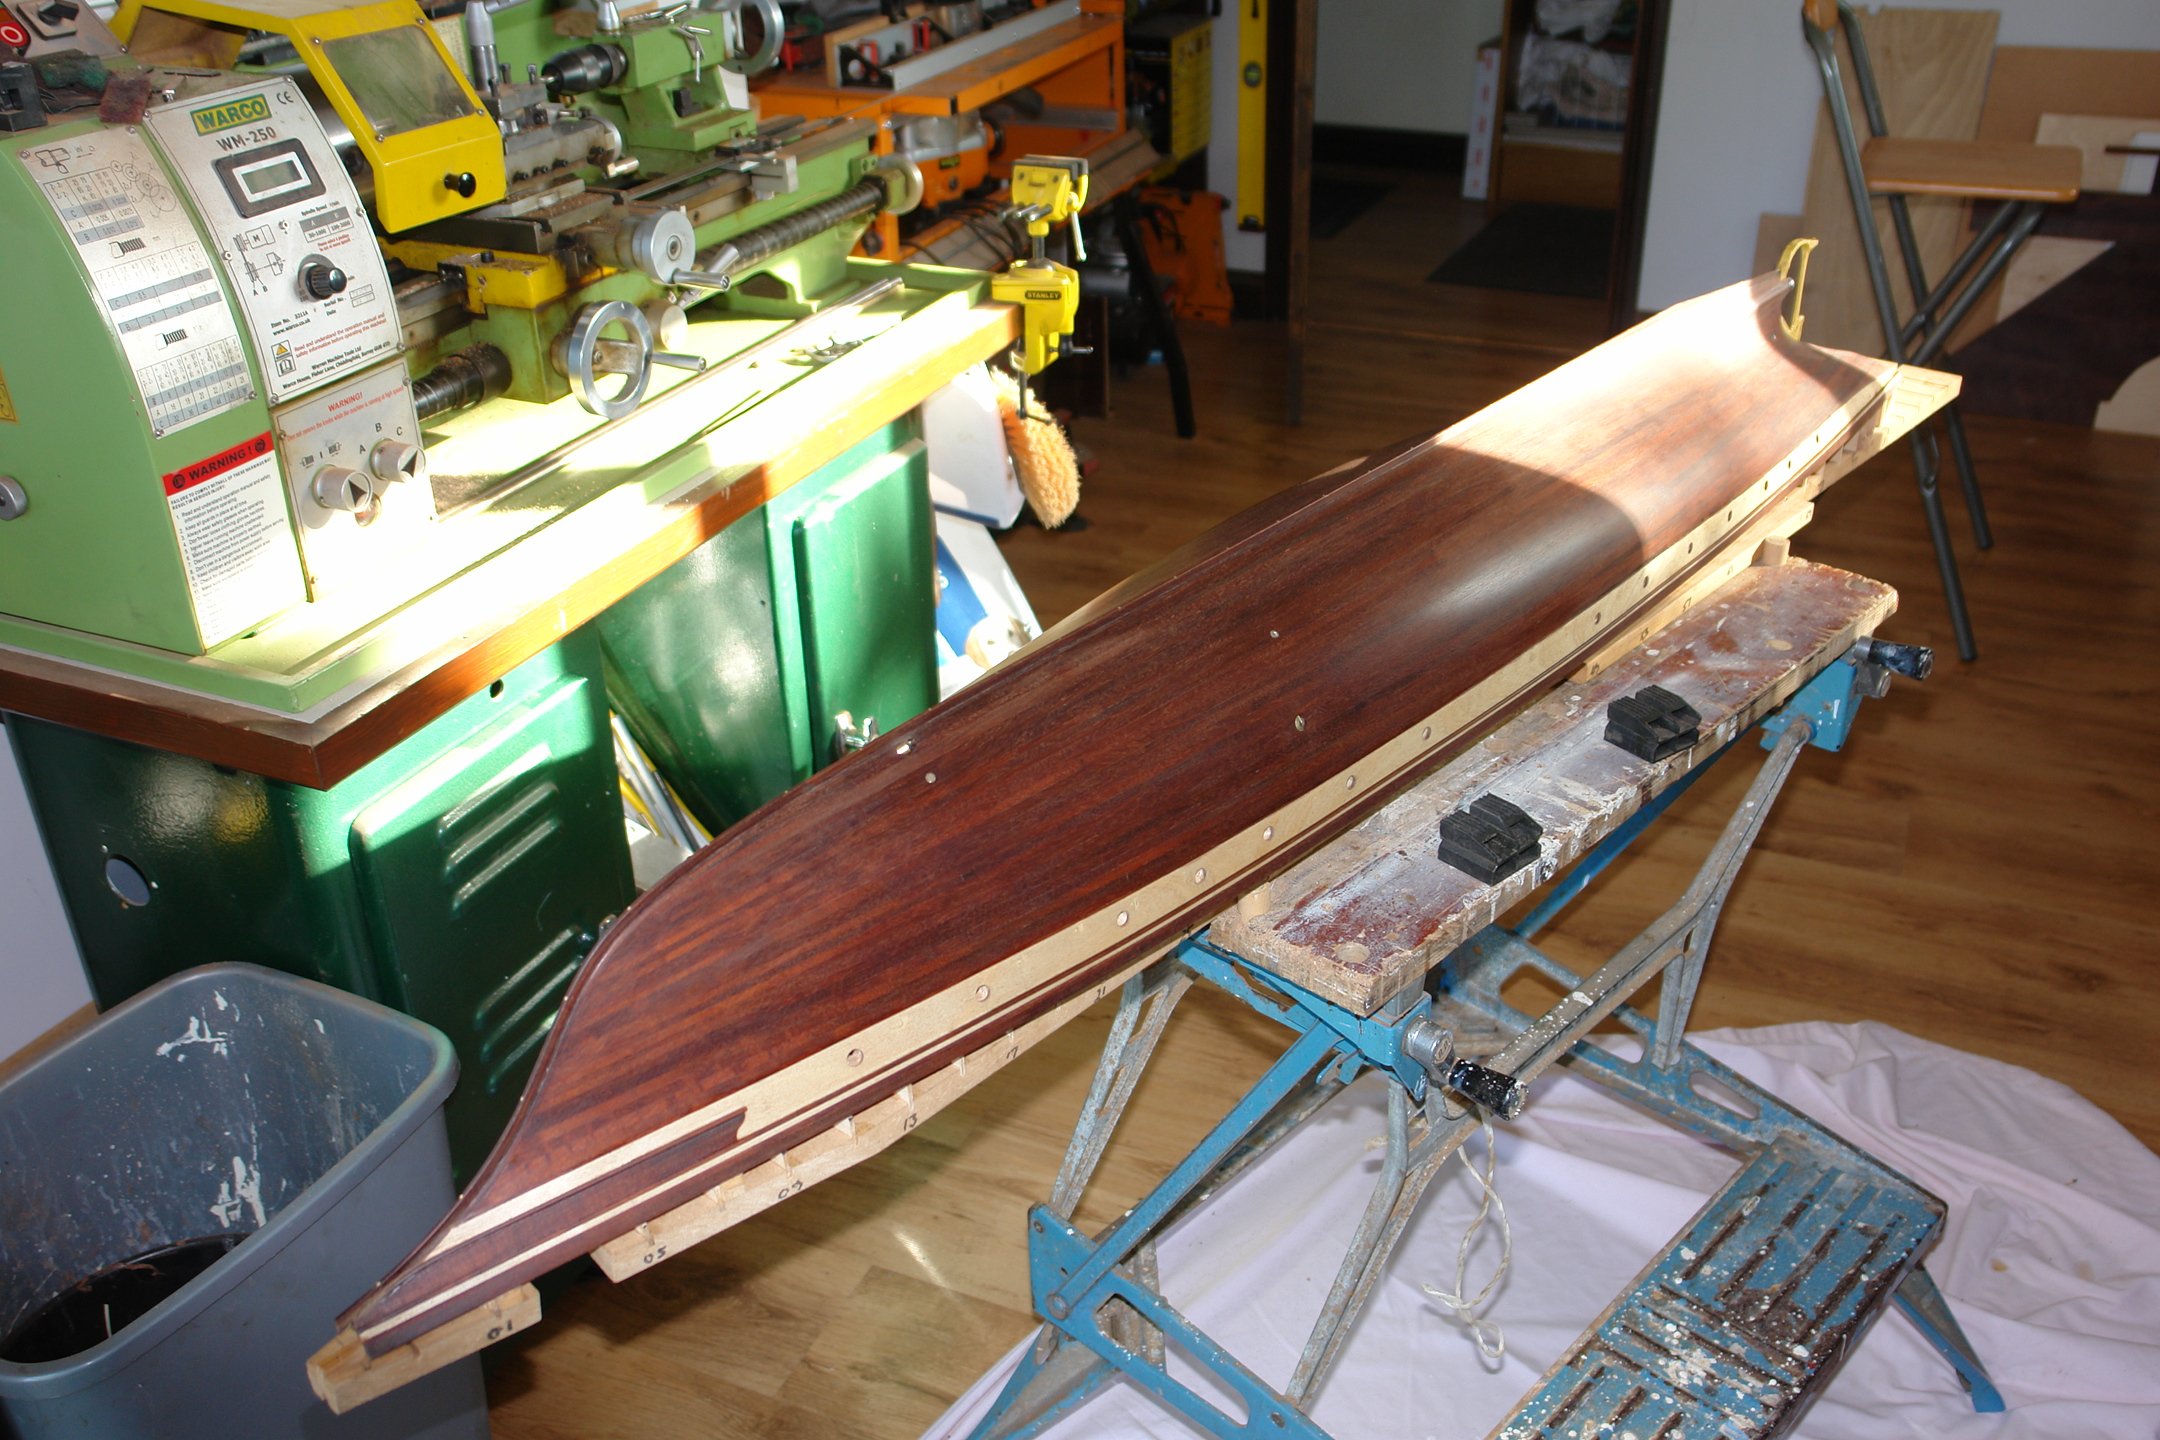
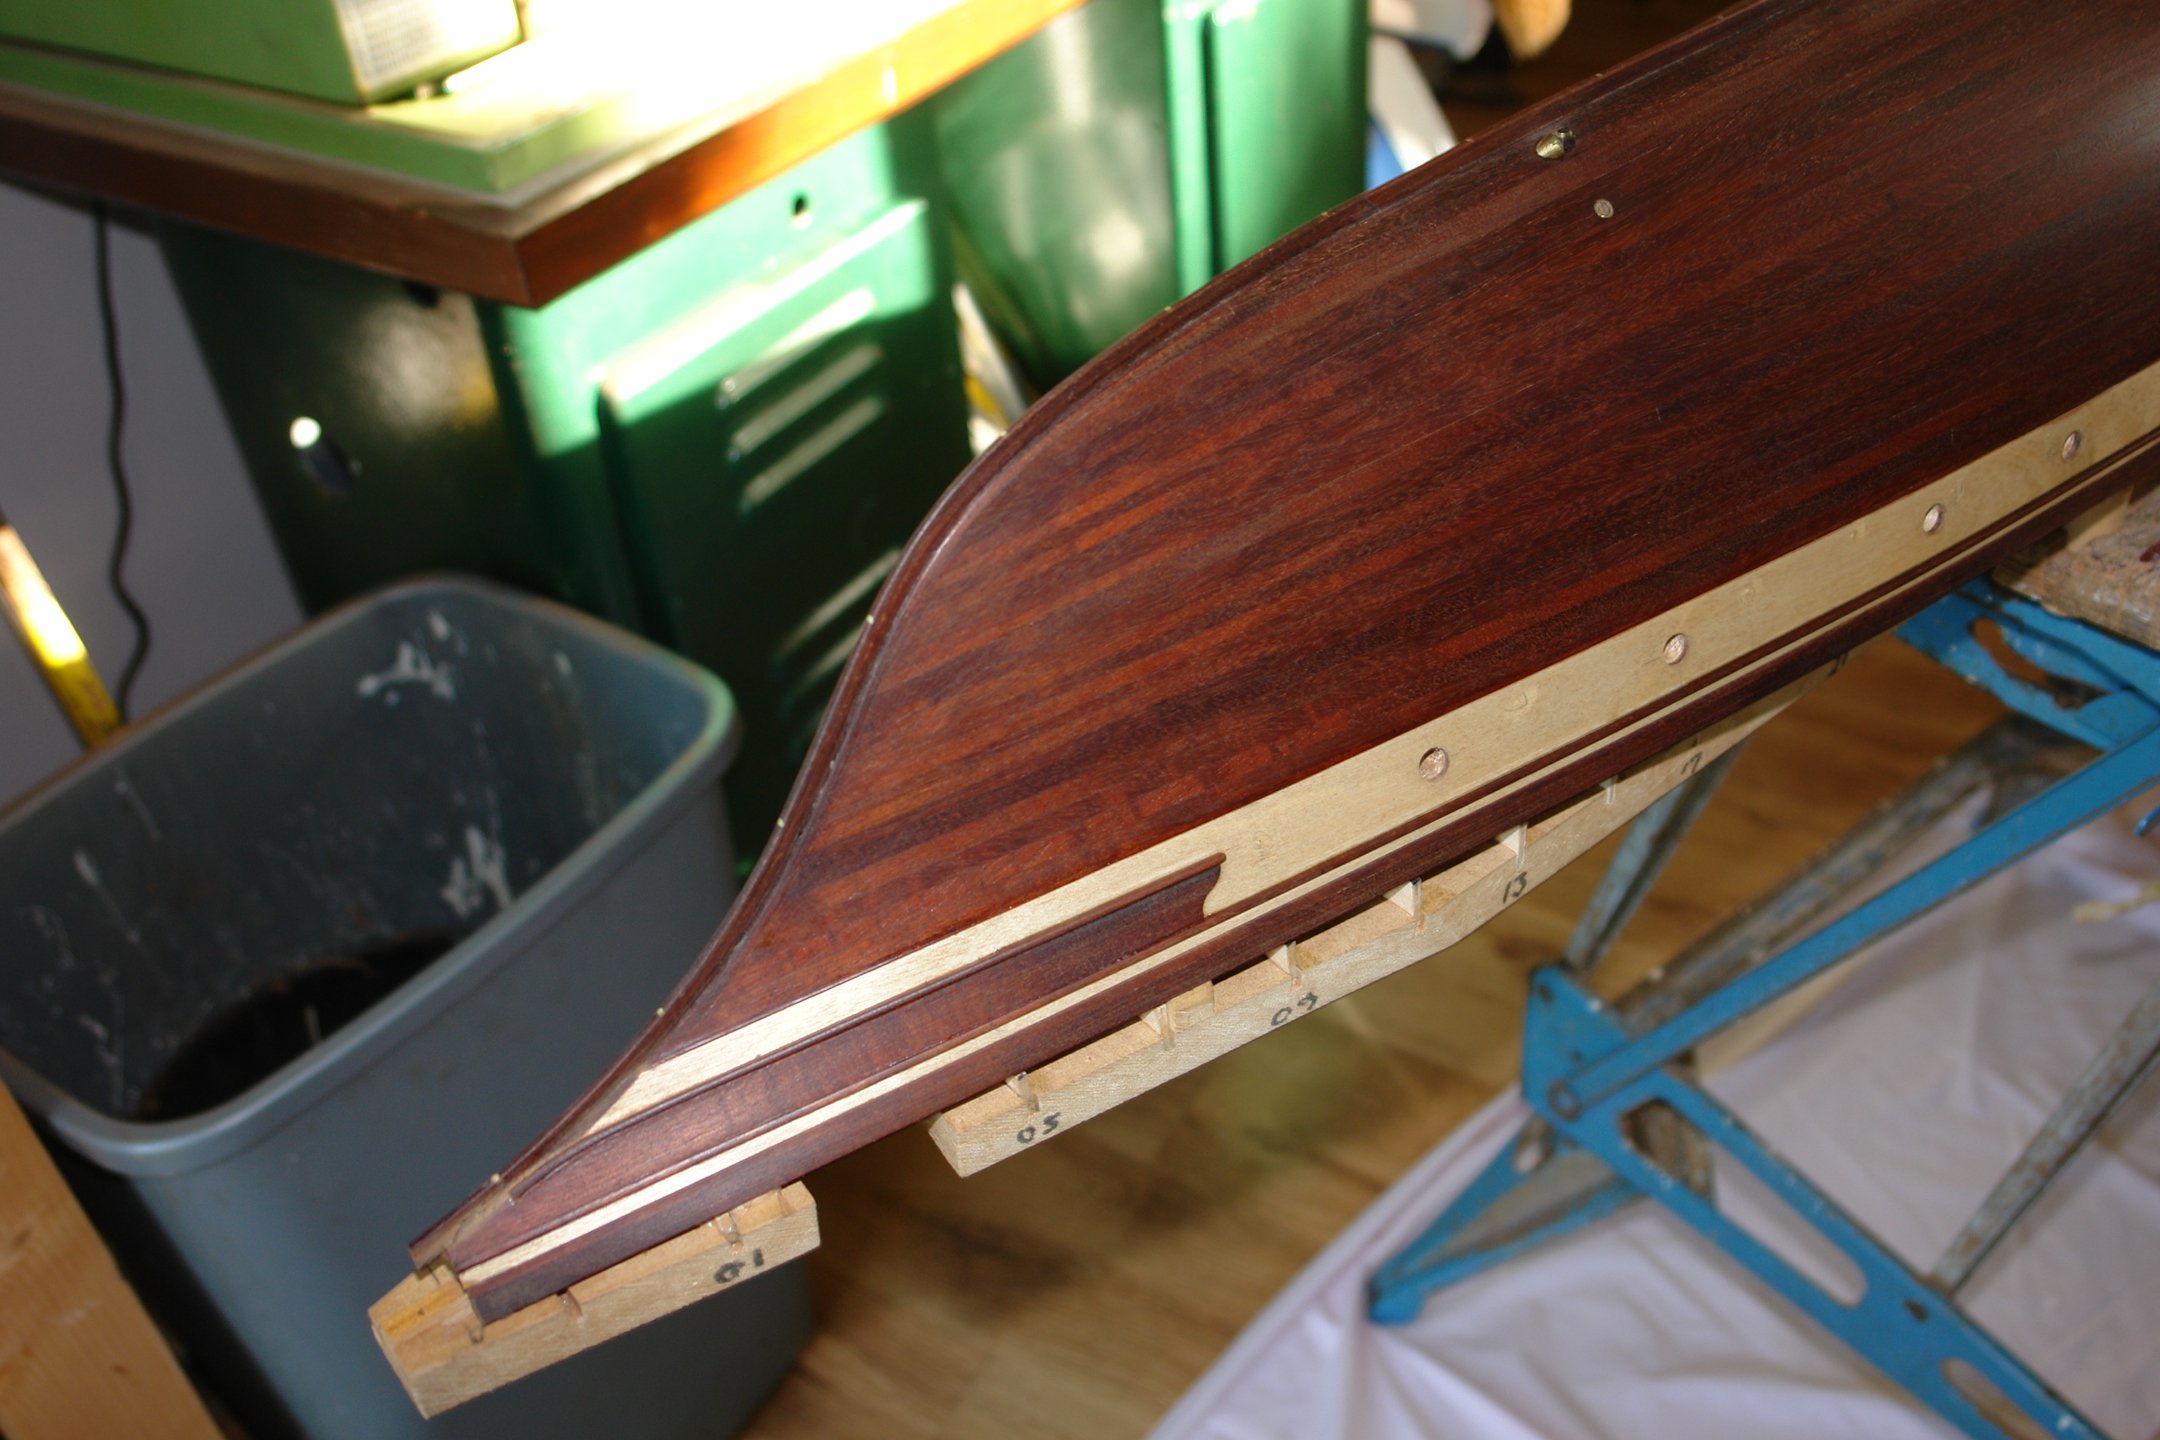
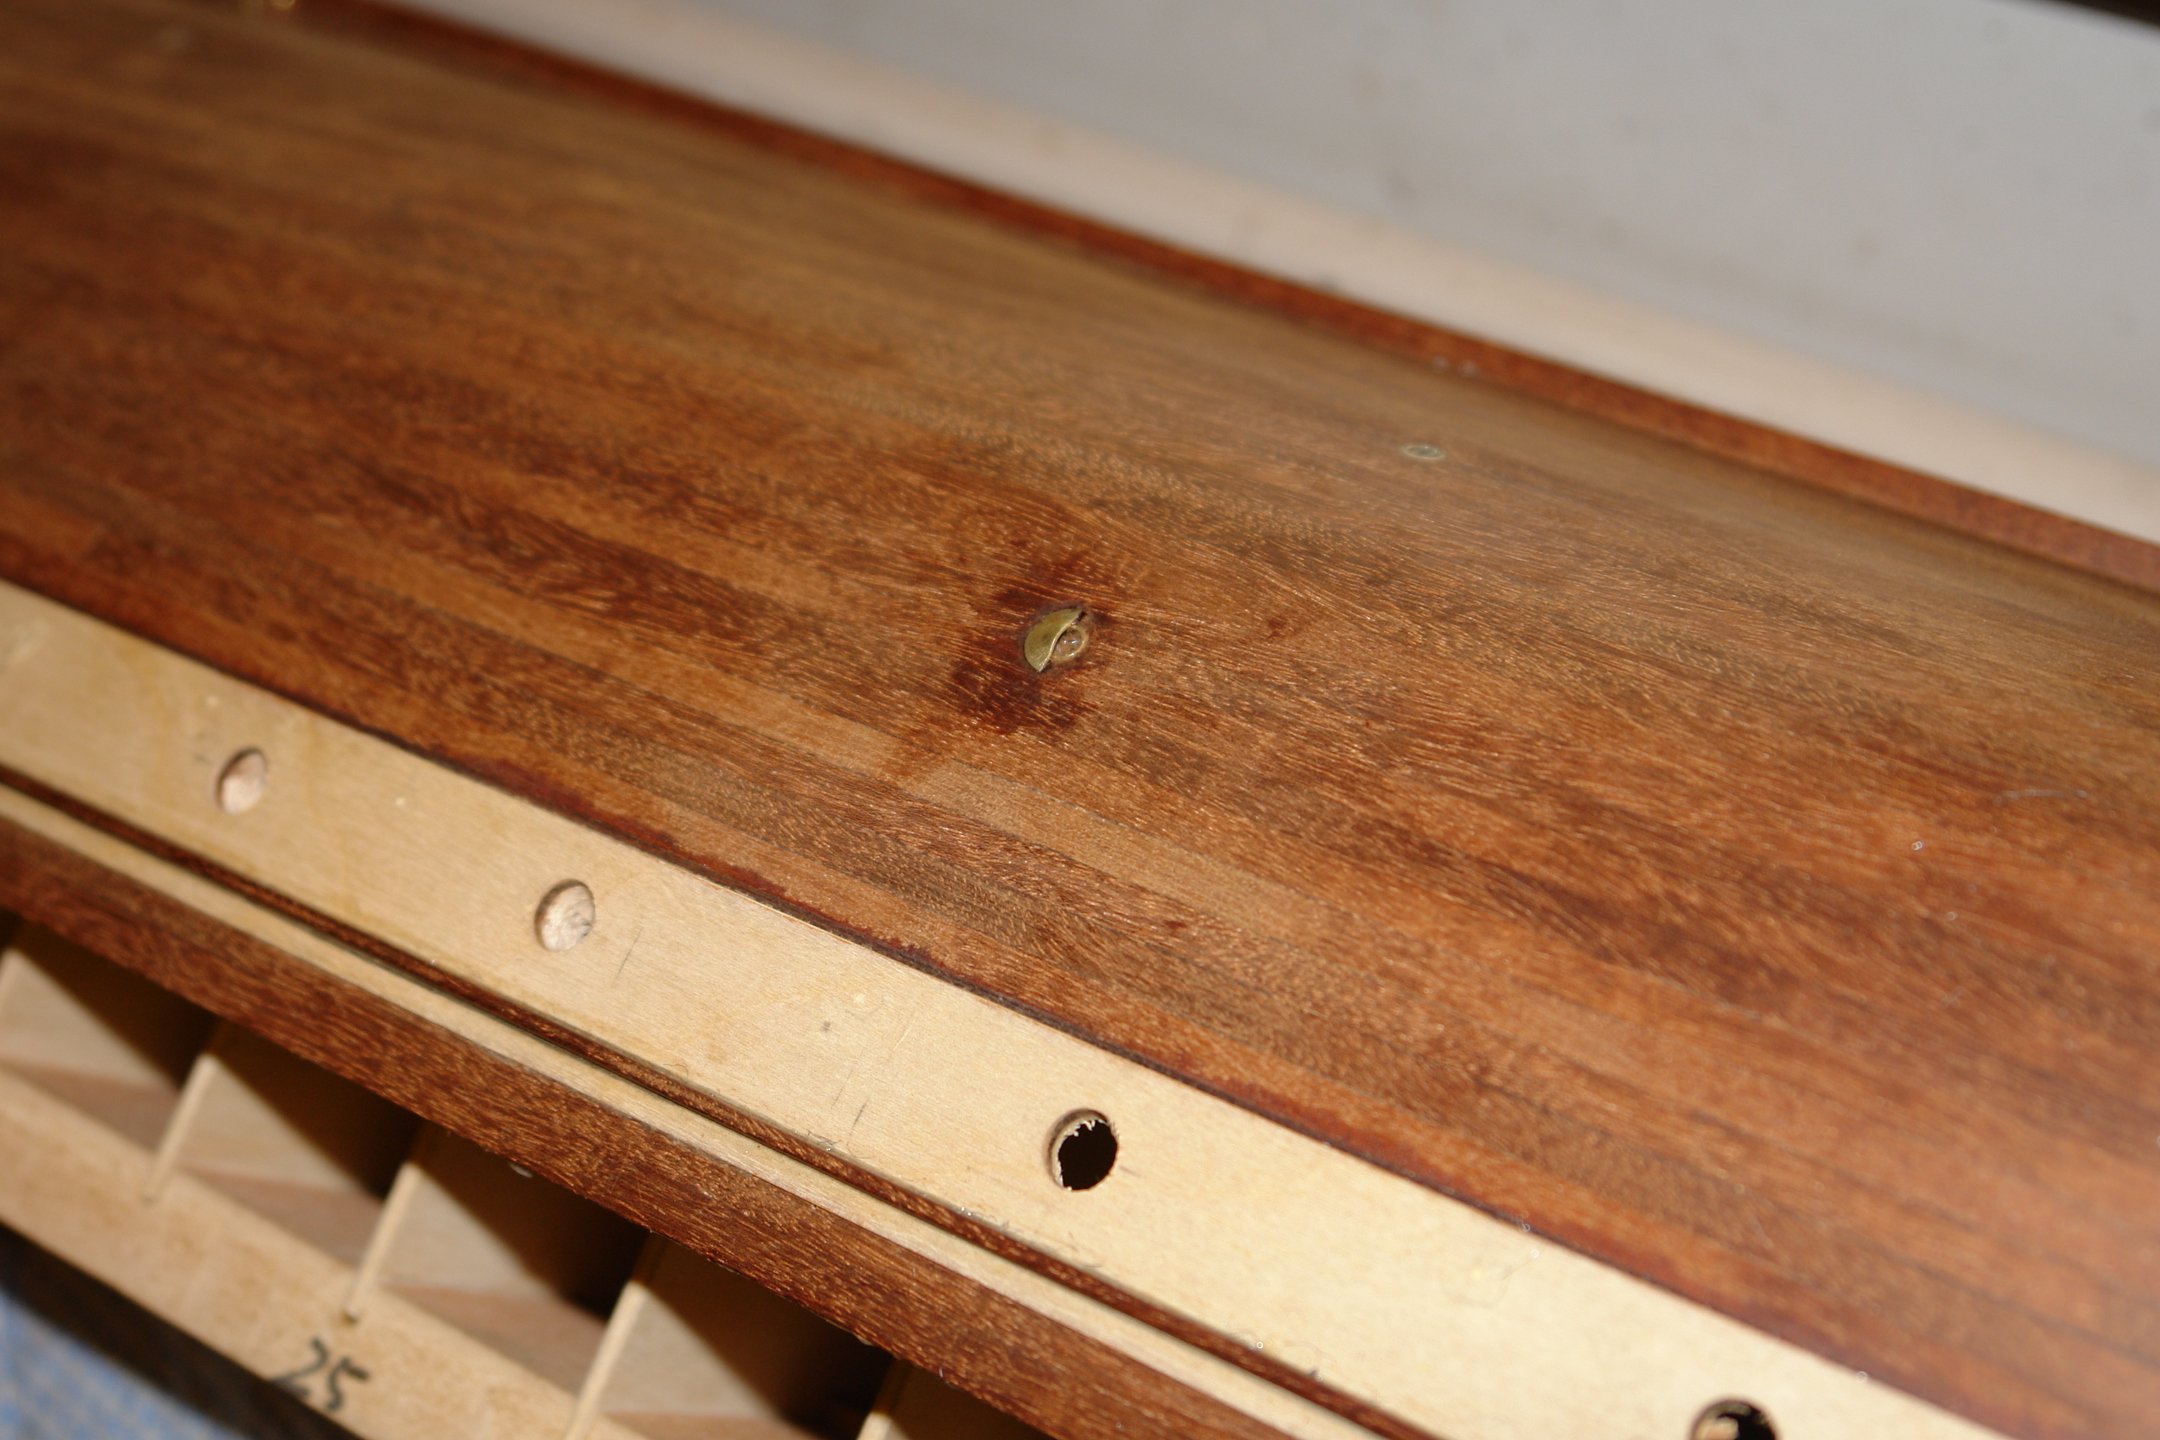
Before the painting marathon there are a few hull penetrations to take care of.
Various drains have various grilles and that odd feature next to the keel also needs to be created.
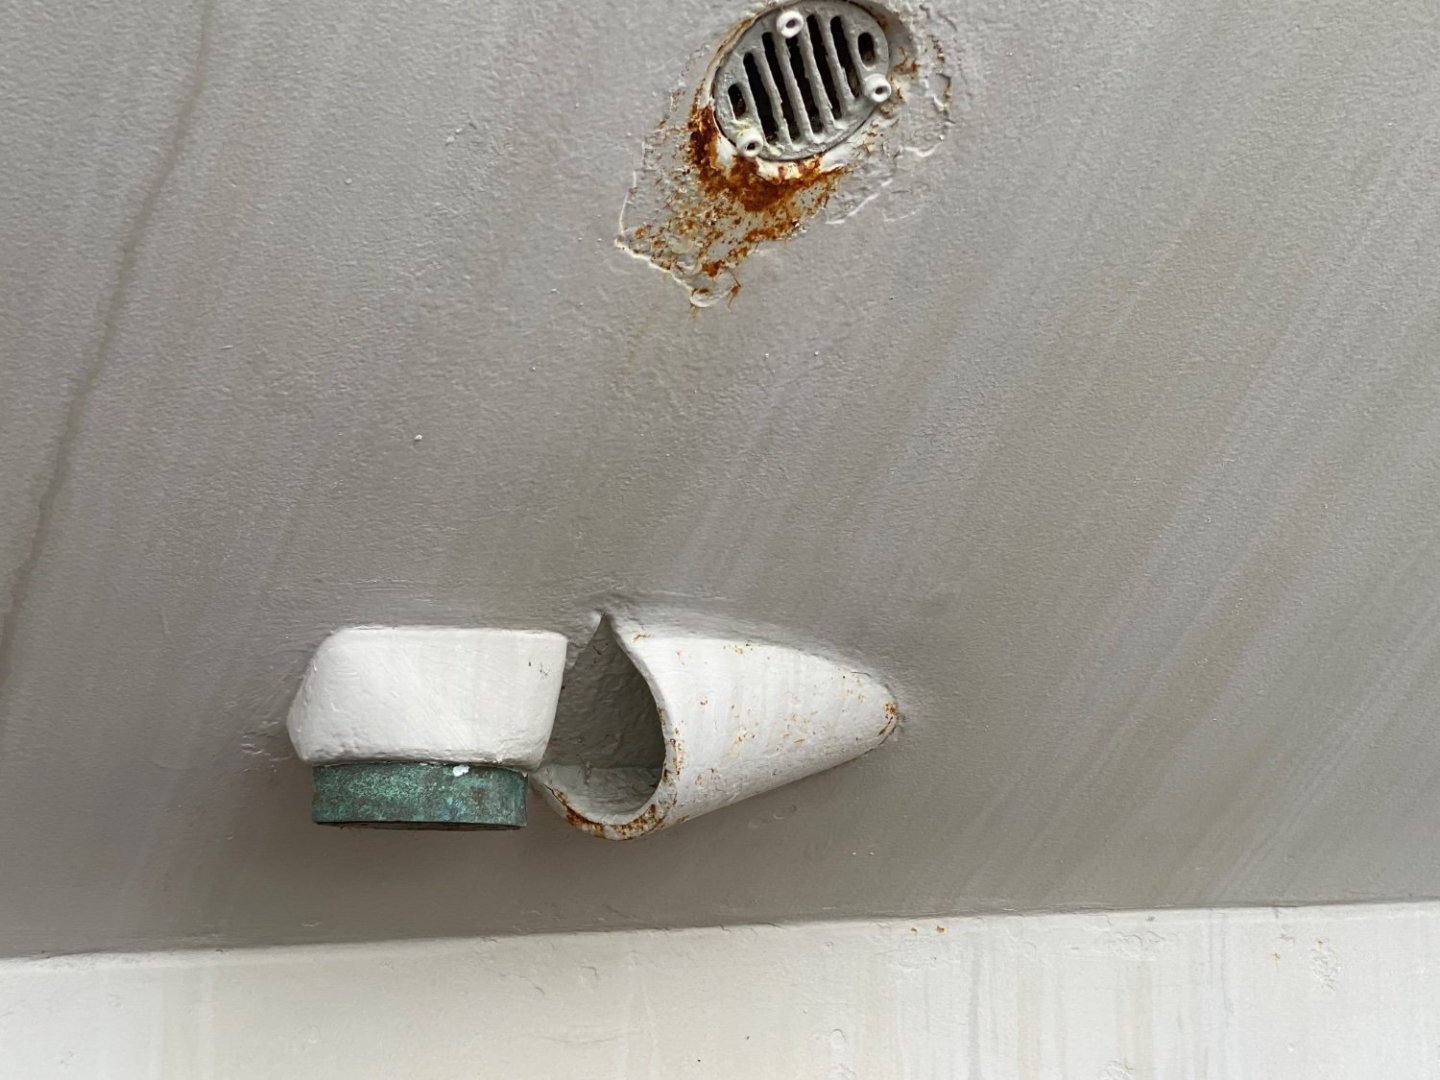
Some of the grilles have clearly been made by the local blacksmith - notice the randomness in the sizes and pattern of the holes.
I am really not sure why the grilles are required at all (I guess someone will know).
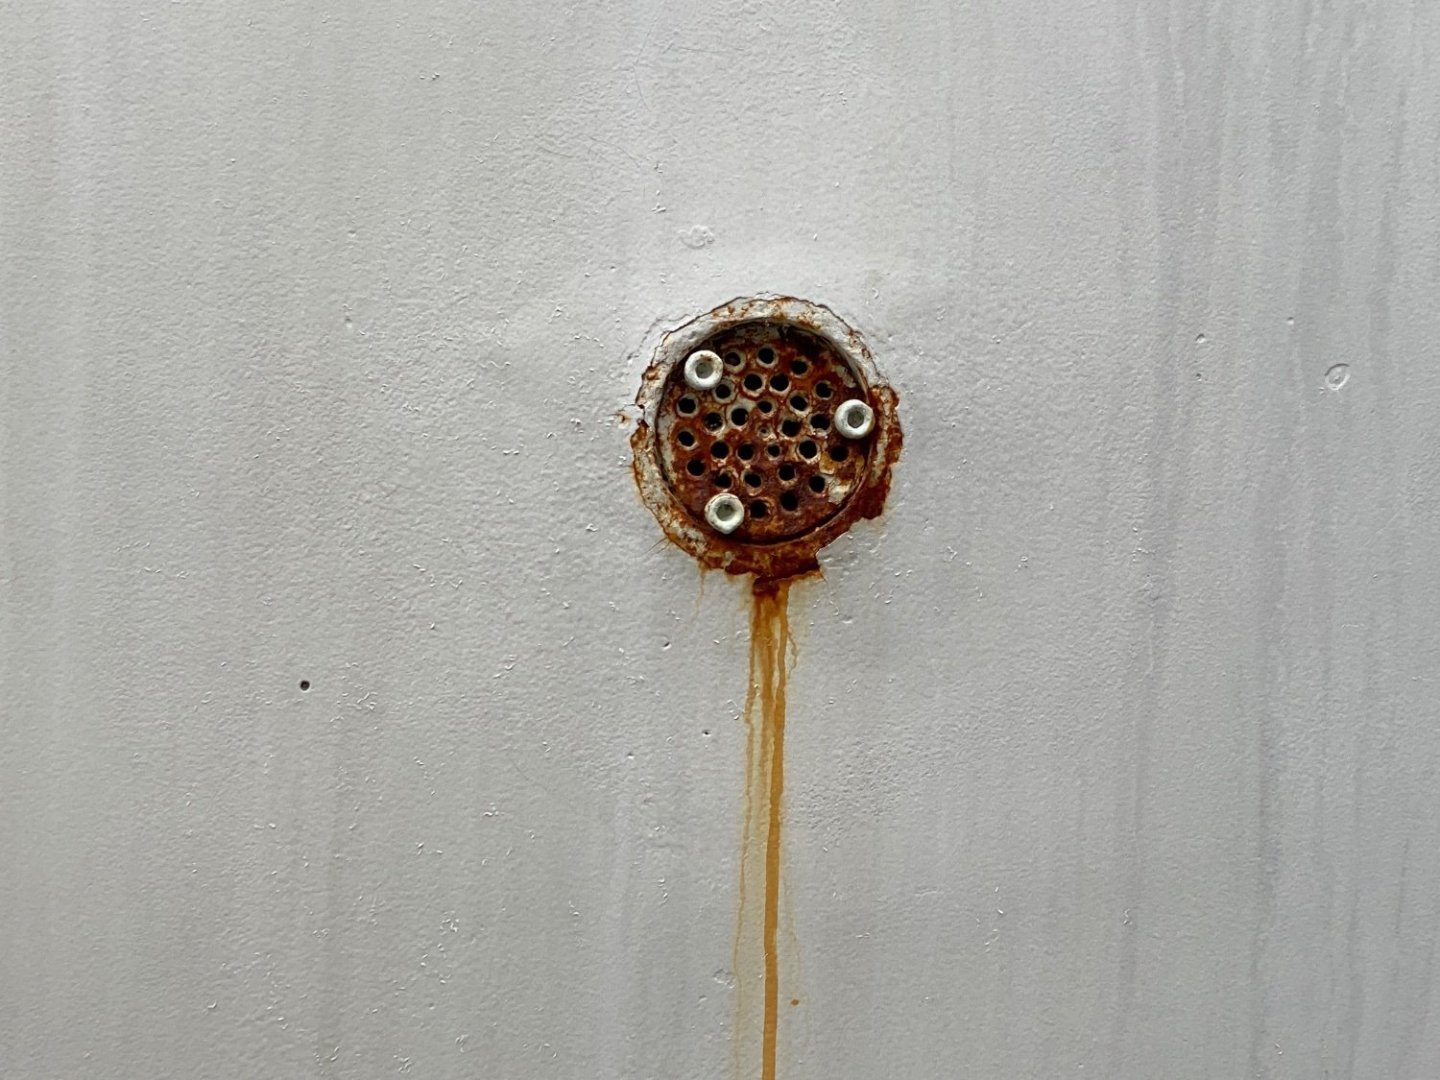
Here is yet another odd below the water line feature.
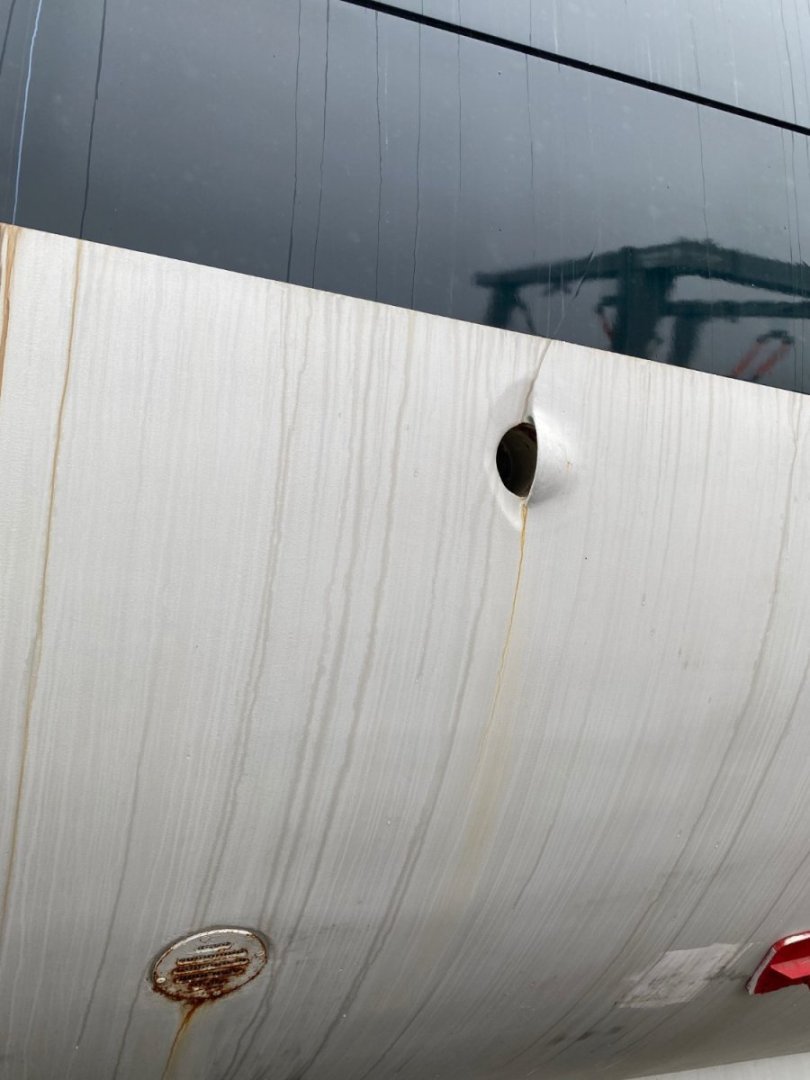
Getting the correct positions for these holes was quite an effort, sorting through lots of photos and trying to judge the actual position by following the water streaking down the hull relative to the portholes. "Highly scientific".
Anyway after a couple of days checking and cross checking I was sort of satisfied with positioning and transferred the positions to the hull using my trusty laser level.
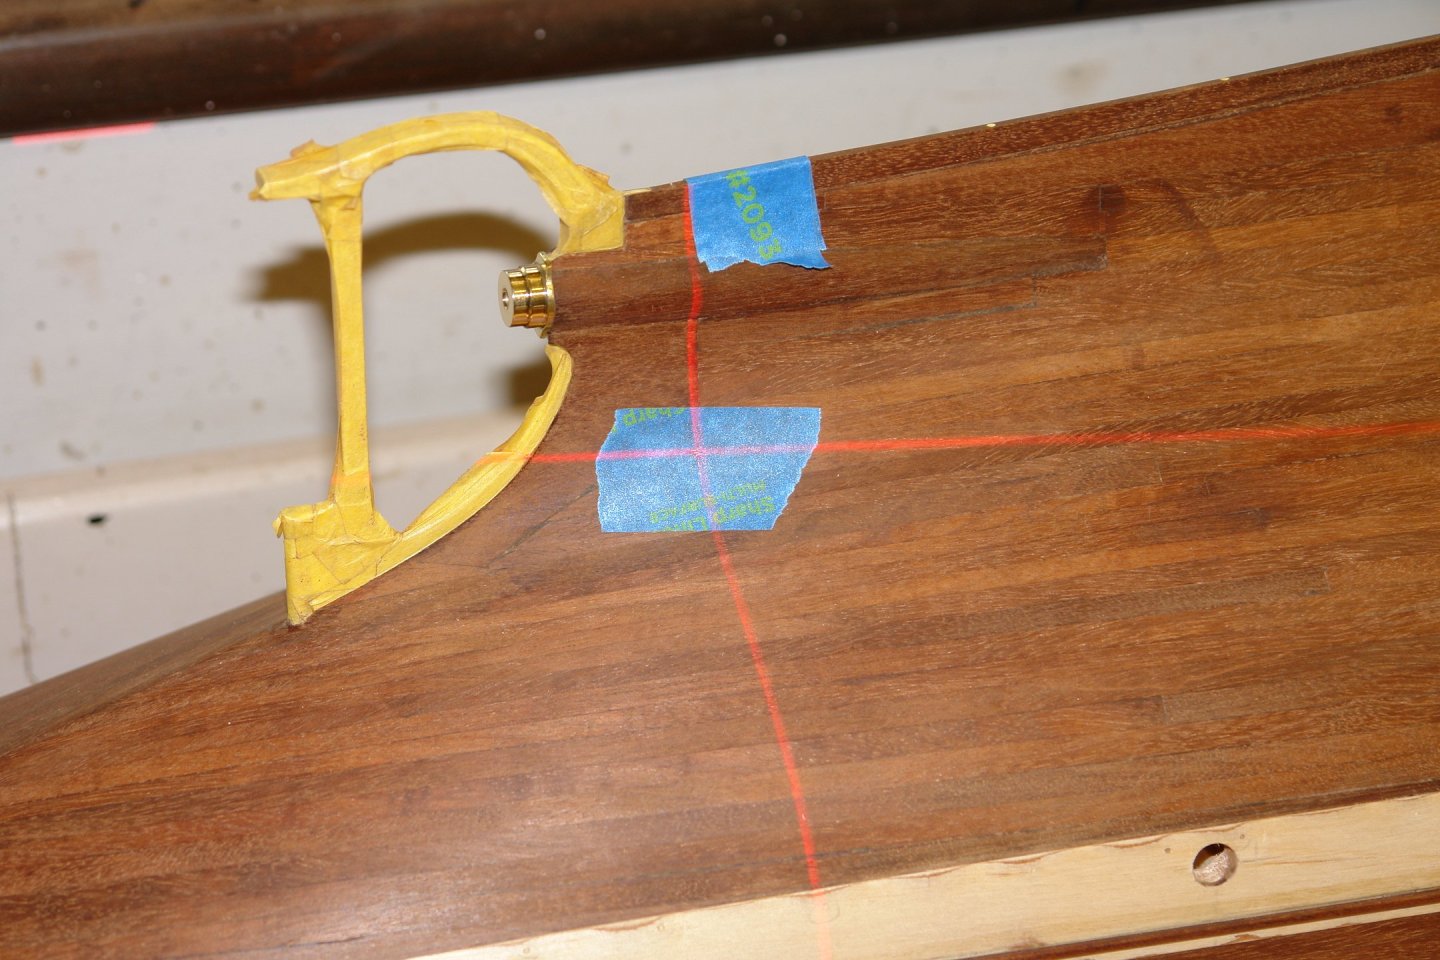
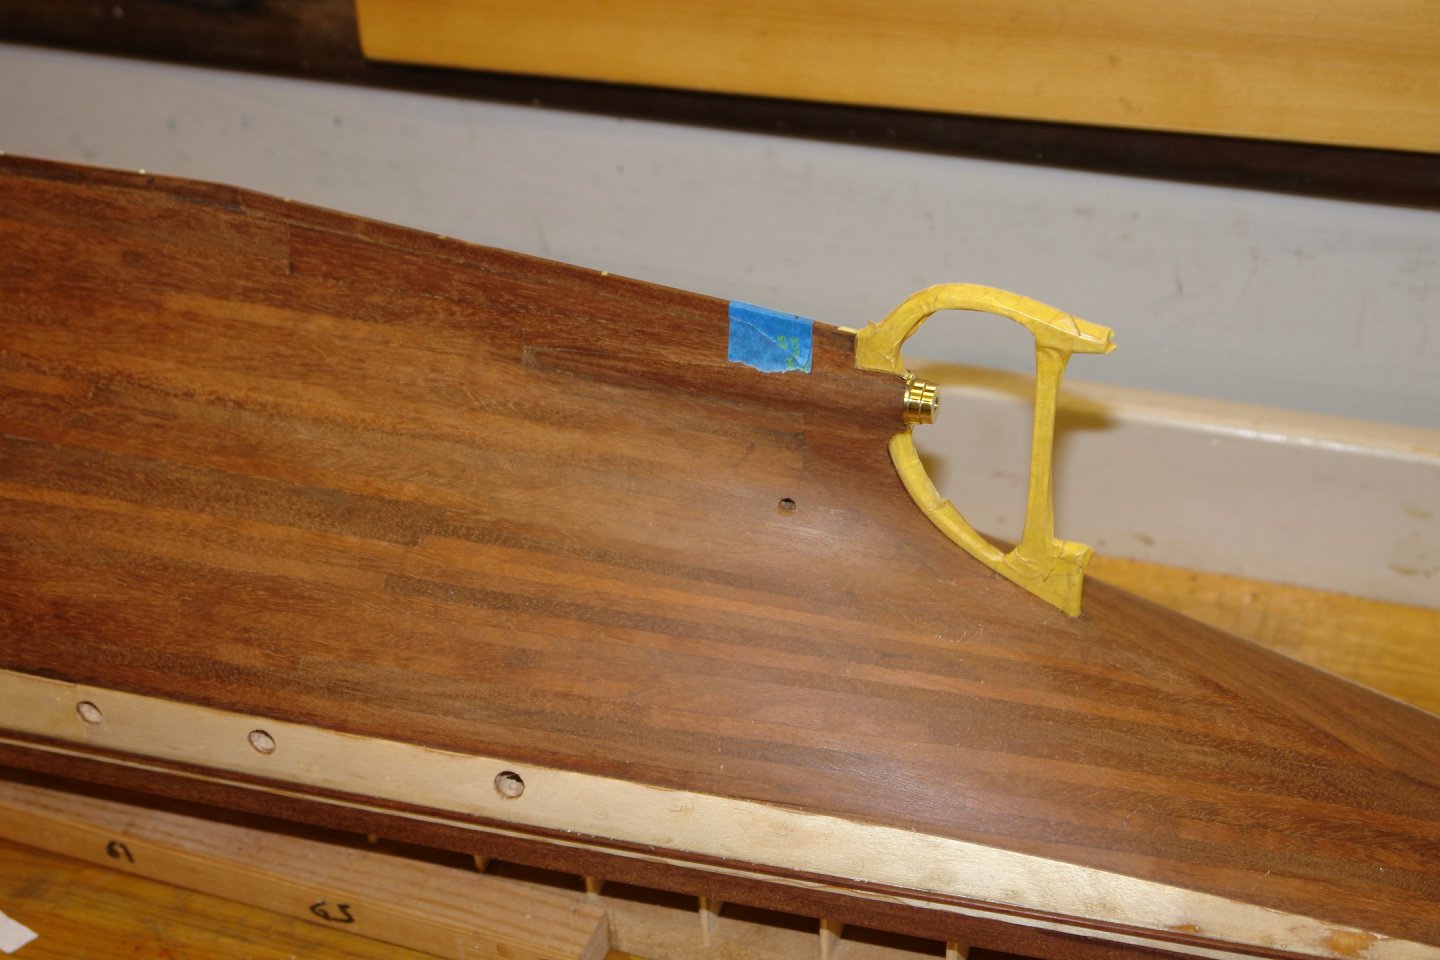
The first attachment was the up-stand for that odd feature (depth sounder?) near the keel.

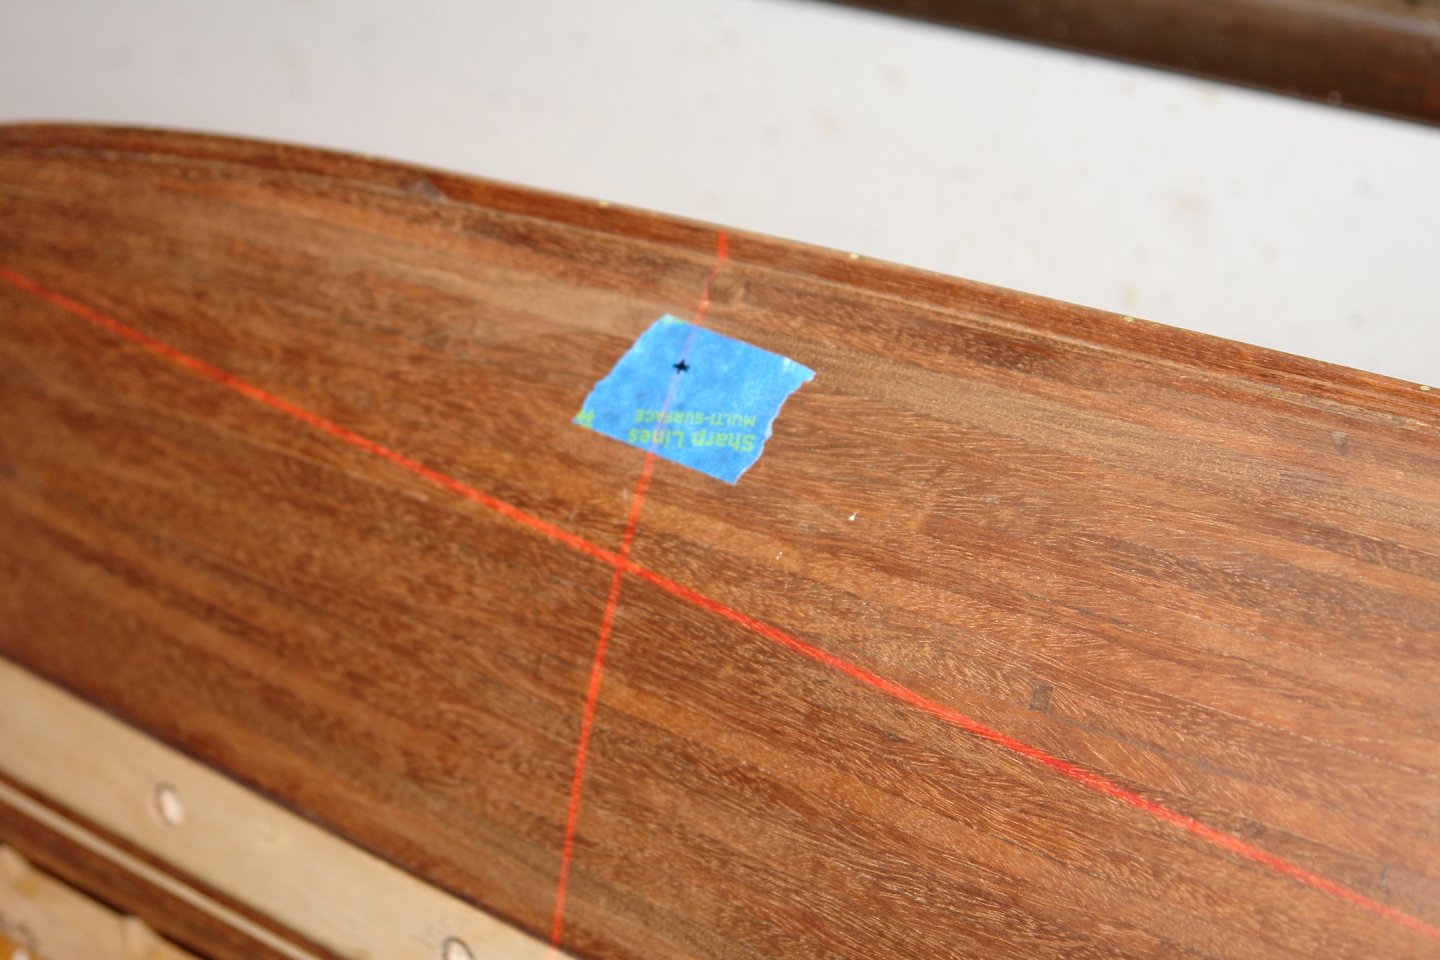
Not much to show for a couple of days of dithering over many photos.
- Retired guy, mtaylor, yvesvidal and 6 others
-
9
-
The hull is looking very sharp, good job craig
- mtaylor and Keith Black
-
2


Biscayne Bay Sailing Skiff by Reverend Colonel - 1:24 - SMALL - made from a beech log from NG Herreshoff design
in - Build logs for subjects built 1901 - Present Day
Posted
Excellent considering you were restricted to making them by hand. I need to make something similar and I suspect I will find it difficult enough to make them with the benefit of machines.