HOLIDAY DONATION DRIVE - SUPPORT MSW - DO YOUR PART TO KEEP THIS GREAT FORUM GOING! (Only 13 donations so far - C'mon guys!)
×


dafi
-
Posts
2,426 -
Joined
-
Last visited
Content Type
Profiles
Forums
Gallery
Events
Everything posted by dafi
-
Round fly thread? Could you give a source? The flat one I have is good for serving really thin lines. Daniel
-

Help with question regarding HMS Victory at Trafalgar
dafi replied to AllanP's topic in Nautical/Naval History
Hello Pete, thank you for the work and care. Myself being inscribed there for a long time already and really appreciate the vast data base on all things concerning Victory. As a lot of other contemporary ships are also presented there, it enlarges the knowledge about this era, and also other periods and model categories are covered, which always nicely enlarges one´s own horizon. As informations, mood and tone are different to MSW, I do not see it as a concurrence, but it is a wonderful addition to all things MSW that can be found here :-) Cheers, Daniel -
Should all spars be aligned in the same direction?
dafi replied to Modeler12's topic in Masting, rigging and sails
There are some contemporary drawings and paintings that show different angles at special occasions, especially in the early days: Resolution Willem van der Velde (younger) Cannon shot by van der Velde Daniel -
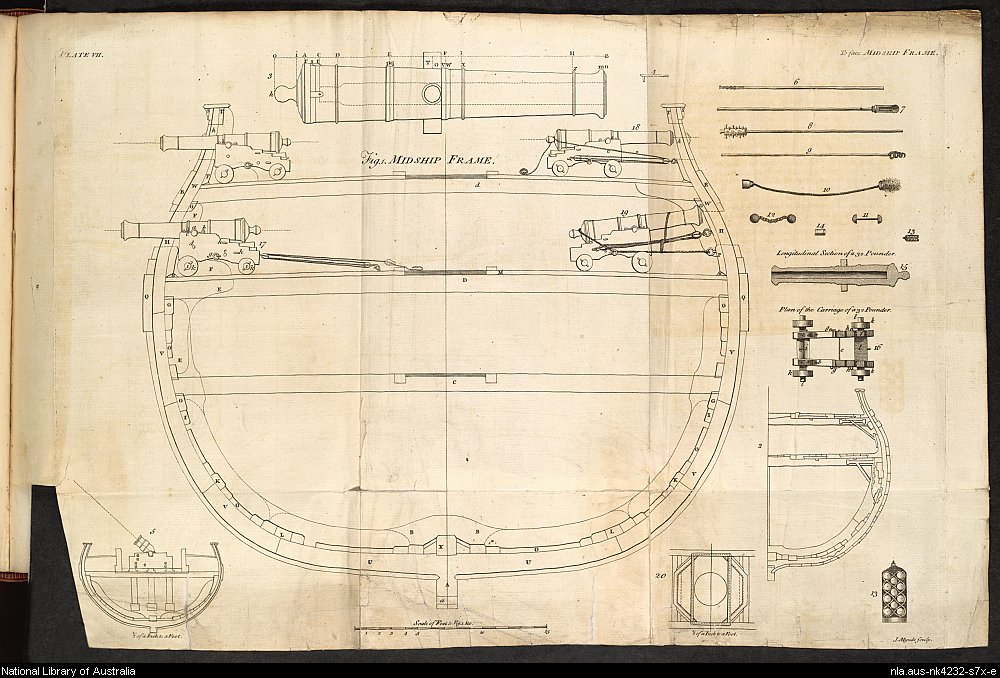
Falconer: Excercising the great Guns EXERCISE of the great guns. 1st. Silence. 2d. Cast loose your guns. 3d. Level your guns. 4th.Take out your tompions. 5th. Run out your guns. 6th. Prime. 7th. Point your guns. 8th. Fire. " The man who takes care of the powder is to place himself on the opposite side of the deck from that where we engage, except when fighting both sides at once, when he is to be amid-ships. He is not to suffer any other man to take a cartridge from him, but he who is appointed to serve the gun with that article, either in time of a real engagement, or at exercise. " Lanthorns are not to be brought to quarters in the night, until the midshipman gives his orders for so doing to the person he charges with that article. Every thing being in it's place, and not the least lumber in the way of the guns, the exercise hegins with, 1st. Silence. At this word every one is to observe a silent attention to the officers. 2d. Cast loose your guns. " The muzzle lashing is to be taken off from the guns, and (being coiled up in a small compass) is to be made fast to the eye-bolt above the port. The lashing-tackles at the same time to be cast loose, and the middle of the breeching seized to the thimble of the pomillion. The spunge to be taken down, and, with the crow, handspec, &c. laid upon the deck by the gun. "N.B. When prepared for engaging an enemy, the seizing within the clinch of the breeching is to be cut, that the gun may come sufficiently within-board for loading, and that the force of the recoil may be more spent before it acts upon the breeching. 3d. Level your guns. " The breech of your metal is to be raised so as to admit the foot of the bed's being placed upon the axle-tree of the carriage, with the quoin upon the bed, both their ends being even one with the other. " N. B. When levelled for firing, the bed is to be lashed to the bolt which supports the inner end of it, that it may not be thrown out of it's place by the violence of the gun's motion, when hot with frequent discharges. See fig. 17, plate VII. 4th. Take out your tompions. "The tompion is to be taken out of the gun's mouth, and left hanging by it's laniard. 5th. Run out your guns. " With the tackles hooked to the upper-bolts of the carriage, the gun is to be bowsed out as close as possible, without the assistance of crows or handspecs; taking care at the same time to keep the breeching clear of the trucks, by hawling it through the rings; it is then to be bent so as to run clear when the gun is fired. When the gun is out, the tackle-falls are to be laid along-side the carriages in neat fakes, that when the gun, by recoiling, overhauls them, they may not be subject to get foul, as they would if in a common coil. 6th. Prime. "If the cartridge is to be pierced with the priming wire, and the vent filled with powder, the pan also is to be filled; and the flat space, having a score through it at the end of the pan, is to be covered, and this part of the priming is to be bruised with the round part of the horn. The apron is to be laid over, and the horn hung up out of danger from the flash of the priming. 7th. Point your guns. At this command the gun is, in the first place, to be elevated to the heighth of the object, by means of the side-sights; and then the person pointing is to direct his fire by the upper-sight, having a crow on one side and a handspec on the other, to heave the gun by his direction till he catches the object. " N. B. The men who heave the gun for pointing are to stand between the ship's side and their crows or handspecs, to escape the injury they might otherwise receive from their being struck against them, or splintered by a shot; and the man who attends the captain with a match is to bring it at the word, " Point your guns," and kneeling upon one knee opposite the train-truck of the carriage, and at such a distance as to be able to touch the priming, is to turn his head from the gun, and keep blowing gently upon the lighted match to keep it clear from ashes. And as the missing of an enemy in action, by neglect or want of coolness, is most inexcusable, it is particularly recommended to have the people thoroughly instructed in pointing well, and taught to know the ill consequences of not taking proper means to hit their mark; wherefore they should be made to elevate their guns to the utmost nicety, and then to point with the same exactness and having caught the object through the upper-sight, at the word, 8th. Fire. " The match is instantly to be put to the bruised part of the priming; and when the gun is discharged the vent is to be closed, in order to smother any spark of fire that may remain in the chamber of the gun; and the man who spunges is immediately to place himself by the muzzle of the gun in readiness, when, at the next word, 9th. Spunge your gun. "The spunge is to be rammed down to the bottom of the chamber, and then twisted round, to extinguish effectually any remains of fire; and when drawn out, to be struck against the out-side of the muzzle, to shake off any sparks or scraps of the cartridge that may have come out with it; and next it's end is to be shifted ready for loading; and while this is doing, the man appointed to provide a cartridge is to go to the box, and by the time the spunge is out of the gun, he is to have it ready; and at the word, 10th. Load with cartridge. The cartridge (with the bottom end first, seam-downwards, and a wad after it) is to be put into the gun, and thrust a little way within the mouth, when the rammer is to be entered; the cartridge is then to be forcibly rammed down, and the captain at the same time is to keep his priming-wire in the vent, and, feeling the cartridge, is to give the word home, when the rammer is to be drawn, and not before. While this is doing, the man appointed to provide a shot is to provide one (or two, according to the order at that time) ready at the muzzle, with a wad like-wise, and when the rammer is drawn, at the word, 11th. Shot your guns. "The shot and wad upon it are to be put into the gun, and thrust a little way down, when the rammer is to be entered as before. The shot and wad are to be rammed down to the cartridge, and there have a couple of forcible strokes, when the rammer is to be drawn, and laid out of the way of the guns and tackles, if the exercise or action is continued; but if it is over, the spunge is to be secured in the place it is at all times kept in. 13th. Put in your tompions. "The tompions to be put into the muzzle of the cannon. 14th. House your guns. "The seizing is to be put on again upon the clinched end of the breeching, leaving it no slacker than to admit of the guns being housed with ease. The quoin is to be taken from under the breech of the gun, and the bed, still resting upon the bolt, within the carriage, thrust under, till the foot of it falls off the axle-tree, leaving it to rest upon the end which projects out from the foot. The metal is to be set down upon this. The gun is to be placed exactly square, and the muzzle is to be close to the wood, in it's proper place for passing the muzzle lashings. See CANNON, and fig. 19, plate VII. 14th. Secure your guns. "The muzzle lashings must first be made secure, and then with one tackle (having all it's parts equally taught with the breeching) the gun is to be lashed. The other tackle is to be bowsed taught, and by itself made fast, that it may be ready to cast off for lashing a second breeching. "N.B. Care must be taken to hook the first tackle to the upper bolt of the carriage, that it may not otherwise obstruct the reeving of the second breeching, and to give the greater length to the end part of the fall. No pains must be spared in bowsing the lashing very taught, that the gun may have the least play that is possible, as their being loose may be productive of very dangerous consequences. EXERCISE to EYES of a ship "The quoin, crow, and handspec, are to be put under the gun, the powder-horn hung up in it's place, &c. "Being engaged at any time when there is a large swell, a rough sea, or in squally weather, &c. as the ship may be liable to be suddenly much heeled, the port-tackle fall is ro be kept clear, and (whenever the working of the gun will admit of it) the man charged with that office is to keep it in his hand; at the same time the muzzle lashing is to be kept fast to the ring of the port, and being hauled taught, is to be fastened to the eye-bolt over the port-hole, so as to be out of the gun's way in firing, in order to haul it in at any time of danger. "This precaution is not to be omitted, when engaging to the windward, any more than when to the leeward, those situations being very subject to alter at too short a warning. "A train-tackle is always to be made use of with the lee-guns, and the man stationed to attend it is to be very careful in preventing the gun's running out at an improper time." EXERCISE may also be applied with propriety to the forming our fleets into orders of sailing, lines of battle, &c. an art which the French have termed evolutions, or tactiques. In this sense exercise may be defined, the execution of the movements which the different orders and dispositions of fleets occasionally require, and which the several ships are directed to perform by means of signals. Source: http://southseas.nla.gov.au/refs/falc/0487.html

-
Pillar description
dafi replied to allanyed's topic in Building, Framing, Planking and plating a ships hull and deck
Took me a moment, as normal translators do not find that ... http://en.wiktionary.org/wiki/hance -
No need to worry Lawrence, no offense taken what so ever and really enjoyed!!! :-) :-) :-) XXXDAn
-
Also have a look at this topic: "When the gunz go booooom" http://modelshipworld.com/index.php?/topic/4503-live-fire-when-the-gunz-go-boooooom/#entry129271 Cheers, Daniel
-
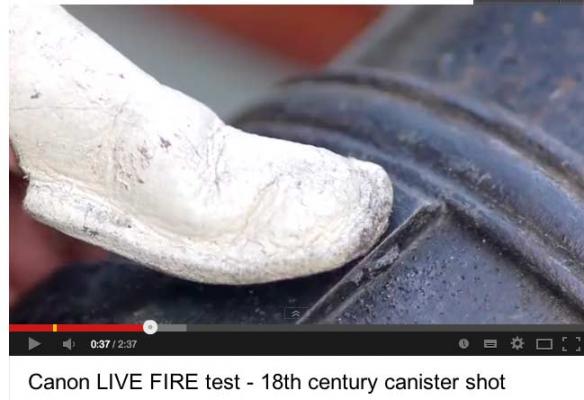
While researching for information about the gun drill on my Victory model, I also watched attentively some live fire videos on you tube. Once into a bit more into the subject, one realises plenty of more details, one does not see the first times, when the noise and smoke and the effects are still taking to much attention off ... The classic: Live Cannonade Fire Carronade at point blanc range against a ship mock-up. The side tackles are loosened before the shot. The blast out of the touchhole does not appear that bad. The outside of the hull only shows little impact, the inner side tells a different story. http://www.youtube.com/watch?v=U6foV4lmL4A Canon LIVE FIRE test - 18th century canister shot http://www.youtube.com/watch?v=lMILWzE9f0k Great to see the loading. At 0:37 one can see the leather protection for the thump to seal the vent hole, seealso the picking of the cartridge with the vent pick, the slow ignition and the long time until the cartridge ignites and the relatively little recoil. Also nicely to be seen in the final slow motion how cartridge and wad pads are flying off, always a risk for the wooden ships. Civil War Artillery Drill, 12 lb. Napoleon Wonderful gun drill with plenty of details Civil War Cannons http://www.youtube.com/watch?v=VHVOHAfS5EY Shooting barrels with little recoil Hornblower cannon firing Nice to see the loading. Seeing the use of the wooden handspike to adjust the coins clearly shows the reason d´être of the steps of the carriages sides. Small recoil, as just imaginary bullets were used. Cannons of the Civil War (1861 - 1865) http://www.youtube.com/watch?v=x_UtQ5v_M30 Nice pictures of rolling fire during reenactment at the start, then slowly gets repetitive ... Shooting the Bronze Swivel Gun with Canister Rounds 6 Pounder Cannon Shoot-Field Artillery-Civil War Uniforms http://www.youtube.com/watch?v=ivaMHdKeaz8 Blowing up cars with a Civil War Whitworth cannon.wmv Great to see the time the bullet take for the flight. Interesting is the start and the grand finale - I guess they helped a bit with pyro tech here ... 32 pdr Field Howitzer bigger caliber, much more booooom and violent recoil ... Civil War 12 pound cannon into 50 gallon drums (Antietam) At 0:16 and 1:50 one can again see the leather protection of the finger, and how the vent was closed/protected with it. For once I am not saying "enjoy" ... Daniel PS: Please also see the topic "why do hot guns jump violently": http://modelshipworld.com/index.php?/topic/3963-why-do-hot-guns-jump-violently/
-
Sometimes, if one knows what to look for, one can identify the bits easily. I first discovered the leather protection to seal the vent in the literature, but when closely looking at several live fire films, one can detect it even in use, here is one example of that :-) Canon LIVE FIRE test - 18th century canister shot http://www.youtube.com/watch?v=lMILWzE9f0k Nice to see the loading, at 0:37 the leather protection on the finger, picking the cartridge through the vent, putting the powder onto the vent, the slow process of ignition down to the charge and a relatively minor recoil. Also nice to be seen in the slow motion the remains of cartridge and wad flying out, always a hazard to the wooden ships. XXXDAn
-
If one looks at the film about the carronades in entry #47 at second 0:06, the blast through the vent appears not to be to violent. XXXDAn
-
And the winner is ... ... ... ... Mark - you got the point! And Dave and Popeye off course :-) :-) :-) I hope you still will talk to me Lawrence ;-) Cheers, Daniel
-
Let the show go on :-) The full crew was up to 14 men for both guns on each side of the ship. Strictly numbered, 1 gun captain, 2 second gun captain, 3 loader, 4 sponger, 5 sec. loader, 6 sec. sponger and 7 - 14 auxiliaries to pull the strings. First picture for clarity without the auxs. One can see nicely, loader and sponger within the breeching ropes, sec. sponger and sec. outside bringing the next items as wad pads or balls. The gun captain is pressing a small leather bag against the vent, for that it is air sealed, for that no smoldering ashes are pressed by air pressure into the vent and that for by retrieving the sponge a vacuum is created that will put off all smoldering bits. The second gun captain is here shown organising the tools like worm and the bars, his time will come, if he has to take halve of the crew to work the opposite gun if battle on both sides is required. As one lieutenant was always taking charge of several big guns, Lt. Williams of course is present here at this excercising the great guns. And it gets really packed, once the auxiliaries are added to pull the strings Also nice to be seen is that sec. loader and sec. sponger have to stand outside the side tackles. Also see the stick of the sponge protruding largely outboard. On the capstan one can see the powder monkee, having prepared already the next cartridge. He is supposed to stay as far as possible for security reasons and to only handle the cartridge to the loaders and to nobody else. Also this was not a job for jung boys as generally thought, in fact Captain Duff of the Mars strictly forbid this as his log states. For the boys was to clean loose powder with a wet swab. I like the two marines that were stationed on each big gun, gives a nice touch of color :-) And also if I was a sponger and loader, I really would look out for that the man on the back tackle had a good lunch and that he makes sure, that there are no 3.5 tons coming towards oneself if a big wave is moving the ship ... Some more pics to enjoy ... ... or a bit more inside the melée :-) Cheers, Daniel
-
Herewego, Dr. dafistein coming straight from his lab ... ... breaking little bones of little people ... ... and reassembled, on the right, the poor lad before being transformed ... ... in his new life as gun captain, holding a leather bag against the vent to air seal it, for that no smoldering ashes is pushed upwards, while the barrel is sponged. Two of the Misters got funny tails ... ... a bit of paint applied ... .... and the crew is complete :-) The lieutenant, the gun captain, loader 2 with the bullet, sponger 2 with the wad pads, powdermonkee, the marine (at ease, the crossbelts off and the button opened). Sponger and loader are already at their place, waiting for the rest of the gang, the second gun captain and the 7 auxiliaries to pull the strings ... Cheers, Daniel
-
Having seen your Sphynx again on the exhibition yesterday, I just can say what I said the other times I saw her: WOW!!! It is a impecable gem! Cheers, hope to see her soon again! Daniel
-
As I realised yesterday by seeing the AV on the exhibition, you did not step forward, neither did a leap, that was a jump! Congratulation, well done Daniel
-
Thank you very much Sirs! While preparing the next input, just to keep you amused, a picture of yesterdays modeling exhibition in Stuttgart Germany: Alex, Joachim and myself enjoying ourselves with nice chats at the booth of the Arbeitskreis historischer Schiffbau (Workgroup for historical Shipbuilding) Alex: http://modelshipworld.com/index.php?/topic/410-hms-sphynx-by-alex-m-scale-148-english-20-gun-frigate-as-build-1775/ Joachim: http://modelshipworld.com/index.php?/topic/836-amerigo-vespucci-by-schiffebastler-mantua-model-scale-184-italien-sail-training-ship-build-1931/?hl=amerigo Cheers and enjoy as we did, Daniel
-
Great work! Daniel
-
What to do if one wants to play? One remembers old kids games :-) So take a paper strip of exactemente 4,5 mm width ... ... folded once ... ... take a template to properly get the corner bent ... ... the second to come ... ... fold the lower part into the opposite way, shorten it and again bent around the corner ... ... prepared the other side ... ... flattened ... ... opened and spread the opposite way ... ... already recognise it ??? Opened once more and ... ... and ready to be hatted :-) Still have to send Lt. Williams to the hairdressers for that the chapeau sits to its designed location ... ...hihihihihihihihihi... ... sincerely yours, the dafi
-
Also if you look at all these strange things like bar shots, chains and so on, I do believe it was negligible what the worm did ... ... funny that those guns did not explode more often ... ... just now and then ... XXXDAn
-
This worm stays as it is. Its purpose is to get powder cartridges out if the charge did not ignite (lovely job this must have been) or to regularly clean the bottom of the breech from possible remains of extinguished or even smoldering cartridges after a shot. That is why it needs hard and pointed ends. The swabbing was done with a different swab, this possibly was fur and was used really wet, that is why a bucket with 9 parts water and one vinagre was always nearby. In my small diasplay you see the loader (known as number 4) is just inserting/retracting the swab, 9 tenths of the rod being outside of the hull ... Cheers, Daniel
-
Sometimes, yes sometimes I hat me for what I am doing to myself ... ... example needed? The worm hook to extract cartridge remains ... ... already I glued a nice long spiral onto a stick and just then looked into the literature ... ... bloody mental cinema ... ... it is not one long spiral but two short opposite spirals, which makes sense for the purpose. First soldering trial with the 0,3 mm copper wires went bad until I remembered that there is a protection around :-( Once removed, results became better, but still quite breakable, but then realised, the spiraling method does not work ... ... okokokokokoko ... ... back to start, rethink and resolder ... ... but how to do the double helix? Took a fitting drill with the right lead ... ... and carefully embedded the wire into the grooves. The lead still being too high, respaned the opposite way against a 1 mm mandral, and carefully readjusted the lead. And here we are, it finally worked ... ... even fits for the bore :-) That is why I sometimes hate myself, took me days to work this out until it fitted ... ... so I got really time enough to hate myself ... ... deeply contrited ... ...yours dafi
-
Thank you Sirs, the joy is on my side ! Ok, lets compromise: 1:100 ... ... let the feast begin ... ;-) XXXDAn
- 33 replies
-
- 1
-

-
- trinkstein
- frigate
- (and 2 more)
-
All the best from me too!!! The thicker breeching line will do a good job. Also for these guns just one training tackle was used. The double one was only used for french 36 an 48 pounders. Makes things easier on the deck :-) Cheers, Daniel