HOLIDAY DONATION DRIVE - SUPPORT MSW - DO YOUR PART TO KEEP THIS GREAT FORUM GOING! (Only 36 donations so far out of 49,000 members - C'mon guys!)
×


Tallshiptragic
-
Posts
551 -
Joined
-
Last visited
Content Type
Profiles
Forums
Gallery
Events
Everything posted by Tallshiptragic
-
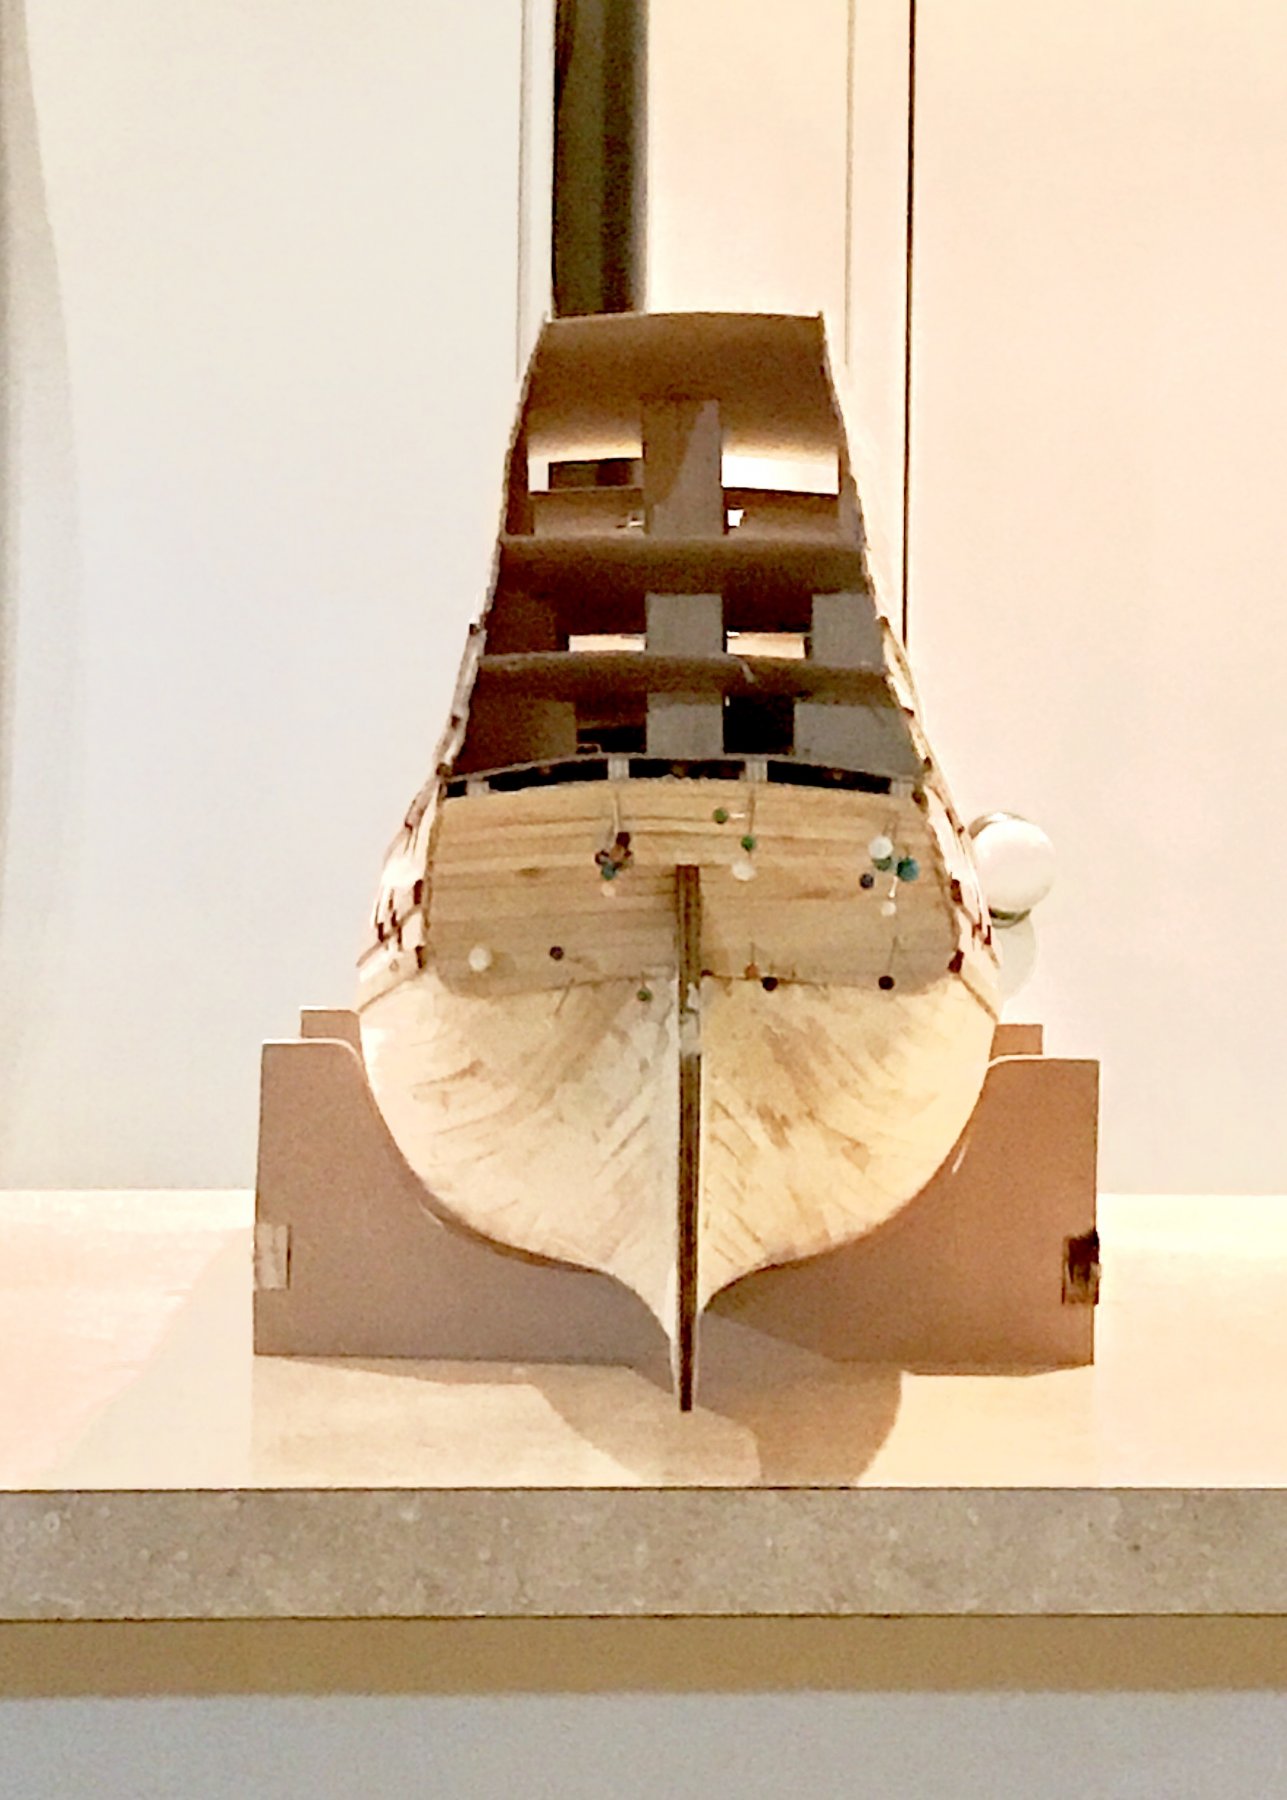
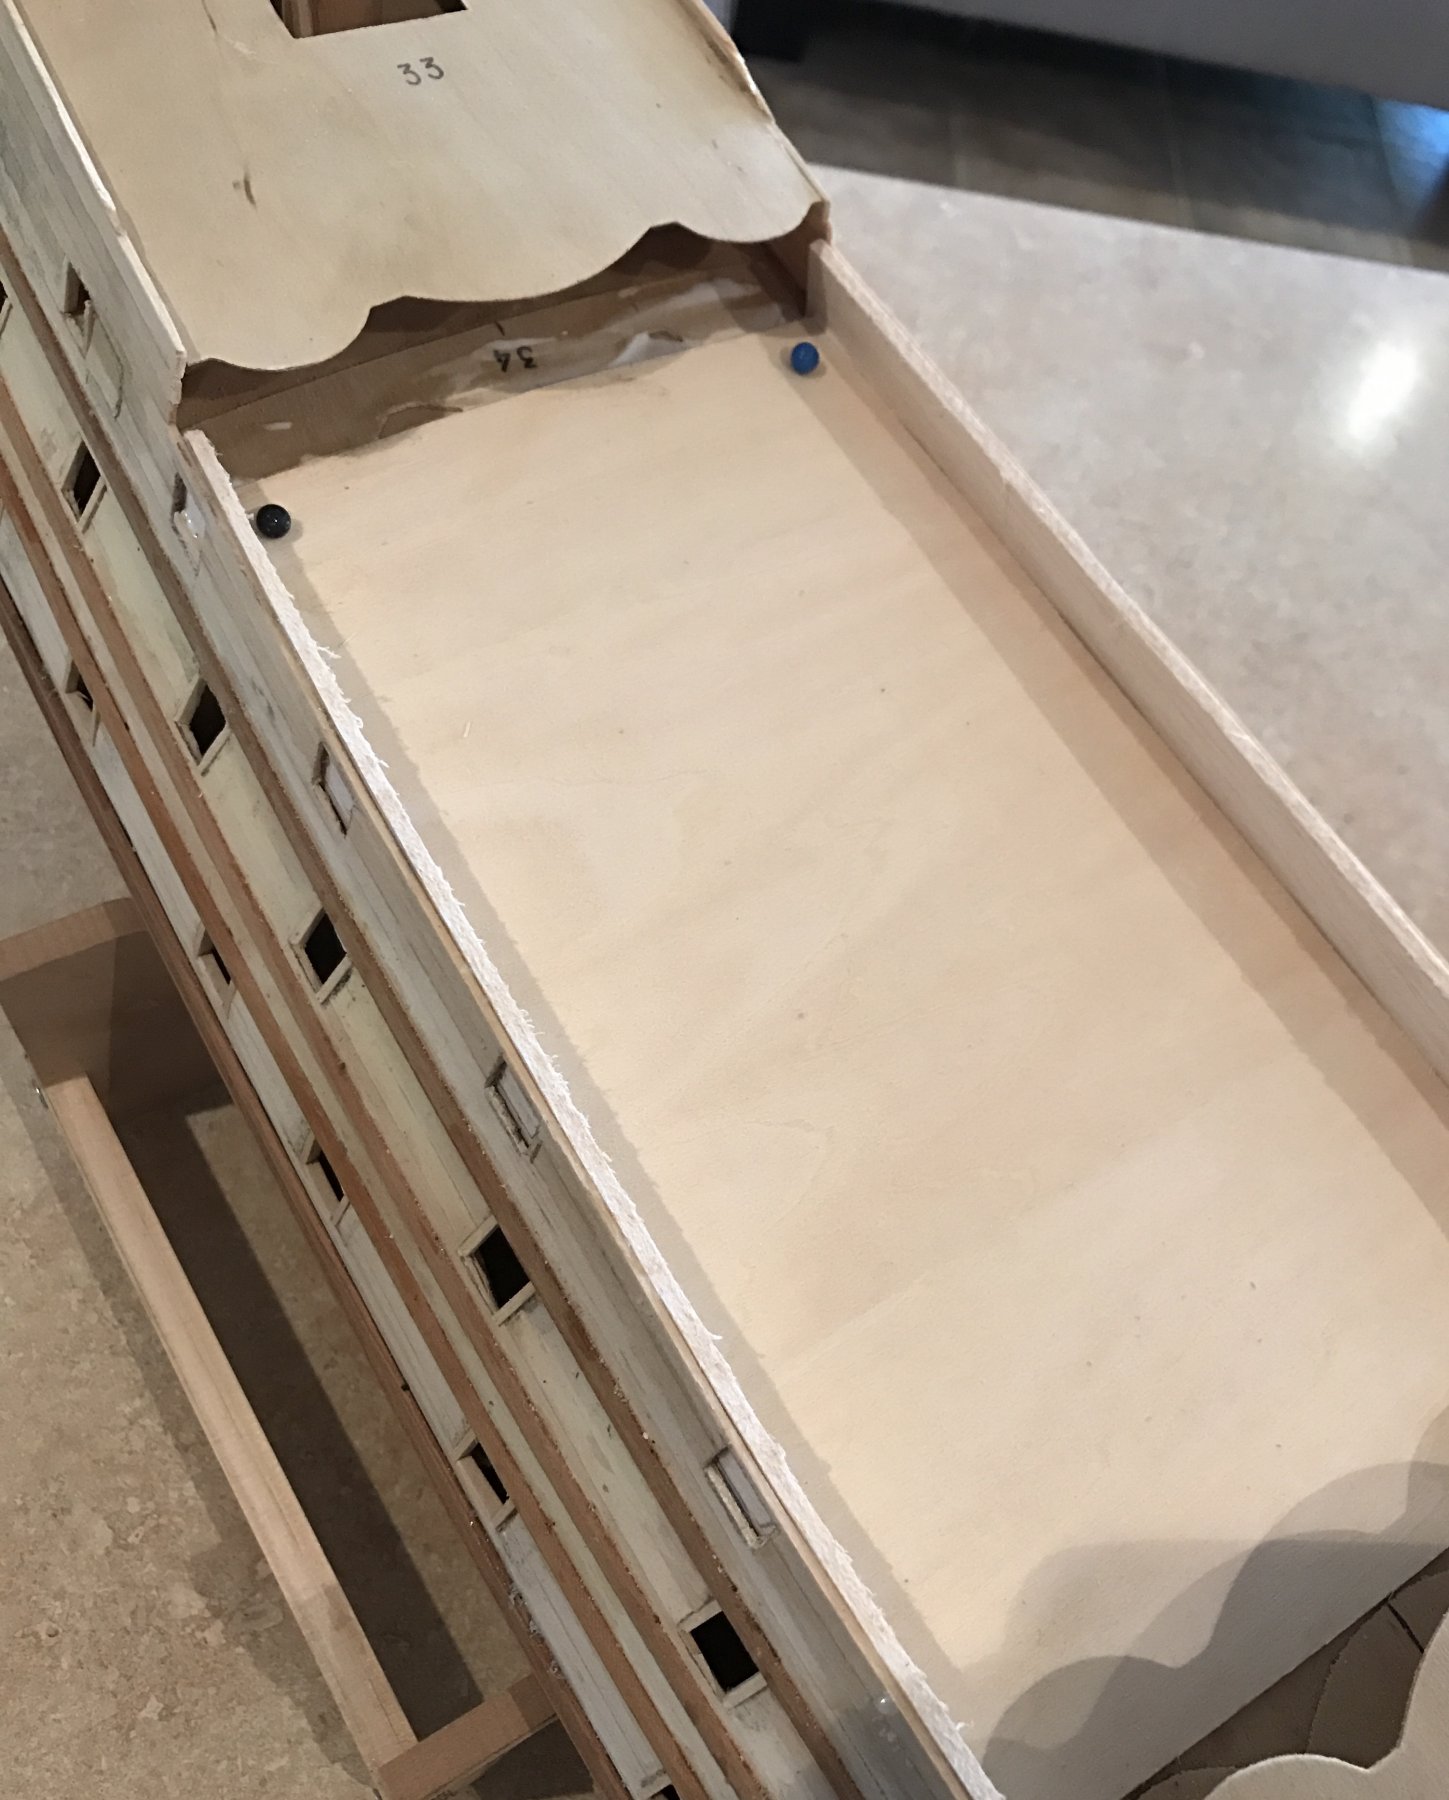
 Transom has now been planked with its initial planking, pins still in place as the glue dries but look at that ***! Haha I love that tumblehome shape! The only thing that would make me love this ship more is if it was Dutch! Alas 😂 Been watching the Dutch movie ' Michiel de Ruyter' (Admiral is the title for the English subtitled version). I may have to make use of my 'De Zeven Provinciën' plans after Sovereign is completed. Though another large vessel straight away may have to wait a touch, though only 80 guns and not 102 guns she is smaller.... 😂
- 322 replies
-
- 7
-

-
- sergal
- sovereign of the seas
- (and 5 more)
-
Ah so even more reason to make sure the dimensions are exact
-
In the scheme of things 1mm isn't so bad, but saying that my lower ports are 15mm so not so noticeable with those. I'd probably fill it or scrap the extra if need be otherwise I'd always know it wasn't quite right haha but that's me
-
From the looks of it, she is looking very neat and sharp.
-
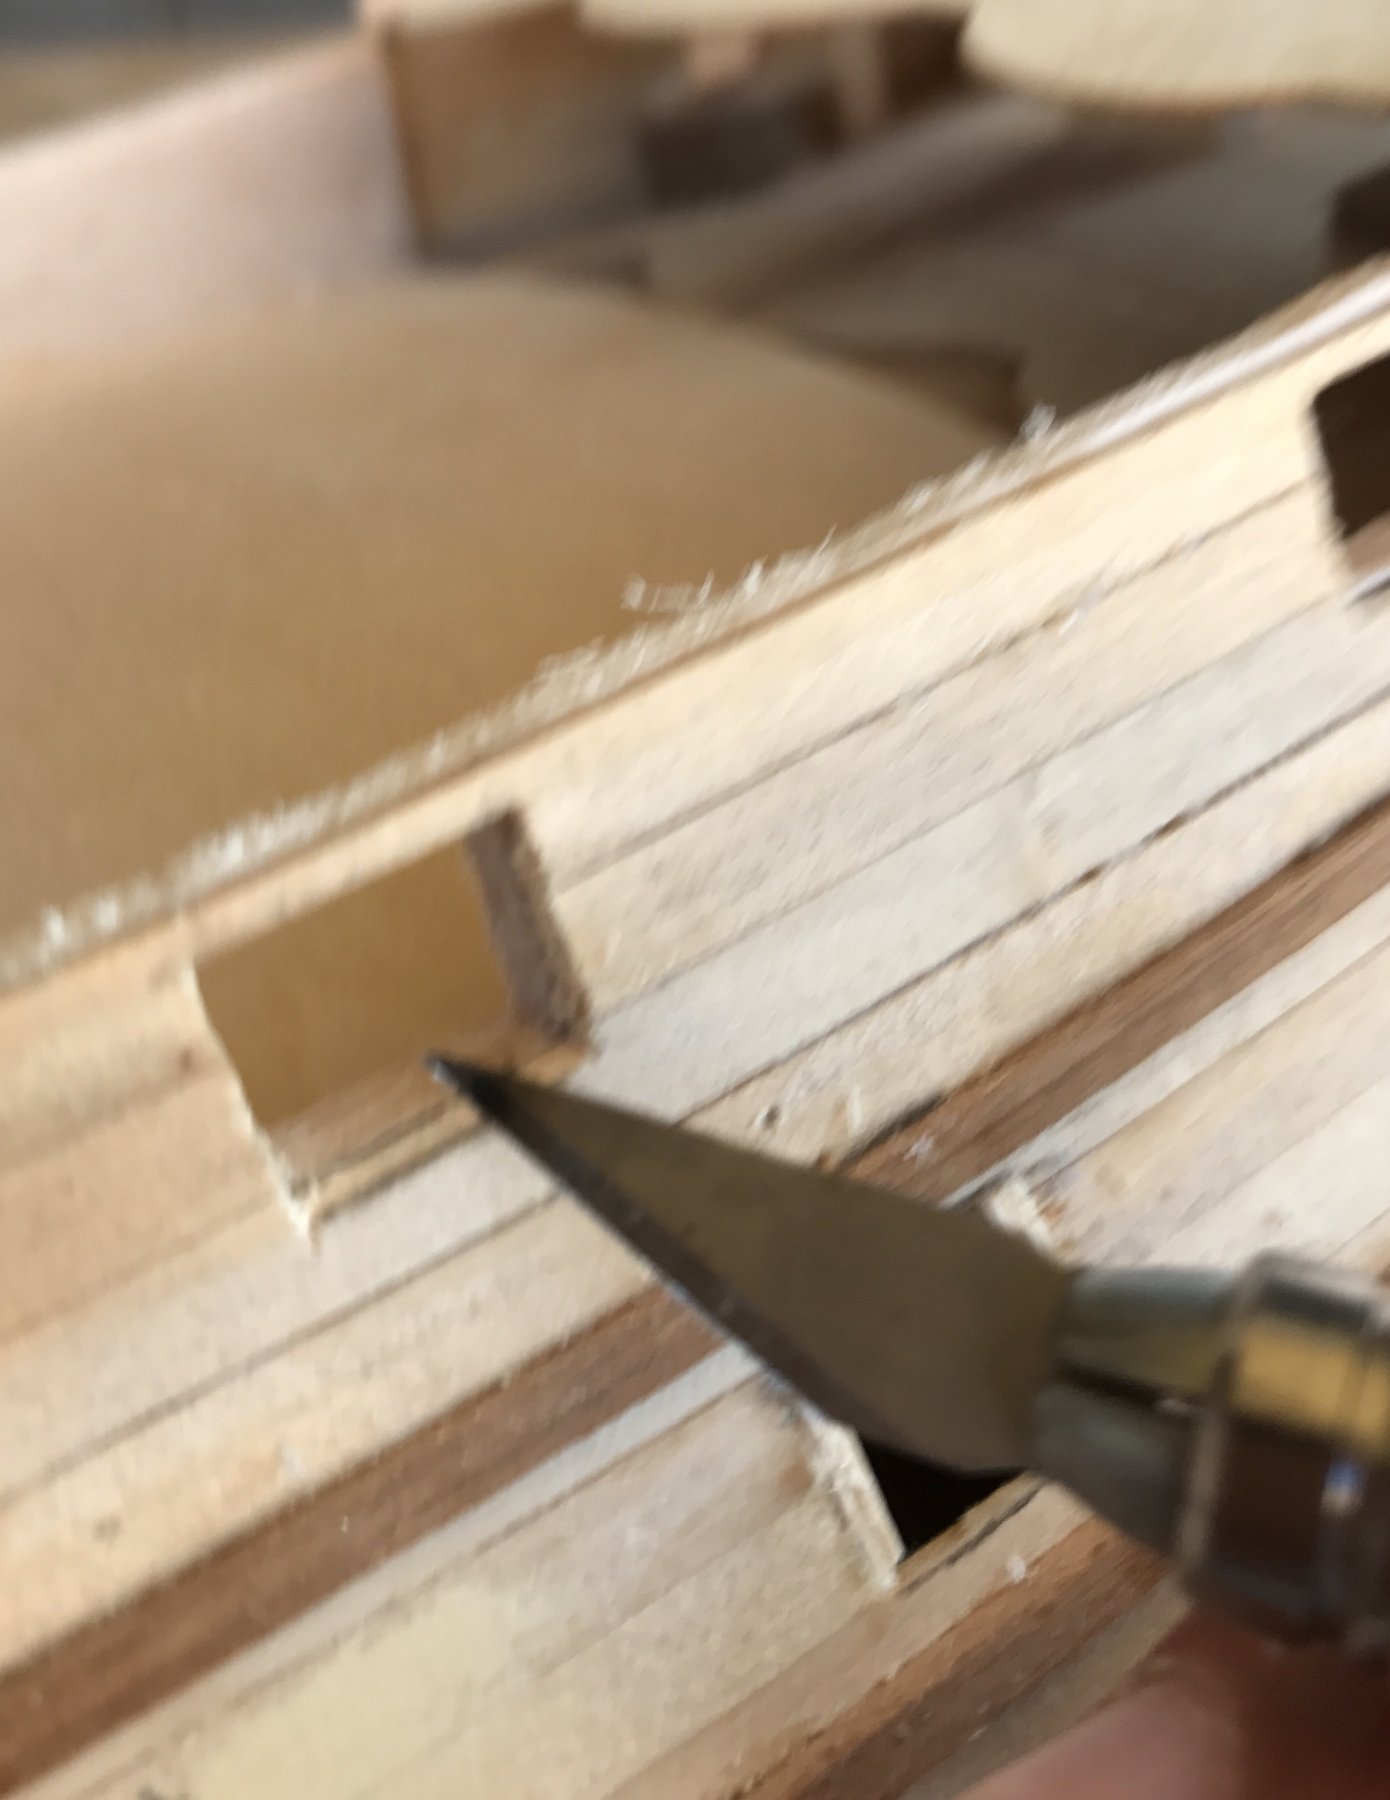
She's looking good messis, the ports are always worrying to cut but measure twice (in my case 5 haha) and cut once. I do the same as you, drill out then a sharp scalpel leaving enough extra to file down. Are you lining the ports also? If so make sure that you'll need the port to be larger to accommodate. Depending of course what you use for the lining. I always make them larger by 1mm and trim the lining to suit as the second planking will cover it up anyway. Keep up the good work.
-
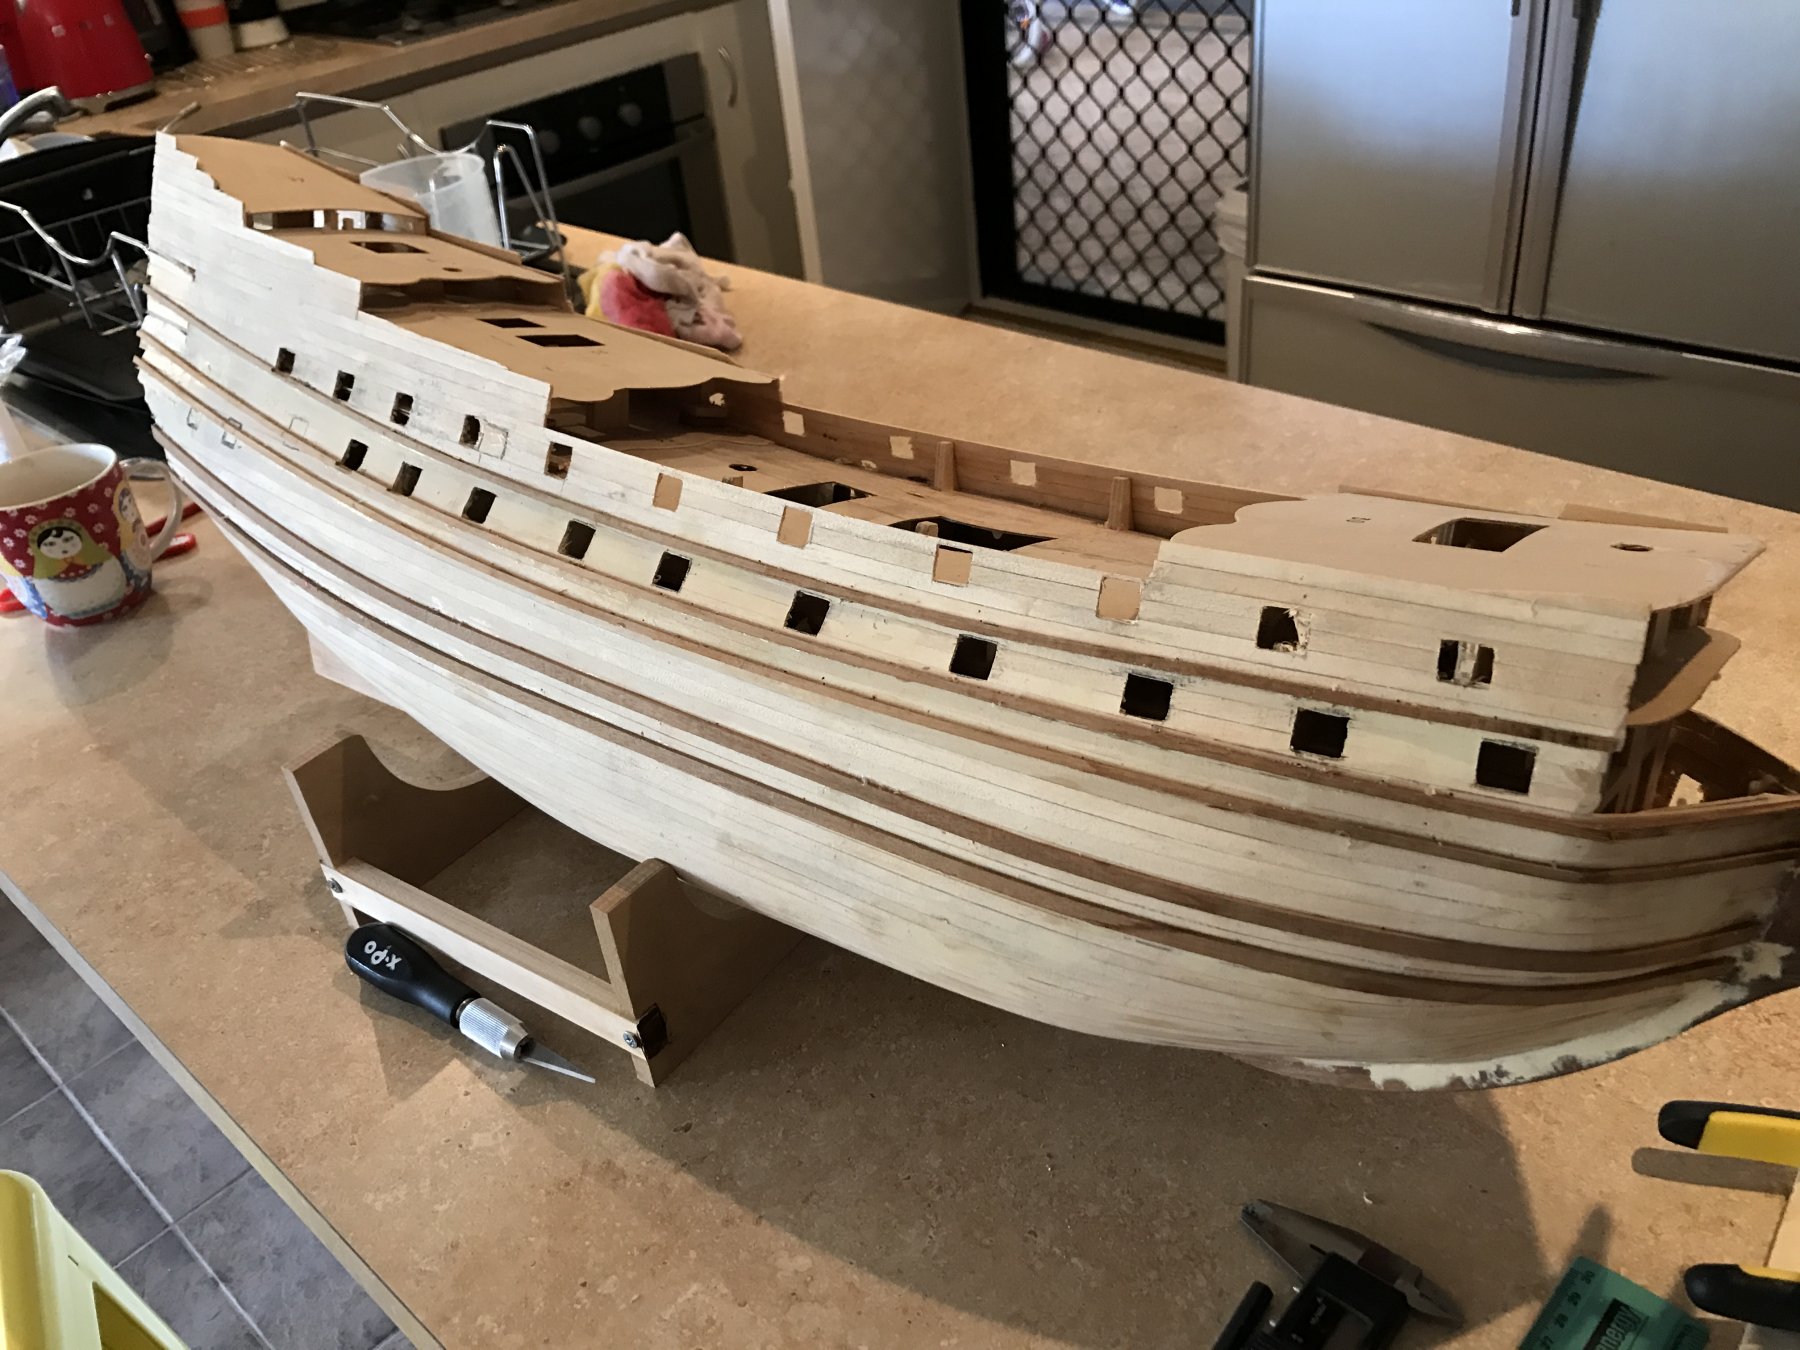
Starboard ports, cleaned up and painted now. Still waiting for my deliver of planks to arrive from Sydney so he second planking is on hold for now. Plenty to carry on with in the meantime though. I'll next plank up the transom and cut the four gun ports there also. Having it all ready when my planks arrive. It's funny, I can order something from Europe or the US and it'll be here within a week but anything from Melbourne or Sydney... hahaha it's a big country but

- 322 replies
-
- 10
-
-
- sergal
- sovereign of the seas
- (and 5 more)
-
Ratlines! Oh how I hate those haha. It's surprising though how after one set of shrouds it changes the appearance so much.
-
Thanks Scott, I'm hoping for the next model to perhaps frame up the ports before planking. Though to do that I'd probably want to have a single layer planking but that's in the future.
- 322 replies
-
- 3
-
-
- sergal
- sovereign of the seas
- (and 5 more)
-
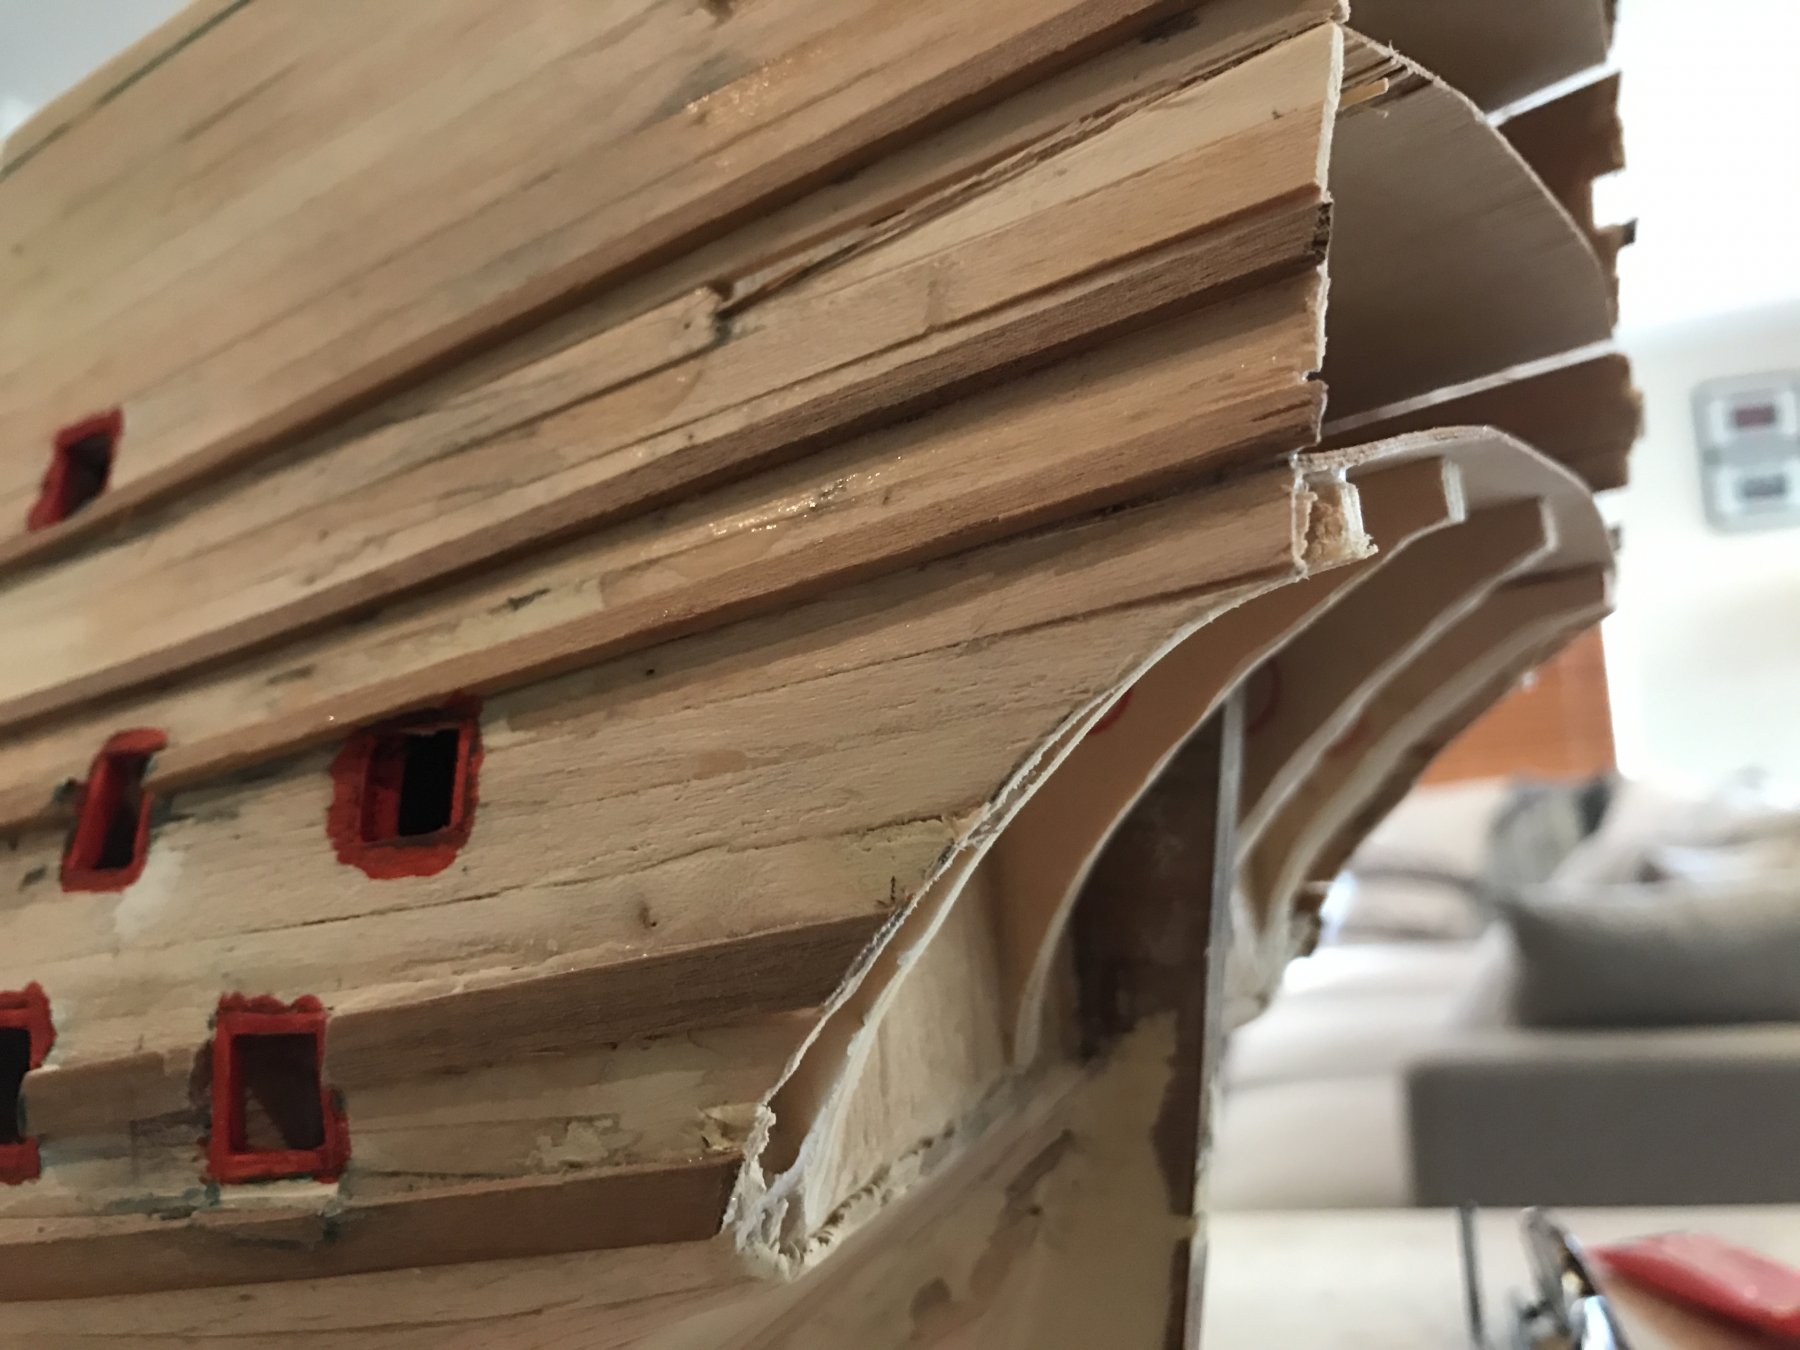
Thanks BE haha yeah she's a complex build of a very complex ship. I told myself when I picked the kit up I'd just build it straight from the box but... haha I just can't help myself. This is the biggest model regarding gun ports I've ever built so yes haha daunting but apart from repetition it's come along easy enough. Just take time with measuring up the ports before cutting. As Sjors mentioned the port side was basically covered in horizontal lines and positions of the gun ports about 5 times until I was completely satisfied. Difficult when the plans you have to work with aren't correct, well for the period I have chosen. Even placement of the wales weren't correctly marked on the plans but once they were on, the ports were so much easier to line up I've actually just finished lining the starboard ports again with the lime scrap planks which I'll file down to the needed width and then paint. Ive also done a few more structural modifications today. The first part was building up the fore peak. Sergal provides a single piece which runs from the fore peak deck and continues into the beakhead. It's also suggested to plank the entire beakhead with a couple gratings... while there isn't any evidence of the Sovereign to suggest this isn't the case, going from other vessels of the early 17th century and later for that matter, I believe this would have been unlikely. So I've built up the fore peak which will be planked and the beakhead deck will sit a step lower and I'll use a mixture of gratings and open boards similar to that of the Vasa and the Batavia replica. The Duyfken replica is built in this same fashion also though more on that when I get to it haha. Also reshaped the front edge of the forecastle deck to show a slight curve to center. Sergals deck showed a prominent step curving of the edges but extending quite a bit forward. From the Van der Velde sketch there is a curve but to the whole face of the bulkhead and almost appears flat. The transom shape has has also been reshaped, the sergal transom has one large sweeping curve followed by a smaller 'notch' at the top. From all the paintings, sketches and contemporary and professional models I've looked at I've found no evidence of this so the transom has been reshaped to only one large sweeping curve. I can finally plank this! Haha The bulwark on the waist has also been thickened- sergal suggested once double planked to trim the frame stubs and that was it, however this part of the hull would have and is thicker on other ships so I have used some 3mm balsa sheet to fill and I'll plank the inside also. This should leave me with an acceptable thickness. Finally with the bulwarks built up I used stringers on the existing false deck to built up the level of the too low waist. New plywood sheet was cut and has been fixed onto these, so the I also have a nice, flat and correct height deck for the waist

- 322 replies
-
- 8
-
-
- sergal
- sovereign of the seas
- (and 5 more)
-
Thanks mate haha yeah it's been awhile. Been a very crazy couple years with work, house moves and a divorce. But in a better place now where I can relax and enjoy my hobbies again Thank you for the kind words. You should definitely start a log. Experience doesn't matt r as long as you enjoy what you're doing, plus encourages other newbies to start. Before your know it you'll have a few builds under your belt and experience will come. Haha thanks Ken, no race just a lot of spare time thus break
- 322 replies
-
- 3
-
-
- sergal
- sovereign of the seas
- (and 5 more)
-
Thanks Rick, that's good info. I've been contemplating the cutter kit which in 1/72 is also laser cut.
-
Fantastic! I've been thinking about attempting one of these kits as you said for something different. So it'll be good to see the quality of the parts and how they come together.
-
That's a comfortable looking workspace! I have a small shed which I have all my tools set up in. It's ok in size with lights and power but gets hot during the day even with the doors open and freezing at nights recently. Luckily my girl prefers if I'm in the house for some reason so if it's not too messy I can work in the living area. But I'm on top of cleaning after every model shift haha to keep that privilege
-
If you're referring to the Mizzen, yep one backstay either side as we had on the replica.
-
Haha well Saschas far from poor has the run of the house and keeps me company in the shed. Which reminds me to me to take her for a walk and release some of her energy
- 322 replies
-
- 5
-
-
- sergal
- sovereign of the seas
- (and 5 more)
-
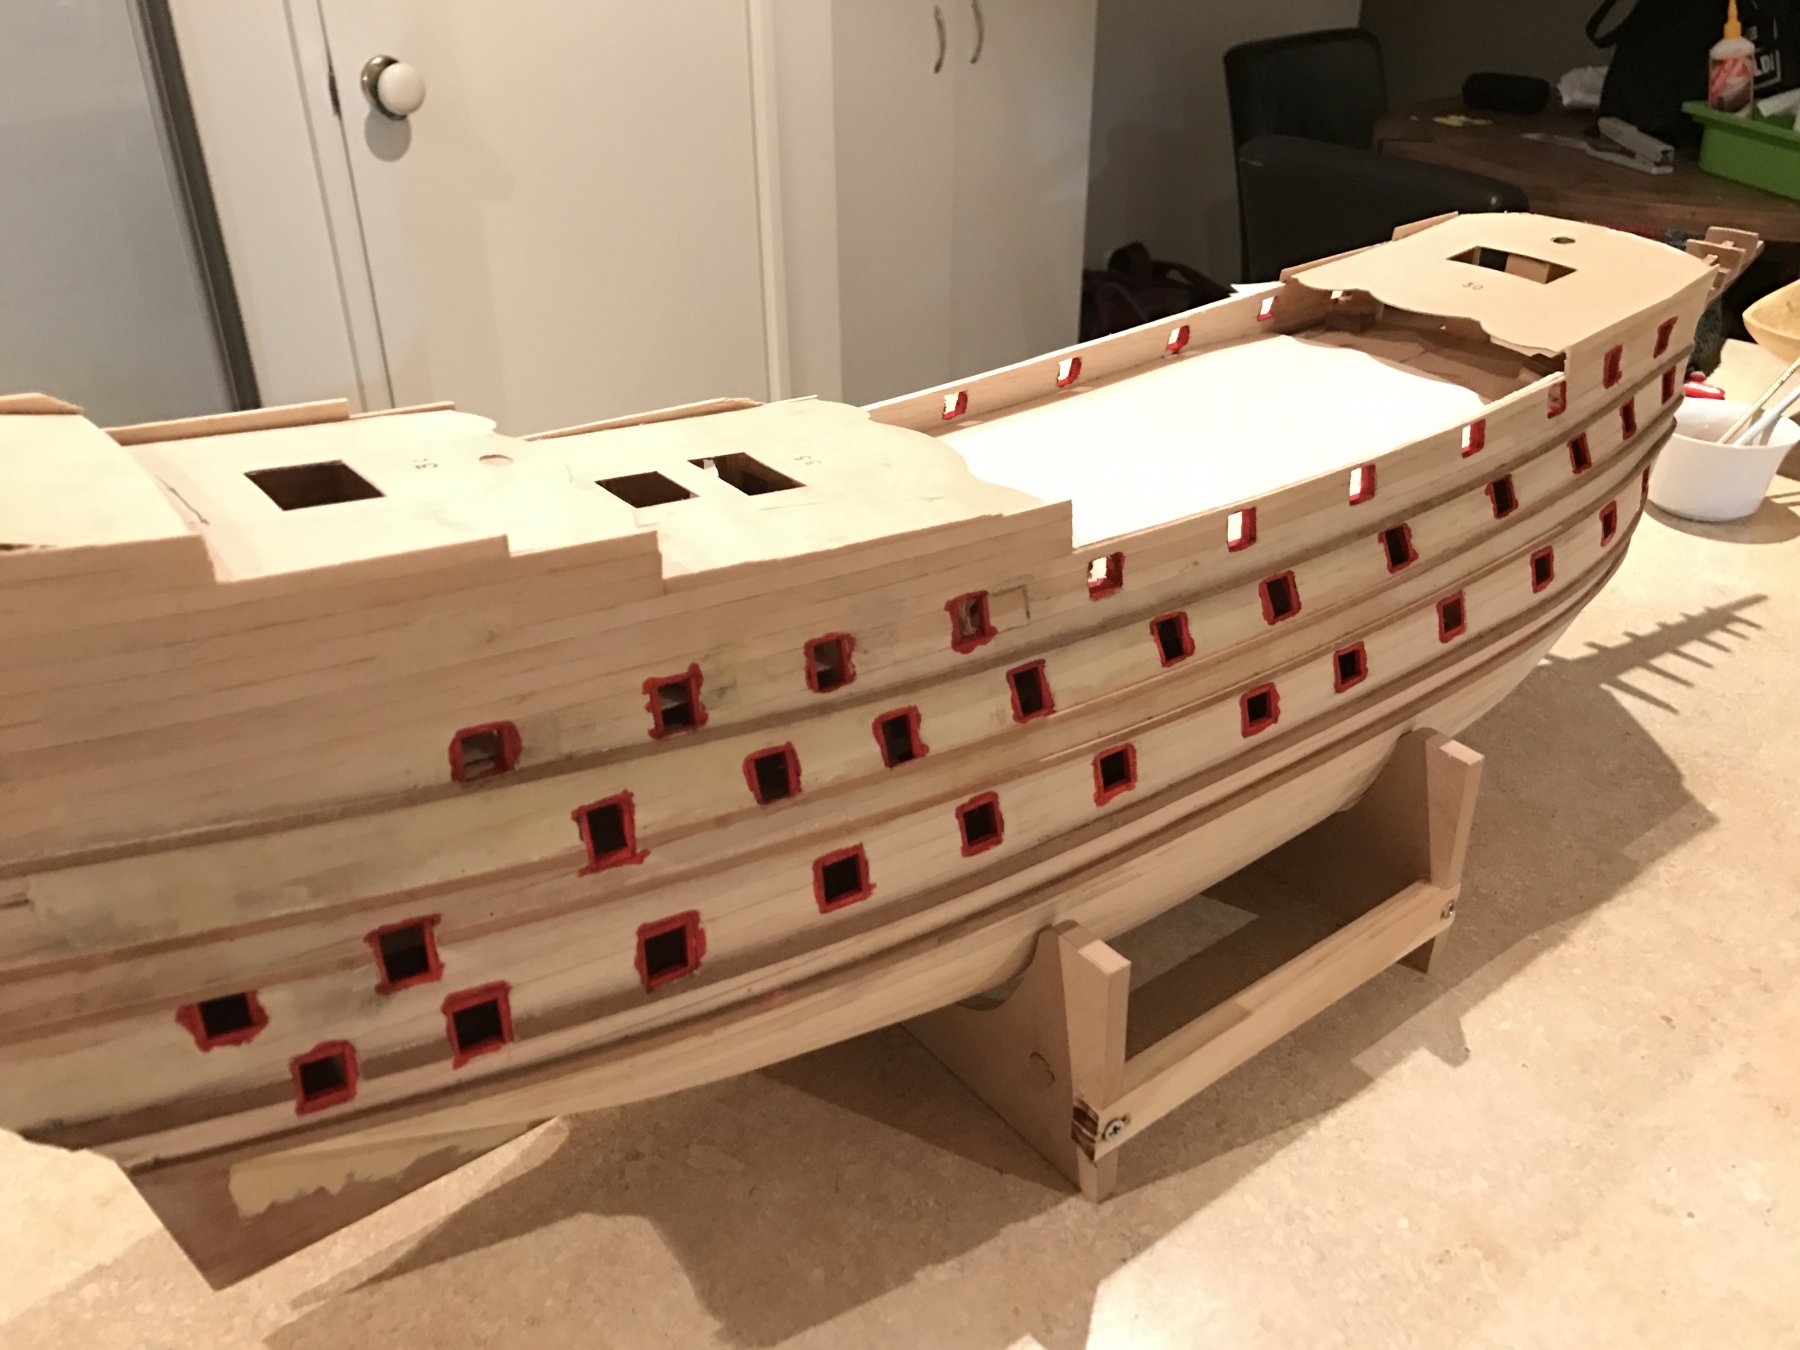
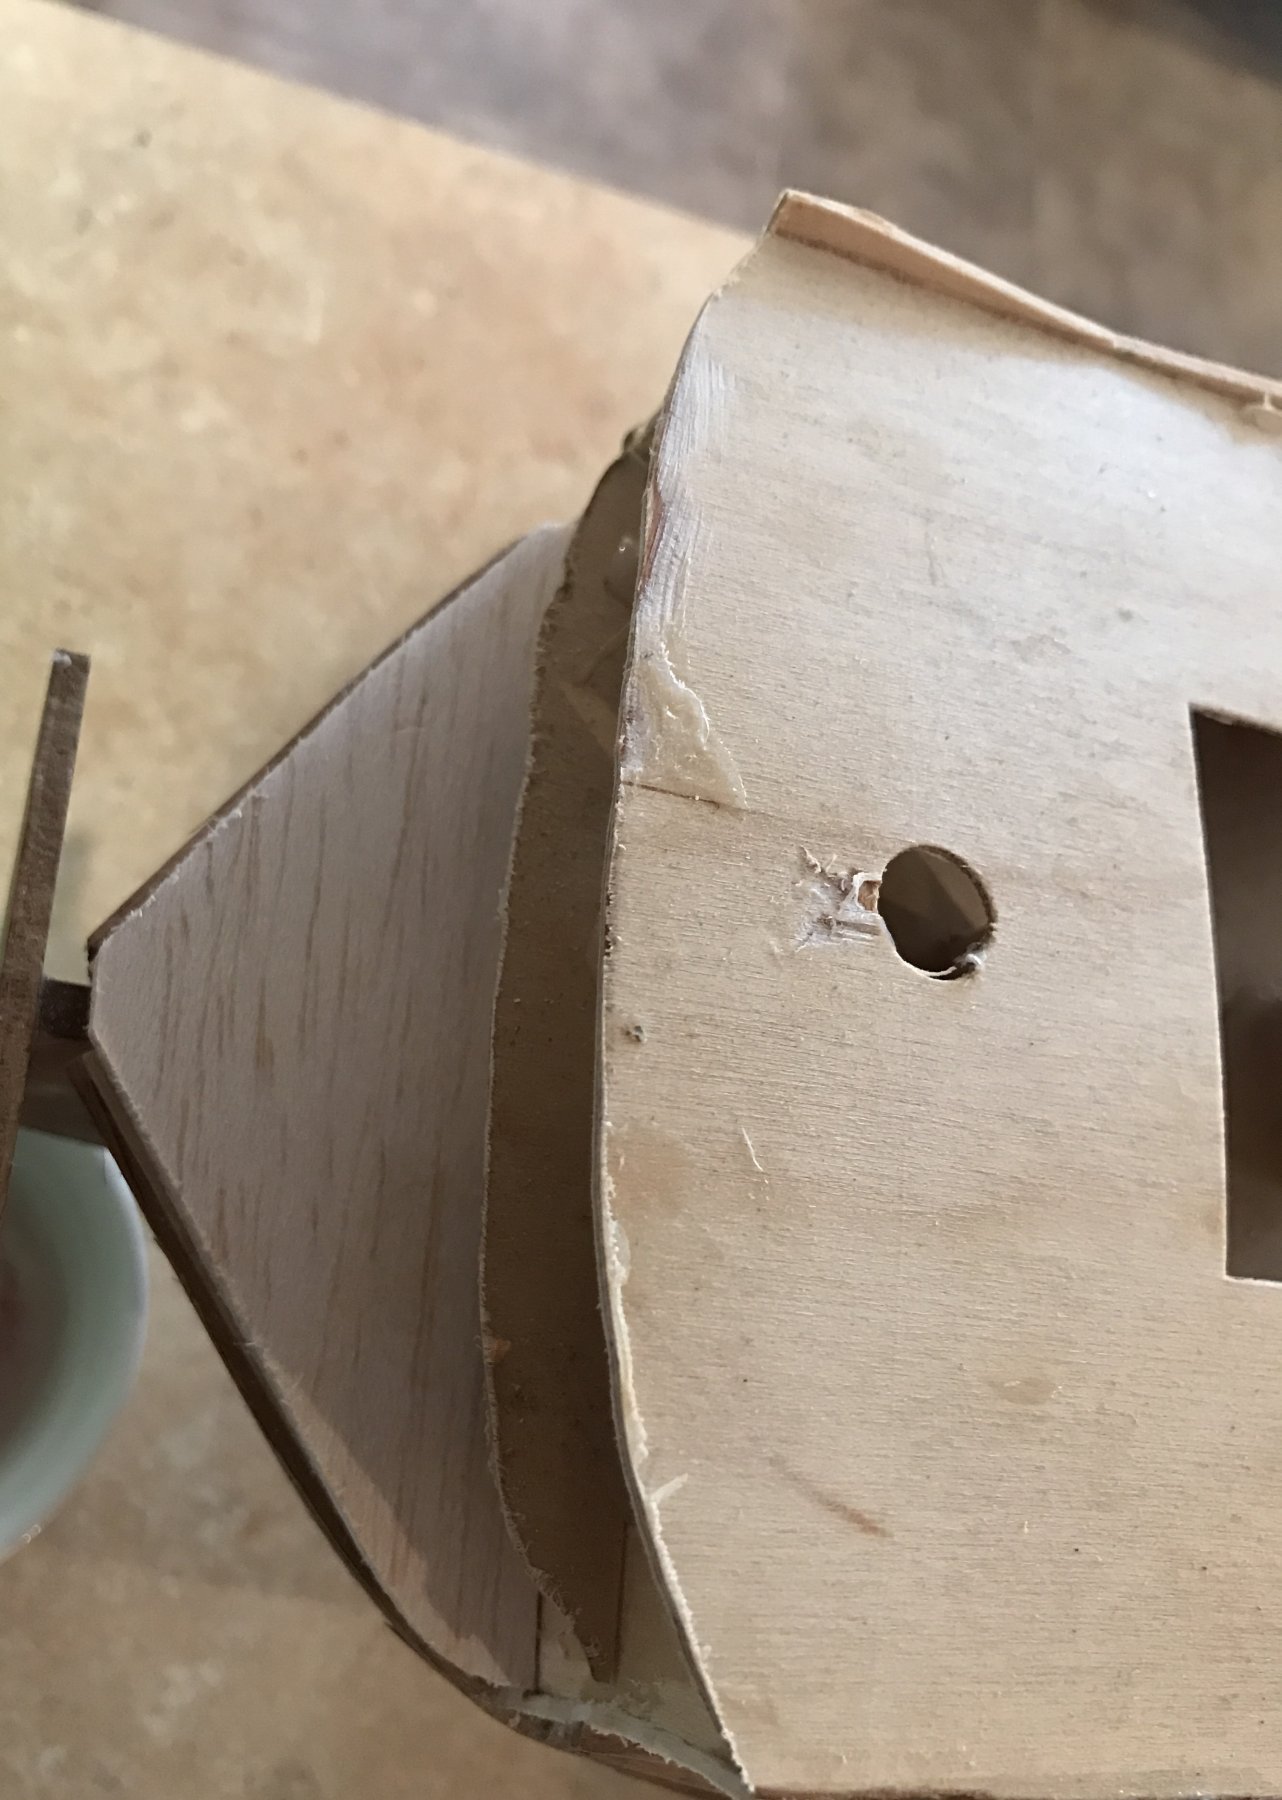
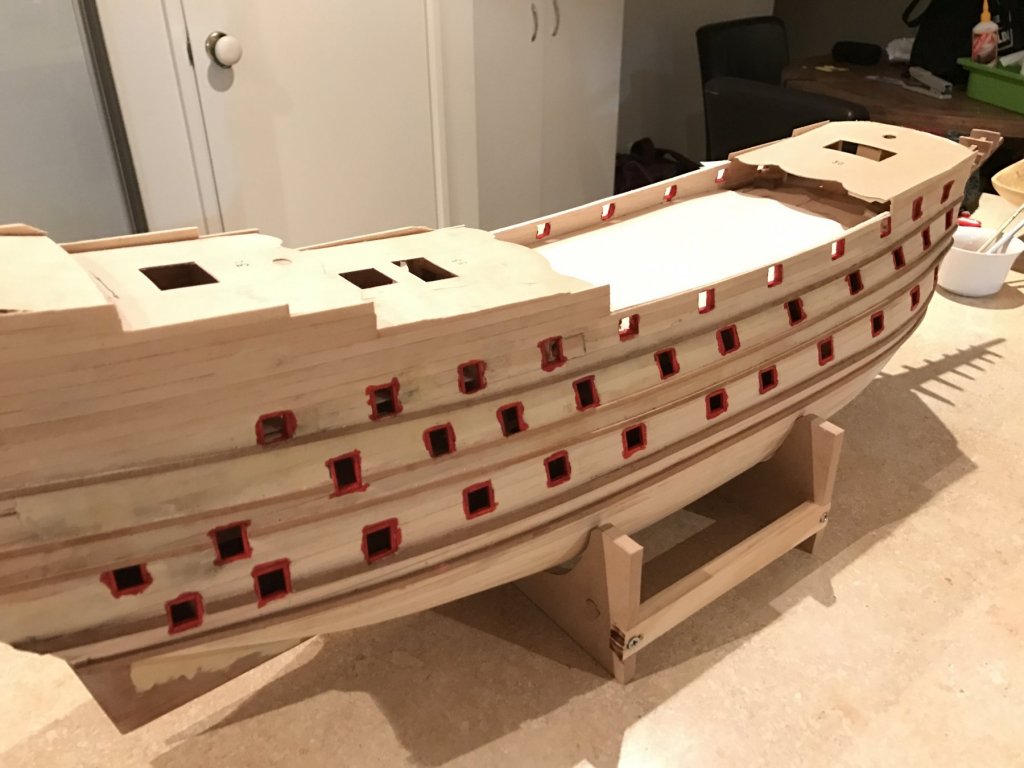
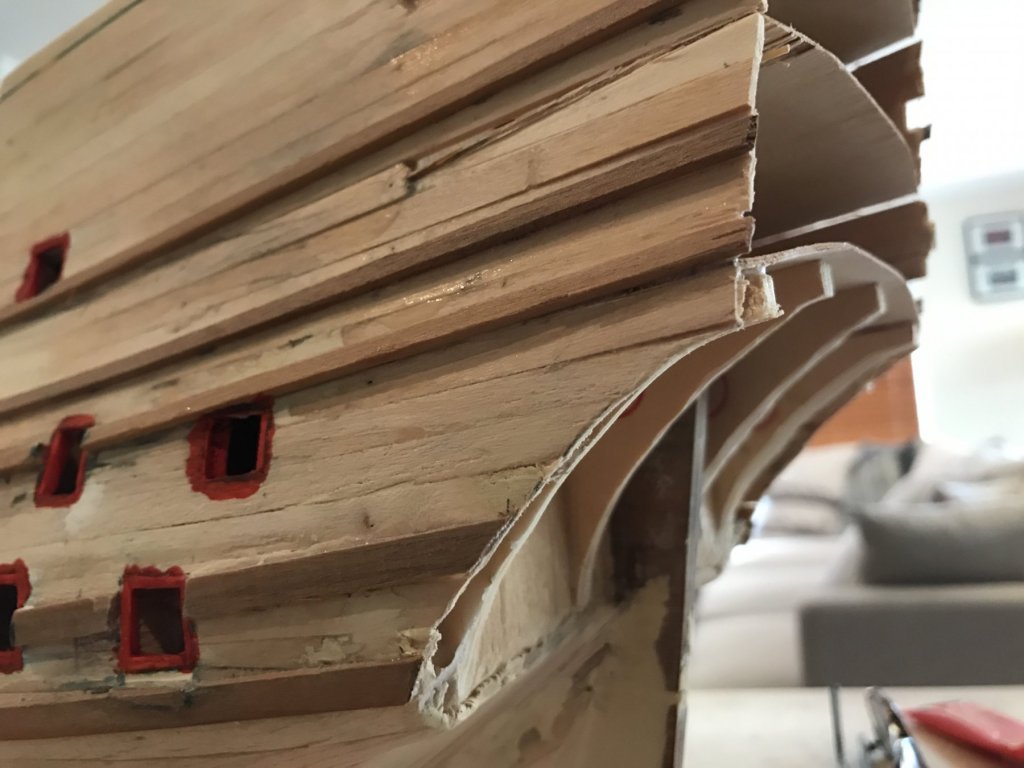
More on the model, have lined the gunports on her port side. I used scrap lime which was too thick but once sanded down made a nice clean opening, to my eyes at least. And have painted them red. Next will be to do the same starboard and trim the curve of the transom before planking that part. Sergal has a smaller second curve at the top of the transom which is incorrect as from what I can gather the Sovereign original transom was one large seeeping curve. I'll trim this to shape, plank the transom and she'll be ready for the second planking to comence


- 322 replies
-
- 8
-
-
- sergal
- sovereign of the seas
- (and 5 more)
-
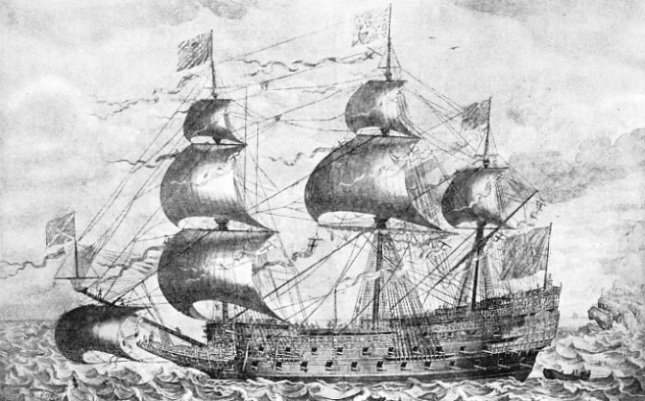
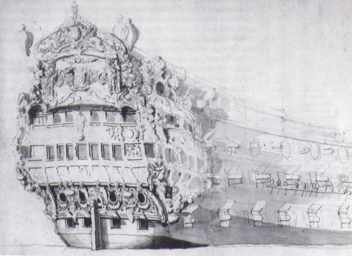
So if you've been following my build so far I've already mentioned some modifications to the kit and why. What a headache it has been also trying to figure out what, when and why things happened! Haha but that's half the enjoyment right? I'm sure one day I'll buy a kit and just build it out of the box.... nah you're right I wouldn't be able to help myself I thought I'd put down what I've learnt about her, now even this depending on which book and even within the same book there are contradictory notes which don't tie in correctly with later or earlier dates and even the known sketches have been incorrectly dated or just not known. So what my best decipher of all the information I've gathered thus far is as follows. The Sovereign of the Seas as most of us would recognize as depicted in either John Payne's engraving or the earliest Van der Velde sketch is of her between 1640 and 1659. It is clear in he Van der Velde sketch which I dated as 1659 (via John sephtons book) could in fact be earlier but not 1637. In both drawings she has the infamous long and low beakhead with the King Edgar figurehead riding a horse over 7 fallen kings, the long extended quarter galleries with open forward sections and light spar decks (grating decks) covering the entire waist and quarter decks. This is apparent as figures are walking on these decks. The John Payne engraving corroborates this as in his engraving the figures are also walking on these decks. Originally the Sovereign had these also above the forecastle and poop deck explaining Sergals model based on an 19th century model at the Greenwich museum and other models to depict quite high bulwarks all around her top sides. However it is noted that after she was launched, the officers criticized her stability when with shortened sail in gusty winds the ship handling horribly due to her being too top heavy. In 1641 the upper works of her poop deck (Sovereign had a topgallant poop or royal poop deck also as the most aft deck) and forecastle were reduced by 6ft with the bulwarks now terminating just above the gunports on those decks. This is evident in Van der Velde the elders sketch which shows her still having a spar deck above the waist and quarter deck but on no other decks. Also the bulwarks on the for mentioned decks terminate above the gunports - for clarity this is how I will model her. Then in 1651 the Sovereign underwent another refit/rebuild in which it's mentioned her outer appearance did not change and only below the waterline and internal modifications made. I believe this to be possible replacement of rotten floor and hull timbers. It is also likely the remaining light spar decks above the waist and quarter decks were also removed. This seems to be the closest appearance to what most of us modelers understand her appearance to be. The Airfix kit named Royal Sovereign 1637 depicts her in this fashion also. There is one note from John sephton that her beakhead was shortened at this time but doesn't fit in with the shipyard notes from a later refit. As an interesting side note in 1652 during the time of the commonwealth Sovereign was to be renamed 'Commonwealth' however 'Sovereign' was used instead. 1659-1660 was the year of her first major rebuilt considering her outward appearance. It was during this rebuild her beakhead was replaced with a shorter and more rounded beakhead with sweeping in broken line from the figure head up to the forepeak with a gargoyle below the cat heads - inline with other ships of the time and similar to the Naseby of 1655 which later became the Prince Royal. The vessel captured by the Dutch in the Thames. Sovereigns original figure head of King Egbert replaced with a rampant lion wearing a crown, however the vertical carvings from her original beakhead were retained and used on the new framing of the modernized peak. Her upperworks cut down more removing the roundhouse (cabin below the topgallant poop) the topgallant poop removed and a royal poop installed- so the upper most poop deck shortened to a smaller strip similar to that of the HMS Prince 1670. Her quarter deck (half deck) was shortened by removing the forward bulwarks of that deck behind the main mast. At this time the forward open parts of the quarter galleries were removed only leaving the box shaped enclosed portion of the galleries- the three turrets above remained. Further gun ports were also cut on the middle and upper gun decks. Vertical skids now fixed to the hull on the waist both sides to aid in lowering of the boats. The final major modification during this time was her transom was increased by 6ft in width to help reduce her leeway (drifting). She was close to 30 years old at this stage and her keel not replaced so it's possible to believe she bega to sag in her stern which would explain the need to increase the size of her butt I the water haha. This for me explains the shape of a squarer ad squarer transom in the Peter Leys painting of the stern of the Sovereign, while still a round tuck stern, its definitely fuller than what sergal and the earlier Van der Velde sketch show. Sovereign was still quite recognizable as her gilded carvings remained. From a distance apart from the shorter beakhead she would have looked like the same ship. It was during this period she became known by the Dutch as the 'golden devil' so we know that she did indeed retain her gilded upper works and still a very impressive ship to look at. Also renamed again and this time to Royal Sovereign at the reinstallation of the crown with Charles II. 1685 saw her last major rebuild. So much of her timbers changed that she was practically a new ship. Most of her carvings are believed to have been removed from her upperworks to reduce the cost of repair, it was also considered to replace her beakhead again this time with the straighter stem as fashionable at the time (HMS Prince beakhead was of this design) but never eventuated during her refit. An entry port was pierced on her starboard side as first rates and second rated vessels now had entry ports of both sides of the hull now. Her now very antiquated galleries completed removed and replaced with the rounder single turret design again as that of HMS Prince's style. Her stern was also significantly rebuilt. While still retaining the effigy of Victory her two rows of windows were significantly changed. More windows cut covering the entire width on both levels with the upper level having an open rather than closed gallery. This resembles the stern configuration of the sergal version more. Not entirely but closer, of course the Coat of arms is incorrect. Perhaps the model from which the sergal model is based at Greenwich is a mix of interpretation of her last stern but with the coat of arms which was common on most first rate vessels of that period. Also her large single stern lantern replaced with three smaller lanterns. From the 18th century only flagships would carry three lanterns and lesser vessels in a squadron 2 or only 1. I know I've rehashed a lot during the build so far but just had to put down on paper or somewhere what has now become clear, hopefully will aid in someone's build or just knowledge of the Sovereign. It surely has helped me a lot! Images below; •Payne's engraving of Sovereign circa 1640's. Note the light spar decks above the forecastle, waist and quarter decks. •Van der Velde's sketch of Sovereign stern after 1685 rebuild. Showing open upper stern gallery and single turret quarter galleries. •Peter Leys painting of Sovereign stern - sometime between 1650-1685. While still round tuck definitely beefier than earlier rendition leading one to believe it more square tuck. •Van der Velde's sketches after 1660 rebuild. Most notable, shorter appearance of beakhead and open walkways of quarter galleries removed also skids on hull sides. •Naseby 1655 (HMS Prince Royal as built) showing the beakhead Sovereign would have received during the 1659-1660 rebuild.


- 322 replies
-
- 4
-
-
- sergal
- sovereign of the seas
- (and 5 more)
-
Hahaha I've never built a part work kit before so that must be damn frustrating
-
She's looking great Ken. In regards to using the strip for the dummy carriages that's what I've always done in ships with concealed gun decks and find it a perfect solution. I've yet to build a euromodel kit though know that they slow the modeler to detail the model as much or as little internally with their frame and deck design so I would do what you're happy as comfortable doing.
-
Cheers Scott. I enjoy the research as much as the building and do get excited building. I'm far from OCD and meticulous, just have gotten ok with hiding mistakes. While I admire those who can build perfectly executed models with all the treenailing and exotic woods I'm happy with a model that represents a period of the vessel for me so not afraid of painting and hiding woodwork errors or using plastics and abs sheet to replicate steel parts - I use ABS sheets, strips and rod for my 1/72 RC models to reduce weight. Hard to break away from some habits I'm afraid but wood is so refreshing I live the smell of saw dust!
- 322 replies
-
- 3
-
-
- sergal
- sovereign of the seas
- (and 5 more)
-
The leading line would run from the lowest block on the shroud attaching to another tackle on deck through which the leading line would then be fixed to a cleat on deck or rail. Sometimes it suggests the line would lead direct to a cleat but this would enable tension either hauling or easing to be uncontrolled so leading to a tackle and then on deck makes the most sense to my mind. This is set up makes sense when you consider the spritsail topmast on the bowsprit- the backstay would run to the forestay or foretopmast stay through blocks and then a leading block on the bowsprit being made fast to a cleat on the forepeak. I hope that makes sense.
- 608 replies
-
- 3
-
-
- la couronne
- corel
- (and 1 more)
-
Thanks mate, I am but now onto the lining which will be tedious but satisfying once done and the second planking can begin. You might note that he main deck (waist) isn't quite right... and it's not by a long shot. The fit is out which is one thing but that was never a real concern as it follows the sheer. Correct if building out of the box but of course not inline with what how I'm building her. This isn't an issue as it also sits too low so I will be building the deck up to fit the straighter deck alignment of my build and to allow the proper height for the guns.
- 322 replies
-
- 3
-
-
- sergal
- sovereign of the seas
- (and 5 more)
-
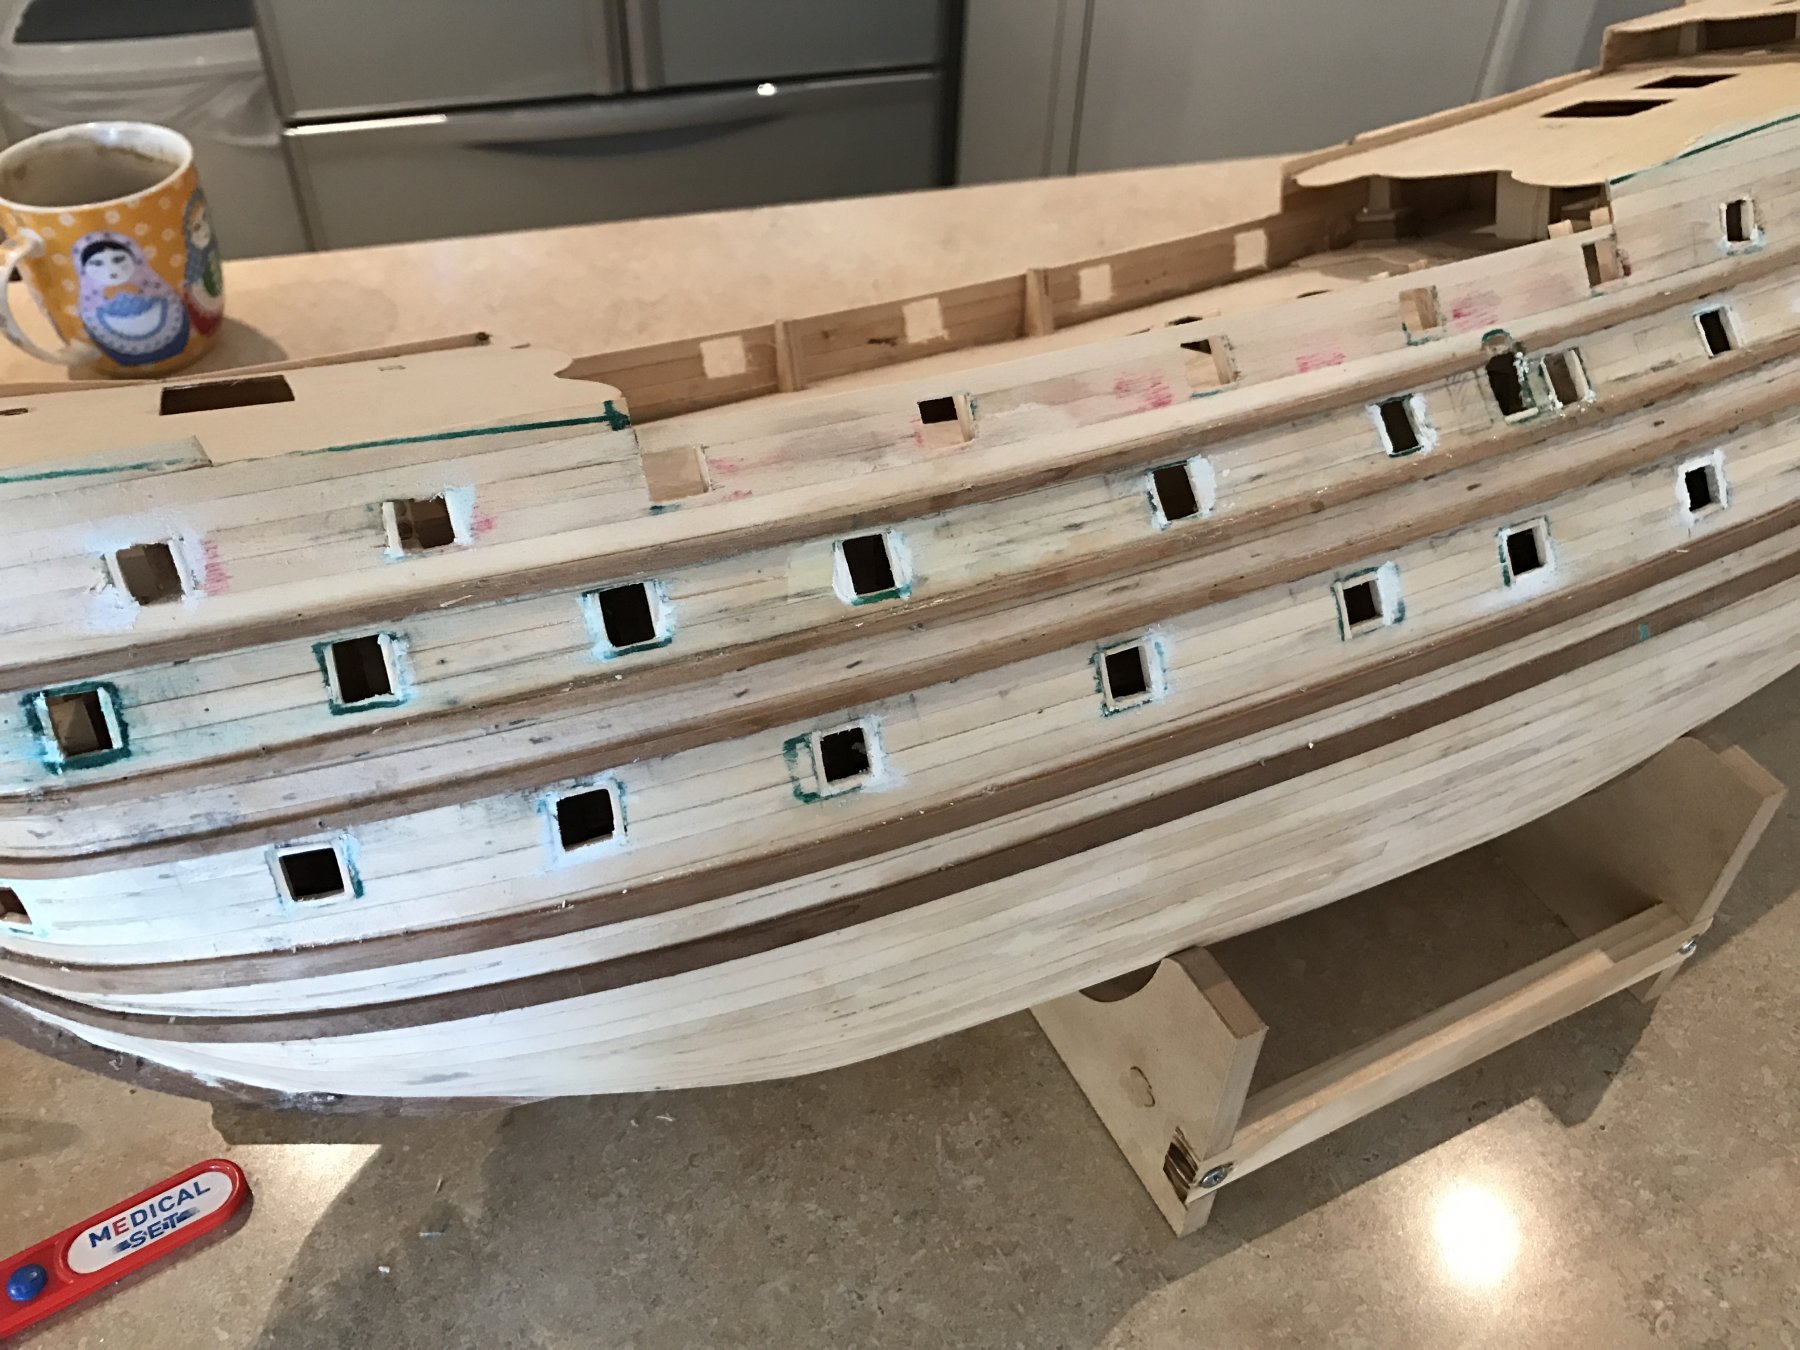
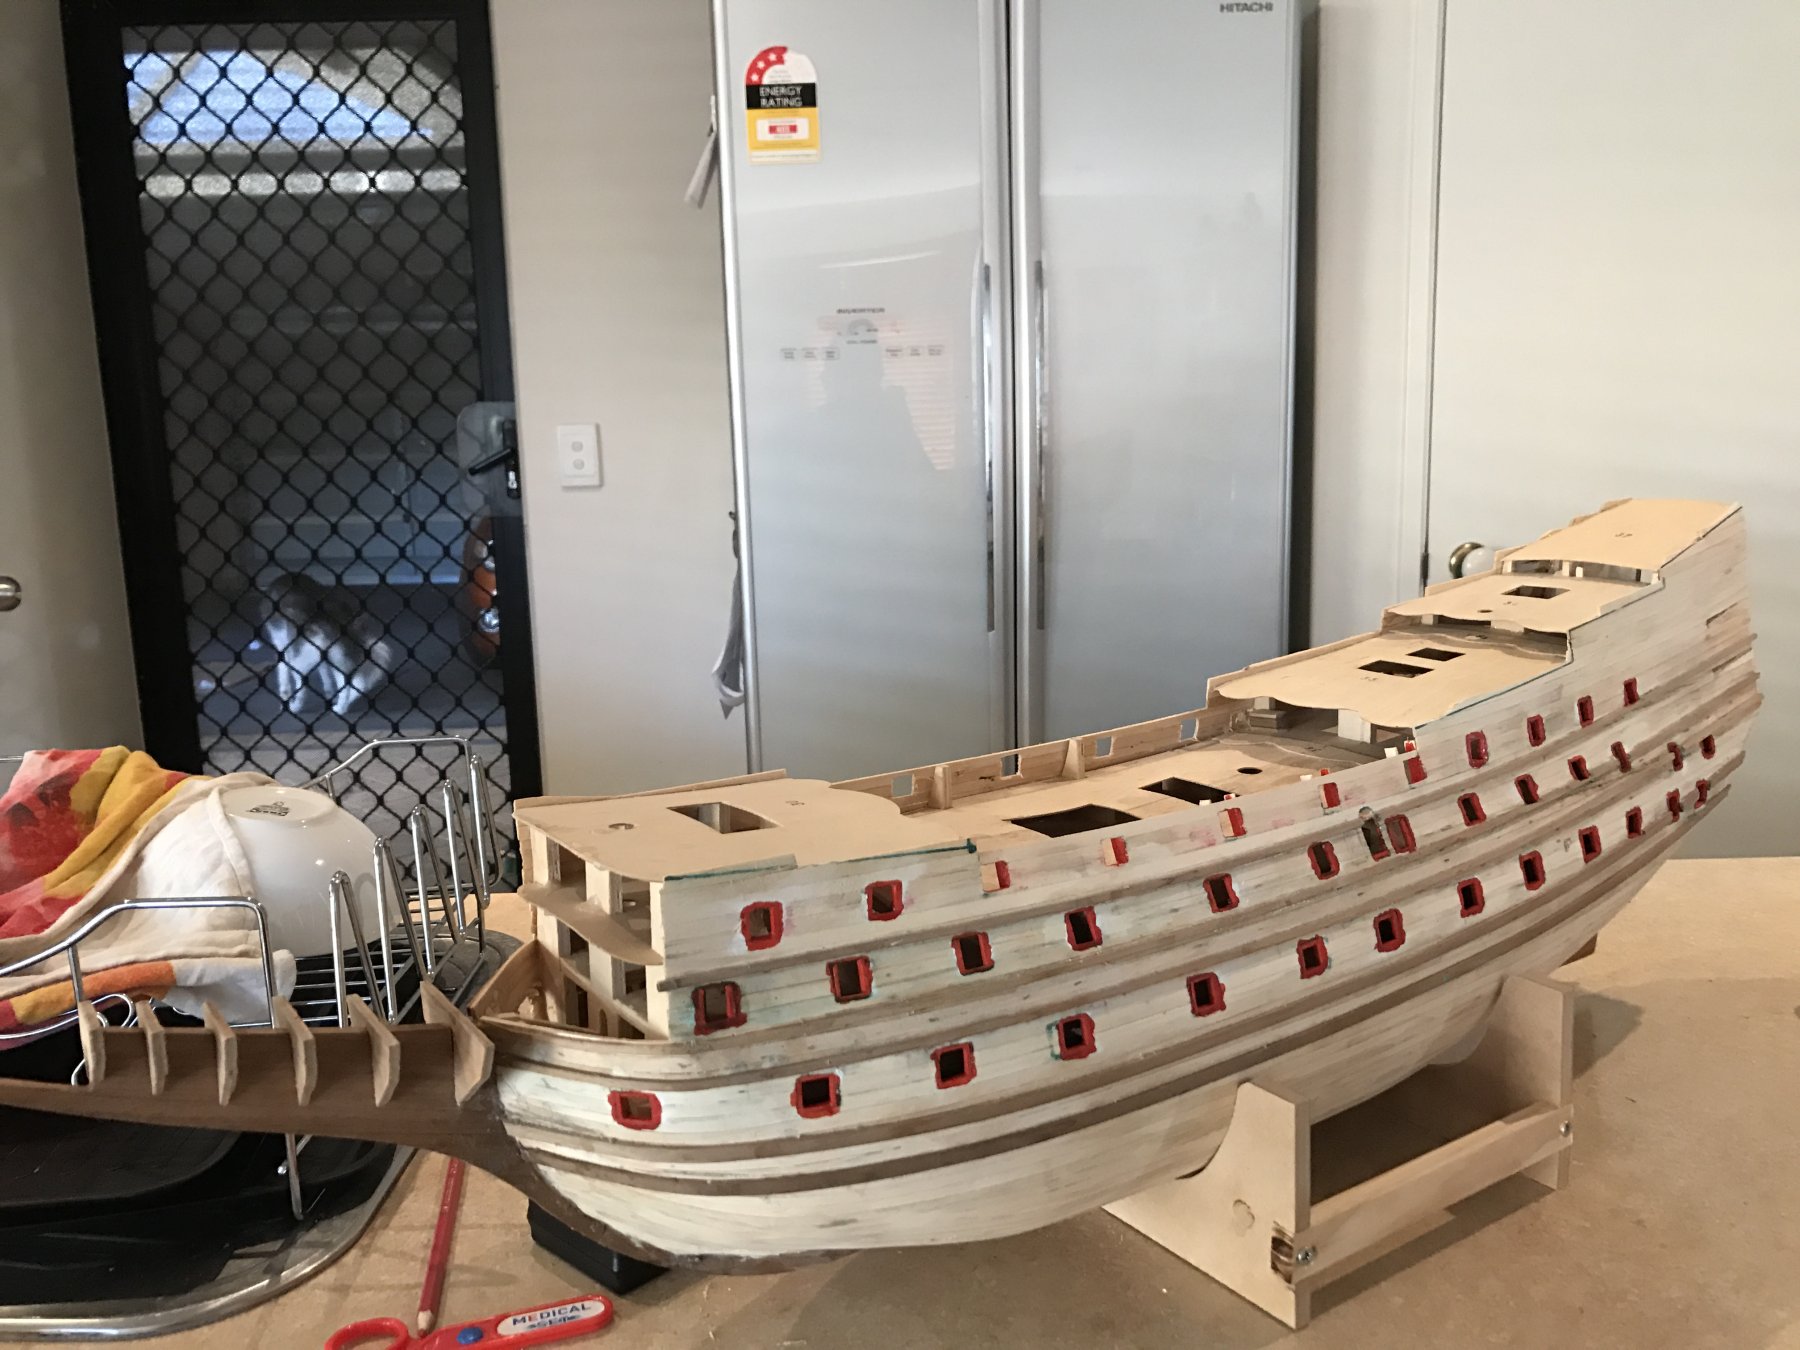
Starboard ports now pierced also. I'm following the research that makes note that the entry port was only on the port side so have left it off the starboard. This is quite clear as per notes from one of her later refits an entry port starboard was pierced in the hull as was then becoming present in most first and second rate English vessels after 1670. So we can assume at the time of Van der Velde's sketch only the port side had an entry port. This is also clear in Van der Velde the younger sketches of Sovereign after her 1660 rebuild showing both sides that there is only an entry port on the port side and none starboard but steps leading up the hull. Phew that was a lot! Haha

- 322 replies
-
- 9
-
-
- sergal
- sovereign of the seas
- (and 5 more)
-
Thanks MJD, if I can get anything like your Vasa I'll be quite proud indeed. Have started to cut the starboard ports, measure up each deck first then cut. See Sjors, starboard is cleaner than the port hahaha

- 322 replies
-
- 8
-
-
- sergal
- sovereign of the seas
- (and 5 more)
-
Hi Sjors, different yes and historically accurate possibly to the same date as Van der Velde's sketch. Like all vessels these ships were in constant refit and modification was also suggested/happening throughout their life. So I can't say mine will be more accurate than this version. PS I do like the blue you've chosen 😊 Also the red stripe between the wales, does DeAgostini give much background to her paint scheme?