


Roger Pellett
-
Posts
4,519 -
Joined
-
Last visited
Content Type
Profiles
Forums
Gallery
Events
Posts posted by Roger Pellett
-
-
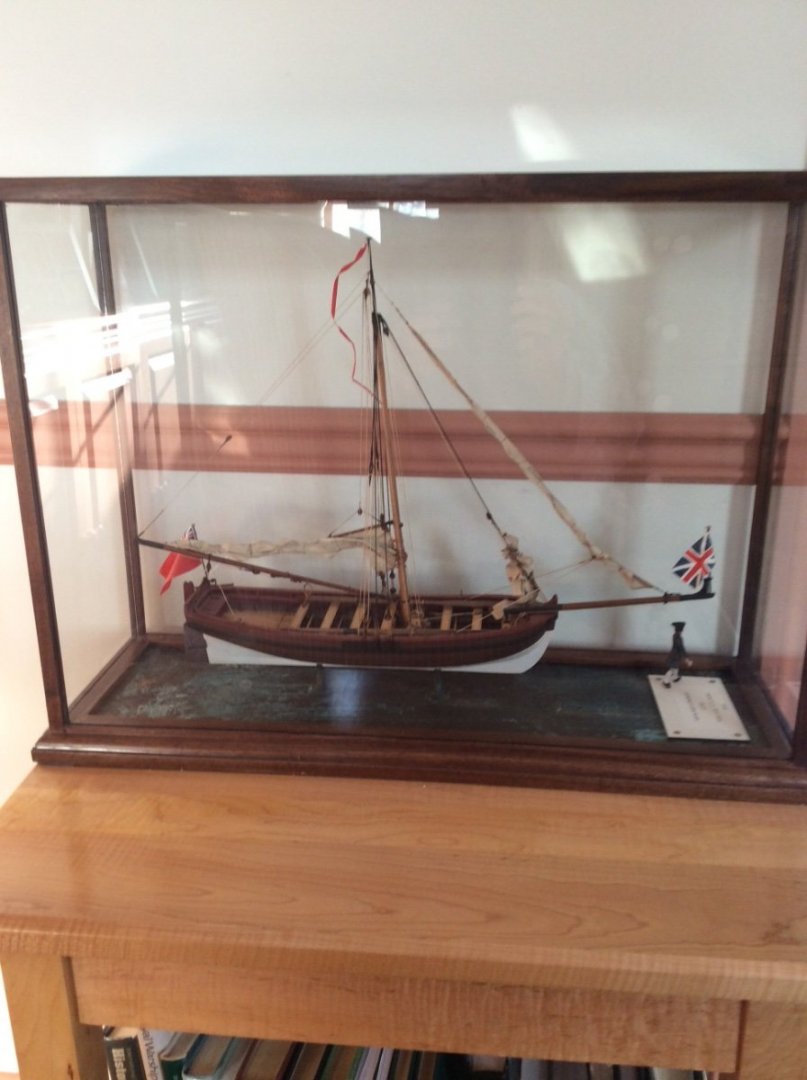
The crew member is the only thing that I did’t build myself. He is a 54mm cast Colonial Gentlemen from Imrie Risley Miniatures that I assembled and painted. The Longboat model is Early- Mid Eighteenth Century, before the establishment of uniform regulations for Royal Navy Officers. The dark blue and white is typical.
54mm is a common size for military miniature figures. It is equivalent to 1:32.
Roger
-
Happy New Year Kevin! It will be interesting watching this.
The Shelter Deck was a gimmick to take advantage of tonnage rules. Ship builders and their Naval Architects have long favored designs that provided maximum cargo carrying capacity while minimizing tonnage, the legal definition definition of carrying capacity. Tonnage is used as the basis of certain shipping costs; canal tolls, harbor fees, etc.
Tonnage rules generally exclude areas where cargo could be carried that are exposed to weather. So an extra deck called a shelter deck was added with a small opening commonly called a "Tonnage Opening." Since the tonnage opening was open to the weather, the entire volume above the extra deck was not included in the tonnage calculations. Of course, if cargo was shipped on the shelter deck, there was nothing to stop the crew from temporarily closing up the tonnage opening and making it watertight.
Roger
- mtaylor, Kevin, Old Collingwood and 1 other
-
 4
4
-
I enjoyed watching you build this model and look forward to see you finish Great Harry.
Congratulations on a job well done.
Roger
- mtaylor and Keith Black
-
2
-
A very nice tutorial on producing realistic sails.
I recently made silkspan sails for my 1:32 scratch built longboat. The model is based on the drawing with sail plan in May’s Warship Boats Book.
I would like to comment on an alternate way of realistically showing furled sails on an unmanned, moored sloop rigged small boat.
In the photo below, the boat has three sails; mainsail, foresail, and jib. A drawing of pre Revolutionary War New York shows one of these small open sloops moored in the Harbor. The loose footed mainsail is not furled to the boom. Instead, it is lashed to itself and partially raised as shown on my model. The jib, set flying, is hoisted but tied in stops with very light line. It would be set by pulling on the sheets to break the stops. I believe that this practice was common at the time.
-
Size Down!
-
Allan,
It looks like a good time with the Grandkids.
In Ohio where I grew up there are a lot of Black Walnut trees. The farmers who had trees on their property, put the nuts in burlap feed sacks and put them on the road in front of their houses. Cars running over them effectively removed the green husks. Cracking the shells and picking out the nut kept them busy on long w inter nights.
The wood is certainly nice to work with.
Roger
- mtaylor and thibaultron
-
2
-
Jason,
Four years from 1966-1970.
When I retired, we talked briefly about where to live including the DC area. We decided to stay here in MN; good friends, Lake Superior, and exceptionally good medical care.
- mtaylor and Keith Black
-
2
-
I think that the taller wooden posts double as awning supports.
- mbp521, Canute, Keith Black and 2 others
-
5
-
-
Jason,
Yup, that’s just down the road from us. We live in Duluth, on top of the hill not far from the UMD campus.
My wife grew up in DC and we were married there. I was stationed there as a very junior naval officer working for the KOG. If you served on the Enterprise I assume that you know who he was.
Roger
- EODGoat, mtaylor and Keith Black
-
3
-
-
Welcome aboard Jason, and also thank you for your service. My advice; find a relatively simple wooden model kit and dive right in (pun intended). My limited experience is that the Navy often calls you to tackle new challenges and this is no different. Post your progress and problems and you’ll find lots of help here.
Roger
- EODGoat, mtaylor and Keith Black
-
3
-
Very nice work, Brian. She just keeps getting better and better.
Here is a cross section from 1873 of hammock stowage for a seagoing US Navy vessel. The book still refers to them as “Hammock Netting’s.” I’m a firm believer in the idea that Form Follows Function, so even though not a river boat this might help. The outside is vertical tongue and groove white pine paneling.
Sorry, the dreaded forum glitch will not let me upload the photo. I’ll try again later.
-
It depends on what happened. If small areas sanded off, then the sandpaper did its job. It removed high spots.
If on the other hand, paint came off in sheets, it failed to adhere to your sealer. This means that paint and sealer were incompatible.
Post a picture to help us diagnose the problem.
-
Oh sure! I just automatically thought steam. Another question/ observation; the fins on the engine cylinders? While fins are usually associated with cooling, I wonder if these are for transferring heat into the cylinder. Otherwise, as the air expanded the drop in temperature could have frozen entrapped moisture.
- FriedClams, Canute, Egilman and 3 others
-
6
-
Eric,
If this were my model, I would not copper plate it. A scale copper plate would be less than .001 in thick and slightly over 1/8in wide.
So, with the vessel out of the water, standing 100ft away what would you see? You certainly would not see individual flat head tack heads, at scale perhaps .005” in diameter, and probably not individual plates. Quite possibly you would see a mottled copper/ brown hull with touches of green along the waterline.
I would rub down the copper paint to a smooth finish and overspray with a very light coat of red tinted brown. You could also dry brush some green along the waterline. If done right, this subtle shading would produce a handsome effect on this small model.
Roger
-
Since no lives for ever or continues to have have the good health and energy to keep running a small business it is eventually sold or closed up. Hopefully Bob has found a buyer who will continue to publish and sell high quality books.
Roger
-
-
Michael,
Spectacular work as usual. Was this charged with steam or hot water?
Steam accumulators used in industrial applications and for US Navy aircraft carrier steam catapults store energy in high pressure hot water. When steam is needed, the valve is opened and the hot water flashes to steam.
Roger
-
The West System Epoxies, widely used here in the USA are “modular.” One formulation of resin can be used with several different hardeners to vary working time. West System also sells a variety of compatible fillers. Viscosity of the resulting mix can vary from a light syrup to peanut butter. What Riotvan88 did is exactly what West System recommends for fairing full sized boat hulls.
I suspect that as you point out, a more aggressive abrasive will solve his problem.
Roger
-
Once you choose a scale for your model, it’s a good idea to determine the length of a scale inch. This need not be exact. Here are my approximate scale inches for various scales:
1:96. .01”
1:64. .015”
1:48. .02”
1:32. .03.” (1/32” is exact)
Now, you can do a lot of scale checks in your head. For example, at 1:64 scale, an 8in block should be about 0.12in long. The actual length should be .125in (1/8) in so my mental gymnastics are off by .005 In or 4%. For me, that’s good enough.
-
Belaying pins:
Shiny brass pins look totally out of place, especially for a working vessel, and paint is likely to chip when you handle them, so what to do?
Blacken them! At your scale, they are, or at least should be tiny, so as long as they are dark the eye cannot determine different shades of wood. Blackening also does not build up a thick layer like paint. After they have been blackened, line them up in shallow holes drilled in a block of wood and give them a very light sprayed coat of Dulcote.
Roger
- ClipperFan, Cathead, gak1965 and 3 others
-
6
-
-
My definition of the term “sanding block” is different from yours. I was suggesting wrapping high quality abrasive paper around a block of wood, not using a proprietary block of material impregnated with abrasive material. I have not found these proprietary sanding blocks to my liking.


carronade information
in Discussion for a Ship's Deck Furniture, Guns, boats and other Fittings
Posted
For US Navy practice I recommend “Arming the Fleet” by Spencer Tucker.