


Roger Pellett
-
Posts
4,519 -
Joined
-
Last visited
Content Type
Profiles
Forums
Gallery
Events
Posts posted by Roger Pellett
-
-
Both of these should be Pinned by the forum gurus. They look like great reference tools.
One color that I have not been able to find anywhere is red lead, not the actual stuff. This is an old time industrial color widely used as a primer. It appears to have been used for painting the bottom of Great Lakes Ships.
Any ideas?
- DaveBaxt, mtaylor and thibaultron
-
 3
3
-
Eberhard,
Your paint job looks good to me! It’s good to se you making progress again.
Roger
- mtaylor, Keith Black and FriedClams
-
3
-
A somewhat cynical view of finishes:
Kits are expensive: You are paying for someone else's intellectual property, which you should, but you are also paying a lot for marketing, and distribution. Each organization between you and the manufacturer needs to be paid.
To offset these marketing and distribution costs, many "Hobby Shop Grade Kits" do not use high grade materials, and many use misleading descriptions to promote sales. For example, genuine American Black Walnut is an excellent wood for high end furniture, but not so good for ship models, and the stuff marketed as walnut by some kit manufacturers is worse.
Trying to find a finish to enhance the appearance of low quality wood is a waste of time. Although there are finishes advertised to turn any wood into a work of art, these are aimed at the DIY and Craft markets. Many of these contain fillers intended to hide defects, thereby covering up detail that we want to show.
So, realizing that not everyone has unlimited resources to devote to this hobby what are the alternatives.
Deal directly with a kit manufacture with a reputation for furnishing high quality materials: By buying directly from the manufacture your money goes into the kit. You are not paying for distribution. Links to these quality kit manufacturers can be found here on MSW.
Use a finish appropriate to the quality of the materials: As they say "paint covers a multitude of sins."
Build from scratch: Today, information that can be used to build accurate ship models is widely available. An hour's search on the internet will turn up dozens of public domain examples of prototypes suitable for all skill levels. Howard Chapelle's work alone could keep an army of model builders busy for a lifetime. Prints of his work are available from the Smithsonian at a reasonable cost (I think comparable to a couple of Starbucks Lattes).
With your prints in hand, go to the lumberyard and hardware store. Buy a couple of chisels, coping saw, a quality pine board and carve a hull. Buy other tools as needed. Back in the 1930's, Popular Mechanics published articles on building ship models using just this solid hull modeling technique. I have two such models built by my father that are between 75 and 85 years old that look like they were built yesterday.
Roger
- thibaultron, jlefever, Canute and 3 others
-
6
-
With so few frames, you will have a difficult time producing an accurately shaped hull. You will make your life a lot easier if you fill in the spaces between the frames with wooden blocking, then carve them to produce a smooth hull. You can then plank over this firm substructure.
Roger
-
I hope that the skiff is going to be restored. Although my sea time was very limited; An 8 week Midshipman Cruise, it was on a small ship, a minesweeper deployed in Japanese coastal waters. Few people realize how important these small boats were to the life of the crews on these small ships. They were our communication to the outside world- movies, mail, etc.
-
knots were used to secure little if any running rigging aboard ship. Have you ever tried to untie a knot in a piece of wet rope, particularly on a dark night when it is under load? Cleats, bollards, bits, and belaying pins were all invented to allow lines to be snubbed or cast off off under load. This is a case where friction is our friend.
Likewise knots were not used to strop blocks. Tying a line around a tiny block is like trying to tie one around a watermelon seed. No wonder that you resorted to CA ☠️ to hold the block in place. Before the development of internally stropped blocks in the second half of the Nineteenth Century blocks were stropped with an endless rope grommet, think of a rope donut. These are not difficult to make. The strop would be seized to the block which also produced an eye that could be lashed to wherever it was needed.
My system for producing these strops comes from Longridge, The Anatomy of Nelson’s Ships. I’ll be happy to post the details when I have some time if you’re. Interested.
Roger
-
I believe that most successful and experienced model ship builders have a mental picture of what they want their model to look like before they start building it. Very much like an artist with a painting. Finishing decisions are, therefore, made early in the game.
Since the introduction of the European style POB models to the American market in the 1970’s there seems to be a desire by neophyte modelers to finish their work bright (with a clear finish) to show their workmanship. While a properly applied bright finish enhances the appearance of Dockyard style models, IMHO this finishing treatment benefits few of these kit models. Most end up looking like toys.
The vast majority of ships were working craft whose owners did not wish to spend money on elaborate finishes. Paint was the order of the day. Even navy ships with their large crews to keep busy were by the Nelson era, painted,
To me, therefore, obsessing about a bright finish for the average kit model is a bit like putting lipstick on a pig. Wipe on poly, shellac, Dulcote, why argue? Git Er Done!
Roger
- thibaultron, Canute, Bob Cleek and 1 other
-
4
-
Brian,
Wonderful work!
They’re not (wince) lifeboats! They are ships boats. The idea of “help, we’re sinking, man the lifeboats” is a merchant marine rather than a navy idea. Warships boats were specialized working craft, from heavily built launches to fancy fine lines officer’s gigs and barges. Photos of these Civil War gunboats show these boats, some clearly. There is an especially well known Brady photograph of soldiers in a ship’s boat in the James River. While I have never seen a boat establishment for these gunboats, I believe that they were equipped with cutters with perhaps a small launch. See Chapelle’s American Sailing Navy for drawings.
If the gunboat was sinking and if there was time to launch one of these heavy craft or if in sinking one floated free, self preservation would cause these boats to be used to save lives but that was not their principal reason for being carried.
Roger
- mtaylor, Canute, Keith Black and 1 other
-
4
-
A wonderful job Rik! I hope that you get to run it, at least on compressed air.
Many many years ago when I was in engineering school, our thermodynamics class went on a field trip to the Henry Ford Museum in Dearborn Michigan, about 25 miles from Ann Arbor where the University of Michigan is located. At that time, the museum had a large collection of steam engines ranging from a Newcomen Atmospheric engine to a relatively recent steam turbine.
The most spectacular was a very large Corliss stationary mill engine, c1880. The flywheel was probably 30ft in diameter and 4 ft wide, the bottom half was of course in a pit in the floor. Our guide, a retired mechanical engineer asked if we’d like to see it run. It turns out that it was hooked up to compressed air. By manually manipulating the valves he singlehandedly got this huge engine running. It was beautifully balanced and very quiet. Quite impressive.
Roger
- bruce d, thibaultron, Rik Thistle and 5 others
-
8
-
You ‘re building a model of an open boat. Any sort of wipe on finish and to some extent brush on finishes require access to the surface to be finished (obviously!). I don’t see how you can apply any kind of wipe on finish to the boat’s interior without either damaging it or leaving unsightly globs on inaccessible surfaces.
If you want an alternative to my Dulcote, I would suggest a thin coating of shellac.
Roger
- Canute, Bob Cleek, thibaultron and 1 other
-
4
-
-
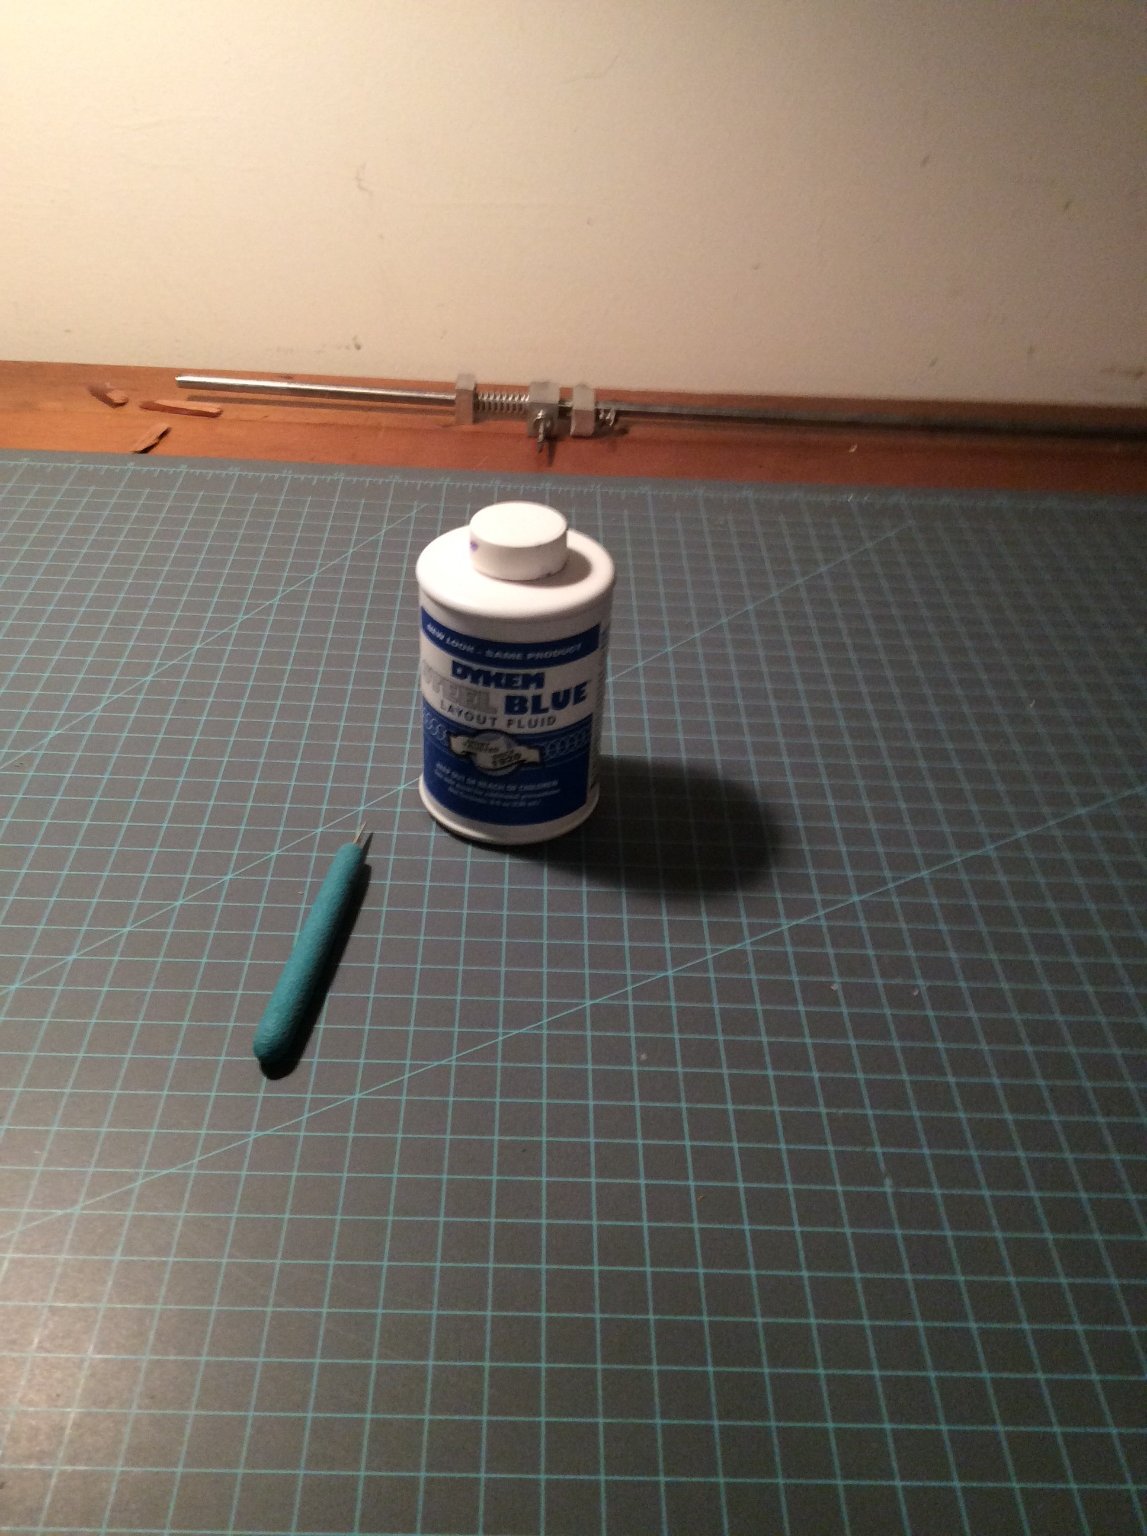
If your work involves metal, here are two things that I consider to be essential; a scriber and Dykem Layout blue. Layout blue is painted on a metal surface and layout lines are scribed thru the blued surface. I’ve tried other things; magic markers, rattle can paint, but nothing comes close to working as well. I bought a can on Amazon.

-
Here are the tools that I would consider to be the minimum necessary for measuring and marking out:
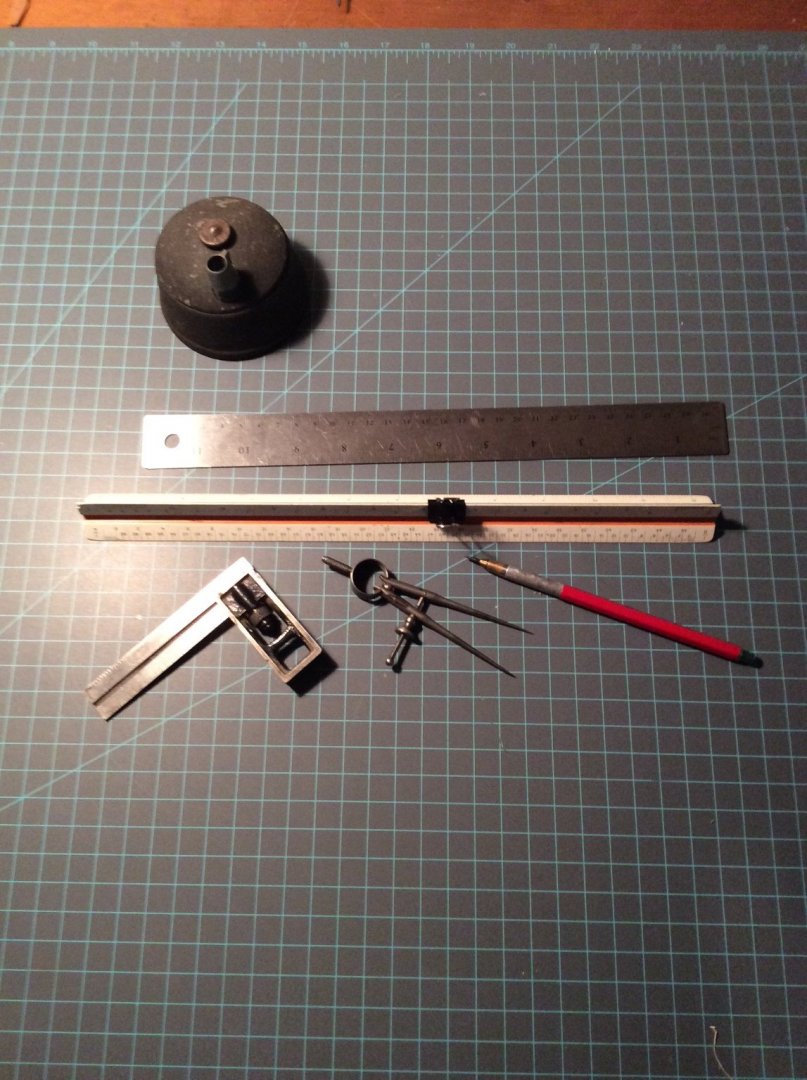 Some comments-
Architect’s scale: This is marked off in different scales as explained above. I build my models in feet and inches but I assume something is similar for metric modelers. While these are not expensive, get one that is easy to read. Unfortunately since there 10 different scales, it is easy to make a mistake by measuring something with the wrong scale. A spring clip on the scale at least makes you Lay it down correctly.
Metal Ruler: My Engineering school drafting instructor stressed that Architect’s scales were not straightedges; hence the metal ruler- Target, $1.00
Square: I have a couple of Machinists scales like Allan mentioned but if I could only have one square, I like the sliding beam square shown. In addition to working as a square, it also works as a marking gage.
Dividers: Get a pair with the bow spring and screw adjustment. The others with just the friction joint never hold the measurement.
Technical lead holder and pointer. After seeing others use these, I dug out my old one from Engineering drafting class and bought a pointer for $10 on EBay. I use 4H lead. I will never go back to a wooden pencil.
Although I have a digital caliper, I don’t consider it to be essential. I try use scale. Measurements, either directly from my Architects scale or using the dividers to transfer measurements from the scale to the work. I use the caliper mostly for measuring drill bit diameters and checking thicknesses of stock.
These tools reflect my personal work habits. I have tried ideas that others use but didn’t work out for me. You will develop your own preferences too.
Roger
-
The model that I am currently building features a lot of soldered brass. This requires a lot of cleaning up after soldering. For this I use a set of cheap no name needle files. My good files I use for material that has not been soldered.
- Canute, Ryland Craze, allanyed and 2 others
-
5
-
Square riggers were built for one thing; to sail efficiently down wind or at least with the wind over the quarter. When not able to do this, the rig had major disadvantages. They did not “point” well when sailing into the wind, tacking is complicated; without a highly skilled crew the ship would often fail to pass through the eye of the wind, and as posted above they required large highly skilled crews.
Of course, before hunting whales, the ship’s first had to get to where they were likely to find them. In the mid Nineteenth Century this required very long voyages from North America or Europe to the Pacific. By this time, the new science of oceanography had mapped prevailing winds and currents so that whaling ship masters could make these voyages traveling mostly “downhill.” The square rig worked well for these long voyages and when they got to the whaling grounds they could take advantage of another square rig feature: The ability to stop the ship when pursuing, killing and butchering whales. This involved backing some sails and filling others.
Schooners were far easier to maneuver than square riggers and were better adapted to dealing with contrary winds because of their ability to sail closer to the wind and to tack easily. They also required much smaller crews. These factors explain their near universal adoption for trades in confined or coastal waters. It is interesting to note that the great multimasted schooners built at the end of the age of sail performed well in coastal trades but not so well on Trans Atlantic voyages.
So, the question is, Was Kate Corey originally built to hunt whales close to home, early whaling grounds were often in Arctic Atlantic waters, or was her Schooner rig just a mistake by her owners?
Roger
- Harvey Golden and mtaylor
-
2
-
-
I tumbled on to the Tamiya spray can primers in our local Hobby Lobby while my wife was spending “quality time” in the next door Target Store. I first used them to prime cast metal military miniature figures. They appear be old style lacquer based coatings as once dried they can be dissolved in lacquer thinner. I like them very much.
My present 1909 Great Lakes Freighter Model will be painted in common industrial colors; black, grey, red oxide, white, all of which are available as Tamiya primers. I intend to use these Tamiya primers for finish painting.
I have found, that overcoating these with a light coat of Testor’s Dulcote seems to give “depth” to the finish and enhances durability on metal surfaces.
I have not had good luck with hardware store rattle can paints as the nozzles gum up long before the can is empty and even switching to a fresh nozzle does not always solve the problem. I have not had this problem with either the Tamiya or Testor’s Model Master spray cans.
Roger
-
IMHO, If you have Floquil paints, you’re using the best. I like the Tamiya paints too. I see no reason to overcoat paints used to paint your hull. I especially would not paint polyurethane varnish over your Floquil painted hull. Floquil is known for its ability to provide excellent coverage with thin coats thanks to their finely ground pigments. Overcoating with varnish will add an unnecessary thick coat that is likely to tint your white topsides.
Wooden spars were often finished bright (natural). Where mast hoops were used they could scar a painted finish. If you decide to paint them white, I wouldn’t worry about getting an exact color match.
Roger
-
In the real world of the sailing navies, I suspect that experienced seamen could identify most naval vessels at a glance with or without a name on the transom. The phrase, “the cut of her jib” comes to mind. In the case of pressed landlubbers, no one cared., and of course many sailors were illiterate.
In the merchant navies name and port of registry painted on the stern identifies legal jurisdiction. Here on the Great Lakes, it’s always amusing to see 1000ft ore carriers that are too long to sail out out of the Lakes with Wilmington (Delaware) painted on the stern as home port.
Roger
- DaveBaxt, Keith Black, RichardG and 1 other
-
4
-
60 years or so collecting model building and maritime history books and not done yet. In 1990, I had the opportunity to include a dedicated library for them. When I’m consigned to a “luxury home for active seniors” 😠 the next owner will probably turn it into a personal gaming space.
Roger

-
Hey! If my post sounded critical of replies by Bob and Justin, I’m sorry. After all, you guys provided straight answers to the question! As self proclaimed master of thread drift I probably clouded the issue.
As a matter of fact, I used my Sears rotary tool yesterday. It did a great job of cutting brass tubing to line portholes in the model that I am building. In fact, the accessories that I use by far the most with this tool are the little disposable cutting discs.
Roger
-
-
I offer a contrary opinion. Since I enjoy sidetracking threads, this advice is worth exactly what you paid for it. 😜
Don’t buy a rotary tool! Instead buy a decent set of needle files. These rotary tools can be too aggressive when used on fragile materials. If used with any sort of heavy tool, the mass rotating at high speed begins to take charge. If you don’t have a light touch and a sure hand, you’re likely to wind up with a picture window instead of a porthole!
I have had a Sears Craftsman rotary tool that is 50 years old. It is great for use on metal but way too aggressive for use on thin wood. I recently bought a Proxxon pen sized engraver that is powered by a separate 12v power supply. With a small round point engraving tool, it works well on model scale materials.
Roger
-
Yes, the boat is located at the Cornwall branch of the museum. I was able to talk to the boatbuilder there as I was curious about the drawings that they used. They were unable to find any drawings specific to the Titanic’s boats. Instead, they used drawings published in a technical paper. He made me copies of the drawings.
In many cases, lifeboats were considered “outfit” by the shipyards and vessel owners so were bought from specialized suppliers. This makes information hard to track down.
Roger
- shipman, USS CYCLOPS and mtaylor
-
3


Paint Conversion Charts
in Painting, finishing and weathering products and techniques
Posted
Thanks, Mark
Bob: Here on the Lakes, the colors of vessels’ hulls reflect the cargos that they are expected to carry; Red oxide, iron ore; Black, coal; and light grey, limestone or cement. A few fleets sported fancy paint jobs; Shenango Furnace painted their hulls green and ships In the Inland Steel Fleet still have a red oxide hull with a white stripe. Crews supposedly hate the paint job since they have to maintain it.
Since, draft can vary greatly depending on loaded condition and since fouling is not a huge problem, the paint job does not mark a load waterline. Instead the hull color is carried down to the strake of plating just above the bilge strake. Below that, the hull is painted with whatever primer was used. In days past this was an orange hued red lead. Color photos from 50 or so years ago sometimes show this, and often show the red lead primer where lock walls, docks, etc. have rubbed off the paint.
When Ships fit out after winter layup, crews standing on the harbor ice with very long handled paint rollers touch up the paint. These ships are usually drydocked every five years. At that time the bottoms are sandblasted and repainted.
With current regulations preventing lead based paints, I would assume that bottoms are now painted with ordinary red iron oxide primer.
Roger