Chuck
-
Posts
9,703 -
Joined
-
Last visited
Content Type
Profiles
Forums
Gallery
Events
Everything posted by Chuck
-
 Allow me to explain this a little more and not in terms of cost. Cost is only one of many considerations. Let us examine the proposal of having chain pumps that are open to show that wonderful mechanism everyone loves. Forget the photoetch right now...let us put our kit designer hat on. Its very easy to think about the visual details.....and then what it costs. But let us consider also how to manufacture each piece....not the photoetch. That is easy...just costly. Let us talk about the obvious thing everyone has missed about the pumps. Can anyone guess what it is? From a manufacturing perspective as well as a builder of the kit? OK who guessed correctly? I am talking about the pump tubes. Everyone has overlooked them in this discussion. They are very long at 5" or so before being trimmed to fit. In order to consider including the inner works, I must consider first how I would bore these thin wooden tubes which are octagon. I know how I would do it if I was scratch building them. It requires specialty bits and other tools. But to mass produce six such hollow pump tubes (per kit) that are made from wood and hollowed out would be a nightmare. How could one manufacture these? In addition, should I spend the money to create the photoetch inner mechanism parts and include them in each kit..... but not include these specially designed and bored octagonal pump tubes, how many people who bought the kit would have the tools and experience to create them from scratch. Lets say I spend the money for the photoetch parts and offer it as an add-on. How many people would be upset because they didnt really think it through, and later realize that they must create these tubes but cant for various reasons. They would probably return the item unopened and I would have a lot of them which I cant get rid of. These are questions that go through the mind of a kit designer....for every single part in the kit. I usually start a project considerring all of these details that everyone would want and desire (the wish list) and work my way "backwards" to simplify certain parts based on how they can be mass produced or built by the average model builder. In the case of the pumps.... I have yet to find a solution for making these hollowed out pump tubes quick enough to make it worth my time as a business concern other than to just do it the way anyone else would, which is by hand one at a time. Not gonna happen. So the hang-up is NOT really the photoetch......its the pump tubes. Sorry for the long explanation but I thought some of you might find it interesting....and be surprised that you and probably most of the others overlooked the obvious, unless of course you never had to consider making hundreds of hollowed out octagonal pump tubes from wood every few weeks.
 -
Its nice if you have the staff to help you cut the stuff....right now the staff consists of me , myself and I. I am not against it but I would rather do it on a one to one basis depending on time constraints when it comes to a different wood for example. For instance I just cut and finished a barge kit for someone in Boxwood. It was double the regular price. But we worked it out independently. To make those PE sets would mean that I would have to order 50 - 100 of them at a time. I am not sure that there are 100 people willing to spend the "plus" price. There are people who ask me.....can I have it in another wood...... There are people that ask for extra parts.... Two different scenarios and both with their own special sort of problems. It really depends on how much they cost to make guys. I havent got that far along with that yet. So I cant say no at this point.
-
At 1/4" scale its not even 6" x 6" x 6"....just to give you a rough idea. I dont have the exact measurements handy but fore to aft its about 5 1/2". Its probably a little taller and a little wider.
-
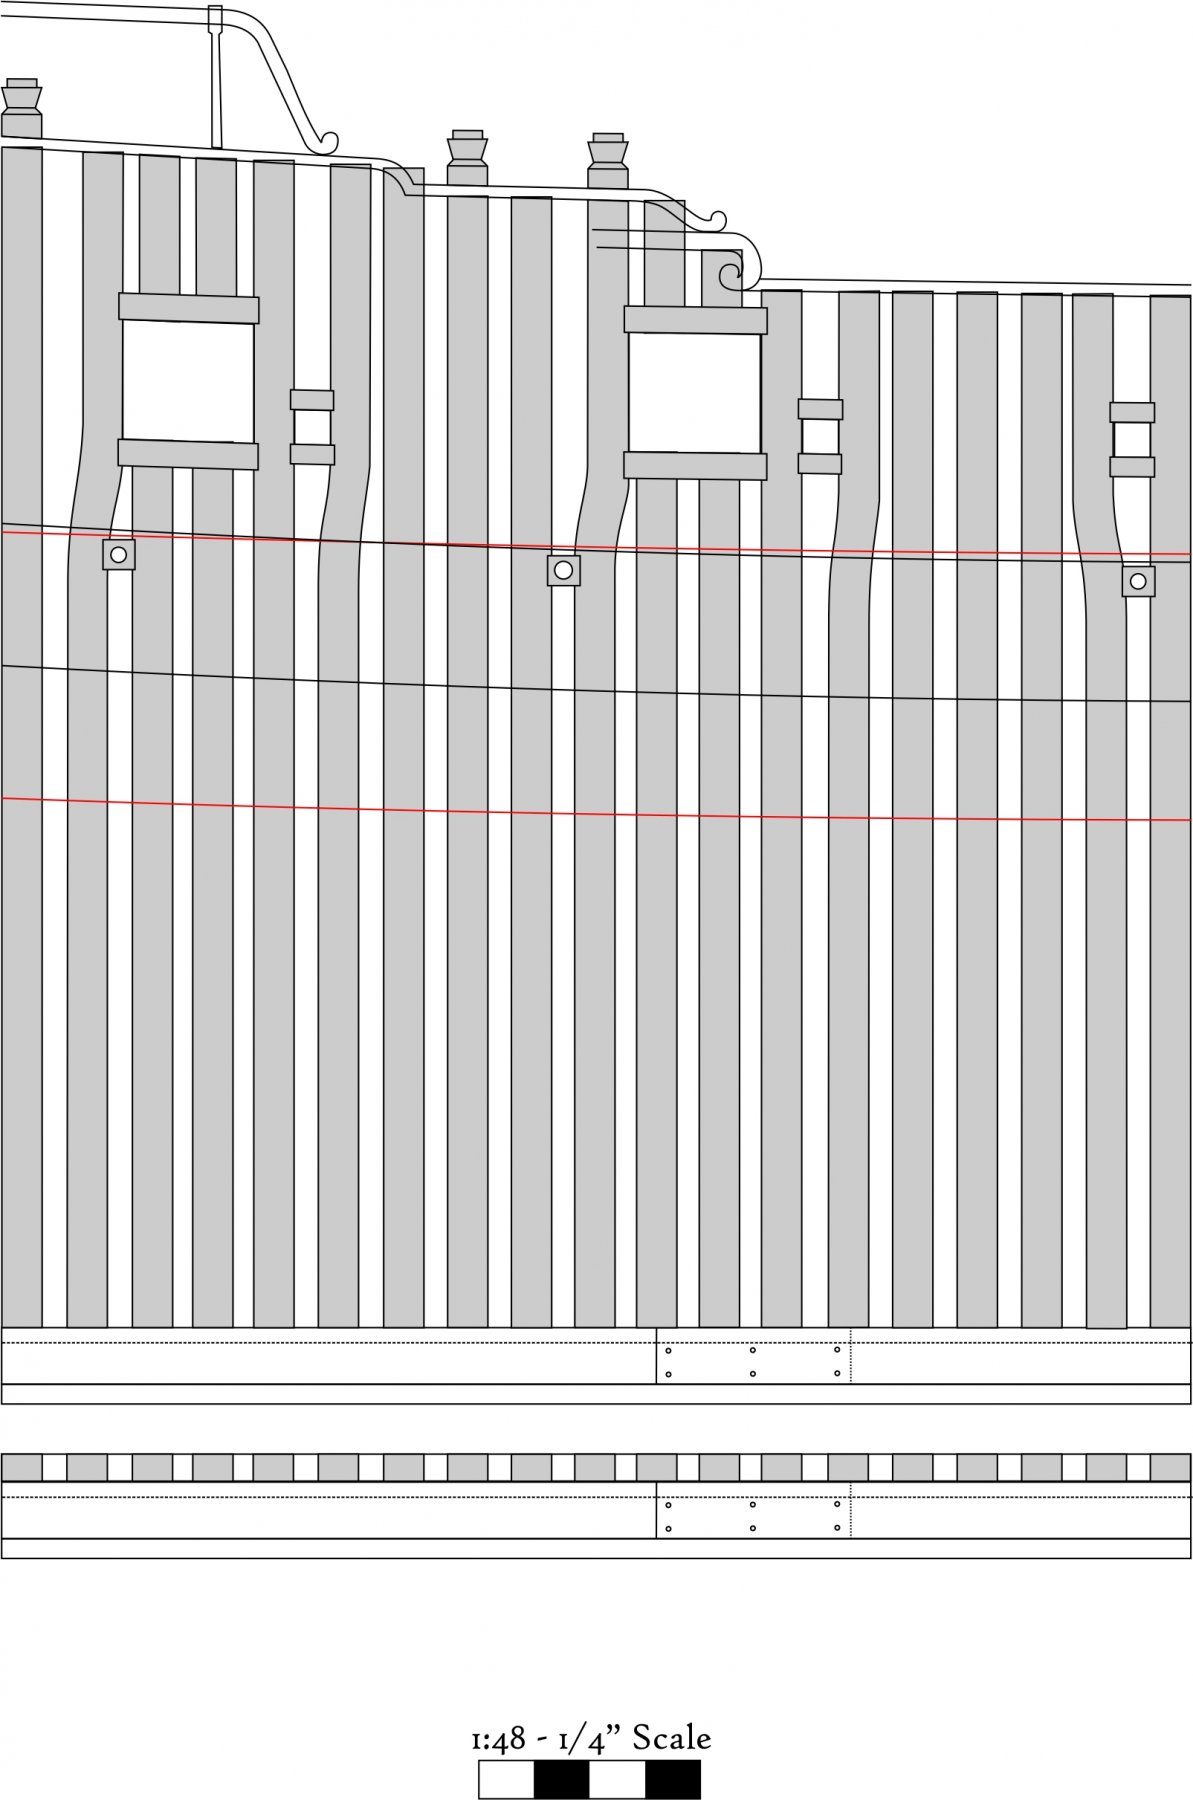
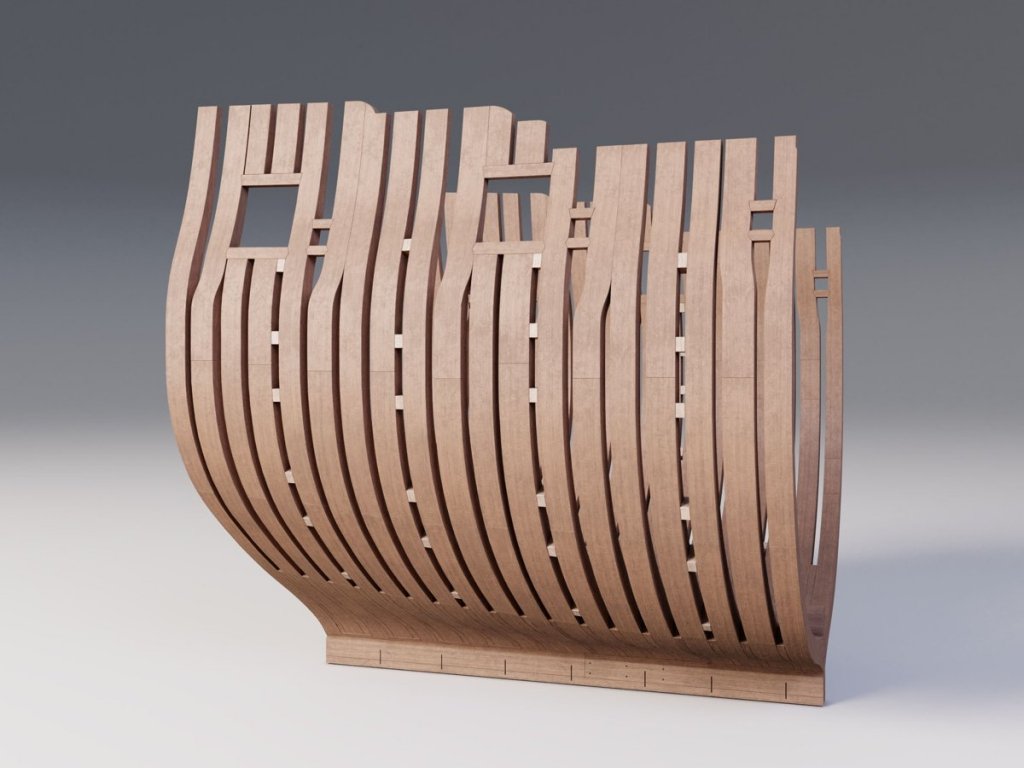
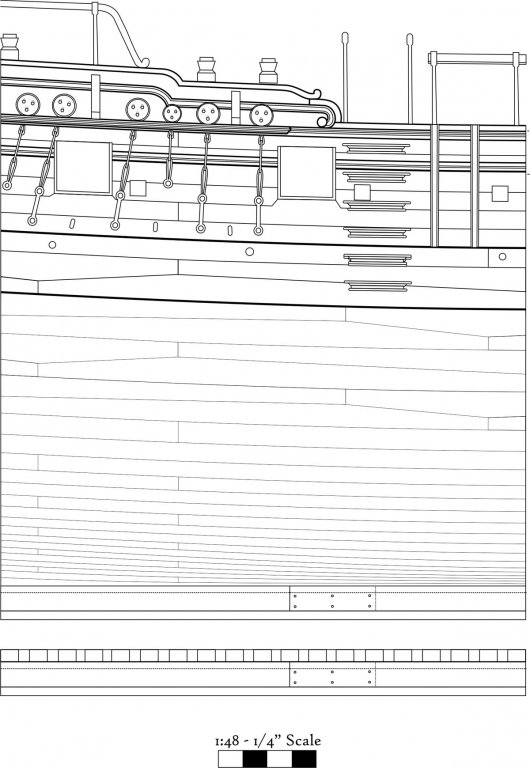
The base kit will just contain the hull details. But there is so much information available thanks to the work of David Antscherl and Greg Herbert. It would be very easy to adapt this kit and add whatever details a builder chooses. With the books available this becomes very easy. In addition....if enough demand exists I would have no problems developing additional upgrade add-on mini kits. Many of you have seen the 3D work Denis Rakaric is doing on the Pegasus. I am very thankful for this and it will be yet another way for builders to d an exceptional job building this. The added details will be of enormous value. Here is one such image of the framed section I am working on. The small spacers will be an optional detail but you can see how this project will be like no other cross section kit yet developed. I am even working on a method to develop those shifted toptimbers you see. Denis is doing fantastic work and I thank him for it. This will be a long haul project for me and progress will be slow while I work on building the Winnie but I will do my best to keep you guys posted on the developments and progress. Showing such images is proof that it is so beneficial to collaborate with others to make these projects even better than anyone could possibly do on their own. Its a pleasure to work with these guys.
-
As of right now that is probably not going to happen. Unfortunately laserboard is not strong enough to use for such pieces. Etched brass is also very expensive and something like that could add another 40 bucks to the price of a kit. If I remember correctly that AM sheet was going for around 50. So for now, its just something I need to consider as I get closer to that part of the build. It depends on how expensive the kit is at that time because I would like to keep the kit at around $200 -225 give or take. Anything else would just limit the amount of folks willing to pay for it. Especially as I need to compete with those cheap-o pirated versions of cross sections that folks are buying. If I price this too high it just wont sell. except to a select few who can afford it. I would also like to keep this kit at an intermediate level for new builders dipping their toe into POF modeling. Real POF though..... and not the stylized Hahn stuff or what you see in those kits I mentioned. That is really my main focus. At 1:64 scale I dont even think it is possible. It would just be too small for almost everyone to build never mind manufacture. They are very tiny finicky pieces to deal with. I think most dont have a real concept of how big they really are when looking at photos by someone who has built those pump details. Chuck
-
You should be able to do that.
-
Drafting underway...just an hour or two every now and again when my girls are watching something stupid on TV. So I sit with them but have my laptop with me while I pretend to be just a little interested.

-
Send me everything you can find. I wont know too much about scale yet until I get into drafting the plans. But yes, that is going to be the prototype and I plan on building it with an open roof like that to detail the cabin.
-
I just wanted to inform you guys that the cross section drafting has begun. Plans from David Antscherl are scanned and drafting has begun. I am very thankful to David Antscherl and Greg Herbert for allowing me to use their plans and expertise for this project. I felt compelled to post this today because of a topic I read on another forum. I think it would be very important to point out the stark differences in how some kit companies approach projects like this. When completed this will be a project that is 98% duplicated from David's plans and research. Having said this, I will be drawing up a completely new set of plans that will NOT be a Xeroxed copy of David's work. I will indeed need to make minor adjustments to facilitate the kit-making process as well as add some new features to make building the cross section easier. The plan sheets will be laid out very differently. But make no mistake about it....this is a duplication of David's plans and work. Even though I have digitized David's plans and have begun duplicating them (tracing) with minor differences....even major ones. This is a duplication and a full-on use of his work. The difference being, I will.... and have acknowledged David's role and Greg's and will be giving them full credits and acknowledgement throughout the project. In addition, there will be financial compensation for all of the wonderful work that they did which will save me a huge amount of time and allow me to create something worthwhile. This is how such a partnership should work. Its about recognition and compensation. To someone uninformed they might be under the mistaken impression that this was not a duplication of the Admiralty Models Pegasus plans and research, at least based on what my finished plans might eventually look like. This is in stark contrast with a recent kit currently on the market for an Ancre French frigate. I was startled to read today a forum topic elsewhere trying to rationalize a theft which is very disingenuous to say the least. Anyone well informed with a minor amount of expertise can compare the plans by Ancre and the pirating kit company to see that they are in fact a duplication. Finding minor differences is NOT an indication that the kit is not a duplication. The comparison for anyone who wants to be truthful about it is very very clear. In addition, there is zero acknowledgement and zero compensation for the work Ancre had done and for its clear and apparent copying. You will not see a 100% photo copy of the plans and it doesnt need to be in order to be honestly and rightfully acknowledged as a pirated duplication. But if you are of the ilk that really.... really wants to believe that, and are looking for some sort of rationalization, then that is what you will determine. It is quite a disturbing, uninformed and very childlike interpretation. Once again, Thank You to David and Greg for allowing me to bring such a project to market so that other will have an opportunity to build this cross section. I can sleep soundly each night knowing that this is the correct way to enter into such a projects development. You guys are the best!!!
-
In addition, because the hull shape adds a great deal "difficulty level" for the average builder to plank and build. I want to keep this project as an intermediate level build. I already have the basic concept laid out in my mind....I just have to put it on my drafting board and start testing a prototype. BUt it will need to wait until after teh cross section gets done first. I have some new and hopefully interesting ideas I want to try with that one. Oh and yes I do have all of those drafts and many more from the same period and from Rijkswerf, I am hoping that I can get the lines taken off the model itself and am working with these guys to get that done as well.
-
It all depend on the shape of the hull. In any case, its best to test how a batten lays across the bulkheads or frames. If they sit down nice then you are good to go. Chuck
- 74 replies
-
- 7
-

-
- queen anne barge
- Syren Ship Model Company
- (and 1 more)
-
He has done more than enough fairing actually. It looks pretty spot on. Chuck
- 74 replies
-
- 2
-
-
- queen anne barge
- Syren Ship Model Company
- (and 1 more)
-
I just order more materials, gears and hubs and things to make more. As soon as they arrive I will make more. Chuck
- 22 replies
-
- 2
-
-
- ropewalk
- rope rocket
- (and 1 more)
-
No...I used to dye the rope and use DMC like everyone else. But I stopped doing that really quick. Now I get all of my thread from Ireland. I have it custom dyed in large batches. Its a commercial source. There are plenty of custom thread making companies out there but you need to order a whole heck of a lot with each batch. Its much more expensive than just buying a ball of thread off the rack. Its my closely held secret as it gives me the edge over other scale model rope makers. When they dye rope...like I did way back when, its tough to get consistent results. Although every batch I get might vary slightly in color, it is much better to do it this way. Saves a whole a bunch of time too. Chuck
- 22 replies
-
- 7
-
-
- ropewalk
- rope rocket
- (and 1 more)
-
Thank You Toni. Left hand isnt any harder. Just leave yourself enough room on the edge of the table when you twist the three individual strands on the headstock. You will be unravelling that thread and then twisting it back up tightly again. So you will be walking the headstock in both directions across the table. Chuck
- 22 replies
-
- 2
-
-
- ropewalk
- rope rocket
- (and 1 more)
-
Thats just as good for me....but really, its kinda fun if you dont have to make 5,000 feet per week. Chuck
- 22 replies
-
- 7
-
-
- ropewalk
- rope rocket
- (and 1 more)
-
Just uploaded the two part video tutorial on how to make rope using the Syren Rope Rocket. I know I am from New Joysee. So no cracks about the accent!!! Exit 15W. Its hard enough talking to yourself when you are making these videos. Because actually making a length of rope only takes 5 minutes....I tried to stretch it. Let me know if you guys have any questions. https://www.syrenshipmodelcompany.com/ropewalk.php
- 22 replies
-
- 13
-
-
- ropewalk
- rope rocket
- (and 1 more)
-
Winnie is underway....I am however having second thoughts about a book and am contemplating doing the same for Winnie that I have done with Cheerful. Just posting the manual/monograph as a free download while selling the starter kit and mini-kits for the model. Seems like the best way to move forward. Easier for all involved. Unfortunately it is a little more complicated than that. But I have time to work out those details. But right now I only have to worry about having fun building her.
-
Bob Not at all. You must have missed my original post. But to recap, Winnie is currently under construction. The plans are basically done except for tweaks as I build her. So while getting my hands dirty on Winnie, I like to also start drafting and designing my next project. I get some computer time in while not in the workshop building the Winnie. These three projects are on my to-do list and I am trying to establish the most commercially interesting one based on our members feedback...or possibly disqualify one if there was no interest. There seems to be interest in all three which is great. And I will start with teh cross section. Chuck
-
That is Dan's baby....as soon as he finishes up what he is working on, I am hoping he will get right back to it. I am in no rush and I certainly dont wont him to rush. Basically I laser cut the parts he draws up after we talk about the design and he continues to build his prototype. Kind of nice actually to have someone else creating a Syren project. But whenever he gets back to it I am sure he will start a build log. Chuck
-
Lookin good. You framed up the entire barge very quickly, I hope you are having fun with it and find it interesting to build.
- 74 replies
-
- 4
-
-
- queen anne barge
- Syren Ship Model Company
- (and 1 more)
-
Thanks.... Kurt, I hope you make some room on your workbench for a cross section, to help me prototype/work out the kinks....should be fun. Chuck
-
On a separate note. My store will be opening hopefully again. Just wanted to give everyone a heads up. Grandma is coming home from the hospital today. I am shooting for tomorrow to re-open the store but depending on how things go once she comes home....at the latest it will be early Thursday morning. Thank you all for your patience. I learned from the last time that this was the best way to handle the situation and closing down for a few days was what enabled me to keep my sanity throughout it all. I will get organized and see what I have to start making tomorrow as I know my inventory must be a wreck. Havent stepped into the shop much since last week. So if you see a lot of stuff out of stock....I am going to get right on it. But it will take some time to catch up once I get the sweatshop up and running again. Thanks again Chuck
-
But not to worry...I will be building the Boeier and Chebacco right after the cross section is completed. Because I agree with you 100%
-
I would like to keep the poll going but allow me to explain why I started this a bit more in detail. I appreciate the responses very much. They were indeed extremely helpful. Like many you who have several kits in the closet and pretty much know what you will be building in the future, I have known for a while that three subjects are what was in my closet so-to-speak. Regardless of how commercially viable any of these were, I was pretty sure that these were projects I was going to build. The real purpose of the poll was to help establish the order in which I was going to develop and build them. Should any of the choices I was excited about been duds with absolutely no interest from the ship model community, I would have still built it. I would have just left it for later and not commercialized it. I am happy to say that it looks like there is sufficient interest in all three. That is good for me. And based on the results, it looks like the cross section is the most popular commercially. Since my current kit/products fund the next projects on my list to bring to market, it makes sense for me to start there. So I am talking with Greg Herbert and David Antscherl right now so I can started on developing the plans for the cross section. I will do so as I build the prototype for the Winchelsea. But yes the Boeier and Chebacco will be brought to market as well. I will just be starting with the cross section. I am so happy that there is actually interest in the later two. Thanks and keep the votes coming as right now it looks like the boeier and chebacco are neck and neck for the number two slot. Chuck