Chuck
-
Posts
9,711 -
Joined
-
Last visited
Content Type
Profiles
Forums
Gallery
Events
Everything posted by Chuck
-
 It looks great so far.
 -
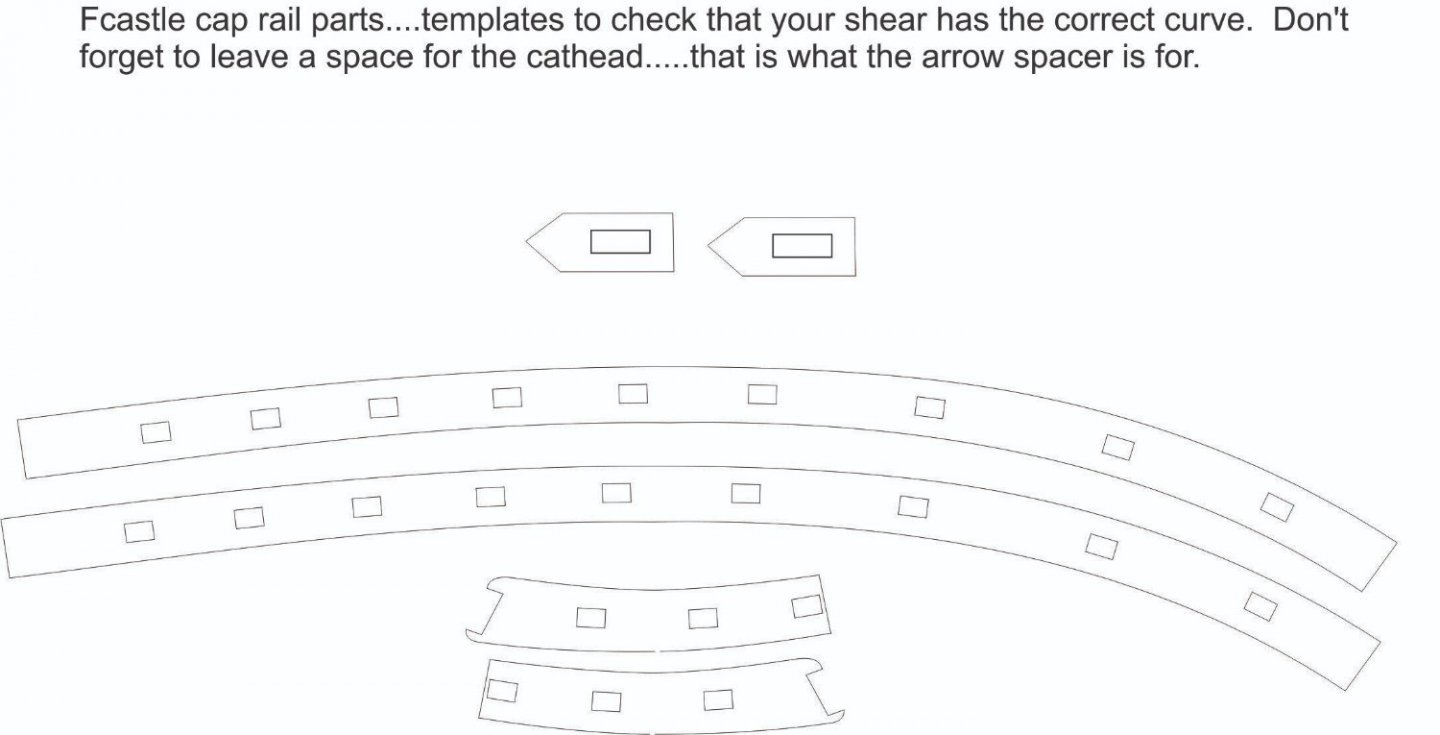
Attached is a PDF of the actual fcastle cap rail parts. This includes the small "arrow" spacer for the cathead. Read chapter 9. BUT...I thought this would be a great way for those who are just starting to fair the bulkheads inchapter one to check that the bow shape and curvature is correct. Lay these on top of the bulkheads were the cap rail will eventually go to check the shape. I know you guys get nervous about the correct shape at the bow. Many of you will NOT have that and the cap rail may not fit. Which will mean you guys will need to scratch build the cap rail and fancy rail parts. Make sure that your bow has the correct shape before you start planking... GBarlow..........Glen, this is the perfect timefor you to use these. fcastle caprail templates..pdf
-
Nope....i am going to wait a few months. See if you guys can figure it out. LOL....I just want to make it extra challenging and extra rewarding when you guys finish it all up.
-
Lovely work....those pumps look perfect. Well done! 😄
-
Looks great so far....just take your time. Welcome to the group and happy new year!!!
- 155 replies
-
- 1
-

-
- Medway Longboat
- Syren Ship Model Company
- (and 1 more)
-
Beautiful work…i bet you are glad the planking is done.
-
Beautiful start!!! Welcome aboard.
-
Its an honor system especially now because we know everyone who has access to the plans in this group. Even their address/phone info. You also agree to only use them for your own personal use when signing up. So yes....you can cut your own. Many have done just that on a scroll saw and I encourage it. But there are no vendors other than myself who offer the laser cut parts. I also frown on individuals going to a service to cut there own parts. You must ask for separate permission to have parts laser cut elsewhere. Plus not all laser templates are available....this is a semi scratch project although laser cut parts can be purchased only through me for 98% of the parts on the model. Chuck
- 1,784 replies
-
- 6
-
-

-
- winchelsea
- Syren Ship Model Company
- (and 1 more)
-
There is no separate plan for that. You have to take them off the large plan sheet. Mill the strips and then plank the counter. They are 1/4" wide and 3/64" thick. No templates for those like any other model project. Chuck
- 1,784 replies
-
- 3
-
-
- winchelsea
- Syren Ship Model Company
- (and 1 more)
-
There is no USA VAT…but yes paying VAT is a problem….but you could always scratch build the parts too expensive to ship for your situation. Thats the beauty of a project like this and being able to buy each chapter as you go. You only buy what you want when you want it. in addition….for the cost…you will never be able to buy another project like this… with this amount of detail and historical accuracy for the price offered. You certainly wont find any cheaper even close to this quality. You get what you pay for. This is the only project that will yield results like this straight out of the package. You wont find another like it. It doesnt exist.


- 1,784 replies
-
- 18
-
-
- winchelsea
- Syren Ship Model Company
- (and 1 more)
-
Nicely executed
-
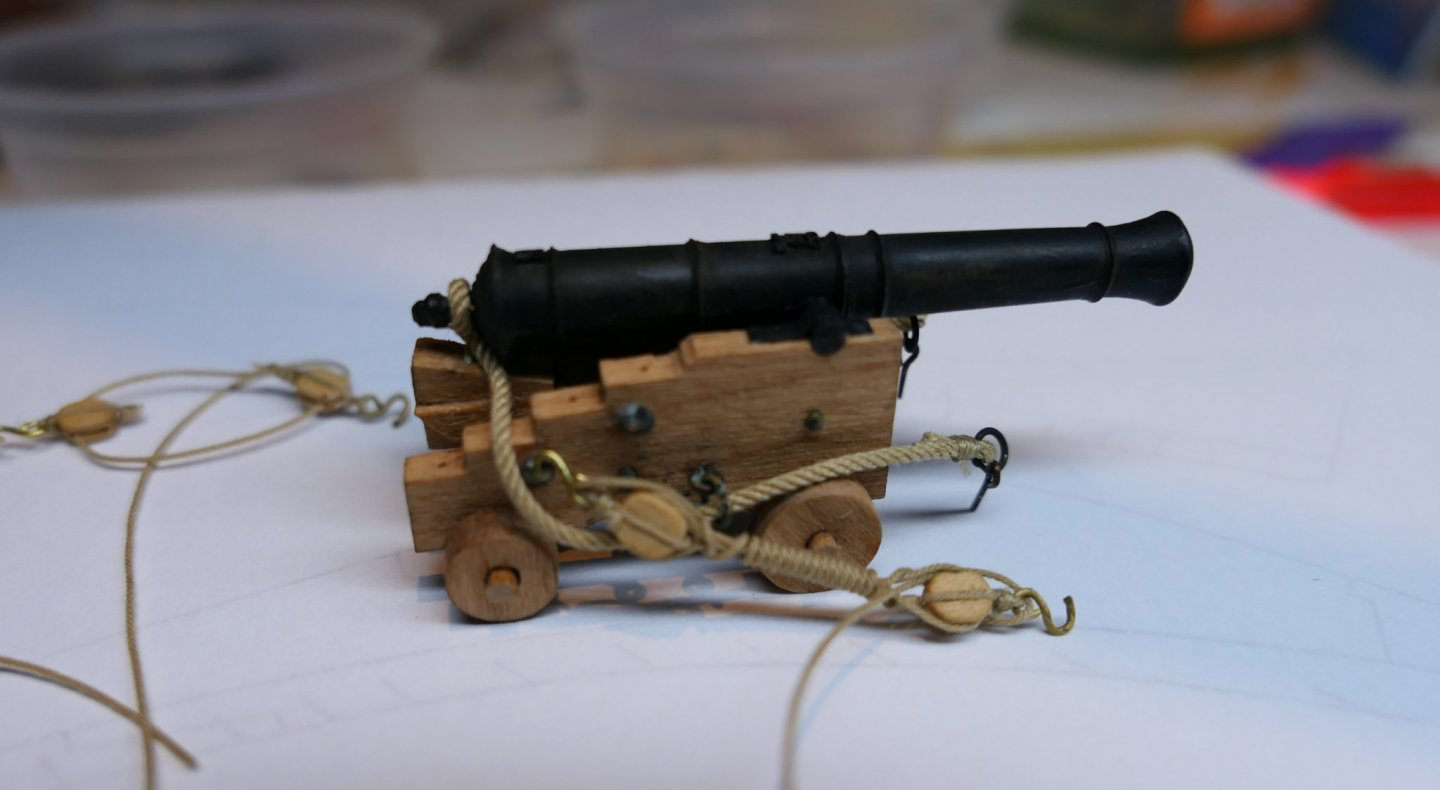
.045 if you prefer a slimmer look and .055 for a more Robust look. The store will open on Jan 1st. this is a carriage with .055 tan rope.
-
It looks very good. But the breech lines should absolutely be tan and not dark brown to simulate being tarred. Chuck
-
Looks good.
-
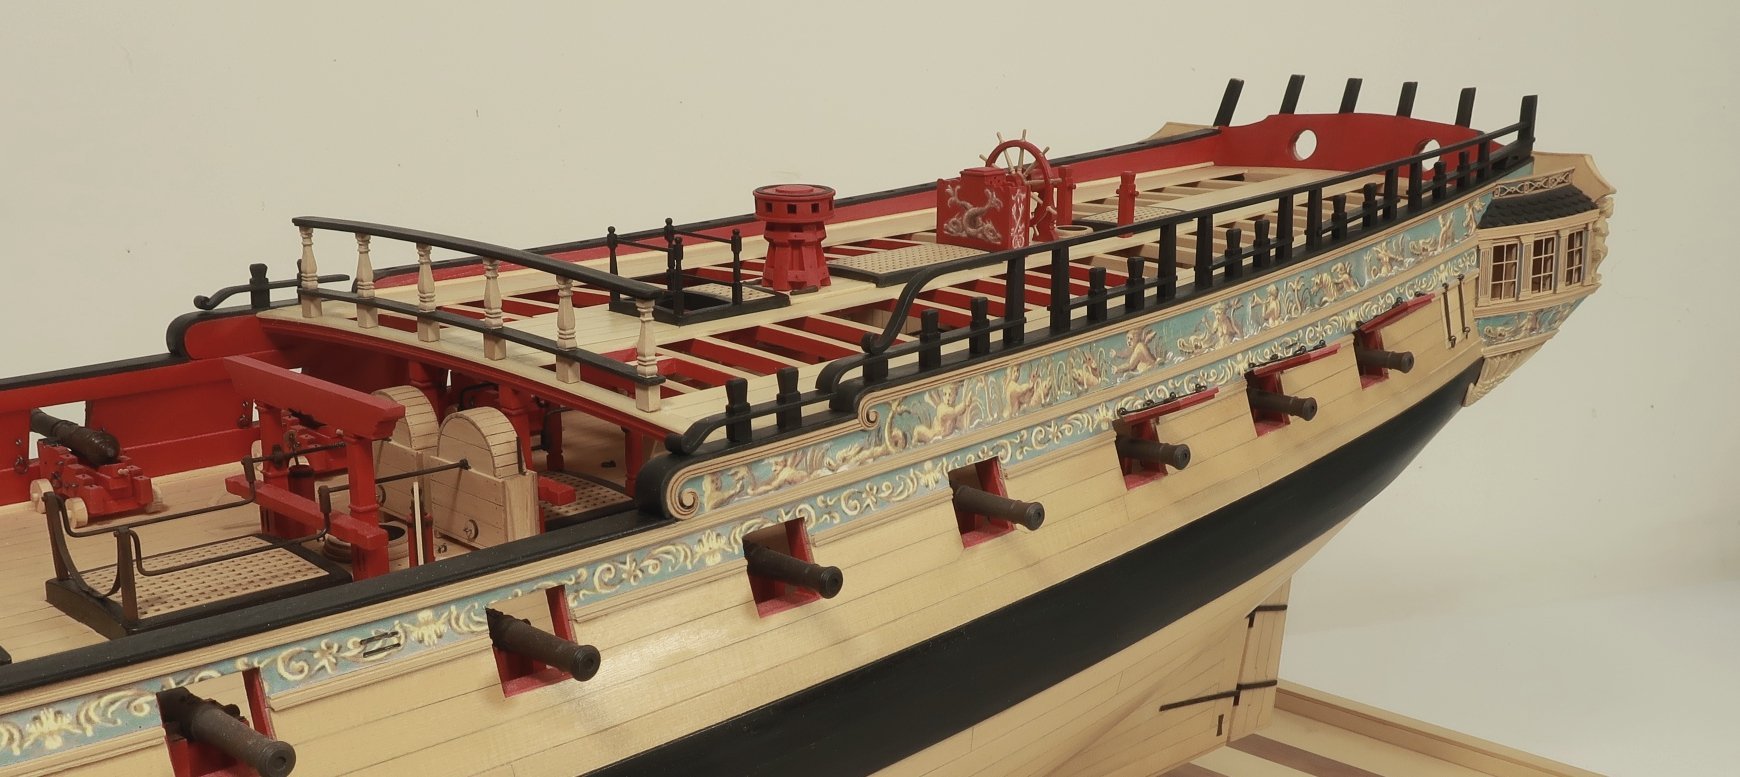
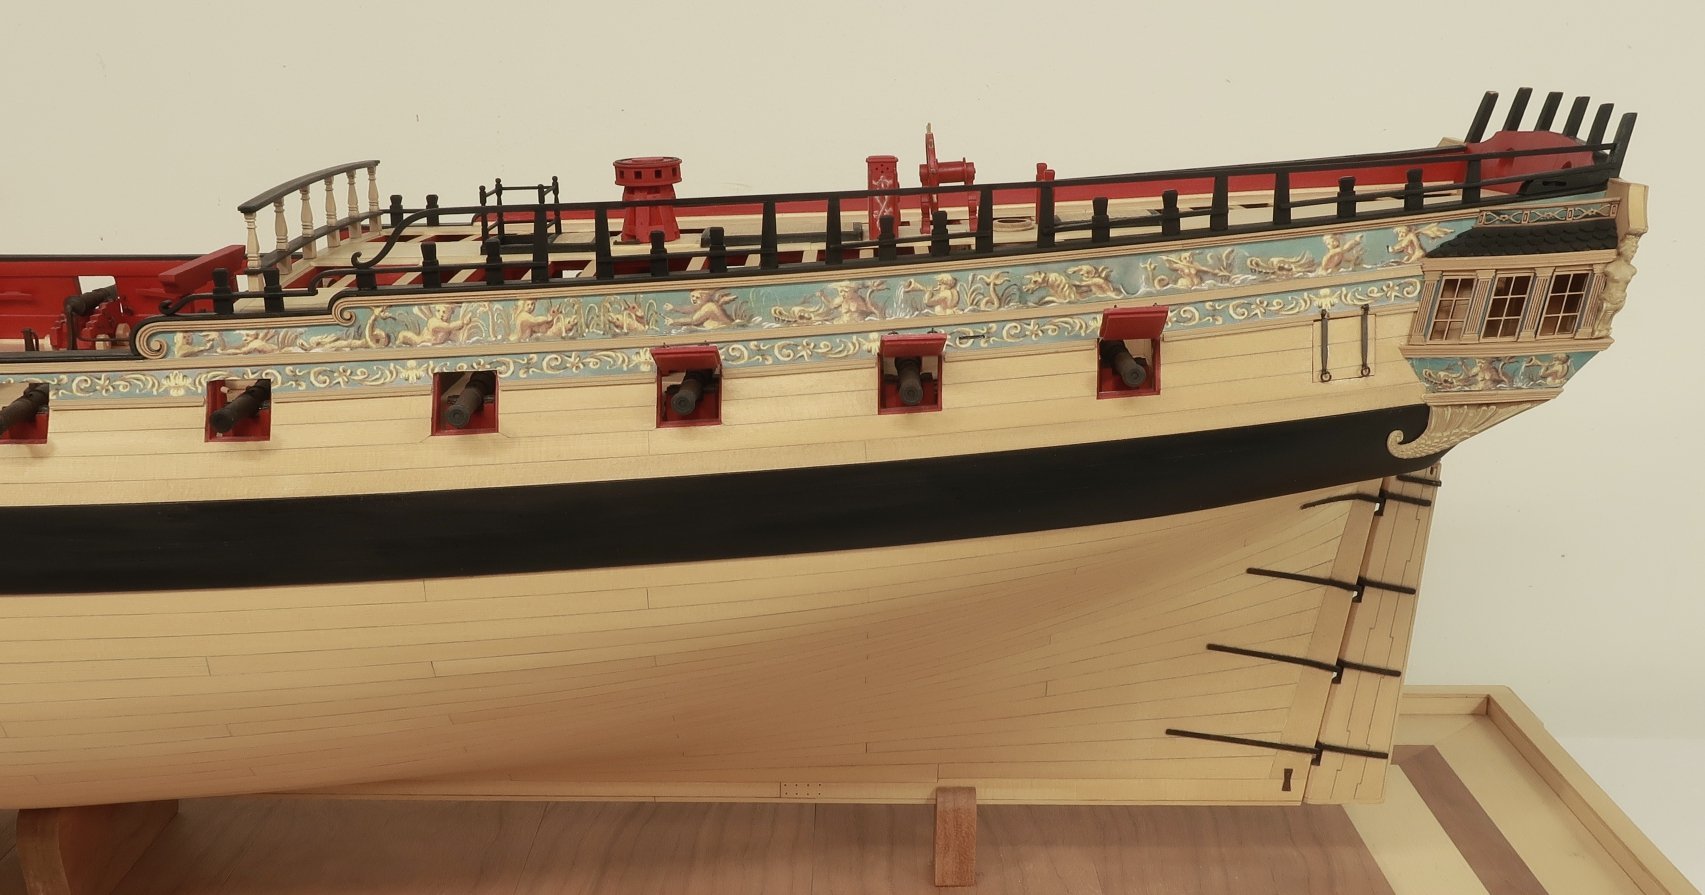
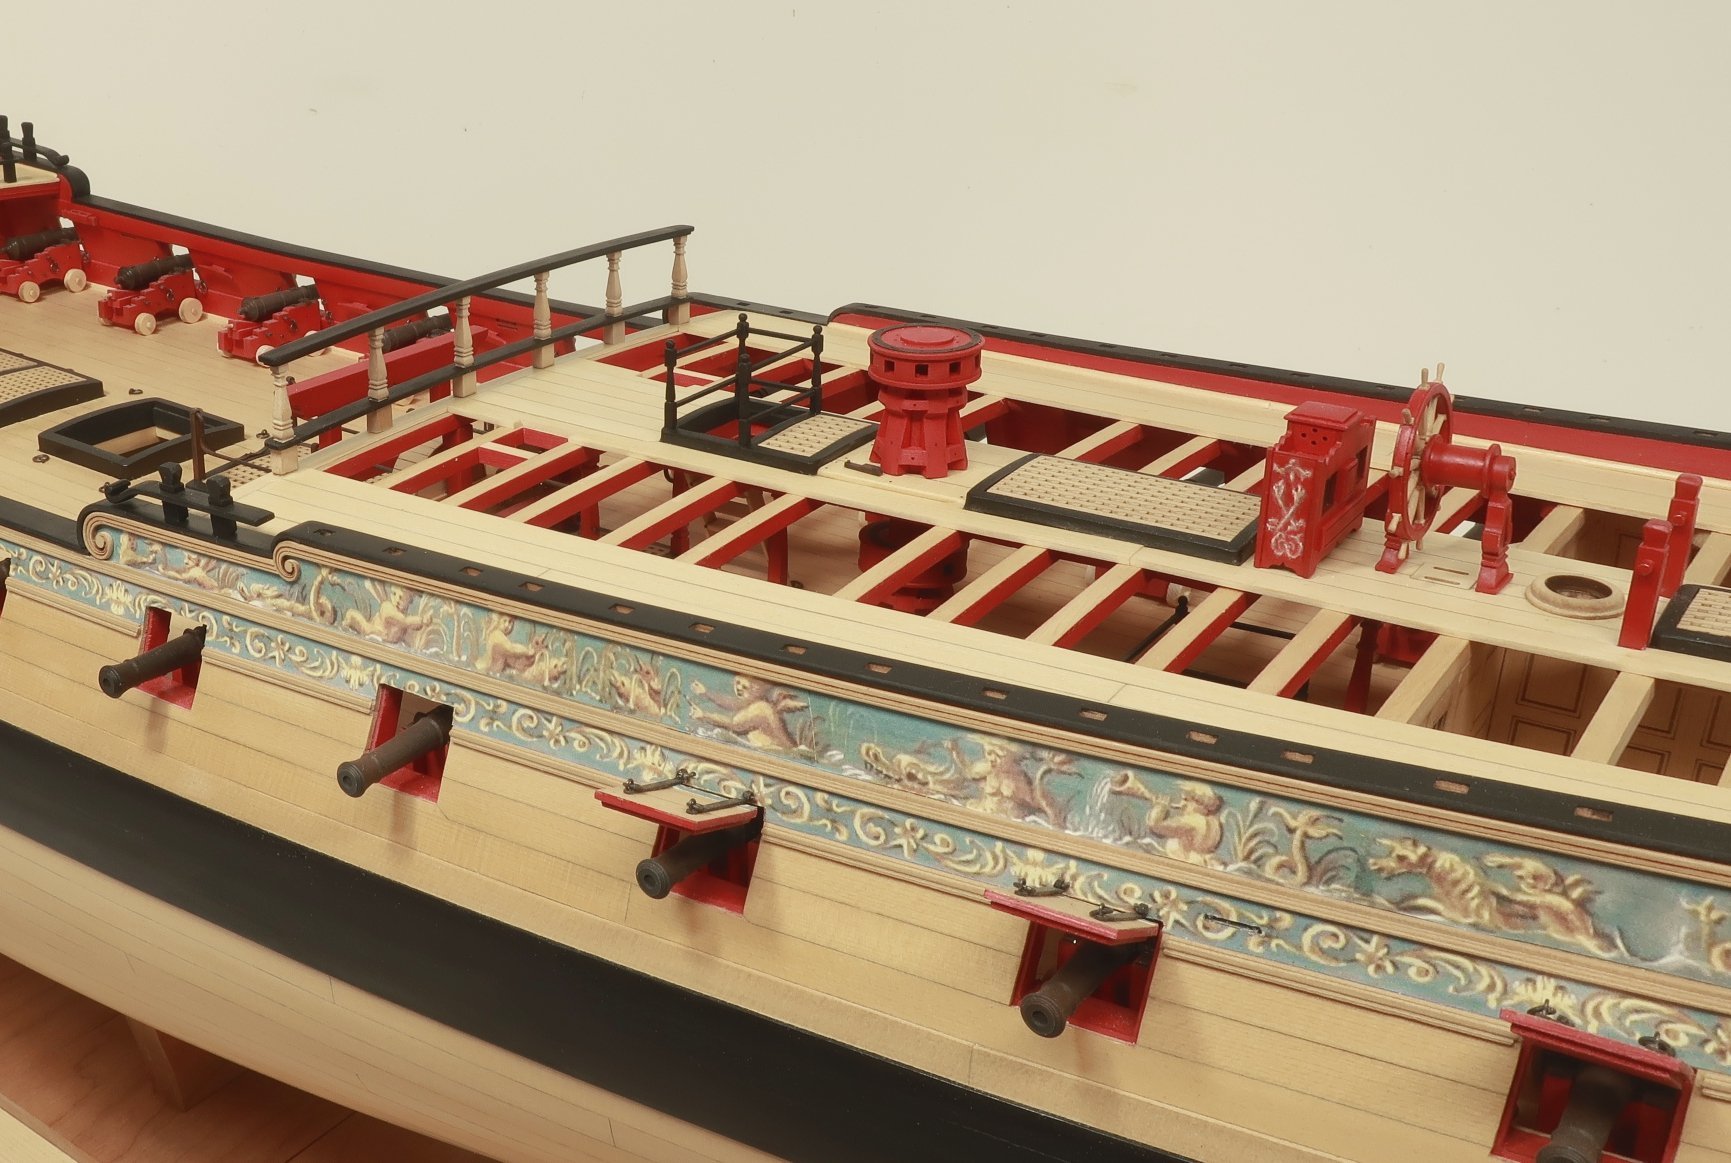
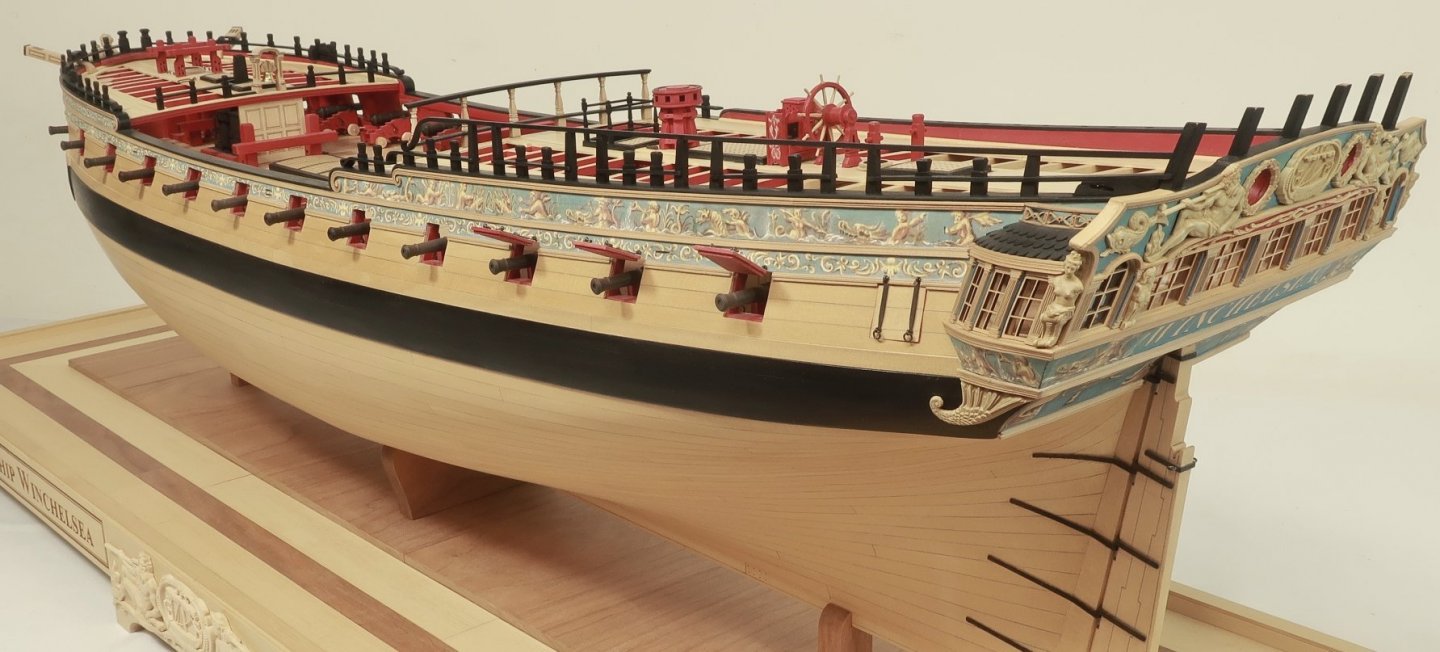
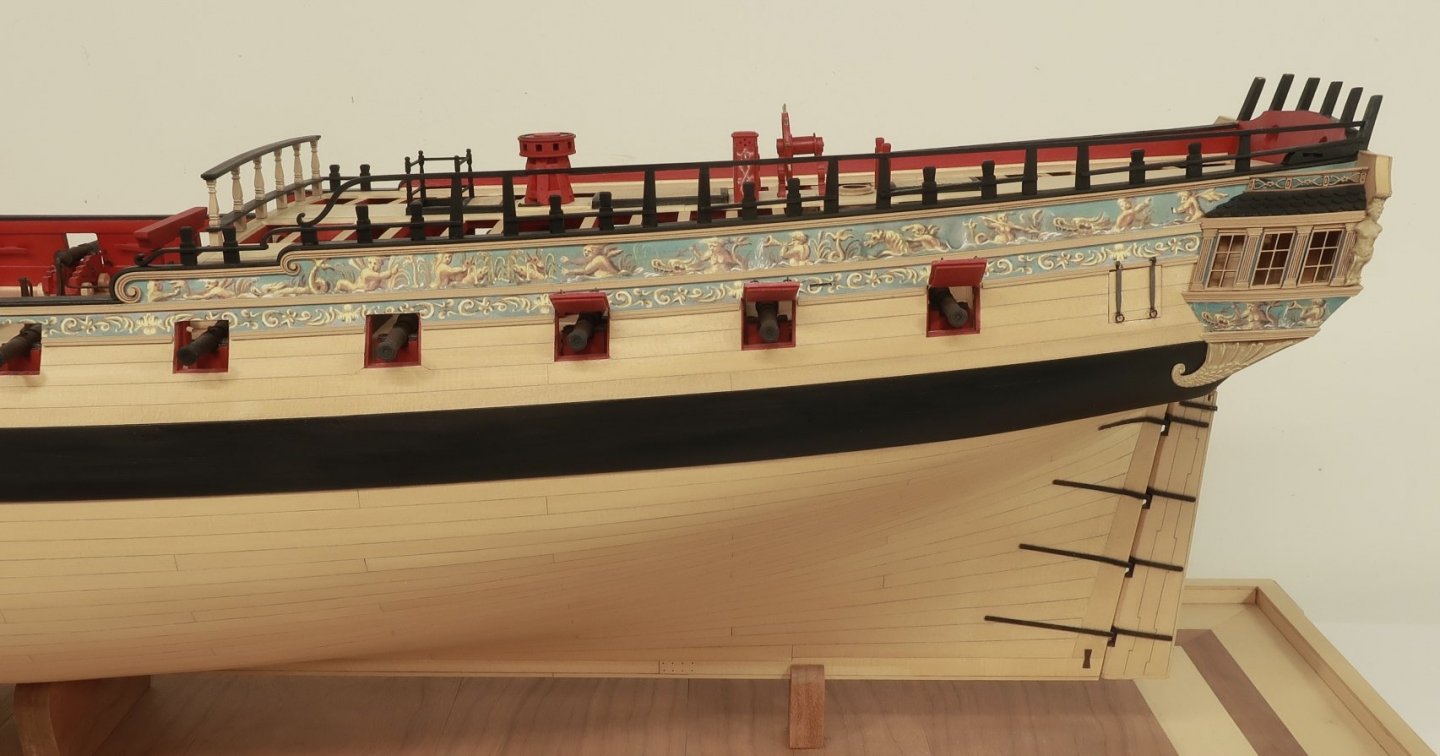
I spent the last 3 days working on and refining the parts that make up the qdeck rail. It was quite a journey. The parts were tweaked to allow a bit of wiggle room when assembling. This is a very intricate rail but is another major element of the model. So I took my time and completed the port side without taking many pictures. I wanted to power through it to establish a good method for building it. When I repeat the process on the starboard side I will take many more pictures and describe how I did it. I found the best approach for me was to build the rail in sections or groups which I will explain. Hopefully I will start the other side by the end f the week. But here are some final pictures of the completed rail on the port side. It really does give the ship its elegant shape so typical of these 5th rates in the Royal Navy. I cant wait to finish the other side to see how it will look. The rail starts to lean in toward the deck more and more as you approach the stern to match the angle of that last stern frame. The uprights which become the sides of the ports and the timberheads are extensions of the frames. You will need to lean these inboard as you work from mid-ship towards the stern....finally adding the top rail which is in two sections. BUT at the same time these uprights are straight and vertical when viewing the ship from the side profile. A tricky but rewarding experience. Note the fixed block at the stern against the transom. The middle rail sits on this.


- 1,784 replies
-
- 30
-
-

-
-
- winchelsea
- Syren Ship Model Company
- (and 1 more)
-
Merry Christmas to all of you…and yes it is full steam ahead on Speedwell in 1:48 Drafting in progress…an hour or two each night while my wife watches her shows. This is in no way finished but enough to show you what I am shooting for.
- 1,784 replies
-
- 35
-
-
-
-
- winchelsea
- Syren Ship Model Company
- (and 1 more)
-
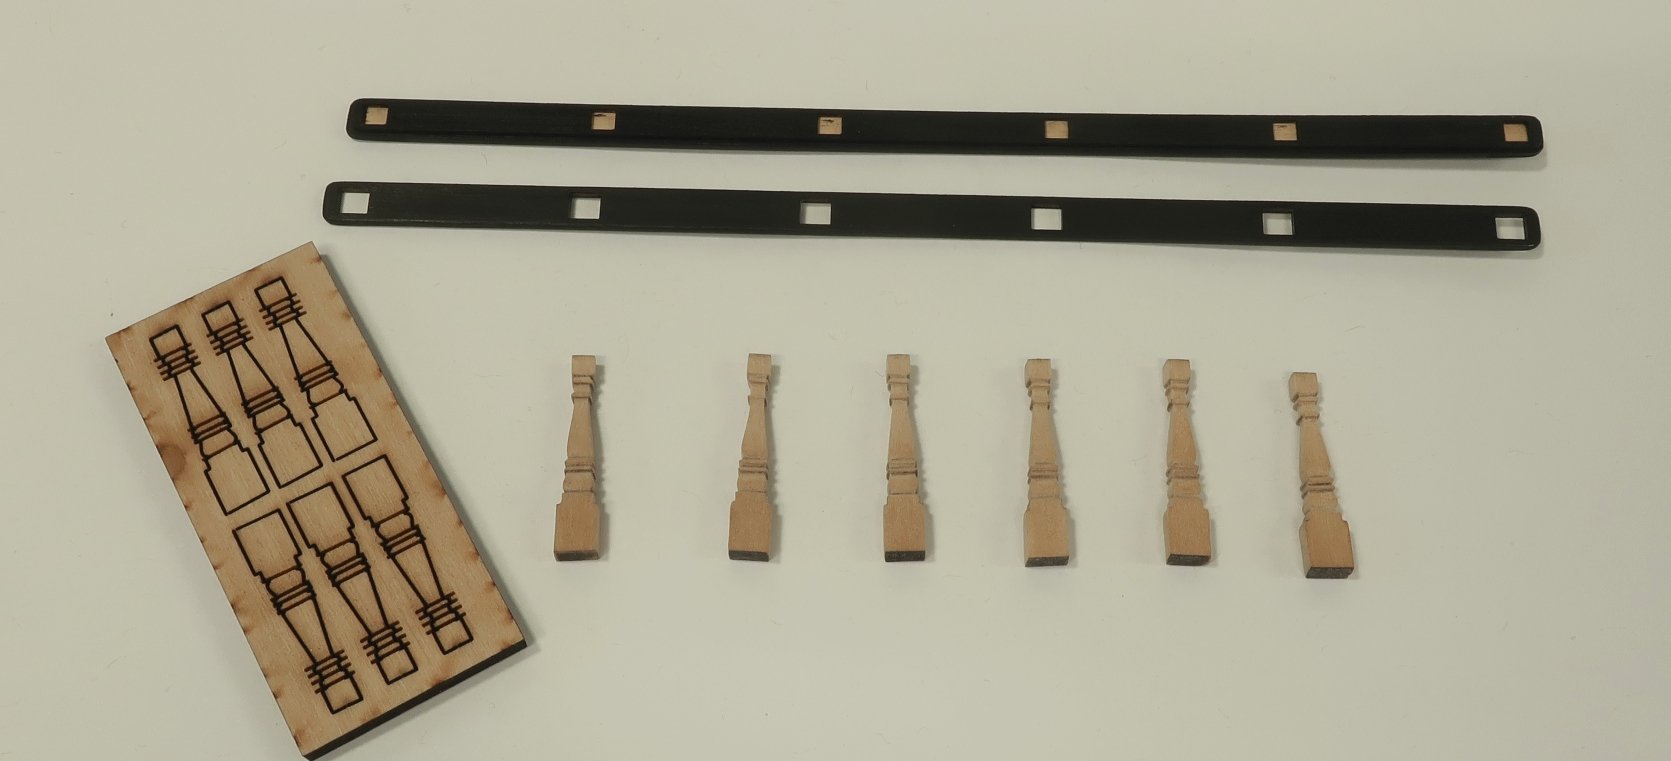
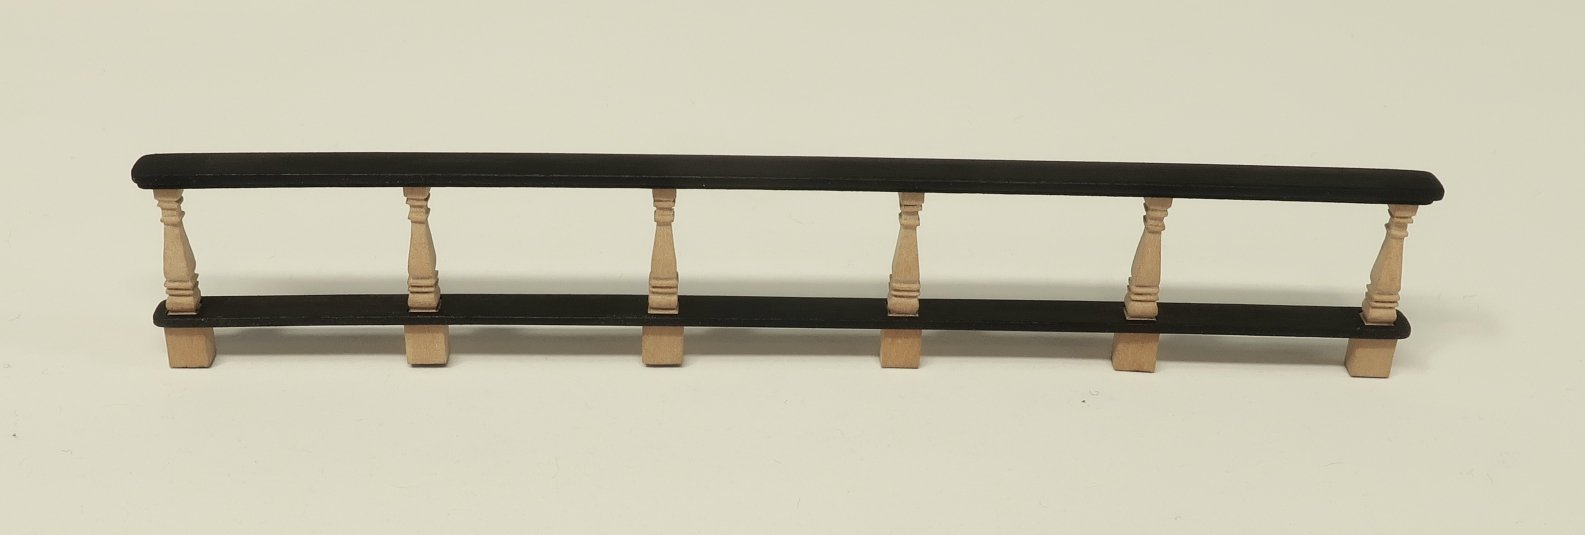
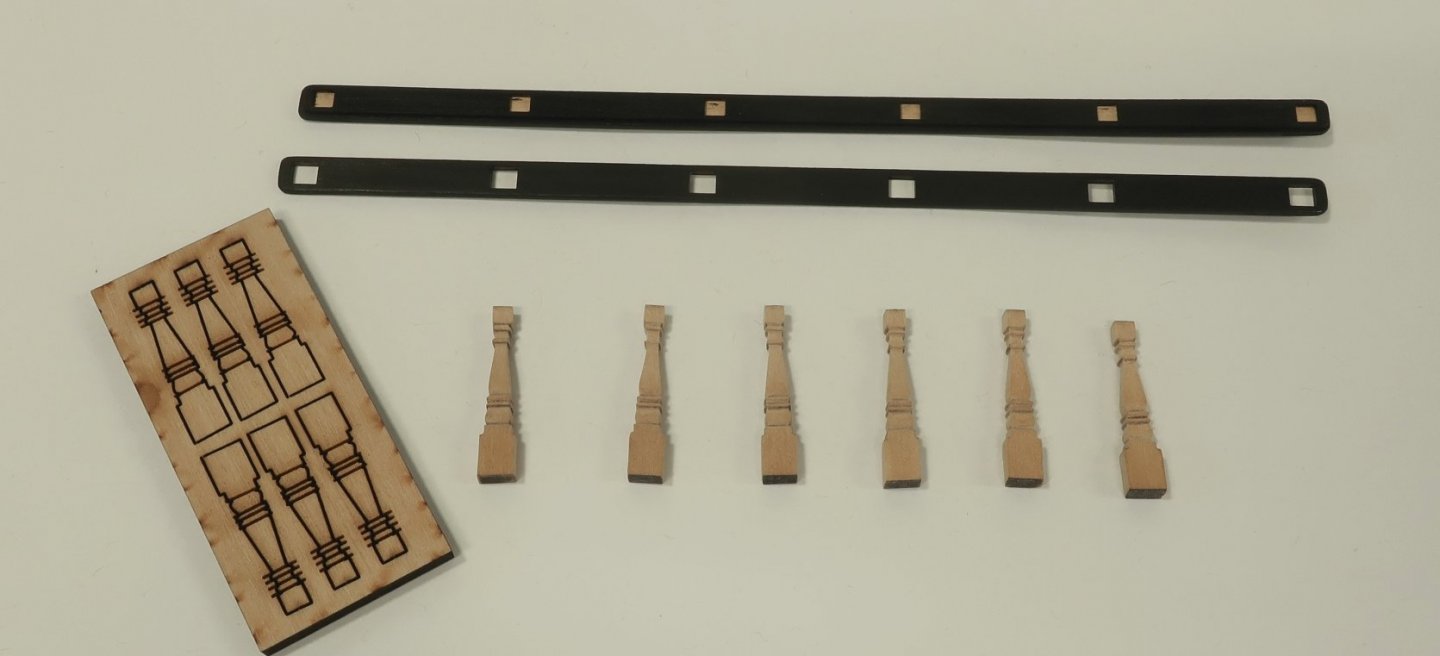
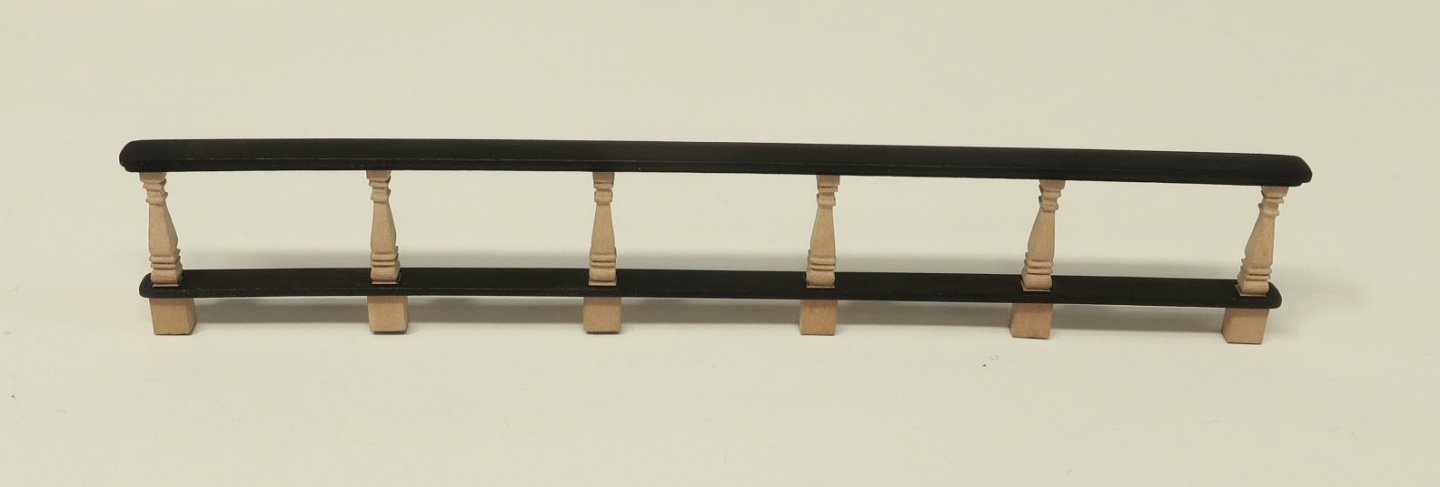
The breastrail.... Its pretty straight forward. All parts are laser cut for you. But you will still need to prepare them and shape them. You must do so in the same way you did for the various laser cut columns during this project. Sand off all the laser char carefully if you dont plan on painting the uprights. I left them natural which meant they had to be pretty clean. Use some files, sandpaper and small chisels...or even a #11 blade in my case. Duplicate the overall shape on the fore and aft sides which was laser cut for you. Remember to get these clean, although you can paint them black if you wanted to. I have basically just laser cut and etched the general shape of these uprights and its up to you to finish them with care. Take you time as the breastrail is a feature element on the model and your eye will be distracted at one that looks sloppy. The lower rail is a 3/64" thick piece of laser cut boxwood. It slides onto each upright. Keep in mind that the angle on the top and bottom of each upright changes as it the rail moves outward from the center. This is to accommodate for the roundup of the qdeck. Make sure you position them accordingly. The more severe angles are toward the outside of the rail. The center pair of uprights has the least amount of angle. Then glue the lower rail onto all six uprights. Slide it down from the top...Make sure its seated properly and do a test fit before gluing. The top rail is actually made in two layers (top of the first photo). There is a very thin 1/64" thick boxwood layer with square holes cut out of it. Glue this onto the solid rail. You will notice its slightly smaller so it leaves a nice lip all around the bottom edge. Paint both rails black before doing a test fit of all pieces. You should be able to align the top rail in position by inserting the tops of the uprights into the square holes on the underside of the top rail. This should also force all of the uprights to be perfectly vertical as the laser cut holes are all lined up. Then test it on the model....it is very very important to center this rail port to starboard. You can peg each upright into the margin plank at the edge of the qdeck if you like. Make sure its straight in all directions. Meaning its vertical when viewed from the side of the hull....and along the edge of the qdeck when viewing it from overhead. You can see how it looks with the uprights left natural. You can paint the entire rail black if you prefer. Also note that I constructed the railings around the companionway and made the ladder leading down to the gun deck....just like the one on the gundeck you already made a few chapters back. I created the stanchions using 1/16" x 1/16" boxwood strips. I created what I though was a nice fancy profile. I kept them square in profile except for the center portion and the little ball on top. They were painted black. They were chocked in my Dremel and turned to create the rounded areas. The horizontal rails were cut from 1/32" x 1/32" boxwood strips. You can also choose not to add this railing at all. Many contemporary models including the one for Winchelsea dont show such a rail. But I think it adds a nice detail. Any Questions or comments? Next up the fancy rails along the shear caprail!!


- 1,784 replies
-
- 34
-
-
-
- winchelsea
- Syren Ship Model Company
- (and 1 more)
-
It looks a bit low in your pictures. But not too bad. Yes it is a bit over faired but not terrible. You need take pics and see how it looks from all angles. Split the difference and i think you will be fine.
-
Lovely work. The small belaying pins from crafty sailor work great as quoins should you want to cut down on the time spent on assembly. They are also pearwood which is perfect for you.
- 642 replies
-
- 5
-
-
- winchelsea
- Syren Ship Model Company
- (and 1 more)
-
I would so much rather you experience the JOY of rope making yourself. You will never buy another package of rope again. That is very nice stuff!!!
-
I buy from wawak. The formulas I use are in this topic. Everyone has given you some great advice. Just stick with it. That sample you made looks great. Serafil Is also quite good if you cant find Mara.
-
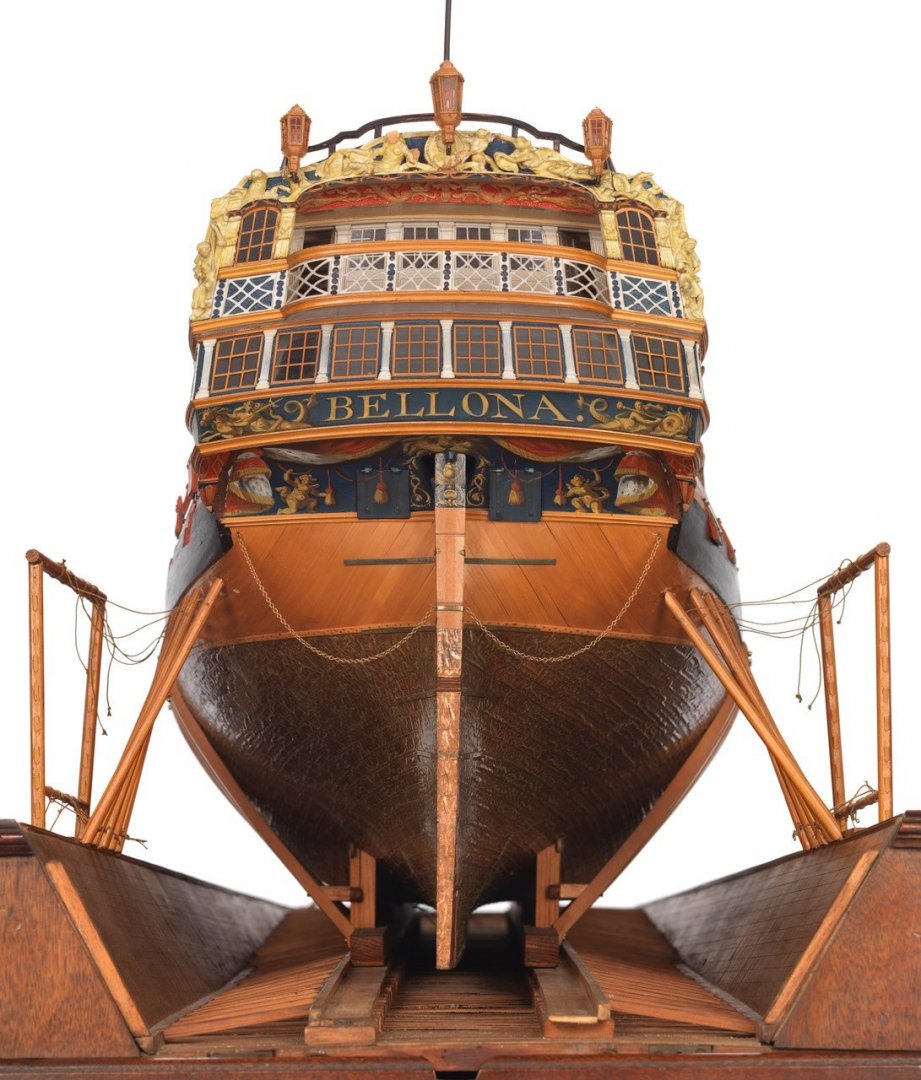
Yes historically it is correct. Too many primary sources show it. Including this well-recognized example. It only looks wrong to many of you because you have been conditioned to see and accept so many wrong displays….done on kits mostly. But too many folks just didnt do the research and many of you (as with other aspects of a project) just adopted the ridiculously wrong occurrences of such things as accurate. Sometimes its very hard to correct fake news or misinformation! Note the size and style. Note the gradual “leaning in” of the letter towards the center. This is almost never shown correctly. The SPHYNX name is pretty close although it should be painted with more depth like the friezes.
- 857 replies
-
- 13
-
-
- Sphinx
- Vanguard Models
- (and 1 more)